Whether you’re a design pro or a total newbie, you’ll find a great tool in this list that will take your website skills to the next level.
WORDPRESS
How to Set Up Google Ads Conversion Tracking in WordPress
Do you want to know how much revenue you’re generating from Google Ads on your website?
Setting up Google Ads conversion tracking will help you uncover insights about your ad campaign’s performance. You can find out which campaign is performing the best, how users interact with your ads, and how you can improve conversions.
In this article, we’ll show you how to properly set up eCommerce Google Ads conversion tracking in WordPress. This is the exact same method that we use on our own websites.

Why Set Up Google Ads Conversion Tracking in WordPress?
If you’re running Google Ads for your WordPress blog, eCommerce store, or membership site, then it is important to know how they’re performing. You can’t improve, what you can’t measure.
Tracking Google Ads conversions helps you see how much revenue you earned from users who clicked on your ad campaigns. It also helps you see which paid keywords and ad groups drive the most conversions. This way, you can optimize your campaigns and budget for more profitable search terms.
Besides that, Google Ads conversion tracking also uncovers how users behave on your WordPress site after clicking an ad. For instance, you might see a lot of users arrive on a landing page, but abandon it after adding products to the cart.
You can use this information to improve the checkout process, offer discounts and incentives as users are about to leave your site, and provide a better user experience.
That said, let’s see how you can add Google Ads conversion tracking in WordPress.
Adding Google Ads to WordPress Website
The easiest way of connecting Google Ads with WordPress is by using MonsterInsights. It is the best Analytics plugin for WordPress that helps set up Google Analytics without editing.
MonsterInsights offers an Ads addon that lets you setup comprehensive conversion tracking without touching a single line of code or hiring a developer.
We will use the MonsterInsights Pro license for this tutorial because it includes the Ads addon. There is also a MonsterInsights Lite version you can use for free.
First, you’ll need to install and activate the MonsterInsights plugin. If you need help, then please see our guide on how to install a WordPress plugin.
Upon activation, you will be redirected to the welcome screen in your WordPress dashboard. Go ahead and click the ‘Launch the Wizard’ button.

Next, you can follow the onscreen instructions to connect Google Analytics to your site. For more details, you can see our guide on how to install Google Analytics in WordPress.
With MonsterInsights, you can also use dual tracking to set up a Google Analytics 4 property. It is the latest analytics version and will soon replace Universal Analytics. You can learn more by following our guide on how to switch to Google Analytics 4 in WordPress.
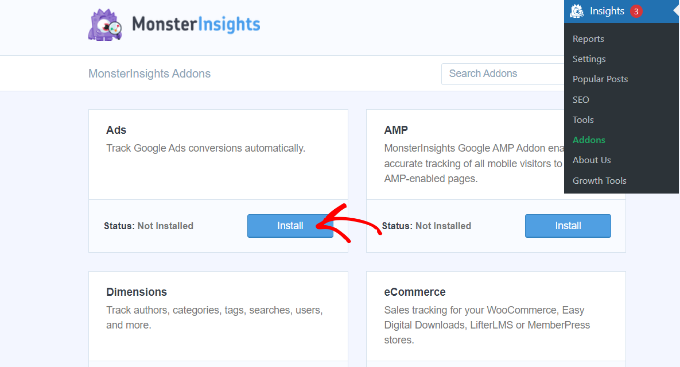
Once you’ve connected Google Analytics with WordPress, the next step is to install the Ads addon. Simply go to Insights » Addons from your WordPress dashboard and navigate to the ‘Ads’ addon.
Go ahead and click the ‘Install’ button. The addon will now automatically install and activate on your site.
Creating a Conversion Action in Google Ads
Next, you’ll need to create a conversion action in Google Ads.
First, you can visit the Google Ads website and log in to your account.
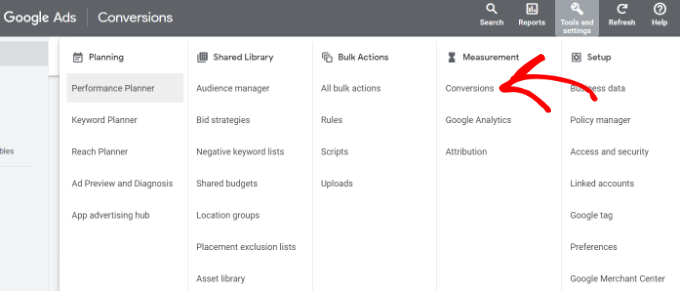
After that, go ahead and click the ‘Tools and settings’ option at the top. Under the ‘Measurement’ column, simply select the Conversions option.
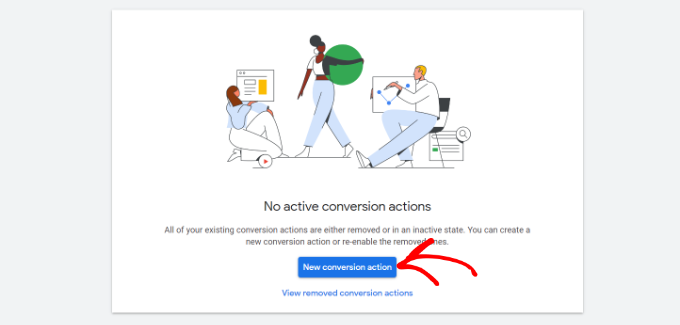
On the next screen, you’ll need to create a conversion action.
You can click the ‘New conversion action’ button to get started.
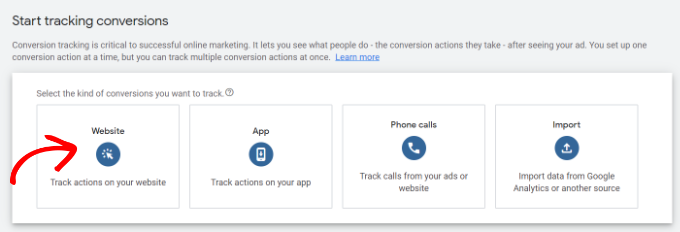
Next, Google Ads will ask you to select the type of conversions you want to track. It will show you 4 options, including a website, app, phone call, or import.
For this tutorial, we’ll choose the ‘Website’ option for tracking ad conversions.
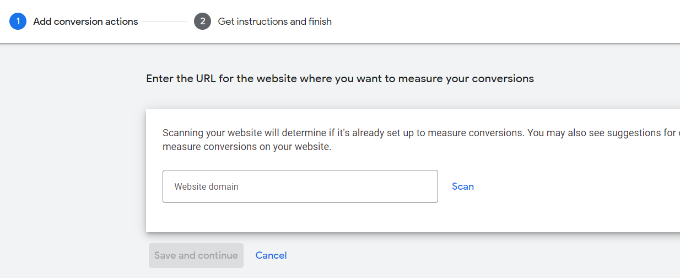
After that, you’ll need to enter the website URL where you’d like to measure conversions.
Once that’s done, simply click the ‘Scan’ button.
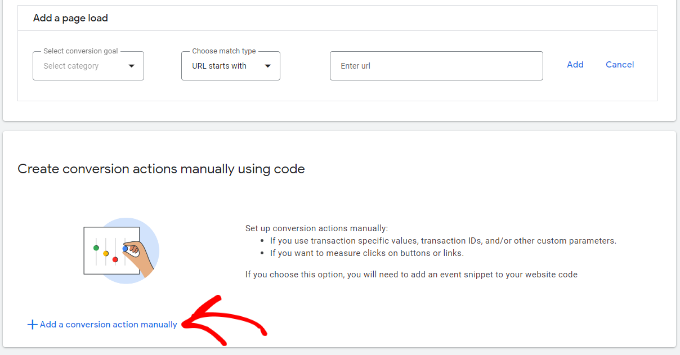
Google Ads will now show 2 options to create conversion actions, including an automatic and manual method. In the automatic method, you’ll need to select the conversion goal, choose a match type, and enter the URL. This way is suitable if you know which events to count as conversions.
However, we recommend selecting the manual method. Simply scroll down and click the ‘+ Add a conversion action manually’ option.
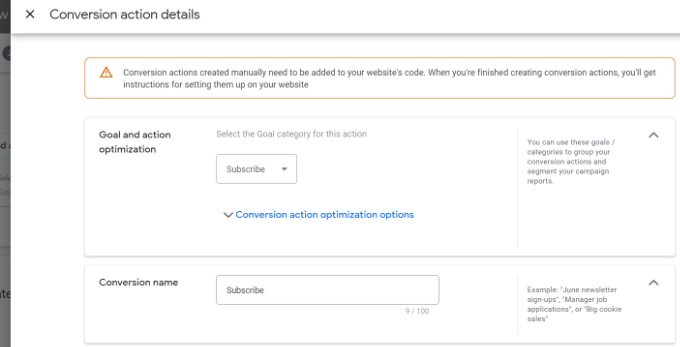
Next, you’ll need to enter the Conversion action details.
First, you can select the ‘Goal and action optimization’ for your conversion. This is the action you’d like to track. For example, when a user subscribes to your newsletter, makes a purchase, adds a product to a cart, submits a contact form, and more.
For the sake of this tutorial, we will select ‘Subscribe’ as the goal. After that, you can enter the Conversion name.
You can now scroll down and select a Value for your conversion. Google Ads lets you choose the same value for each conversion, assign different values for conversions, or don’t use a value for conversion action.
We will select the ‘Use the same for each conversion’ option, select the currency, and enter a value for this tutorial.

Besides that, you can also choose how many conversions to count per click.
If you’re tracking email newsletter signups, then we recommend selecting the ‘One’ option. This way, each subscriber is counted once. However, you can use the ‘Every’ option in an eCommerce store and count each purchase as a conversion.
After selecting these options, simply click the ‘Done’ button at the bottom.
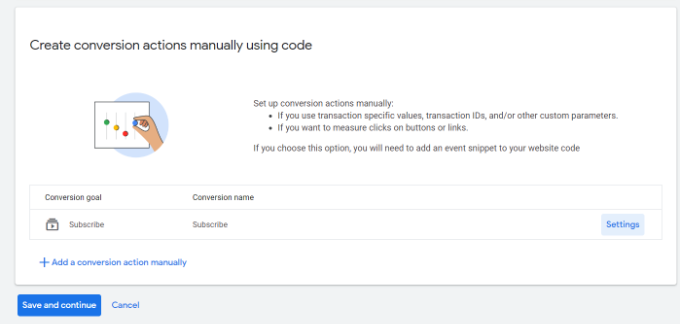
You can now see your conversion action under the ‘Create conversion actions manually using code’ section.
Go ahead and click the ‘Save and continue’ button to get instructions for adding the tracking tags for conversion action to your site.
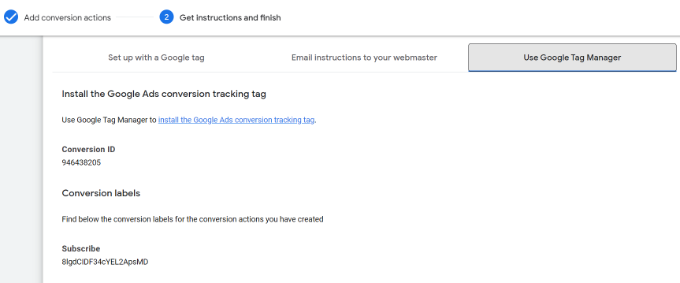
On the next screen, you’ll see 3 options to add the conversion action to your site.
Simply select the ‘Use Google Tag Manager’ option. You should see the Conversion ID and Conversion Label. Copy these to a notepad file or keep the browser window/tab open.
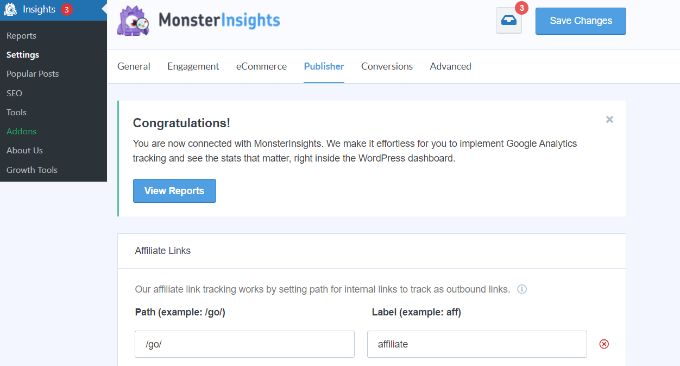
To finish the setup process, you’ll need to head to your WordPress website dashboard and view the MonsterInsights settings.
From here, go to Insights » Settings and click on the ‘Publisher’ tab.
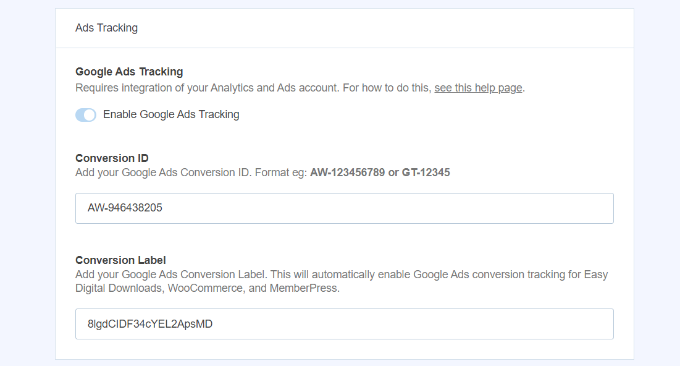
After that, you can scroll down to the ‘Ads Tracking’ section.
Go ahead and enter the Conversion ID. Make sure you follow the format, which will look like this: AW-123456789.
If you are tracking Google Ads on Easy Digital Downloads, WooCommerce, and MemberPress, then enter the Conversion Label in the respective field.
That’s it. You’ve successfully set up Google Ads conversion tracking on your WordPress website.
View Google Ads Conversion Tracking Data in Google Analytics
You can take it a step further and connect Google Ads with Google Analytics to get more insights about how people use your website after clicking on an ad.
For instance, you can see the number of visitors from paid search and find out which pages they view after landing on your site. You can also use different filters and create custom reports in Google Analytics.
Let’s see how you can link your Google Ads account with Google Analytics 4 and Universal Analytics.
Connect Google Ads with Google Analytics 4
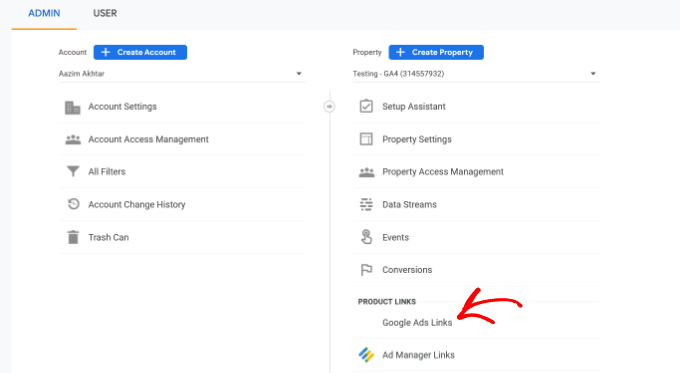
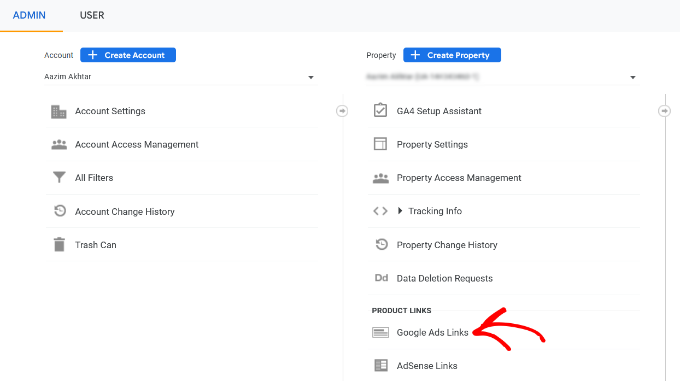
First, you’ll need to log in to your GA4 account and then go to the ‘Admin’ settings.
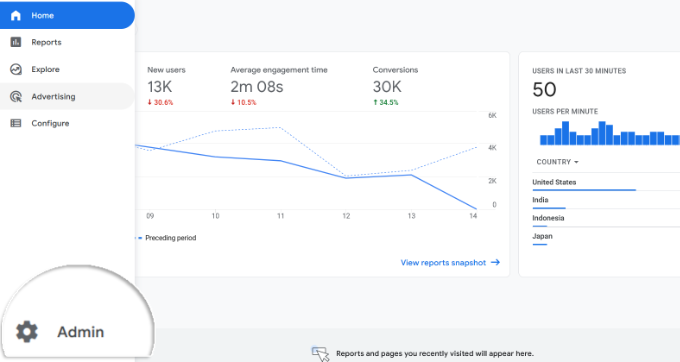
After that, you can click the ‘Google Ads Links’ option.
It is located under the Property column.
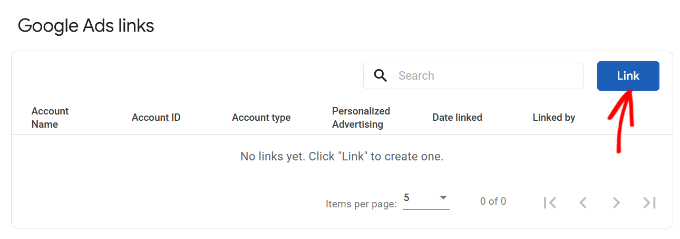
A new window will now slide in from the right.
Go ahead and click the ‘Link’ button in the top right corner.
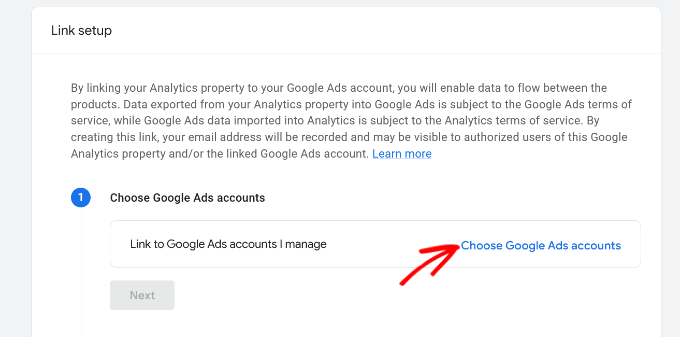
Next, you will see different options for Link setup.
First, you can click the ‘Choose Google Ads accounts’ option.
On the next screen, you’ll need to select the Google Ads account you wish to connect.
Once that’s done, simply click the ‘Confirm’ button at the top.
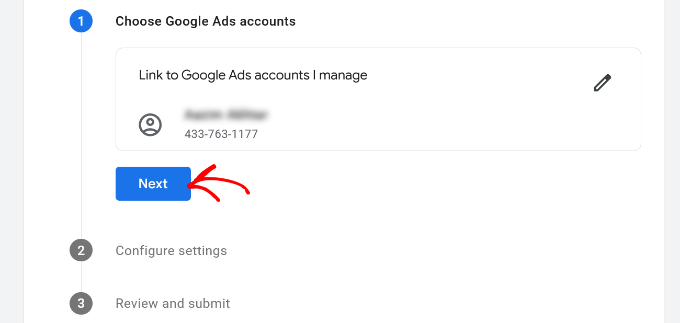
You will now see the Google Ads account that you want to link.
Go ahead and click the ‘Next’ button.
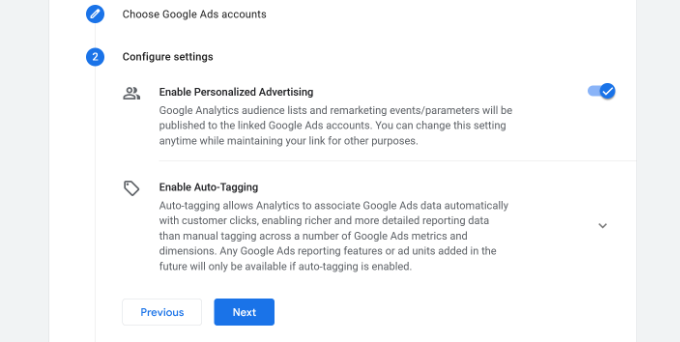
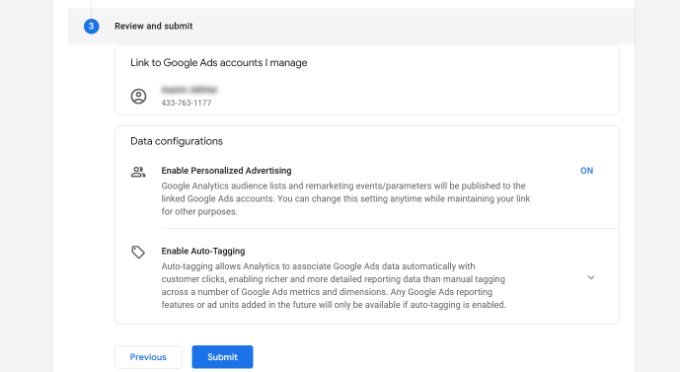
In the next step, Google Analytics will give you options to enable personalized advertising and enable auto-tagging.
You can use the default settings and click the ‘Next’ button.
After that, you’ll see a summary of your Link setup settings.
If everything checks out, then go ahead and click the ‘Submit’ button.
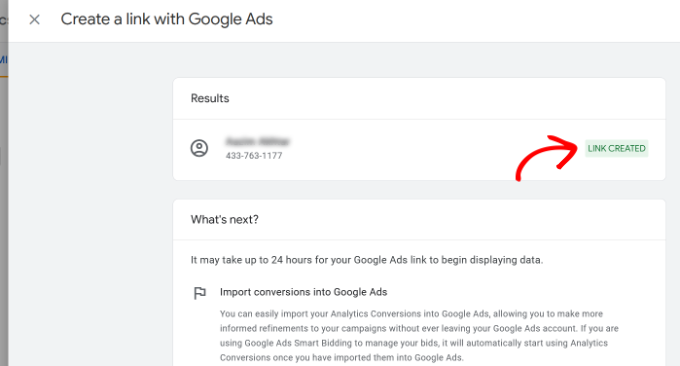
You should now see a ‘Link Created’ notification in front of your Google Ads account. This means that you’ve successfully connected Google Ads with Google Analytics.
Do note that it can take up to 24 hours for your Google Ads data to appear in Analytics reports.
Next, you can view the Google Ads conversion tracking report in Google Analytics 4.
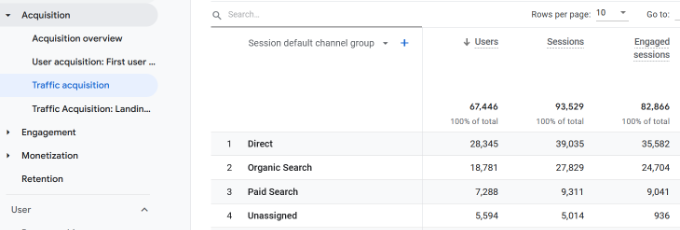
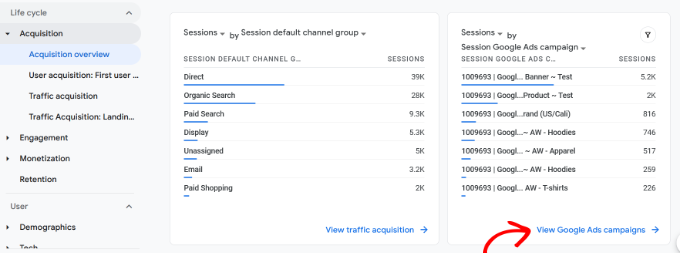
First, you can head to Acquisition » Traffic acquisition from the menu on your left and scroll down to see how many visitors came from the Paid Search channel.
After that, you can go to Acquisition » Acquisition overview and view the Session Google Ads campaign report. This will show which campaign got the most traffic.
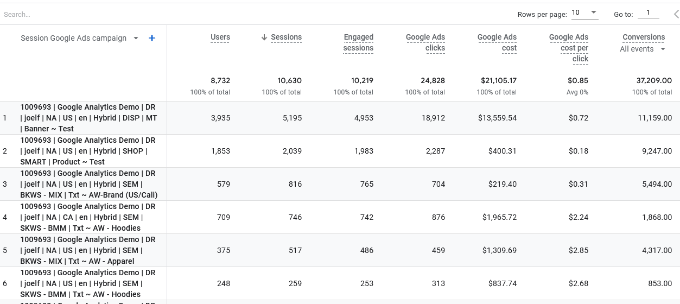
You can also click the ‘View Google Ads campaigns’ option at the bottom to view more details.
For each campaign, you can see the total number of users, sessions, number of Google Ads clicks, cost per click (CPC), conversions, and more.
Using the information from this report, you can see which campaigns perform the best.
Connect Google Ads with Universal Analytics
If you’re using Universal Analytics, then you can first log in to your account.
After that, head to the ‘Admin’ settings.
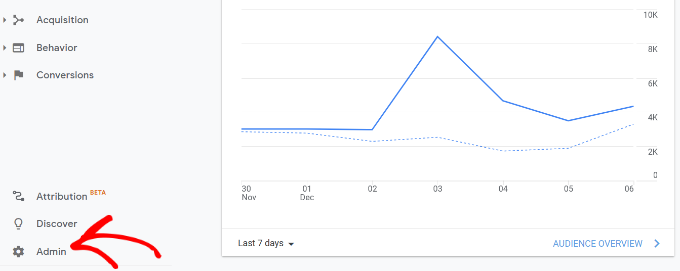
Next, you’ll need to go to the Google Ads Links option.
You can find the option under the Property column.
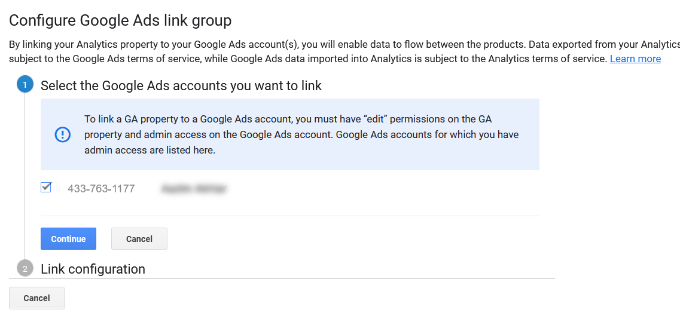
On the next screen, you’ll need to select the Google Ads account you want to connect.
After selecting your account, simply click the ‘Continue’ button.
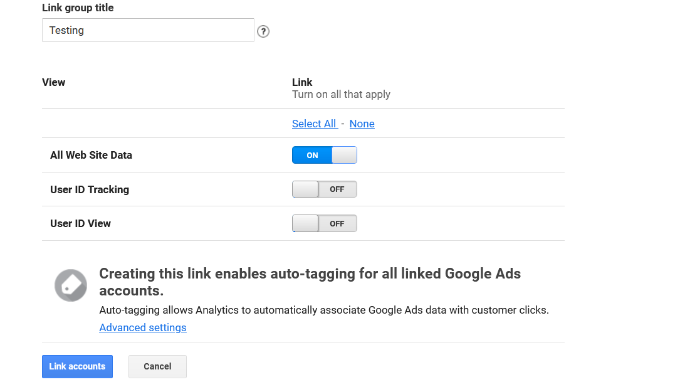
Next, you will need to enter a Link group title.
You can then select the Views to link with your Google Ads account. Simply click the toggle to ON for the correct Views.
Once that’s done, simply click the ‘Link accounts’ button.
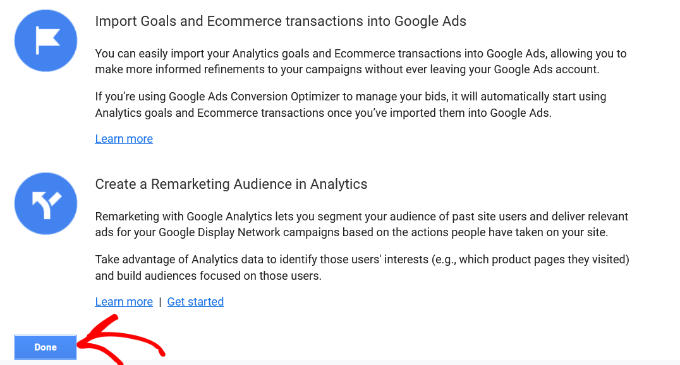
Google Analytics will now show a summary of your settings. Simply scroll down and click the ‘Done’ button.
That’s it. Your Google Ads account will now be linked to the Universal Analytics property.
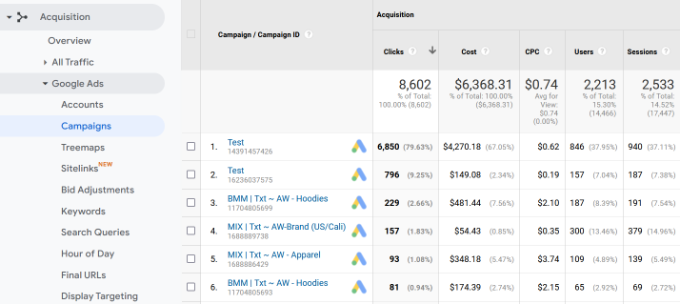
To view data from your ad campaigns, head to Acquisition » Google Ads » Campaigns from the menu on your left. You can see the number of clicks, cost, CPC, and more for each campaign.
Final Thoughts on Google Ads Conversion Tracking in WordPress
When it comes to setting up any conversion tracking, the most important thing you want to make sure is that the setup is done properly. This is why we use and recommend MonsterInsights because it just does everything for you behind the scenes without touching any code.
However if you prefer to add code directly on your WordPress site, then you can do that as well by using a plugin like WPCode. This will help future-proof your customizations. There’s a free version of WPCode that you can use by following our tutorial on adding custom code in WordPress.
We hope this article helped you learn how to set up Google Ads conversion tracking in WordPress. You may also want to see our ultimate WordPress SEO guide and the best WooCommerce plugins to grow your store.
WORDPRESS
7 Best WooCommerce Points and Rewards Plugins (Free & Paid)

Are you looking for a points and rewards plugin for your WooCommerce store?
Since there are hundreds of reward system plugins available on the market, choosing the right one for your needs can be intimidating.
To help you easily choose the right one for your site, we tested some of the most popular plugins on the market. While testing, we examined different factors like ease of use, features, and pricing.
In this article, we will show you some of the best WooCommerce points and rewards plugins.

In a hurry? No worries! Here are our top picks so you can quickly choose the best WooCommerce points and rewards plugin for your site.
How We Test & Review WooCommerce Points Plugins
A WooCommerce points and rewards plugin allows you to offer incentives to customers with points for their purchases and actions. These points can then be redeemed for different rewards like free products, discounts, free shipping, and other benefits.
Picking the right plugin for your WooCommerce store can be tricky because there are hundreds of options. To help you out, we tested and reviewed some of the best WooCommerce rewards plugins on the following criteria:
- Hands-on testing – Over the last 16+ years, we’ve tested thousands of WooCommerce plugins. We went through multiple WooCommerce points and rewards plugins and shortlisted the 7 best options.
- Easy of Use – When testing the plugins, we considered how easy they were to use and configure. We looked for options that were beginner-friendly, offered a simple setup process, and didn’t require coding.
- Features and Other Benefits – In addition to offering a reward system for your WooCommerce store, we also looked for other features and benefits.
Why Trust WPBeginner?
At WPBeginner, we have over 16 years of experience in WordPress, design, and online marketing. Our team of WordPress experts extensively reviews each plugin that is featured in this article and thoroughly tests them on real websites. To learn more, see our complete editorial process.
That said, let’s look at some of the best WooCommerce rewards and points plugins.
1. Loyalty Program by Advanced Coupons

Loyalty Program by Advanced Coupons is the best WordPress coupon code plugin. It offers a WooCommerce loyalty program feature that makes it very easy to add points and rewards to your online store.
In our testing, the plugin was very easy to set up. The best part is that you can use the default settings out of the box and start a loyalty program within a few minutes.
Advanced Coupons also makes it super simple for customers to keep track of the points they’ve earned. You can add customizable notices to inform customers about their points, how the reward system works, and how they can easily redeem the points at any time.
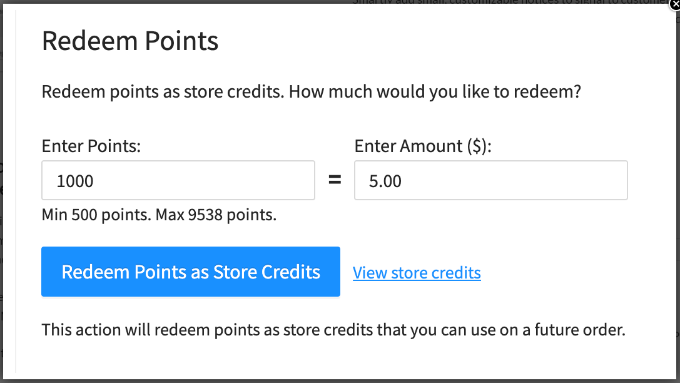

Another interesting feature we found during our testing was the different ways you can allow customers to earn points. With a click of a button, you can reward customers for purchasing products, leaving a review, commenting on a blog post, and more.
Besides that, Advanced Coupons offers other features like free gift coupons, BOGO deals, shipping discounts, and more. It also lets you set up conditional logic where a coupon can automatically applied based on products in the cart, subtitle, or recently added products.
Pros:
- Create a loyalty program within minutes
- Select how customers can earn points
- Show personalized notices for points earned
- Allow customers to easily redeem points
- View reports of points earned and redeemed
Cons:
- The loyalty program feature isn’t available in the free version
Why We Recommend Advanced Coupons: After testing different points and rewards WooCommerce plugins, Advanced Coupons is the best option for all types of online stores. It is beginner-friendly and offers lots of features compared to other plugins on the list.
Pricing: You’ll need the Advanced Coupons ‘Plugin Bundles’ plan to access the Loyalty Program option, which will cost $119 per year.
2. FunnelKit Cart


FunnelKit Cart (formerly called WooFunnels) is a user-friendly WooCommerce sales funnel builder. It lets you create high-converting lead pages, upsells, and checkout pages, as well as offer rewards to customers to boost sales.
With FunnelKit, you can gamify the shopping experience for customers. When a user adds items to the cart, they can unlock a special gift when the price reaches a certain threshold. Basically, it lets you add milestone-based rewards and incentives to your WooCommerce cart.
For example, if a customer adds items worth $25, they can enjoy free shipping. If they spend $50 or more, they get an additional 10% discount.
When testing the plugin, we found that it offers 3 types of rewards. These include free shipping, a discount coupon, or a gift.
Besides that, FunnelKit offers other features to boost sales on your online store. For example, you get a template library, pre-built automation options, A/B testing, conversion pixel tracking, integrations, and more.
Pros:
- Add rewards to your cart
- Easily optimize your sales funnel for conversions
- Beginner-friendly to use and set up
- Seamless integration with other plugins and themes
- A/B test your sales funnels
Cons:
- Upsell or cross-sell features are not available in the free version
- Limited templates in the free version
Why We Recommend FunnelKit Cart: If you’re looking for a WooCommerce plugin that lets you optimize your sales funnel and add a reward system to cart pages, then we highly recommend FunnelKit Cart.
Pricing: FunnelKit Cart prices start from $99.50 per year. There is also a free version you can use to get started.
3. YITH WooCommerce Points and Rewards
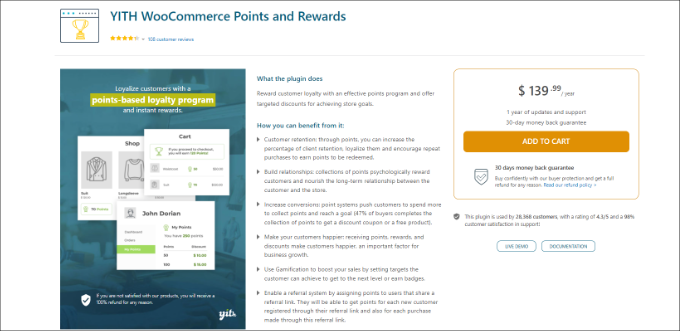

YITH WooCommerce Points and Rewards is the next plugin on our list. It helps you create a loyalty program for your online store and reward customers for their actions.
Our first impression was that the plugin would be complicated to use. However, that’s not the case. It is very easy to use and offers different settings to customize the points system.
For instance, you can automatically assign points for each purchase or manually award points to different customers. There are 4 types of points to choose from, which include assigning a fixed amount of points, setting a percentage amount, setting a fixed amount based on product price, or not assigning any points.
Besides that, YITH WooCommerce Points and Rewards offers a bunch of extra points options. You can reward customers when they register, first login, referral link signup, customer’s birthday, and more. The plugin also shows custom banners to encourage users to spend more and collect more points.
Pros:
- Automatically award points to customers
- Show custom banners to encourage more points
- Send email notifications to customers regarding their rewards
- Allow customers to view and redeem earned points
- Easily track users and the points they’ve earned
- Award extra points based on user actions
Cons:
Why We Recommend YITH WooCommerce Points and Rewards: It is perfect for anyone who wants to add a reward program to their WooCommerce store. The plugin is very easy to use and offers lots of options to customize the points system.
Pricing: YITH WooCommerce Points and Rewards is a premium plugin that will cost you $139.99 per year.
4. Points and Rewards for WooCommerce


Points and Rewards for WooCommerce is a free plugin that offers almost all the features you’d find in a premium plugin to create a loyalty program for your eCommerce store.
For instance, you can award points to customers based on different actions like signing up, clicking a referral link, spending above a specific amount, purchasing a particular product, and more.
One feature that stood out for us was that store owners could assign points on previous orders that were fulfilled before installing this plugin. It’s a great way to increase customer loyalty and boost sales.
Other than that, the plugin also offers different user levels and badges to customers. It even offers a spin-to-win wheels option where users can win more points.
Pros:
- Simple and easy-to-use plugin
- Seamless integration with WooCommerce
- Assign points on previous orders
- Allow customers to redeem points in the cart or at checkout
- Membership system for exclusive offers
Cons:
- Doesn’t offer personalized banners
- Points expiration and product purchase are not available in the free version
Why We Recommend Points and Rewards for WooCommerce: If you want a free plugin for setting up points and rewards in WooCommerce, then this is the best option. It offers great features that you’d find in different premium plugins.
Pricing: The Points and Rewards for WooCommerce plugin is free to use.
5. WPLoyalty
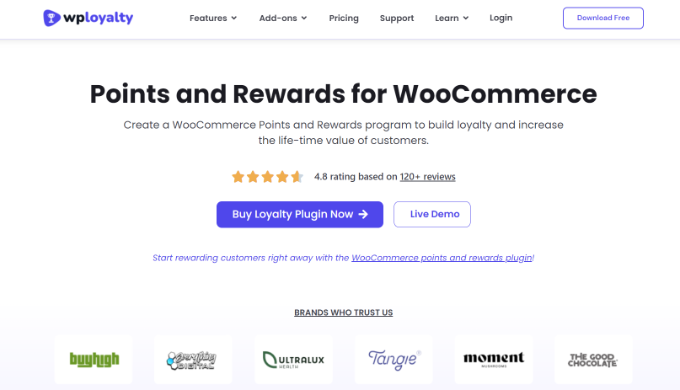

WPLoyalty is a powerful WooCommerce rewards and points plugin that allows you to create customized loyalty programs. It offers lots of features and lets you reward customers for multiple actions.
We particularly like the feature of customized campaigns and rewards. The plugin comes with pre-built campaigns that you can use for your WooCommerce store. For example, you can create a campaign for points for purchase, rewards based on spending, writing a review, birthdays, and more.
Besides that, it is very easy to customize each campaign and set the point system. WPLoyalty lets you add different levels to the loyalty program, set an expiration date, send email notifications, and integrate with multi-currency plugins.
The best part is that you can choose from different reward types. These include percentage discounts, free shipping, free products, and more.
Pros:
- Create customizable loyalty programs
- Choose from pre-built campaigns
- Beginner-friendly to use
- Set expiration date for campaigns
- Reward customers based on multiple actions
- Manage customers and points with easy to understand dashboard
Cons:
- The free version has limited features
Why We Recommend WPLoyalty: It is a perfect plugin for new WooCommerce websites that want a premium points and rewards plugin. The plugin is packed with features and offers affordable pricing plans along with a free version.
Pricing: WPLoyalty prices start from $9 per month. There is also a free version you can use to get started.
6. WooCommerce Points and Rewards


WooCommerce Points and Rewards is a WooCommerce extension that lets you award points for purchases and other actions performed by a user. It is a basic and clean plugin that makes it very easy to set up a loyalty program.
When testing the plugin, we found that you can only redeem the points for discounts. Unlike other WooCommerce points and rewards plugins, there isn’t an option to offer other incentives to customers.
That said, you can define the value of points for each purchase and action. It also lets you control the maximum discount that can be applied to the cart or any product. Plus, the plugin shows a log of all the points earned by customers and lets you manage them from the WordPress dashboard.
Pros:
- Clean and beginner-friendly plugin
- Offer points that can redeemed for discounts
- Easily manage customer points from your dashboard
- Award points for different user actions
- Control values of points and discounts
Cons:
- Lacks features offered by other premium plugins
- Expensive pricing plan
Why We Recommend WooCommerce Points and Rewards: The plugin is great for WooCommerce store owners who want to offer points to customers that can only be redeemed as discounts.
Pricing: WooCommerce Points and Rewards will cost you $159 (billed annually).
7. Gratisfaction


Gratisfaction is another free WooCommerce loyalty plugin. The plugin lets you award points to users based on actions and allow them to redeem the points for discounts.
The best part about using Gratisfaction is that it offers a wide range of customer actions for awarding points. For example, you can offer points for subscribing to an email list, sharing on social media, watching a video, and more.
Besides that, you get pre-built templates to create multiple types of programs, including loyalty programs, instant win campaigns, contests, giveaways, and purchase-to-win campaigns.
Pros:
- Pre-built campaign templates
- Reward points based on different actions
- Create multiple campaigns
- Lightweight and simple plugin
Cons:
- Lacks customization options
- Offers only discounts as rewards
Why We Recommend Gratisfaction: We recommend this plugin to anyone looking for a free WooCommerce loyalty plugin and who wants to create other types of campaigns to boost sales.
Pricing: Gratisfaction is a free WordPress plugin.
Which Is the Best WooCommerce Points and Rewards Plugin?
Overall, we found Loyalty Program by Advanced Coupons to be the WooCommerce points and rewards plugin.
It gives you full control over the points you might want to award for different user actions. For instance, users can earn points for purchasing products, leaving comments, reviewing a product, and more.
Plus, you can offer different incentives like free shipping, free products, discounts, BOGO deals, and other rewards to customers for redeeming their points.
With all these features, affordable pricing plans, a free plugin version, and a beginner-friendly interface, Advanced Coupons is the best solution for creating a loyalty program in WooCommerce.
FAQs about WooCommerce Points and Rewards Plugins
Here are some commonly asked questions about points and rewards plugins for WooCommerce.
1. How do I add reward points in WooCommerce?
There are lots of WooCommerce plugins you can use to create a loyalty program and award points to customers. These can be for performing different actions or purchasing products. We recommend using the Advanced Coupons plugin because it offers a lot of features and is very easy to use.
2. How do I increase sales in WooCommerce?
There are different ways to boost sales in WooCommerce, such as providing discounts, running flash sales or giveaways, and offering points to customers that they can redeem for free prizes.
3. Is Shopify better than WooCommerce?
Shopify is considered to be more user-friendly, but WooCommerce offers more flexibility and features. For more details, please see our comparison of WooCommerce vs Shopify.
Best Guides for Your WooCommerce Store
Here are some additional resources you can go through to take your WooCommerce store to the next level:
We hope this article helped you learn about the best WooCommerce points and rewards plugins. You may also want to see our guide on the best live chat software for small businesses and how much it costs to build a website.
If you liked this article, then please subscribe to our YouTube Channel for WordPress video tutorials. You can also find us on Twitter and Facebook.
WORDPRESS
How to Make $5000 of Passive Income Every Month in WordPress
Are you looking for a low-maintenance side gig to generate some extra income? Selling digital downloads might be the answer.
I’ve been personally selling digital downloads for over a decade. It’s a painless way to make money because you don’t have all the overhead of selling physical goods, and you can set up an online store with little effort using a free WordPress plugin.
Let me share my experiences with you and tell you how you can make $5000 of passive income per month selling digital downloads on WordPress.
Note: Keep in mind that running an online business takes time and requires your constant attention. Selling digital downloads, however, is as close to passive as it gets.
This is a guest post by Chris Klosowski, the president of Easy Digital Downloads, the best digital eCommerce plugin for WordPress. This is an expert column that we publish every Thursday, where we invite a WordPress expert to share their experiences with our readers.

Why Digital Downloads Are a Great Way to Make Passive Income
You’ve heard the expression, ‘No pain, no gain.’ This means that achieving something worthwhile normally requires sacrifice and hard work.
But what if I told you that you can make money with your WordPress website while you sleep?
That’s passive income.
Passive income is money that you earn with little to no ongoing effort. Think of earning interest on your savings account or renting out a spare room.
Or selling digital downloads.
Compared with selling physical products, digital downloads are a breeze. There’s no need to keep track of inventory, no running out of stock, no need to hire storage space or workers to manage it, and no shipping and handling.
Like everything, it requires a little setup. You’ll have to create or obtain the files you want to sell. And you’ll need to set up a WordPress website and install an eCommerce plugin.
Easy Digital Downloads (EDD) is one example of a plugin designed specifically for digital downloads. It lets you get started for free, and you can purchase extensions to add the features you need as you grow.
Once your online store is set up, you can continue to sell your digital product over and over again. So, the money you make will require very little ongoing effort.
You can even use automation to save time and effort and make the income truly passive.
How Much Passive Income Can You Earn With Digital Downloads?
The amount of money you can make by selling digital downloads varies a lot, depending on your skills, experience, and the type of digital products you are selling.
When starting out, it’s typical for beginners to make just a few hundred dollars a month in initial sales.
That being said, in time, it’s not uncommon for established sellers with a loyal audience to achieve $5,000 or more per month.
For example, Emily McDermott tells the story of how she made a promising $700 in her first month of selling attractive business documents. After just three months, she was making over $7,000 a month. Plus, she spends just a couple of hours a week working on her online store.
The potential doesn’t stop there. Top earners make tens of thousands of dollars each month. But this is rare and will take more effort.
This extra work may take it out of the ‘passive’ income category. But with that sort of revenue, you’ll probably want to spend more time working on your online store anyway.
A number of our Easy Digital Downloads customers have achieved this. For example, Set Sail Studios has made $236,000+ selling fonts, and Escape Room Geeks has made $390,000+ selling printable escape room kits.


Are you interested in making this kind of passive income? Your first step is to decide on a digital product to sell.
The Best Types of Digital Products for Passive Income
The best digital products for creating passive income have a high perceived value but require little ongoing maintenance. They should generate a profit and line up with your business niche.
Potential customers will only buy your digital download if it solves a problem or meets a need. A unique product in a specific niche will help you stand out and attract an engaged audience.
To create passive income, you need to choose digital products that don’t require ongoing effort.
For example, software products like WordPress plugins and themes can be quite profitable, but they often require continuing development and support. That takes an ongoing investment in time, so they are not the best options for a side gig that makes passive income.
On the other hand, a simple software program or web application that solves a common problem may be perfect. The EDD Software Licensing add-on can be used to activate the buyer’s copy of the software without your direct involvement.
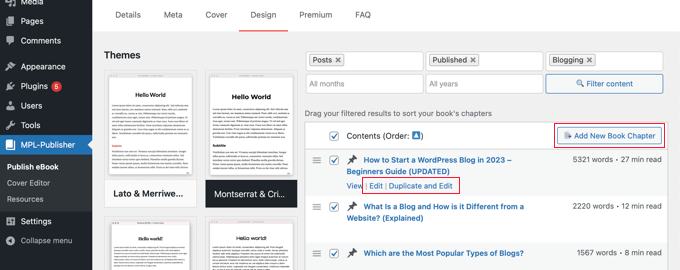
eBooks are another profitable option. If your blog contains a lot of useful information, then you can easily repurpose the content as an eBook. You could create multiple books by choosing blog posts on specific topics, such as your most engaging and popular posts in specific categories.

Alternatively, you may be able to repurpose the content as an online course and sell ongoing subscriptions to access the material. This offers more value than eBooks but also takes more time to set up. I will talk more about subscriptions later.
Perhaps you gained a lot of insights when you set up your business and are passionate about helping others do the same. You could sell an eBook about the key steps to creating a successful business or offer useful business documents and Excel templates.
Just make sure you choose a product you have expertise in. For example, Sam Parrett from Set Sail Studios creates and sells unique brush fonts, and this aligns well with his graphic design website.
Photographers could create a stock photo library, and designers could sell digital art products, printables, or Canva templates.
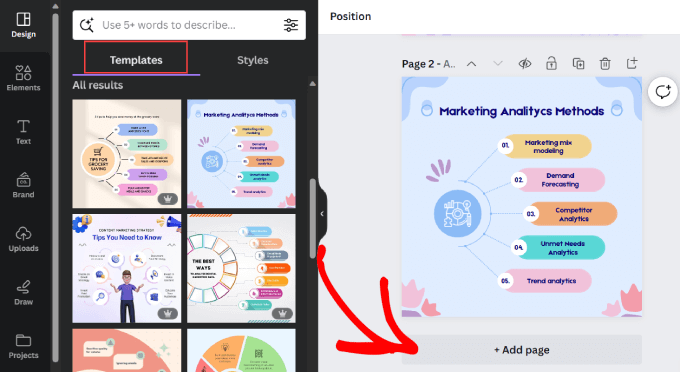

The types of digital products that can generate passive income are endless. For inspiration, you can read about the pros and cons of many categories in this post on the most popular digital products to sell on the EDD blog.
How to Reduce Your Workload With Automation
When making passive income, you’ll want to be as hands-off as possible. In my experience, the best way to do this is to use automation to work smarter, not harder.
Luckily, you can get your website to perform many routine tasks automatically using automation.
These include email marketing, social media, customer service, admin tasks, and more. It’s simply a matter of choosing the right automation tools and setting them up correctly.
If you are using Easy Digital Downloads, then the software will automatically email purchase receipts and order confirmations to your customers. You can even personalize your automated eCommerce emails, leading to increased customer engagement.
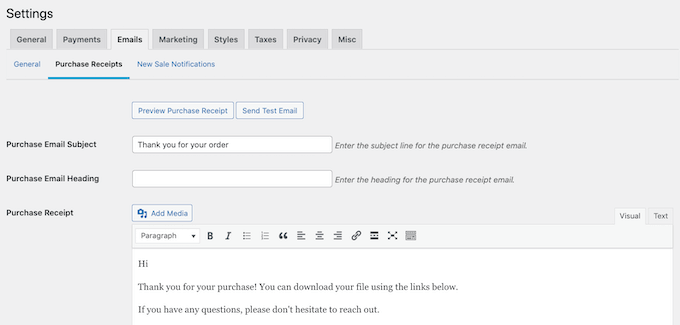

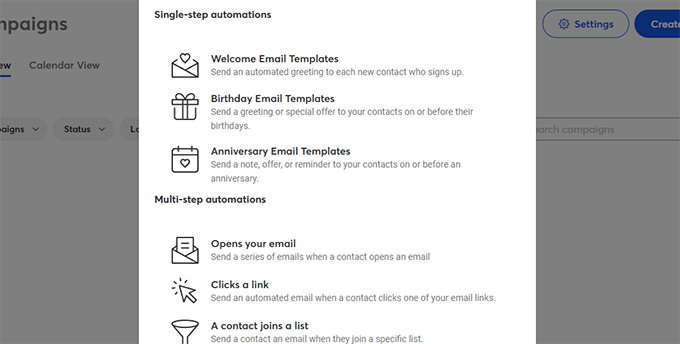
Using some extra tools, you can also automate your email marketing. This means that instead of writing emails manually one by one, you write them just once and set up triggers based on user activity to personalize the emails and send them automatically.
Personalized emails based on user activity are 320% more effective than generic emails.
You can set up the triggers using the FunnelKit Automations plugin for WordPress and send out the emails using a top email marketing service like Constant Contact.

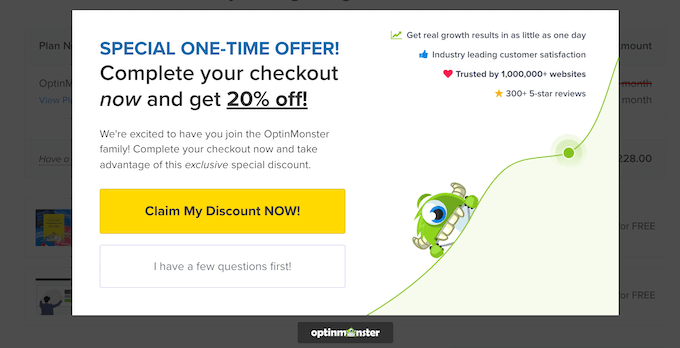
Additionally, you can use automation to reduce cart abandonment. By offering incentives and reminding visitors about their forgotten purchases, you will be able to build customer loyalty and encourage future purchases that contribute to your passive income stream.
For example, OptinMonster‘s exit-intent technology will watch the user’s mouse to determine when they are about to leave your website. It can then automatically display a popup just in time, offering an incentive to complete the visitor’s purchase.

There are plenty of other automated workflows you can use while selling digital downloads. To learn about the best automation tools, see how to use eCommerce automation to save time and money.
Marketing Strategies to Boost Your Passive Income
I mentioned earlier that you can get started selling digital downloads by using the free version of Easy Digital Downloads. Let me introduce you to some paid marketing tools and add-ons that can help you make even more passive income.
In my last guest post, I talked about how order bumps are one of the best ways to encourage customers to spend more money on digital downloads. This is when you offer the buyer extra or upgraded products during checkout.
This is a great strategy when you are selling multiple digital products. You can automatically add order bumps with the EDD cross-sell and upsell add-on to boost your sales.
For example, if you sell music downloads and a customer purchases a song, you can offer them the option of purchasing the entire album while checking out. They may appreciate the suggestion and make the larger purchase.


Alternatively, if you are selling your digital products through WooCommerce, then you can see this tutorial on how to create an order bump for WooCommerce.
Another strategy is to turn a one-off payment into ongoing income by offering subscriptions or recurring payments.
This is a good strategy when you are selling online training or access to cloud-based software. Subscriptions allow your customers to avoid a large initial bill and bring in ongoing revenue to your business.
Subscriptions are easy to set up with the EDD recurring payments add-on. And because it’s an automated system, you will get fewer late or missing payments.
I hope these tips help you make passive income from your WordPress website. You may also want to see these guides on the right way to create an email newsletter and the best AI chatbots for your website.
If you liked this article, then please subscribe to our YouTube Channel for WordPress video tutorials. You can also find us on Twitter and Facebook.
WORDPRESS
10 Amazing WordPress Design Resouces – WordPress.com News

Designing a beautiful website from scratch can be difficult for developers of all skill levels. Luckily, in today’s Build and Beyond video, Jamie Marsland reveals his ten favorite WordPress design tools and websites to elevate your next build.
Get inspiration for your next website’s design and then start building with WordPress.com. Ready to get going? Click below to embark on your free trial today:
Here are the sites and resources mentioned in the video:

Heikei
Stunning backgrounds and visuals


Shots
Easy mockups for products and thumbnails


Coolors
Generate color palettes with a click



Join 110.1M other subscribers
-

 SEARCHENGINES7 days ago
Google Core Update Volatility, Helpful Content Update Gone, Dangerous Google Search Results & Google Ads Confusion
-

 SEO7 days ago
10 Paid Search & PPC Planning Best Practices
-

 MARKETING5 days ago
5 Psychological Tactics to Write Better Emails
-

 SEARCHENGINES6 days ago
Weekend Google Core Ranking Volatility
-

 MARKETING6 days ago
The power of program management in martech
-

 SEO6 days ago
WordPress Releases A Performance Plugin For “Near-Instant Load Times”
-
SEARCHENGINES4 days ago
Daily Search Forum Recap: April 15, 2024
-

 PPC5 days ago
20 Neuromarketing Techniques & Triggers for Better-Converting Copy






You must be logged in to post a comment Login