What’s harder: winning the Masters Tournament or re-creating its website in under 30 minutes? Watch the video and find out.
WORDPRESS
Features are good, What about ‘Security’?

What is FatCow Hosting?
FatCow is a name you may not have come across in your journey to find the right web hosting service.
It’s a pretty small company—though it was founded in 1998 and has therefore been around as long as some of the best in the biz, FatCow’s name hasn’t exerted as much pull as its other, larger, competitors.
And yet, FatCow has managed to stay afloat in a very competitive area of online business for two decades—so clearly, it’s not too shabby despite its size.
And this leads us to wonder—what is up with FatCow?
Is it staying alive by luck, or is it a hidden gem in the hosting world?
In this review, I’ll take a look at FatCow and discuss my experience using it.
I’m happy to report that this underdog is a solid hosting company, but there are a few caveats to look out for.
So—let’s get to it!
FatCow: The Cons
FatCow is one of the more nuanced hosting companies that I’ve reviewed.
I like it, or at least I want to, especially because it’s a relatively small contender in a large pool of hosting companies.
However, there are a few things that FatCow doesn’t do the most competitively, and it’s my job to highlight those flaws.
So let’s get it over with quickly.
First off, the price: FatCow focuses on simplicity, but the result is that its shared web hosting package is a bit pricey.
It’s inexpensive for its first term, relative to the features you get, but once it renews, it’s quite costly.
Moreover, it’s just one package—you can’t opt for a cheaper package with fewer features, just the one package that may be above your ideal price point.
Other competitors certainly offer shared web hosting packages for lower prices and similar amounts of features, which makes this unfortunate.
Another downside is FatCow’s customer support: I found their knowledge base to be a little shoddy.
A redundant link here, a how-to article that uses another hosting company’s video there, and so on…all things considered, their customer support isn’t terrible, but far from the most robust, I’ve seen.
The good news is that’s about it for FatCow’s flaws.
The pricing structure is a little too simple for shared web hosting, and a bit expensive for shared web hosting depending on what you’re after.
Its on-site documentation could be revamped.
Other than that, it’s decent—so let’s get into that fun part!
FatCow: The Pros
Thankfully, FatCow does have some good things going for it. The first thing I want to look at is the simplicity of the pricing structure.
Yes, if you want to get shared web hosting, you might find FatCow’s pricing a little too restrictive to get something tailored for your needs, especially if you’re trying to save money.
However, if you want WordPress, VPS, or dedicated hosting—well, FatCow’s structure actually makes things very easy.
WordPress hosting has two tiers that are both well-featured and not significantly priced apart from one another.
Dedicated and VPS hosting have the same features, and getting a different package really means getting more server accommodations than tools.
It’s very streamlined and makes it hassle-free to get those options.
The other thing is also related to its shared web hosting package: if you want a cheap option that doesn’t need to have every feature, FatCow isn’t the place for you.
But if you’d get the highest tier of shared hosting for a heavier toolkit on another platform, then FatCow’s price is actually not so inexpensive.
If you want all those tools and accommodations, it’s not overpriced.
It’s overall a well-featured platform, so I give them credit for that.
Moreover, their security is pretty solid. It’s not the best—I do think they might be able to employ a harder security infrastructure and more cyber-defenses—but I appreciate their on-site transparency.
Finally, their simplicity can drag them down with shared hosting prices and customer support, but overall, they are a very easy to use service. It’s streamlined: as mentioned, the pricing is simple, but so is the actual software itself.
It certainly has an easy learning curve and a pleasant user interface.
Combining that with a good set of features is a worthy accomplishment that every hosting company has to hit, and I appreciate FatCow’s success.
Now, let’s look into pricing a little more.
FatCow: Pricing
Something I like a lot about Fatcow is the simplicity of its pricing.
Everything is extremely straightforward; you don’t need to dig around too long to figure out how many services you can buy.
So let’s keep that simplicity going, eh?
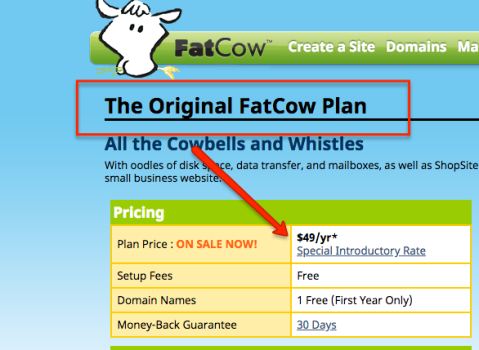
First off we have the option most of you will be looking at: shared web hosting, which FatCow calls “The Original FatCow Plan.”
The Original FatCow starts at $49 a year—this is a special introductory rate that will increase after your first term—which evens out to roughly $4.08 per month.
The renewal prices are $14.95 a month for a year-long term, $13.95 for a 2-year term, and $12.95 for a 3-year term. Frankly, these are very pricey—I had to double check to make sure it wasn’t for a different hosting package.
But nope, that’s for its standard, shared web hosting service. Of which, by the way, there is only one option—it’s not a tiered product from which you can choose packages with fewer features for a lower price.
WordPress hosting, a staple hosting product for most services, starts at $3.75 a month and ends at $6.95 a month.
Yes, there are only two tiers, WordPress Starter, and WordPress Essential—but hey, they’re decently priced and WordPress Essential seems to be fully featured.
Virtual Private Servers start with a Basic plan, for $19.99 per month for the first term ($24.99 afterward), and end with Optimum at $79.99 ($99.99 regularly).
For those looking at heavy-duty options, dedicated hosting with FatCow starts at $119.99 a month and ends at $191.99.
Of course, these are discounted for the first terms; once that period is over, you’ll pay $149.99 for the Startup (first tier) package and $239.99 for the Enterprise (third tier) package.
Overall, WordPress hosting is pretty cheap on FatCow, and VPS and Dedicated server hosting with FatCow is also well-priced.
The only issue is shared web hosting: it’s $49 for the first year isn’t too overpriced, but it’s still much more expensive at over $4 a month than what many other leading providers offer—which is more in the $2-3 range.
When you renew it, however, the price rises dramatically. If you commit for three years, you still pay $12.95 a month. To put things in perspective: GoDaddy and Bluehost renew at $7.99 a month, and that’s for a year-long package.
So overall, I would say FatCow’s shared web hosting option is overpriced, but its other options are very fair and still worth considering.
So let’s talk about features—the thing that will really determine how well-priced a package is!
FatCow: Features
Usually we focus on the features for shared web hosting, because it’s typically the most sought-after hosting option.
As FatCow’s shared web hosting is overpriced, however, we’ll try to talk a little more about every other service they offer.
Shared hosting has a decent set of features—decent insofar as it might mediate the price a bit.
Of course, there is the actual hosting itself, as well as an easy site-builder, application installation wizards, and online store tools, email, SEO and marketing tools, and customer support.
It also comes with a 30-day money-back guarantee, a free domain name, unlimited mailboxes, unlimited disk space, and no caps on bandwidth.
It’s easy to view these as generous—however, you could also get these features for simply upgrading to a second or third-tier shared hosting package on a different platform.
This is really only worth it for your first term of use; after the renewal causes the price to rise, you might as well go elsewhere.
The WordPress hosting packages offer free domain registration, unlimited disk space, and unlimited bandwidth as well. More interestingly, they offer free search engine marketing credits, which is pretty neat for the Starter package’s low price.
The features for VPS hosting are more or less the same between tiers: the increase in price basically accounts for an increased number of cores, RAM, storage, and bandwidth. You can calculate the price yourself here.
The same is true for Dedicated hosting plans: what increases really is capacity, not tools, between price points.
Overall, I would say dedicated and VPS hosting plans with Fatcow are about as fully-featured as on any other platform, and competitively priced (or at least normally priced).
WordPress hosting seems to be a pretty good deal with FatCow, regardless of which tier you get, although it’s not necessarily the best deal for WordPress hosting out there.
Shared web hosting has a pretty good set of features—the only problem is it’s a bit pricey.
You might be getting a good deal for that first year, paying around $4 a month for what could be twice that on another platform, but after your first term, the renewal price is so significant that I’m not sure it’s worth it.
That being said, it sounds like FatCow doesn’t really struggle with having the right amount of tools or having a good amount of the right tools—just price.
How does being able to juggle these features pan out for the user?
Let’s find out.
Ease of Use and User Control
Having a combination of ease of use and flexibility is pretty essential. FatCow markets itself as a platform for small-to-medium businesses.
One would, therefore, expect FatCow to offer enough power to satisfy business needs, but a service that is streamlined and simple, to make things easy and efficient.
This is how every popular hosting company markets itself, but FatCow specifically names simplicity as one of the company’s founding premises.
The good news is that FatCow does indeed succeed in this regard. You might have seen it a little bit in the pricing and features sections: even when you’re looking at what to buy, there isn’t really an overwhelming amount of choices.
Shared hosting has one package with every feature. WordPress hosting has only two packages. For VPS and dedicated server hosting, the tools you get are the same—the only thing you pay more for is extra accommodations and space.
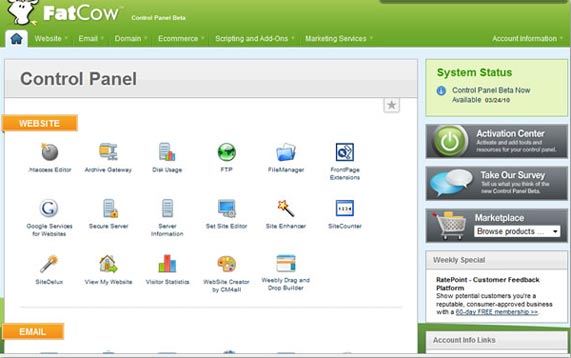
Even if you’ve visited their site, everything is extremely simple and easy to navigate. The same is true for the site once you’ve logged in. You won’t need to dig around much for anything.
All website builders are easy to use—that’s their goal, after all—but FatCow’s is no exception. This video, from their help page, is a good demonstration.
Managing your account, email, domains, and so on, are about as easy as that website builder. As a matter of fact, the website builder is probably one of the more complicated things you’ll have to deal with.
All things considered, FatCow does great with ease of use, without sacrificing your ability to control your account or site.
Customer Support
Something that adds to FatCow’s ease of use factor is its solid customer support. As with most platforms, FatCow offers educational and factual material on-site for searching, browsing, or onboarding.
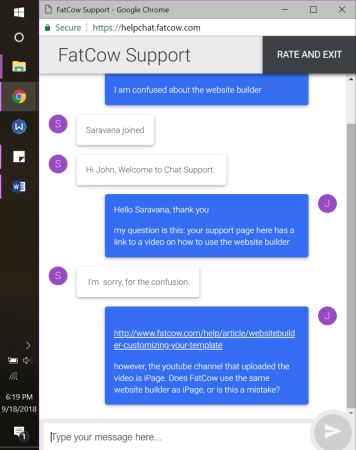
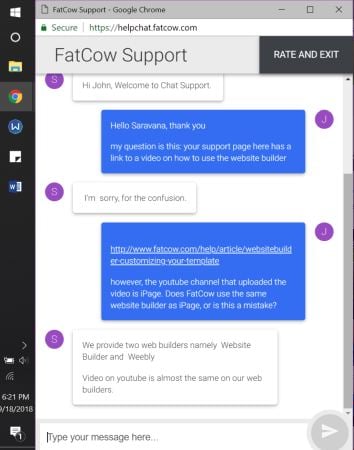
In addition, it has customer service representatives available to answer questions by live chat, phone, or ticket/email. I tested out their live chat as a guest, to see what any anonymous visitor could get.
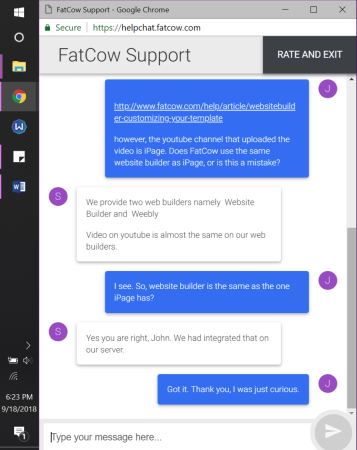
Note: the times in the bottom left corner of the screen are accurate within a minute of the most recent message being sent.
It took a couple of minutes, but I did get a response.
This is certainly not the type of question a customer service representative normally gets. I still got a response—even if it could have been worded better.
I had to clarify, but it was overall helpful. Note that the representative says the video on their help page is “almost” the same as their website builder.
In my message, however, I asked if the website builder in the video/that iPage uses is the same as FatCow’s—not similar, but same.
The FatCow representative then affirmed my answer, which leaves me wondering—is it the same builder, or similar?
Now, I understand I’m being pretty anal about a very trivial and unorthodox matter. The representative was overall helpful, understood the question, and tried their best to answer.
And before you ask: yes, the website builder they use is pretty much the same as iPage’s.
The larger question is about their knowledge base.
Why couldn’t they use a video of their own builder, and put it on a FatCow YouTube channel?
Are they so strained for resources that they must use other hosting platform’s screengrabs and pass it off as their own?
Now aside from that, the knowledge base is good. It’s simple and straight to the point.
One last grievance is their contact page, which has two links: one to their knowledge base, and another to their user guides. Both links redirect to the same help page/knowledge base.
I get this seems like minor stuff by itself, but when it all comes together, their on-site documentation looks a little shoddy; hasty, to say the least.
I can’t read every article they have on-site, and neither can you—so how much of it is actually helpful and specific to the FatCow platform?
Is any of it misleading, outdated, or copied from other platforms?
It’s tough to say, but I’m left a bit skeptical of FatCow’s customer support for these reasons.
FatCow’s a small company though, and maybe we can forgive them a bit.
Overall, their knowledge base seems comprehensive, and their representatives respond in a timely manner. That they offer 24/7 phone support at their size is an added bonus.
I just don’t think it’s the best customer support I’ve seen.
But if the security is good, you won’t really need to deal with customer support too much—so let’s take a look at that!
Security
You don’t need me to tell you that security is essential. As FatCow is a smaller service, it’s easy to wonder if maybe they pinch pennies on security, or fail to be transparent.
This is not the case. FatCow is more transparent about its security than many other big names in the hosting world, which is quite comforting.
As a matter of fact, this page is dedicated to describing FatCow’s servers and their security. They only have two servers, and both in the Boston area—proof they really are a small contender—but those servers seem well-guarded.
Of particular interest, they offer a “pooled server environment.” This is a nontraditional structure that basically lets the first available machine serve a customer’s pages, giving faster loading times.
If one machine crashes, another unit will be clustered nearby to take over immediately.
So far, this makes FatCow’s security look pretty good.
Now, I still think they could have a little more infrastructure in place to protect from hackers and cyber attacks, but given that they only have two servers in the same area, it’s more understandable.
In my experience, the uptime has been pretty good. Aside from a few minutes during the off month here or there—nothing unusual even for the bigger platforms—I’ve had reliable uptime.
I wouldn’t say FatCow has the best security I’ve seen, but it’s very solid for its size. I am sure FatCow is reliable enough for anyone worrying about their uptime or information.
Do I Recommend FatCow?
In conclusion, FatCow presents a few drawbacks and quite a few benefits—all of which likely stems from its small size and/or its focus on simplification.
On one hand, pricing is simple in a way that makes buying a plan from FatCow painless. For some types of hosting, the simplicity means that you’ll get a really good deal.
On the other hand, for shared web hosting, it’s only a good deal for the first term. Afterward, simplicity might limit your ability to get a package properly tailored to your needs.
The features are good, it’s very easy to use service, and the security seems pretty solid even if it might be able to do with a bit more.
The customer support is alright—nothing major, but a few things here and there give me the sense their knowledge base could have outdated or shoddy articles.
Overall, I would recommend FatCow for small to medium businesses who want VPS, WordPress, or dedicated hosting solutions.
I would not recommend FatCow for anyone looking to make a cheap personal website—if you want to do shared hosting but with full features, either FatCow or a high-tiered shared hosting package with another company would be good.
WORDPRESS
Making 43% of the Web More Dynamic with the WordPress Interactivity API – WordPress.com News

Creating rich, engaging, and interactive website experiences is a simple way to surprise, delight, and attract attention from website readers and users. Dynamic interactivity like instant search, form handling, and client-side “app-like” navigation where elements can persist across routes, all without a full page reload, can make the web a more efficient and interesting place for all.
But creating those experiences on WordPress hasn’t always been the easiest or most straightforward, often requiring complex JavaScript framework setup and maintenance.
Now, with the Interactivity API, WordPress developers have a standardized way for doing that, all built directly into core.
The Interactivity API started as an experimental plugin in early 2022, became an official proposal in March 2023, and was finally merged into WordPress core with the release of WordPress 6.5 on April 2, 2024. It provides an easier, standardized way for WordPress developers to create rich, interactive user experiences with their blocks on the front-end.
ELI5: The Interactivity API and the Image Block
Several core WordPress blocks, including the Query Loop, Image, and Search blocks, have already adopted the Interactivity API. The Image block, in particular, is a great way to show off the Interactivity API in action.
At its core, the Image blocks allow you to add an image to a post or page. When a user clicks on an image in a post or page, the Interactivity API launches a lightbox showing a high-resolution version of the image.
The rendering of the Image block is handled server-side. The client-side interactivity, handling resizing and opening the lightbox, is now done with the new API that comes bundled with WordPress. You can bind the client-side interactivity simply by adding the wp-on--click directive to the image element, referencing the showLightbox action in view.js.
You might say, “But I could easily do this with some JavaScript!” With the Interactivity API, the code is compact and declarative, and you get the context (local state) to handle the lightbox, resizing, side effects, and all of the other needed work here in the store object.
actions: {
			showLightbox() {
				const ctx = getContext();

				// Bails out if the image has not loaded yet.
				if ( ! ctx.imageRef?.complete ) {
					return;
				}

				// Stores the positons of the scroll to fix it until the overlay is
				// closed.
				state.scrollTopReset = document.documentElement.scrollTop;
				state.scrollLeftReset = document.documentElement.scrollLeft;

				// Moves the information of the expaned image to the state.
				ctx.currentSrc = ctx.imageRef.currentSrc;
				imageRef = ctx.imageRef;
				buttonRef = ctx.buttonRef;
				state.currentImage = ctx;
				state.overlayEnabled = true;

				// Computes the styles of the overlay for the animation.
				callbacks.setOverlayStyles();
			},
...
The lower-level implementation details, like keeping the server and client side in sync, just work; developers no longer need to account for them.
This functionality is possible using vanilla JavaScript, by selecting the element via a query selector, reading data attributes, and manipulating the DOM. But it’s far less elegant, and up until now, there hasn’t been a standardized way in WordPress of handling interactive events like these.
With the Interactivity API, developers have a predictable way to provide interactivity to users on the front-end. You don’t have to worry about lower-level code for adding interactivity; it’s there in WordPress for you to start using today. Batteries are included.
How is the Interactivity API different from Alpine, React, or Vue?
Prior to merging the Interactivity API into WordPress core, developers would typically reach for a JavaScript framework to add dynamic features to the user-facing parts of their websites. This approach worked just fine, so why was there a need to standardize it?
At its core, the Interactivity API is a lightweight JavaScript library that standardizes the way developers can build interactive HTML elements on WordPress sites.
Mario Santos, a developer on the WordPress core team, wrote in the Interactivity API proposal that, “With a standard, WordPress can absorb the maximum amount of complexity from the developer because it will handle most of what’s needed to create an interactive block.”
The team saw that the gap between what’s possible and what’s practical grew as sites became more complex. The more complex a user experience developers wanted to build, the more blocks needed to interact with each other, and the more difficult it became to build and maintain sites. Developers would spend a lot of time making sure that the client-side and server-side code played nicely together.
For a large open-source project with several contributors, having an agreed-upon standard and native way of providing client-side interactivity speeds up development and greatly improves the developer experience.
Five goals shaped the core development team’s decisions as they built the API:
- Block-first and PHP-first: Prioritizing blocks for building sites and server side rendering for better SEO and performance. Combining the best for user and developer experience.
- Backward-compatible: Ensuring compatibility with both classic and block themes and optionally with other JavaScript frameworks, though it’s advised to use the API as the primary method. It also works with hooks and internationalization.
- Declarative and reactive: Using declarative code to define interactions, listening for changes in data, and updating only relevant parts of the DOM accordingly.
- Performant: Optimizing runtime performance to deliver a fast and lightweight user experience.
- Send less JavaScript: Reduce the overall amount of JavaScript being sent on the page by providing a common framework that blocks can reuse. So the more that blocks leverage the Interactivity API, the less JavaScript will be sent overall.
Other goals are on the horizon, including improvements to client-side navigation, as you can see in this PR.
Interactivity API vs. Alpine
The Interactivity API shares a few similarities to Alpine—a lightweight JavaScript library that allows developers to build interactions into their web projects, often used in WordPress and Laravel projects.
Similar to Alpine, the Interactivity API uses directives directly in HTML and both play nicely with PHP. Unlike Alpine, the Interactivity API is designed to seamlessly integrate with WordPress and support server-side rendering of its directives.
With the interactivity API, you can easily generate the view from the server in PHP, and then add client-side interactivity. This results in less duplication, and its support in WordPress core will lead to less architectural decisions currently required by developers.
So while Alpine and the Interactivity API share a broadly similar goal—making it easy for web developers to add interactive elements to a webpage—the Interactivity API is even more plug-and-play for WordPress developers.
Interactivity API vs. React and Vue
Many developers have opted for React when adding interactivity to WordPress sites because, in the modern web development stack, React is the go-to solution for declaratively handling DOM interactivity. This is familiar territory, and we’re used to using React and JSX when adding custom blocks for Gutenberg.
Loading React on the client side can be done, but it leaves you with many decisions: “How should I handle routing? How do I work with the context between PHP and React? What about server-side rendering?”
Part of the goal in developing the Interactivity API was the need to write as little as little JavaScript as possible, leaving the heavy lifting to PHP, and only shipping JavaScript when necessary.
The core team also saw issues with how these frameworks worked in conjunction with WordPress. Developers can use JavaScript frameworks like React and Vue to render a block on the front-end that they server-rendered in PHP, for example, but this requires logic duplication and risks exposure to issues with WordPress hooks.
For these reasons, among others, the core team preferred Preact—a smaller UI framework that requires less JavaScript to download and execute without sacrificing performance. Think of it like React with fewer calories.
Luis Herranz, a WordPress Core contributor from Automattic, outlines more details on Alpine vs the Interactivity API’s usage of Preact with a thin layer of directives on top of it in this comment on the original proposal.
Preact only loads if the page source contains an interactive block, meaning it is not loaded until it’s needed, aligning with the idea of shipping as little JavaScript as possible (and shipping no JavaScript as a default).
In the original Interactivity API proposal, you can see the run-down and comparison of several frameworks and why Preact was chosen over the others.
What does the new Interactivity API provide to WordPress developers?
In addition to providing a standardized way to render interactive elements client-side, the Interactivity API also provides developers with directives and a more straightforward way of creating a store object to handle state, side effects, and actions.
Directives
Directives, a special set of data attributes, allow you to extend HTML markup. You can share data between the server-side-rendered blocks and the client-side, bind values, add click events, and much more. The Interactivity API reference lists all the available directives.
These directives are typically added in the block’s render.php file, and they support all of the WordPress APIs, including actions, filters, and core translation APIs.
Here’s the render file of a sample block. Notice the click event (data-wp-on--click="actions.toggle"), and how we bind the value of the aria-expanded attributes via directives.
<div
	<?php echo get_block_wrapper_attributes(); ?>
	data-wp-interactive="create-block"
	<?php echo wp_interactivity_data_wp_context( array( 'isOpen' => false ) ); ?>
	data-wp-watch="callbacks.logIsOpen"
>
	<button
		data-wp-on--click="actions.toggle"
		data-wp-bind--aria-expanded="context.isOpen"
		aria-controls="<?php echo esc_attr( $unique_id ); ?>"
	>
		<?php esc_html_e( 'Toggle', 'my-interactive-block' ); ?>
	</button>

	<p
		id="<?php echo esc_attr( $unique_id ); ?>"
		data-wp-bind--hidden="!context.isOpen"
	>
		<?php
			esc_html_e( 'My Interactive Block - hello from an interactive block!', 'my-interactive-block' );
		?>
	</p>
</div>
Do you need to dynamically update an element’s inner text? The Interactivity API allows you to use data-wp-text on an element, just like you can use v-text in Vue.
You can bind a value to a boolean or string using wp-bind– or hook up a click event by using data-wp-on–click on the element. This means you can write PHP and HTML and sprinkle in directives to add interactivity in a declarative way.
Handling state, side effects, and actions
The second stage of adding interactivity is to create a store, which is usually done in your view.js file. In the store, you’ll have access to the same context as in your render.php file.
In the store object, you define actions responding to user interactions. These actions can update the local context or global state, which then re-renders and updates the connected HTML element. You can also define side effects/callbacks, which are similar to actions, but they respond to state changes instead of direct user actions.
import { store, getContext } from '@wordpress/interactivity';

store( 'create-block', {
	actions: {
		toggle: () => {
			const context = getContext();
			context.isOpen = ! context.isOpen;
		},
	},
	callbacks: {
		logIsOpen: () => {
			const { isOpen } = getContext();
			// Log the value of `isOpen` each time it changes.
			console.log( `Is open: ${ isOpen }` );
		},
	},
} );
Try it out for yourself
The Interactivity API is production-ready and already running on WordPress.com! With any WordPress.com plan, you’ll have access to the core blocks built on top of the Interactivity API.
If you want to build your own interactive blocks, you can scaffold an interactive block by running the below code in your terminal:
npx @wordpress/create-block@latest my-interactive-block --template @wordpress/create-block-interactive-template
This will give you an example interactive block, with directives and state handling set up.
You can then play around with this locally, using wp-env, using a staging site, or by uploading the plugin directly to your site running a plugin-eligible WordPress.com plan.
If you want a seamless experience between your local dev setup and your WordPress.com site, try using it with our new GitHub Deployments feature! Developing custom blocks is the perfect use case for this new tool.
The best way to learn something new is to start building. To kick things off, you may find the following resources a good starting point:
Join 106.9M other subscribers
WORDPRESS
The Masters Golf Tournament – WordPress.com News

Congratulations are in order for Scottie Scheffler, the winner of the 2024 Masters Tournament in Augusta, Georgia! In today’s Build and Beyond video, Jamie Marsland takes on the slightly less intimidating task of re-creating the Masters website as quickly as he can. Can he possibly do it in just 30 minutes?
Along the way, you’ll learn about sticky navigation menus, image overflows and breakouts, card layouts, and more.
Interested in a free trial that allows you to test our all that WordPress.com has to offer? Click below:
Join 110M other subscribers
WORDPRESS
10 Best Technical Documentation Software for WordPress

Are you looking for the best technical documentation software for WordPress?
Technical documentation software helps you easily write, edit, and manage documentation inside WordPress. This enables users to get the information they need without asking for support and helps you reduce support queries.
In this article, we’ll show the best technical documentation software for WordPress that you can use for your business.

Why Use Technical Documentation Software for WordPress?
According to Harvard Business Review, over 81% of customers try to take care of issues themselves before contacting a support representative.
If customers cannot find quick answers to their basic questions, they are likelier to leave a negative review, ask for a refund, or find an alternative.
By using technical documentation software, you can provide your customers with the information they need without reaching out for technical support via contact form or phone support.

The following are some of the top reasons for using technical documentation software for your business:
1. Saves You Time + Money: With a handy documentation section, your support team spends less time answering the same questions repeatedly. Many customers find answers before even opening a support ticket. By being more efficient, you can keep your support team small and save money.
2. Improves Customer Satisfaction: Getting quick answers makes your customers happy. It also gives them the satisfaction that they can find reliable information when needed.
3. Builds Trust and Brand Loyalty: Satisfied customers are likelier to leave positive reviews about your business and recommend it to others. This trust leads them to buy more products from your business in the future.
4. Adds a 24/7 Support Rockstar to Your Team: Think of technical documentation as a support team member who works 24/7 at no additional cost to your business. It is always available, other team members can use it frequently, and you can always add new information to it.
How to Add Technical Documentation in WordPress
A WordPress website comes with two common content types: posts and pages.
Posts are published in reverse chronological order, making them less than ideal candidates for technical documentation articles. Pages are standalone content types and can be used to create technical documentation.
However, ideally, they are best suited for your business pages (services, storefront, about page, landing pages, and more).
This is where technical documentation software for WordPress comes in handy.
These tools are separate plugins or themes that add a Knowledge Base or Documentation content type to your WordPress website.
Among these tools, you can choose from several excellent options.
That being said, let’s look at the best technical documentation software you can use in WordPress.
1. Heroic Knowledge Base
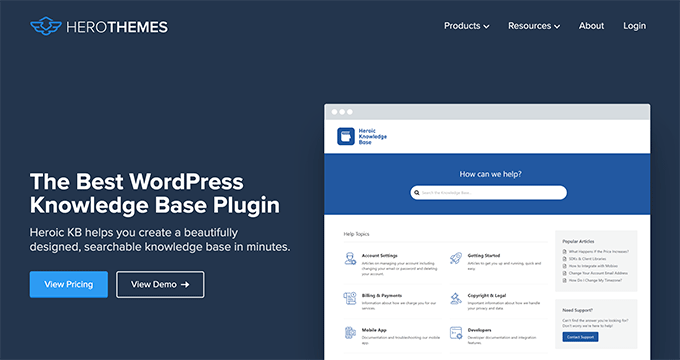

Heroic Knowledge Base is the best WordPress technical documentation software on the market.
It allows you to easily add technical documentation in WordPress and sort it into categories and tags. There is no complicated setup involved.
The front end displays your documentation in an easy-to-browse layout with a prominent search bar at the top. You don’t need to write any code to get it working on your website.
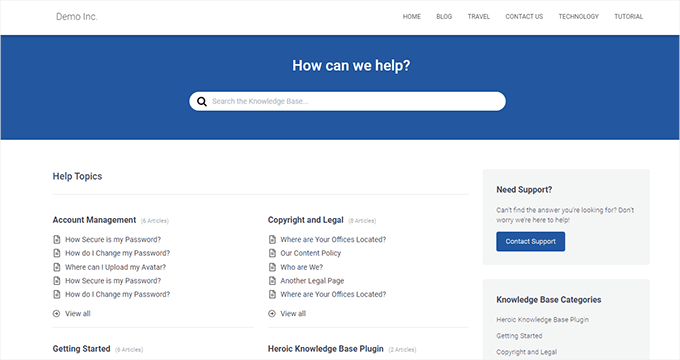

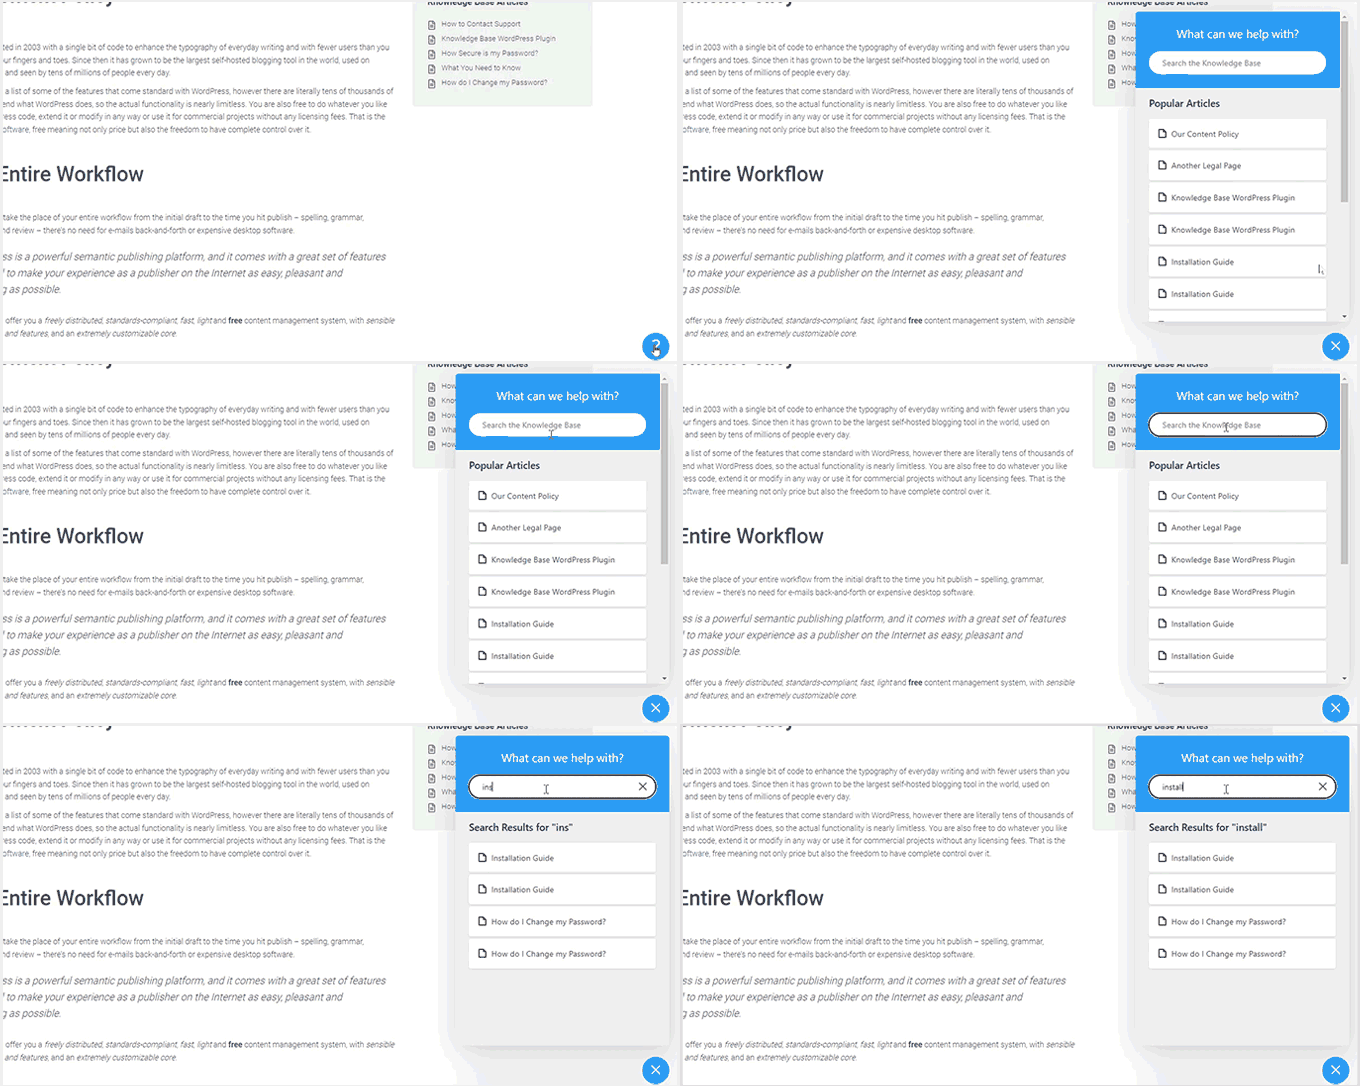
The live search feature uses Ajax to show answers when users start typing. This helps your customers get to the answers much faster.
Most importantly, it works with any WordPress theme and will use its own custom templates to display the knowledge base area. This is perfect if you want to use it on your business website.
Heroic Knowledge Base also comes with a support assistant bot, which appears across your website and provides instant answers when users click it.

Want to know what your customers are struggling with? Heroic Knowledge base comes with analytics to help you gain insights into user behavior.
Pros of Using Heroic Knowledge Base
- Easy to use without any complicated setup.
- It works with any WordPress theme and can be used on an existing WordPress website.
- The live search feature helps users find articles more quickly.
- Built-in analytics allow you to track which parts of the documentation are accessed by more users, providing insights into improving your products.
- Includes a support assistant bot to help users quickly find answers
Cons of Using Heroic Knowledge Base
- It is a paid plugin with no free version. However, they do offer a 14-day risk-free money-back guarantee.
- License renews at regular pricing, which is a bit high. However, you can choose to cancel your subscription and keep the plugin.
Why We Chose Heroic Knowledge Base: Heroic Knowledgebase is the most comprehensive and easy-to-use technical documentation software for WordPress. It works with any WordPress theme, which means it can be easily used on your existing WordPress website.
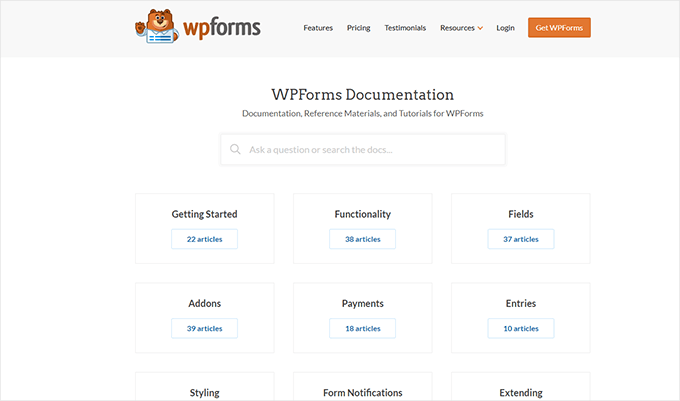
We already use it for the documentation hub on the WPForms website, and our documentation team loves it.
Pricing: Starting from $149.50.
2. Groove
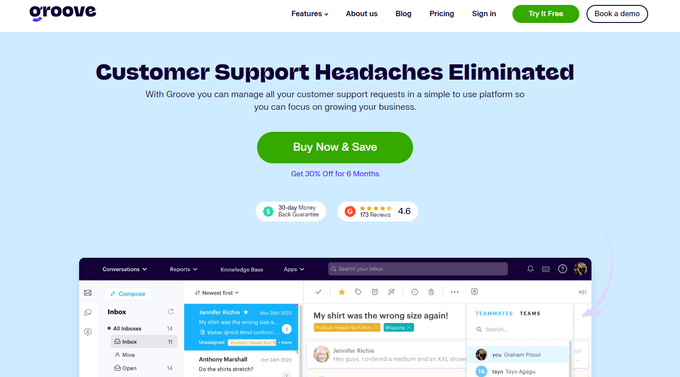

Groove is a powerful customer support platform that combines a knowledge base, a help desk, and live chat into one solution.
It is easy to use, and you can use it under your own domain name.
It comes with an easy design tool that allows you to choose your brand colors and upload a logo. Plus, the knowledge base pages look great on all devices and screen sizes.
Groove Knowledge Base also provides valuable insights such as article performance metrics, most searched terms, and most viewed articles. It can even make article suggestions.
Pros of Using Groove
- Easy to use and manage.
- Requires no special skills.
- It can be used alongside Goove’s customer support platform with shared inboxes, live chat, and help desk software.
- Help icon on every page, allowing users to quickly search the knowledge base and seamlessly transition to customer support.
- Customizable mobile-friendly themes.
Cons of Using Groove
- It can be a little more expensive than some software on the list.
- Data is stored on Groove servers instead of your WordPress website.
Why We Chose Groove: Technical documentation is where a customer’s support interaction begins, and they may need further help. This is where Groove can help you seamlessly transfer customers to support inboxes or live chat.
In our experience with Groove, we like its ease of use, simple interface, and self-serve widget, and how it easily integrates into every page of your website.
Pricing: Starting from $4.80 per user per month.
3. KnowAll
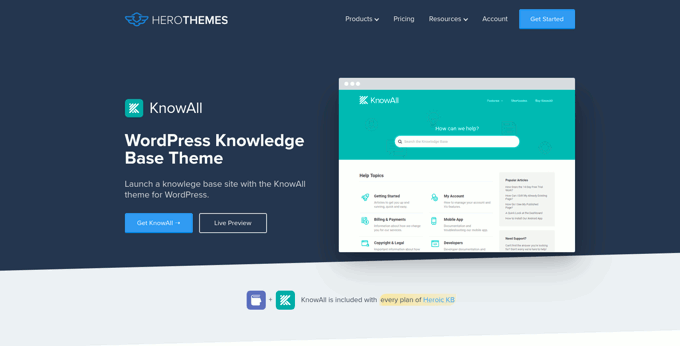

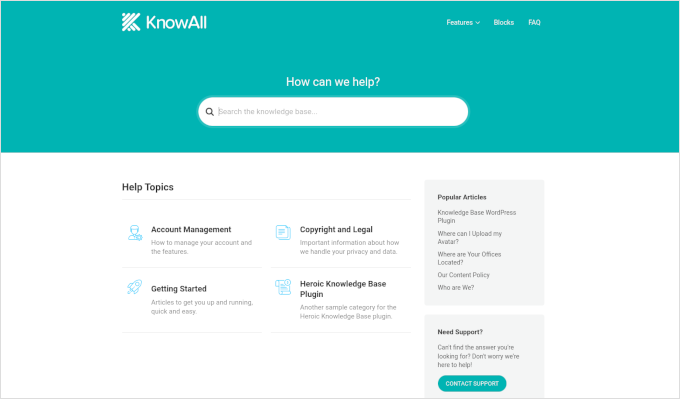
KnowAll is the best WordPress knowledge base theme on the market. It comes with the best WordPress technical documentation plugin called Heroic Knowledgebase.
It is the perfect solution if you are building a separate website to handle support for your business. In that case, you can use KnowAll to set up a fully functional documentation center instantly.

Pros of Using KnowAll
- Suitable if you want to make a separate website for support and documentation.
- You can customize it like any other WordPress theme.
- As a classic theme, it supports the Theme Customizer, widgets, and navigation menus.
- Comes with Heroic Knowledgebase blocks, which you can use anywhere on your site.
Cons of Using KnowAll
- It is a WordPress theme, so it wouldn’t be a good solution on a site where you are already using a different theme.
Why We Chose KnowAll: Some businesses may want to set up a separate WordPress site for support documentation. In that case, KnowAll is a ready-to-go solution that provides everything they need. Plus, it comes free with the Heroic Knowledge Base plugin, which, as mentioned, is the best technical documentation software for WordPress.
Pricing: Free with Heroic Knowledge Base plugin, starting from $149.50.
4. BetterDocs


BetterDocs stands out as a reliable WordPress knowledge base plugin, offering a blend of user-friendliness and extensive features.
It comes with pre-designed knowledge base templates tailored to work with any WordPress theme. It also integrates with popular WordPress page builders through additional widgets.
Pros of using BetterDocs
- A simple and easy-to-use technical documentation plugin for WordPress, suitable for beginners and experts alike.
- Includes pre-designed templates to work with any WordPress theme.
- It comes with additional widgets that can be used with page builder plugins.
Cons of using BetterDocs
- Using it with your existing WordPress theme may require some additional tweaks.
Why We Chose BetterDocs: We found BetterDocs to be a great tool for creating technical documentation in WordPress. It is easy to use and makes it easy for your users to find the answers using an excellent live search feature.
Pricing: Starting from $55 for a single site license.
5. weDocs


weDocs is another powerful solution for creating technical documentation in WordPress. It is easy to use and allows you to add a docs section to your existing website or a separate support website.
It includes a search feature and allows you to organize documentation in a hierarchical format. You can also use tags to sort articles into topics and subtopics. You can also sort articles with a drag-and-drop interface.
Pros of Using weDocs
- It works with existing WordPress websites and can also be used on a standalone support website.
- It lets you organize documentation in a hierarchical format. Plus, you can use tags to sort articles into topics.
- It has a drag-and-drop interface to organize documentation pages.
- Comes with an AI assistant built with ChatGPT to show relevant information automatically.
Cons of Using weDocs
- It does not come with a separate theme but has built-in templates to work with any WordPress theme. This may require a little bit of tweaking, but nothing too tricky.
Why We Chose weDocs: It is a good option if you want to organize documentation in hierarchical pages. The drag-and-drop organizer allows you to easily set up documentation architecture.
Pricing: The base plugin is available for free. Pro plans start at $47 / year.
6. Echo Knowledge Base


Echo Knowledge Base makes creating and managing documentation, FAQs, and articles easy and organized.
It has a user-friendly interface, and you can easily add, edit, and organize your content without technical know-how.
Pros of Using Echo Knowledge Base
- Allows you to organize support articles with categories and tags.
- You can use AI assistance to help write and answer questions.
- It includes multiple layout styles and shortcodes to add FAQs and support content across your website.
Cons of Using Echo Knowledge Base
- A little less beginner-friendly than other solutions on the list.
- The base free plugin doesn’t have good search experience. You’ll need to buy a paid add-on separately to add advanced search.
Why We Chose Echo Knowledge Base: If you are looking for a free solution, then Echo Knowledge Base can be a good option. It provides a good base to add documentation and you can always purchase a bundle to add more features if needed.
Pricing: The base plugin is free. You can buy add-on packs starting from $46 / year.
7. BasePress


BasePress is another simpler and easy-to-use plugin that helps you create professional-looking documentation pages and a knowledge base for your website.
It has three customizable themes, allowing you to create a visually appealing support center with minimal effort.
The advanced instant search bar helps users find answers quickly, while the drag-and-drop interface makes organizing articles into sections, categories, and tags easy.
Pros of Using BasePress
- It allows you to create multiple knowledge bases.
- Comes with article voting and analytics.
- Content restriction lets you choose who has access to documentation.
- Instant search lets users find answers quickly, you can add the search bar anywhere on your site using a shortcode.
Cons of Using BasePress
- The built-in templates may require some tweaking to work alongside your existing WordPress theme.
- Features like article voting, an advanced search bar, table of contents, etc. are available under paid plans.
Why We Chose BasePress: If you are looking for a basic free technical documentation plugin, then BasePress could be a good solution. However, if you need the features available in its premium version, you should compare it with other paid solutions on this list.
Pricing: The lite plugin is free. Pro plans start at $79 / year.
8. HelpCrunch


HelpCrunch is a multi-purpose WordPress technical documentation plugin that allows you to easily create a support website for your customers.
It allows you to organize your help documents into categories and tags easily. It also has a more accessible customizer that lets you choose the theme and background colors for your docs section.
Pros of Using HelpCrunch
- Offers a multi-channel customer support software with chat, email, and technical docs.
- Supports popular messaging apps like Facebook Messenger, WhatsApp, and Instagram to chat with customers.
- AI-powered live chat assistant helps customers find answers more quickly.
Cons of Using HelpCrunch
- It is a multi-channel, full-fledged customer support platform with email marketing, live chat support, and a knowledge base. If you are just looking for technical documentation software, this might be overkill.
- A bit pricier than other solutions on the list.
Why We Chose HelpCrunch: If you are looking for a knowledge base with built-in live chat support, then HelpCrunch can be a good solution for your business. It offers multiple ways for customers to seek help, which ensures customers can get the information they need.
Pricing: Starting from $12 monthly for each team member without emails.
9. VS Knowledge Base
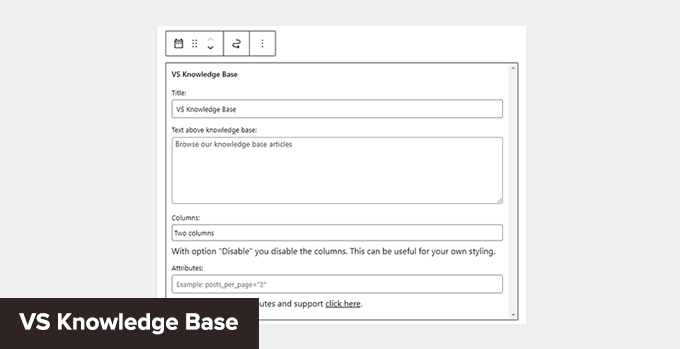

VS Knowledge Base is a very simple knowledge base plugin for WordPress. It is suitable for advanced users adding documentation on a separate WordPress installation in a subfolder or subdomain.
It does not come with its own knowledge base content type but can be used with any other content type, like posts or pages.
Pros of Using VS Knowledge Base
- Extremely simple and straightforward solution to create technical documentation in WordPress.
- Use shortcodes or VS Knowledge Base widget to display documentation.
- Works with any WordPress theme.
Cons of Using VS Knowledge Base
- Since it does not use a separate content type for knowledge base articles, it will not be easy to use on an existing WordPress website.
- It lacks advanced features that many other solutions on this list offer.
Why We Chose VS Knowledge Base: For businesses that want to set up a separate WordPress install on a dedicated support site, VS Knowledge Base can be a very basic and simple solution.
Pricing: Free.
10. BSF Docs


BSF Docs is a lightweight WordPress documentation plugin. It comes with a Docs content type for adding technical documentation articles.
It offers a very basic set of features which makes it quite easy to use. There is not much for you to customize, and you can just start adding your documentation.
Pros of Using BSF Docs
- A lightweight technical documentation plugin that is super simplistic by design.
- Comes with a basic template to display technical documentation sorted by categories.
- You can create documentation articles using the Docs content type or posts/pages.
Cons of Using BSF Docs
- Lacks many of the features that are available in some other solutions on this list.
- The default templating works with most WordPress themes, but you may still need some customization.
Why We Chose BSF Docs: If you need a free plugin to create and manage your technical documentation, BSF Docs is a good solution. It includes a very helpful live search feature and works quite well with any WordPress theme.
Pricing: Free.
Bonus Tools
Adding technical documentation alone would help reduce support requests. However, you may need additional tools to ensure your customers get the best support possible.
Combining your documentation with the following tools will help you create a robust customer support system.
11. Heroic Inbox
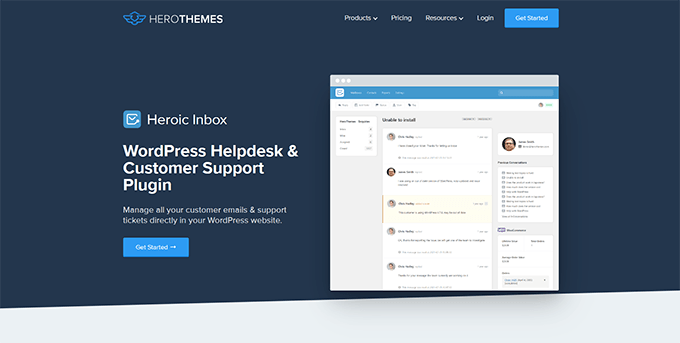

Heroic Inbox is a WordPress helpdesk and customer support plugin from the makers of KnowAll and Heroic Knowledge Base plugins.
It allows you to manage all customer support emails and tickets inside WordPress. You can create multiple mailboxes for support, sales, partnerships, and more from the same dashboard.
With built-in user management, you can assign different mailboxes to different team members and route customer emails to the right team.
Team members can add notes only visible to your team to share information and coordinate responses.
It also pulls all customer information in the sidebar next to a conversation. You can see past support requests and customer activity when answering a ticket.
Pricing: Starts at $199.50 for the standalone plugin. However, the real value comes with their bundle package, starting at $299.50, and includes Heroic Knowledge Base.
12. WPForms


WPForms is the best WordPress form builder on the market. It allows you to create forms in WordPress, including customer support forms, feedback forms, survey polls, and more.
WPForms lets you easily allow your customers various options to contact and provide feedback. This helps you make data-driven decisions, leading to more customer satisfaction.
WPForms is a no-code solution and comes with a drag-and-drop form builder. It includes over 1600 templates for all kinds of forms your small business might need.
Pricing: Starting from $49.50. There is also a free version that you can try.
13. Nextiva


Nextiva is the best business phone service provider for small businesses. Adding a business phone number to your website gives your business credibility and gives customers an extra channel to reach out if they need help.
Nextiva allows you to share a number on multiple devices. It includes intelligent routing features to send calls to the available team members automatically.
Plus, you can choose phone numbers in different states or regions or even get a toll-free number for business.
Pricing: Starting at $14.95 /user/month.
14. LiveChat


LiveChat is the best live chat support software on the market.
A recent study by Kayako showed that more than 41% of customers prefer live chat to reach out for support.
LiveChat allows you to add live chat support to your WordPress website easily. It offers easy integration with any knowledge base software you are using.
Plus, it helps you capture leads on your website, which you can then convert into paying customers.
Pricing: Starting from $20 per month per agent.
Which Is the Best Technical Documentation Software for WordPress?
Heroic Knowledge Base is the best technical documentation software for WordPress. It is easy to use, does not require writing any code, and can be used with your existing WordPress website or WooCommerce store.
Plus, it gives you access to the KnowAll theme, which makes it even easier to create a customer support website without any modifications to your existing WordPress theme.
Not to mention that the same company offers Heroic Inbox, which lets you manage customer support right there in WordPress instead of paying third-party companies to handle email support tickets.
Frequently Asked Questions About Technical Documentation Software
1. Which software should you use to write technical documentation?
You can write technical documentation using software like Heroic Knowledge Base. This allows you to create, edit, organize, and update technical documentation easily.
2. What are some good examples of technical documentation?
You can look at the technical documentation at WPForms as an excellent example. You may also find examples in your industry or business niche and see how your competitors or similar businesses have managed their documentation and resources.
We hope this article helped you find the best technical documentation software for WordPress. You may also want to see our guide on using automation in WooCommerce to increase sales or see our guide on tracking conversions in WordPress / WooCommerce.
If you liked this article, then please subscribe to our YouTube Channel for WordPress video tutorials. You can also find us on Twitter and Facebook.
-

 WORDPRESS7 days ago
Turkish startup ikas attracts $20M for its e-commerce platform designed for small businesses
-

 PPC7 days ago
A History of Google AdWords and Google Ads: Revolutionizing Digital Advertising & Marketing Since 2000
-

 MARKETING6 days ago
Roundel Media Studio: What to Expect From Target’s New Self-Service Platform
-

 SEO5 days ago
Google Limits News Links In California Over Proposed ‘Link Tax’ Law
-
SEARCHENGINES6 days ago
Daily Search Forum Recap: April 12, 2024
-

 MARKETING7 days ago
Unlocking the Power of AI Transcription for Enhanced Content Marketing Strategies
-

 SEARCHENGINES7 days ago
Google Search Results Can Be Harmful & Dangerous In Some Cases
-

 SEO4 days ago
10 Paid Search & PPC Planning Best Practices






You must be logged in to post a comment Login