


 [40% Discount, Save $400]")
 [40% Discount, Save $400]")
 [70% OFF, Save $150]")
 [70% OFF, Save $150]")


Meet Studio by WordPress.com, our new, free, open source local WordPress development environment.
WORDPRESS
How to Send Automated Coupons in WordPress to Bring Back Customers

Do you want to send automated coupons in WordPress to bring back customers?
By sending the right coupon to the right person at the right time, you can re-engage customers who are losing interest. This can get you more sales, create brand loyalty, and help you keep your best customers.
In this guide, we’ll show you a few different ways to send automated coupons in WordPress, and bring back customers.
Why Send Automated Coupons to Bring Back Customers?
You may have heard the saying that it costs five times more to get a new customer than keep an old one.
While lead generation will help grow your business, you also need to keep your existing customers happy. Over time, people may lose interest in your website, forget about your products, or start shopping with a competitor.
That’s where automated coupons come in.
The best WordPress automation tools and plugins can watch your customers for signs they’re becoming disengaged. For example, a customer may not place an order for 2 months or stop opening your emails.
One way to bring those customers back is to automatically send them a coupon code via email. By creating this automated workflow in WordPress, you can retain customers without having to do all the hard work yourself.
Pro Tip: If you send coupons via email, then you’ll need to make sure those messages land in the customer’s inbox and not in the spam folder. Here, a good SMTP service provider is essential for improving your email deliverability. We also recommend using WP Mail SMTP as it allows you to easily send WordPress emails using any SMTP service provider.
With that being said, let’s see how you can send automated coupons in WordPress and bring back customers. Simply use the quick links below to jump to the method you want to use.
Method 1. Using FunnelKit (Best for WooCommerce Users)
One way to send automated coupons in WordPress, is by using FunnelKit Automations.
FunnelKit is a WordPress sales funnel builder and optimization plugin that allows you to create powerful customer winback campaigns. It also lets you create unique, personalized coupons, which can really catch the shopper’s attention.
FunnelKit integrates with WooCommerce and has lots of features that are designed to grow your online store. With that in mind, FunnelKit is a great choice if you already use WooCommerce to sell products and services online.
How to Set up the FunnelKit WordPress Plugin
First, you’ll need to install and activate the free version of FunnelKit Automations, as it provides the base for the premium plugin’s features. For more details, please see our guide on how to install a WordPress plugin.
After that, you’ll need to install and activate the FunnelKit Automations Pro plugin.
After activating both plugins, go to FunnelKit Automation » Settings. You can now go ahead and add the license key to the ‘License’ field.

You’ll find this information in your account on the FunnelKit website. After adding this information, click on the ‘Activate’ button.
How to Create an Automated Coupon Workflow for WordPress
Now, we’re going to create a workflow that will generate a personalized coupon and send it to the customer via email. This workflow will run once 30 days have passed since the customer’s last order.
To create the workflow, go to FunnelKit Automations » Automations (Next Gen) in the WordPress dashboard. Then, click on the ‘Add New Automation’ button.

You’ll now see all the different automation templates that you can use.
Since we want to create our own workflow, select ‘Start from Scratch.’

In the popup that appears, type in a name for the automation. This is just for your reference, so you can use anything you want.
With that done, click on ‘Create.’

Now, we need to choose the action that will kickstart the workflow, so click on ‘Select Trigger.’
In the left-hand menu, choose ‘WooCommerce’ and then click to select ‘Customer Win Back.’

With that done, click on ‘Done’ to add the trigger to your automation workflow.
Back in the main editor, click on the ‘Customer Win Back’ trigger.

In the ‘Customer Last Ordered Period’ section, you can type in how long FunnelKit will wait before running the workflow.
For example, in the following image the workflow will run when 30 days have passed since the customer’s last order.
FunnelKit will repeat this automation once every 24 hours, so it’s important to only run it for a short period of time. For this reason, we’ve set the workflow to stop when 35 days have passed since the customer’s last order.

In this way, you won’t annoy customers by sending them dozens of emails.
Next, you can set the time when the automation will run, using the ‘Schedule this….’ fields. FunnelKit will use your store’s timezone, so you may want to change your online store settings if you want to use a different timezone instead.

With that done, click on ‘Save.’
Back in the main workflow editor, click on ‘+’ and then select ‘Action.’

In the popup that appears, select ‘WooCommerce’ and then click on ‘Create Coupon.’
Simply click on ‘Done’ to add this action to the workflow.

Back in the main FunnelKit editor, click on the action you just added. This opens a popup where you can customize the ‘Create Coupon’ action.
To start, type a name for the coupon into the ‘Coupon Title’ field. This is just for your reference so you can use anything you want.

After that, choose the type of coupon that you want to create, using the ‘Discount Type’ dropdown menu.
FunnelKit supports percentage discount, fixed cart discount, and fixed product discount. Most of the time, you’ll want to select ‘Percentage Discount’ to make sure all customers get a similar benefit, no matter how much they spend or what products they buy.
After that, type an amount into the ‘Amount’ field. For example, you might offer customers 20% off, or a $5 discount on all purchases.

FunnelKit automatically creates a unique coupon code for each contact. However, you can add a prefix to the start of the coupon, which can either be plain text or dynamic tags. FunnelKit will replace these tags with real text every time it creates a code, so this is a great way to create personalized coupons.
Since we want to bring shoppers back in, you may decide to include the customer’s name in the coupon. This can catch their attention, and also makes your code easier to remember.
To add plain text as a prefix, simply type into the ‘Coupon Code Prefix’ field.

To add one or more tags, click on the ‘Merge tags’ icon.
This is the button that has curly braces.

Now, you’ll see all the tags that you can use in the automated coupon.
We’re going to use the {{contact_first_name}} tag, but you can use any tags you want.

Simply copy each tag and then paste it into the ‘Coupon Code Prefix’ field.
As you can see in the following image, you can use a mix of plain text and tags.

By default, the coupon will never expire. A sense of urgency and FOMO can push customers to use a coupon, so you may want to select the radio button next to ‘Expire after Specific Days’ or ‘Expire on Specific Date.’
You can then use the controls to specify when the coupon will expire.

Finally, you can choose whether the coupon gives customers a free shipping discount.
Shoppers love free shipping, so you may want to consider adding this to your coupon by selecting the ‘Yes’ radio button under ‘Allow Free Shipping.’

When you’re happy with how the coupon is set up, make sure you copy the small pieces of code under the ‘Coupon Title.’
You’ll need this coupon code for the email we’ll be creating in the next step, so store it somewhere safe.

With that done, click on ‘Save’ to store your changes.
Now we have a coupon, it’s time to create the email that FunnelKit will send to your customers. To add an email action, click on the ‘+’ button and then select ‘Action.’

If it isn’t already selected, then click on ‘Messaging’ in the left-hand menu.
Then, select ‘Send Email’ and click on ‘Done.’

You can now create an email by typing in a subject and preview, and adding body text.
Similar to creating a coupon, it’s best to use a mix of plain text and tags. To add dynamic tags, click on the ‘Merge Tags’ icons that appear next to the To, Subject, and Preview Text fields.

If you want to add tags to the email body, then you can click on the ‘Merge Tags’ button.
To add your coupon code, simply paste or type in the {{wc_dynamic_coupon id= code we copied in the previous step.

When you’re happy with how the email looks, click on ‘Save & Close.’
That’s it. When you’re ready to make the automation live, click on the ‘Inactive’ slider so it turns to ‘Active.’

Now, FunnelKit will automatically send the coupon to any customer who hasn’t purchased from you in the past 30 days.
Method 2. Using Uncanny Automator (Over 100 Integrations)
Another way to send automated coupons in WordPress, is by using Uncanny Automator. It is one of the best WordPress automation plugins on the market and lets you create powerful workflows to save time and help you respond to customers more quickly.
Uncanny Automator works seamlessly with WooCommerce, plus all of the must have WordPress plugins and third-party tools. If you’re already using lots of different software on your online store, then Uncanny Automator may be a good choice for you.
There is a free Uncanny Automator plugin that lets you automate many common tasks. However, we’ll be using Uncanny Automator pro because it works with WooCommerce.
To start, you’ll need to install Uncanny Automator pro, plus the free plugin as it provides the base for the premium version. If you need help, then please see our guide on how to install a WordPress plugin.
Upon activation, go to Automator » Settings and enter your license key into the ‘Uncanny Automator Pro license key’ field.

You’ll find this information under your account on the Uncanny Automator website.
Uncanny Automator is a powerful and flexible plugin, so there’s lots of different ways that you can bring customers back to your site. Let’s take a look at a few options.
Automatically Send Coupons to Logged-Out Customers
It’s smart to let customers create an account with your online store, as it encourages brand loyalty and makes it easier for shoppers to buy from you in the future.
User registration can also help with lead generation. If you get the shopper’s email address, then you can target them with email marketing, personalized ads, an email newsletter, and much more.
If you’re using WooCommerce, then this plugin automatically creates all the pages customers need to create and manage an account. WooCommerce also adds a new Customer role, which it automatically assigns to any shoppers who register with your store.
Are you using a different eCommerce solution that doesn’t support customer registration? Then see our guide on how to allow user registration on your WordPress site.
After that, you can simply create a new role for your customers. For detailed instructions, please see our beginner’s guide to WordPress user roles and permissions.
If you allow user registration, then you can track when a shopper logs out of their account, as this suggests they’re losing interest in your store. You can then send a coupon to encourage them to log back in.
To create this recipe, simply go to Automator » Add new in the WordPress dashboard.
Uncanny Automator will now ask whether you want to create a recipe for logged-in users, or everyone. Go ahead and select ‘Logged-in users,’ then click on the ‘Confirm’ button.

Next, you can give the recipe a name by typing into the ‘Title’ field. This is just for your reference so you can use anything you want.
Once you’ve done that, click on ‘WordPress’ in the ‘Select an integration’ area.

You can now choose a trigger, which is anything that kickstarts the recipe.
In the dropdown menu, start typing the following ‘A user logs out of a site’ and then select the right option when it appears.

We only want to run the workflow when someone with the ‘Customer’ user role logs out of their account.
With that in mind, click on the ‘Add filter’ button.

In the popup that appears, click on ‘WordPress.’
Next, find ‘The user has a specific role’ in the dropdown menu.

Open the ‘Role’ dropdown and select the role you’re using for your customers.
After that, go ahead and click on ‘Save filter.’

Now it’s time to specify the action that Uncanny Automator will perform every time this workflow runs.
We’re going to send the customer an email containing a coupon, so go ahead and click on ‘Add action.’

Since we want to send an email, select ‘Emails’ as the integration.
In the dropdown that appears, click on ‘Send an email.’

This adds all the fields that you can use to create the email.
To start, we need to make sure the message goes to the right user, by clicking on the asterisk next to the ‘To’ field. Then, select ‘Common’ and ‘User email.’

You can now create the email by adding a subject line and body text.
Here, you can use a mix of plain text and tokens, which are placeholders that Uncanny Automator replaces with real values automatically. For example, if you want to use the customer’s name, then you can click on the asterix and select ‘Common.’
Simply select the ‘User first name’ token to create the personalized greeting.

You’ll also need to create a coupon and add it to the email.
The easiest way is by using the Advanced Coupons plugin, which is the best WordPress coupon code plugin on the market. It lets you create lots of different advanced coupons to get more sales and grow your business.
For a step-by-step guide, please see our post on how to create smart coupons.
After creating a coupon, you can simply add it to the email.

When you’re happy with how the email looks, click on ‘Save.’
After that, it’s time to set a delay. This is how long Uncanny Automator will wait after the customer logs out, before sending them the coupon.
To add a delay, hover your mouse over the ‘Email’ action. When it appears, click on ‘Delay.’

You can then add your delay in the popup that appears.
Once you’ve done that, go ahead and select ‘Set delay.’

When you’re happy with how the recipe is set up, it’s time to make it active.
In the ‘Recipe’ box, click the ‘Draft’ switch so that it shows ‘Live’ instead.

That’s it. Now, when a customer logs out of their account, Uncanny Automator will wait for the specified amount of time before sending them a coupon code.
Automatically Send Coupons for a Specific Product
Sometimes a shopper may look at a product multiple times. This suggests they’re interested in the item, but something is stopping them from making a purchase.
In this case, you may want to send them a coupon, which will encourage them to splash out on the product.
To get started, create a new recipe for logged-in users following the same process described above. After that, click on ‘WooCommerce’ in the ‘Select an integration’ area.

Next, choose a trigger by typing the following ‘A user views a product.’
When the right trigger appears, give it a click.

By default, this trigger is set to ‘Any product.’
If you want to link the recipe to a specific product, then open the ‘Product’ dropdown and choose that product from the list.

Once you’ve done that, click on the ‘Number of times’ button.
By default, the recipe will run every time a customer looks at a product. You should change this, so the customer has to look at the product multiple times before triggering the recipe. To do this, type a different number into the ‘Number of times’ field.

When that’s done, click on ‘Save’ to store your settings.
This recipe should only run when a customer views a product, so click on ‘Add Filter.’ In the popup that appears, click on ‘WordPress’ and then choose ‘The user has a specific role.’

After that, open the ‘Role’ dropdown and select the role you’re using for your customers.
When you’re ready, click on ‘Save filter.’

Now it’s time to add the action. There are a few different ways to send automated coupons from your WordPress website.
To email a code to your customers using Uncanny Automator and Advanced Coupons, simply follow the same process described above.
Another option is to generate the code using WooCommerce. To do this, click on ‘Add Action’ and then select ‘WooCommerce’ as the integration.

In the search bar, start typing ‘Generate and email a coupon code to the user.’
When the right option appears, give it a click.

This will add some new settings where you can create the coupon code.
To generate a code automatically, simply leave the ‘Coupon code’ field blank.

In the ‘Discount type’ field, choose the kind of coupon that you want to create, such as a fixed cart discount or percentage discount.
For this guide, we’ll select ‘Percentage discount’.

After that, type the percentage discount into the ‘Coupon amount’ field.
In the following image, we’re offering customers a 30% discount on their purchase.

In the next field, you can set an expiry date for the coupon, either by using the YYY-MM-DD format or typing in the number of days until the coupon expires.
For example, in the following image the coupon will expire after 7 days.

You can also set a minimum and maximum spend for the coupon. We’ll leave these fields blank so the customer can use the code with any purchase.
You may also want to check the ‘For individual use only’ box so customers can’t use this code in combination with other coupons.

Next, scroll to the ‘Usage limit per coupon’ section. The shopper should only be able to use the coupon once, so type in ‘1.’
There are lots of other settings you can change for the coupon. It’s a good idea to look through these settings to see whether you want to make any more changes.
When you’re happy with how the coupon is set up, scroll to the ‘Email’ section. To start, find the ‘To’ field and then click on the asterisk next to it. Then, click on ‘Common’ and select ‘User email.’

With that done, you can add a subject line and change the text in the email body.
To create a more personalized email, it’s a good idea to use a mix of plain text and tokens, by following the same process described above.

When you’re happy with the email, click on the ‘Save’ button to store the recipe.
After that, you can make the recipe live by clicking the ‘Draft’ switch so that it shows ‘Live.’

Now, every time someone views a product multiple times, it’ll trigger the recipe workflow.
We hope this article helped you learn how to send automated coupons in WordPress to bring back customers. You may also want to check out our guide on how to create a WooCommerce popup to increase sales and the best WooCommerce plugins for your store.
If you liked this article, then please subscribe to our YouTube Channel for WordPress video tutorials. You can also find us on Twitter and Facebook.
WORDPRESS
Your New Favorite Way to Develop WordPress Locally – WordPress.com News

Say goodbye to manual tool configuration, slow site setup, and clunky local development workflows, and say hello to Studio by WordPress.com, our new, free, open source local WordPress development environment.
We’ve built Studio to be the fastest and simplest way to build WordPress sites locally.
Designed to empower developers, designers, and site builders, Studio offers a seamless solution for creating and running WordPress sites directly on your local machine, as well as showcasing work-in-progress sites with your clients, teams, and colleagues.
Check out a few of our favorite features in the video below:
A new way to develop WordPress locally, available for free
Studio is now available to use for free on Mac*, and you can get up and running with a new local site in just a few minutes:
- Download Studio for Mac.
- Install and open Studio.
- Click Add site, and you’re done!
Once you have a local site running, you can access WP Admin, the Site Editor, global styles, and patterns, all with just one click—and without needing to remember and enter a username or password.
You can even open your local sites in your favorite development tools, such as VS Code, PhpStorm, Terminal, and Finder, making it even easier to add Studio to your existing development workflow.
Plus, Studio is open source; feel free to fork away on GitHub.
*A Windows version of Studio is coming soon, and you can request early access here.
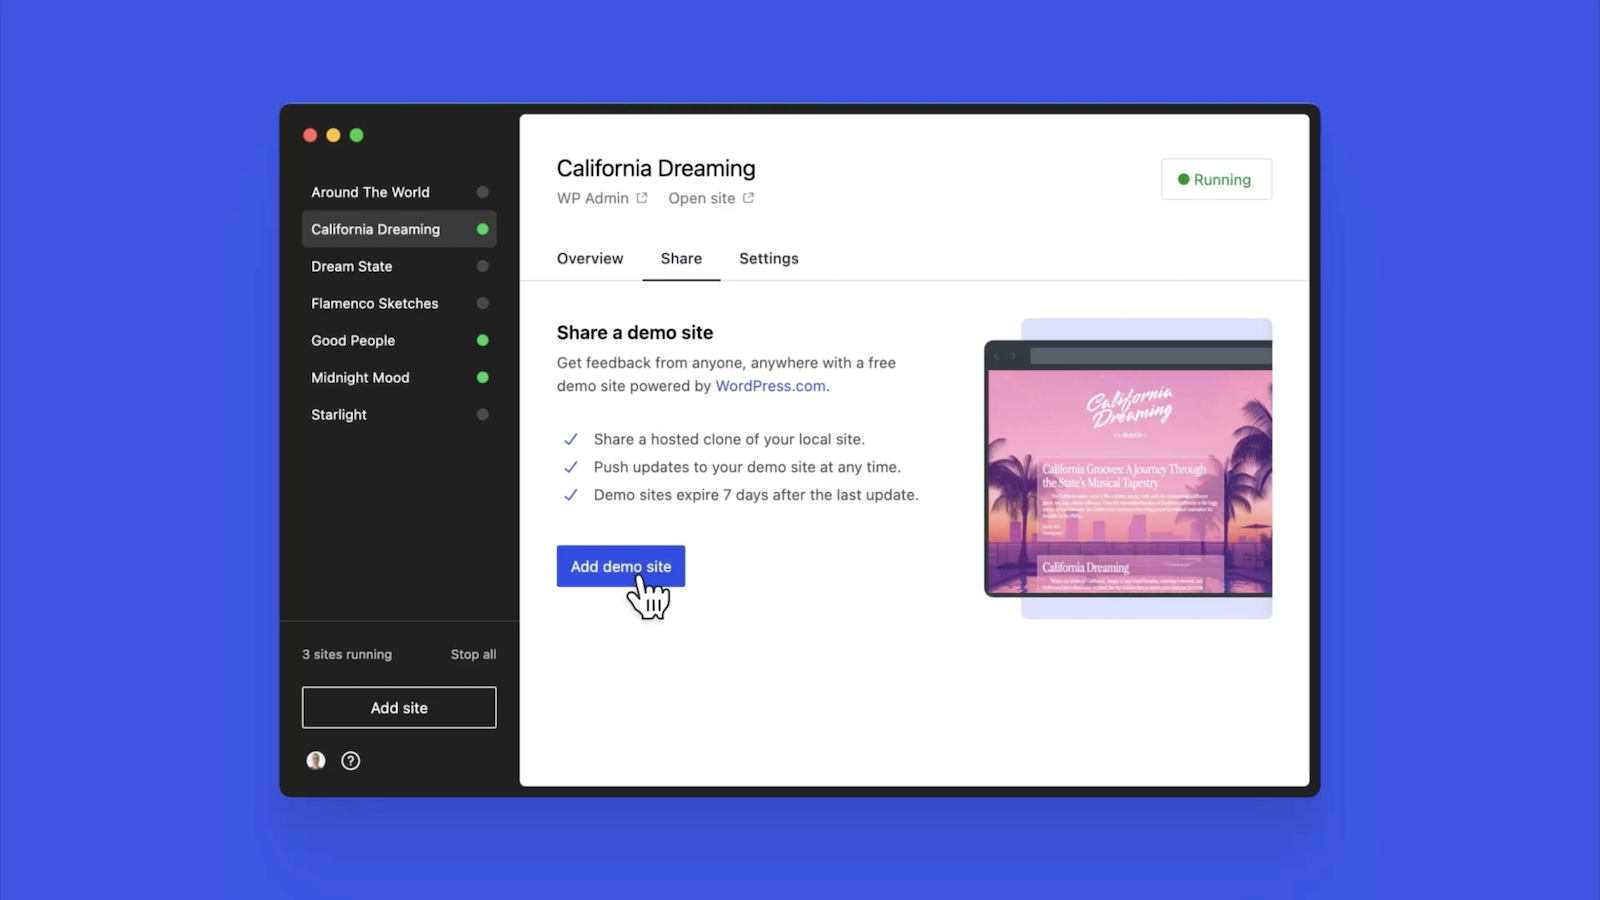
Effortlessly share your work and keep moving forward
In the realm of web development, showcasing local work has often been a challenge when projects live solely on your machine. With Studio’s demo sites, you have a convenient, built-in solution for sharing your progress with your team, clients, or designers.
These publicly-accessible demo sites, hosted on WordPress.com, are a convenient way to share your work without the need for complex server setups or lengthy deployments. In less than 15 seconds, you can have a shareable link to your local site that stays active for seven days.
The best part? Demo sites can be refreshed to reflect your latest build, allowing you to easily convey any updates or changes!
Breaking free from traditional constraints
Unlike traditional local environment tools like MAMP or Docker, Studio takes a fresh approach to local WordPress development. Studio is a lightweight and efficient solution that minimizes overhead and maximizes simplicity by forgoing the need for web servers, MySQL servers, or virtualization technologies.
Behind the scenes, Studio uses WordPress Playground, the WebAssembly-powered PHP binary. Thanks to this technology, there is no need to use a traditional web server, making your development experience much quicker and smoother.
Say goodbye to complex setups and compatibility issues. Studio makes it easier than ever to build and manage WordPress sites locally.

Let’s get building
At WordPress.com, we’re committed to making your website management experience seamless. In the last few years alone, we launched staging sites with synchronization features, SSH and WP-CLI access, global edge caching, GitHub Deployments, and more.
Studio is yet another powerful feature to add to your toolkit. Stay tuned for more exciting updates, and remember to follow our blog to stay in the loop.
And, of course, download Studio today. Your local development workflow will thank you.
Major kudos to the Studio team on this launch! Antonio Sejas, Antony Agrios, Kateryna Kodonenko, Philip Jackson, Carlos García Prim, David Calhoun, Derek Blank, Siobhan Bamber, Tanner Stokes, Matt West, Adam Zielinski, Brandon Payton, Berislav Grgicak, Alexa Peduzzi, Jeremy Massel, Gio Lodi, Olivier Halligon, Matthew Denton, Ian Stewart, Daniel Bachhuber, Kei Takagi, Claudiu Filip, Niranjan Uma Shankar, Noemí Sánchez, and our beta testers.
Join 110.2M other subscribers
WORDPRESS
Smooth Transition: A Comprehensive Guide to Migrating from WooCommerce to Shopify

Are you considering migrating from WooCommerce to Shopify but feeling overwhelmed by the process? Fear not! This comprehensive guide is designed to walk you through every step of the migration journey, ensuring a smooth transition for your online store. Whether you’re looking to capitalize on Shopify’s user-friendly interface or seek better scalability for your growing business, this guide has covered you. Let’s dive into the essential steps and strategies for seamlessly migrating from WooCommerce to Shopify.
Understanding the Migration Process
Assessing Your Current WooCommerce Setup
Before embarking on the migration journey, take a thorough inventory of your current WooCommerce setup. Identify your products, categories, customers, and any customizations you’ve made to your store. This assessment will provide a clear roadmap for transferring your data to Shopify without missing any crucial elements.
Choosing the Right Shopify Plan
Shopify offers a range of plans tailored to different business needs, from basic to advanced. Take the time to evaluate your requirements and select the plan that aligns best with your budget and growth goals. Whether you’re a small startup or an established enterprise, Shopify has a plan to suit your needs.

Preparing Your Data for Migration
Backing Up Your WooCommerce Data
Before initiating the migration process, creating a backup of your WooCommerce data is essential. This ensures that you have a safety net in case anything goes awry during the transition. Export your product listings, customer information, order history, and other relevant WooCommerce data.
Importing Your Data into Shopify
Once you’ve backed up your WooCommerce data, it’s time to import it into Shopify. Shopify provides tools and apps that streamline the data migration process, making it easy to transfer your products, customers, and orders seamlessly. Follow the step-by-step instructions provided by Shopify to upload your data accurately.
Additionally, if you’re migrating from WooCommerce to Shopify, it’s crucial to understand the specific steps involved in this process. Ensure that you follow the recommended procedures and utilize the available resources to facilitate a smooth transition.

Designing Your Shopify Store
Choosing a Theme
One of the perks of migrating to Shopify is access to a wide range of professionally designed themes. Browse Shopify’s theme library to find a design that reflects your brand identity and complements your products. Whether you prefer a minimalist aesthetic or a bold, eye-catching layout, Shopify has a theme to suit your style.
Customizing Your Theme
Once you’ve selected a theme, customize it to align with your brand’s look and feel. Shopify’s intuitive drag-and-drop editor makes it easy to tweak your theme’s layout, colors, fonts, and imagery without any coding knowledge required. Experiment with different customization options until you’re satisfied with the overall design of your Shopify store.

Configuring Your Settings and Features
Setting Up Payment Gateways
Shopify offers a variety of payment gateways to accommodate different customer preferences. Configure your preferred payment methods, including credit cards, PayPal, Apple Pay, and more, to provide a seamless checkout experience for your customers. Ensure that your payment gateways are integrated securely to protect sensitive customer information.
Managing Shipping Options
Streamline your shipping process by configuring your shipping settings in Shopify. Set up shipping zones, rates, and fulfillment preferences to ensure accurate shipping costs and delivery times for your customers. Shopify’s built-in shipping tools make it easy to manage your shipping logistics efficiently.

Launching Your Shopify Store
Testing Your Store
Before going live with your Shopify store, thoroughly test its functionality to identify and resolve any issues. Conduct test transactions, navigate the checkout process, and review your store’s performance on different devices and browsers. Address any bugs or discrepancies to ensure a smooth launch for your Shopify store.
Announcing Your Launch
Once you’re satisfied with the functionality and design of your Shopify store, it’s time to announce your launch to the world. Generate excitement among your audience by promoting your new store on social media, email newsletters, and other marketing channels. Offer exclusive deals or discounts to incentivize customers to explore your new Shopify storefront.

Post-Migration Optimization
Monitoring Performance Metrics
After migrating to Shopify, monitor your store’s performance metrics to gauge its success. Track key metrics such as traffic, conversion rates, and average order value to identify areas for improvement. Use Shopify’s built-in analytics tools or integrate third-party analytics platforms to gain valuable insights into your store’s performance.
Continuously Improving Your Store
Optimize your Shopify store based on the insights gleaned from your performance metrics. Experiment with different marketing strategies, product offerings, and user experience enhancements to maximize your store’s potential. Continuously seek customer feedback and iterate on your store’s design and functionality to stay ahead of the competition.
Conclusion
In conclusion, migrating from WooCommerce to Shopify can be a manageable task. By following the steps outlined in this comprehensive guide, you can navigate the migration process with confidence and ease. From assessing your current setup to launching your new Shopify store and beyond, this guide equips you with the knowledge and tools to make a smooth transition. Embrace Shopify’s opportunities for scalability, flexibility, and growth, and watch your online business thrive in its new home.

Related
WORDPRESS
WordPress Block Patterns Give You Superpowers – WordPress.com News

Few WordPress features offer more return on your learning investment than block patterns.
With the power of block patterns you’ll be a WordPress superstar in no time, whether you’re an establish pro or just starting out. Block patterns are professionally designed layouts that you can add your site in a single click. What makes them especially powerful is that once they’re inserted, you can edit and customize every aspect. (Or, you can leave them be!)
In today’s Build and Beyond video, Jamie Marsland walks you through everything you need to go to become a block pattern expert, in under four minutes.
Get started on your site today with a free trial:
Join 110.2M other subscribers
")
PPC6 days ago
19 Best SEO Tools in 2024 (For Every Use Case)

MARKETING7 days ago
Ecommerce evolution: Blurring the lines between B2B and B2C
SEARCHENGINES5 days ago
Daily Search Forum Recap: April 19, 2024
SEARCHENGINES6 days ago
Daily Search Forum Recap: April 18, 2024

WORDPRESS6 days ago
How to Make $5000 of Passive Income Every Month in WordPress

SEO7 days ago
2024 WordPress Vulnerability Report Shows Errors Sites Keep Making

WORDPRESS6 days ago
10 Amazing WordPress Design Resouces – WordPress.com News

SEO6 days ago
25 WordPress Alternatives Best For SEO
")
WORDPRESS5 days ago
7 Best WooCommerce Points and Rewards Plugins (Free & Paid)

MARKETING6 days ago
Tinuiti Marketing Analytics Recognized by Forrester
-
") PPC6 days ago
PPC6 days ago19 Best SEO Tools in 2024 (For Every Use Case)
-
 MARKETING7 days ago
Ecommerce evolution: Blurring the lines between B2B and B2C
-
SEARCHENGINES5 days ago
Daily Search Forum Recap: April 19, 2024
-
SEARCHENGINES6 days ago
Daily Search Forum Recap: April 18, 2024
-
 WORDPRESS6 days ago
How to Make $5000 of Passive Income Every Month in WordPress
-
 SEO7 days ago
2024 WordPress Vulnerability Report Shows Errors Sites Keep Making
-
 WORDPRESS6 days ago
10 Amazing WordPress Design Resouces – WordPress.com News
-
 SEO6 days ago
25 WordPress Alternatives Best For SEO
You must be logged in to post a comment Login