Connect with us

WORDPRESS

How We Built It: my.blog – WordPress.com News

Published

on

How We Built It: my.blog – WordPress.com News

A peek at how our special projects team built the all new my.blog website.

When Automattic launched the .blog domain extension back in 2016, our in-house team built a shiny new website to go with it. The vibe of my.blog very much matched the era, featuring a simple layout, a generic color palette, and a “just the basics” approach to the content and overall messaging. 

The previous iteration of my.blog did its job well, but was due for a redesign.

Eight years later, it was time for a refresh. 

Our special projects team recently revisited my.blog, giving it a totally new aesthetic and approach, as well as some cool new features. In this post, we’re going to give you a peek behind the curtain about how this new site came to be. The fresh design beautifully showcases what’s possible with WordPress. 

Take a look around my.blog and don’t forget to grab a .blog domain while you’re at it!  

Design inspo 

The first step for our team was to nail down a design motif. For any website project, starting here sets the tone for the entire site. What are the colors, styling, and typographical elements that speak to what you’re trying to get across?

Our design team presented two beautiful options, each with their pros and cons:  

The fluid layout of the lighter version, codenamed Lemon Softness, really stood out, whereas the tile or card layout of the darker version, codenamed Starfield, looked nice, but felt like more of the same on today’s web. 

On the other hand, the dark aesthetic of Starfield spoke a little more to our future-facing sensibilities. 

Ultimately, we combined them. The layout of Lemon Softness is what you’ll see on my.blog today (including a few very cool scrolling animations), while the Starfield inspiration shows up in Dark Mode toggle (the moon/sun icon on the top right). Also check out the “glass morphism” effect in the header at the top of the site, which blurs the imagery just a bit so that you can clearly read and navigate the menu.

Blogger inspo 

Of course, it’s not all about the design. Along with the bold new look, our team included a few features that will inspire bloggers of all stripes and encourage getting back into the habit. After all, blogging is actually thriving in our social media world. 

First, we wanted to ensure that “dotbloggers” (folks who use a .blog domain) were highlighted right on the front page. This carousel pulls posts from the “dotblogger” blog category

my.blog homepage featuring bloggers using a .blog domain.

Just a bit further down on the page, we decided to feature .blog sites; this carousel is actually populated dynamically from a .blog domain database. 
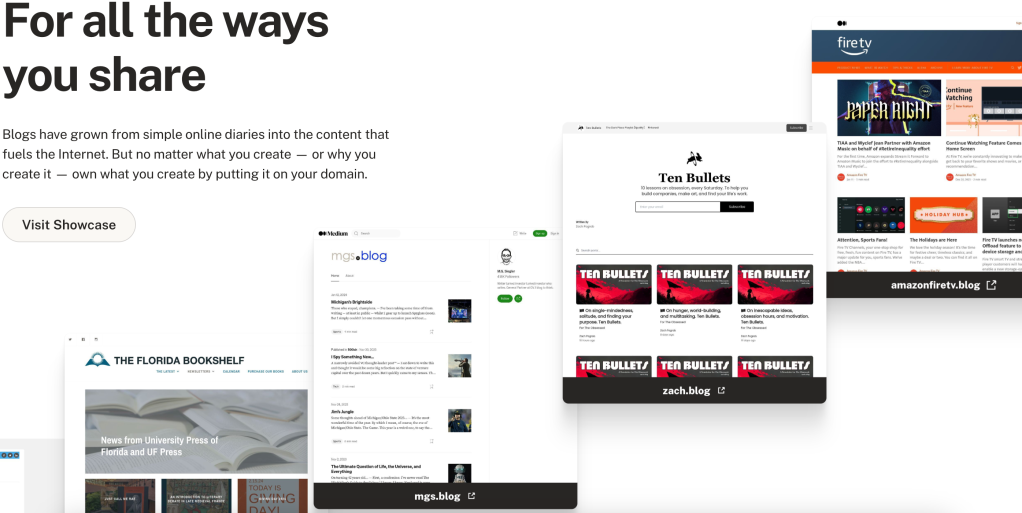
my.blog homepage carousel featuring websites with a .blog domain.

Finally, the team wanted to emphasize how powerful blogging can be. Just as “the death of the novel” has been overblown for at least 100 years, “the death of blogging” is a regular fixture of online discourse. The reality is that more people than ever before are blogging and seeing the value of having a corner of the internet that’s all theirs. To this end, we spent time crafting a manifesto that speaks to this: 

We hold this truth at the center of our mission and vision: content is valuable. When you publish online—whatever you publish—you are declaring your willingness to create and add something to our world.

Owning your domain means that you’re not at the whims of an ever-changing algorithm. It’s a claim of ownership and independence. A .blog domain is more than that—it’s a signal and a badge of authenticity that declares your particular corner of the internet as a space for stories, expressions, thoughts, and ideas. You’re an original.

A .blog domain is more than just the dynamic pillar of your online presence (though it is that too). It’s a stage for all of the utterly unique ways you share your story—in words, photographs, videos, podcasts, artwork, and more.

Resources for days 

Beyond the glitz and glamor, the .blog website also needs to provide practical resources for both registrars and dotbloggers. On the registrar side, our team made it especially convenient to access promotional content and visual marketing assets. When it comes to bloggers looking for a domain, the search page provides real-time results for what’s available and where you can purchase it. 

As a reminder, you can also buy a .blog domain directly from WordPress.com/domains—for just $2.20 for the first year, or for free if you purchase any annual paid plan.  

Take a look for yourself 

No need to take our word on the great job our special projects team did with the new my.blog website. Head over, click around, grab your own memorable domain name, and start (or restart) blogging today. 


Join 111.8M other subscribers

Source link

Keep an eye on what we are doing
Be the first to get latest updates and exclusive content straight to your email inbox.
We promise not to spam you. You can unsubscribe at any time.
Invalid email address

WORDPRESS

Hostinger Review: Website Creation Made Easy

Published

on

By

Hostinger Review: Website Creation Made Easy

Pros

  • Remarkably easy to use

  • Includes LiteSpeed caching plugin

  • Good server performance

  • Affordable plans jam-packed with features

Cons

  • Customer service is only available via live chat

  • Live chat service is primarily chatbot-run; speaking to a person can be difficult

Hostinger is a fast-growing website that recently landed on the official list of WordPress.org recommended hosts. I’d spent a little bit of time fiddling with Hostinger tools before, and I wanted to build a deeper understanding of how — and how well — they work.

To accomplish this, I purchased a Hostinger plan and tested the site creation tools for ease of use. I then hosted a test site for one week, using uptime monitoring and speed tests to determine server performance. Finally, I tested the customer service by reading the knowledge base and reaching out via live chat. You can learn more about the full process of how we test web hosting services.

Overall, I was impressed by Hostinger’s offerings. Despite providing low prices, both for the introductory term and for renewal pricing, Hostinger packs a lot of value. It delivers excellent site creation and management tools, exceptional server performance and impressive security features. The only drawback is the mediocre customer service. This makes Hostinger a great choice for simple sites, especially for-fun hobby sites and blogs but can make it a poor choice for business sites.

Hostinger plans and pricing

Hostinger offers several types of web hosting:

  • Shared hosting
  • Managed WordPress hosting
  • Managed WooCommerce hosting
  • Website builder hosting (regular)
  • Website builder hosting (e-commerce)
  • Cloud hosting
  • VPS hosting

Here’s a quick breakdown of the Hostinger plans for each of these hosting types:

Hosting type Best for Price
Shared hosting Hobby sites, blogs and small business websites using a CMS other than WordPress Starts at $3 to $8 a month, renews at $8 to $20 a month
Managed WordPress hosting Hobby sites, blogs and small business websites built with WordPress Starts at $3 to $8 a month, renews at $8 to $20 a month
Managed WooCommerce hosting E-commerce sites built with WordPress + WooCommerce Starts at $4 to $15 a month, renews at $9 to $33 a month
Website builder hosting (regular) Users who want to create a hobby site, blog or small business website without learning/maintaining new software Starts at $3 to 4 a month, renews at $8 to $9 a month
Website builder hosting (e-commerce) Users looking to build an e-commerce site without learning/maintaining new software Starts at $4 a month, renews at $14 a month
Cloud hosting Sites with very international audiences or teams Starts at $8 to $30 a month, renews at $20 to $55 a month
VPS hosting Sites that expect 400,000+ monthly visitors or require server customization Starts at $5 to $20 a month, renews at $8 to $45 a month

Next, let’s take a closer look at Hostinger’s plans.

Shared hosting

Shared hosting divides the bandwidth, processing power and storage of a web server — a specialized computer built for hosting websites — between many websites. Each website gets a predetermined percentage of these resources, limiting the number of pages your site can store and the monthly visitors it can accommodate. Shared hosting is typically good for small-to-medium websites with 1,000 to 2,000 pages and 10,000 to 400,000 monthly visitors.

Shared hosting is also great for first-time website owners with a low budget, as the server’s configured for you and the cost is quite low, often $3 to $5 a month to start and $10 to $20 per month on renewal.

Hostinger’s shared hosting plans are particularly generous, including:

  • Hosting for at least 100 websites
  • Free domain for the first year
  • Free site migration for all of your sites
  • Secure socket layer — SSL — for all of your sites
  • Email hosting
  • Weekly backups
  • WordPress auto-updates
  • WordPress vulnerabilities scanner
  • LiteSpeed-enhanced servers
  • Hostinger website builder with 150 site templates
  • Comprehensive security: firewall, distributed denial of service — DDoS — protection, malware scanning and domain privacy

There are also some key differences, primarily in storage and the number of monthly visitors each plan can accommodate:

Plan Storage Bandwidth Additional features Price
Premium 100GB (at least 1,000 pages) across up to 100 websites 25,000 monthly visits Starter WooCommerce support $3 a month for the first term, $8 a month on renewal
Business 200GB (at least 2,000 pages) across up to 100 websites 100,000 monthly visits WordPress AI tools and Basic WooCommerce support, website builder AI and e-commerce tools, free CDN, on-demand backups $4 a month for the first term, $14 a month on renewal
Cloud Startup 200GB (at least 2,000 pages) across up to 300 websites 200,000 monthly visits Dedicated IP address, priority support, Standard WooCommerce support $8 a month for the first term $25 a month on renewal

All prices are based on a four-year term. Your per-month price will increase if you choose a shorter contract length.

Managed WordPress hosting

WordPress is a popular content management system, or CMS, for creating, organizing and maintaining blog posts and web pages without needing code. According to W3Techs, 43.4% of all websites use WordPress, and developers have created almost 60,000 plugins that make it possible to accomplish almost anything you can imagine with WordPress. This has led many web hosts to create WordPress-specific plans that include things like auto-updates to the CMS.

Hostinger offers three managed WordPress plans with the same prices and many of the same features as the shared hosting plans. In fact, the biggest differences are things you’ll get less of: managed WordPress plans start with just 25GB of storage — enough for at least 250 pages — and a limit of 10 websites. The highest-tier managed WordPress plan offers 200GB — enough for at least 2,000 pages — and lets you host up to 200 websites. Due to these limitations, I recommend that most WordPress users choose the shared hosting plans instead.

Managed WooCommerce hosting

WooCommerce is a popular e-commerce plugin for WordPress that makes it easy to build an online store, with dozens of extensions for things like subscription services and paid communities. Hostinger offers three managed WooCommerce plugins with one-click WooCommerce setup and a variety of third-party integrations.

The lowest-tier managed WooCommerce hosting plan, Business, starts at $4 a month (renewing at $14 a month) with a four-year contract. The Business plan includes one-click WooCommerce setup, free store migration, limited third-party WooCommerce integrations, a free Amazon affiliate plugin and all of the WordPress features included in the Premium shared hosting plan. You’ll also get enough bandwidth for 100,000 monthly visitors and enough storage for at least 2,000 pages.

The highest-tier managed WooCommerce hosting plan, Cloud Professional, starts at $15 a month (renews at $40 a month) with a four-year contract. Cloud Professional includes everything from the Business plan, plus expert e-commerce tech support, AI tools, hosting for up to 300 websites and enough storage for at least 2,500 pages. Cloud Professional sites can accommodate 300,000 monthly visits.

Website builder hosting

A website builder is a visual tool for building a website without code. Website builders are typically proprietary, meaning they’re owned by individual hosting companies, so the company handles things like software updates and maintenance, leaving you to focus on the more creative side of things. Hostinger offers a particularly robust website builder tool, complete with an AI site builder that creates a site for you in seconds based on basic information about the purpose of your site and its brand.

Most Hostinger plans include access to the Hostinger website builder but you can access a more tailored hosting experience with the website builder plans. There are two of these plans, with starting costs ranging from $3 to $4 a month ($12 to $14 a month on renewal) with a four-year contract. The main difference between these plans is that the higher-tier option includes more AI content generation tools and some e-commerce functionality. There are no storage or bandwidth limits listed for these plans.

E-commerce website builder hosting

Hostinger also offers a specialized plan for users who want to build an e-commerce store with the Hostinger website builder. This plan starts at $4 a month ($14 a month on renewal) with a four-year contract for the website builder and all related AI content generation tools. You’ll also get e-commerce features like the ability to build an online store with product pages, payment processing with no transaction fees and basic inventory management tools for 500 digital or physical products. There are no storage or bandwidth limits listed for this plan.

VPS hosting

Virtual private server, or VPS, hosting divides one physical server into several isolated virtual servers. Each server has dedicated resources, like processing power and bandwidth, typically allowing VPS sites to host more web pages and accommodate more visitors than sites on shared hosting. A VPS also gives you more server customization options, like the ability to choose security software for your VPS.

Hostinger offers unmanaged VPS hosting, which means that you’ll be responsible for configuring and maintaining all digital aspects of your server. This includes installing software, making sure it’s up to date and monitoring/managing the security of your VPS.

The most affordable VPS plan from Hostinger starts at $5 a month ($8 a month on renewal) with a two-year contract. This plan includes enough storage for at least 500 web pages and enough bandwidth to accommodate up to 4 million visitors, making it ideal for static business websites and blogs that are just starting out. E-commerce sites, with their numerous product pages and large image files, may require more storage. Long-running blogs with thousands of blog posts will also need more storage.

The most expensive Hostinger VPS plan starts at $20 a month (renewing at $45 a month) with a two-year contract. This plan includes enough storage for at least 4,000 pages and enough bandwidth for 32 million monthly visitors.

Hostinger ease of use: Website creation has never been simpler

I started the hands-on portion of my Hostinger review by testing three key functions for ease of use: the purchase process, account management and website/server management.

Purchase process

The Hostinger purchase process is pretty simple. Selecting a plan takes you to a page where you can view the details of the purchase and change your contract length from the four-year default. Renewal pricing is listed under the contract selection process, a nice change from sites like HostGator — which lists renewal prices in tiny font — or A2 Hosting — which hides renewal prices entirely. Prices update automatically if you change the contract length.

Hostinger's web hosting check out page is easy and transparent Hostinger's web hosting check out page is easy and transparent

Screenshot/CNET

Next, you’ll be asked to create an account. You can either create a unique account with your email address and a new password or log in with your Google account, then move on to the billing area.

Hostinger accepts several payment methods including credit cards, PayPal and cryptocurrency. Most web hosts accept only credit cards, making this a notable feature.

Hostinger payment options checkout page Hostinger payment options checkout page

Screenshot/CNET

The other notable thing about Hostinger’s purchase process is the complete lack of upsells. Where most hosts encourage you to buy add-ons — and some, like HostGator, even pre-select add-ons for you — Hostinger doesn’t even display other services for sale. For context, A2 Hosting is the only other host I’ve worked with that didn’t have any upsells whatsoever.

Account management

Hostinger’s account management area is also easy to navigate. Your hosting package and domain are clearly listed in the center of the page, along with a box encouraging you to use Hostinger’s AI tools. The sidebar includes links to areas for essential tasks like website, domain and email management. You can even access billing management (a feature hidden in a drop-down menu by companies like HostGator) from this sidebar.

Hostinger account management area Hostinger account management area

Screenshot/CNET

Website and server management

Hostinger offers a few options for website creation, including AI-powered tools that build a website for you — using either WordPress or the Hostinger website builder — based on information like your site’s name and purpose.

I decided to build my site from scratch, clicking the Manage button next to my hosting package. This leads to a page with links to essential hosting features, like email setup, and an Auto-Install button for installing WordPress (or your preferred CMS) on your site.

Hostinger web hosting website and server management dashboard Hostinger web hosting website and server management dashboard

Screenshot/CNET

The installation process takes only a few clicks and a couple of minutes for your server to set up your CMS. WordPress users are then greeted by a Hostinger onboarding process that guides you through basic site-building tasks like adding a new page. There’s also a Learn tab with WordPress tutorials and a Tools tab where you can see things like the version of WordPress you’re running. This makes it much easier for first-time website owners and is outmatched only by the A2 Hosting site assistant, which features direct links to more actions like editing your homepage.

Hostinger web hosting WordPress installation Hostinger web hosting WordPress installation

Screenshot/CNET

WordPress installs from Hostinger feature a Tools plugin that monitors your site health and the LiteSpeed caching plugin for improved site loading times.

Server management is conducted through the hPanel, a proprietary system for managing your website(s), email, files and databases. The website management page I shared earlier is also part of the hPanel, so you can find everything in one place. 

The hPanel offers a clean, visually optimized interface that’s easy to navigate for even the most tech-averse beginners. hPanel tools are also comprehensive, letting you do everything from basic site monitoring to complex tasks like managing the DNS — domain name system — records that let you connect your site to Google Search Console.

Hostinger DNZ Zone Editor Hostinger DNZ Zone Editor

Screenshot/CNET

I found hPanel to be more user-friendly than the industry-standard cPanel or alternative proprietary tools like the Ionos server management system. There is a downside, however: most free website migration services can only move cPanel sites to a new host, so if you decide to switch hosts, you’ll need to transfer the site yourself. Figuring out how to do this may also be difficult, as most tutorials for manually transferring a site to a new host focus on using cPanel. You may also dislike hPanel if you’re used to cPanel and don’t want to learn a new system.

Overall

Creating a site with Hostinger is incredibly easy, from purchasing a plan to managing your server resources. In fact, it’s the most intuitive site creation process I’ve encountered with any web host, with no upsells during checkout, a simple yet comprehensive account dashboard and the equally uncomplicated Panel. This earns Hostinger a 10/10 ease of use ranking — the highest ease of use ranking I’ve given any hosting company so far. Only A2 Hosting has even come close, earning a 9/10 with its comprehensive guided WordPress install and site assistant.

Hostinger performance: Reliable and fast

There are two key metrics to consider when determining a web hosting company’s performance:

  • Uptime: The percentage of time your site spends online and accessible to visitors. Uptime matters because there are thousands of sites competing in every niche, so users who can’t load one site will often leave for another site, resulting in lost traffic and possibly even lost money.
  • Site speed: The number of seconds it takes your site to load. Browsers are used to instant connections and there’s a good chance they’ll leave your site if they can’t get one, making site speed one of the most important factors in a website’s success.

I spent one week testing my Hostinger site to see how well it performed on both of these metrics. I also examined Hostinger’s performance tools to understand how the company helps its users optimize site speed.

Performance tools

Hostinger primarily improves site speed through caching, a protocol that stores static information, like a website’s layout. With caching, information is housed in a data storage layer programmed to run at the speed of either your web server’s CPU — central processing unit — or a visitor’s CPU. Data stored this way can be accessed much faster than data stored using the typical RAM, or random access memory.

WordPress sites built with Hostinger come with the LiteSpeed caching plugin pre-installed. LiteSpeed offers multiple types of caching, image optimization and code minification, which is a protocol for reducing the size of JavaScript and HTML files to improve site speed. Users on higher-tier plans can access additional object caching tools for WordPress to further improve loading times.

There’s also a Cache Manager in the Advanced area of hPanel. You can use this tool to enable automatic caching with a refresh rate of every 30 minutes, regardless of the CMS you’re using.

Hostinger web hosting cache manager Hostinger web hosting cache manager

Screenshot/CNET

Higher-tier users can also access a content delivery network, or CDN, that stores data in several networked servers around the globe. This ensures faster site speeds for international users, as pulling data from a server close to you is faster than pulling data from a server on the other side of the world.

Uptime

Hostinger offers the industry-standard 99.9% uptime guarantee, promising that server issues won’t cause your site to go down for more than 10 minutes per week. I hooked my site up to BetterStack monitoring for one week to see how Hostinger lives up to this promise.

My test site experienced no downtime during this week, suggesting that Hostinger manages its servers well enough to generally exceed its 99.9% uptime guarantee, earning Hostinger a 10/10 uptime ranking. This is similar to my experience with other top web hosts like GoDaddy and A2 Hosting, which both had 100% uptime during my test week. It’s also better than HostGator — which just barely lived up to its 99.9% uptime guarantee — and InMotion Hosting — which had multiple hours of downtime during my test week.

Site speed

Many experts recommend that your site should load in under 3 seconds, as bounce rate, or the percentage of users who leave your site after viewing only one page, increases by 32% when loading time goes from 1 to 3 seconds.

I spent five days testing my Hostinger site speed using WebPageTest, taking a few measures to maximize my tests’ resemblance of the average user experience:

  • Testing at different times of day to see if Hostinger’s servers perform well both during and outside of standard business hours.
  • Testing from different locations to estimate how international users would experience Hostinger site’s loading speed.
  • Testing on both mobile and desktop to estimate how users on different devices experience sites on Hostinger servers.
  • Using the built-in performance tools without modifying the built-in settings or adding extra performance tools.

I came up with the following average site speeds based on these tests:

California UK Germany India Dubai Australia
Mobile 2.62 2.51 2.75 3.33 3.12 3.5
Desktop 1.41 1.43 1.42 2 1.86 2.35

I then further condensed these numbers into the following averages:

  • Average mobile site speed of 2.97 seconds
  • Average desktop site speed of 1.74 seconds
  • Overall site speed of 2.34 seconds

This makes Hostinger the second fastest host of all the companies I’ve tested so far, falling only slightly behind GoDaddy’s 2.29 second average and earning Hostinger a speed ranking of 8/10. I was pleased with this result, especially since I only used the LiteSpeed settings that were automatically enabled on installation. You may be able to improve site speed by turning on additional LiteSpeed features, such as object cache and image compression.

Overall performance

Hostinger earns a performance ranking of 9/10 thanks to its spectacular uptime and good site speed. This is on par with GoDaddy’s 9/10 (the highest performance ranking of any host I’ve tested so far) and slightly above the 8.4/10 earned by Ionos (the web host with the second-highest overall ranking of the companies I’ve tested so far).

Hostinger security

Hostinger offers users a few layers of security:

  • Secure socket layer — SSL — certification: An encryption protocol that protects data sent to and from your site, such as contact information submitted through a form. SSL certification also signals that your site is safe. Some browsers and VPNs won’t even open a site without SSL certification. Google also penalizes sites without SSL certification, making it difficult for these sites to rank well.
  • Firewall: Software that filters out malicious data attempting to infiltrate your site or its server, similar to how a Brita filter removes harmful particles from your water. Firewalls can’t protect against every threat, but they can keep most malicious software at bay.
  • Distributed denial of service — DDoS — protection: Software that prevents malicious traffic from overwhelming your site/server and shutting it down.
  • Malware scanner: Software that scans your site for any malware that gets through the firewall.
  • Automated backups: Copies of your site stored on a different server, letting you quickly restore your site if it goes down. The lowest-tier plan includes weekly backups and higher-tier plans include daily backups.
  • Secure Access Manager: Software that lets you add collaborators to your hosting plan and control what they can access within your hPanel.

These security measures are similar to the security suites offered by top hosts like Ionos and A2 Hosting. They’re also more than you’ll get with HostGator or DreamHost, which offer only malware scanning through advanced hosting plans or add-ons.

Hostinger customer service: Mediocrity in action

Your web host’s customer service should be available 24/7, with both a knowledge base (an area where you can find tutorials on how to set up and fix things yourself) and direct communication options through live chat, email and phone. I explored Hostinger’s self-serve resources, then reached out to customer service to test the speed and helpfulness of its support team.

Hostinger knowledge base and tutorials

Instead of the usual knowledge base page with links to information in specific categories, like domain and website setup, the question mark in the top right corner of the hPanel takes you to a help page with three options:

  • Search the knowledge base for specific assistance
  • Access Hostinger’s tutorials
  • Start a live chat

Hostinger web hosting knowledge base Hostinger web hosting knowledge base

Screenshot/CNET

I love how this minimalistic approach provides users with the tools they need to seek help without being overwhelming like the InMotion Hosting knowledge base. However, I personally would prefer to have two or three buttons leading to the most commonly requested topics, like domains and WordPress setup — especially since you can access an area just like this by clicking the Knowledge Base link at the bottom of the public-facing Hostinger site.

Hostinger web host knowledge base articles Hostinger web host knowledge base articles

Screenshot/CNET

Searching for a topic opens a new tab with links to relevant articles. I would prefer having the search results show up in the same tab, particularly since I’ve always got too many tabs open to begin with. But the search results themselves are clear and well-organized.

Hostinger web host knowledge base search Hostinger web host knowledge base search

Screenshot/CNET

The articles themselves are clearly laid out, with step-by-step instructions accompanied by images to show you how to complete basic tasks. My one disappointment is the lack of video tutorials in this area, which could complicate things for users who prefer to learn through video. Most of these articles also focus on granular tasks, like installing WordPress, rather than the whole process of building a website.

The Hostinger Tutorials area offers more complete walk-throughs for understanding things like how to build a WordPress site. You can either search these tutorials for something specific or scroll the Tutorials page if you want to establish a general understanding of website creation.

Hostinger web host knowledge base Hostinger web host knowledge base

Screenshot/CNET

This area also includes several video tutorials on topics like how to create a blog with WordPress and how to build an e-commerce store. Hostinger offering these in-depth tutorials in both text and video provides great accessibility for anyone interested in learning about these topics.

Overall, I had a couple of minor quibbles with the functionality of Hostinger’s self-serve help tools, but the comprehensive coverage of hosting-related topics and the availability of in-depth tutorials earn Hostinger a knowledge base ranking of 10/10.

Direct communication

Hostinger offers customer support only via live chat, a stark difference from the combination of live chat, email and phone support offered by other web hosts I’ve tested. While some of those hosts, like InMotion Hosting, limit phone service to higher-tier plans, Hostinger is the first company I’ve tested with no phone service at all. 

I tested Hostinger’s live chat by asking how to do a manual site backup and received step-by-step instructions within 5 minutes. However, the answers seemed like canned AI responses. 

AI responses aren’t inherently bad — especially since the answers I received were helpful and comprehensive — but I wanted to see if I could communicate with a real person. I typed “Speak to a real person” and was connected to an agent within 2 minutes.

Unfortunately, that’s where my positive experience ended. I spent over half an hour waiting for the customer service representative to respond to my questions. This is the longest I’ve waited for any live chat service other than InMotion Hosting. In fact, I was about to close the conversation when a new customer service agent stepped in, sending step-by-step instructions for fixing the issue I mentioned.

Overall, I have mixed feelings about Hostinger’s live chat. The AI is fast and trained to answer a wide range of questions. Speaking to a person took a while, but the customer service rep also provided helpful answers, including links to more comprehensive tutorials. This led me to give Hostinger a live chat ranking of 6/10.

Overall customer service

Ranking Hostinger’s customer service is complicated. The knowledge base and tutorials provide comprehensive, step-by-step guidance for dealing with many simple web tasks. The live chat bot is trained well, providing instant answers to most simple questions — often by sending links to the knowledge base or tutorials. However, even the best-trained bot can’t answer every question or fix every solution, and connecting with a human to answer my questions took longer than it should have.

Averaging out the knowledge base and live chat rankings gives Hostinger’s customer service a 7.5/10 customer service ranking, but there’s another catch: the lack of phone or email support. While this isn’t a huge issue for many users — a lot of us prefer live chat — it is enough to drop Hostinger’s customer service ranking to 6.5/10.

Unfortunately, poor customer service is common among web hosts. DreamHost earned a 3/10 due to its inaccessible live chat and phone service. HostGator earned 6/10 by failing to respond to email requests or follow through on scheduled calls. Even A2 Hosting, a company I otherwise loved working with, only netted a 7.5/10 customer support ranking due to its slow phone support. The only web hosts I’ve received consistently good support from were GoDaddy — ranked at 8/10 — and Ionos — ranked at 9.5/10 — thanks to their prompt live chat and phone support.

Reputation

My experience with Hostinger is only one experience, so I read numerous other Hostinger reviews to get a more well-rounded view of the Hostinger experience. I found over 32,000 Trustpilot reviews for Hostinger with an overall rating of 4.6 out of five stars. However, there are over 2,000 one-star reviews, many of them citing a lack of customer service. Some Trustpilot reviews also cite more serious issues, such as users being charged after they turned off auto-renew and websites being suspended with no warning or explanation. We’ve canceled our plan, so will update this section with our own experience about whether auto-renewal successfully shuts off.

Overall, it seems like the majority of Hostinger customers have a positive experience, but I’m far from the only one who’s experienced poor customer support. And some folks have experienced far worse issues.

Hostinger value: Ideal for low-budget projects

The next thing to consider is how Hostinger’s offerings compare with what you can get from other popular web hosts.

Here’s a quick look at what three of those hosts offer on their basic shared hosting plans:

Host Plan Features Price Additional notes
HostGator Hatchling 10GB storage, pre-installed WordPress and HostGator site assistant, unmetered bandwidth, free SSL certification, free domain for first year, firewall with DDoS protection Starts at $3.75 a month, renews at $10 a month (based on three-year term) Customer service is poor for advanced queries and issues, performance is mediocre, no phone support on lowest-tier plan
GoDaddy Web Hosting Economy 25GB storage, free domain for first year, free SSL for first year, site migration, automated daily backups Starts at $6 a month, renews at $10 a month (based on three-year term) Lacks key security protocols, lots of additional fees and upsells
A2 Hosting Ignite 10GB storage, free SSL certificate, unlimited email accounts, free site migration, WordPress auto-install, WordPress auto-updates, security tools suite Starts at $2 a month, renews at $13 a month (based on three-year term) Phone customer service can be slow

There are a few conclusions we can draw based on this information:

  • Hostinger offers average introductory prices. The $3 a month introductory rate for Hostinger’s lowest-tier plan is higher than the $2 a month for A2 Hosting, but lower than the $3.75 a month for HostGator or the $6 per month from GoDaddy.
  • Introductory contracts at Hostinger are longer than normal. Hostinger requires a four-year contract to get the best prices for its shared and WordPress hosting plan, a full year longer than the three years expected from the other companies discussed here.
  • Hostinger’s renewal prices are low. At $8 a month on renewal, Hostinger’s basic plan is more affordable than the $10 charged by HostGator and GoDaddy or the $13 a month charged by A2 Hosting.
  • Hostinger offers great storage. The 100GB — enough for at least 1,000 pages — of storage on the lowest-tier Hostinger plan is higher than the base storage offered by HostGator, GoDaddy or A2 Hosting. This is an especially important consideration for e-commerce sites, as product pages and pictures require extensive storage.
  • Hostinger offers great WordPress features. Hostinger goes beyond the auto-updates offered in A2 Hosting’s basic shared hosting plan, including a specialized WordPress vulnerabilities scanner and LiteSpeed-enhanced servers. This also puts it miles ahead of GoDaddy and HostGator, which don’t even offer auto-updates on the lowest-tier plan.
  • Hostinger offers great security tools. Hostinger offers both the standard protections (SSL certification, firewall protection and DDoS protection) and additional tools like malware scanning and weekly backups. Of the three hosts discussed here, only the A2 Hosting security suite comes close to matching Hostinger’s security standards.

Based on all of this, I give Hostinger a 9/10 for value. The only drawback is that you’ll have to sign up for a full four years to get the best discount, resulting in a higher initial fee. However, the long-term savings — including those netted from the lower renewal pricing — more than makes

Hostinger: Is it worth it?

Let’s take a look at how well Hostinger performed so that you can decide if this is the right web hosting company for your needs and budget:

  • Ease of use: 10/10
  • Performance: 9/10
  • Customer service: 6.5/10
  • Value: 9/10

Averaging out these scores gives Hostinger an overall ranking of 8.62/10. This puts Hostinger slightly above our next-highest-ranking web host, Ionos (with its 8.45/10 ranking) and the third-highest, A2 Hosting (8.25/10). Based on this ranking, I can confidently recommend Hostinger if you’re looking for shared or WordPress hosting and you’re comfortable using live chat for all of your customer service needs.

If you prefer receiving customer support via phone or you just want to ensure you’re getting the fastest, most reliable customer service on the market, I recommend buying hosting from Ionos instead.

Hostinger is generally considered to be a reputable hosting service. However, there are some extremely negative reviews on Trustpilot, so your experience may vary.


Show more

What are the cons of Hostinger?

The main con of Hostinger is the lack of email or phone support. Speaking to a human via live chat can also take an unusually long time.


Show more

Is Hostinger better than GoDaddy?

Hostinger is better than GoDaddy in key areas like the user interface and affordable pricing. However, GoDaddy provides better customer support.


Show more


Source link

Keep an eye on what we are doing
Be the first to get latest updates and exclusive content straight to your email inbox.
We promise not to spam you. You can unsubscribe at any time.
Invalid email address
Continue Reading

WORDPRESS

8 Best Banks for ECommerce Businesses in 2024

Published

on

By

8 Best Banks for ECommerce Businesses in 2024

For eCommerce businesses to thrive, they need financial providers that offer cost-effective business checking accounts that integrate with popular eCommerce platforms. Business services that provide seamless payment for customers and vendors are also vital. Our list includes fintech companies offering innovative account features and traditional banks providing full-service banking products to support the growth of your online business.

We review the 10 best banks for eCommerce businesses.

  • Best overall bank: Bluevine


    Provider is a fintech platform, not a bank. It provides FDIC insurance and deposit services through a partnership with Coastal Community Bank.
  • Best for integrated payment solution and digital invoicing: Chase


    Member FDIC
  • Best for fee-free wire transfers and discounted software: Mercury


    Provider is a fintech platform, not a bank. It provides FDIC insurance and deposit services through a partnership with Choice Financial Group and Evolve Bank & Trust.
  • Best for cash flow management tools: U.S. Bank


    Member FDIC
  • Best for speedy fund access and eCommerce app integrations: Novo


    Provider is a fintech platform, not a bank. It provides FDIC insurance and deposit services through a partnership with Middlesex Federal Savings.
  • Best for large teams needing more accounts and debit cards: Relay


    Provider is a fintech platform, not a bank. It provides FDIC insurance and deposit services through a partnership with Thread Bank.
  • Best for budgeting and multiple software integrations: North One


    Provider is a fintech platform, not a bank. It provides FDIC insurance and deposit services through a partnership with The Bancorp Bank, N.A., Member FDIC.
  • Best for multi-currency accounts and integrated payment gateway: Revolut


    Provider is a fintech platform, not a bank. It provides FDIC insurance and deposit services through a partnership with Community Federal Savings Bank (CFSB) and Sutton Bank.

Best banks for eCommerce businesses quick comparison

Below, we summed up the top features we considered for the 8 financial providers. Here is our list of the best banks for eCommerce businesses.

Bluevine: Best overall bank for eCommerce businesses

Our rating: 4.50 out of 5

Image: Bluevine

Bluevine is an excellent fintech offering high-interest business checking accounts with unlimited transactions and a line of credit financing with easy qualification requirements. New eCommerce business owners can open the basic tier, Bluevine Standard, and earn a 2.0% APY up to $250,000 for qualifying balances. Once your eCommerce enterprise takes off, you can easily switch to Bluevine’s higher tier products, Bluevine Plus or Bluevine Premier, to take advantage of higher yields (3.0% to 4.25%) and discounted wire transfer rates and same-day ACH fees.

Why we chose it

We ranked Bluevine as the overall best bank for eCommerce businesses since it integrates with one of the most popular eCommerce platforms, Square, which allows easy online payments. Bluevine is also compatible with other top accounting and payment software, QuickBooks, Wave, Wise, Venmo, and Cash App, among others. Company owners with an international clientele can also send payments to 32 countries in 15 currencies, and these payments can be available within 24 hours.

Note that cash deposits are accepted by Bluevine but have corresponding fees


Green Dot charges up to $4.95 per transaction while Allpoint+ ATMs collect $1 plus 0.5% of the deposit amount.

.

Monthly fees

  • Bluevine Standard: $0
  • Bluevine Plus: $30; waivable by having:
    • An ADB of $20,000 across your Bluevine checking account, including subaccounts.
    • A spend of $2,000 monthly using your Bluevine debit card or credit card.
  • Bluevine Premier: $95; waivable by meeting:
    • An ADB of $100,000 across your Bluevine checking account, including subaccounts.
    • A spend of $5,000 monthly using your Bluevine debit card or credit card.

Features

  • Square integration, including Wise, Venmo, and CashApp.
  • Compatible with Quickbooks, Xero, and Wave.
  • International payments to 32 countries in 15 currencies.
  • Free incoming wire transfers and standard ACH fees.
  • Lines of credit of up to $250,000 at low rates.
  • Business credit card with unlimited cashback and a $0 annual fee.
  • Five subaccounts with unique account numbers.
  • Priority customer support for Bluevine Premier clients.

Pros and cons

Pros Cons
Three business checking options with high interest rates (2.0% to 4.25%). Cash deposit fees at Allpoint+ ATMs and Green Dot locations.
No minimum balance requirement, opening deposit, or monthly fee for Bluevine Standard. Charges $2.50 for non-network ATM use on top of operator surcharges.
FDIC insurance of up to $3 million.

Chase: Best for integrated payment solution and digital invoicing

Our rating: 4.19 out of 5

Chase logo.
Image: Chase

A renowned traditional bank, Chase provides integrated payment solutions and partners with Authorize.net to make it easy to accept card payments on your eCommerce website or through your mobile device. Chase gives you the option to open three business checking accounts with waivable fees. Aside from this, the bank has a full lineup of business savings, certificates of deposit (CDs), business credit cards, lending products, and merchant services. You can access in-person customer service from over 4,700 branches in 48 states.

Why we chose it

We consider Chase one of our best banks for eCommerce businesses because it features robust payment solutions, including a free payment processor, QuickAccept, which lets you receive phone payments and send secure payment links. QuickAccept is free when you open the lowest tier account — Chase Business Complete Banking. You can also access it through the Chase mobile app. Additionally, QuickAccept funds can be deposited for free into your account on the same day. Free digital invoicing is also available from your bank account, helping you track the payments processed via QuickAccept.

Opening a Chase Business Complete Banking account does not require an initial opening deposit and a required minimum balance. You get 20 paper transactions, unlimited electronic transactions, and a monthly cash deposit allowance of $5,000.

Monthly fees

  • Chase Business Complete Banking: $15; waivable by having any of these:
    • $2,000 average daily balance.
    • $2,000 Chase Ink Business Cards spend.
    • $2,000 in deposits from Chase QuickAccept or other eligible Chase Payment Solutions transactions.
    • Chase Private Client Checking account.
    • Qualifying proof of military status.
  • Chase Performance Business Checking: $30; waivable by meeting a $35,000 or greater combined average daily balance (ADB) in qualifying business deposit accounts.
  • Chase Platinum Business Checking: $95; waivable by meeting a $100,000 combined ADB across qualifying business deposit and investment accounts. With a linked Private Client Checking account, the required ADB is $50,000.

Features

  • Built-in card acceptance through its mobile app.
  • Payment and invoicing services via Chase Payment Solutions.
  • $0 or $5 wire fees for outbound FX transactions facilitated online or via Chase’s app.
  • Ability to send international wires in 120-plus currencies to more than 160 countries.
  • Free associate and employee debit cards upon request.
  • Chase Bank QuickBooks integration.
  • Fraud protection services.
  • Online and branch customer support.

Pros and cons

Pros Cons
$5,000 free cash deposits monthly for entry-level accounts. No interest earnings.
Unlimited electronic transactions Only 20 fee-free paper transactions.
$300 cashback bonus for new accounts (conditions apply). $3 ATM fee when using nonnetwork (waived for higher-tier accounts).
No required opening deposit and minimum balance. High balances to waive the monthly fees for premium checking accounts.

Mercury: Best for fee-free wire transfers and discounted software

Our rating: 4.17 out of 5

Mercury logo.
Image: Mercury

Mercury is a fintech favored by tech startups for its fee-free business checking account with unlimited transactions, solid startup services, and high FDIC insurance of $5 million ( via partner banks’ sweep network). Its Shopify, Square, and Stripe integrations support eCommerce businesses and streamline operations. Mercury offers tiered workflow plans for faster payments through bill pay. You can benefit from advanced automated accounting when you subscribe to its paid plans, Mercury Plus, or Mercury Pro.

Why we chose it

Unlike other financial providers requiring you to subscribe to a higher plan to waive wire fees, Mercury sets itself apart by offering free domestic and international wire transfers. If you are an eCommerce entrepreneur, you can save a lot when paying your local and overseas vendors. You can also access software deals on business tools, like Google Cloud, QuickBooks Online, Gusto, and Slack, which makes running your online business more efficient. Mercury is also compatible with other business software, such as Xero, Zapier, Amazon, and PayPal.

Monthly fee

  • Mercury Business Checking: $0.

Features

  • Physical and virtual debit cards.
  • QuickBooks, Netsuite, and Xero accounting software integration.
  • Compatible with Shopify, Stripe, Square, Zapier, Amazon, and PayPal payment processors.
  • IO corporate card has auto cash back rewards.
  • Savings account available.
  • Customized account access and 14 subaccounts.
  • Advanced accounting automation is available under a subscription plan.
  • Mercury investor database.

Pros and cons

Pros Cons
No opening deposit, minimum balance requirement, or monthly fee. Cash deposit is not allowed.
Fee-free wire transfers. Sole proprietorship and trust accounts cannot be opened.
1.5% cashback on all domestic and international credit card spending. The checking account does not bear interest.

Novo: Best for speedy fund access and eCommerce app integrations

Our rating: 4.13% out of 5

Novo logo.
Image: Novo

Novo is a digital provider that widely supports eCommerce businesses by offering a fee-free checking account which integrates with top eCommerce platforms, such as Stripe, Square, Shopify, eBay, Amazon, WooCommerce, and Etsy. Online shop owners can easily send unlimited and free invoices, receive their Stripe funds quickly, and pay vendors on the same day. For overseas payments to suppliers, you can process international transfers at a low fee, courtesy of Novo’s partnership with Wise.

Why we chose it

Novo accommodates the needs of online store owners, Amazon sellers, and dropshippers, by making Stripe payments available within hours through Novo Boost. The seamless connection with Stripe provides transparency since you can easily check your available Stripe balance in the platform. If you need to increase product orders, you can also make vendor payments using Express ACH to ensure that funds are received on the same day. With Novo, you can open 20 reserve accounts to separate your business expenses, receive ATM fee refunds of up to $7 monthly, and connect with essential business solutions, QuickBooks, Xero, and Wise.

The Novo Business Checking account features unlimited monthly transactions and allows cash deposits exclusively through money orders.

Monthly fee

  • Novo Business Checking: $0.

Features

  • Stripe, Square, eBay, Amazon, Shopify, WooCommerce, and Etsy integrations.
  • Low-fee international payments through Wise partnership.
  • Built-in unlimited invoicing through the Novo app.
  • Compatible with QuickBooks, Xero, Zoho, Freshbooks, and Gusto.
  • Links with Zapier, Slack, Venmo, Cash App, and PayPal.
  • Physical and virtual debit cards.
  • No standard ACH fees and incoming wire fees.
  • Merchant cash advances (MCAs) financing up to $75,000 via Novo Funding.

Pros and cons

Pros Cons
Up to $7 monthly ATM fee refunds. No interest earnings.
No opening deposit or monthly fee. No direct cash deposits.
No minimum balance requirement. No debit card cash back rewards.

Features

  • Cashflow tools.
  • QuickBooks and ADP integrations.
  • Zelle, point-of-sale (POS) solutions, and cash management services.
  • Overdraft protection.
  • High-yield money market accounts.
  • Check fraud prevention services.
  • Fee-free withdrawals at the MoneyPass network.
  • Small Business Administration (SBA) loans, lines of credit, and term loans.

Pros and cons

Pros Cons
$900 welcome bonus. Minimal interest is offered for interest-bearing checking products.
No monthly fee for basic tier checking. Steep balances required to waive monthly fees for high-tier accounts.
Cashflow tools. Low free cash deposit limit for basic accounts.

Relay: Best for large teams needing more accounts and debit cards

Our rating: 3.94% out of 5

Relay logo.
Image: Relay

The fintech Relay offers a fee-free business checking product that integrates with eCommerce platforms Square, Stripe, and Shopify. It also connects with payment and money transfer apps like PayPal, Venmo, Melio, and Wise, including accounting software QuickBooks Online and Xero. Online companies with large teams can apply for more business checking accounts and debit cards to streamline expense management. You can also assign different permission levels for each employee to divide financial tasks.

Why we chose it

For eCommerce businesses with large teams, it is possible to open up to 20 checking accounts and issue up to 50 Visa debit cards, both virtual and physical cards to employees. This makes it easy to track and control business expenses. An advantage Relay offers over other financial providers is allowing its customers to deposit cash for free at over 55,000 Allpoint ATMs. No ATM withdrawal fees are also charged by Relay, although operator surcharges can apply.

The Relay business checking account has no monthly fee and provides unlimited transactions. To take advantage of fee-free wire transfers and same-day ACH transfers, you can upgrade to Relay Pro at $30 monthly. Additionally, you can auto-import bills and batch bill payments.

Monthly fees

  • Relay Business Checking: $0.
  • Relay Pro: $30; not waivable.

Features

  • QuickBooks, Xero, Gusto, and Plaid integrations.
  • Relay business savings accounts earn 1% to 3% interest.
  • Shared account access with team members.
  • Debit cards can be customized.
  • No overdraft fees.
  • $5 to $10 wire fees (Relay Business Checking) and $0 wire fees (Relay Pro).
  • Relay Pro offers fee-free outgoing wires, same-day ACH, and more perks.
  • FDIC insurance coverage of up to $3 million.

Pros and cons

Pros Cons
Fee-free incoming wire transfers. No APY for checking accounts.
20 subaccounts under a single ID (10 for sole proprietors). Lacks business financing options.
No required minimum balance, opening deposit, or monthly fee for Relay Standard.

North One: Best for budgeting and multiple software integrations

Our rating: 3.89% out of 5

North One logo.
Image: North One

North One is a fintech platform that offers convenience to eCommerce business owners by providing an account where you can view sales, payments, and spending in one setting. Although you need an opening deposit of $50, you won’t need to pay a monthly fee. It also integrates with popular eCommerce tools, such as Shopify, Square, and Stripe, which makes it easy to monitor your business income and expenses. Unlimited subaccounts are available to track transactions from other product lines. If you need additional working capital, North One provides financing through lines of credit and term loans.

Why we chose it

A North One standard account is ideal for eCommerce entrepreneurs since one of its main features is a budgeting tool, Envelopes, where you can categorize different business expenses for a more organized approach. Another key offering is its wide range of integrations spanning accounting, financial management, invoicing, payments and eCommerce, payroll, and productivity. These software and tools allow you to run your online business smoothly. If you often send same-day ACH, you can upgrade to North One Plus ($20 monthly) for fee-free transfers.

To deposit cash in your North One account, you can transact at Green Dot retail locations (up to $4.95 per deposit). Standard users get one cash deposit fee refund, whereas Plus users get three.

Monthly fee

  • North One Standard Account: $0.
  • North One Plus Account: $20.

Features

  • Compatible with Stripe, PayPal, Square, Shopify, Amazon, and eBay.
  • Physical and virtual cards for each owner.
  • Free bill pay and incoming domestic wires.
  • Integrates with QuickBooks, Wave, Patriot Accounting, Zoho, and more.
  • Paper checks can be sent via the North One account.
  • Discounts and free trials of business software and productivity tools.
  • Local customer support is available through phone, email, and live chat.
  • Monthly ATM withdrawal fee refunds (2 for Standard users and 6 for Plus users).

Pros and cons

Pros Cons
Unlimited transactions. No APY is provided.
Sales, payments, spending, and budgeting are viewed in one place. Lacks interest earnings.
Its budgeting tool helps categorize funds. No savings accounts.

Revolut: Best for multi-currency accounts and integrated payment gateway

Our rating: 3.86% out of 5

Revolut logo.
Image: Revolut

Revolut offers eCommerce businesses an all-in-one finance platform that supports global payments and multi-currency accounts. You can issue employee cards for better expense management, use analytics tools, and integrate with top eCommerce solutions such as WooCommerce, Prestashop, Adobe Commerce, OpenCart, Shopify, and BigCommerce. Revolut business accounts are available for companies and freelancers in a free or paid plan.

Why we chose it

If your eCommerce company operates internationally, then opening a Revolut account can be valuable. You can make low-cost international transfers using multi-currency local accounts. You can also hold and exchange 25 currencies and spend up to 150 local currencies, which makes cross-border payments more affordable.

Revolut tops other providers by offering its own payment gateway for eCommerce businesses. Through Revolut Pay, advanced payment solutions are available for fast and secure payments. Checkout processes are also simplified. Diverse payment methods are supported, making it convenient for your customers to use their preferred digital payment mode.

Monthly fees

  • Basic: $0.
  • Grow: $30.
  • Scale: $119.
  • Enterprise: Custom.

Features

  • Multiple local account options are in USD, EUR, CHF, and GBP.
  • Physical cards and virtual cards.
  • QuickBooks, Xero, and Sage integrations.
  • In-app chat support is available 24/7.
  • Shared account access.
  • Creation and sending of custom invoices.
  • Facilitates bulk payments for paid plans.
  • Various payment acceptance tools.

Pros and cons

Pros Cons
No monthly fees for the Basic Business Account. Free international transfer allowance is available for paid plans only.
Hold and exchange 25 currencies. 2% ATM withdrawal fees regardless of the amount.
Speedy local and international payments with free transaction allowances for some plans. Cash deposits are charged up to $4.95.

How to choose the best banks for eCommerce businesses

We looked at the following factors when evaluating and assigning a rating for the best banks for eCommerce businesses:

  • Integration with eCommerce platforms and other business tools.
  • International payment access and wire transfer costs.
  • Monthly fees and waiver conditions.
  • Transaction limits.
  • Interest rate offer.
  • Minimum opening deposit and required maintaining balances.
  • ATM fees and transaction limits.
  • Cash deposit options.
  • Account features.
  • Ease of account opening and app ratings.
  • Business products and services offered.
  • Customer support availability.

Methodology

To create the list of the best banks for eCommerce businesses, we reviewed the different providers’ eCommerce integrations, including their available business tools. We also checked a bank’s ability to send international payments and provide APY earnings. In addition, we evaluated the account’s fee structure, specifically its monthly fees, transaction limits, initial deposits, and maintaining balance requirements. Further, account features and other available business products and services were also considered.

Frequently asked questions

Do I need a business bank account for eCommerce?

It is recommended for small business owners to open a business account for eCommerce to separate their business revenue from their personal funds. In addition, opening a business bank account helps you build business credit, ease tax preparation, and establish business credibility.

What is an eCommerce merchant account?

An eCommerce merchant account is a specific bank account tailored for eCommerce businesses to accept online customer payments. Using a secured payment gateway, customers can pay for an online product or service from their bank account to an eCommerce merchant account.

This article was reviewed by our banking expert Tricia Jones.

Source link

Keep an eye on what we are doing
Be the first to get latest updates and exclusive content straight to your email inbox.
We promise not to spam you. You can unsubscribe at any time.
Invalid email address
Continue Reading

WORDPRESS

5 Most Profitable Online Businesses You Can Start Today for Free!

Published

on

By

5 Most Profitable Online Businesses You Can Start Today for Free!

In today’s digitalized world, starting a business doesn’t always mean you have to have a good chunk of money and years of experience in the field. Yeah, it’s good if you have them, but even without them, you can start a business and make money. Not just a few hundred dollars; some businesses can even make you a millionaire if you invest your time and available resources into them. 

You need to have the right approach and the proper set of skills to make that happen. And you can learn such skills for free on the internet. So, all you need is the willingness to put in the work and effort it needs. 

In this post, you’ll see 5 most profitable online business ideas that you can start today for free. You don’t need anyone to help you with these businesses when you’re starting out; you can do it all alone, and you can manage these businesses from the comfort of your home. 

Even if you don’t know a single thing about these businesses, you can learn them for free on YouTube, Udemy, and the Interent. There’s more than enough free resources out there about these topics to take you from 0-10 real quick. 

So, sit down and grab your popcorns, because this article might be the only thing you need to launch your first online business, today itself!

Please note: This post contains affiliate links to products I use, trust, and recommend. If you choose to purchase a helpful product using these links, I may receive a small commission for referring you – at no extra cost to you. These funds help me keep this blog up and running.

1. Affiliate Marketing

Affiliate marketing is one of the most profitable and easy-to-start businesses out there. In affiliate marketing, you need to promote someone else’s product in order to make money. The person who promotes the product in exchange for some commission is called an affiliate

When you sign up to be an affiliate of any program, you’ll get a unique link to promote the products called an affiliate link. You need to use your affiliate link to send customers to the seller’s page. That link tracks the amount of sales you generate to determine the money you make. 

You don’t need to create, package, or ship the products yourself. The seller who is selling the product will do these all. All you need to do is, refer customers to the seller. And when the customer referred by you through your affiliate link makes a purchase, you get a small percentage of the sale amount as a reward. That’s it. That’s what affiliate marketing is! 

Through affiliate marketing, you can promote both physical and digital products. 

You don’t always have to sell products to earn affiliate commission. Sometimes, you get commission to make people download something. That can be an app, software, or browser extension. Sometimes, you get commissions to make people sign up for particular websites or services. Sometimes, you get commission to generate leads for businesses and agencies, etc. All these things need to be done through your affiliate link in order for you to make a commission.

how affiliate marketing works

How to Get Started?

1. Choose your Niche

You need to choose a niche to start affiliate marketing. You can’t promote everything from workout gear to making money online courses yourself! So, choosing a niche is very important to succeed in affiliate marketing. Some popular niches for affiliate marketing are: health & fitness, finance, home & kitchen, technology, relationships, etc. 

2. Find the Product

After choosing a niche, you need to find a product to promote. If you decide to get into the health and fitness niche, then you can promote workout plans, weight loss supplements, keto meal plans, hair loss products, and so much more. So, decide what you want to promote and find a good product for it. 

3. Build a Platform

Now, you’ve decided your niche, and your product is ready to promote, so all you need is a platform to promote it. You can promote affiliate products either through a blog or through social media. You can write articles on your blog or grow your social media accounts to share your affiliate links. 

Here are some popular affiliate marketing platforms you can join. 

The affiliate marketing industry is worth nearly $17 billion. So, you can start your affiliate marketing journey today to get a small chunk of that seventeen billion dollars for yourself!

2. Selling Digital Products

Selling digital products is another great way to make a hefty amount of money online. Digital products are a great way to share your knowledge and creativity with the world while making some money. 

Digital products are products that are created and sold online. They don’t exist in the real world, except for printables. Printables are graphics that are created digitally but needs to be printed out in the real world to be used. 

From ebooks to online courses and printables to music, there’s a wide variety of products that you can create and sell. 

Here are some digital products that you can create and sell easily. 

If you’re wondering which digital product sells the best and which one you should sell, consider this analysis done among 96,000 creators by influencers.club. According to the analysis, online courses were the most sold digital products, with 35.7% of the entire digital products sold, followed by ebooks (7.3%) and cookbooks (3.8%)

Here are a few more: 

Check out 16 Best Digital Products to Sell in 2024

How to Get Started?

1. Choose Your Niche

The first step to building a profitable digital product business is to choose a niche that you’re interested in and have a demand in the market. You can select a niche based on your expertise, passion or to profit from an untapped market opportunity. Make sure that there are enough people willing to pay for your products so that you can make a good amount of money selling them.

2. Create Your Product

After choosing a niche to get into, you need to create a solid product to sell. In order to get constant sales, your product needs to be highly valuable. Either it needs to solve your customer’s problem or it needs to add significant value to their life. Make sure that your product is up-to-date, functional, and user-friendly. 

3. Set up a Platform to Sell

Now that you have decided your niche and your product is ready to sell, all you need is a platform to host and sell your products. You can either sell digital products through your own website or through platforms like Etsy, Gumroad, Teachable, etc.

You can sell ebooks, printables, planners, digital arts, wallpapers, templates, etc. through Etsy and Gumroad. And to sell online courses, you can use platforms like Teachable or Udemy. 

You can use graphic design tools like Canva and Adobe Illustrator to create printables, stickers, templates, wallpapers, etc. And you can write your ebook on Google Docs or Notepad and save it as a pdf to sell it. 

4. Price Your Products

After your product is ready and you’ve decided a platform to sell, you need to set a price to sell your products.

Pricing is a really crucial part. You can’t price it too high or too low. If you price it too high, very few people are likely to buy it, and if you price it too low, you won’t make enough profit.

So, while pricing your product, evaluate the product yourself and do your market research to analyze your competitors pricing to determine your own product’s pricing. 

You can promote your digital products by creating video/image content, writing blog posts, email marketing, paid ads, SEO, and through social media marketing. 

Digital products can be a great way to make money online passively without needing much work and attention. So, this might be something you would love to get into! The best part is, there is no limit on how much money you can make. Ana from TheSheApproach has made over $55,000 selling ebooks alone through her small blog.

3. Print on Demand

Print on Demand, or POD, is gaining immense popularity in recent times due to its business model. Print on demand business has less to no startup cost, which makes it easier for anyone to get into it.

In Print on Demand business, you create designs to print on mugs, t-shirts, hoodies, caps, pants, etc. After your design is ready, you find a print-on-demand supplier to print and sell your products. 

Unlike other type of businesses, in POD, the products are not produced first and listed for sale later. Instead, the products are promoted first and only produced or printed when a customer places an order. 

In POD, your job is to create designs and market your products. Your POD supplier will do everything else, from printing, packaging, and delivering the product. They will even handle the returns if they have to. 

How to Get Started?

1. Choose a Niche

First of all, choose a niche you want to start your business in. Choose a niche that has huge demand in the market and something you’re interested in. For example, if you’re interested in sports, you can create designs related to sports, print them, and sell them. 

2. Create Your Designs

After you’ve chosen your niche, you need to create designs to print on products. Good designs attract more eyeballs and generate more sales compared to plain, low-quality designs. So, put your maximum effort into creating good designs. Your designs might be the only differentiator between success and failure of your POD business. 

3. Choose a Print on Demand Supplier

After your design is ready, you need to find a good and trustworthy POD supplier to print and supply your products. Choose a supplier that uses high-quality materials to create products, has less fees, low shipping time, good customer support, and large area coverage. These things are crucial for your business’s success. 

Here are some popular print-on-demand suppliers: 

4. Set up Your Store

Now that your product is ready to sell, you need to find a platform to sell it. You can sell your POD products on Etsy, WooCommerce, or eBay, or setup a Shopify store to sell them. Your store must be clean and colorful to convert more visitors into customers. 

5. Price Your Products

After your store is setup, you need to price your product. Make sure to check your competitors prices before pricing your own products. You can’t sell your products for significantly more than what your competitor is selling for. If you do so, you won’t get as many sales as you would have with a lower price point. 

You can market your Print on Demand products mainly through social media and paid ads. You can start and grow a social media account to promote your POD products for free. 

The print-on-demand market is worth more than $7.24B in 2024 and is projected to reach $43.4B by 2030 with a growth rate of staggering 26.8%. So, this might be the chance to dip your toes into the world of ecommerce with print on demand.

4. Dropshipping

Dropshipping is one of the hottest and most popular online business right now. It has made thousands of teenagers and 20-year-olds millionaires, and its craze is not going down anytime soon. 

Dropshipping is a business model where you find a product, advertise it, and generate sales, but someone else produces, packages, and ships them for you.

You buy products for less price from retailers or even manufacturers and sell them for a higher price through your own store. For example, if I find a cool watch on Alibaba.com that I can buy for $7 a piece, then I will create my own store to advertise that product and sell it for $20, $30, or even more. That is how you make money with dropshipping. 

In dropshipping, you don’t have to worry about producing product, packaging, shipping, or keeping a product inventory because whenever an order comes in, you forward that order and customer’s details to your supplier, and then your supplier will produce, package, and deliver the product to your customer. There are several tools and softwares to automate this entire process. Here you’re basically a middleman reselling the products. 

How to Get Started?

1. Find a Product

To start a dropshipping business, first you need to find a product that solves a specific problem of your customers. Sometimes the product can be a fashionable or decorative item like a watch. The product has to have a high potential to sell. In the world of dropshipping, a product that solves a problem and has a high potential to sell is called a winning product.

2. Find a Supplier

After finding a good product to sell, you need to find a supplier who can supply you the same product for a cheaper price. A supplier can be the making or breaking point of your business because your job is to promote the product and bring customers. Everything except that is done by your supplier, so if you find a good supplier, you won’t have or have very few problems in your business, and vice versa.

So, before choosing your supplier, check their product quality, delivery time, packaging style, and customer service. A good supplier must have high-quality products, low delivery time, good packaging quality, and good customer support. 

AliExpress is the go-to platform to find suppliers and products at a cheaper price, for dropshipping.

3. Build Your Store

After you’ve found a good product and a reliable supplier, you need to build a store to market your products. You can create your store on platforms like WooCommerce, Shopify, GetResponse, and Wix or sell them directly on Amazon or eBay. The design of your store must be clean, simple, and colorful to get more sales. 

4. Market Your Store

After your store is setup and ready to sell, you need to advertise it, to bring customers to it. To advertise your store, you can use social media, paid ads, content marketing, SEO, and more.

Most dropshippers advertise their store through either Facebook or TikTok ads and through content marketing by creating viral pieces of content for TikTok, Instagram reels, and YouTube shorts. 

That’s it! That’s how you can start your own dropshipping business and profit from the $250B dropshipping industry.

5. Dropservicing

Now you know what dropshipping is, but have you ever heard about dropservicing? Huh? Dropshipping deals with selling physical products, but dropservicing is all about selling services. 

Dropservicing, also known as service arbitrage, is a business model where you sell services to clients. But instead of doing the work yourself, you outsource the work to a third-party service provider, either a freelancer or an agency. In dropservicing, you’re basically a middleman, just like in dropshipping, who acts as a service seller in front of clients to make money without doing any work yourself. 

Whatever remains after paying your service provider from the amount your client paid is your profit. For example, if you find a client who is ready to pay you $1000 to edit a video for him. Then you find a freelancer or a video editing agency who can edit the same video for $400, then you can keep the remaining $600 with yourself. The more you charge your client and the less you pay your service provider, the more money you make. Didn’t understand? Read it again, you’ll get it! 

How to Get Started?

1. Choose a Niche

To start a dropservicing business, you must be good at some kind of skill or a particular niche. That can be web designing, video editing, graphic designing, content writing, etc. Even though you’re not the one doing the work, you need to have proper knowledge and skill in the field to convince your client that you’re capable enough and a perfect fit for the work. 

2. Find Your Service Provider

After you’ve decided your niche, you need a service provider to do the required tasks for you. While choosing a service provider, you need to make sure that they are good at what they do; otherwise, you’ll end up with a low-quality output that may not satisfy your clients and may not fulfill their requirements. You can find service providers on platforms like Fiverr, Upwork, Freelancer, etc., or on social media platforms like Facebook and LinkedIn. 

3. Setup a Platform

After you’ve decided your niche and found the service providers, you need to market your services in order to get clients. To do so, either you can create your own website, create a profile on freelancing platforms, or promote your services through social media. 

While setting up a platform, you need to add your portfolio, past works, pricing, client testimonials, and contact information. Don’t worry if you don’t have any of these! You can add your service provider’s portfolio and client testimonials as yours while setting up your platform. 

4. Set Your Prices

Before you launch your dropservicing business, you need to set a price for your services. While setting up pricing your services, find out how much your service provider is charging for the service you’re going to sell, and set your prices accordingly. For example, if your service provider charges $400 to edit a video, you can set your video editing price at $600, $700, or more. 

You can promote your dropservicing business through content marketing, SEO, social media marketing, cold outreach, paid advertising, and freelance platforms. 

Cold outreach is a process where you reach out to or contact someone via email who doesn’t have any connection with your business. The email is meant to aware them about your product or service and provide them with an offer.

Best Platforms to Start Your Business

If you’re thinking of starting a blog to get into affiliate marketing, then I would highly suggest you create your blog on either Wix or WordPress. These two are the best blog builders out there. 

And if you’d like to create your own website to promote your digital products, dropshipping/dropservicing business, and print-on-demand products, then I would suggest you use GetResponse’s simple drag-and-drop website builder. It’s very easy to use and completely free to create and manage a website for lifetime. Getresponse also has its own email marketing tool, so, if you want, you can even start email marketing with it for completely free!

Get your business online with free website builder (en)

Tips to succeed:

1. Stay Consistent: You won’t see results overnight, so you need to be consistent to get results and make money. 

2. Learn, Learn, Learn: Whatever business you get into, learn about it as much as you can. Learning will help you gather more knowledge about the topic, which ultimately helps you to get better results and earn more. 

3. Be Patient: Many people give up too early because they are really, really impatient. Remember, great things take time, and if it were so easy and fast, then everyone would have done it. 

4. Provide Value: If you want to make money, then you need to provide something that is equally valuable to your customers. So, make sure your main motive is to provide value along with making money. 

So, these were the 5 most profitable online business ideas that you can start today for free. Let me quickly recap them for you. 1. Affiliate marketing 2. Selling digital products 3. Print on Demand (POD) 4. Dropshipping 5. Dropservicing. Make sure to give them a try if you’re thinking of starting an online business. And tell me in the comments, which one of these businesses would you start if you have to?

Source link

Keep an eye on what we are doing
Be the first to get latest updates and exclusive content straight to your email inbox.
We promise not to spam you. You can unsubscribe at any time.
Invalid email address
Continue Reading

Trending