Connect with us

WORDPRESS

How to Add Free Trial Subscriptions in WordPress (4 Methods)

Published

on

How to add free trial subscriptions in WordPress

Do you want to add free trial subscriptions in WordPress?

Subscriptions are a great way to get consistent, recurring revenue for your business. However, it can be difficult to convince people to sign up for long-term subscriptions.

In this guide, we’ll show you how to get more signups by adding free trial subscriptions to your WordPress website.

Why Add Free Trial Subscriptions in WordPress?

By adding subscriptions to your website, you’ll have a more consistent cash flow, fewer payment errors, and fewer payment delays. However, customers often want to try before they buy, especially if you’re selling longer-term or more expensive subscriptions.

With that being said, it’s a good idea to offer free trials for all your subscriptions. For example, you might give customers a free month’s trial of your subscription box service or create a free one-week pass for your online yoga classes.

An example of a subscription box with a free trial

If customers enjoy the free trial, then they might pay for a premium subscription. Even if shoppers don’t sign up straight away, you can still use their contact information to do lead generation. For example, you might send them exclusive coupon codes or target them with web push notifications.

With that being said, let’s see how you can add free trial subscriptions in WordPress. Simply use the quick link below to jump straight to the method you want to use.

Method 1: Easy Digital Downloads (Free Trial For Software and Digital Products)

Do you want to offer a free trial subscription for digital products? Maybe you’re planning to sell subscriptions for online courses, a stock photography website, a digital music store, or something else.

The easiest way to offer free trial subscriptions for digital products is by using Easy Digital Downloads. This plugin lets you easily sell ebooks, PDF files, audio files, videos, and any other type of digital product.

Even better, if you’re a SiteGround customer then the Easy Digital Downloads plugin comes pre-installed, so you can start selling subscriptions and digital products straight away.

In this guide, we’ll show you how to create a free trial for an all-access pass. This pass will look just like any other digital product on your online store.
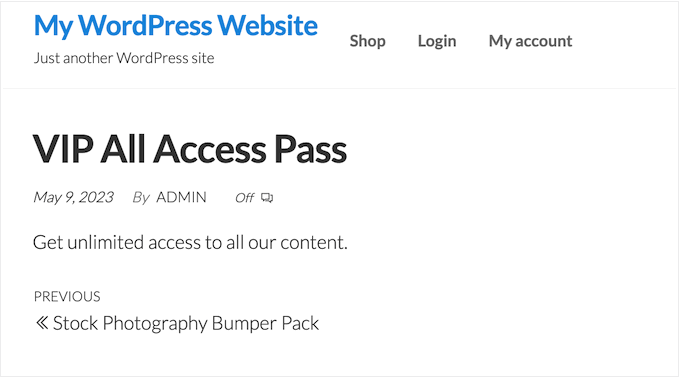
An example of an all access pass created using Easy Digital Downloads

After signing up for the free trial, customers will be able to view, access, and download different products on your online store.

Customers can simply click on a link inside their account, to see all the products that are included in their free pass.

An example of an unlimited pass created using Easy Digital Downloads

To stop customers from abusing their trial, you can set daily download limits, limit the free pass to specific product categories, and more.

With all that in mind, we’ll be using three extensions to create a user-friendly ‘all access’ free trial. You’ll need to buy the Extended or higher license for Easy Digital Downloads in order to download these three extensions.

For step-by-step instructions on how to set up Easy Digital Downloads, please see our guide on how to sell digital downloads on WordPress.

Install Easy Digital Downloads Extensions

After setting up Easy Digital Downloads, it’s time to install the extensions by going to Downloads » Extensions.
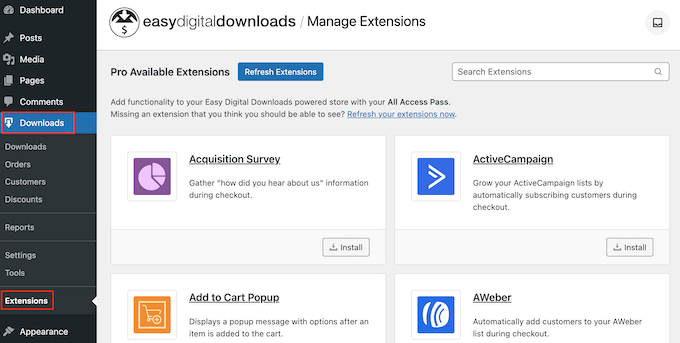
Installing Easy Digital Downloads extensions

On this screen, find the All Access, Free Downloads, and Recurring Payments extensions.

For each extension, click on the ‘Install’ button.
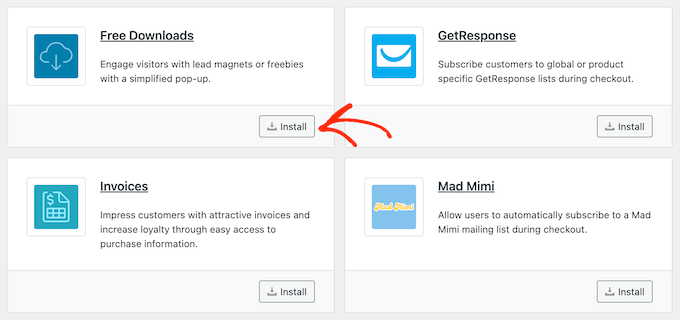
Installing Easy Digital Downloads addons

Create a Free Trial Subscription in WordPress

With that done, you’re ready to create a free all access trial. To get started, head over to Downloads » Downloads in the WordPress dashboard.

On this screen, click ‘Add New.’
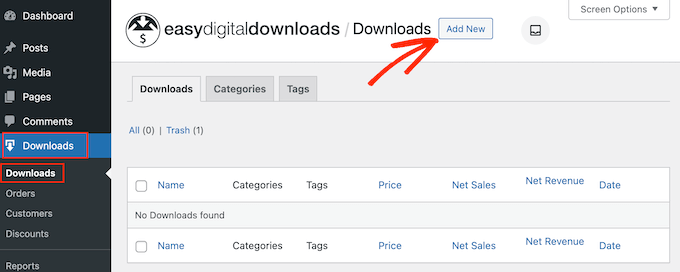
Adding a new digital download using WordPress

You can now type in a name for the subscription.

This will be visible to customers, so it’s a good idea to use something descriptive.
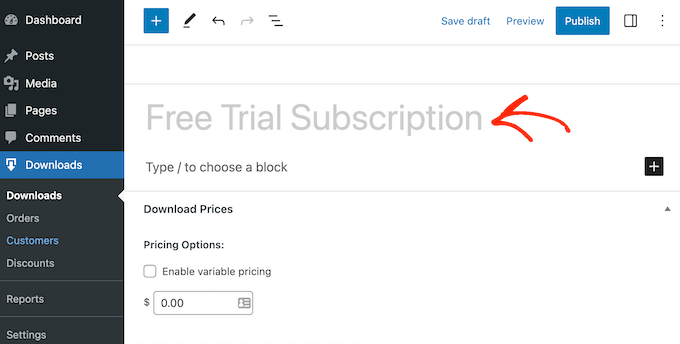
Creating a free trial subscription using Easy Digital Downloads

After that, scroll to the ‘Download Options’ section. Under ‘Pricing Options,’ type in 0.

Next, check the box next to the following option: ‘Enable free trial for subscriptions.’
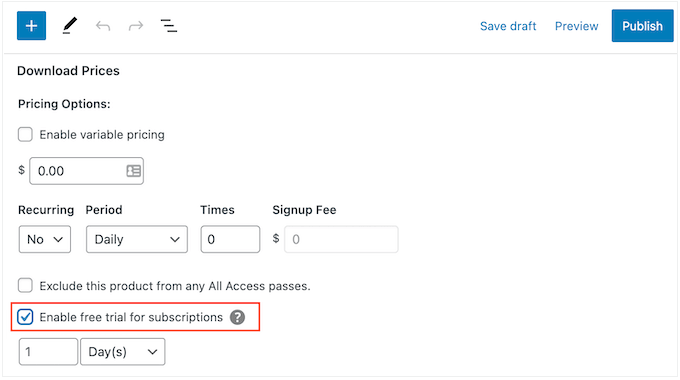
Enabling a free trial in Easy Digital Downloads

Now, it’s time to turn this subscription into a free all-access pass that customers can use across your entire online store.

To do this, simply scroll to the ‘All Access’ section and check the following option: Convert this product into an “All Access” pass.
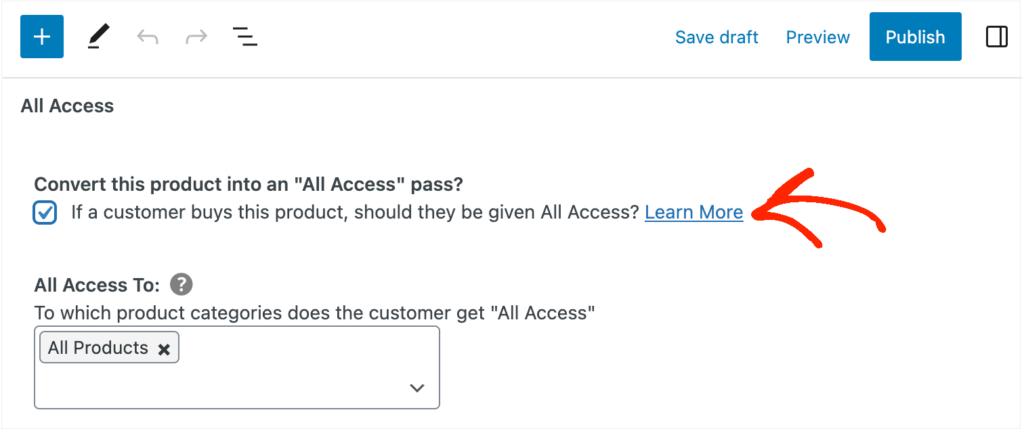
Creating an all access pass for an online store

Limit the Trial to Specific Product Categories (Optional)

By default, the free trial gives customers access to all your products. However, you can restrict the free trial to specific product categories. For example, if you create and sell ebooks then you might include some books in the free trial, and keep others for paid subscribers.

To restrict the free trial to specific categories, simply click on the ‘x’ next to ‘All Products.’
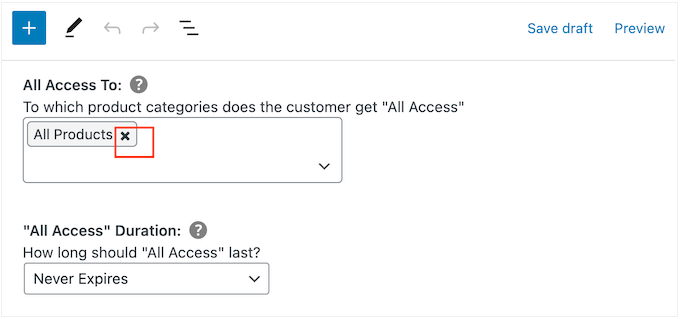
Limiting a free trial to specific product categories

After that, you can click on the ‘Type to search categories’ dropdown and start typing in the category you want to include in the free trial.

When the right category appears, click to select it.
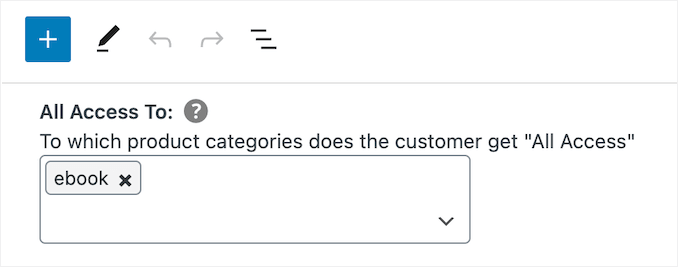
Creating a free trial subscription for specific product categories

Set a Time Limit

With that done, you can choose whether to make the free trial permanent or to set a time limit.

If you’ve restricted the free trial to specific product categories, then it may make sense to choose ‘Never Expires.’ For example, if you sell digital art and graphics then you might allow customers to download as many watermarked images as they want, forever. However, they’ll need to buy a subscription in order to remove the watermark.

Just be aware that Easy Digital Downloads also allows you to set a download limit. This means you can use ‘Never Expires’ while also limiting how many items the customer can download.

To create a never-ending free trial, open the ‘All Access Duration’ dropdown menu and choose ‘Never Expires.’

How to create a permanent free trial

Another option is to set a time limit. This works particularly well for digital products that take a while to get through or for products the customer will want to access over and over again.

For example, if you create and sell online courses then you could offer a two-day free trial, so customers will need to buy a subscription to finish their training.

To set a time limit, open the ‘All Access Duration’ dropdown and choose from years, months, weeks, or days. You can then type a number into the field that appears.

Changing the duration of an all access pass in WordPress

Add a Daily, Weekly, Monthly, or Yearly Download Limit

You can also type in a Download Limit. This can protect your site from customers who might try to abuse the free trial. For example, if you sell Excel or Google Spreadsheets in WordPress, then you might set a download limit so customers can’t download your entire product catalog while on a free trial.

By default, Easy Digital Downloads has a download limit of 0, which means the customer can download as many products as they want. To change this, type a number into the ‘Download Limit’ field.

You can then make this limit per day, week, month, or per year using the dropdown that appears.
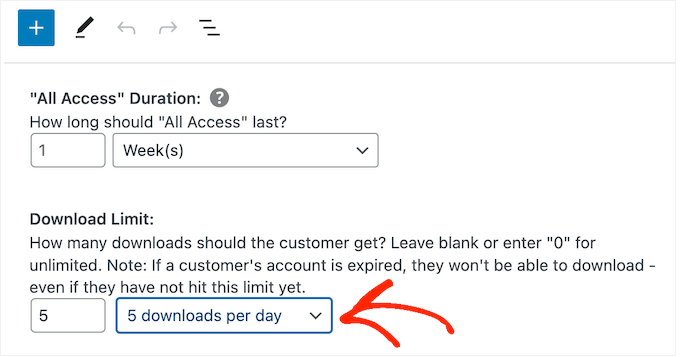
Adding a download limit for your free trial

Adding Variable Pricing to Your Free Trial (Optional)

Are you using variable pricing on your online marketplace? Then you may want to include specific price variations in the free trial.

For example, if you’ve created Standard and Deluxe price variations, then you may want to include Standard in the free trial, while keeping the Deluxe version for paying users only.

Creating variable pricing using Easy Digital Downloads

If you’ve enabled variable pricing, then Easy Digital Downloads includes all variations in its free trial by default.

To change this, find ‘Total Price Variations’ and type in how many variations you want to include in the free trial. Depending on the number you use, you’ll see a list of the different variations on your online store.
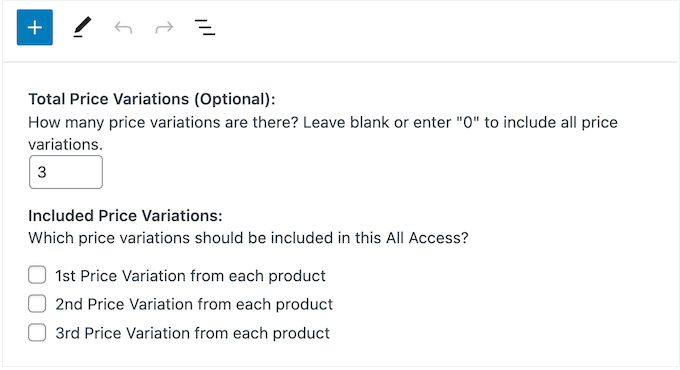
Digital products with variable pricing

Simply check the box next to each variation you want to include in the free trial.

Customizing the Purchase Confirmation Page and Email

When a customer downloads a product using their free trial pass, Easy Digital Downloads will show them a Purchase Confirmation page.

An example of a purchase confirmation screen on an online store

It will also send a confirmation message to their email address.

By default, both the Purchase Confirmation page and email contain the following link: Click here to use your All Access Pass. This takes the customer to a page where they can download their free products.

To change the link text, type into the ‘Receipts: All Access Link Message’ box.
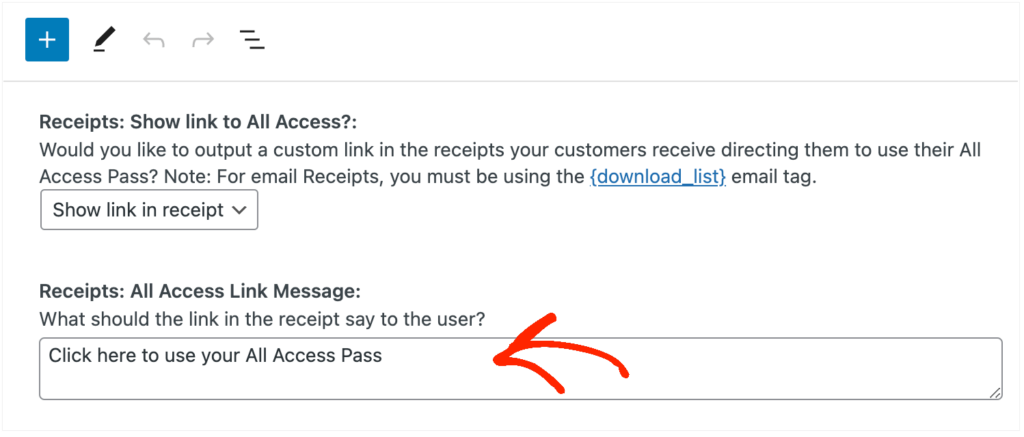
How to customize a purchase receipt using Easy Digital Downloads

You can also change the page where Easy Digital Downloads will send customers when they want to download their free products.

To do this, simply create a new page in WordPress and then add the following shortcode:

[downloads all_access_customer_downloads_only="yes"]

This will show all the products the customer can download while on a free trial. You can then add other content, such as text, images, a contact form, or anything else you want to include.
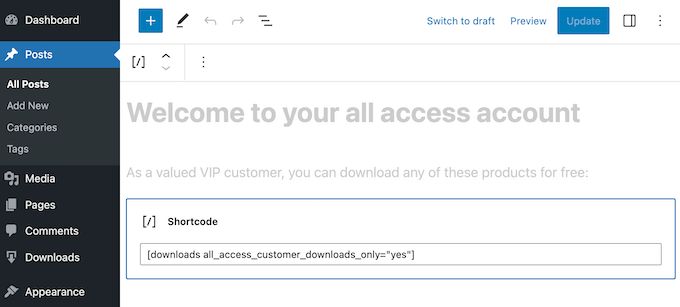
How to offer a free trial subscription using WordPress

For more information on how to place the shortcode, please see our guide on how to add a shortcode in WordPress.

After publishing the page, simply add its URL to the ‘Receipts: Link URL’ field.
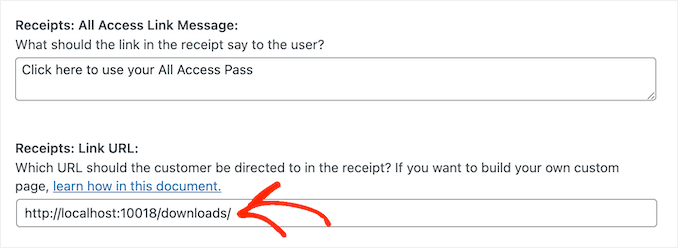
Customizing the purchase receipts link for a digital download

When you’re happy with how the free trial is set up, click on the ‘Publish’ button.

Create a Premium Subscription

With that done, you may want to create a premium ‘all access’ subscription. When their free trial expires, customers can upgrade to this subscription and continue enjoying your content.

To create a premium subscription go to Downloads » Add New.

You can then type in a name for the subscription and set the price, by typing into the ‘Pricing Options’ field.
Adding pricing options to a digital product in WordPress

You can also make this a recurring subscription, add an optional sign-up fee, and more using the settings under ‘Download Prices.’

With that done, scroll to the ‘All Access’ section. At this point, you can turn the subscription into an all-access pass, add a download limit, and more by following the same process described above.

When you’re happy with how the premium all-access subscription is set up, don’t forget to click on ‘Publish’ to make it live.

Remove the Checkout for Free Trial Users

After creating the free trial subscription, you’ll want to get as many signups as possible. With that being said, it’s a good idea to allow customers to start the free trial without going through the checkout screen.

Easy Digital Downloads can hide the checkout screen when a customer is claiming a free product, including your free trial subscription.

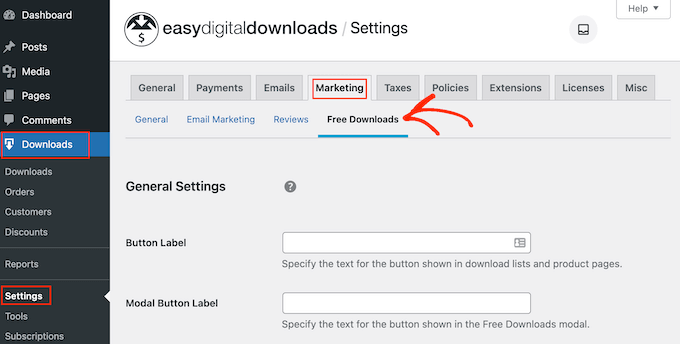
To do this, simply go to Downloads » Settings, and then select the ‘Marketing’ tab. Next, click on ‘Free Downloads’ to hide the checkout.

How to hide the checkout for free trial signups and free downloads

After that, you can use ‘Button Label’ to specify the text you’ll show when products are available for free download.

By default, this is ‘Download Now.’

How to customize the all access download pass

You can replace this with your own custom messaging.

Simply go ahead and type into the ‘Button Label’ field.
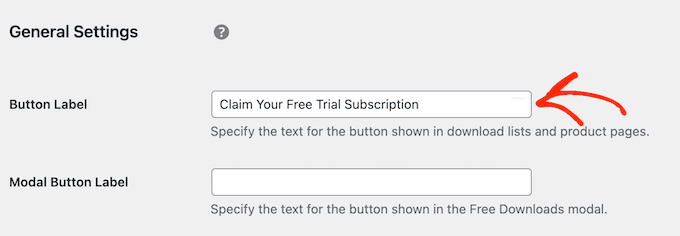
Customizing the free download and free trial subscription CTA

There are more settings that can help you do lead generation like a pro. For example, you can collect the person’s name and email address, even when they’re signing up for a free trial or downloading a free product. However, we recommend keeping things simple, as this will often get you the most signups.

When you’re happy with the changes you’ve made, click on ‘Save Changes.’ Now, if you visit the free trial product page, you’ll see the new button text in action.

How to add a free trial subscription to a website

Create Expiration Reminder Emails

Free trials can generate leads, but the goal is to convert those people into paying customers.

With that in mind, you may want to email people when their free trial is about to expire. This will encourage them to buy a premium subscription, so they can continue accessing your digital content.

​​Easy Digital Downloads integrates with all the best email marketing services. However, you can also create reminder emails using the Recurring Payments extension you installed earlier.

To use this extension, go to Download » Settings. Then, select the ‘Emails’ tab followed by the ‘Recurring Payments’ link.
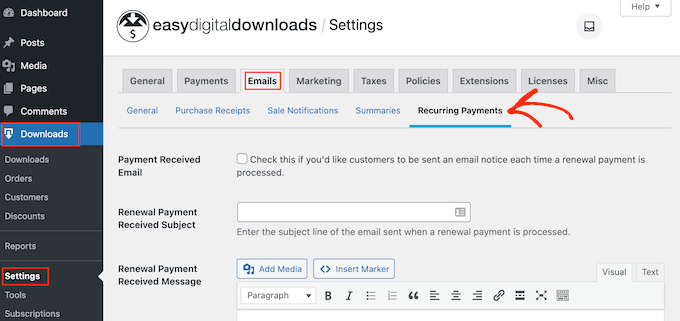
How to set up recurring payments for online subscriptions

On this screen, check the box next to ‘Send Expiration Reminders.’

After that, select ‘Add Expiration Reminder.’
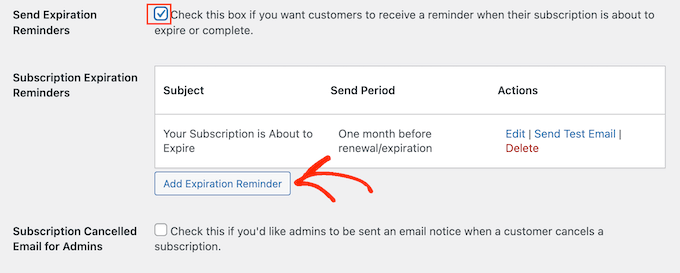
How to create an expiration reminder for an online subscription

This takes you to a screen where you can type in an email subject and a message.

To make the email more personal, it’s a good idea to use template tags. Easy Digital Downloads will replace these tags with real values such as the customer’s name, the expiration date, and the name of their subscription.

You can see all the available template tags underneath the small text editor.

Create personalized emails using template tags

Just be aware that Easy Digital Downloads will send the message to all customers, and not just the people on your free trial.

When you’re happy with the information you’ve typed in, click on Add Reminder Notice.
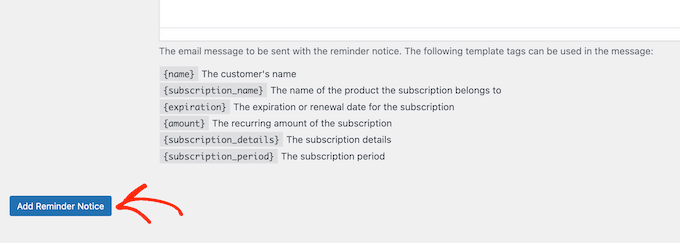
How to add a reminder notice using Easy Digital Downloads

Now, Easy Digital Downloads should notify customers when their subscription is about to expire. However, sometimes your WordPress hosting server may not be properly configured or email providers such as Gmail might use filters that wrongly flag your emails as spam.

To get more conversions, your emails need to arrive in the customer’s inbox and not in the spam folder. For that reason, we recommend using a WordPress SMTP plugin and provider to improve your email deliverability

WP Mail SMTP is the best WordPress SMTP plugin on the market. It allows you to connect your WordPress site with a mailer service. This means your expiration reminder and other messages will always arrive safely in the customer’s inbox.

Method 2. MemberPress (Free Trial For Memberships or Courses)

A membership website allows users to pay for premium content, online courses, features, and access to a community. However, these members-only features are usually hidden behind a paywall in WordPress, so visitors can’t see what the membership includes.

With that in mind, you may want to offer visitors a free trial so they can try before they buy. The easiest way to do this is by using MemberPress.

MemberPress is an all-in-one membership plugin that allows you to accept payments, add unlimited membership levels, create gated content, restrict access based on different membership levels, and much more. It also lets you create as many free trials as you want, including different trials for different membership levels.

First, you’ll need to install and activate the plugin. If you need help, then please see our guide on how to install a WordPress plugin.

You can now add payment methods, create members-only content, design a pricing page, and more. For step-by-step instructions, please see our ultimate guide to creating a WordPress membership site.

Once your site is set up, you’re ready to create a membership plan with a free trial.

Create a New Membership Level

To get started, head over to MemberPress » Memberships in the WordPress dashboard. Here, click on the ‘Add New’ button.
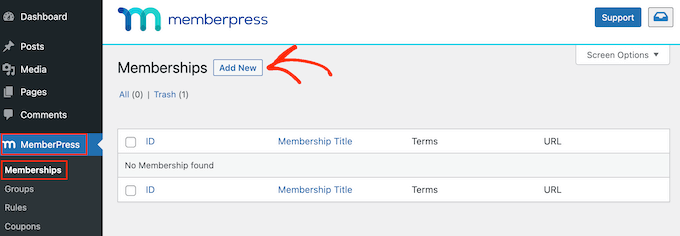
Adding a new membership subscription to WordPress

You can now type in a title for the membership plan, add an optional description, upload a featured image, and more.

For more information, please see our ultimate guide to creating a WordPress membership site.
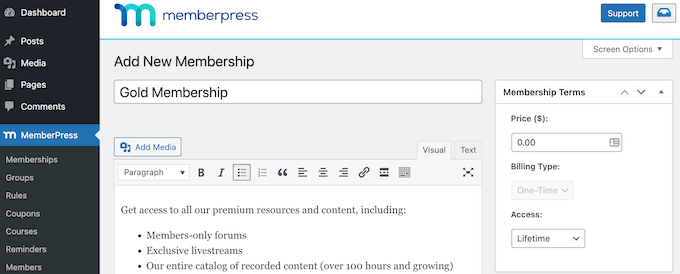
Adding a membership level to a website using MemberPress

With that done, you can set the price by typing into the ‘Price’ box.

This is how much members will pay once the free trial expires.
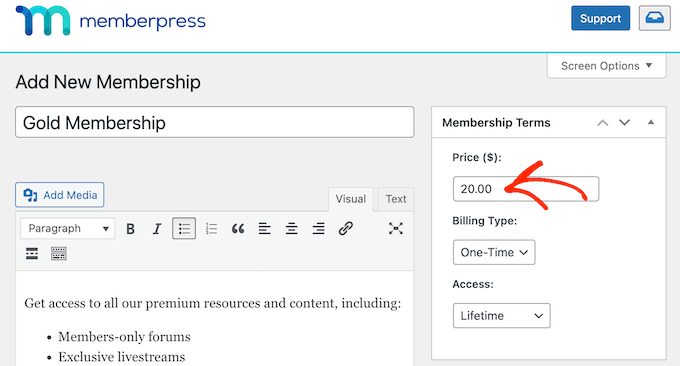
Creating a paid membership subscription using MemberPress

You can only create a free trial for recurring memberships. However, if you want to charge members a one-time fee then there’s a workaround, which we’ll be covering shortly.

With that being said, open the ‘Billing Type’ dropdown and choose ‘Recurring.’
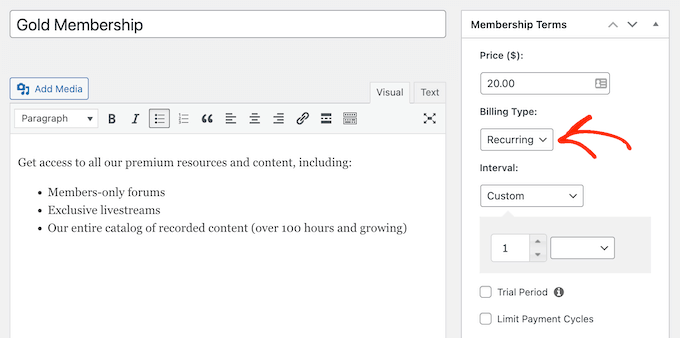
How to create a recurring membership using WordPress

Next, you need to set the billing interval for the recurring payment. This is how often your members will be charged once the free trial expires.

Simply open the ‘Interval’ dropdown and choose an option from the list, such as monthly or yearly billing.
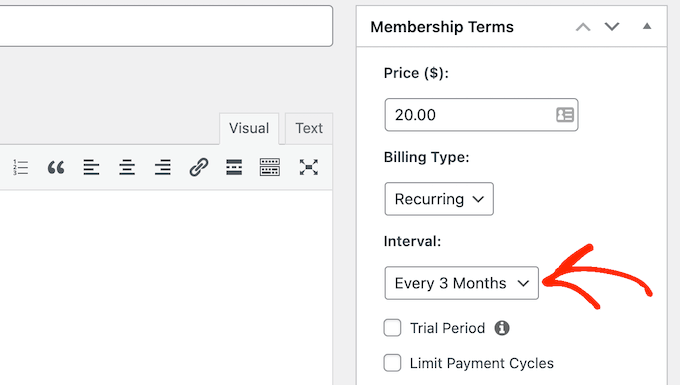
How to set a billing interval for a membership subscription

Want to use a different interval? Then select ‘Custom’ instead.

You’ll now see some new controls where you can set a custom interval.
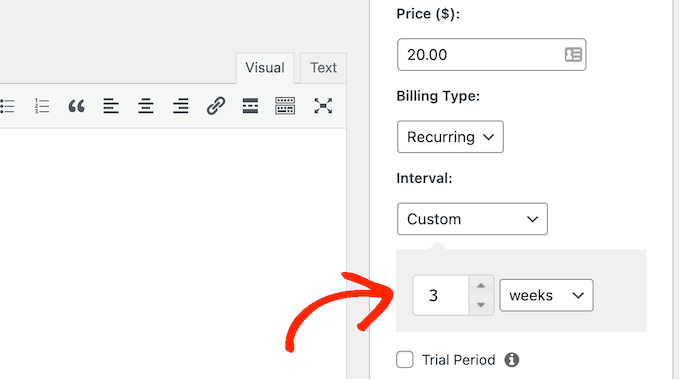
Setting a custom billing interval for your membership site

Create a Free Trial Membership Subscription

With that done, check the box next to ‘Free Trial.’

You can now specify how many days the free trial will last, by typing into the ‘Trial Duration’ field. For example, if you want to offer a one-month trial then you would type in ‘30.’
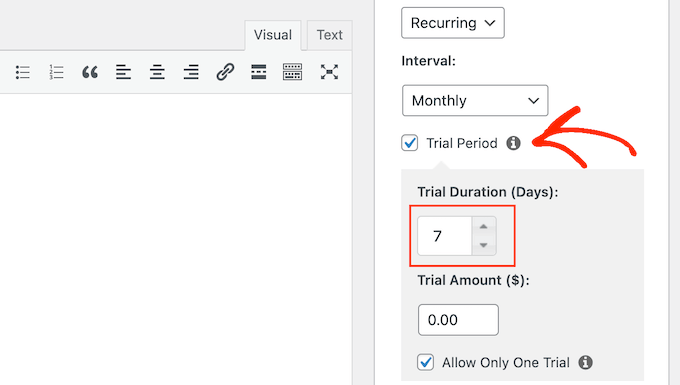
Changing the duration of a free membership trial

After that, you’ll need to type in the ‘Trial Amount,’ which is the total cost of the subscription trial period before tax. You’ll typically want to type ‘0’ into this box.

Finally, you can choose whether to limit customers to one free trial by checking or unchecking the ‘Allow Only One Free Trial’ box. If you check this box, then customers who cancel their subscription and then re-subscribe won’t get another free trial.

You’ll typically want to leave the box checked, so customers can’t abuse the free trial. However, if you only offer a very short trial then you may want to allow customers to have multiple free trials.
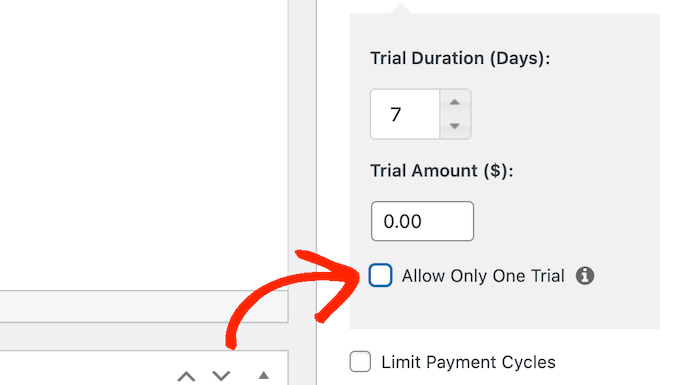
Choose whether to allow multiple free trials per member

Just be aware that coupons will override this setting, so it’s still possible to offer multiple free trials to the same customer.

Create a Lifetime Membership (Optional)

As already mentioned, you can only offer a free trial for recurring memberships. However, it is possible to create a trial for lifetime memberships, by changing a few MemberPress settings.

To do this, check the ‘Limit Payment Cycles’ box and set the ‘Max # of Payments’ to 1.
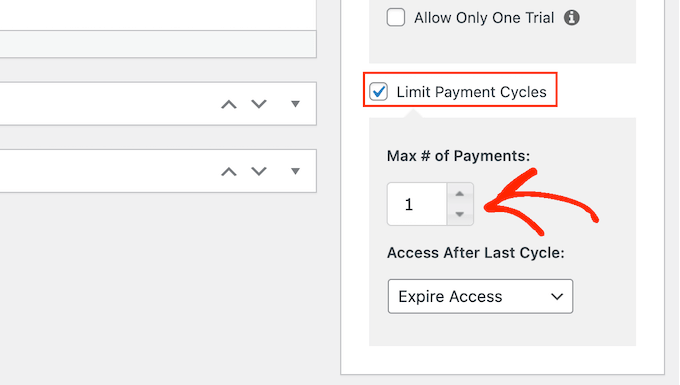
Limiting the payment cycles using MemberPress

After that, open the ‘Access After Last Cycle’ dropdown and select ‘Lifetime Access.’

Now, once the trial expires customers will need to pay a one-time fee for lifetime membership.
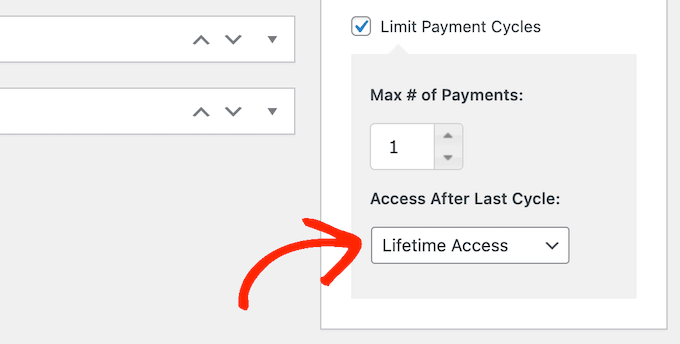
Creating a one-time payment membership

Publish the Free Trial Membership Subscription

With that done, you can make any other changes to the membership level.

When you’re happy with how the membership is set up, it’s time to make it live by clicking on the ‘Publish’ button.
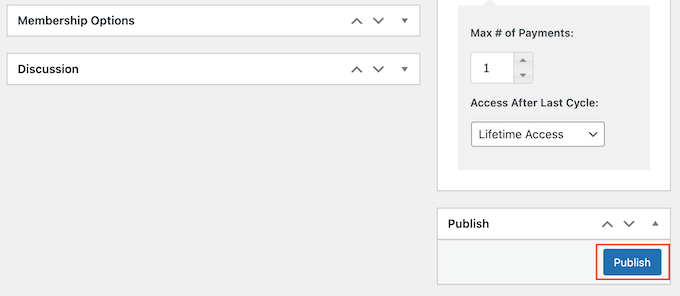
Publishing a membership level with a free trial

To see how the membership looks to potential customers, go to MemberPress » Memberships. On this screen, you’ll see the membership level you just created.

Here, just hover your mouse over the membership level and click on the ‘View’ link.
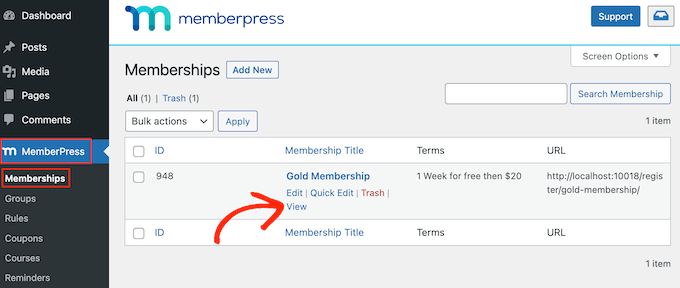
Previewing a membership level in WordPress

WordPress will now show the membership signup form in a new tab.

Do you want to add a free trial to more membership levels? Then simply follow the same process described above.

Once you’ve added a free trial to your membership site, you’ll want to encourage visitors to sign up for the free trial. This might mean mentioning the free trial in your email newsletter, creating popups using a WordPress popup plugin, promoting it on social media, and more.

Method 3. WooCommerce Subscriptions (Free Trial For Physical Products)

If you want to sell digital products online, then we recommend using Easy Digital Downloads. However, if you want to sell physical products, then WooCommerce is the world’s most popular eCommerce platform.

By default, WooCommerce doesn’t allow you to offer free trial subscriptions. However, it’s easy to add this missing feature using WooCommerce Subscriptions.

This plugin adds a new ‘simple subscription’ product type to your WooCommerce store. You can add this product type to any existing item, or create new subscription products. For example, you might let shoppers try a product before they buy it, or maybe you will send them a sample subscription box from your online boutique shop.

When a customer visits a subscription product, they’ll see a ‘Sign up now’ button instead of the standard ‘Add to cart’ call to action button.

A free trial subscription, created using WooCommerce

The WooCommerce checkout page will also show some information about the subscription.

This includes the length of your free trial.
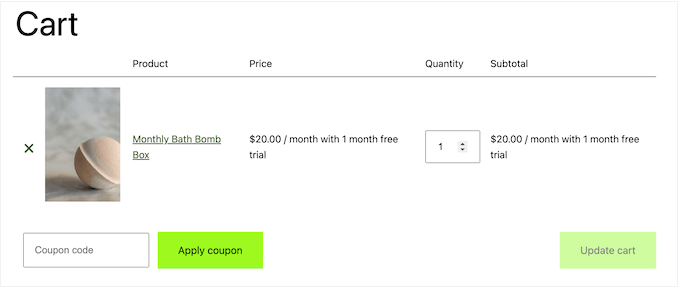
An example of a free trial subscription on a WooCommerce store

Customers can manage all their subscriptions by logging into their WooCommerce account, and then visiting the new ‘My Subscriptions’ section.

Here, they can see when the subscription started, how much it costs, the subscription status, and more. The customer can also cancel, reactivate, and renew their subscriptions directly from this page, without having to contact you directly.

How to manage WooCommerce subscriptions

In this way, a customer who is enjoying a free trial can quickly and easily upgrade to a premium subscription.

In this guide, we’re going to assume you’ve already set up a WooCommerce store. If you haven’t, then you may want to check out our complete guide to WooCommerce made simple.

After that, you’ll need to install and activate the WooCommerce Subscriptions plugin. If you need help, then please see our guide on how to install a WordPress plugin.

As soon as the plugin is active, you’re ready to add free trial subscriptions to WooCommerce. Simply go to Products » Add New.
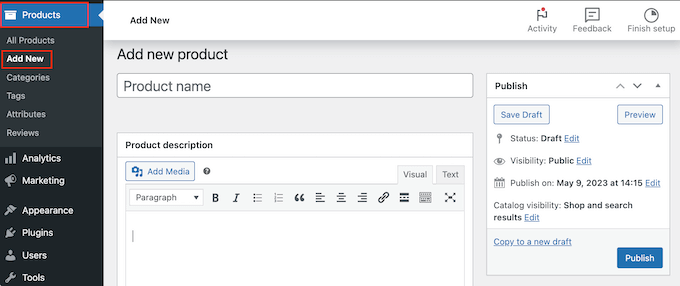
How to add a new product in WooCommerce

You can now create this product in exactly the same way you create any WooCommerce product. For example, you can type in the product’s title, add a description, or create a WooCommerce product gallery.

After entering all this information, scroll to the ‘Product Data’ box.
Adding product data to WooCommerce

Here, open the dropdown menu and choose ‘Simple subscription.’

This adds some new settings that you can use to create a subscription and add a free trial.
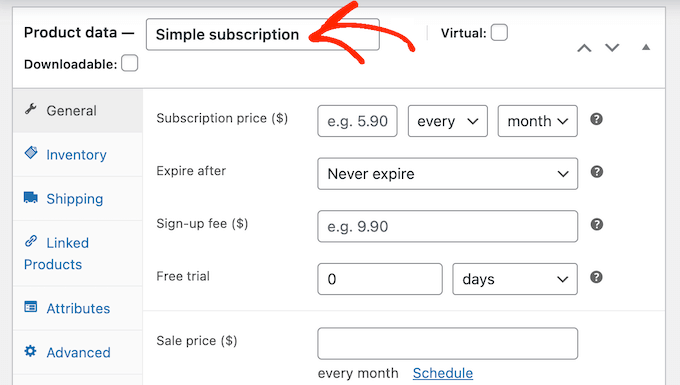
The new Simple Subscription WooCommerce product type

To start, type in the ‘Subscription price.’

Then, use the dropdown menus to choose how long the subscription will last. In the following image, the subscription will cost $20 per month once the free trial expires.
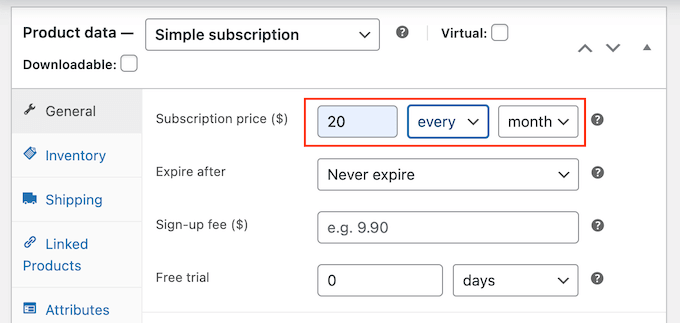
Setting the WooCommerce subscription price

You can now choose whether the subscription will last forever, or expire after a set amount of time. Just be aware that the expiration length doesn’t include the free trial. This means that if the subscription expires in 1 month and you offer a one-month free trial, then the subscription will last for 2 months.

Another option is to give the customer lifetime access. To do this, open the ‘Expire After’ dropdown and choose ‘Never expire.’
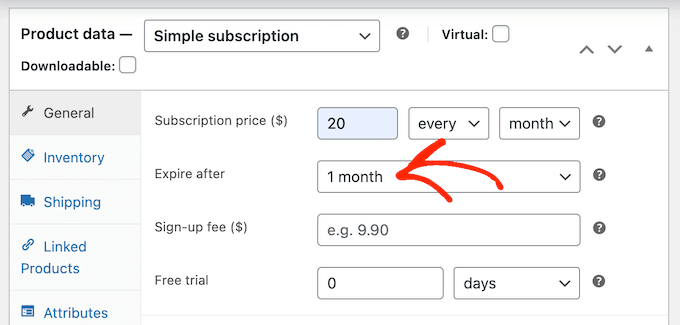
Setting an expiration date for a WooCommerce subscription

Next, you may want to add a sign-up fee.

Just be aware that WooCommerce will charge this fee no matter whether the customer is buying a subscription or signing up for a free trial. With that in mind, we don’t recommend adding a sign-up fee to products that have a free trial subscription.
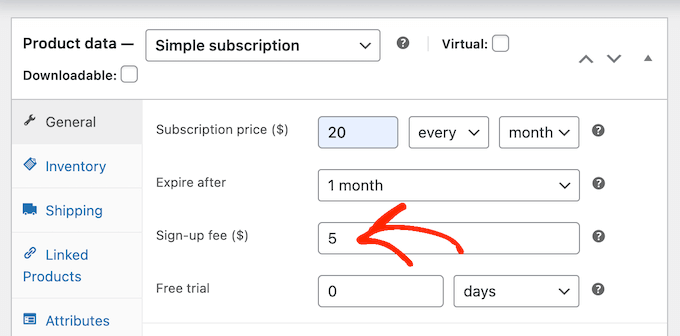
Adding an optional signup fee in WooCommerce

With that done, you can specify how long the free trial will last by opening the dropdown that shows ‘days’ by default, and then choosing an option from the list.

After that, just type in how many days, weeks, months, or years the free trial should last. Note that the free trial can’t last longer than 90 days, 52 weeks, 24 months, or 5 years.
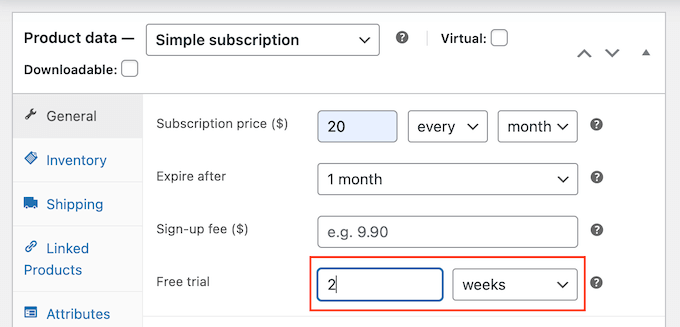
Creating a free trial in WooCommerce

You can now make any other changes to the product. When you’re happy with how the product and subscription are set up, either click on ‘Update’ or ‘Publish’ to make the trial live.

You can now create free trial subscriptions for other products, by following the same process described above.

Once you’ve added one or more subscriptions to your WooCommerce website, you’ll want to get as many signups as possible. With that in mind, you should allow visitors to use their preferred payment method.

By adding the free Stripe Payment Gateway for WooCommerce plugin to your website, you can collect payments through Visa, MasterCard, Google Pay, Apple Pay, and more.

Simply install the plugin and the onboarding wizard will guide you through the process of adding more payment methods and enabling express checkout.
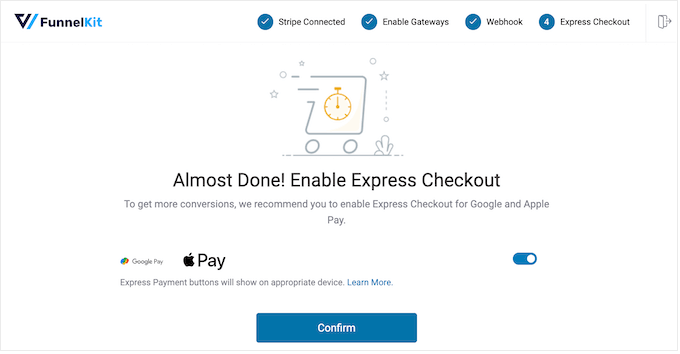
The Stripe Payment Gateway for WooCommerce plugin

Method 4. WP Simple Pay (Free Trial For Custom Services)

Many freelancers, consultants, trainers, and other business owners sell their services as a subscription. For example, if you run a yoga studio then you might offer a one month free trial of your personalized training program.

The best way to offer a free trial for custom services is by using WP Simple Pay. It’s the best Stripe payment plugin for WordPress and lets you accept payments, manage invoices, and offer free trials without having to set up a shopping cart, or add products to an online store.

Note: There is a free version of WP Simple Pay that allows you to accept credit cards, Apple Pay, iDEAL, and other payment methods. However, in this guide we’ll be using the premium plugin as it allows you to offer free trials.

Set Up the WP Simple Pay Plugin

First, you’ll need to install and activate the WP Simple Pay plugin. If you need help, then please see our guide on how to install a WordPress plugin.

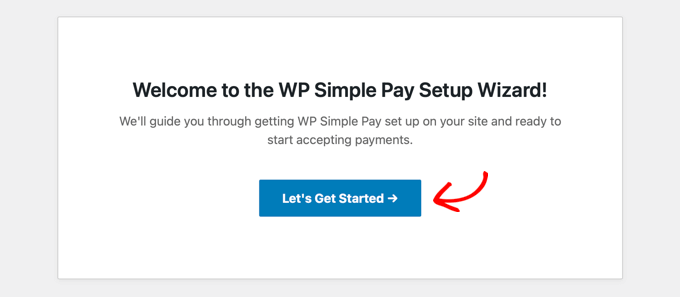
Upon activation, the plugin will automatically launch the setup wizard. Go ahead and click the ‘Let’s Get Started’ button.

The WP Simple Pay setup wizard

After that, you’ll need to enter the license key. You can find this information under your account on the WP Simple Pay website.

With that done, click the ‘Activate and Continue’ button.
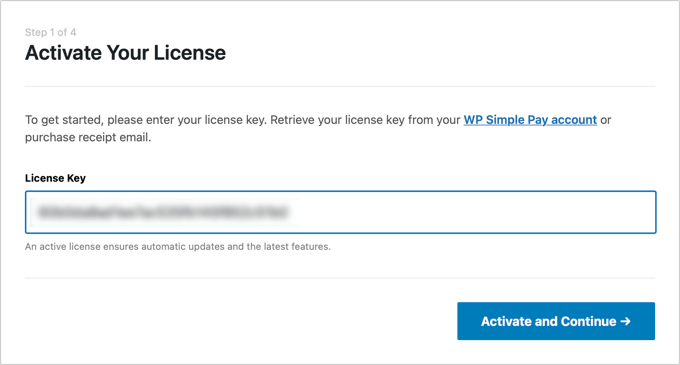
Adding a license to a WordPress plugin

Connect WordPress to Your Stripe Account

In the next step, you’ll need to connect your Stripe account to WP Simple Pay. Stripe is a popular payment gateway, and it’s the easiest way to accept credit card payments in WordPress, so it’s a great way to sell custom services online.

To get started, simply click the ‘Connect with Stripe’ button. You can then either log into your Stripe account, or create a new account if you haven’t already registered with Stripe.
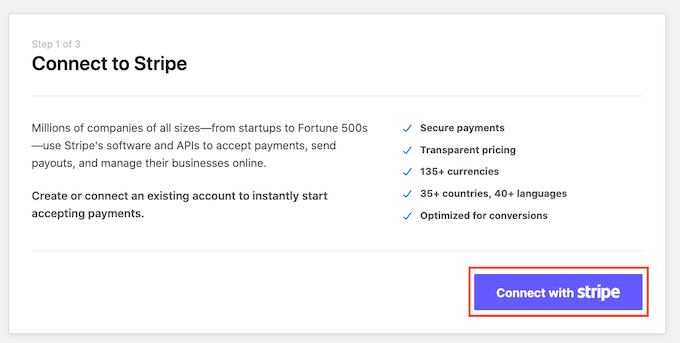
Connecting your WordPress website to Stripe

After connecting WP Simple Pay with Stripe, the setup wizard will ask you to configure its emails. You can choose whether to receive emails for payment receipts, upcoming invoices, and payment notifications.

You’ll also need to enter the email address where WP Simple Pay will send the messages.
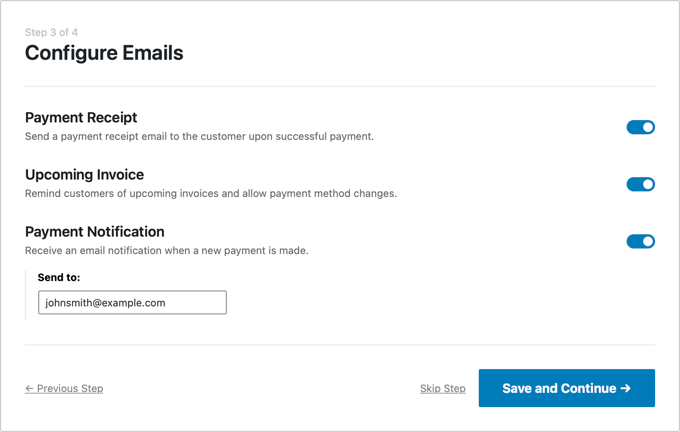
Configuring WP Simple Pay's emails

Simply click the ‘Save and Continue’ button when you’re done.

Create a Subscription Form With a Free Trial

Now, you’re ready to create a subscription form that offers a free trial. Go ahead and click on the ‘Create a Payment Form’ button.
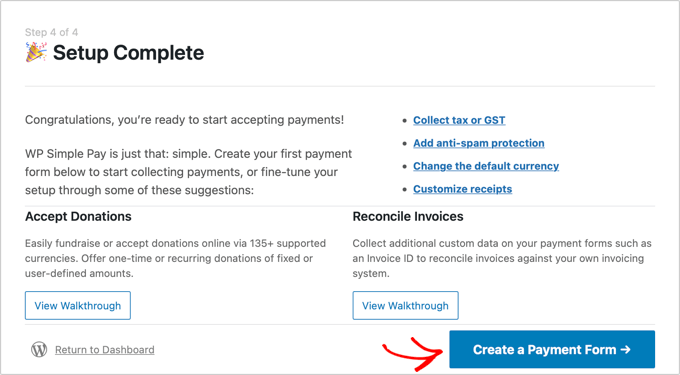
Completing the WP Simple Pay setup

WP Simple Pay comes with a ton of ready-made templates that you can use to create ‘buy now pay later’ payment plans, get donations, accept Google Pay in WordPress, and more.

To offer a free trial, hover over the ‘Recurring Services with Trial Period Form’ template. When it appears, click on the ‘Use Template’ button.
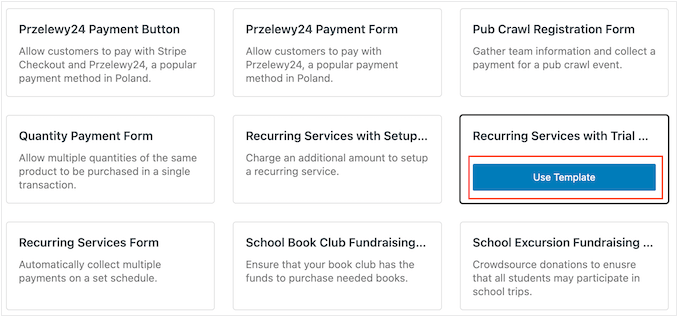
The WP Simple Pay's subscription and free trial template

This will take you to the payment form editor.

To start, you can rename the form and type in an optional description. By default, the description is ‘Try our service free for 30 days,’ but you can change this to anything you want.
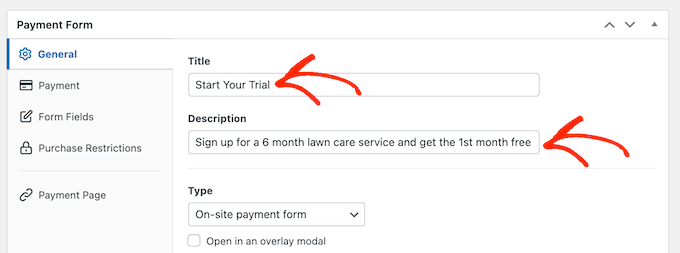
Adding a title and description to a subscription form

By default, WP Simple Pay will create an on-site payment form. However, you may want to show a payment button instead. When the visitor clicks the button, they’ll see the payment form in a popup.

To create a popup, check the box next to ‘Open in an overlay modal’ box.
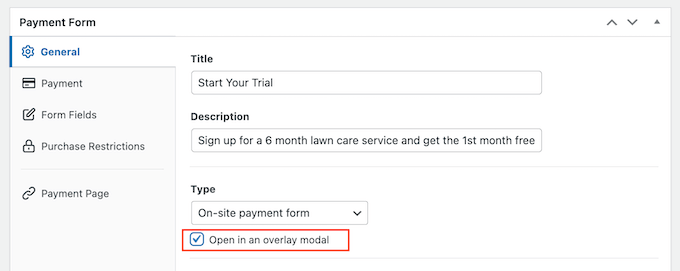
Opening a subscription form in a popup

Another option is to host the payment form on Stripe’s site, by opening the ‘Type’ dropdown.

Here, select ‘Off-site Stripe Checkout form.’
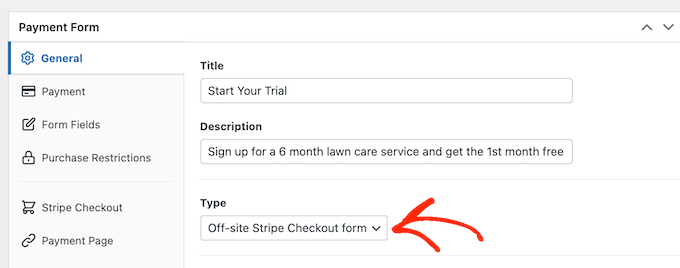
Hosting a subscription and payment form on the Stripe website

When a customer buys a subscription, WP Simple Pay will redirect them to its built-in Payment Success Page. If you want to send visitors to a different page, then select either ‘Specific Page’ or ‘Redirect URL.’

You can then either type in the URL or select the page you want to use instead. For example, you might send subscribers to a custom thank you page, or a page where they can manage their free trial.
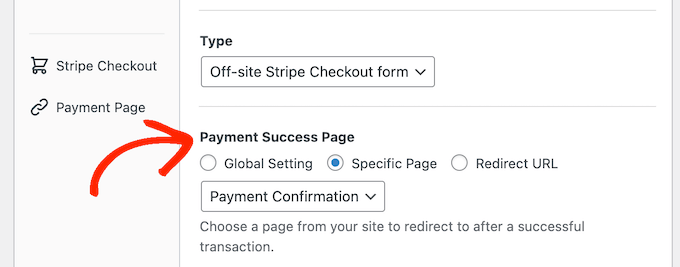
Changing the payment success page in WordPress

Add a Price to Your Subscription Form

When you’re ready, select the Payment tab.

Here you can set the payment mode to either live or testing. Testing mode allows you to complete the purchasing process without getting charged, so it’s perfect for testing new subscriptions on your website.
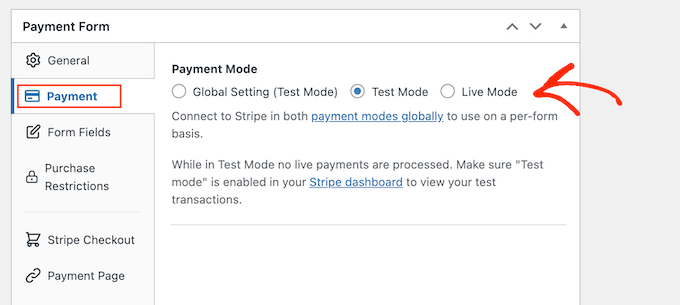
Creating a subscription form in testing mode

If you do select ‘Test Mode,’ then remember to come back to this page and change the mode to ‘Live’ when you’re finished testing.

Next, you can set the price of your subscription and the currency using the ‘Amount’ settings.
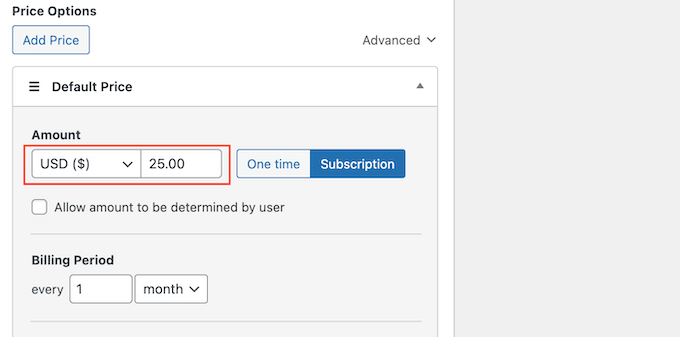
Adding a price to a subscription form with a free trial

With that done, you can choose how often WP Simple Pay should charge subscribers.

Simply open the ‘Billing Period’ dropdown and choose day, week, month, or year. Then, type a number into the field next to the dropdown menu.
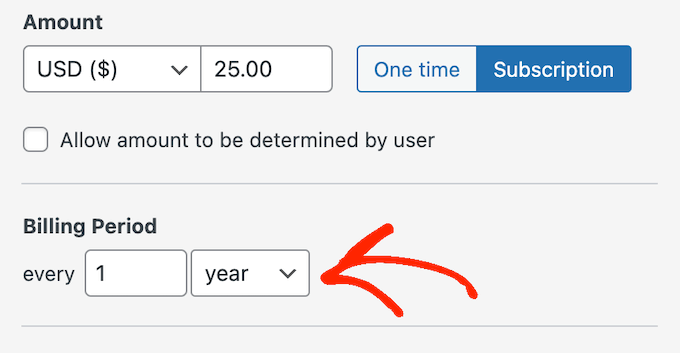
Setting a billing period for a subscription form in WordPress

By default, WP Simple Pay offers customers a 30 day free trial.

If you want to make the free trial longer or shorter, then simply type a number into the ‘Free Trial’ field.
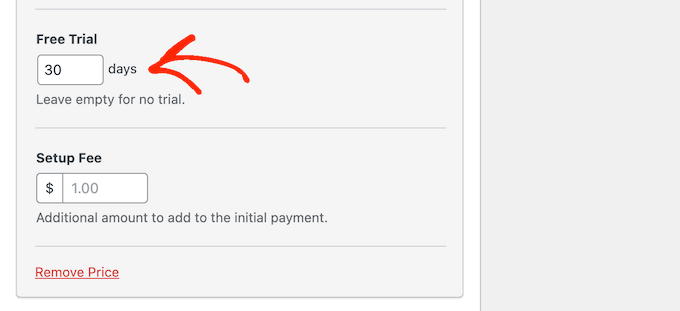
Setting the free trial duration

Sometimes, you may want to charge subscribers a set up fee. For example, if you’re a life coach then this extra fee may cover the time and effort required to add new clients to your admin system.

To charge an additional fee, simply type an amount into the ‘Setup Fee’ field.

Adding a set up fee to a subscription form with a free trial

With that done, scroll to the ‘Payment Methods’ section.

Here, you can check the box next to any additional payment methods you want to offer, such as Klarna payments or ACH payments.
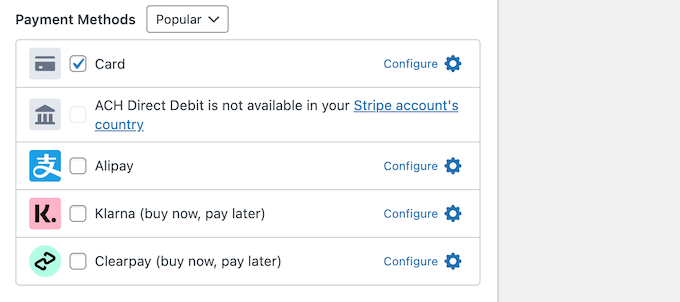
Adding more payment methods to your website

By offering visitors a choice of payment methods, you may be able to get more subscribers. However, try not to offer too many options, as this can become confusing.

Depending on the payment methods you select, you may see a ‘Configure’ link. In this case, click on ‘Configure’ and then follow the onscreen instructions to set up the payment gateway or method.
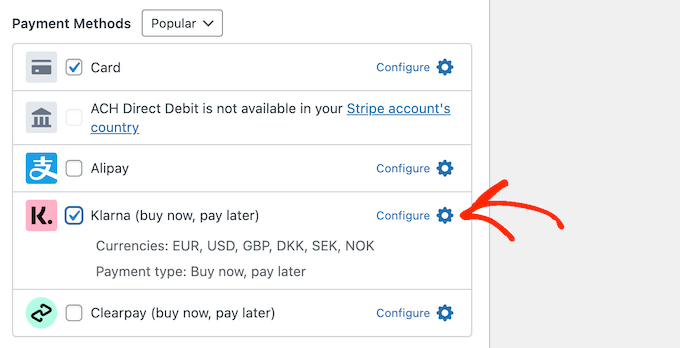
Adding more payment methods to WP Simple Pay

Customize the WP Simple Pay Subscription Form

With that done, you’re ready to build the subscription form.

Simply click on ‘Form Fields’ to open WP Simple Pay’s form builder.
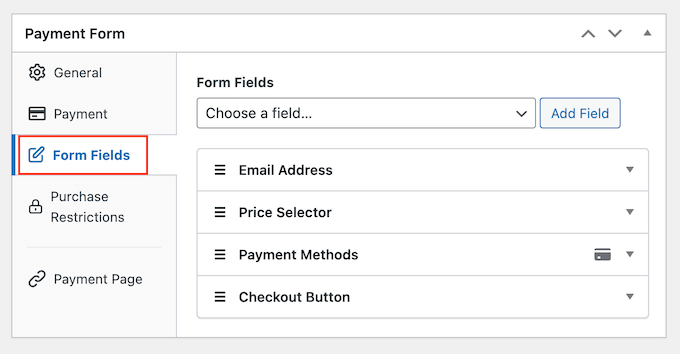
Customizing the WP Simple Pay subscription template

The template already collects some basic information about the customer, such as their email address and credit card information.

The following image shows how the default form will look on WordPress.
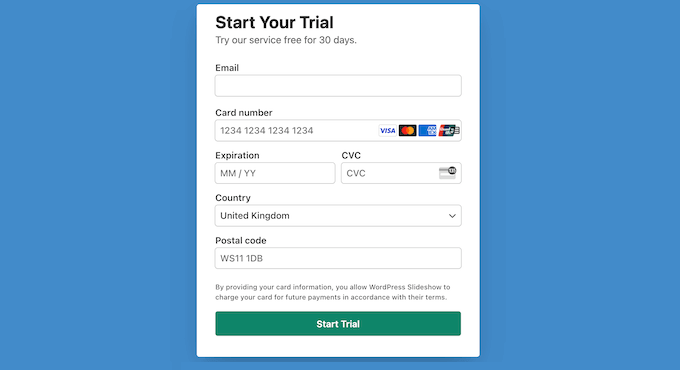
An example of a subscription form, created using WP Simple Pay

To customize any of the default fields, simply click select it.

The section will expand to show all the settings you can customize, such as changing the field’s label or adding some placeholder text.
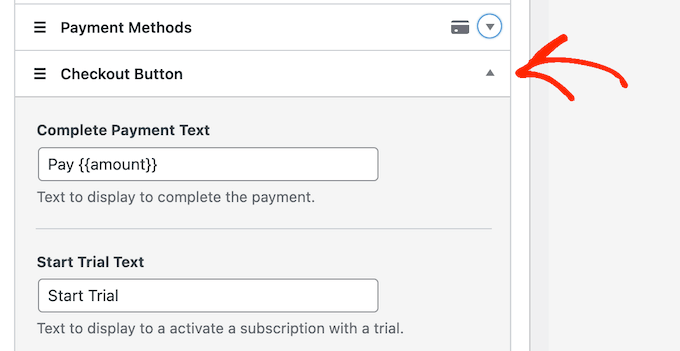
Customizing the recurring payment form

You can also remove fields from the subscription form.

Simply click to expand the field, and then select ‘Remove.’
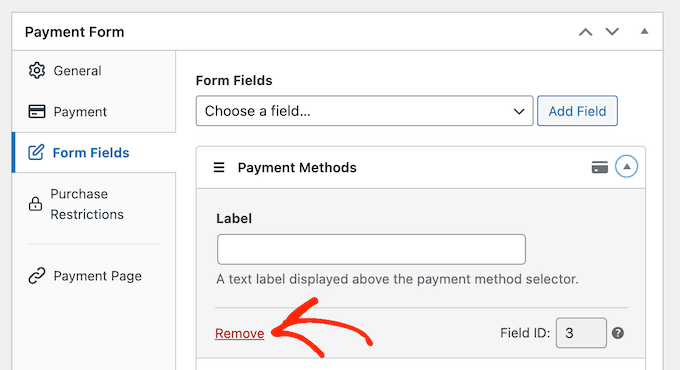
Deleting fields from a subscription form

Do you need to collect more information from your new subscribers? For example, you might need their tax ID or phone number.

Just click on the ‘Form Fields’ dropdown and then choose a field from the list. After that, click on ‘Add Field.’
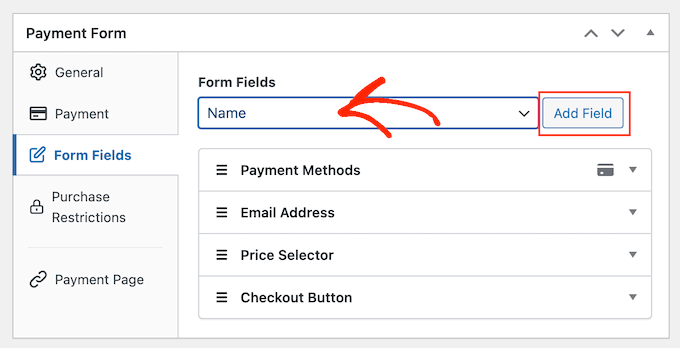
Adding WP Simple Pay fields to a subscription form

Finally, you can change the order the fields appear in your form using drag and drop.

As you’re customizing the form, you can click on ‘Preview’ to see how it will look on your blog or website.
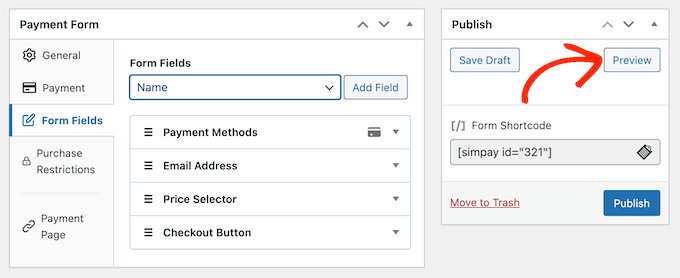
Previewing how a subscription form and free trial will look on your WordPress website

When you’re happy with the form, click ‘Publish’ to store your settings.

Add the Subscription Form to Your WordPress Website

Now, you’re ready to add the form to your WordPress blog using either a block or shortcode.

The easiest method is to use a block, so open the page or post where you want to show the subscription form.

Then, click on the plus (+) sign and type in ‘WP Simple Pay.’
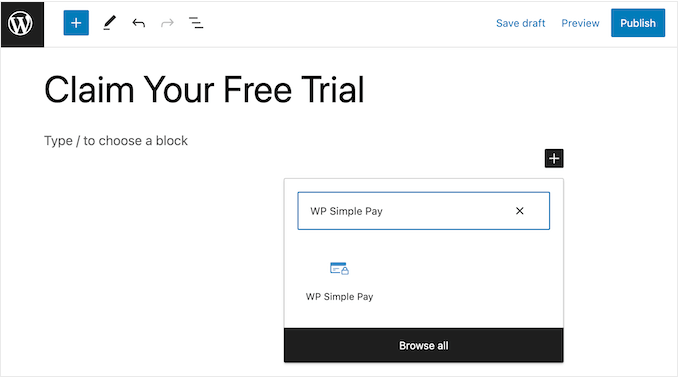
Adding a block using the page or post editor

When the right block appears, click to add it to the page or post.

With that done, open the dropdown menu in the WP Simple Pay block, and choose the form you want to display.
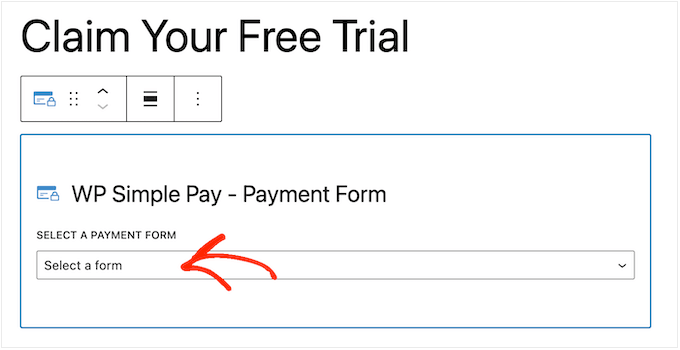
Adding a WP Simple Pay form to your website using blocks

When you’re finished, click on either ‘Update’ or ‘Publish.’

Now, if you visit your website you’ll see the subscription form live.
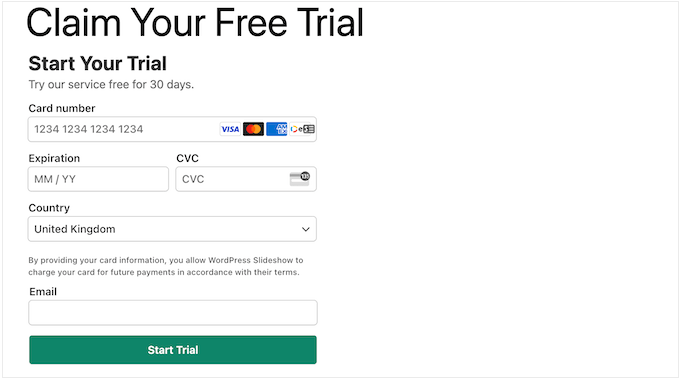
An example of a subscription form, on a WordPress website

Another option is to add the subscription form using shortcode. To get the shortcode, head over to WP Simple Pay » Payment Forms in the WordPress dashboard.

Here, just find the subscription form and click on its ‘Copy Shortcode’ button.
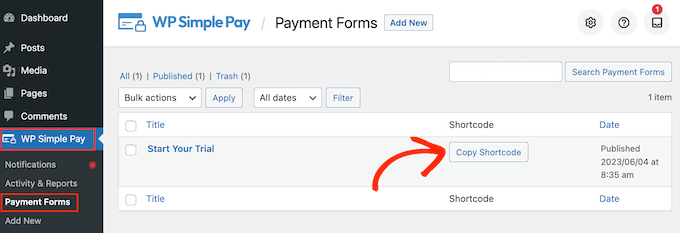
Adding a subscription form to your website using shortcode

Now you just need to paste the shortcode into any page, post, or widget-ready area. For step-by-step instructions on how to place the shortcode, please see our guide on how to add a shortcode in WordPress.

We hope this article helped you learn how to add free trial subscriptions in WordPress. You may also want to check out our guide on how to run a giveaway / contest in WordPress, and the best live chat software for small businesses.

If you liked this article, then please subscribe to our YouTube Channel for WordPress video tutorials. You can also find us on Twitter and Facebook.


Source link

Keep an eye on what we are doing
Be the first to get latest updates and exclusive content straight to your email inbox.
We promise not to spam you. You can unsubscribe at any time.
Invalid email address

WORDPRESS

5 Must See Telegram Plugins for WooCommerce

Published

on

By

5 Must See Telegram Plugins for WooCommerce

Telegram is one of the most popular instant messaging apps for encrypted communication. You can use it for more than getting in touch with your friends though. For instance, with the right plugins, you can send store updates, deals, and order notifications to it. Here are 5 telegraph plugins for WooCommerce you shouldn’t miss:

🛠️ Divi Builder drag & drop page builder for WP

Notification for Telegram: this plugin sends Telegram messages when you receive a new order or order status changes. It lets customers add their own Telegram nickname.

WooCommerce Telegram Order Notification: another plugin that sends WooCommerce order notifications to your Telegram app. Notifications will include order number, status, customer name, and other info.

5 Must See Telegram Plugins for WooCommerce 2

WP Telegram: this plugin integrates your WordPress site with Telegram. It can send posts automatically to Telegram when published or updated. It supports multiple channels and chats. It supports WooCommerce products and other custom post types.

5 Must See Telegram Plugins for WooCommerce 3

Bot for Telegram: this plugin helps you sell products via Telegram. You simply have to create a bot and add it in the setting page. It supports simple, grouped, affiliate, and variable products.

5 Must See Telegram Plugins for WooCommerce 4

Master Telegram Chat Initiator: a handy plugin that shows a Telegram button on your WooCommerce site. It supports Elementor and WPBakery Pagebuilder. It allows for multiple agents. It has a widget that lets you show the button anywhere.

Have you found better plugins for Telegram? Please share them here.

Keep reading the article at WP Solver. The article was originally written by WordPress Jedi on 2024-01-02 10:39:43.

The article was hand-picked and curated for you by the Editorial Team of WP Archives.


Source link

Keep an eye on what we are doing
Be the first to get latest updates and exclusive content straight to your email inbox.
We promise not to spam you. You can unsubscribe at any time.
Invalid email address
Continue Reading

WORDPRESS

The 9 Best eCommerce Hosting Providers in 2024

Published

on

By

The 9 Best eCommerce Hosting Providers in 2024

Are you ready to embark on a new adventure by launching an e-commerce store that will allow you to rake in some serious cash? Fortunately, you have a wide range of hosting options that will suit your new endeavor, depending on which features matter to you most and which ones fit your budget. We make it easier for you to decide with these nine best eCommerce hosting solutions. 

Whether you want free SSL certificates for your online stores or are looking for budget-friendly options, we have you covered. 

Start taking advantage of these hosting providers for your eCommerce sites today. 

TL;DR: What are the Best eCommerce Hosting Services?

Depending on what you want from an ecommerce site, you may choose to go with one of these two services:

BluehostBluehost features very inexpensive hosting that is suitable for beginners who are looking to launch their first ecommerce sites. If you want the flexibility of a WordPress site with WooCommerce and other plugins, then this is the best ecommerce hosting for you. 

ShopifyIf you’re a little more low-tech, the easy interface of Shopify is ideal. It is uniquely designed to be an ecommerce platform only, allowing you to sell physical and digital goods with just a few clicks. It’s a bit more expensive but might be worth it to build a robust ecommerce site that functions hands-off for you. 

9 Best eCommerce Hosting Providers for Reliable Websites

When it comes to finding the best e-commerce hosting provider, there are no one-size-fits-all solutions that will work for every online store. Instead, there are various services, depending on your priorities, budget, and ease of use. Here are the top nine solutions that you might consider for a reliable website. 

1. Bluehost: Best for Beginners

The 9 Best eCommerce Hosting Providers in 2024

The first and perhaps easiest ecommerce hosting solution is Bluehost. It’s ideal for beginners and users who need an inexpensive plan for their wallets, but it will require a little bit of technical know-how. Once you sign up for their hosting, you will have a one-click install for WordPress. 

From here, you can utilize the WooCommerce WordPress plugin to facilitate your ecommerce website (which is a free tool that allows you to set up shop). You can put unlimited items in your storefront, limited only by your creativity and market research. 

Of course, you can also utilize the endless number of plugins available via the WordPress platform. You can get people signed up for your email newsletter, monitor your traffic, and even focus on your search engine optimization with Yoast SEO. If you can dream it, you can do it with WordPress hosting on this platform. 

This is why I personally love Bluehost and use it for all of my niche sites. It’s affordable, reliable, and gets the job done. 

The only real drawback of Bluehost is its storage limits. Their cheapest plan has 10 GB SSD storage and their most expensive plan will come with 100 GB SSD storage. 

Pricing: Starting at $2.95 per month for Basic


2. Shopify: Best E-Commerce Hosting with Website Builder

1715462765 565 The 9 Best eCommerce Hosting Providers in 20241715462765 565 The 9 Best eCommerce Hosting Providers in 2024

Maybe you need something a bit more robust than Bluehost, something that can help you create an ecommerce store. Shopify is the solution you have been searching for because it acts as both your hosting provider and a website builder. 

Even low-tech people with minimal coding knowledge get websites up and running quickly on Shopify. They have thousands of templates and apps you can use to customize the appearance and functionality of your storefront with their website builder. It’s a drag-and-drop editor with What You See Is What You Get (WYSIWYG), which makes it easy for a novice coder to start right away. 

They have affordable transaction rates, allowing you to implement their payment gateways as quickly as possible. Plus, you get shipping discounts, inventory management tools, and 24/7 chat support.

For more information on this ecommerce platform, see our full Shopify review here. 

I have built several Shopify stores and found it to be quite intuitive. I’ve been happy with the selection of themes, the ease of use, and even the pricing. It’s a little expensive compared to Bluehost, but it’s worth it to get an ecommerce business off the ground quickly. 

Pricing: $29 per month and up


3. Siteground: Best for a WordPress Website

1715462765 232 The 9 Best eCommerce Hosting Providers in 20241715462765 232 The 9 Best eCommerce Hosting Providers in 2024

If you know that your new online store is going to be a WordPress site, then Siteground should be your first stop. Like Bluehost, Siteground features some of the best e-commerce hosting services with a quick and simple WordPress installation. You can get running quickly with plugins already installed to maintain a brand-new store. 

The best part of setting up an e-commerce store with Siteground is that you can sell digital and physical goods, so your store won’t be limited as you scale and expand your offerings. 

It’s also worth noting that Siteground has some of the fastest loading speeds for web hosting. Compare it to some of the others in our detailed showdown.

They tend to offer great introductory rates for the first year, but it’s worth noting that these prices are much higher if you choose to renew for the second or third year. For a comprehensive look at how this hosting provider stacks up, see our full Siteground review here. 

Pricing: Starting at $2.99 per month


4. A2 Hosting: Most Affordable for Advanced Features

1715462765 699 The 9 Best eCommerce Hosting Providers in 20241715462765 699 The 9 Best eCommerce Hosting Providers in 2024

If you’re looking for the best eCommerce hosting at an affordable rate, then A2 Hosting might be the fit for you. It has more advanced features than Bluehost or Siteground, but it still offers a competitive price for a robust online store. What can you expect from A2 that would make you sign up now?

Take a look at the benefits of building your eCommerce website on A2:

  • Fast loading times
  • Free SSL certificate
  • Automatic backups
  • Server resources on three continents
  • Good uptime.

Not only do you get premium web hosting, but you won’t pay an exorbitant fee for their services. If your budget is more in line with Siteground than Shopify, you’ll be pleasantly surprised. Advanced features don’t necessarily come with a high price tag. 

Pricing: Starting at $2.99 per month


5. Hostgator: Best on a Budget

1715462766 594 The 9 Best eCommerce Hosting Providers in 20241715462766 594 The 9 Best eCommerce Hosting Providers in 2024

If you’re looking to build eCommerce websites on a budget, then Hostgator might be your ideal web hosting provider. Unlike Shopify, which can be a premium tool, you can take advantage of the eCommerce features on Hostgator for a third of the price. 

With Hostgator’s e-commerce web hosts, you get robust features like 40 GB storage, gift card, and wishlist functionality, a free SSL certificate, a free domain for the first year, and even access to powerful tools like Yoast SEO. 

Plus, you never have to worry about losing your website. They have automatic daily backups for the first year. If security features and uptime are important to you, then Hostgator has a lot to offer. But, if you want less expensive web hosting, you can also use this platform for WordPress hosting with a plugin like WooCommerce. 

Compare Bluehost vs Hostgator here to see which one is the better fit for your web hosting. 

Pricing: $9.95 per month for an online store


6. Liquid Web: Best for Increased Traffic

1715462766 897 The 9 Best eCommerce Hosting Providers in 20241715462766 897 The 9 Best eCommerce Hosting Providers in 2024

Liquid Web is a top contender for the best e-commerce hosting provider if you’re concerned about some of the less expensive options’ lower uptime. Liquid Web hosting offers a 100 percent uptime promise, so you’ll never have to worry about clients missing out on your offering. 

Online stores can really benefit from this hosting provider if they’re in a hurry to start selling. Like some of the other e-commerce hosting services included here, it offers a one-click install for WordPress so that you can begin installing plugins and setting up your storefront. 

They also have sixteen compliant data centers around the globe with on-site technicians. 

Apart from their robust e-commerce features, they have excellent customer support. Chats are answered within the first minute in case you have any questions about your new e-commerce site.

Pricing: Managed WordPress starting at $17.50 per month


7. InMotion Hosting: Best for Quick Setup

1715462766 901 The 9 Best eCommerce Hosting Providers in 20241715462766 901 The 9 Best eCommerce Hosting Providers in 2024

Sometimes, the most important aspect of starting online stores is simply to get off the ground. If setup speed is one of your primary concerns with your new web hosting, then InMotion Hosting  may be the perfect solution for you. They use a one-click install with Softaculous, which makes setup a breeze. 

Like many of the other ecommerce hosting providers, InMotion still offers a free SSL certificate for your online store, can integrate with WooCommerce and Magento, and includes cPanel for your WordPress management. 

Plus, you won’t have to worry about getting in touch with customer support. Their team is available around the clock, 365 days per year. Reach out via phone, live chat, or email to get questions answered and issues resolved ASAP. 

Pricing: Shared WordPress hosting starting at $3.99 per month


8. IONOS: Best Premium Hosting Provider

1715462766 605 The 9 Best eCommerce Hosting Providers in 20241715462766 605 The 9 Best eCommerce Hosting Providers in 2024

Getting an online store started is hard enough. IONOS aims to make it easy, acting as a premium hosting provider. Their speed is unparalleled, with fast performance and even security features like DDoS protection and automatic backups for your online store. 

The downside to using this eCommerce hosting solution is that their most inexpensive plan is a bit more restrictive. On their Essential plan, you get only 10 GB of storage and 10 databases. 

However, there are some perks to this eCommerce hosting provider as well: you get a free domain for the first year, professional email access, and daily backups. Like InMotion, they offer free 24/7 support to ensure your business has everything it needs to function at the highest level. 

IONOS is a great option if you are willing to pay a little extra for your e-commerce hosting provider. It isn’t expensive enough to set you back, but it is more than Bluehost. Plus, you’ll be locked into a three-year term for your online store. 

Pricing: Starts at $4 per month


9. Dreamhost: Best for Fast Loading Times

1715462766 892 The 9 Best eCommerce Hosting Providers in 20241715462766 892 The 9 Best eCommerce Hosting Providers in 2024

Last but not least, Dreamhost is one of the best ecommerce hosting providers because it features some of the fastest loading times on the market. Some of the other benefits their ecommerce website will include: 

  • Free domain
  • Unlimited traffic
  • One-click WordPress installer and free migrations
  • Free SSL certificate
  • Inexpensive email add-on.

When your online store requires better uptime, Dreamhost is also worth considering. Competitive with Liquid Web, Dreamhost features an uptime promise of upwards of 99.99 percent, which makes it extremely competitive for your e-commerce store. 

If you aren’t sure whether Dreamhost is the right fit for your eCommerce business, you have nothing to lose. They feature a 97-day money-back guarantee to ensure that their service is the right fit for you. 

Compare Siteground vs Dreamhost here for a head-to-head comparison. 

Pricing: Starting at $2.59 per month

Final Thoughts on The Best ECommerce Hosting Options

Finding the best ecommerce hosting provider can feel overwhelming when all you want to do is launch a new online store. The good news is that there are tons of options out there so that you can find an ideal solution for your storefront.

No matter what you want to sell, how you want to host it, and what you can afford, one of these providers will work for your ecommerce website. 

Which one is right for you? 

Consider which benefits you need in an online store, and you’ll find a hosting provider that works for you!


Source link

Keep an eye on what we are doing
Be the first to get latest updates and exclusive content straight to your email inbox.
We promise not to spam you. You can unsubscribe at any time.
Invalid email address
Continue Reading

WORDPRESS

Best WordPress Plugins of All Time: Updated List for 2024

Published

on

By

Photo of Webqo

Best WordPress Plugins of All Time: Updated List for 2024

WordPress continues to reign supreme as the platform of choice for millions of users worldwide in the ever-evolving landscape of website development. One key factor contributing to its popularity is the vast ecosystem of plugins, which empower users to customize and enhance their websites easily.

As we venture into 2024, the demand for innovative WordPress plugins remains stronger than ever. From SEO optimization to performance enhancement, security fortification, e-commerce solutions, and beyond, WordPress plugins offer diverse tools to meet the evolving needs of website owners and developers alike.

In this comprehensive guide, we’ll explore the top WordPress plugins for 2024, highlighting their key features and benefits and how they can elevate your website’s functionality and performance. Whether you’re a seasoned WordPress user or just getting started, these essential plugins will streamline your workflow, boost your site’s visibility, and delight visitors.

Without further ado, let’s dive into the world of WordPress plugins and discover the must-have tools for the year ahead.

Best WordPress Plugins of All Time

Top WordPress Plugins: Updated List for 2024

Key Takeaways

  • Stay updated with the latest WordPress plugin trends to remain competitive in 2024.
  • Invest in plugins offering comprehensive security, performance, and SEO functionality.
  • Select plugins that prioritize the user experience and site management ease.
  • Keep an eye on new plugin releases that could revolutionize how we interact with WordPress.
  • Ensure compatibility and support when choosing plugins to protect your website investment.
  • Embrace plugins that help unlock the full potential of WordPress as a digital platform.

In full transparency – some of the links on Webqo Blog are affiliate links, and if you use them to make a purchase, we will earn a commission at no additional cost to you.


Essential SEO WordPress Plugins

Effective SEO WordPress plugins are key to getting ahead in search engine results. These tools help make your site easier to find by improving its SEO. This means better site visibility and more visitors.

All-in-One SEO

A Comprehensive SEO Solution

AIOSEO - A Comprehensive SEO Solution
AIOSEO WordPress Plugin – A Comprehensive SEO Solution

All-in-One SEO (AIOSEO) is a top choice for managing SEO. It comes packed with features to handle all your SEO needs with ease. You can edit your SEO titles, meta descriptions, and keywords without hassle. Plus, its sitemap feature works well with Google Search Console. This helps you keep an eye on how your site is indexed.

AIOSEO is unique with its TruSEO content analysis and custom schema generator. These tools are crucial for staying relevant in searches and attracting more clicks from search results.

Yoast SEO

A Popular Choice for Optimizing WordPress Sites

Yoast SEOYoast SEO
The Best WordPress SEO Plugin

Yoast SEO is another great SEO plugin. It’s known for being easy to use. It offers a simple way to edit meta information and helpful tips for linking and schema, which can greatly improve your site’s SEO.

The free version of Yoast SEO is a good start for beginners or those on a budget. If you’re ready for more, the premium version offers extra features like social previews. This can further improve your site’s SEO.

Using these plugins can really boost your site’s performance on search engines. In today’s competitive digital world, they provide a necessary advantage. They can help your website stand out online.


Enhancing Website Performance with Caching Plugins

Website caching boosts your site’s speed and improves its user experience. Website performance caching plugins are key to faster loading times and help keep people on your site longer. In today’s digital world, using advanced WordPress caching is essential for success.

WP Super Cache

Improve Loading Speeds with Advanced Caching

Improve Loading Speeds with WP Super CacheImprove Loading Speeds with WP Super Cache
Improve Loading Speeds with WP Super Cache

WP Super Cache helps your site by creating static HTML files. Your WordPress site works faster because it’s easier on your server. This plugin is perfect for speeding up your site without spending money.

WP Rocket

An All-in-One Solution for Site Performance

WP Rocket - WordPress Caching PluginWP Rocket - WordPress Caching Plugin
WP Rocket – Best WordPress Caching Plugin

WP Rocket stands out with its comprehensive approach. It improves caching, speeds up images, optimizes databases, and more. Its easy interface lets anyone improve their site’s performance, making it a top choice for enhancement.

Feature WP Super Cache WP Rocket
Caching Method Static HTML file caching Page caching, browser caching, and cache preloading
Optimization Tools CDN support, cache preloading File compression, lazy load images, database optimization
User-Friendliness Basic interface suited for tech-savvy users Simple, intuitive interface for all levels of users
Cost Free Premium (with free trial)

Choosing between WP Super Cache and WP Rocket depends on your needs. WP Super Cache offers free options, while WP Rocket provides premium services. Both are great choices for improving your website’s performance, satisfying users, and ranking higher on search engines.


WordPress Security Essentials

Keeping your WordPress site safe from cyber threats is crucial today. Hackers are getting smarter. A secure blog protects your content and keeps your brand’s trust. Using WordPress site security solutions is essential for any site owner.

Good security steps can make or break your site. The right tools help fight off attacks, from brute force to malware. Let’s see what defenses you can use for WordPress.

  • SolidWP Security Specializes in preventing unwanted intrusions and securing user credentials.
  • Secupress Offers a sleek interface and powerful protection against myriad digital threats.
  • WordFence Features an endpoint firewall and malware scanner engineered from the ground up to protect WordPress.
  • Limit Login Attempts Reloaded Thwarts brute force attacks by restricting the number of failed login attempts.
  • WPS Hide Login Enhances security by allowing the creation of custom URLs for the login page, minimizing exposure to automated attacks.
Plugin Core Function User-Friendly Interface Notable Feature
SolidWP Security User Credential Protection Yes Two-Factor Authentication
Secupress Digital Threat Defense Yes Anti-Brute Force Lockdown
WordFence Firewall and Malware Scanner Yes Real-time IP Blocklisting
Limit Login Attempts Reloaded Login Protection Yes Login Attempt Limiting
WPS Hide Login Custom Login URL Creation Yes Stealth Login Page

Remember, it’s important to layer your security. This makes it hard for hackers to get through. Using several WordPress security plugins gives you strong protection against many cyber threats.


WordPress Plugins for Creating Engaging Content

Creating engaging WordPress content is easier with the right page builder plugins. Elementor and SeedProd are top choices for design and customization. They lead page-building experience and theme customization.

Elementor

Leading the Way in Page Building

ElementorElementor
What Elementor Can Do?

Elementor makes page building easy and fun. Its drag-and-drop interface lets you design complex layouts without coding, and its responsive editing features make WordPress design accessible and enjoyable.

SeedProd

Quickly Craft Beautiful Pages and Themes

SeedProdSeedProd
Drag & Drop WordPress Website Builder

SeedProd speeds up theme customizations and page creation. It helps users create stunning web pages quickly. Creating beautiful pages and themes becomes easy and creative with its intuitive platform.

Feature Elementor SeedProd
Interface Drag-and-Drop Editor Visual Drag-and-Drop Theme Builder
Customization Advanced Styling Options Ready-to-Use Page Templates
Widgets/Blocks Hundreds of Unique Widgets Custom Blocks for Various Purposes
Responsiveness Mobile Editing and Preview Adaptive Design Features
Learning Curve Minimal, User-Friendly Very Low, Beginner-Friendly
Use Case Detailed Site Builds Quick Launches and Revisions

Using these plugins for WordPress means more than a good-looking site. It’s about improving user experience and connecting with your audience. Elementor and SeedProd help you create content easily and effectively as digital tools evolve.

You can also check out this list of the best WordPress themes to improve your website.


Top Backup Solutions for WordPress

Every WordPress website owner needs a good backup strategy. A reliable backup plan ensures you can regain your site after hacking, server issues, or mistakenly deleting content. Using the best WordPress site backup plugins protects your data and gives you peace of mind. Let’s look at some top backup solutions trusted by the WordPress community.

BackupBuddy is a premium choice known for its ease of use and protection of multiple sites. It lets you set up scheduled and instant backups.

BlogVault is great because it saves off-site data and makes a recovery simple.

WP Time Capsule is ideal for those who prefer saving changes as they happen. It saves resources by backing up only recent changes instead of everything.

Feature BackupBuddy BlogVault WP Time Capsule
Backup Type Full and Scheduled Incremental Incremental
Storage Options Local and Cloud Off-site BlogVault Servers Choose Your Own Cloud Storage
Restore Capabilities Individual File Restore One-Click Restore One-Click Restore
Price Point Subscription-Based Monthly/Annual Plans Annual Subscription
Additional Benefits Private Support, Customizable Backup Content Easy Site Migrations, Performance Checks Real-time Backup, Staging Site

It’s key to pick the right plugin to secure WordPress data. Consider what’s most important: ease of use, reliability, and cost. Make sure the plugin you choose meets your specific requirements. Apart from these features, it’s also crucial to have ongoing support and updates. This ensures your backups stay effective as WordPress and its plugins continue to grow.


WordPress Analytics Plugins to Track Performance

Knowing your audience and your content’s impact is vital today. WordPress analytics plugins are essential for website owners who want to monitor their site’s performance. By integrating with Google Analytics, these plugins provide detailed insights and reports through MonsterInsights and ExactMetrics. They help you make smart decisions based on data.

MonsterInsights

Integrating Google Analytics into WordPress

MonsterInsightsMonsterInsights
The Best WordPress Analytics Plugin

MonsterInsights makes using Google Analytics easy. It helps you track your website’s performance without hassle. The interface turns complex data into easy-to-read reports right in your WordPress dashboard. Here’s what MonsterInsights offers:

Feature Description
Real-Time Stats See what visitors are doing on your site right now.
Universal Tracking Track activity across devices and campaigns for a complete view.
E-commerce Tracking Learn about your customers’ buying habits to boost your ROI.
Custom Dimensions Get deeper insights by tracking data like authors and post types.
Enhanced Link Attribution Find out which links on your page get the most clicks and attention.

ExactMetrics

Detailed Reporting for Informed Decisions

Best Premium WordPress Analytics PluginBest Premium WordPress Analytics Plugin
Best Premium WordPress Analytics Plugin

ExactMetrics is perfect for those who need advanced analytics. It offers detailed data to refine your strategies with its robust reporting features. Here’s what you get with ExactMetrics:

  1. A clear dashboard – It shows important metrics in an easy-to-understand way.
  2. Performance tracking – Check how load times impact the user experience.
  3. Demographic data – Understand who your audience is.
  4. Custom reports – Make reports that focus on your specific goals and KPIs.
  5. Affiliate link tracking – Monitor how well your affiliate links are doing to improve earnings.

Both MonsterInsights and ExactMetrics offer powerful ways to monitor your website. They integrate easily with your WordPress dashboard, keeping you informed. This helps you enhance your site’s success with every choice you make.


E-commerce Integration: Best WordPress Plugins

You need the best tools to build a strong eCommerce platform on WordPress. eCommerce WordPress plugins like WooCommerce are top choices. They offer a complete solution to integrate an online store with WordPress. With many features, WooCommerce lets business owners easily create and manage their online store. This shows how vital eCommerce site enhancement is.

WooCommerceWooCommerce
WooCommerce

However, WooCommerce is not the only option for an engaging customer shopping experience. Let’s explore the features of top WooCommerce plugins. These can boost your online store’s efficiency and appeal:

  • Product Add-Ons: Allow customers to personalize products to their liking.
  • WooCommerce Subscriptions: Facilitate recurring payments for subscription-based products or services.
  • WooCommerce Bookings: Enable customers to book appointments, reservations, or rentals directly from your website.
  • Dynamic Pricing: Set flexible pricing rules based on quantity, user role, or other criteria.
  • WooCommerce Memberships: Create a membership system tied to your store, offering special discounts or exclusive products.

As your online business grows, these plugins are key. They give your customers a more dynamic, interactive, and personalized experience. Using such plugins makes operations smoother and boosts your store’s capabilities. This lets you adjust your eCommerce offerings to meet your market’s changing needs.

Every plugin plays a vital role in your online store’s success. They help your eCommerce site run smoothly, efficiently, and attractively. In today’s online market, making your customers happy is essential. These eCommerce WordPress plugins are necessary for building successful online stores. Adding these eCommerce site enhancement tools to your strategy leads to a well-managed, more engaging, and more profitable online business.


User Interaction and Forms

Making a connection with your audience is key. Adding user interaction plugins and WordPress contact forms helps a lot. This makes reaching out easier and improves everyone’s experience. It encourages more feedback and gives you useful information.

WPForms

User-Friendly Drag & Drop Contact Forms

WPFormsWPForms
Drag & Drop WordPress Form Builder

With the WPForms drag-and-drop builder, anyone can create custom contact forms. It’s easy to use, regardless of your skill level.

Gravity Forms

Advanced Forms for WordPress

Gravity FormsGravity Forms
Advanced Forms for WordPress – Gravity Forms

Gravity Forms’ advanced functionalities are perfect if you need something more complex. They let you customize everything, from polls to detailed order systems.

Feature WPForms Gravity Forms
User Interface Drag & drop, user-friendly Developer-oriented, advanced
Template Availability Extensive library of pre-built templates Basic and advanced templates
Use Cases Contact forms, newsletters, payments Surveys, user-generated content, web applications
Integration Seamless with popular services Extended through add-ons
Customer Support Documentation & priority support Extensive knowledge base & ticket support

Choosing between WPForms and Gravity Forms depends on your needs and expertise. Both can boost user engagement and collect important data. They push WordPress sites to be more interactive.


Email Marketing and List Building Plugins for Growth

Growing your WordPress email list is key for boosting engagement and loyalty. Effective list-building strategies help you gain a dedicated following, not just email addresses. Certain email marketing plugins are great at increasing subscription rates and improving campaigns.

OptinMonster is a top choice for email subscriber plugins. It offers easy-to-use design tools and targeted pop-ups, which increase conversion rates significantly. Plugins also help keep subscribers, capture leads, and let site owners create personalized email campaigns that speak to audiences.

OptinMonsterOptinMonster
Convert and Monetize Your Website Traffic – OptinMonster

Discover plugins that add subscribers to your list and help you engage them through powerful segmentation and automated follow-ups.

Using a range of email marketing WordPress plugins is crucial. Plugins that work well with analytics and other tools help webmasters. They can offer each subscriber a personalized and data-driven journey.

  • Segmentation features: For personalized experiences.
  • Automated triggers: To send emails at optimal times.
  • A/B Testing capabilities: To refine campaigns for better results.
  • Easy opt-in form builders: To grow lists effectively.

These are key parts of strong list-building strategies. They attract and keep subscriber interest.

Growing your email list with the right plugins lays a foundation for success. As your site grows, update your strategies to keep your marketing efforts fresh and effective.


MemberPress and LMS Plugins: Building Online Communities and Courses

The need for digital learning spaces is growing. This has increased the demand for strong Learning Management Systems (LMS) that work well with WordPress. LMS plugins for WordPress are great because they let you create courses, build online communities, and make learning more engaging.

These tools are super helpful for those who create content and teach. With LMS plugins, you can create and run full online courses, which helps spread knowledge and grow communities.

LMS plugins for WordPress empower educators to reach broader audiences and transform the online learning landscape.

LearnDash

A Powerhouse for Online Course Creation

LearnDash - WordPress LMS PluginLearnDash - WordPress LMS Plugin
LearnDash – WordPress LMS Plugin

LearnDash makes creating online courses easy. It is known for its easy-to-use interface and cool features. This plugin helps you put together and deliver courses online. It includes tracking course progress, advanced quizzes, and ways to deliver courses on different levels. LearnDash is a key tool for delivering educational content online.

MemberPress

Making Membership Management Effortless

Membership Plugin for WordPressMembership Plugin for WordPress
Membership Plugin for WordPress

If you want to create areas for exclusive content or subscription products, MemberPress is perfect. It adds exclusivity to online communities. This plugin fits into your WordPress site and lets you create a membership site with different access levels and subscription options.

Feature LearnDash MemberPress
Course Creation Drag-and-drop course builder
Membership Levels Limited support through add-ons Unlimited levels with customizable access rules
Content Dripping Scheduled content delivery Content access based on subscription level
Quizzes and Assessments Advanced quiz settings and question types
Community Building Certificate and badge awarding system Integration with forums and social groups
Subscription Management Automatic billing and renewal notifications

Using LMS plugins on your WordPress site can make it a lively place for sharing knowledge and building community. Whether managing a membership site with MemberPress or creating online courses with LearnDash, these tools make your site a center for learning and connection.


FAQs about Best WordPress Plugins

Best WordPress Plugins of All Time: Updated List for 2024

You’ll discover some frequently asked questions about the best WordPress plugins below.

What are the best WordPress plugins for 2024?

The top WordPress plugins for 2024 are designed to improve your site’s SEO and speed. They also boost security and enhance how your site works and feels. Some key plugins are All in One SEO, WP Super Cache, and WooCommerce.

Which SEO plugins are essential for WordPress sites?

Important SEO plugins for WordPress include All in One SEO and Yoast SEO. They help your site rank higher in search engine results. They do this by managing SEO titles, creating sitemaps, and analyzing your content to make it better.

How can caching plugins enhance website performance?

Caching plugins like WP Super Cache speed up your site by saving cached versions of pages. They use methods and features like file compression to make your site faster and more pleasant for visitors.

What are the top security plugins for WordPress?

For WordPress security, iThemes Security and WordFence are among the best. They protect your site from attacks, scan for risks, and manage firewalls. These steps keep your WordPress site safe from threats.

Can you recommend plugins for creating engaging content on WordPress?

Elementor and SeedProd stand out for engaging content. Elementor has many design options for building pages. SeedProd’s drag-and-drop builder lets you easily create beautiful pages and themes.

What are the best WordPress plugins for site backups?

Top backup plugins for WordPress sites include BackupBuddy and UpdraftPlus. They regularly save your data, offer easy ways to restore it, and keep your site safe from data loss or attacks.

How do social media plugins benefit WordPress websites?

Social media plugins help integrate your site with platforms like Facebook and Twitter. They make sharing content easier, increase engagement, and build a community around your brand.

Why are WordPress analytics plugins important?

Analytics plugins like MonsterInsights provide valuable insights into your website’s performance. They track visitor behavior, helping you to improve your site for better engagement and conversions.

What plugins should I use for eCommerce on WordPress?

WooCommerce is essential for running an online store on WordPress. It has features for listing products, managing inventory, and handling payments securely.

What are the best WordPress plugins for creating forms and improving user interaction?

WPForms and Gravity Forms are great for making forms on WordPress. They support everything from simple contact forms to complex surveys, boosting user interaction and data collection.

Are there effective plugins for email marketing and list building?

Email marketing is made easy with plugins like OptinMonster. They allow you to build subscription forms, launch targeted campaigns, and manage email lists effectively.

Which plugins are best for creating membership sites and online courses on WordPress?

MemberPress and LearnDash are top choices for membership sites and online courses. MemberPress helps with membership management. LearnDash is great for setting up courses, quizzes, and certifications.


Quick Links

Top WordPress Plugins: Updated List for 2024

We hope you enjoyed this post. If you did, you might want to check out these other resources:


Best WordPress Plugins Summary

As we’ve explored in this comprehensive guide, WordPress plugins are crucial in enhancing your website’s functionality, security, and performance. From SEO optimization to performance enhancement, security fortification, e-commerce solutions, and content creation, WordPress plugins offer diverse tools to meet the evolving needs of website owners and developers.

In 2024, the demand for innovative WordPress plugins continues growing as businesses and individuals seek to stay ahead in the competitive online landscape. By leveraging the top WordPress plugins highlighted in this guide, you can streamline your workflow, boost your site’s visibility, and delight visitors with an immersive browsing experience.

Whether you’re a seasoned WordPress user or just getting started, these essential plugins will enhance your website’s capabilities and help you achieve your online goals. As you embark on your journey with WordPress in 2024 and beyond, remember to stay informed about the latest tools and trends in the ever-evolving ecosystem of WordPress plugins.

Thank you for exploring the best WordPress plugins for 2024. We hope you found this guide informative and insightful, and we wish you success in creating exceptional websites powered by WordPress.

Source link

Keep an eye on what we are doing
Be the first to get latest updates and exclusive content straight to your email inbox.
We promise not to spam you. You can unsubscribe at any time.
Invalid email address
Continue Reading

Trending