SEO
Understanding Bounce Rate & How to Audit It
Many people talk about how important it is to have a “low bounce rate.”
But bounce rate is one of the most misunderstood metrics in SEO and digital marketing.
This article will explore the complexities of bounce rate and why it’s not as straightforward as you might think.
You’ll also learn how to analyze your bounce using Google Analytics 4 exploration reports.
In order to understand what bounce rate is, we need to define what engaged sessions are according to GA4.
What Is An Engaged Session?
An engaged session in GA4 is a session which meets either of the following criteria:
- Lasts at least 10 seconds.
- Has key event (formerly conversions).
- Has at least two screen views (or pageviews).
Simply put, if a user lands on your homepage and leaves without converting (key event), that would produce a 100 percent bounce rate for that session.
If one lands and visits a second page or signs up for your newsletter (as you defined it as a key event), that would mean the bounce rate for that session is 0%.
What Is Bounce Rate In Google Analytics?
Bounce rate is a percentage of unengaged sessions, and it is calculated with the following formula:
(total sessions/unengaged sessions)*100.
So, it’s not only visiting a second page that brings the bounce rate down but also when key events occur.
You can set up any event, either built-in or custom-defined in Google Analytics 4 (GA4), to count as a key event (formerly conversion), and in cases when it occurs during the session, it will be counted as a non-bounce visit.
Here is how to define any event as a key event:
- Navigate to Admin.
- Under Data display, navigate to Events.
- Find the event you are interested in and toggle Mark as key event to turn it blue.
How To Change The Default Engaged Session Timer In GA4
As a marketer, you may want to adjust the default 10-second timer for engaged sessions based on your project needs.
For example, if you have a blog article, you may want to set the timer as high as 20 seconds, but if you have a product page where users typically take more time to explore details, you might increase the timer to 30 seconds to better reflect user engagement.
To change:
- Navigate to Data streams and click on the stream.
- In the slide popup, navigate to Configure tag settings.
- In the second slide popup, click Show more at the bottom.
- Click on the Adjust session timeout setting.
- Change Adjust timer for engaged sessions to the value of your choice.
Here is the detailed video guide on how to adjust the timer for engaged sessions:
What Is A Good Bounce Rate?
So, it’s not as straightforward as saying, “Example.com has a bounce rate of 43 percent, and example2.com has a bounce rate of 20 percent; therefore, example2.com performs better.”
For example, if you search [what’s on at the cinema…], then land on a website and have to dig through five pages of the site to find what’s showing, the website might have a low bounce rate but will have a poor user experience.
In this case, that’s misleading if you consider a low bounce rate good.
On top of that, what use is there in measuring the bounce rate for the whole website when you have lots of different templates that are laid out and designed in different ways, and you track ‘key events,’ aka conversions, differently?
In most cases, this shows that your marketing is effective and well-targeted, and visitors are engaging with your content and wanting to know more.
Remember, bounce rate is not a ranking factor, but when users navigate deeper into your pages, it is an engagement ranking signal that Google may take into account, according to what Google’s Pandu Nayak said during hearings.
That said, it may make sense to track the number of sessions with two or more pageviews in GA4, which you may want to consider as a KPI when reporting.
How To Set Up A Custom Audience With Multiple Pageviews Per Session
If you want to know how many visitors you have who have more than two page views in a session, you can easily set it up in GA4.
To do that:
- Navigate to Admin.
- Under Data display, navigate to Audiences.
- Click the New Audience blue button on the top right corner.
- Click Create custom audience.
- Set up a name for your audience.
- Select scope to “Within the same session.”
- Select session_start.
- Click And and select “page_views” with the parameter with “Event count” greater than one.
You simply tell it to add to my audience all users who viewed more than two pages within the same session. Here is a quick video guide on how to do that.
You can set up audiences with any granularity, like sessions with exactly two or three pageviews and greater than three pageviews.
Later, you can filter your standard reports using your custom audiences.
How To Do Bounce Rate Reporting And Audit
Next time your boss or client asks you, “Why is my bounce rate so high?” – first, send them this article.
Second, conduct an in-depth bounce rate audit to understand what’s going on.
Here’s how I do it.
Bounce Rate by Date Range
Look at bounce rates on your website for a particular period. This is the most simple reporting on bounce rate.
To do that:
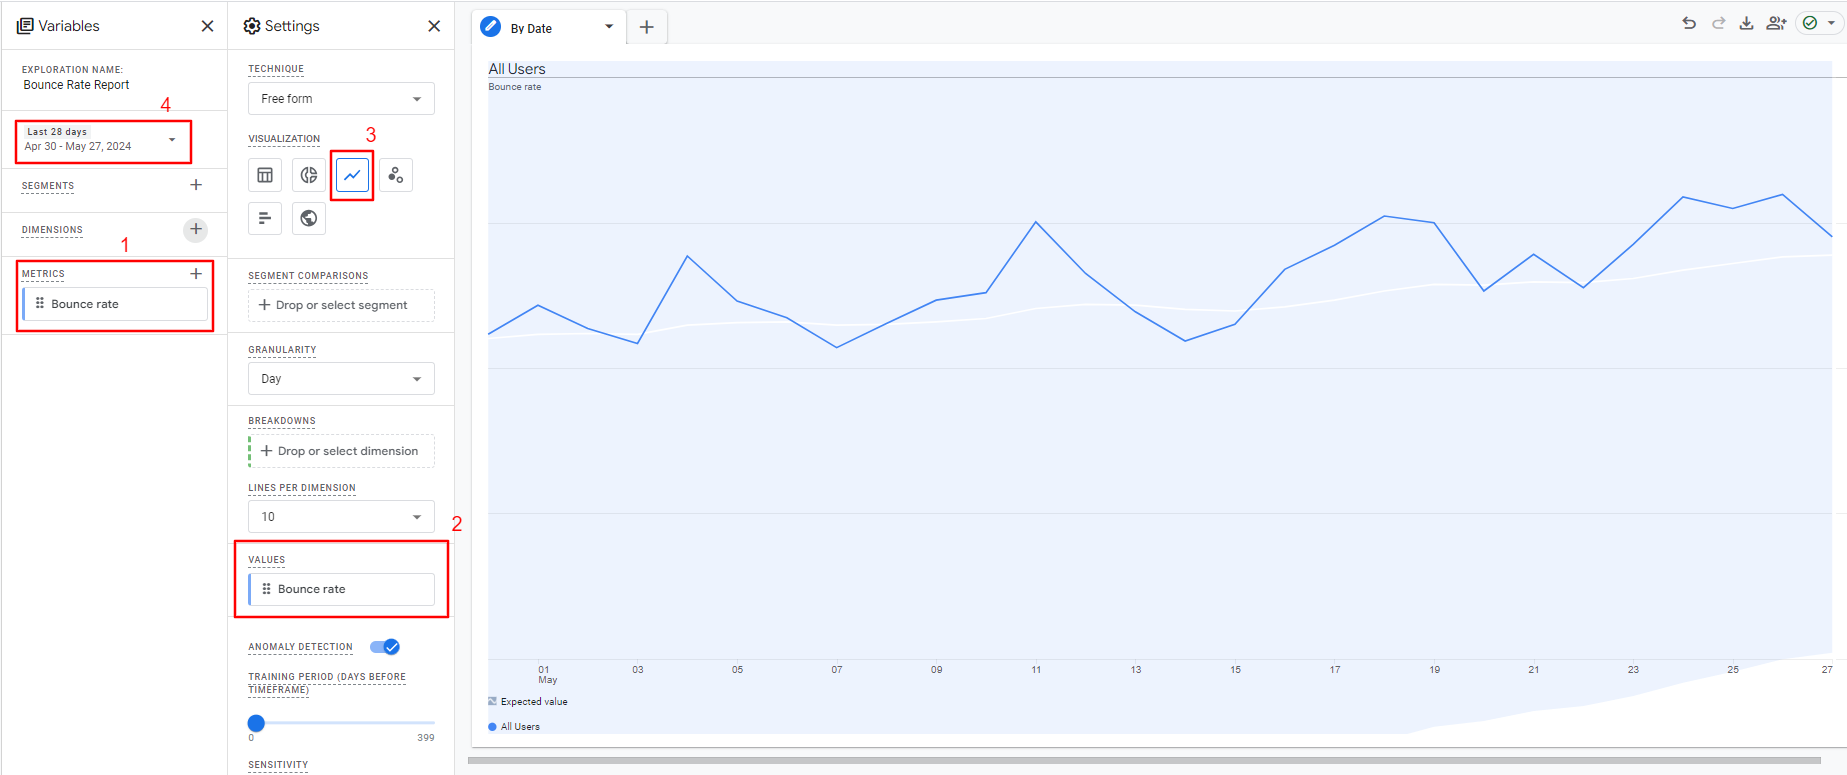
- Navigate to Explorations on the right-side menu.
- Click ‘Blank’ report.
- From Metrics choose “Bounce rate.”
- Set Values to a “Bounce rate.”
- Under Settings (2nd column), choose visualization type “Line chart.”
- Select the date period of your choice.
If you see spikes in the chart, it may indicate a change you made to the website that influenced the bounce rate.
How To Analyze Bounce Rate On A Page Level
When running a lead generation campaign on many different landing pages, evaluating which pages convert well or poorly is vital to optimize them for better performance.
Another example use case of page-level bounce reports is A/B testing.
To do that:
- Navigate to Explorations on the right-side menu.
- Click Blank report.
- From Metrics, choose Bounce rate and Sessions.
- From Dimensions, choose Landing page + query string.
- Under Settings (second column), choose visualization type ‘Table.”
- Set Rows to a “Landing page + query string.”
- Set Values to a “Bounce rate: and “Sessions.”
- Set the filter to include pages with more than 100 sessions ( to ensure the data you’re mining is statistically significant).
- Select the date period of your choice.
Tip: You don’t need to create a new blank exploration report; instead, add another tab to the same report and change only the configuration.
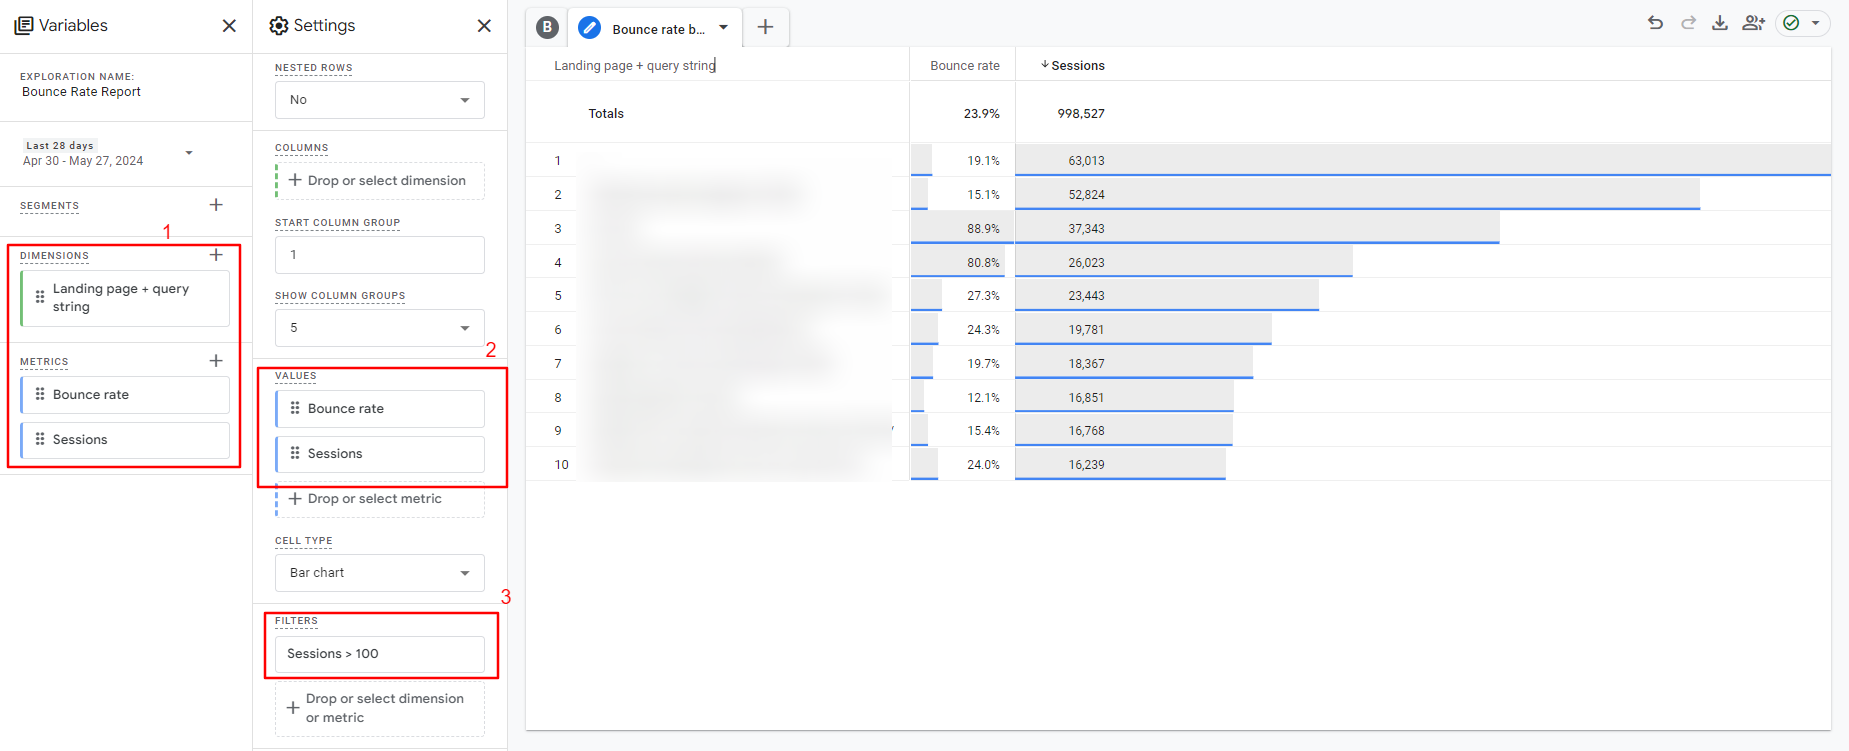
If we don’t filter by sessions number, you’ll be looking at bounce rates on some pages with only one or two sessions, which doesn’t tell you anything.
Once you’ve done the above, repeat the process per channel to gain an even more rounded understanding of what content/source combinations produce the most or least engaged visits.
How To Analyze Your Bounce Rates By Traffic Channel
Bounce rates can be wildly different depending on the source of traffic.
For example, it’s likely that search traffic will produce a low bounce rate while social and display traffic might produce a high bounce rate.
So you also have to consider bounce rate on a channel level as well as on a page level.
The bounce rate from social and display is almost always higher than “inbound” channels for these reasons:
- When a user is on social media looking through their news feed, they are (often) not actively looking for what we are promoting.
- When a user sees a banner ad on another website, they are (often) not actively looking for what we are promoting.
However, for inbound channels like organic and paid search, it’s logical that the bounce rate is lower as these users are actively searching for what you are promoting.
So, you capture their attention during the “doing” phase of their buyer’s journey (depending on the search term in question).
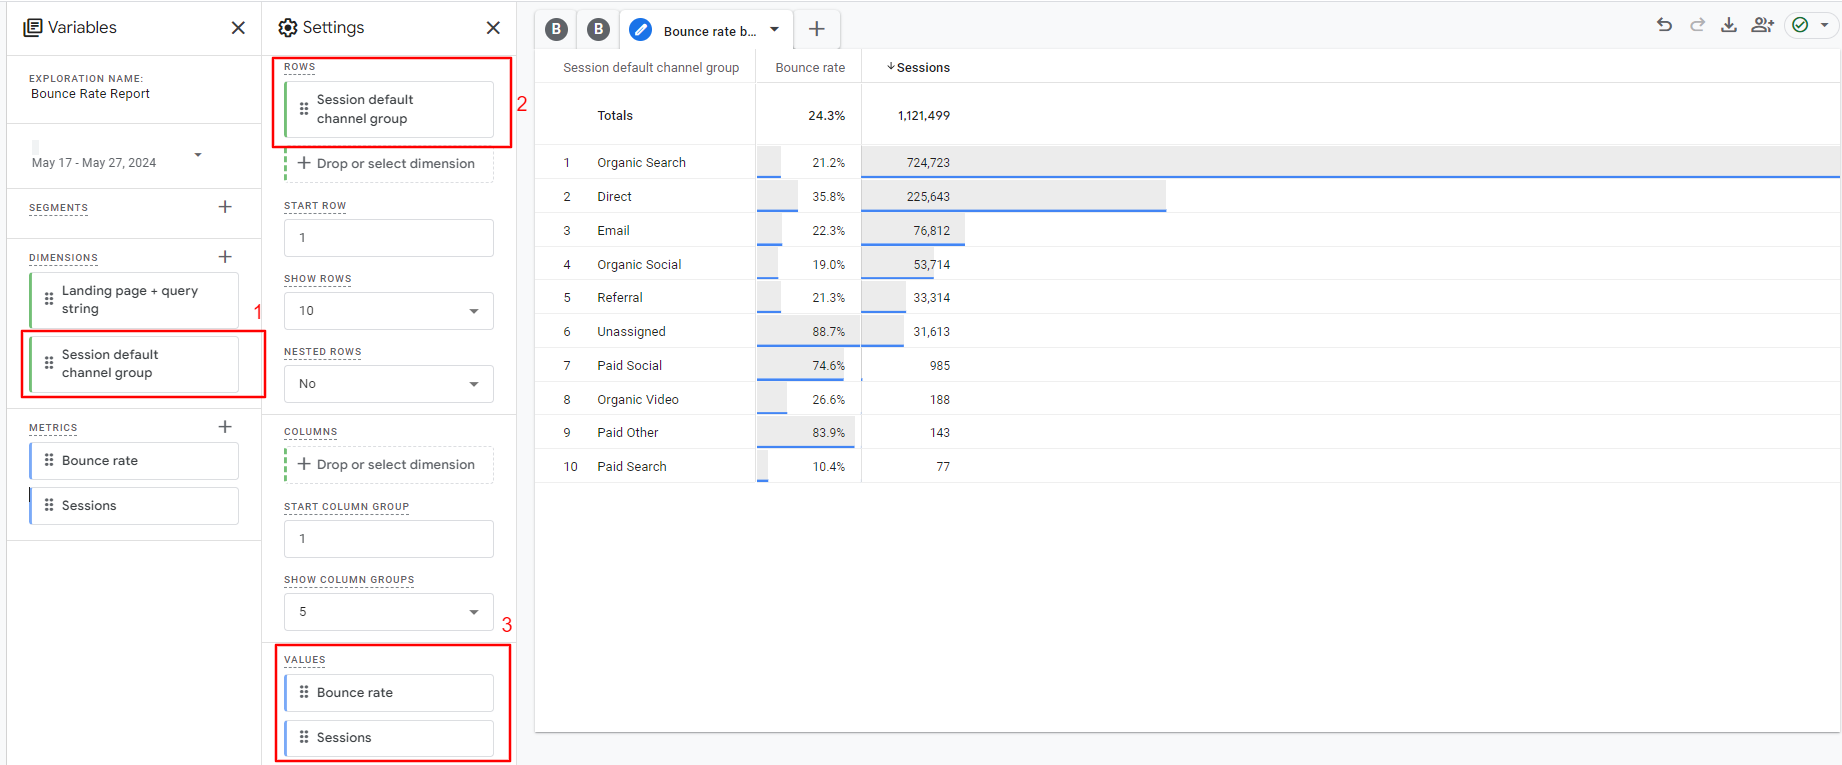
To dig deeper into each one:
- From Metrics, choose Bounce rate and Sessions.
- From Dimensions, choose Session default channel group.
- Under Settings (second column), choose visualization type Table.
- Set Rows to a Session default channel group.
- Set Values to a Bounce rate and Sessions.
- Select the date period of your choice.
A little homework: Try to plot a line graph based on the bounce rate for your organic traffic.
Now, you can dig deeper into the data and look for patterns or reasons that one page or set of pages/source or set of sources has a higher or lower bounce rate.
Compile the information in an easy-to-read format, ping it to the powers that be, and head for a congratulatory coffee.
Do You Have The Right Intent?
Sometimes, you’ll find pages that rank in search engines for terms that have more than one meaning.
For example, a recent one I discovered was a page on a website I manage that ranks first for the search term ‘Alang Alang’ (the name of a villa), but Alang Alang is also the name of a film.
The villa page had a high bounce rate, and one reason for this is that some of the visitors landing on that page were actually looking for the film, not the villa.
By doing keyword and competition research to see what results your target keywords produce, you can quickly understand if you have any pages that rank well for terms that could be intended for other topics.
When you identify such pages, you have three options:
- Completely change your keyword targeting.
- Remove the page from the SERPs.
- Overhaul your title and meta description, so searchers know explicitly what the page is about before they click.
How To Increase Website Engagement
Now you’ve figured out what’s going wrong, you’re all set to make some changes.
All of this depends on your study’s findings, so not all of these points are relevant to every scenario, but this should be a good starting point.
Most importantly track custom events as “key events” (conversions) so things like newsletter sign-ups result in Google Analytics classifying that as a non-bounce even if the user didn’t visit a second page.
Is High Bounce Rate Bad?
Hopefully, you now understand why bounce rate isn’t simply “high” or “low”. It depends on many factors, and there is no single answer to the question, “Is high bounce rate bad?”
If you defined your ‘key events’ (conversions) and GA4 settings correctly for your goals, a high bounce ( +90% ) rate is definitely concerning because it means your visitors don’t engage enough with your webpages.
But if you have GA4 on default settings, you can never rely on data because of the reasons we discussed above.
Never assume anything. Do your research and make sure you configure your GA4 account properly to track ‘key events.’
Now, go forth and conquer your bounce rate!
More resources:
Featured Image: eamesBot/Shutterstock
SEO
How to Revive an Old Blog Article for SEO
Quick question: What do you typically do with your old blog posts? Most likely, the answer is: Not much.
If that’s the case, you’re not alone. Many of us in SEO and content marketing tend to focus on continuously creating new content, rather than leveraging our existing blog posts.
However, here’s the reality—Google is becoming increasingly sophisticated in evaluating content quality, and we need to adapt accordingly. Just as it’s easier to encourage existing customers to make repeat purchases, updating old content on your website is a more efficient and sustainable strategy in the long run.
Ways to Optimize Older Content
Some of your old content might not be optimized for SEO very well, rank for irrelevant keywords, or drive no traffic at all. If the quality is still decent, however, you should be able to optimize it properly with little effort.
Refresh Content
If your blog post contains a specific year or mentions current events, it may become outdated over time. If the rest of the content is still relevant (like if it’s targeting an evergreen topic), simply updating the date might be all you need to do.
Rewrite Old Blog Posts
When the content quality is low (you might have greatly improved your writing skills since you’ve written the post) but the potential is still there, there’s not much you can do apart from rewriting an old blog post completely.
This is not a waste—you’re saving time on brainstorming since the basic structure is already in place. Now, focus on improving the quality.
Delete Old Blog Posts
You might find a blog post that just seems unusable. Should you delete your old content? It depends. If it’s completely outdated, of low quality, and irrelevant to any valuable keywords for your website, it’s better to remove it.
Once you decide to delete the post, don’t forget to set up a 301 redirect to a related post or page, or to your homepage.
Promote Old Blog Posts
Sometimes all your content needs is a bit of promotion to start ranking and getting traffic again. Share it on your social media, link to it from a new post – do something to get it discoverable again to your audience. This can give it the boost it needs to attract organic links too.
Which Blog Posts Should You Update?
Deciding when to update or rewrite blog posts is a decision that relies on one important thing: a content audit.
Use your Google Analytics to find out which blog posts used to drive tons of traffic, but no longer have the same reach. You can also use Google Search Console to find out which of your blog posts have lost visibility in comparison to previous months. I have a guide on website analysis using Google Analytics and Google Search Console you can follow.
If you use keyword tracking tools like SE Ranking, you can also use the data it provides to come up with a list of blog posts that have dropped in the rankings.
Make data-driven decisions to identify which blog posts would benefit from these updates – i.e., which ones still have the chance to recover their keyword rankings and organic traffic.
With Google’s helpful content update, which emphasizes better user experiences, it’s crucial to ensure your content remains relevant, valuable, and up-to-date.
How To Update Old Blog Posts for SEO
Updating articles can be an involved process. Here are some tips and tactics to help you get it right.
Author’s Note: I have a Comprehensive On-Page SEO Checklist you might also be interested in following while you’re doing your content audit.
Conduct New Keyword Research
Updating your post without any guide won’t get you far. Always do your keyword research to understand how users are searching for your given topic.
Proper research can also show you relevant questions and sections that can be added to the blog post you’re updating or rewriting. Make sure to take a look at the People Also Ask (PAA) section that shows up when you search for your target keyword. Check out other websites like Answer The Public, Reddit, and Quora to see what users are looking for too.
Look for New Ranking Opportunities
When trying to revive an old blog post for SEO, keep an eye out for new SEO opportunities (e.g., AI Overview, featured snippets, and related search terms) that didn’t exist when you first wrote your blog post. Some of these features can be targeted by the new content you will add to your post, if you write with the aim to be eligible for it.
Rewrite Headlines and Meta Tags
If you want to attract new readers, consider updating your headlines and meta tags.
Your headlines and meta tags should fulfill these three things:
- Reflect the rewritten and new content you’ve added to the blog post.
- Be optimized for the new keywords it’s targeting (if any).
- Appeal to your target audience – who may have changed tastes from when the blog post was originally made.
Remember that your meta tags in particular act like a brief advertisement for your blog post, since this is what the user first sees when your blog post is shown in the search results page.
Take a look at your blog post’s click-through rate on Google Search Console – if it falls below 2%, it’s definitely time for new meta tags.
Replace Outdated Information and Statistics
Updating blog content with current studies and statistics enhances the relevance and credibility of your post. By providing up-to-date information, you help your audience make better, well-informed decisions, while also showing that your content is trustworthy.
Tighten or Expand Ideas
Your old content might be too short to provide real value to users – or you might have rambled on and on in your post. It’s important to evaluate whether you need to make your content more concise, or if you need to elaborate more.
Keep the following tips in mind as you refine your blog post’s ideas:
- Evaluate Helpfulness: Measure how well your content addresses your readers’ pain points. Aim to follow the E-E-A-T model (Experience, Expertise, Authoritativeness, Trustworthiness).
- Identify Missing Context: Consider whether your content needs more detail or clarification. View it from your audience’s perspective and ask if the information is complete, or if more information is needed.
- Interview Experts: Speak with industry experts or thought leaders to get fresh insights. This will help support your writing, and provide unique points that enhance the value of your content.
- Use Better Examples: Examples help simplify complex concepts. Add new examples or improve existing ones to strengthen your points.
- Add New Sections if Needed: If your content lacks depth or misses a key point, add new sections to cover these areas more thoroughly.
- Remove Fluff: Every sentence should contribute to the overall narrative. Eliminate unnecessary content to make your post more concise.
- Revise Listicles: Update listicle items based on SEO recommendations and content quality. Add or remove headings to stay competitive with higher-ranking posts.
Improve Visuals and Other Media
No doubt that there are tons of old graphics and photos in your blog posts that can be improved with the tools we have today. Make sure all of the visuals used in your content are appealing and high quality.
Update Internal and External Links
Are your internal and external links up to date? They need to be for your SEO and user experience. Outdated links can lead to broken pages or irrelevant content, frustrating readers and hurting your site’s performance.
You need to check for any broken links on your old blog posts, and update them ASAP. Updating your old blog posts can also lead to new opportunities to link internally to other blog posts and pages, which may not have been available when the post was originally published.
Optimize for Conversions
When updating content, the ultimate goal is often to increase conversions. However, your conversion goals may have changed over the years.
So here’s what you need to check in your updated blog post. First, does the call-to-action (CTA) still link to the products or services you want to promote? If not, update it to direct readers to the current solution or offer.
Second, consider where you can use different conversion strategies. Don’t just add a CTA at the end of the post.
Last, make sure that the blog post leverages product-led content. It’s going to help you mention your products and services in a way that feels natural, without being too pushy. Being subtle can be a high ROI tactic for updated posts.
Key Takeaway
Reviving old blog articles for SEO is a powerful strategy that can breathe new life into your content and boost your website’s visibility. Instead of solely focusing on creating new posts, taking the time to refresh existing content can yield impressive results, both in terms of traffic and conversions.
By implementing these strategies, you can transform old blog posts into valuable resources that attract new readers and retain existing ones. So, roll up your sleeves, dive into your archives, and start updating your content today—your audience and search rankings will thank you!
SEO
How Compression Can Be Used To Detect Low Quality Pages
The concept of Compressibility as a quality signal is not widely known, but SEOs should be aware of it. Search engines can use web page compressibility to identify duplicate pages, doorway pages with similar content, and pages with repetitive keywords, making it useful knowledge for SEO.
Although the following research paper demonstrates a successful use of on-page features for detecting spam, the deliberate lack of transparency by search engines makes it difficult to say with certainty if search engines are applying this or similar techniques.
What Is Compressibility?
In computing, compressibility refers to how much a file (data) can be reduced in size while retaining essential information, typically to maximize storage space or to allow more data to be transmitted over the Internet.
TL/DR Of Compression
Compression replaces repeated words and phrases with shorter references, reducing the file size by significant margins. Search engines typically compress indexed web pages to maximize storage space, reduce bandwidth, and improve retrieval speed, among other reasons.
This is a simplified explanation of how compression works:
- Identify Patterns:
A compression algorithm scans the text to find repeated words, patterns and phrases - Shorter Codes Take Up Less Space:
The codes and symbols use less storage space then the original words and phrases, which results in a smaller file size. - Shorter References Use Less Bits:
The “code” that essentially symbolizes the replaced words and phrases uses less data than the originals.
A bonus effect of using compression is that it can also be used to identify duplicate pages, doorway pages with similar content, and pages with repetitive keywords.
Research Paper About Detecting Spam
This research paper is significant because it was authored by distinguished computer scientists known for breakthroughs in AI, distributed computing, information retrieval, and other fields.
Marc Najork
One of the co-authors of the research paper is Marc Najork, a prominent research scientist who currently holds the title of Distinguished Research Scientist at Google DeepMind. He’s a co-author of the papers for TW-BERT, has contributed research for increasing the accuracy of using implicit user feedback like clicks, and worked on creating improved AI-based information retrieval (DSI++: Updating Transformer Memory with New Documents), among many other major breakthroughs in information retrieval.
Dennis Fetterly
Another of the co-authors is Dennis Fetterly, currently a software engineer at Google. He is listed as a co-inventor in a patent for a ranking algorithm that uses links, and is known for his research in distributed computing and information retrieval.
Those are just two of the distinguished researchers listed as co-authors of the 2006 Microsoft research paper about identifying spam through on-page content features. Among the several on-page content features the research paper analyzes is compressibility, which they discovered can be used as a classifier for indicating that a web page is spammy.
Detecting Spam Web Pages Through Content Analysis
Although the research paper was authored in 2006, its findings remain relevant to today.
Then, as now, people attempted to rank hundreds or thousands of location-based web pages that were essentially duplicate content aside from city, region, or state names. Then, as now, SEOs often created web pages for search engines by excessively repeating keywords within titles, meta descriptions, headings, internal anchor text, and within the content to improve rankings.
Section 4.6 of the research paper explains:
“Some search engines give higher weight to pages containing the query keywords several times. For example, for a given query term, a page that contains it ten times may be higher ranked than a page that contains it only once. To take advantage of such engines, some spam pages replicate their content several times in an attempt to rank higher.”
The research paper explains that search engines compress web pages and use the compressed version to reference the original web page. They note that excessive amounts of redundant words results in a higher level of compressibility. So they set about testing if there’s a correlation between a high level of compressibility and spam.
They write:
“Our approach in this section to locating redundant content within a page is to compress the page; to save space and disk time, search engines often compress web pages after indexing them, but before adding them to a page cache.
…We measure the redundancy of web pages by the compression ratio, the size of the uncompressed page divided by the size of the compressed page. We used GZIP …to compress pages, a fast and effective compression algorithm.”
High Compressibility Correlates To Spam
The results of the research showed that web pages with at least a compression ratio of 4.0 tended to be low quality web pages, spam. However, the highest rates of compressibility became less consistent because there were fewer data points, making it harder to interpret.
Figure 9: Prevalence of spam relative to compressibility of page.
The researchers concluded:
“70% of all sampled pages with a compression ratio of at least 4.0 were judged to be spam.”
But they also discovered that using the compression ratio by itself still resulted in false positives, where non-spam pages were incorrectly identified as spam:
“The compression ratio heuristic described in Section 4.6 fared best, correctly identifying 660 (27.9%) of the spam pages in our collection, while misidentifying 2, 068 (12.0%) of all judged pages.
Using all of the aforementioned features, the classification accuracy after the ten-fold cross validation process is encouraging:
95.4% of our judged pages were classified correctly, while 4.6% were classified incorrectly.
More specifically, for the spam class 1, 940 out of the 2, 364 pages, were classified correctly. For the non-spam class, 14, 440 out of the 14,804 pages were classified correctly. Consequently, 788 pages were classified incorrectly.”
The next section describes an interesting discovery about how to increase the accuracy of using on-page signals for identifying spam.
Insight Into Quality Rankings
The research paper examined multiple on-page signals, including compressibility. They discovered that each individual signal (classifier) was able to find some spam but that relying on any one signal on its own resulted in flagging non-spam pages for spam, which are commonly referred to as false positive.
The researchers made an important discovery that everyone interested in SEO should know, which is that using multiple classifiers increased the accuracy of detecting spam and decreased the likelihood of false positives. Just as important, the compressibility signal only identifies one kind of spam but not the full range of spam.
The takeaway is that compressibility is a good way to identify one kind of spam but there are other kinds of spam that aren’t caught with this one signal. Other kinds of spam were not caught with the compressibility signal.
This is the part that every SEO and publisher should be aware of:
“In the previous section, we presented a number of heuristics for assaying spam web pages. That is, we measured several characteristics of web pages, and found ranges of those characteristics which correlated with a page being spam. Nevertheless, when used individually, no technique uncovers most of the spam in our data set without flagging many non-spam pages as spam.
For example, considering the compression ratio heuristic described in Section 4.6, one of our most promising methods, the average probability of spam for ratios of 4.2 and higher is 72%. But only about 1.5% of all pages fall in this range. This number is far below the 13.8% of spam pages that we identified in our data set.”
So, even though compressibility was one of the better signals for identifying spam, it still was unable to uncover the full range of spam within the dataset the researchers used to test the signals.
Combining Multiple Signals
The above results indicated that individual signals of low quality are less accurate. So they tested using multiple signals. What they discovered was that combining multiple on-page signals for detecting spam resulted in a better accuracy rate with less pages misclassified as spam.
The researchers explained that they tested the use of multiple signals:
“One way of combining our heuristic methods is to view the spam detection problem as a classification problem. In this case, we want to create a classification model (or classifier) which, given a web page, will use the page’s features jointly in order to (correctly, we hope) classify it in one of two classes: spam and non-spam.”
These are their conclusions about using multiple signals:
“We have studied various aspects of content-based spam on the web using a real-world data set from the MSNSearch crawler. We have presented a number of heuristic methods for detecting content based spam. Some of our spam detection methods are more effective than others, however when used in isolation our methods may not identify all of the spam pages. For this reason, we combined our spam-detection methods to create a highly accurate C4.5 classifier. Our classifier can correctly identify 86.2% of all spam pages, while flagging very few legitimate pages as spam.”
Key Insight:
Misidentifying “very few legitimate pages as spam” was a significant breakthrough. The important insight that everyone involved with SEO should take away from this is that one signal by itself can result in false positives. Using multiple signals increases the accuracy.
What this means is that SEO tests of isolated ranking or quality signals will not yield reliable results that can be trusted for making strategy or business decisions.
Takeaways
We don’t know for certain if compressibility is used at the search engines but it’s an easy to use signal that combined with others could be used to catch simple kinds of spam like thousands of city name doorway pages with similar content. Yet even if the search engines don’t use this signal, it does show how easy it is to catch that kind of search engine manipulation and that it’s something search engines are well able to handle today.
Here are the key points of this article to keep in mind:
- Doorway pages with duplicate content is easy to catch because they compress at a higher ratio than normal web pages.
- Groups of web pages with a compression ratio above 4.0 were predominantly spam.
- Negative quality signals used by themselves to catch spam can lead to false positives.
- In this particular test, they discovered that on-page negative quality signals only catch specific types of spam.
- When used alone, the compressibility signal only catches redundancy-type spam, fails to detect other forms of spam, and leads to false positives.
- Combing quality signals improves spam detection accuracy and reduces false positives.
- Search engines today have a higher accuracy of spam detection with the use of AI like Spam Brain.
Read the research paper, which is linked from the Google Scholar page of Marc Najork:
Detecting spam web pages through content analysis
Featured Image by Shutterstock/pathdoc
SEO
New Google Trends SEO Documentation
Google Search Central published new documentation on Google Trends, explaining how to use it for search marketing. This guide serves as an easy to understand introduction for newcomers and a helpful refresher for experienced search marketers and publishers.
The new guide has six sections:
- About Google Trends
- Tutorial on monitoring trends
- How to do keyword research with the tool
- How to prioritize content with Trends data
- How to use Google Trends for competitor research
- How to use Google Trends for analyzing brand awareness and sentiment
The section about monitoring trends advises there are two kinds of rising trends, general and specific trends, which can be useful for developing content to publish on a site.
Using the Explore tool, you can leave the search box empty and view the current rising trends worldwide or use a drop down menu to focus on trends in a specific country. Users can further filter rising trends by time periods, categories and the type of search. The results show rising trends by topic and by keywords.
To search for specific trends users just need to enter the specific queries and then filter them by country, time, categories and type of search.
The section called Content Calendar describes how to use Google Trends to understand which content topics to prioritize.
Google explains:
“Google Trends can be helpful not only to get ideas on what to write, but also to prioritize when to publish it. To help you better prioritize which topics to focus on, try to find seasonal trends in the data. With that information, you can plan ahead to have high quality content available on your site a little before people are searching for it, so that when they do, your content is ready for them.”
Read the new Google Trends documentation:
Get started with Google Trends
Featured Image by Shutterstock/Luis Molinero