An all-new experience for measuring and analyzing how great you are.
WORDPRESS
A Tour of the All-New Stats Page – WordPress.com News

In recent weeks, you may have seen a redesigned Stats page on your WordPress.com dashboard. This all-new Stats experience enhances your ability to analyze and optimize your site’s content. We’ve restructured the layout in a friendlier way, introduced new modules that reveal crucial data points, and revamped the overall look of this powerful analytics tool.
Let’s jump in and take a short tour!
Go beyond the numbers
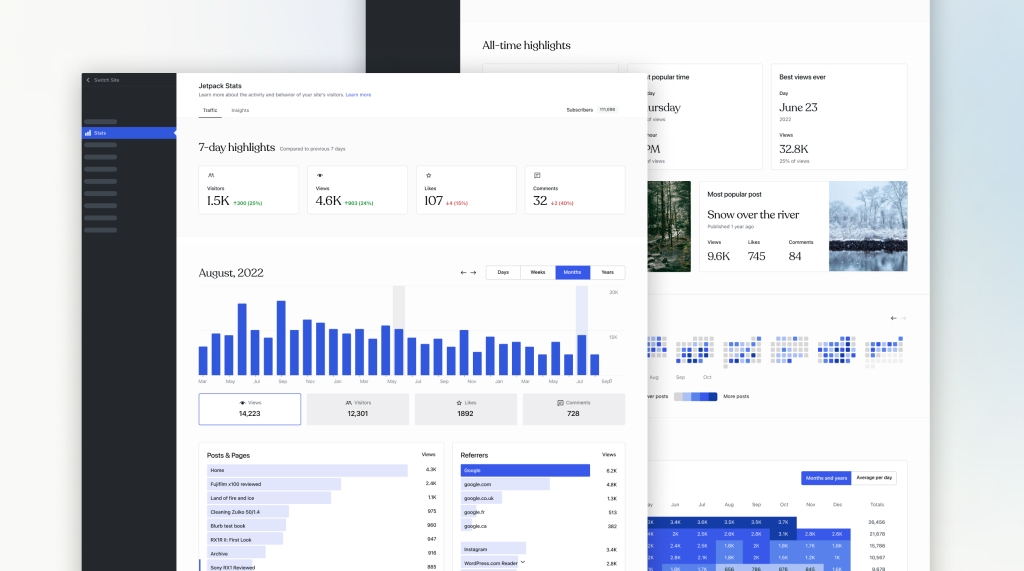
On the new Stats page, you’ll now see two tabs:
- Traffic: When you first click over to Stats, you’ll land on the Traffic page, which displays your site’s latest metrics. By navigating within the chart at the top, you can also focus on a specific week or month.
- Insights: This is where things get interesting, in our opinion. The Insights tab allows you to view and learn from long-term trends. This includes data about the most effective times/days to publish, your most popular posts/categories on an annual (or all-time) basis, visual overviews of your traffic and posting history, and more.
Monitor trends and track cumulative stats
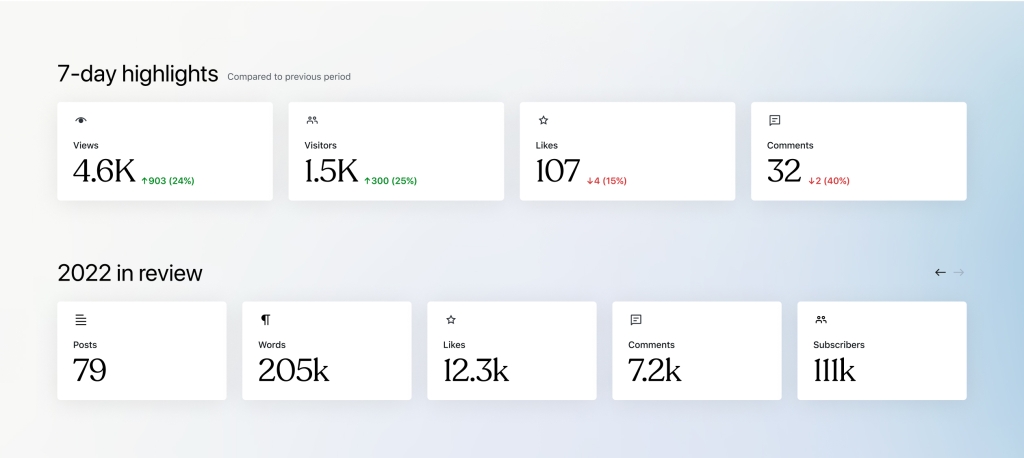
When checking stats, it’s easy to focus on the present and lose track of content performance over time. To help you take that longer-term view, we’ve pulled together “7 Day Highlights” to help you compare visitor interaction on a week-to-week basis, along with a year-in-review section that displays cumulative stats for the year.
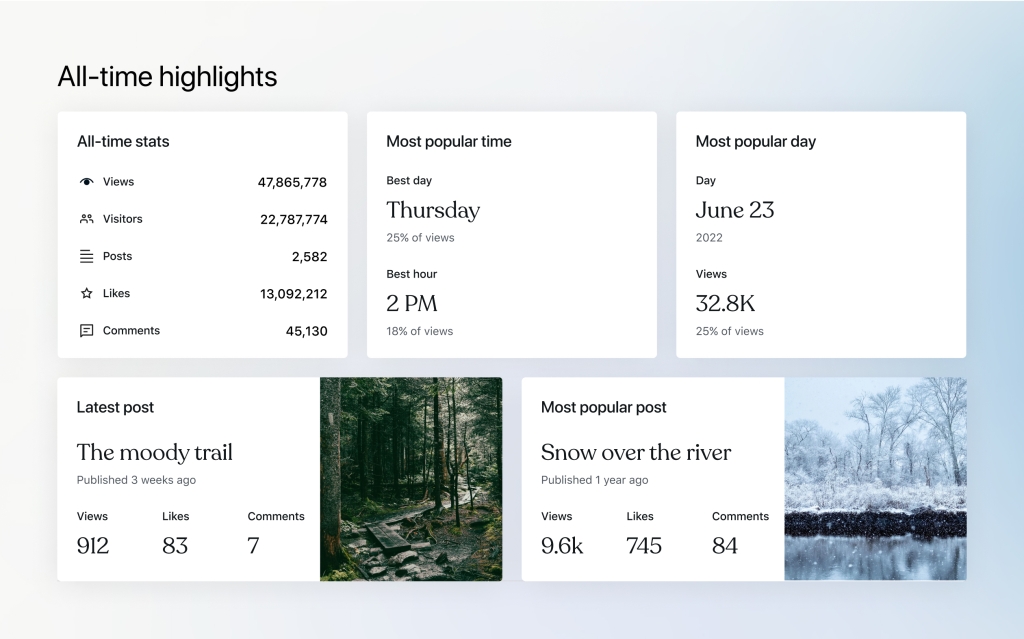
You can also monitor lifetime statistics, as well as other interesting data points, by looking at “All-time highlight” on the Insights tab.
Know your impact anytime and any place
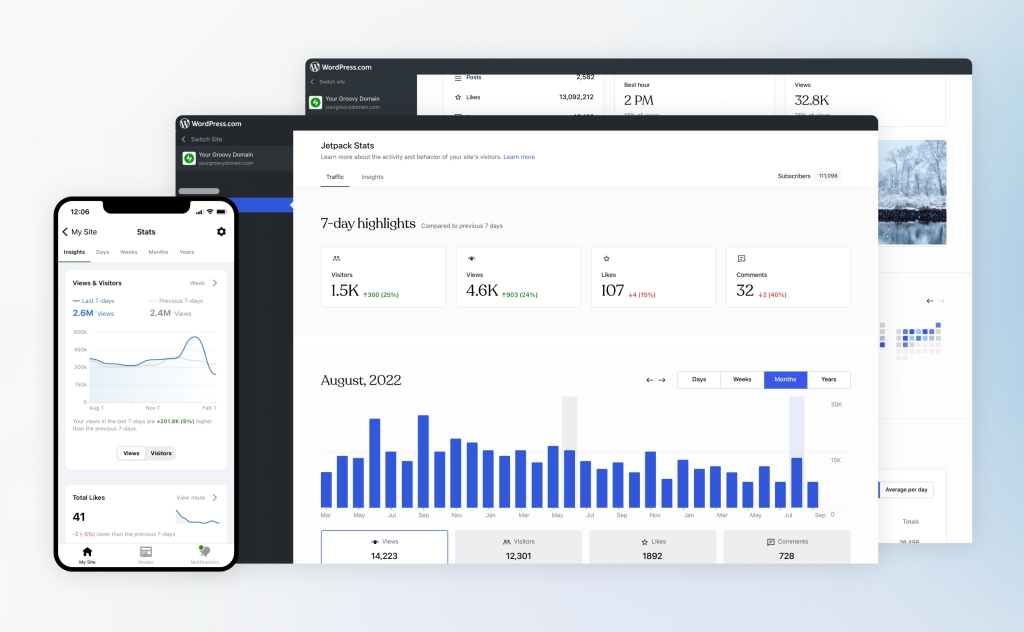
Everything on the Stats page has been optimized for mobile phones, tablets, large desktop monitors, and everything in between.
Having these numbers available across multiple platforms allows you to check on your latest posts’ data and traffic stats when and where it’s most convenient.
A better Stats experience
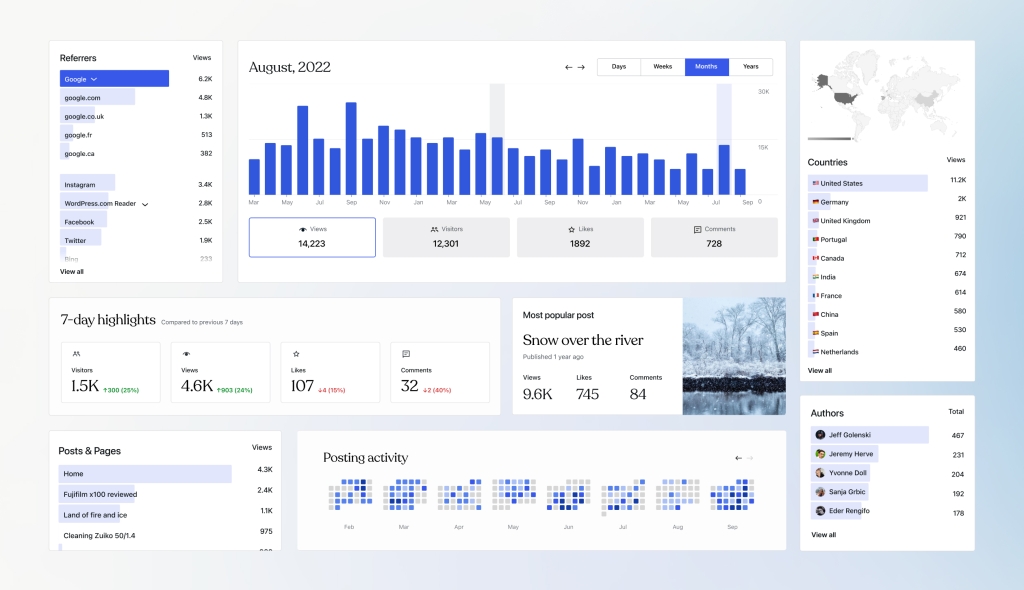
We believe that these changes will help you better understand how your website is performing and make data-driven decisions to grow your business. We hope you enjoy the new Stats page, and look forward to hearing your feedback.
Check it out for free today at WordPress.com/stats or in the Jetpack mobile app.
Join 99,040,158 other subscribers
WORDPRESS
[GET] The7 Website And Ecommerce Builder For WordPress
The7 website and ecommerce builder for wordpress is the most customizable WordPress, Elementor, and WooCommerce theme available on the market up to …
Source link
WORDPRESS
Making 43% of the Web More Dynamic with the WordPress Interactivity API – WordPress.com News

Creating rich, engaging, and interactive website experiences is a simple way to surprise, delight, and attract attention from website readers and users. Dynamic interactivity like instant search, form handling, and client-side “app-like” navigation where elements can persist across routes, all without a full page reload, can make the web a more efficient and interesting place for all.
But creating those experiences on WordPress hasn’t always been the easiest or most straightforward, often requiring complex JavaScript framework setup and maintenance.
Now, with the Interactivity API, WordPress developers have a standardized way for doing that, all built directly into core.
The Interactivity API started as an experimental plugin in early 2022, became an official proposal in March 2023, and was finally merged into WordPress core with the release of WordPress 6.5 on April 2, 2024. It provides an easier, standardized way for WordPress developers to create rich, interactive user experiences with their blocks on the front-end.
ELI5: The Interactivity API and the Image Block
Several core WordPress blocks, including the Query Loop, Image, and Search blocks, have already adopted the Interactivity API. The Image block, in particular, is a great way to show off the Interactivity API in action.
At its core, the Image blocks allow you to add an image to a post or page. When a user clicks on an image in a post or page, the Interactivity API launches a lightbox showing a high-resolution version of the image.
The rendering of the Image block is handled server-side. The client-side interactivity, handling resizing and opening the lightbox, is now done with the new API that comes bundled with WordPress. You can bind the client-side interactivity simply by adding the wp-on--click directive to the image element, referencing the showLightbox action in view.js.
You might say, “But I could easily do this with some JavaScript!” With the Interactivity API, the code is compact and declarative, and you get the context (local state) to handle the lightbox, resizing, side effects, and all of the other needed work here in the store object.
actions: {
			showLightbox() {
				const ctx = getContext();

				// Bails out if the image has not loaded yet.
				if ( ! ctx.imageRef?.complete ) {
					return;
				}

				// Stores the positons of the scroll to fix it until the overlay is
				// closed.
				state.scrollTopReset = document.documentElement.scrollTop;
				state.scrollLeftReset = document.documentElement.scrollLeft;

				// Moves the information of the expaned image to the state.
				ctx.currentSrc = ctx.imageRef.currentSrc;
				imageRef = ctx.imageRef;
				buttonRef = ctx.buttonRef;
				state.currentImage = ctx;
				state.overlayEnabled = true;

				// Computes the styles of the overlay for the animation.
				callbacks.setOverlayStyles();
			},
...
The lower-level implementation details, like keeping the server and client side in sync, just work; developers no longer need to account for them.
This functionality is possible using vanilla JavaScript, by selecting the element via a query selector, reading data attributes, and manipulating the DOM. But it’s far less elegant, and up until now, there hasn’t been a standardized way in WordPress of handling interactive events like these.
With the Interactivity API, developers have a predictable way to provide interactivity to users on the front-end. You don’t have to worry about lower-level code for adding interactivity; it’s there in WordPress for you to start using today. Batteries are included.
How is the Interactivity API different from Alpine, React, or Vue?
Prior to merging the Interactivity API into WordPress core, developers would typically reach for a JavaScript framework to add dynamic features to the user-facing parts of their websites. This approach worked just fine, so why was there a need to standardize it?
At its core, the Interactivity API is a lightweight JavaScript library that standardizes the way developers can build interactive HTML elements on WordPress sites.
Mario Santos, a developer on the WordPress core team, wrote in the Interactivity API proposal that, “With a standard, WordPress can absorb the maximum amount of complexity from the developer because it will handle most of what’s needed to create an interactive block.”
The team saw that the gap between what’s possible and what’s practical grew as sites became more complex. The more complex a user experience developers wanted to build, the more blocks needed to interact with each other, and the more difficult it became to build and maintain sites. Developers would spend a lot of time making sure that the client-side and server-side code played nicely together.
For a large open-source project with several contributors, having an agreed-upon standard and native way of providing client-side interactivity speeds up development and greatly improves the developer experience.
Five goals shaped the core development team’s decisions as they built the API:
- Block-first and PHP-first: Prioritizing blocks for building sites and server side rendering for better SEO and performance. Combining the best for user and developer experience.
- Backward-compatible: Ensuring compatibility with both classic and block themes and optionally with other JavaScript frameworks, though it’s advised to use the API as the primary method. It also works with hooks and internationalization.
- Declarative and reactive: Using declarative code to define interactions, listening for changes in data, and updating only relevant parts of the DOM accordingly.
- Performant: Optimizing runtime performance to deliver a fast and lightweight user experience.
- Send less JavaScript: Reduce the overall amount of JavaScript being sent on the page by providing a common framework that blocks can reuse. So the more that blocks leverage the Interactivity API, the less JavaScript will be sent overall.
Other goals are on the horizon, including improvements to client-side navigation, as you can see in this PR.
Interactivity API vs. Alpine
The Interactivity API shares a few similarities to Alpine—a lightweight JavaScript library that allows developers to build interactions into their web projects, often used in WordPress and Laravel projects.
Similar to Alpine, the Interactivity API uses directives directly in HTML and both play nicely with PHP. Unlike Alpine, the Interactivity API is designed to seamlessly integrate with WordPress and support server-side rendering of its directives.
With the interactivity API, you can easily generate the view from the server in PHP, and then add client-side interactivity. This results in less duplication, and its support in WordPress core will lead to less architectural decisions currently required by developers.
So while Alpine and the Interactivity API share a broadly similar goal—making it easy for web developers to add interactive elements to a webpage—the Interactivity API is even more plug-and-play for WordPress developers.
Interactivity API vs. React and Vue
Many developers have opted for React when adding interactivity to WordPress sites because, in the modern web development stack, React is the go-to solution for declaratively handling DOM interactivity. This is familiar territory, and we’re used to using React and JSX when adding custom blocks for Gutenberg.
Loading React on the client side can be done, but it leaves you with many decisions: “How should I handle routing? How do I work with the context between PHP and React? What about server-side rendering?”
Part of the goal in developing the Interactivity API was the need to write as little as little JavaScript as possible, leaving the heavy lifting to PHP, and only shipping JavaScript when necessary.
The core team also saw issues with how these frameworks worked in conjunction with WordPress. Developers can use JavaScript frameworks like React and Vue to render a block on the front-end that they server-rendered in PHP, for example, but this requires logic duplication and risks exposure to issues with WordPress hooks.
For these reasons, among others, the core team preferred Preact—a smaller UI framework that requires less JavaScript to download and execute without sacrificing performance. Think of it like React with fewer calories.
Luis Herranz, a WordPress Core contributor from Automattic, outlines more details on Alpine vs the Interactivity API’s usage of Preact with a thin layer of directives on top of it in this comment on the original proposal.
Preact only loads if the page source contains an interactive block, meaning it is not loaded until it’s needed, aligning with the idea of shipping as little JavaScript as possible (and shipping no JavaScript as a default).
In the original Interactivity API proposal, you can see the run-down and comparison of several frameworks and why Preact was chosen over the others.
What does the new Interactivity API provide to WordPress developers?
In addition to providing a standardized way to render interactive elements client-side, the Interactivity API also provides developers with directives and a more straightforward way of creating a store object to handle state, side effects, and actions.
Directives
Directives, a special set of data attributes, allow you to extend HTML markup. You can share data between the server-side-rendered blocks and the client-side, bind values, add click events, and much more. The Interactivity API reference lists all the available directives.
These directives are typically added in the block’s render.php file, and they support all of the WordPress APIs, including actions, filters, and core translation APIs.
Here’s the render file of a sample block. Notice the click event (data-wp-on--click="actions.toggle"), and how we bind the value of the aria-expanded attributes via directives.
<div
	<?php echo get_block_wrapper_attributes(); ?>
	data-wp-interactive="create-block"
	<?php echo wp_interactivity_data_wp_context( array( 'isOpen' => false ) ); ?>
	data-wp-watch="callbacks.logIsOpen"
>
	<button
		data-wp-on--click="actions.toggle"
		data-wp-bind--aria-expanded="context.isOpen"
		aria-controls="<?php echo esc_attr( $unique_id ); ?>"
	>
		<?php esc_html_e( 'Toggle', 'my-interactive-block' ); ?>
	</button>

	<p
		id="<?php echo esc_attr( $unique_id ); ?>"
		data-wp-bind--hidden="!context.isOpen"
	>
		<?php
			esc_html_e( 'My Interactive Block - hello from an interactive block!', 'my-interactive-block' );
		?>
	</p>
</div>
Do you need to dynamically update an element’s inner text? The Interactivity API allows you to use data-wp-text on an element, just like you can use v-text in Vue.
You can bind a value to a boolean or string using wp-bind– or hook up a click event by using data-wp-on–click on the element. This means you can write PHP and HTML and sprinkle in directives to add interactivity in a declarative way.
Handling state, side effects, and actions
The second stage of adding interactivity is to create a store, which is usually done in your view.js file. In the store, you’ll have access to the same context as in your render.php file.
In the store object, you define actions responding to user interactions. These actions can update the local context or global state, which then re-renders and updates the connected HTML element. You can also define side effects/callbacks, which are similar to actions, but they respond to state changes instead of direct user actions.
import { store, getContext } from '@wordpress/interactivity';

store( 'create-block', {
	actions: {
		toggle: () => {
			const context = getContext();
			context.isOpen = ! context.isOpen;
		},
	},
	callbacks: {
		logIsOpen: () => {
			const { isOpen } = getContext();
			// Log the value of `isOpen` each time it changes.
			console.log( `Is open: ${ isOpen }` );
		},
	},
} );
Try it out for yourself
The Interactivity API is production-ready and already running on WordPress.com! With any WordPress.com plan, you’ll have access to the core blocks built on top of the Interactivity API.
If you want to build your own interactive blocks, you can scaffold an interactive block by running the below code in your terminal:
npx @wordpress/create-block@latest my-interactive-block --template @wordpress/create-block-interactive-template
This will give you an example interactive block, with directives and state handling set up.
You can then play around with this locally, using wp-env, using a staging site, or by uploading the plugin directly to your site running a plugin-eligible WordPress.com plan.
If you want a seamless experience between your local dev setup and your WordPress.com site, try using it with our new GitHub Deployments feature! Developing custom blocks is the perfect use case for this new tool.
The best way to learn something new is to start building. To kick things off, you may find the following resources a good starting point:
Join 106.9M other subscribers
WORDPRESS
The Masters Golf Tournament – WordPress.com News

What’s harder: winning the Masters Tournament or re-creating its website in under 30 minutes? Watch the video and find out.
Congratulations are in order for Scottie Scheffler, the winner of the 2024 Masters Tournament in Augusta, Georgia! In today’s Build and Beyond video, Jamie Marsland takes on the slightly less intimidating task of re-creating the Masters website as quickly as he can. Can he possibly do it in just 30 minutes?
Along the way, you’ll learn about sticky navigation menus, image overflows and breakouts, card layouts, and more.
Interested in a free trial that allows you to test our all that WordPress.com has to offer? Click below:
Join 110M other subscribers
-

 WORDPRESS7 days ago
Turkish startup ikas attracts $20M for its e-commerce platform designed for small businesses
-

 MARKETING6 days ago
Roundel Media Studio: What to Expect From Target’s New Self-Service Platform
-

 SEO5 days ago
Google Limits News Links In California Over Proposed ‘Link Tax’ Law
-
SEARCHENGINES6 days ago
Daily Search Forum Recap: April 12, 2024
-

 SEARCHENGINES7 days ago
Google Search Results Can Be Harmful & Dangerous In Some Cases
-

 MARKETING7 days ago
Unlocking the Power of AI Transcription for Enhanced Content Marketing Strategies
-

 SEO5 days ago
10 Paid Search & PPC Planning Best Practices
-

 SEARCHENGINES5 days ago
Google Core Update Volatility, Helpful Content Update Gone, Dangerous Google Search Results & Google Ads Confusion

