SEO
14 Ways to Improve Ecommerce Product Pages for SEO
For e-commerce websites, optimizing product pages is one of the most critical aspects of SEO.
Optimized product pages enhance the user experience and rank better for long-tail search terms, which typically have lower competition and high commercial intent. This is vital for ecommerce because users searching for specific products are usually further down the sales funnel and more likely to purchase.
In this article, I’ll discuss several recommendations for optimizing ecommerce product pages for SEO, including improving on-page elements, making the most of rich snippets, and enhancing user engagement.
Keyword research is an essential first step because the data can guide the order in which pages are optimized and how they are optimized.
There are a few ways I usually do this, depending on the size of the site:
- Scraping product names and gathering data
- Using Ahrefs’ Site Explorer
- Using Ahrefs’ Keywords Explorer
Scraping data for large sites
A significant challenge for some product page keyword research is the sheer number of pages many ecommerce stores have. For instance, manually entering target keywords for 20,000 products and researching them would take weeks. Thus, a more efficient method is necessary.
One approach is to scrape data from product pages to create your keyword set and then use Keywords Explorer to collect keyword data in bulk.
Here is how I’d do that for AO (Appliances Online):
First, I would conduct some quick research to understand how users generally search for different types of products. To do this, I’d search for the product in Google and then:
- Copy the page’s URL into Site Explorer
- Go to the Organic Keywords report
- Filter for top 5 keyword rankings
For example, we can see above that most people search for this smart TV with some combomination of the brand name and SKU. But a few people include the category (“smart TV”) and other related attributes in their query too.
Armed with this information, I can try to scrape that data from the page (and all other similar pages on the site).
Often, you can locate what you require to scrape in a specification table or similar. For AO, they have some JSON containing product data embedded in the HTML.
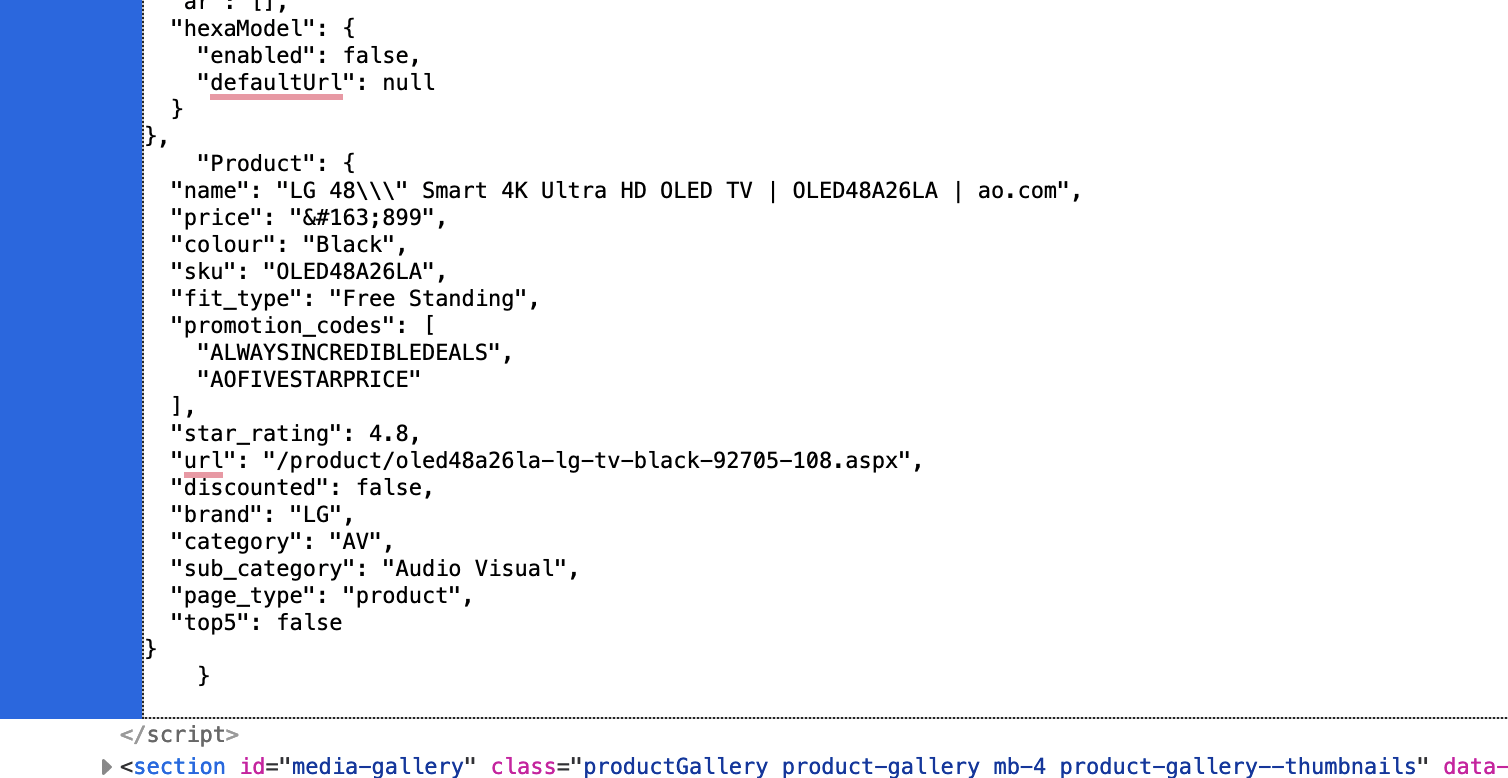

This JSON is on every product page, so I’m going to extract all of that using Screaming Frog’s custom extraction:


I also extracted categories and sub-categories. AO has this in JSON, but you can also extract this information by scraping breadcrumbs.
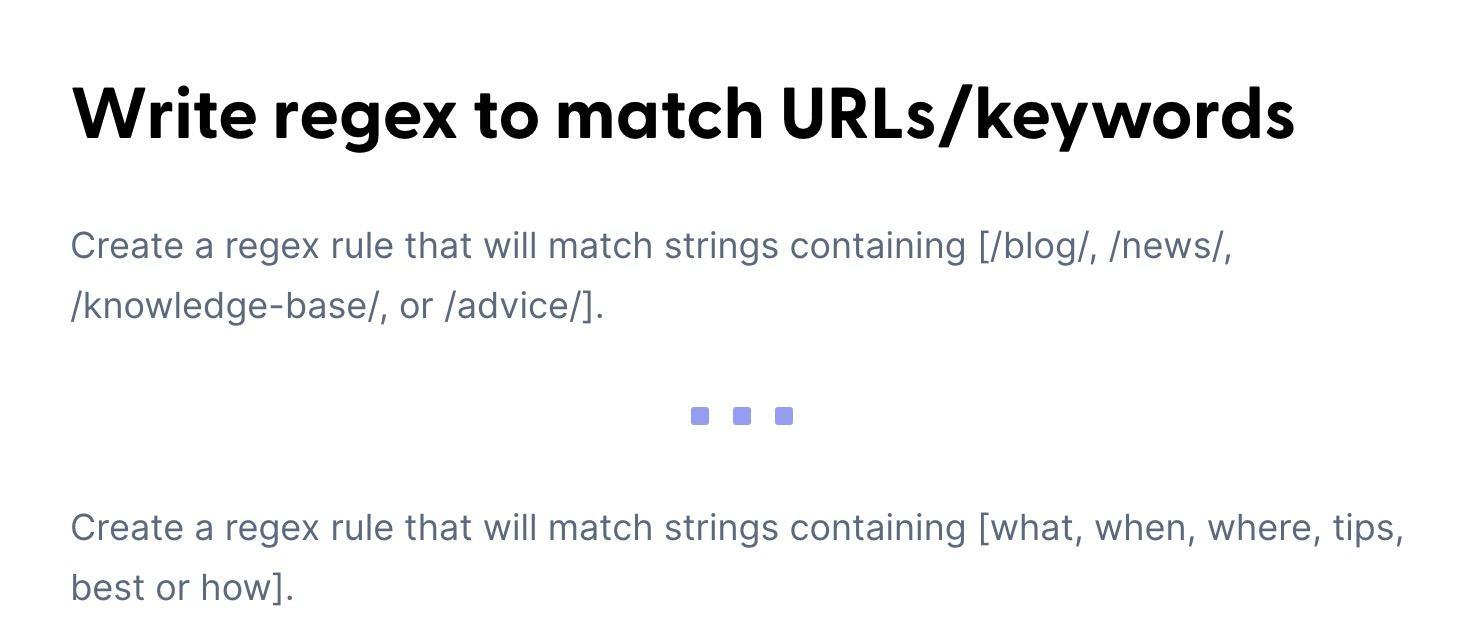
Here is an example of the regex I’ve used to extract data from the JSON:
<[^>]*id="product-json"[^>]*>[^<]*"sku":s*"([^"]*)"*Start your crawl, then head to the custom extraction tab and export. You may need trial and error to extract the data you want correctly. If you’re not a pro at regex, I recommend using ChatGPT; if you want an example prompt, here is one from my ChatGPT prompts for SEO resource.

I haven’t completed a full crawl of the site for this example, but after exporting, the CSV should look like this.
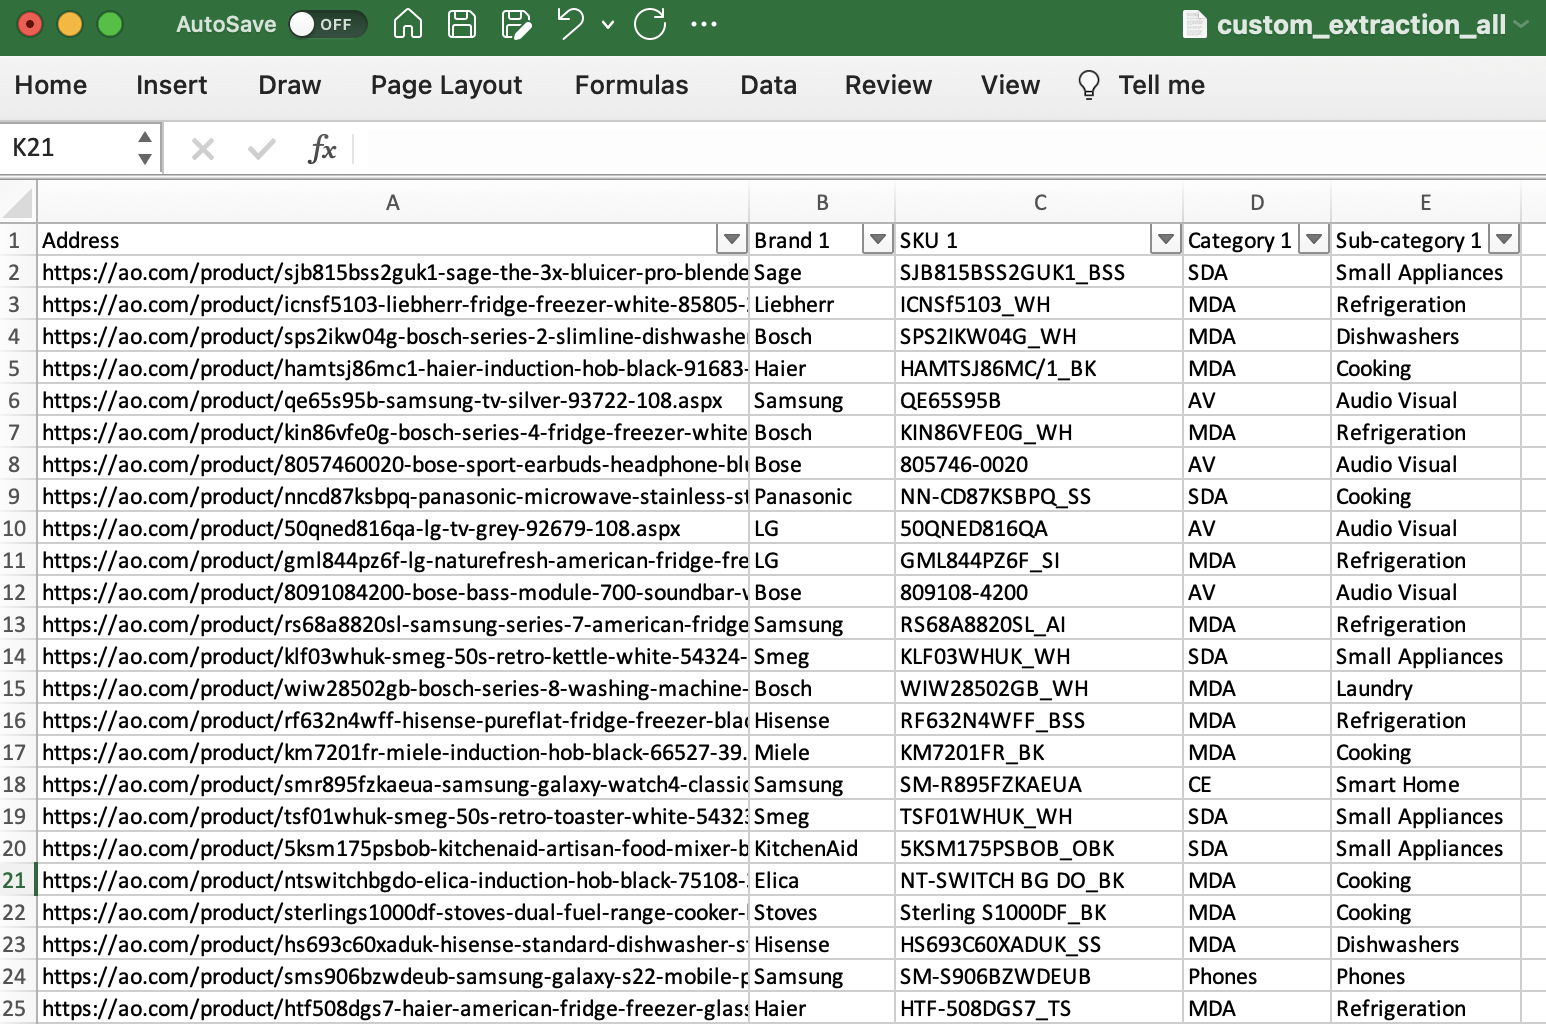

Next, I can use the TEXTJOIN formula to merge the SKU and brand name in the format I wanted like this –
=(LOWER(TEXTJOIN(" ",TRUE,B6:C6)))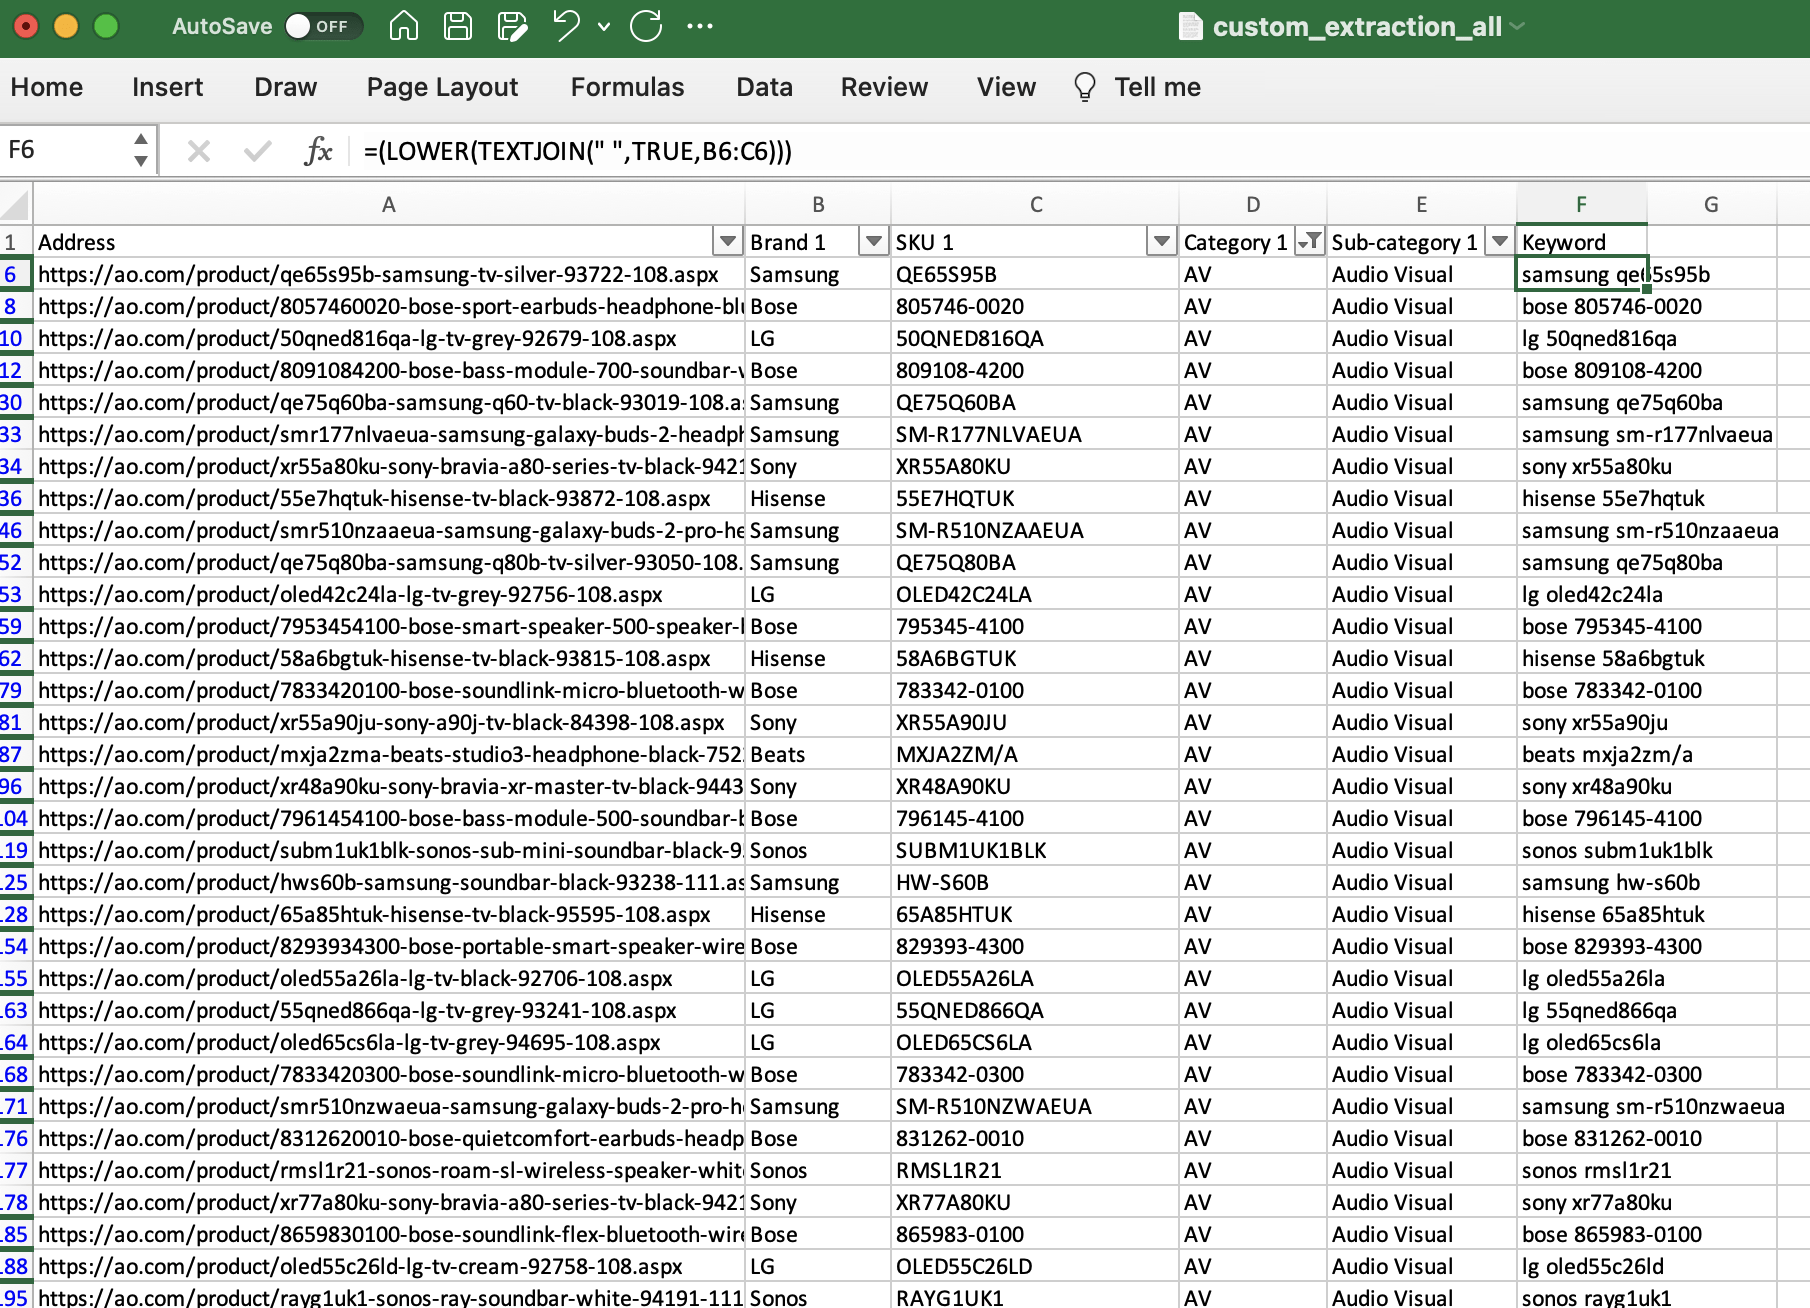

And then, copy and paste the keyword column into Keywords Explorer.
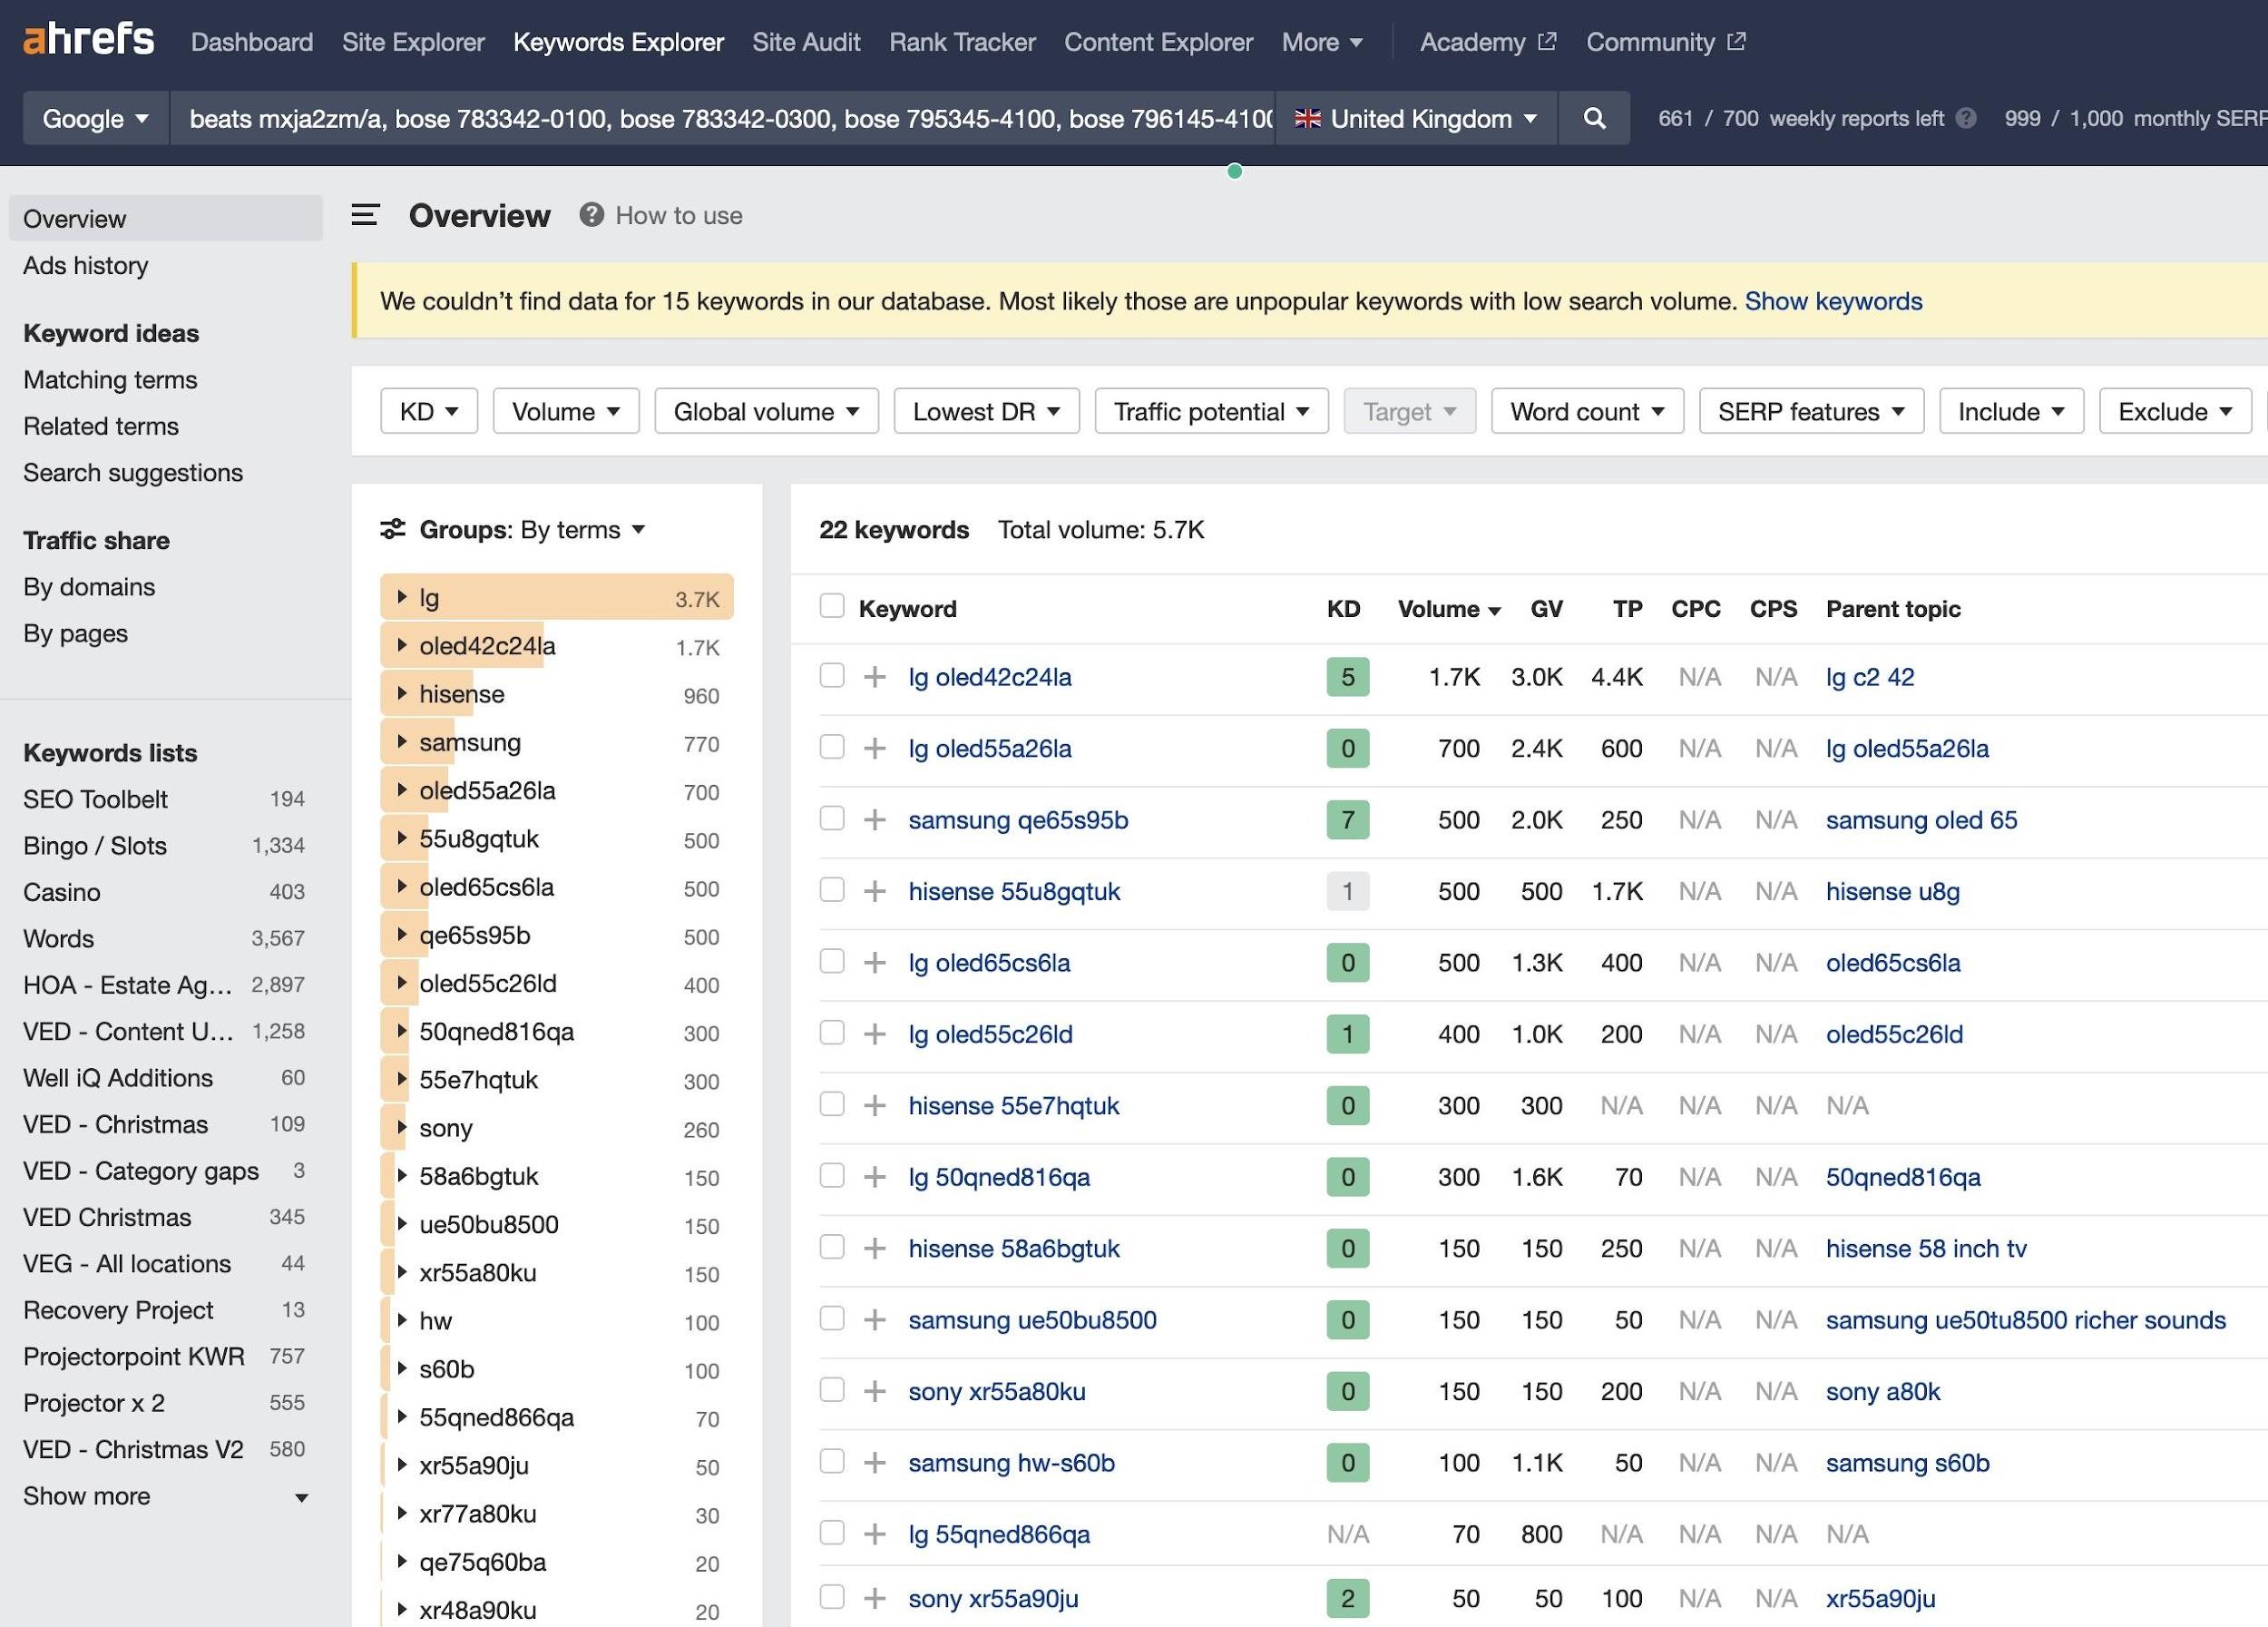

We now have keyword opportunity data for these products. The TP (Traffic Potential) metric is particularly helpful. It gives us an understanding of the total traffic potential, even if the brand plus product code combination we’ve used isn’t the most-searched-for query.
This is just an example of how you could scrape useful data in bulk. The methodology will change for each site, but the process is the same.
Sometimes, you may just scrape the H1, and other times, spec tables. If you’re lucky, like in this example, there will be some JSON with all the data you need.
While I’m focusing on product pages for this guide, I’ve written another example on my blog for analyzing competitor site structure using a similar methodology. It’s well worth a read if scraping data for SEO purposes interests you.
Using Ahrefs’ Site Explorer
If scraping information isn’t an option, you can collect data for large websites using Ahrefs’ Site Explorer. But, this method might not be as precise. It also requires having all product pages in a URL directory.
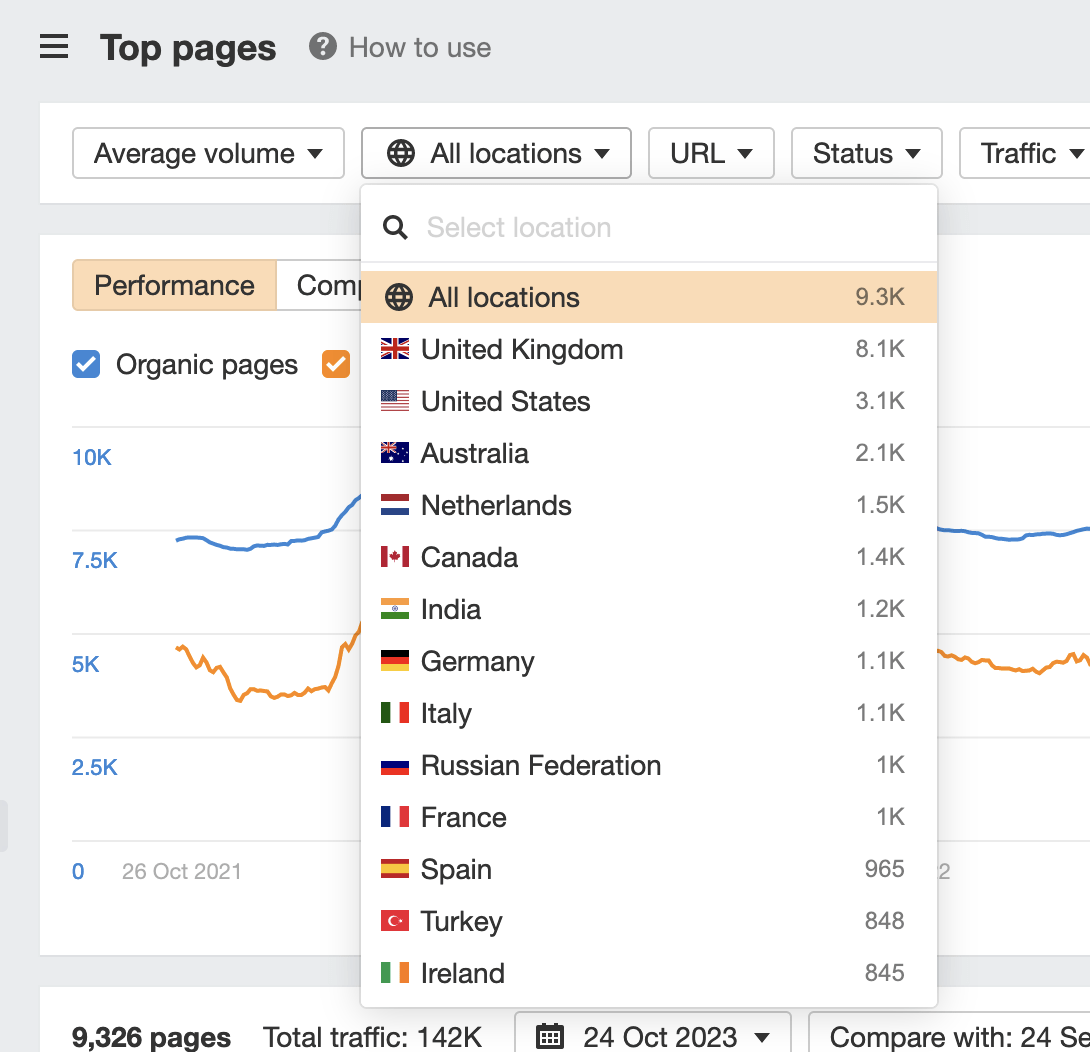
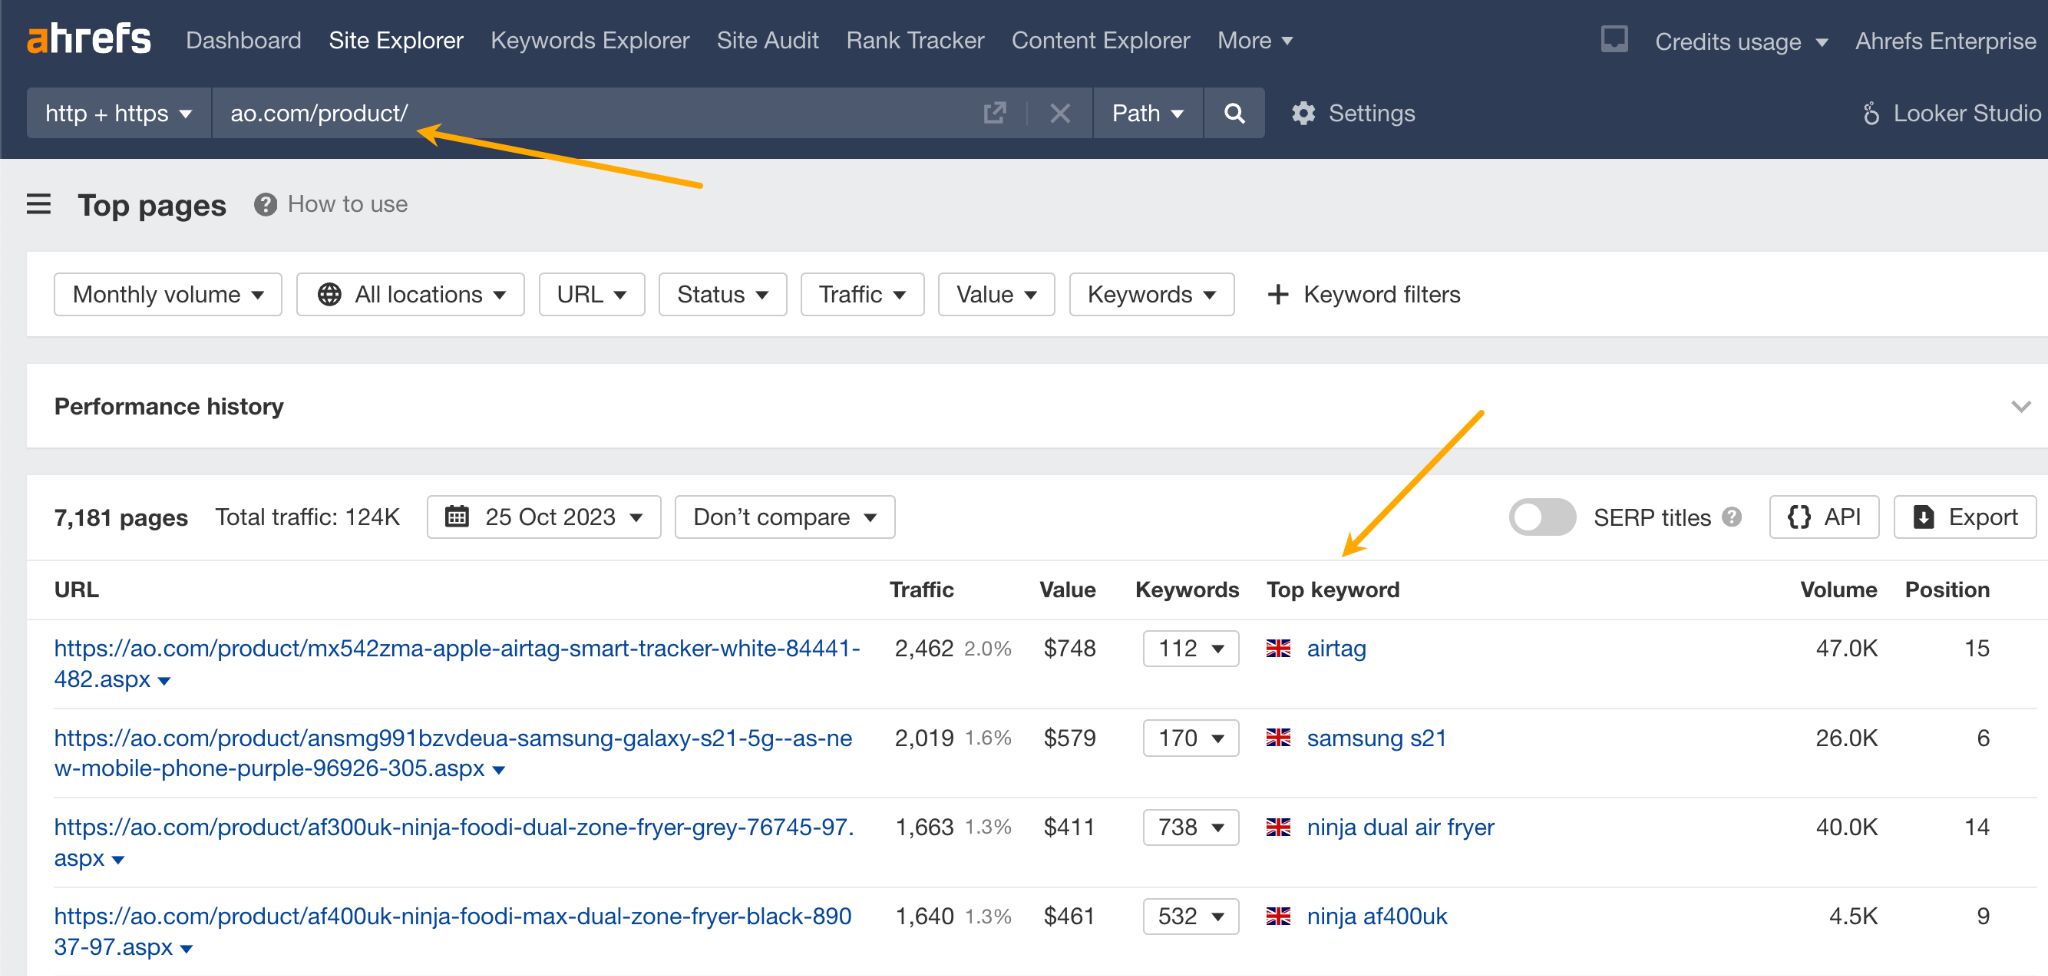
Begin by entering the domain and directory where product pages are located (for example, ‘www.example.com/product/’) into Site Explorer. Next, go to the Top pages report and filter for the country you want data for.

Then, use the ‘Top keyword’ column to identify the keyword that brings in the most traffic for the URL.
This approach is more effective for websites that already have a good ranking. However, the keyword driving the most traffic may not necessarily be the best one for the page. So you may get mixed results.

Sidenote.
Interesting to note with the example above, there may also be an opportunity to export from the Top Pages report, and then use the product URL structure to gather keywords by using some REGEXREPLACE and REGEXEXTRACT formulas.
Using Ahrefs’ Keywords Explorer
You could also manually enter target keywords into Keywords Explorer and do specific research for a product. However, this approach will only be viable if there are fewer products to research as it’s more time-consuming.
More often than not, you’ll need to use various tactics to get the best results for stores with many different product types.
Use universal H1 and title tag templates for optimal results. These templates should incorporate product H1s and other relevant product data, such as SKUs or brand names to create the most effective format, guided by your keyword research.
Consider creating templates for each category level if you run a large store. For instance, TVs might need a different title/H1 template than cables.
You’ll need to do this if your keyword research shows that users search differently for the various products you sell.
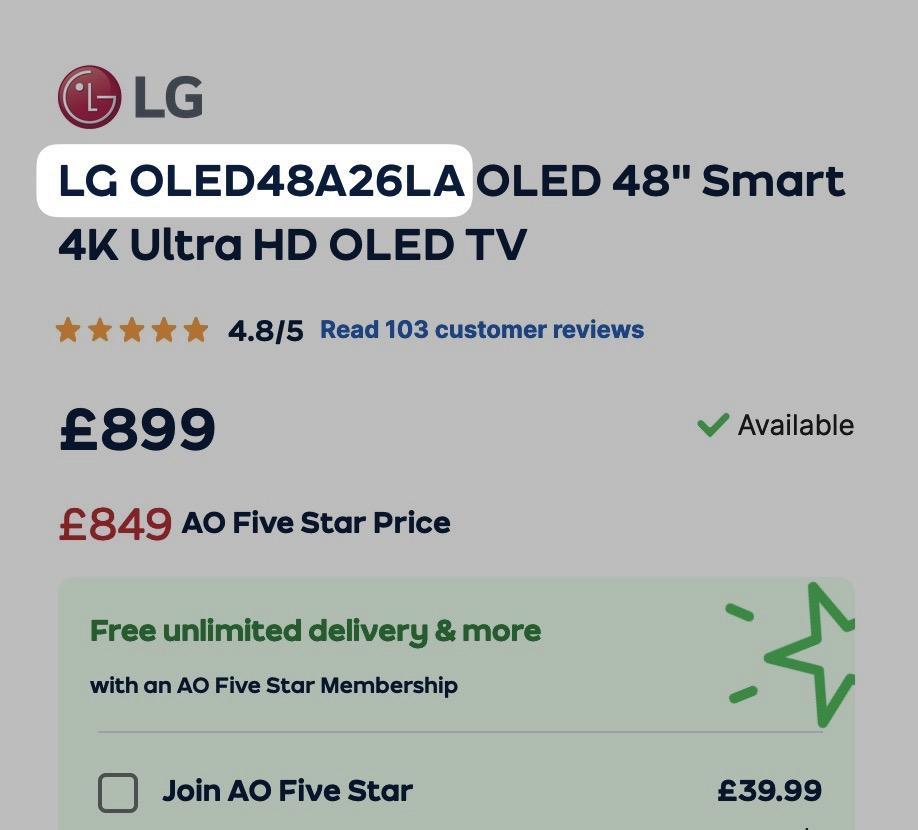
For instance, AO uses different templates for various categories.
The <h1> for their AV (audio visual) products consistently begins with a combination of brand and product code.

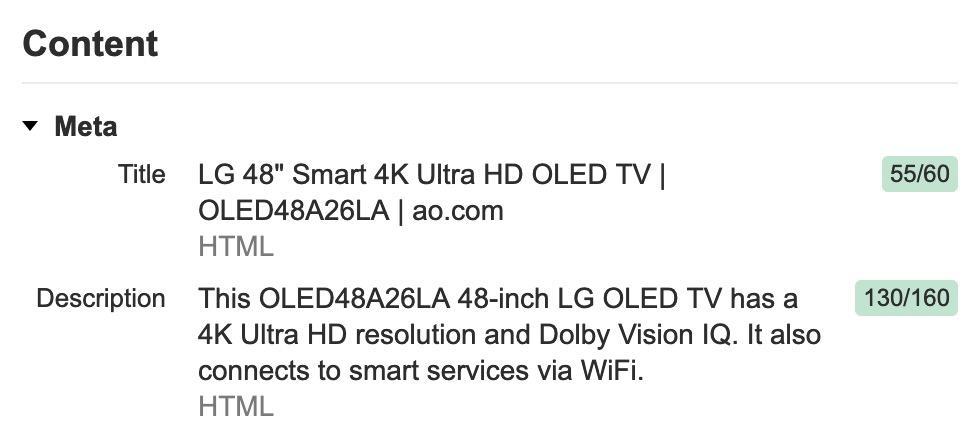
However, looking at the page with Ahrefs SEO Toolbar, they don’t follow this trend through to title tags, which they likely should do to better match user search queries:

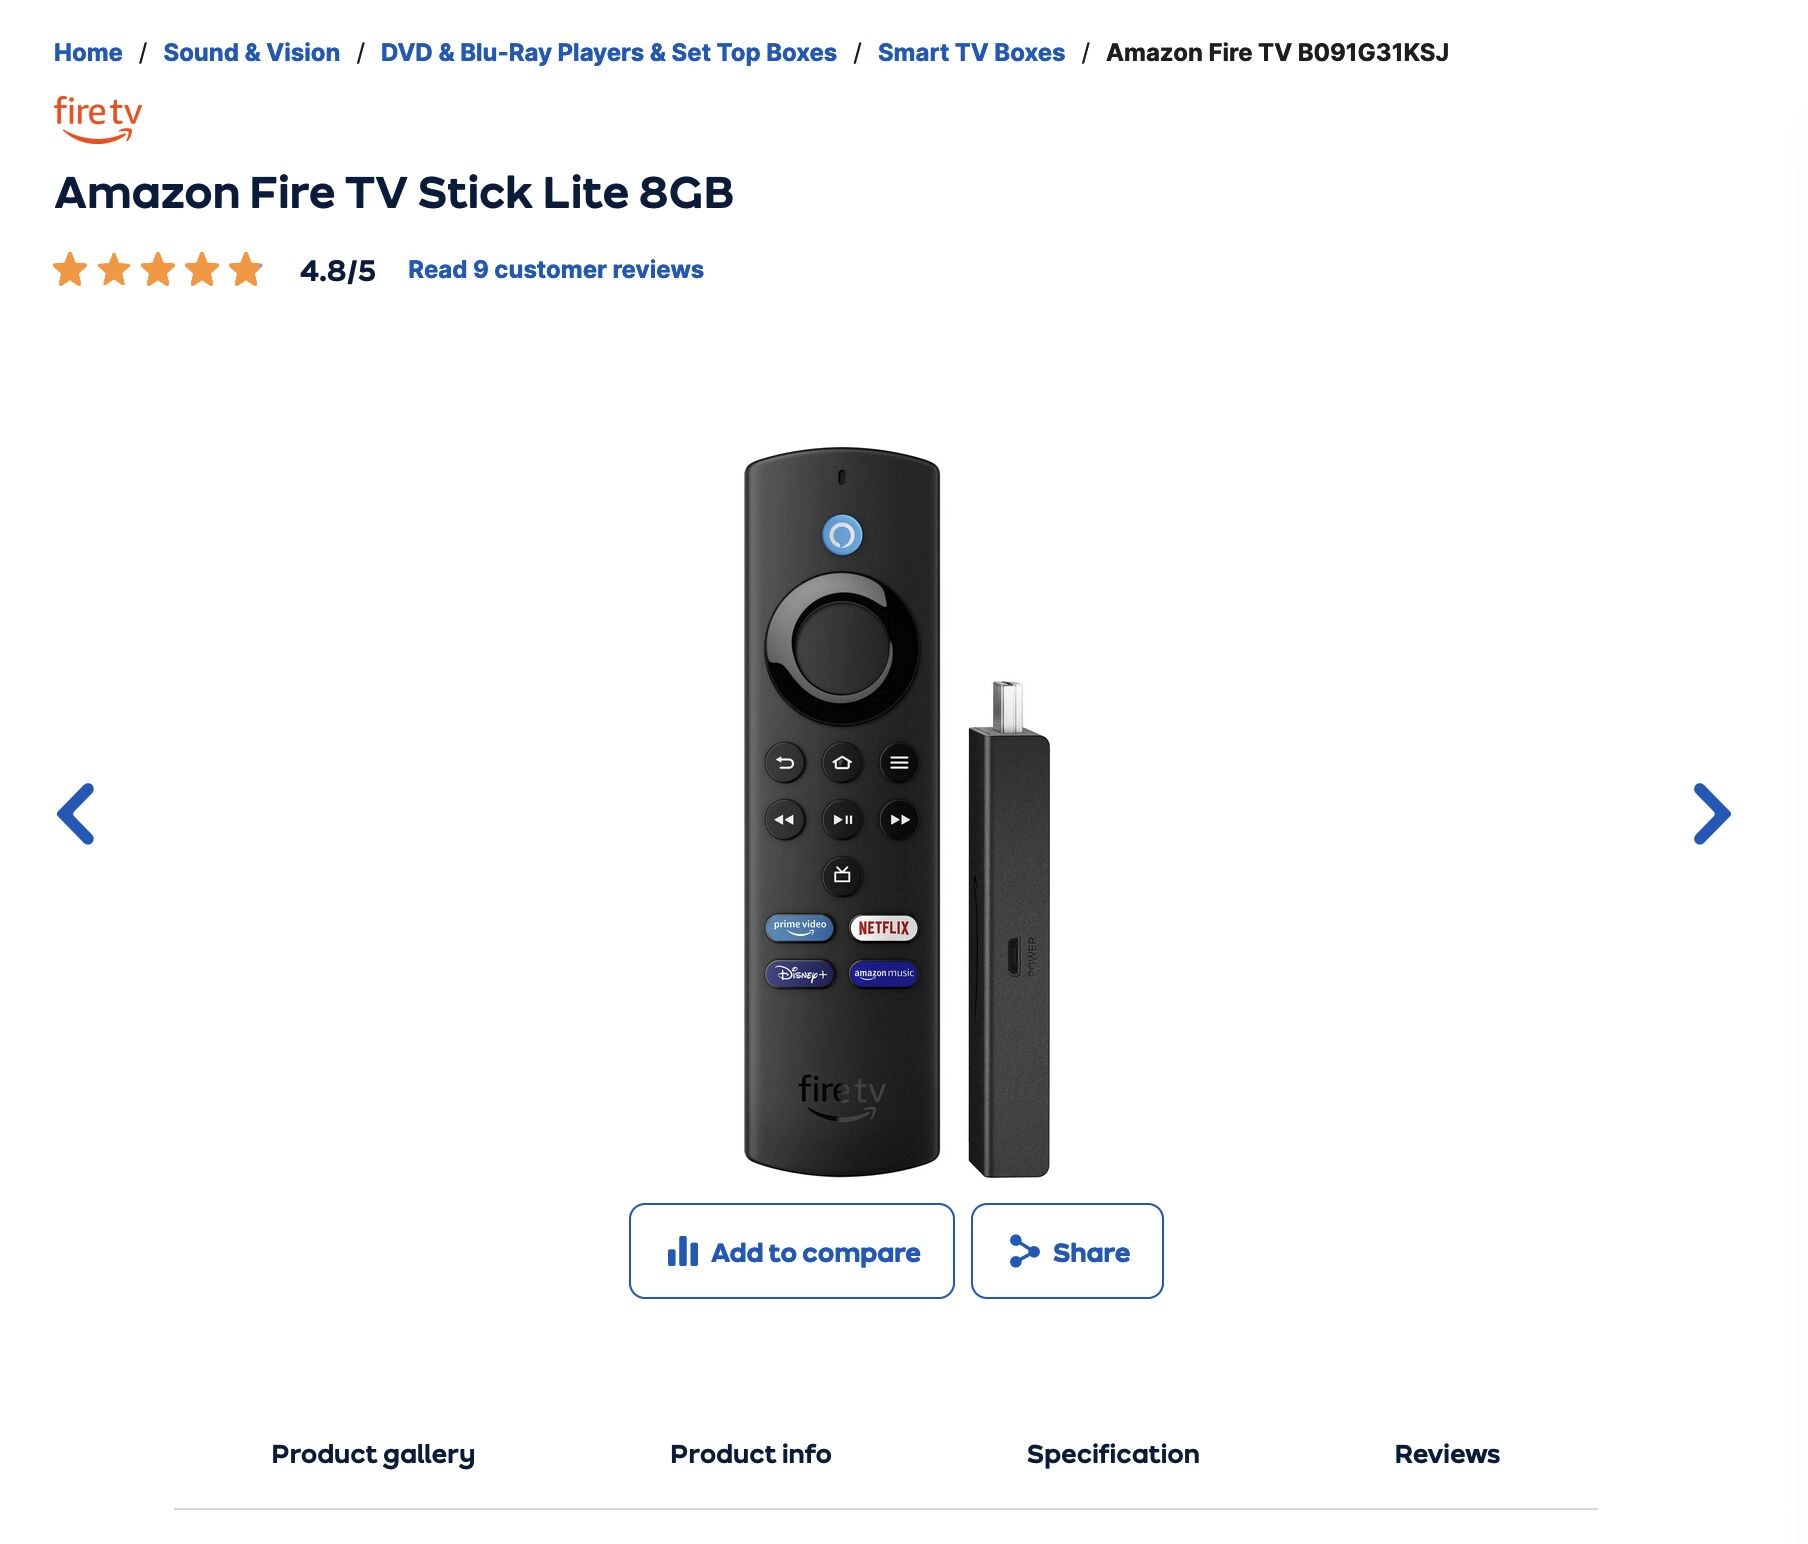
In AO’s ‘Sound’ category, they changed their H1 to be just the brand + product name rather than the product code + brand name combination shown previously.

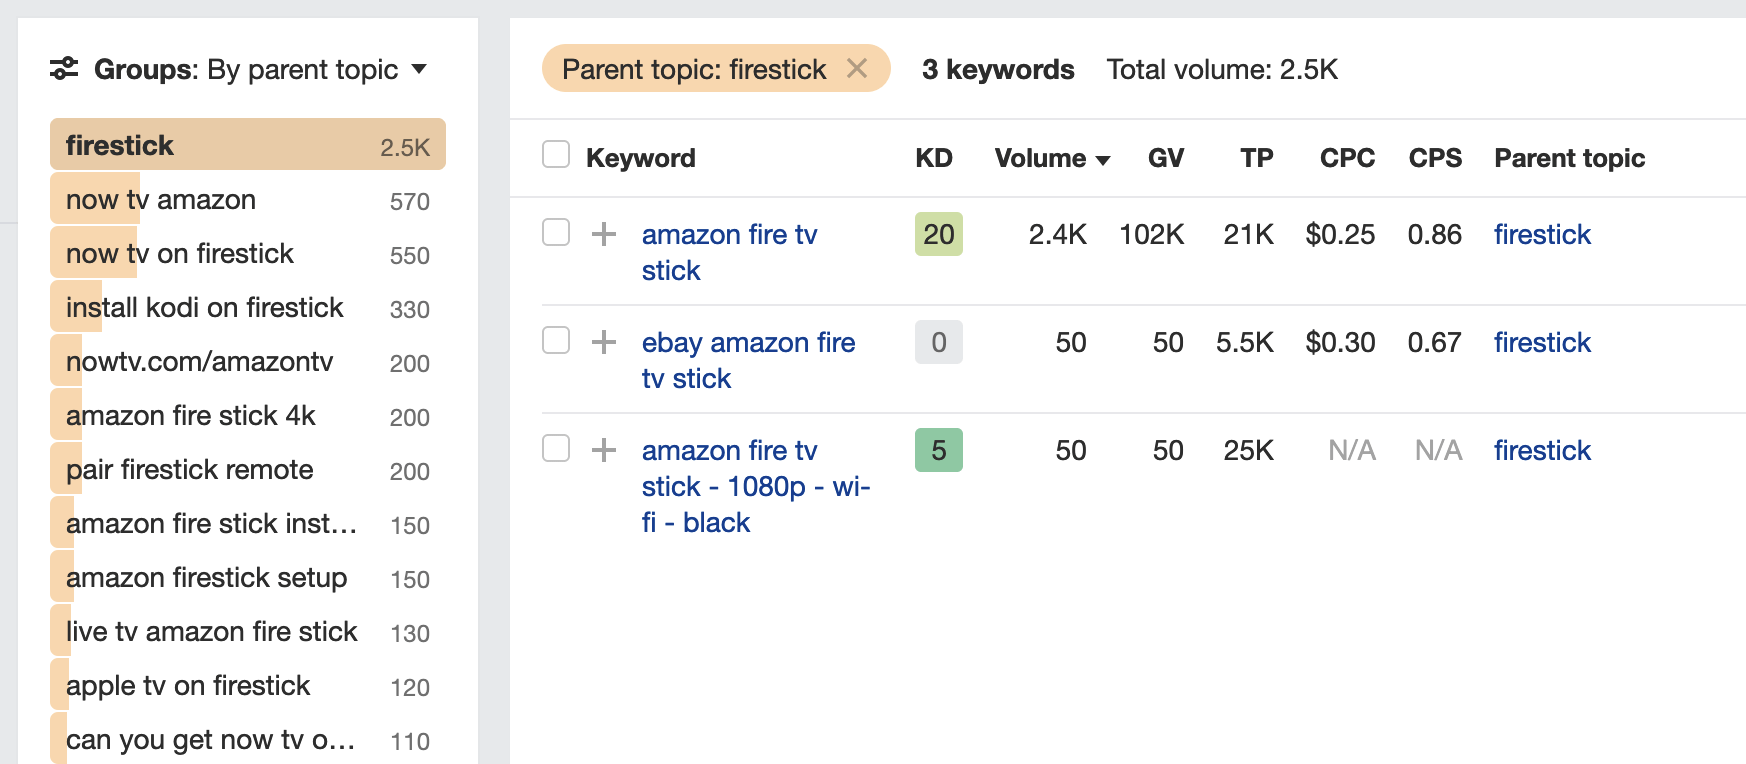
They likely have done this as users don’t search for product codes for this product, as shown in Keywords Explorer.

Of course, in some situations, you’ll want to set a H1/title combo that best matches the user’s search query and intent for an individual product if the potential traffic return is worth the time investment.
Manufacturer descriptions serve as a useful foundation for your store. However, you are in a great position as a retailer to offer more than what the manufacturer provides.
This might include offering recommendations or comparisons to assist customers in purchasing decisions.
There are a plethora of strategies to make your product pages more beneficial. Here are some examples.
Add FAQs
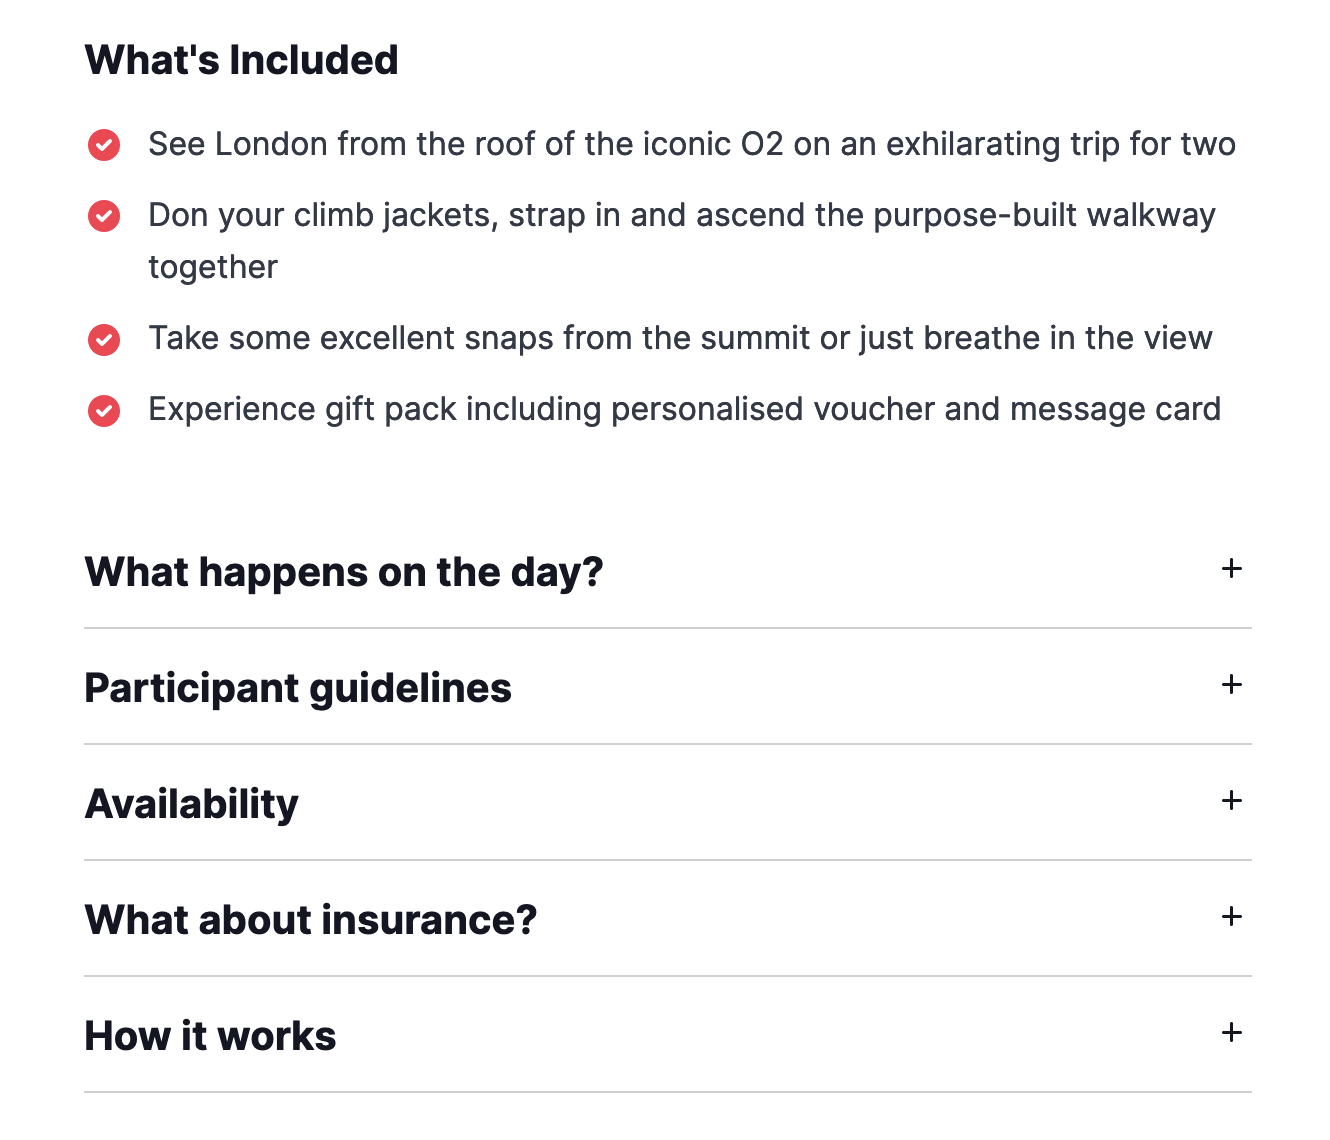
FAQs are a great way to succinctly provide additional information about your product. For example, Virgin Experience Days has accordions answering key user objections before purchasing, such as the activity’s day plan, insurance, availability, and more.

Add a short review
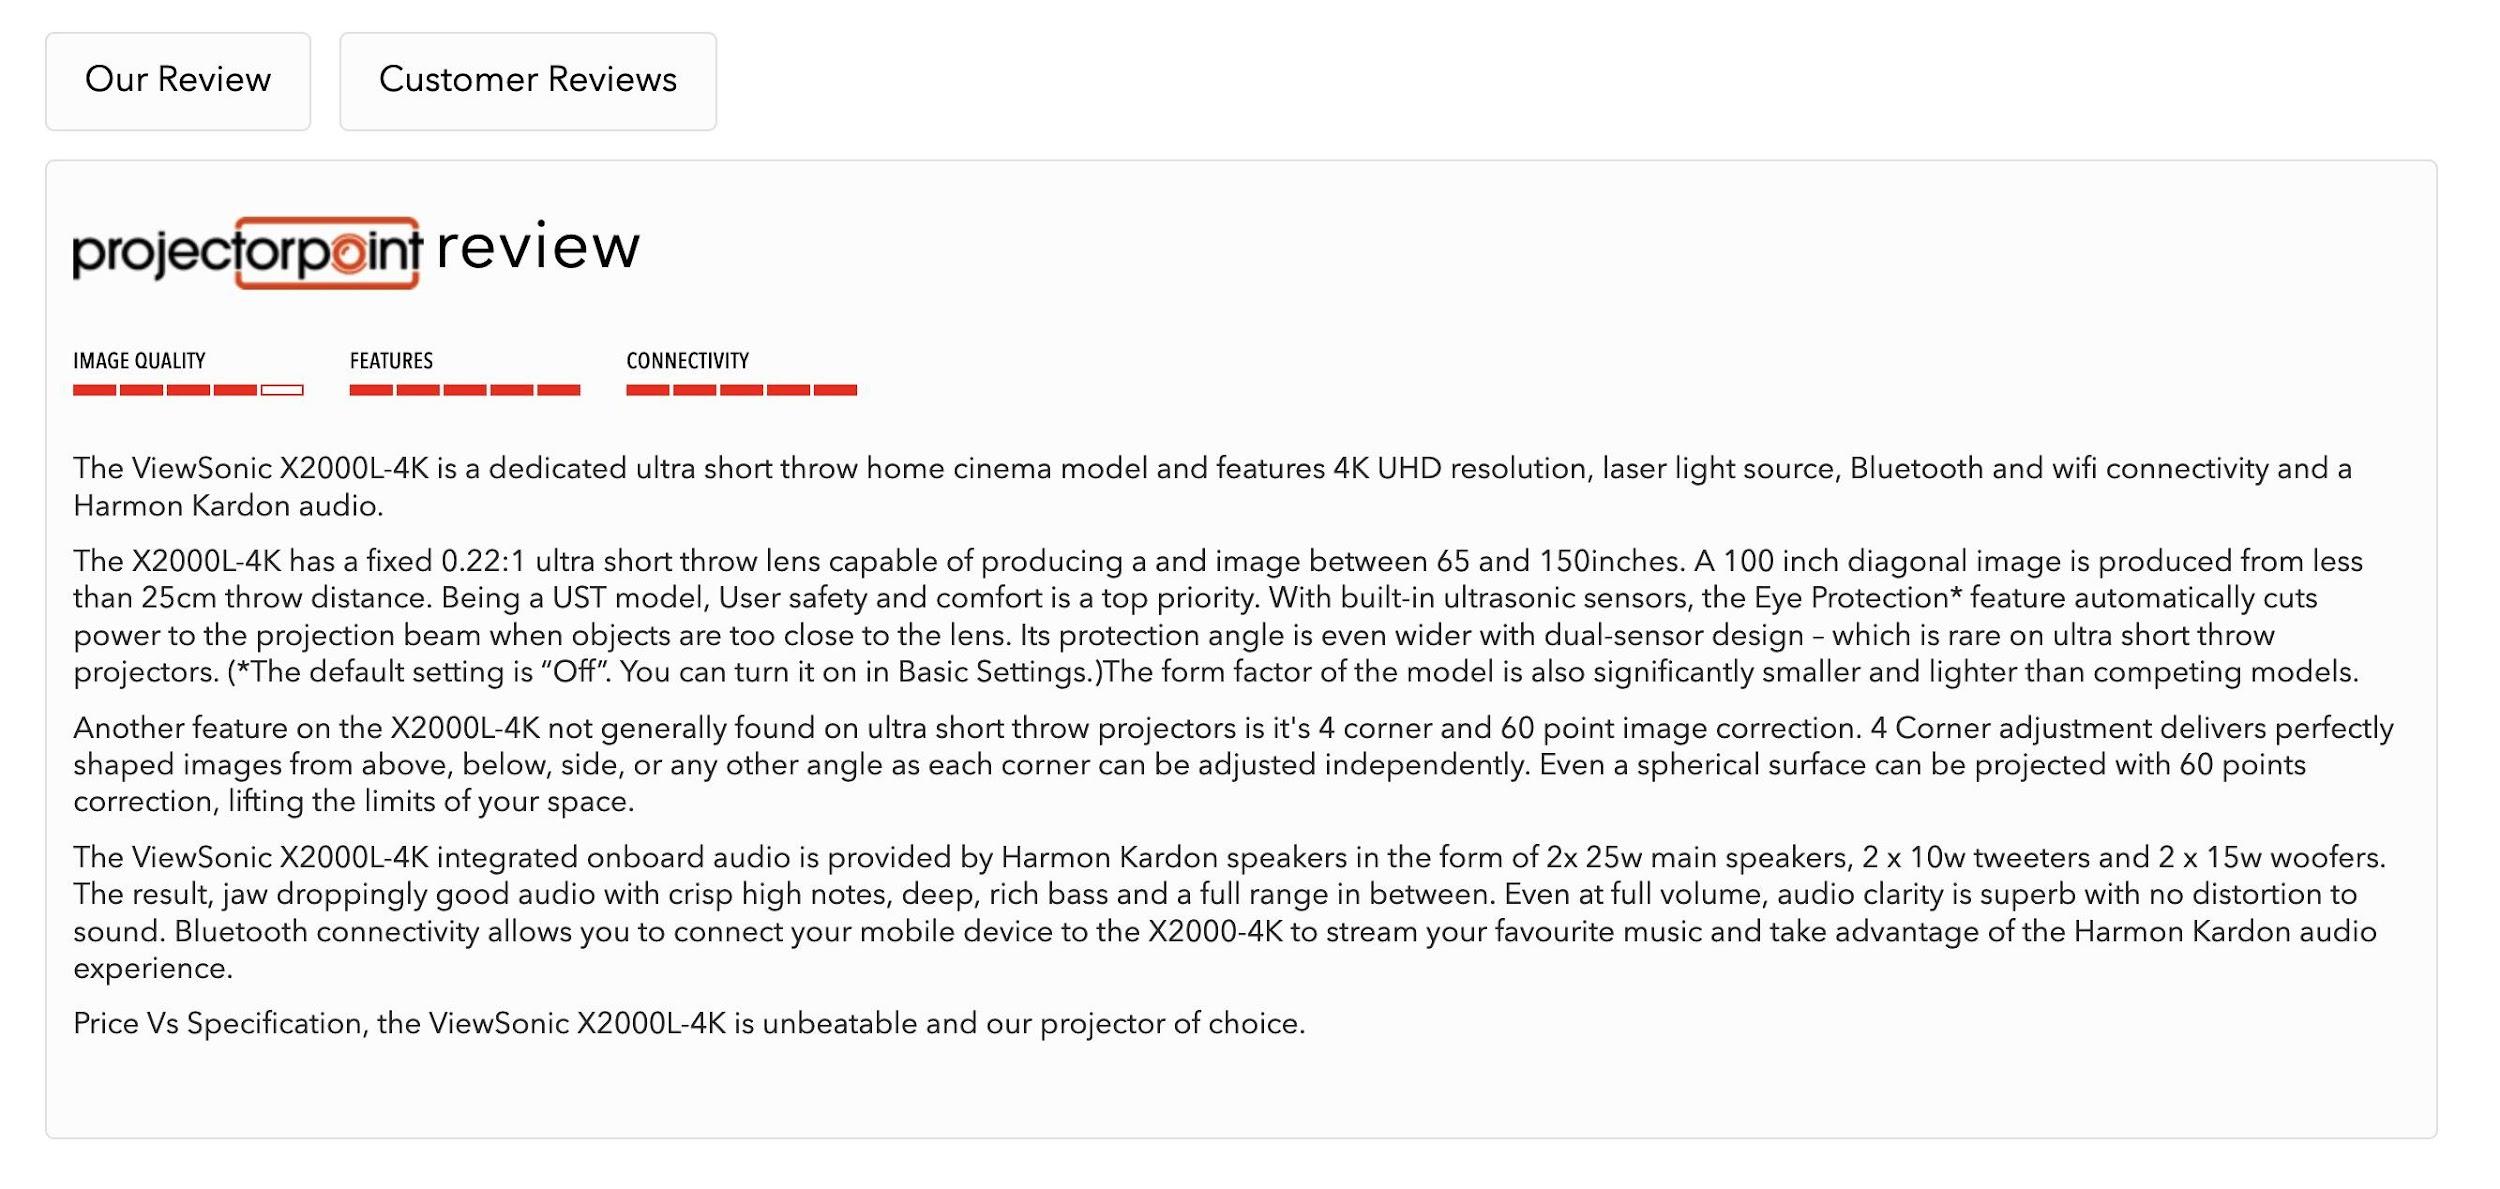
Alongside the manufacturer description, write a short opinion on what you think of the product. This works best for physical products.
Projector retailer Projectorpoint does this brilliantly by writing 4 or 5 paragraphs on important product pages and scoring them on set criteria.

Add a Q&A
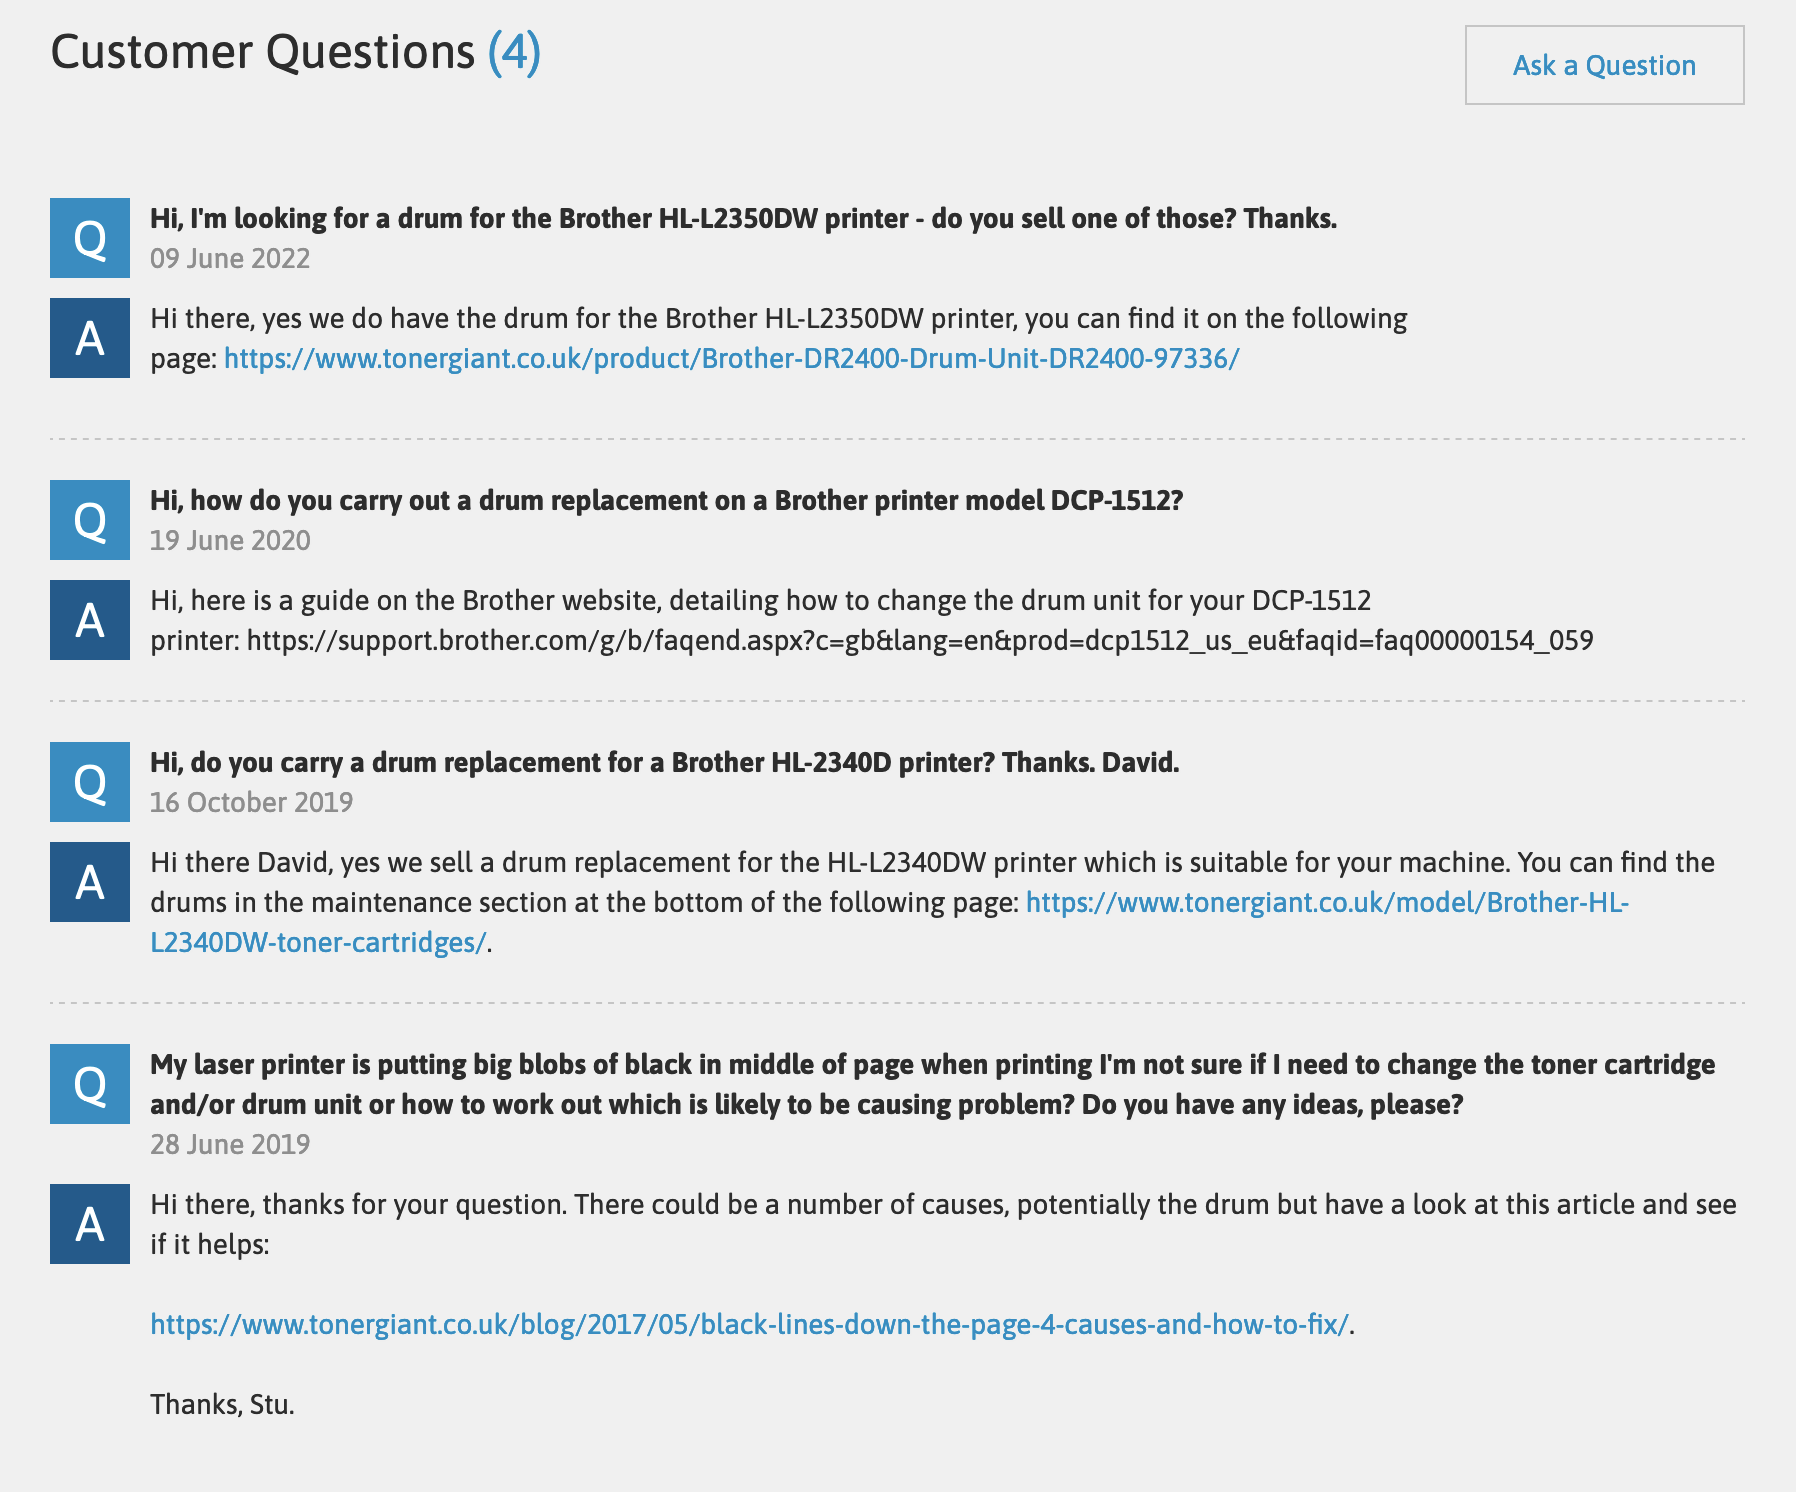
Adding a Q&A section to product pages is a great way to address customer queries, enhance content, and aid informed buying decisions.
Source questions from customers or competitors and provide clear, concise, and valuable responses. Toner Giant is a great example of a brand doing this well.

Always provide essential information
Every industry has a key piece of information that greatly influences the customer’s buying choice. Providing this information is helpful, which is precisely the type of content Google is looking for when ranking.
This might sound simple, but many websites fail to provide this information on product pages. Here are some examples of what helpful content could be on product pages for different industries:
- Clothing and Footwear: Offer detailed size charts specific to the clothing item or shoe model.
- Electronics: Clearly list out key features like battery life or storage capacity.
- Furniture: Provide height, width, and depth measurements to ensure the item fits the intended space.
- Beauty Products: Detail the full list of ingredients to cater to those with allergies or specific preferences. As a bonus, explain why this information is in the product.
- Food Products: Present a detailed nutritional breakdown per serving.
- Books: Give a brief summary or blurb to provide readers with an insight into the content.
- Sports equipment: Describe the material used and its longevity, especially for items like tennis rackets or running shoes.
- Jewelry: Detail the type of metal or gem and provide care instructions to maintain shine and prevent damage.
Add creative, helpful content
Also, consider creative ways to emphasize the advantages and features of your product.
Bellroy does this exceptionally well by showcasing how their slim wallets compare to regular wallets. This highlights their main selling point: their wallets stay slim and small even when they’re full.
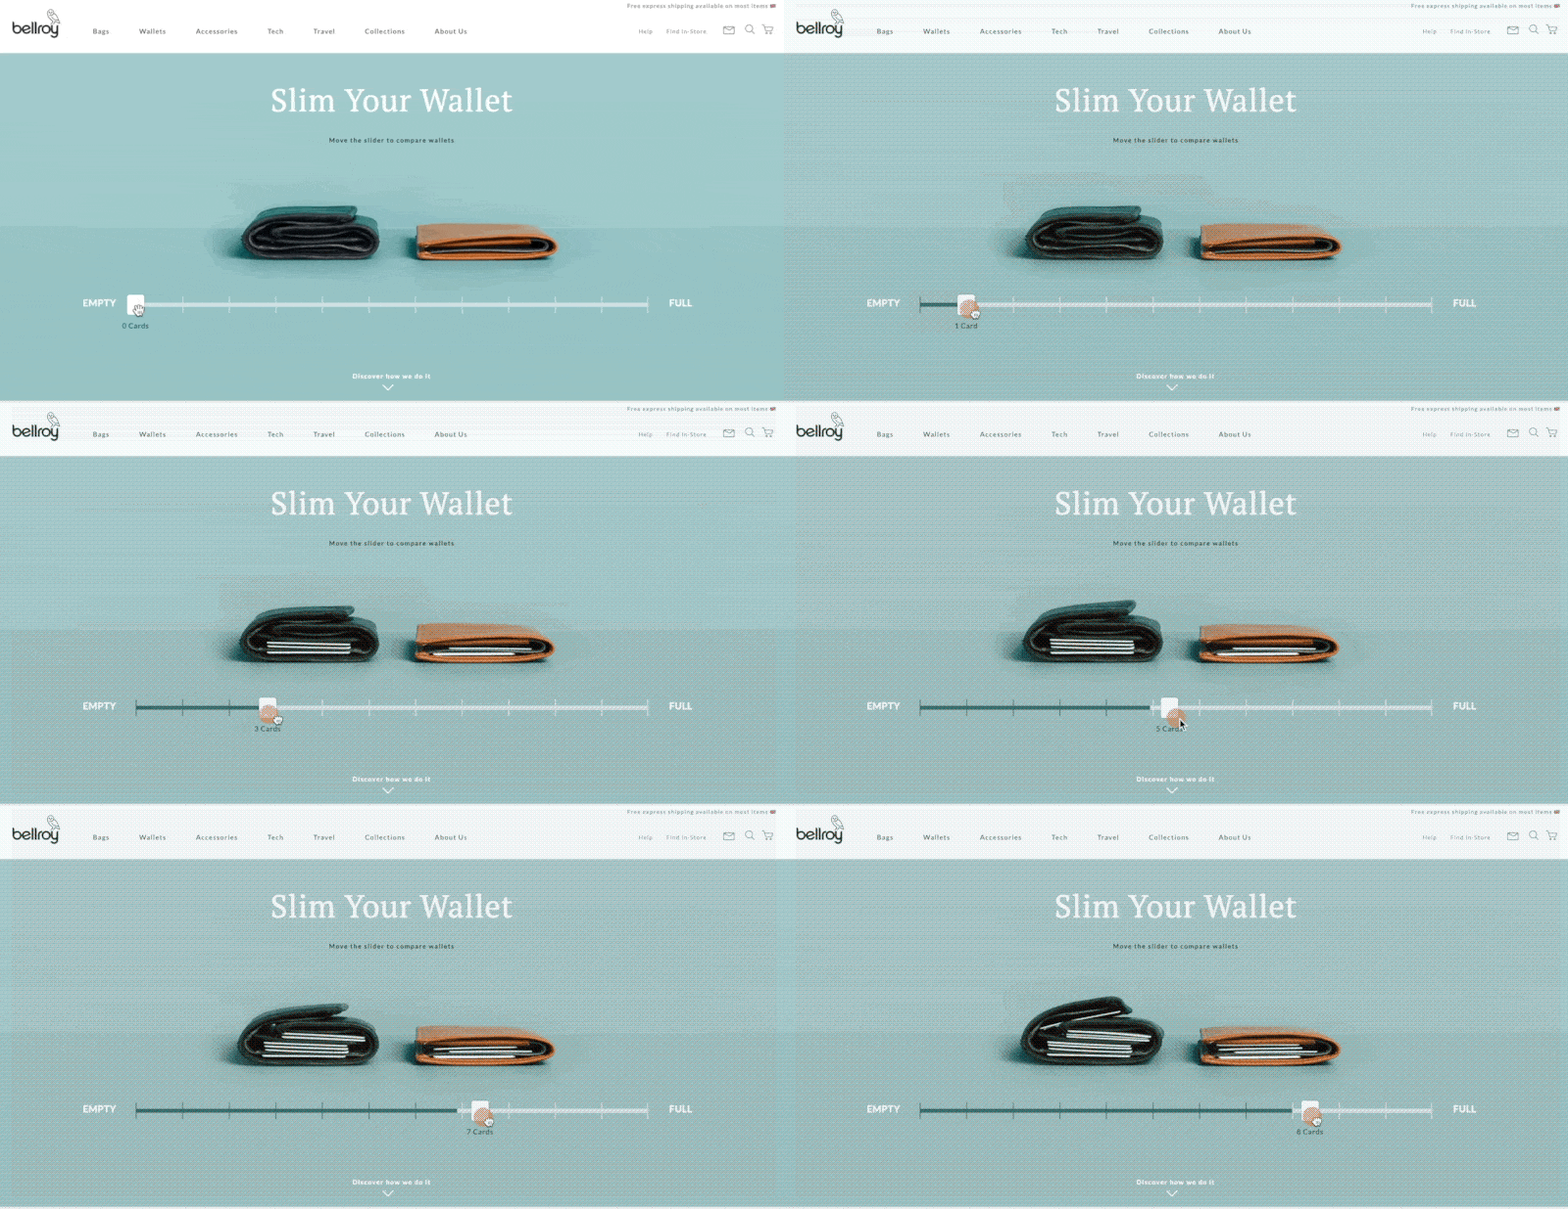

Adding useful content like this also turns your product pages into linkable assets, as it did for Bellroy.
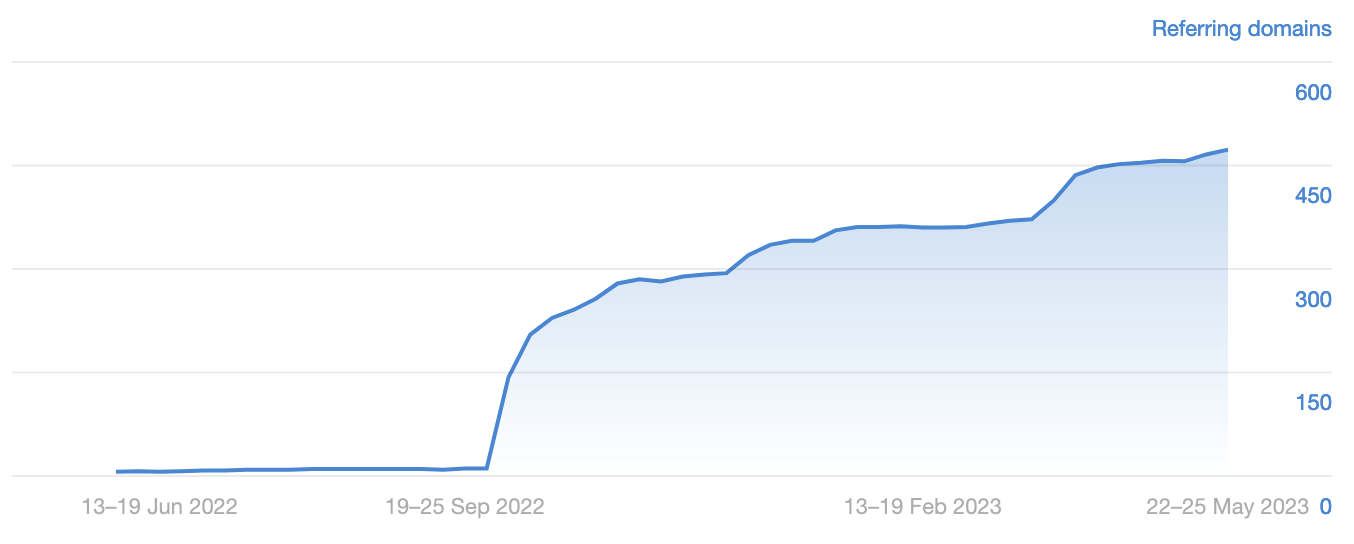

Much of this can be credited to their excellent product and the smart way they showcase its advantages.
There are many ways in which you can replicate this success; here are some to consider, alongside examples of brands implementing similar strategies (albeit not always directly on product pages):
- Calculators: Casper, the mattress brand, has a sleep calculator that helps users determine their sleep schedule based on wake-up times.
- Interactive comparison features: Apple effectively uses this strategy to compare different models of their iPhones, iPads, and Macs.
- Augmented reality experiences: IKEA uses AR through its IKEA Place app, which allows customers to virtually place furniture in their homes to see how it fits and looks.
- Size guides and fitting tools: ASOS uses a “Fit Assistant” that recommends sizes based on a customer’s details and previous orders.
- Environmental impact or sustainability information vs. the competition: Patagonia provides information on their environmental impact and sustainability practices.
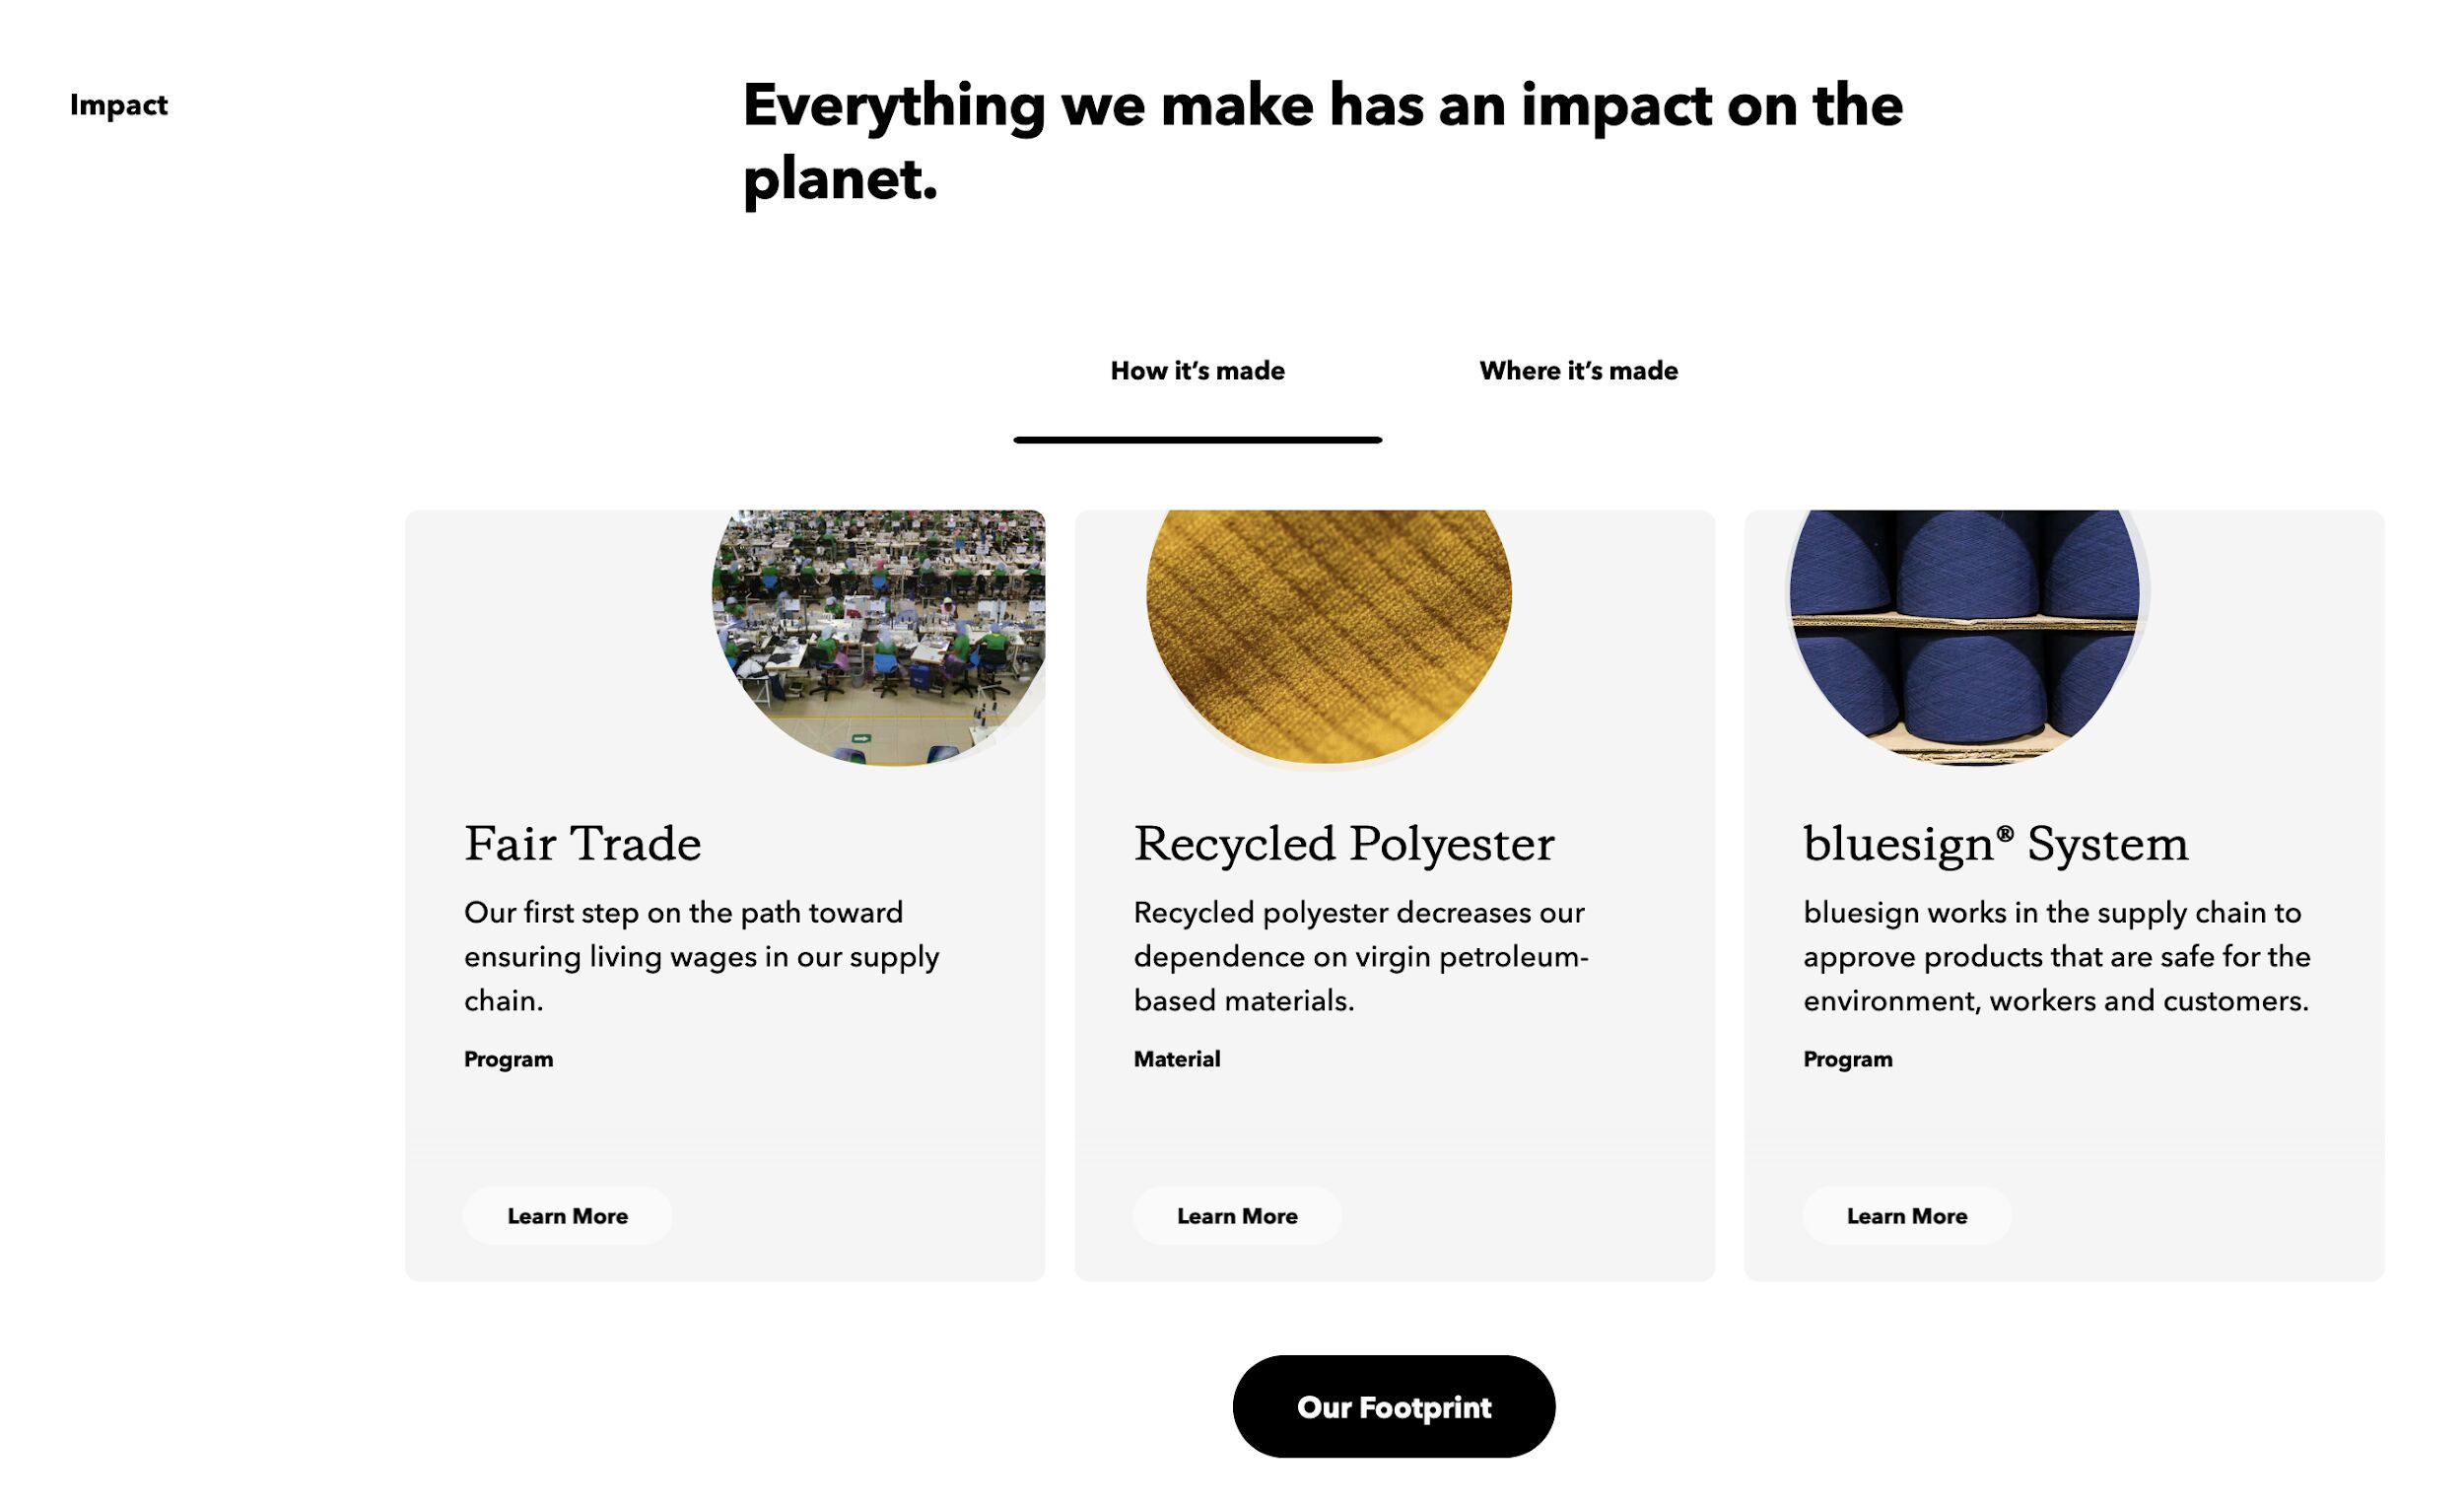

- Information about the production process or origin story: Everlane details the production process, from materials sourcing to manufacturing to the costs to make the product.
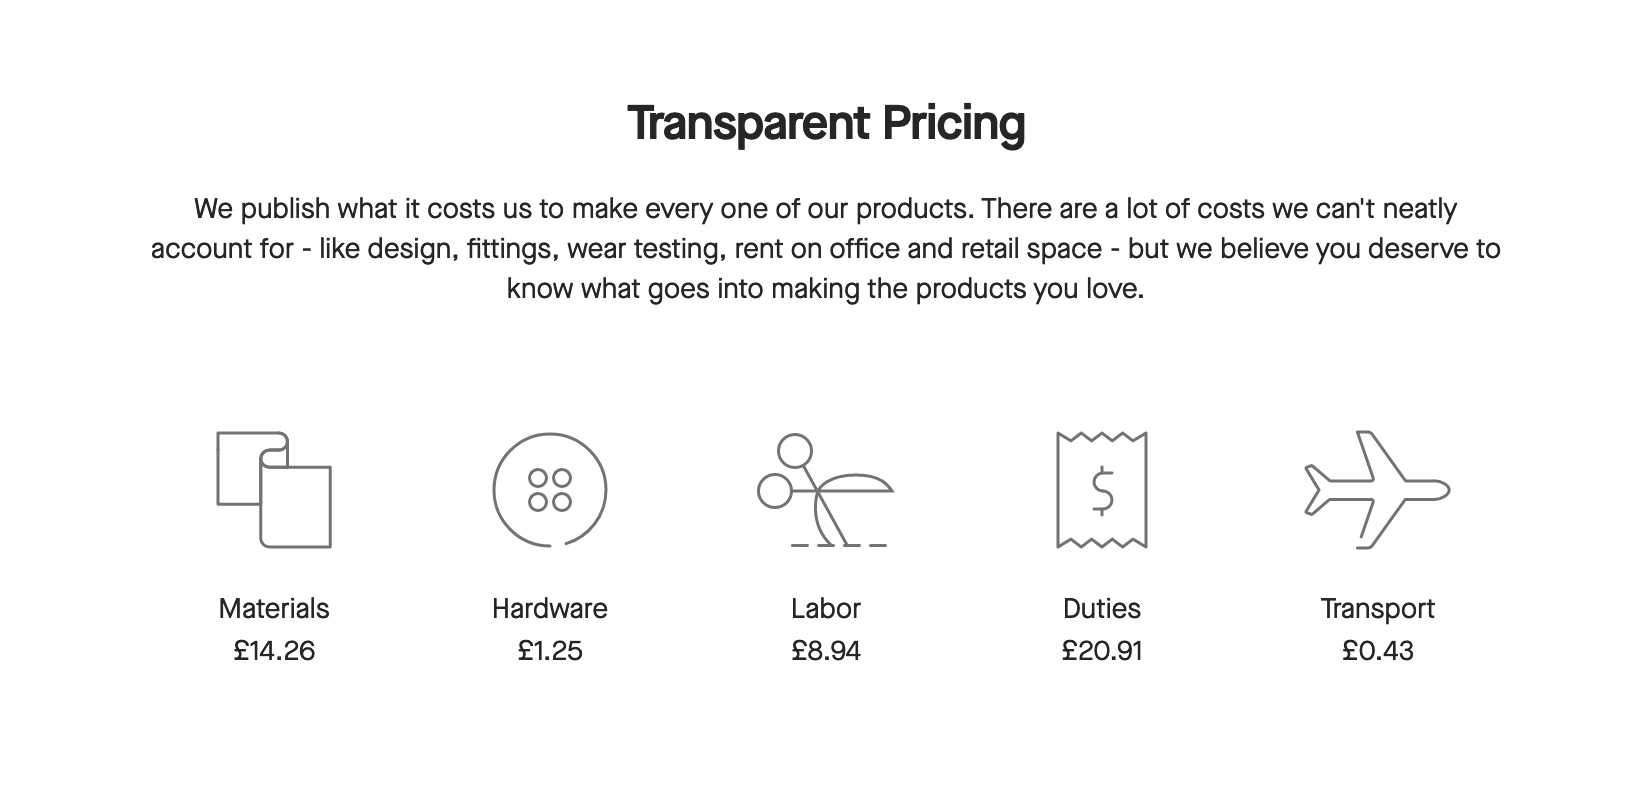

- User-generated content like customer photos or videos: Glossier encourages users to post their own photos using their products, creating a community feel.


- 360-degree product view or virtual try-on: Warby Parker offers a virtual try-on feature for their glasses using a phone’s camera.


- Engaging video demonstrations: Blendtec, known for its series of “Will it Blend?” videos, showcases their blenders’ power and durability.
- Detailed product breakdowns, showing all the components and their functions: Dyson often breaks down its vacuum cleaners component by component in both images and video content to demonstrate their innovative technology.
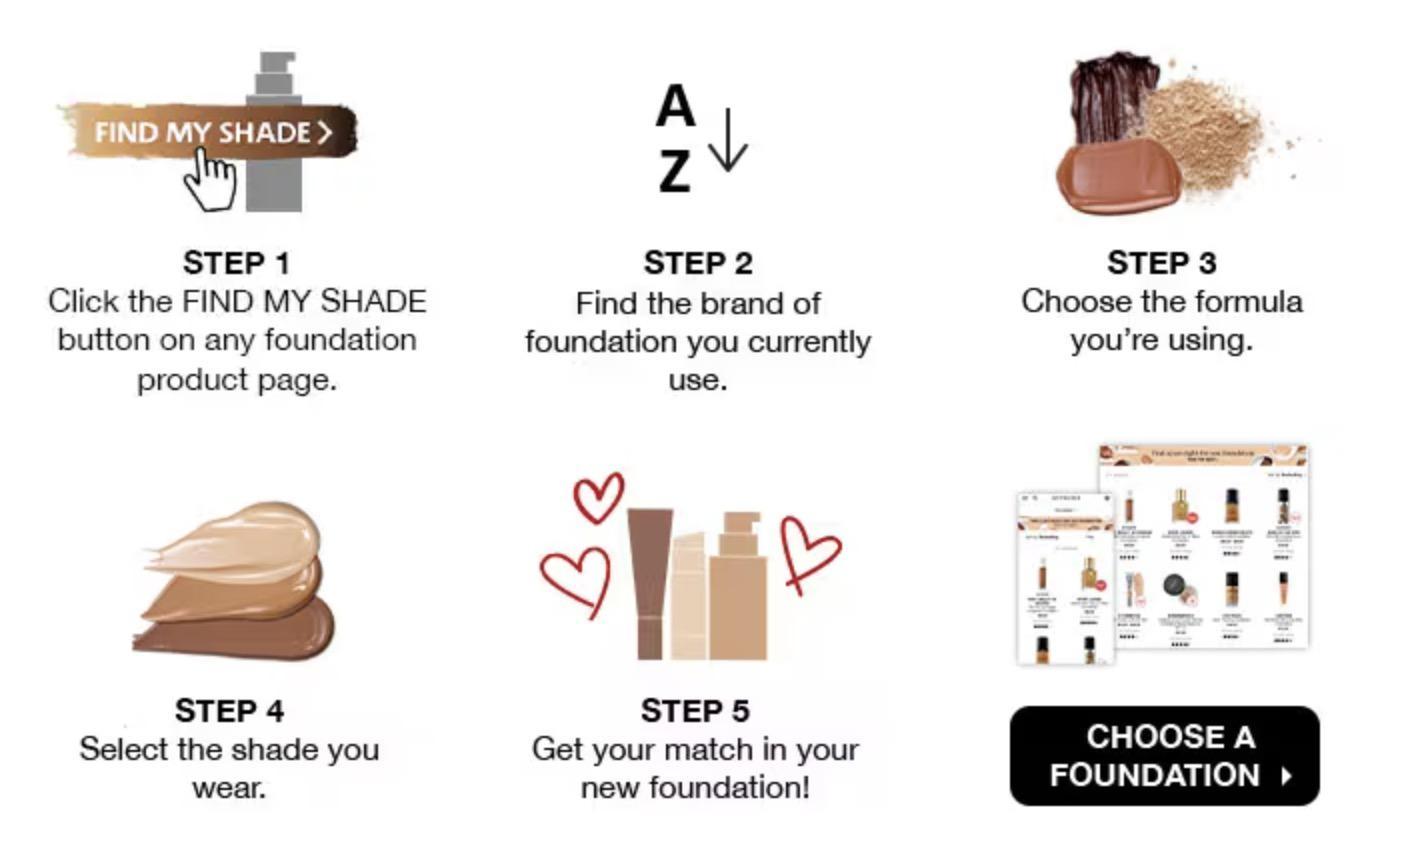
- Interactive quizzes or tools: Sephora offers quizzes like “Foundation Finder” to help customers find the perfect product match for their specific needs.

A semantic heading structure is essential for improving the accessibility and readability of your website. It helps users understand the content hierarchy and quickly find the necessary information.
This practice is also key for SEO, as search engine algorithms will understand page structure better.
To use heading tags semantically on your product pages effectively, keep these points in mind:
- The H1 tag is your primary heading; it usually closely matches the text in the title tag. There should be only one H1 per page.
- H2 tags are secondary headings that denote major sections within your page.
- H3-H6 tags are used for subsections within these sections.
- Each level should be nested within the level above it — for example, H3 tags should be nested within an H2 section, and so forth. You shouldn’t jump levels, so don’t go from a H2 to a H4.
- Make your headings descriptive and concise.
Here’s an example of how Bellroy could do this for a product page:
- H1: Bellroy Slim Wallet
- H2: Key Features
- H3: Ultra Slim Design
- H3: Premium, Sustainably-Sourced Materials
- H3: RFID Protection
- H2: Customer Reviews
- H3: Review 1
- H3: Review 2
- H3: Review 3
- H2: How to Care for Your Wallet
- H3: Cleaning Instructions
- H3: Maintenance Tips
- H2: Key Features
This structure provides a clear, logical information flow to help users and search engines understand and navigate the page.
Use top-notch photos or videos to display your product from various viewpoints. This enhances the quality of your product pages, which can improve how well they rank, but it also opens you up to receiving traffic via Google Images.
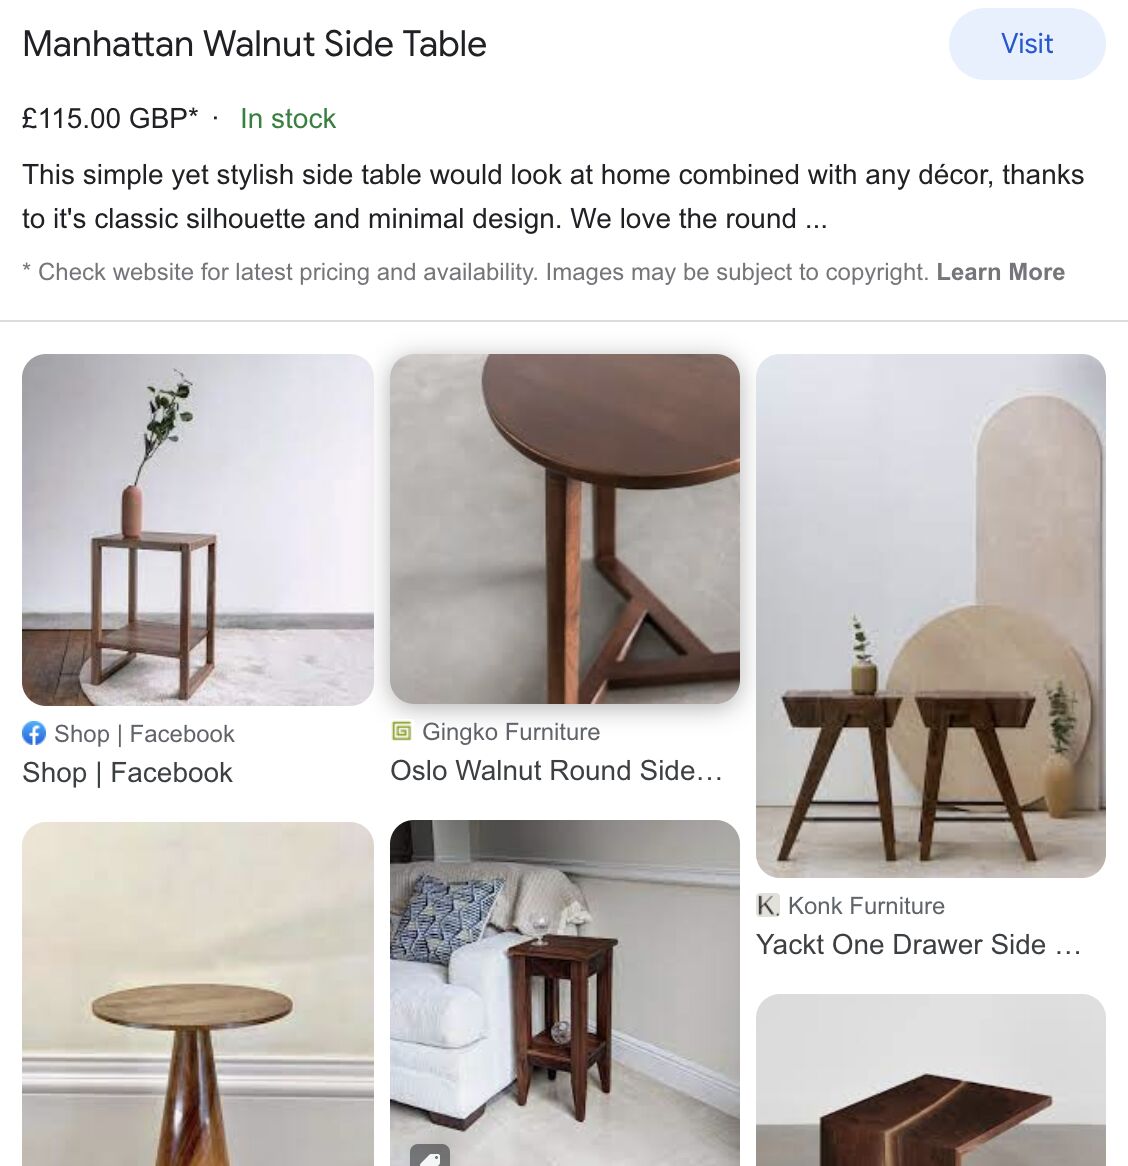
For certain types of products, like decor or fashion, many users utilize image search to discover products. Here’s an example of what an image result listing looks like for an image search of “walnut side table” – Google is showing this image in search results directly from the product page.


Under the selected image result, Google also displays visually similar products.

But how do you ensure your products perform well on image search? Here are a few pointers.
Use descriptive alt text and file names
Alt text is important for accessibility as it describes the image for visually impaired users.
Alt text and a descriptive filename for a product image on Bellroy’s site would look something like this:
<img src="https://ahrefs.com/blog/ecommerce-product-page-seo/bellroy-slim-wallet-black.jpg" alt="Bellroy Slim Wallet in Black">This alt text accurately describes the image, which helps both search engines and screen readers.
Use <img src>
A common issue with image SEO is using CSS to include images as background elements instead of the <img src> tag in HTML.
All images must be included in the HTML code with the <img src> tag to ensure Google can effectively index the image like this:
<img src="https://ahrefs.com/images/bellroy-slim-wallet-black.jpg">Host images on your own domain
While not essential, hosting on your domain rather than a third-party one will simplify tracking your performance in Google Images. All you need to do is change the search type filter to “Images” in Google Search Console.


If you’re using an image CDN, make sure the one you pick provides an option for a custom CNAME so that you can host it on a subdomain like images.yoursite.com.
Semantic HTML is a great way to improve how well search engines understand your content. While heading tags are commonly discussed for SEO purposes, several other ways to optimize product pages with semantic markup exist.
Here are a few key examples:
- Definition lists (DL, DT, DD) or <table>: These can be used to structure and present specification data in a clear and organized manner. DL represents the list itself, DT represents the term or label, and DD represents the definition or value. You can optionally wrap DT and DD in a <div> for styling purposes.
- Unordered lists (UL) and list items (LI): Utilizing UL and LI tags can help create bullet-pointed lists to highlight features, benefits, or other relevant information about your products. You can also use it for product carousels.
- Other examples: There are numerous other semantic HTML elements that can be used to enhance the structure and meaning of your product pages. Some examples include using <section> to group related content, <article> to define individual product sections, or <figure> and <figcaption>.
Of the above, I favor the use of definition lists the most and always apply them for my clients. Let’s take Virgin Experience Days, one of my clients, as an example.
I was exploring methods to enlarge their SERP snippet on product pages. I noticed each page has a list of helpful product information. This includes details such as the available locations, people involved, and the product’s validity period.


Before, the area used <div> tags which lacked semantic meaning. I requested a change to definition lists. As a result, the markup of that section now appears like this:
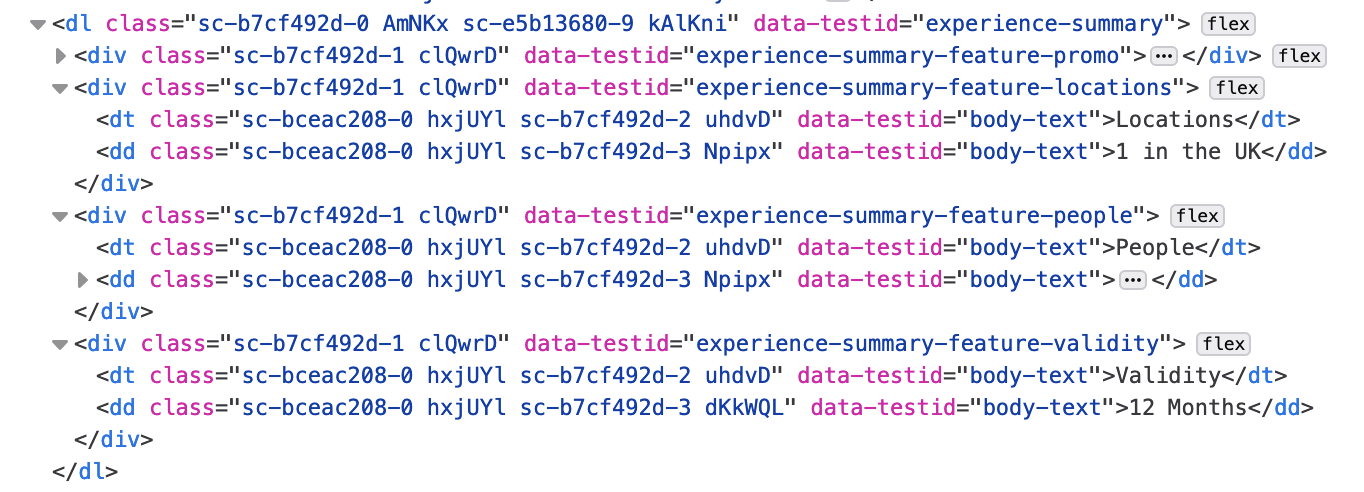

I hoped that Google would start displaying this information in search results as it comprehends the content structure better. A few weeks later, my hope became reality. This valuable product information also started to appear alongside other rich data from structured data on product SERP listings.


By implementing semantic HTML in these various ways, you can provide search engines with more context and make it easier for them to understand the content and relevance of your product pages. This, in turn, can improve rankings and the information shown in your SERP listings.
Many retailers neglect to prioritize unique meta descriptions for product page SEO due to the large number of products they carry.
To address this, they often use templates to generate meta descriptions using the product page name and any relevant product attributes.
For example, Schuh, a shoe store, creates its product page meta descriptions this way.
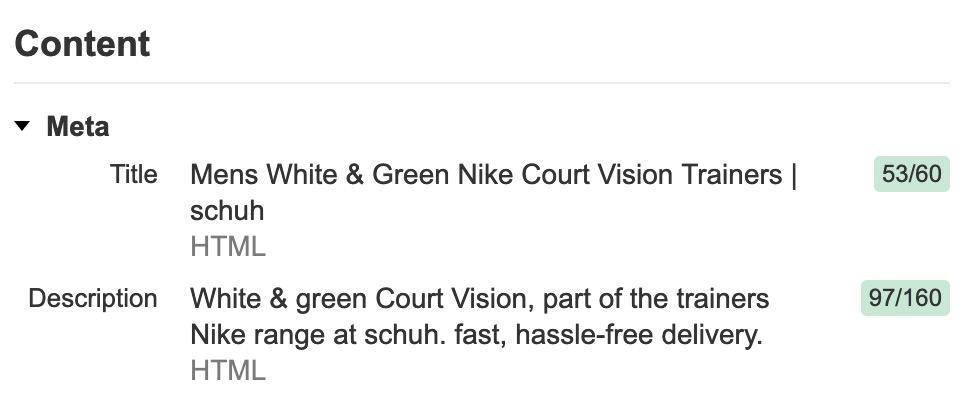

The main problem is that the meta descriptions are too generic. They don’t describe the product being sold or do a great job of matching intent and attracting clicks.
Thankfully, large-language models (LLMs) like GPT have made generating meta descriptions that follow best practices easy.
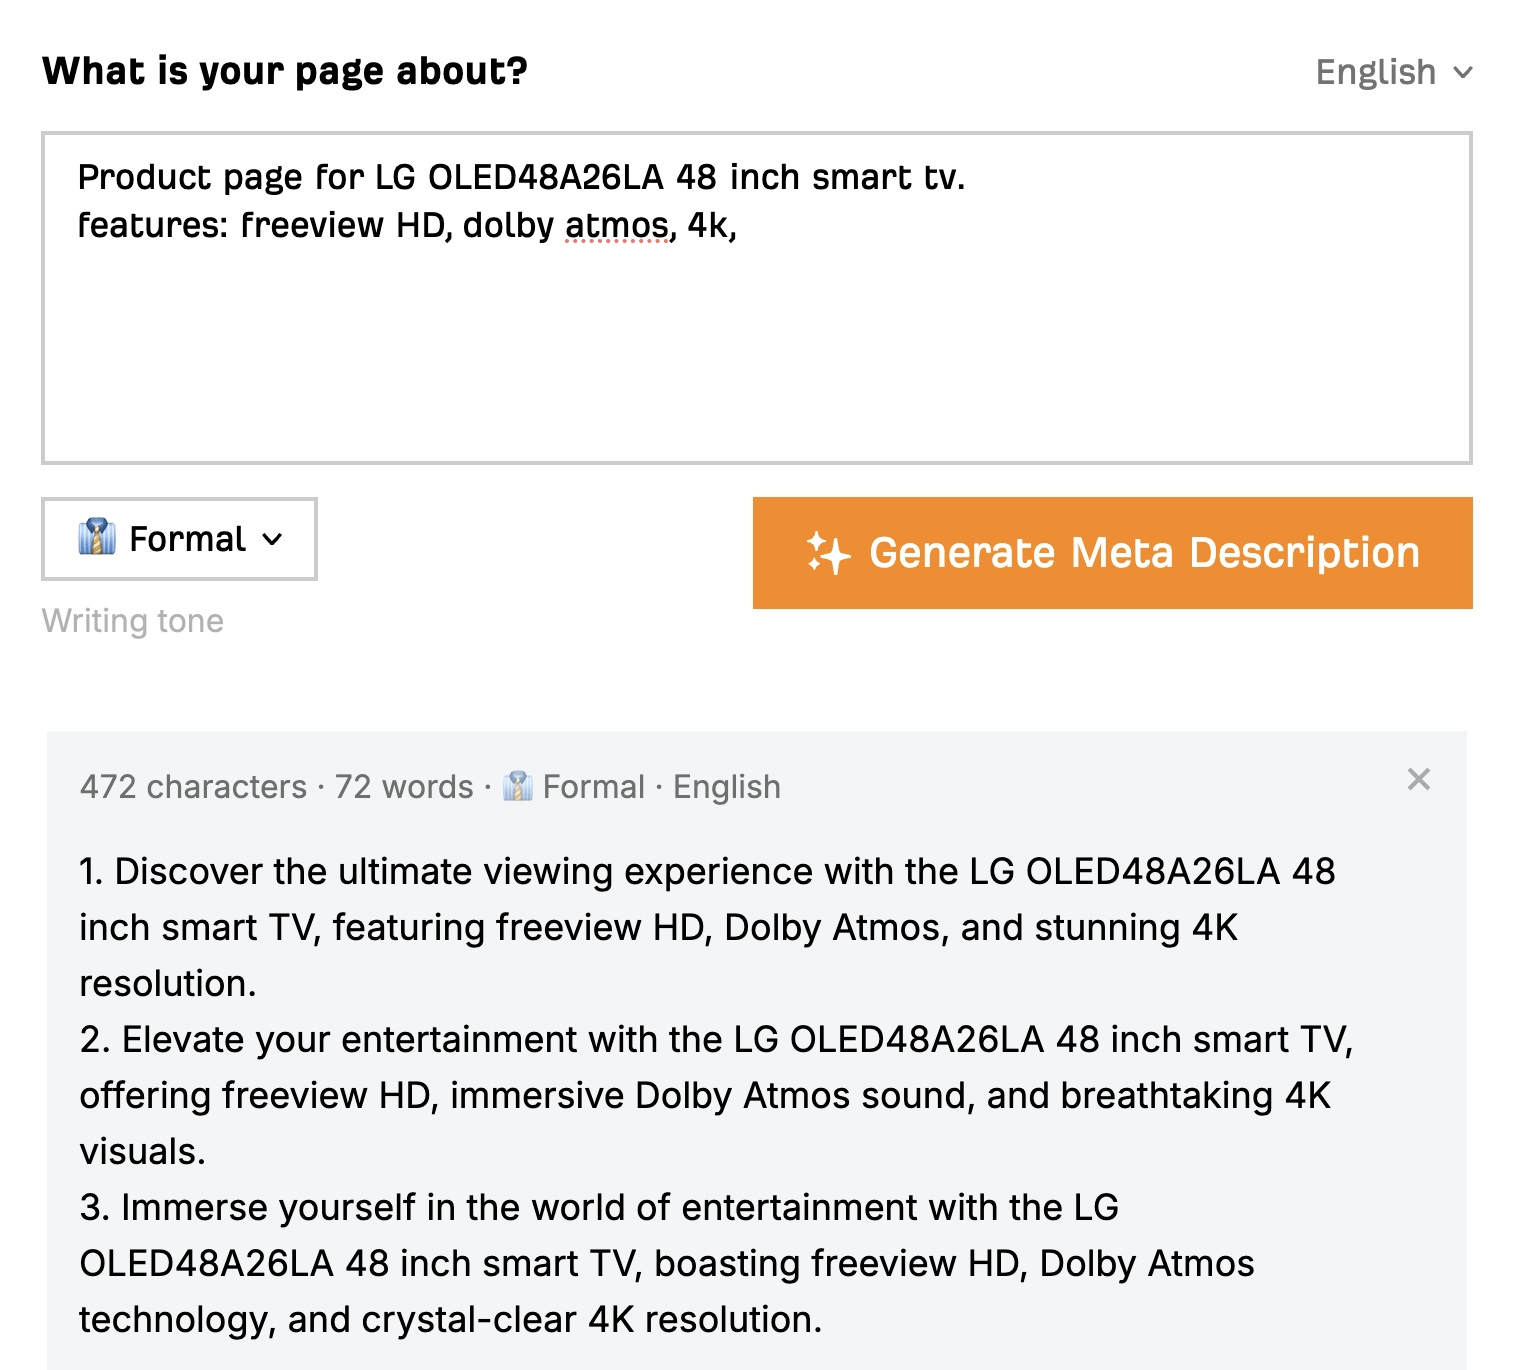
It’s now simple to provide some information within a prompt and then request the AI to generate the description. You can use Ahrefs’ free AI meta description generator to do this. Just describe your page, choose the writing tone, and set the number of variants you want.

Structured data enhances a product page’s SERP listing, often improving click-through rates and organic performance. It includes details like product name, price, and availability, aiding search engines in better understanding page content.
Although structured data is not a ranking factor, Google’s Gary Ilyses notes:
It will help us understand your pages better, and indirectly, it leads to better ranks in some sense, because we can rank easier.
Pairing structured data with product feeds from the Merchant Center amplifies eligibility for enriched results and diverse search experiences, also enabling free Google Shopping listings. This dual data optimizes visibility across various Google products.
Providing structured data impacts how you’ll be displayed in various Google products, such as:
You usually find prices and reviews in the detailed results. However, adding more product details to your structured data can improve your listings and Google’s understanding of your content further. This data could cover product pros and cons, shipping, returns, and stock information.
To use structured data, JSON-LD is the recommended option. Here’s an example of some simple product schema for a Bellroy slim wallet. It includes pricing, shipping, returns, reviews, and more:
<script type="application/ld+json">
{
  "@context": "http://schema.org/",
  "@type": "Product",
  "sku": "bellroy-00001",
  "gtin14": "01234567890123",
  "name": "Bellroy Slim Wallet",
  "image": [
    "https://ahrefs.com/images/bellroy-slim-wallet-black.jpg"
  ],
  "description": "A slim, minimalist wallet made from premium, sustainably-sourced leather.",
  "brand": {
    "@type": "Brand",
    "name": "Bellroy"
  },
  "offers": {
    "@type": "Offer",
    "url": "https://www.yourwebsite.com/bellroy-slim-wallet",
    "itemCondition": "http://schema.org/NewCondition",
    "availability": "http://schema.org/InStock",
    "price": 79.00,
    "priceCurrency": "USD",
    "priceValidUntil": "2024-12-31",
    "shippingDetails": {
      "@type": "OfferShippingDetails",
      "shippingRate": {
        "@type": "MonetaryAmount",
        "value": 5.00,
        "currency": "USD"
      },
      "shippingDestination": {
        "@type": "DefinedRegion",
        "addressCountry": "US"
      },
      "deliveryTime": {
        "@type": "ShippingDeliveryTime",
        "handlingTime": {
          "@type": "QuantitativeValue",
          "minValue": 1,
          "maxValue": 2,
          "unitCode": "DAY"
        },
        "transitTime": {
          "@type": "QuantitativeValue",
          "minValue": 2,
          "maxValue": 7,
          "unitCode": "DAY"
        }
      }
    },
    "hasMerchantReturnPolicy": {
      "@type": "MerchantReturnPolicy",
      "applicableCountry": "CH",
      "returnPolicyCategory": "https://schema.org/MerchantReturnFiniteReturnWindow",
      "merchantReturnDays": 60,
      "returnMethod": "https://schema.org/ReturnByMail",
      "returnFees": "https://schema.org/FreeReturn"
    }
  },
  "review": {
    "@type": "Review",
    "reviewRating": {
      "@type": "Rating",
      "ratingValue": 4.5,
      "bestRating": 5
    },
    "author": {
      "@type": "Person",
      "name": "Jane Doe"
    }
  },
  "aggregateRating": {
    "@type": "AggregateRating",
    "ratingValue": 4.6,
    "reviewCount": 150
  }
}
</script>Customer reviews are an invaluable way to help users make a purchasing decision and can also significantly impact SEO. Here are a few key benefits of reviews for product page SEO:
- Relevant, helpful content: User-generated content, such as reviews, provides fresh and relevant content that is helpful to users, which is exactly the type of content Google aims to reward.
- Improved CTR: Product pages with positive reviews tend to have higher click-through rates (CTR) than those without (if you add the structured data mentioned above).
- Increasing Conversion Rates (CVR): Various studies have found significant benefits to CVR. One study by the Spiegel Research Center found that displaying reviews can increase CVR by up to 270%. A similar study by Bazaarvoice found that products with 25 reviews receive 108% more traffic than those without reviews.
- Building trust and transparency: Reviews show that you value user opinions and are transparent about the quality and performance of your products. This transparency can increase customer loyalty and repeat purchases, which can indirectly impact SEO.
So it’s clear collecting reviews is something you should be doing; here are some additional tips you need to consider to ensure they positively impact SEO.
Use pagination with <a href> links for product pages
A common SEO misstep on product pages is insufficient indexing of review content, often as they aren’t crawlable.
This often happens as sites load reviews using AJAX and don’t include crawlable pagination, restricting search engines’ ability to crawl and index review content, which can help them understand relevancy.
Here are two key considerations to ensure that search engines can index your customer reviews.
Utilize <a href> links
You should use standard <a href> links when creating pagination for your reviews. This ensures search engines can easily discover and crawl each component page. Here’s an example of how you might implement this in HTML:
<nav>
  <ul class="pagination">
    <li><a href="https://ahrefs.com/product-page">1</a></li>
    <li><a href="http://ahrefs.com/product-page?page=2">2</a></li>
    <li><a href="http://ahrefs.com/product-page?page=3">3</a></li>
    <li><a href="http://ahrefs.com/product-page?page=4">4</a></li>
    <li><a href="http://ahrefs.com/product-page?page=5">5</a></li>
    <!-- etc. -->
  </ul>
</nav>
Incorporate self-referencing canonicals on each paginated page
Self-referencing canonicals inform search engines that each paginated page should be treated separately. This can help prevent issues with duplicate content.
Here’s how you might add a self-referencing canonical to each paginated page:
<!-- On /product-page?page=2 -->
<link rel="canonical" href="https://example.com/product-page?page=2" />

<!-- On /product-page/reviews?page=3 -->
<link rel="canonical" href="https://example.com/product-page?page=3" />

<!-- etc. →
Internal linking is a critical part of improving the SEO of your product pages. Adding strategic internal links to different products and categories helps search engines better understand your site structure and helps PageRank flow throughout the site.
One great element of product page internal linking is that it can be largely automated. Here’s an overview of the common types of internal linking you’ll see on product pages and how they’re often implemented.
Complementary products
Often, you’ll see complementary products to the one being purchased. For fashion retailers like Reiss, when viewing a blazer product, a complementary product would be recommending shirts and trousers.
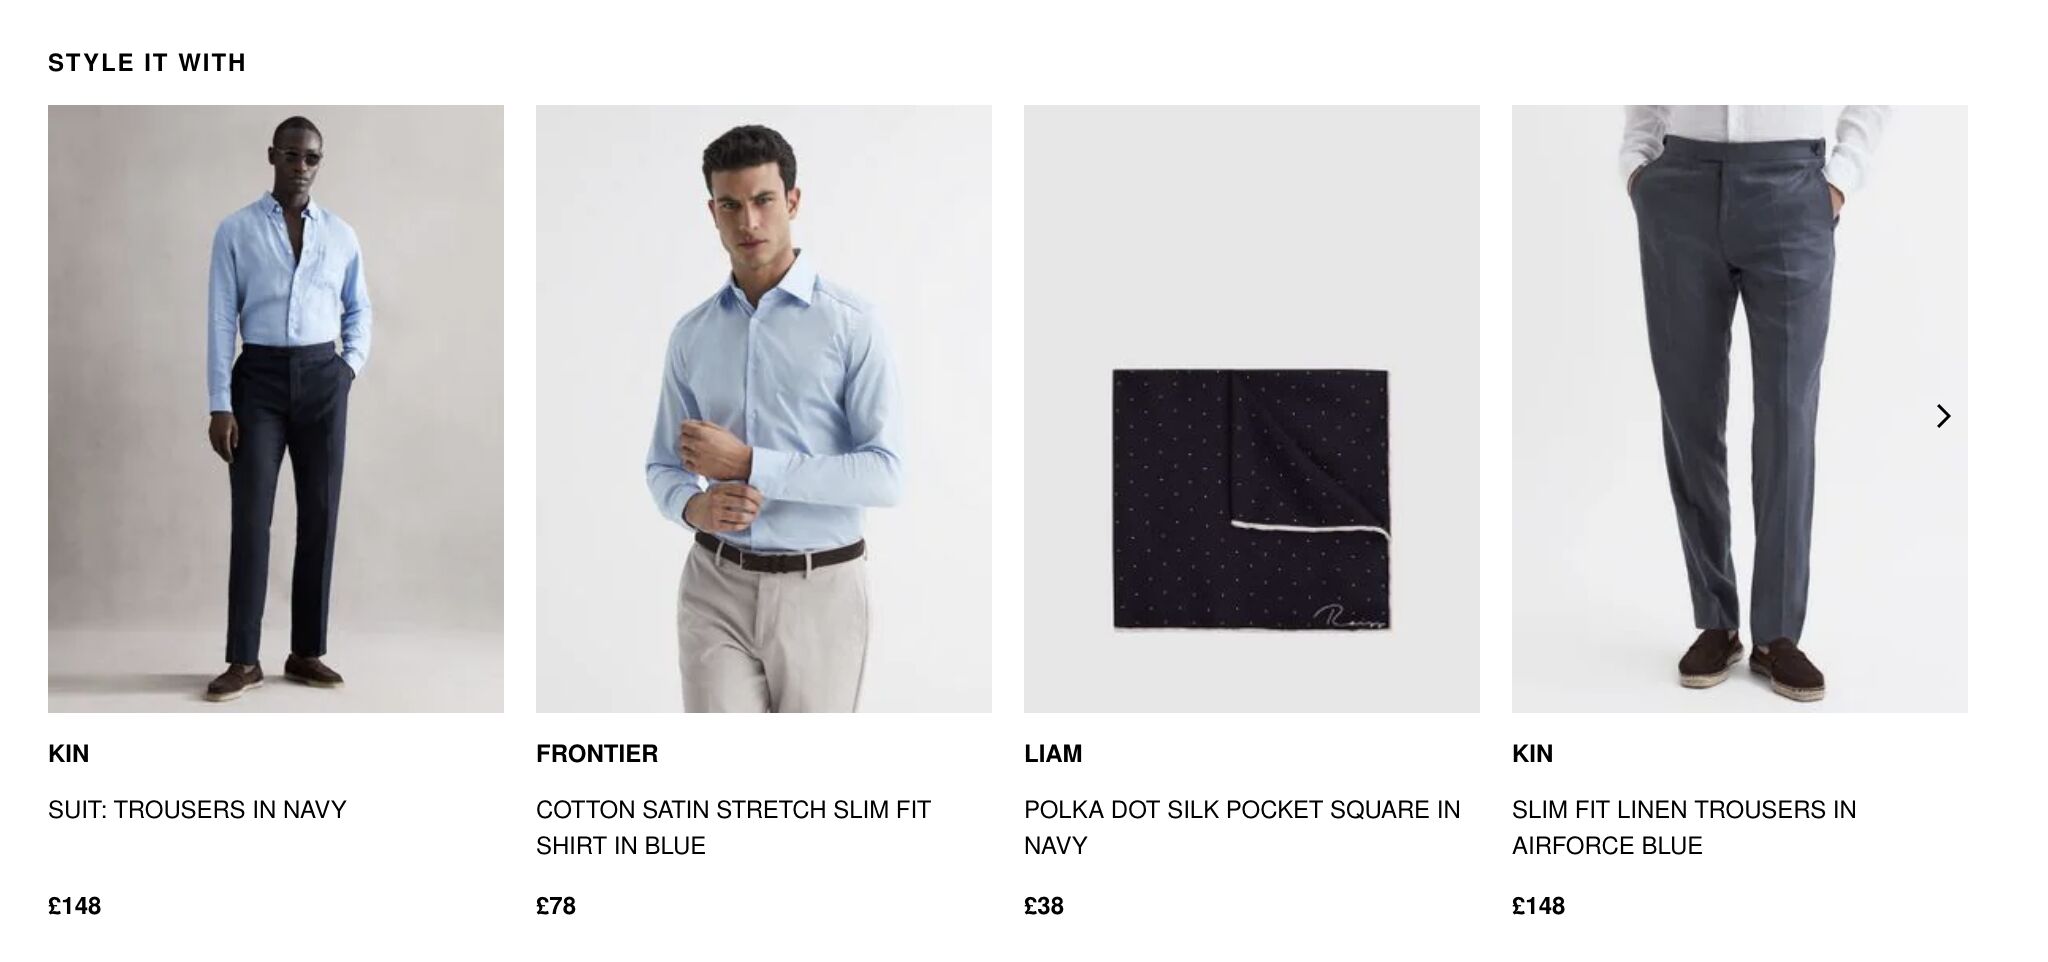

This is usually manually selected by a site merchandiser or is rule-based. For example, if the product is a blazer, rules would be configured to show products from categories like “shirts,” “trousers,” and “pocket squares.”
Related products
Alongside complementary products, you’ll often also see directly related products to the one viewed.


These would often be automated by displaying products belonging to the same category and sometimes ones with common attributes to the one being viewed.
Frequently bought together
This is another common way related products are displayed on product pages.
Amazon is known for this feature; when viewing a product, you’ll often see a “Frequently Bought Together” section that shows you common products that others typically buy with the one you’re viewing.
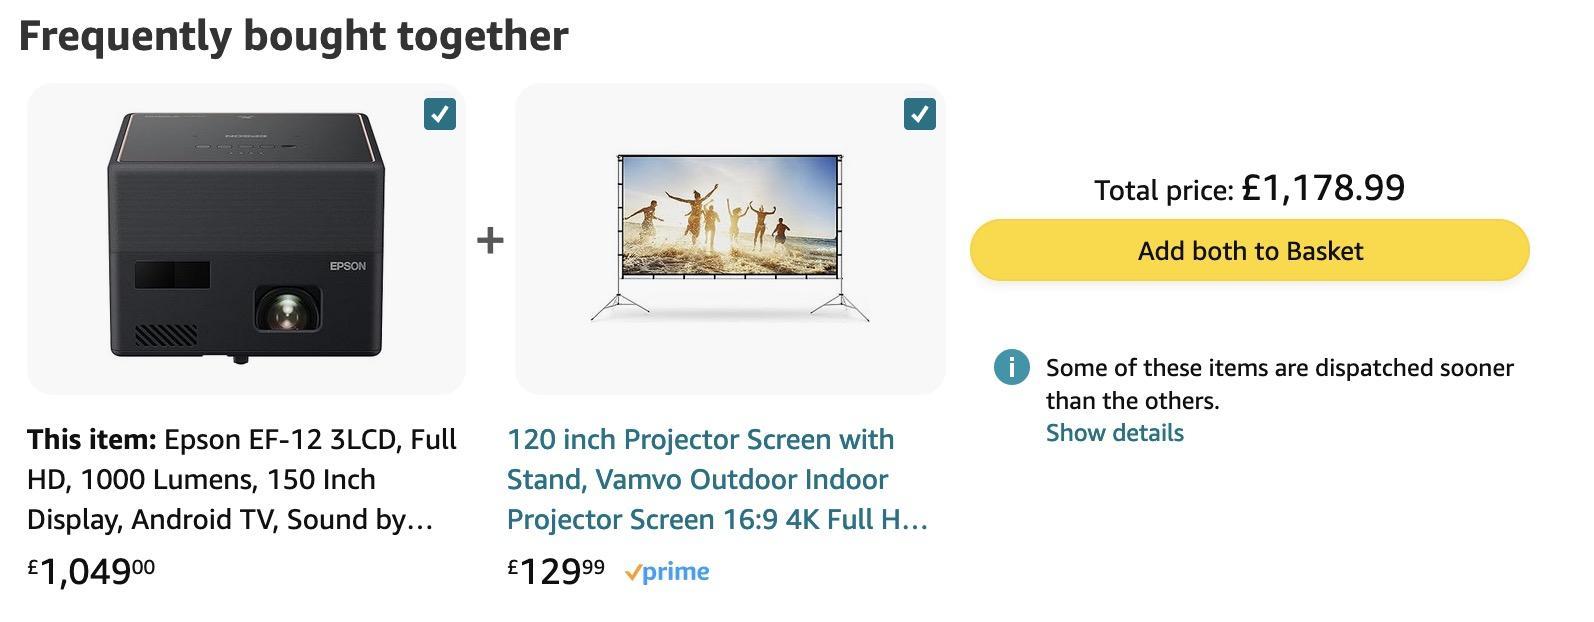

This is automated based on customer purchasing data. If customers often buy a camera, a tripod, and a camera bag, these items would display.
Links to all parent categories
In some instances, product pages will feature links that lead back to all parent categories to which the product belongs.
This allows users to navigate back and explore other items within those categories easily. It also benefits SEO by getting PageRank to flow back to important categories on the site.
This is usually implemented by simply listing the categories to which the current product has been added.


Breadcrumbs
Breadcrumbs enhance navigation by showing users their location within a site’s hierarchy. Starting from the home page, they chart the path through categories and subcategories to the product.


Breadcrumbs should remain static, even if a product falls into multiple categories. Static breadcrumbs ensure a consistent user experience and display the most relevant parent category path, helping users better understand site navigation.
Link to important products globally
If you have particularly important products, either for the site’s revenue or for organic traffic potential, consider linking to these products globally in the header or footer.
Here’s an example of that on Fanatical, a PC gaming site.
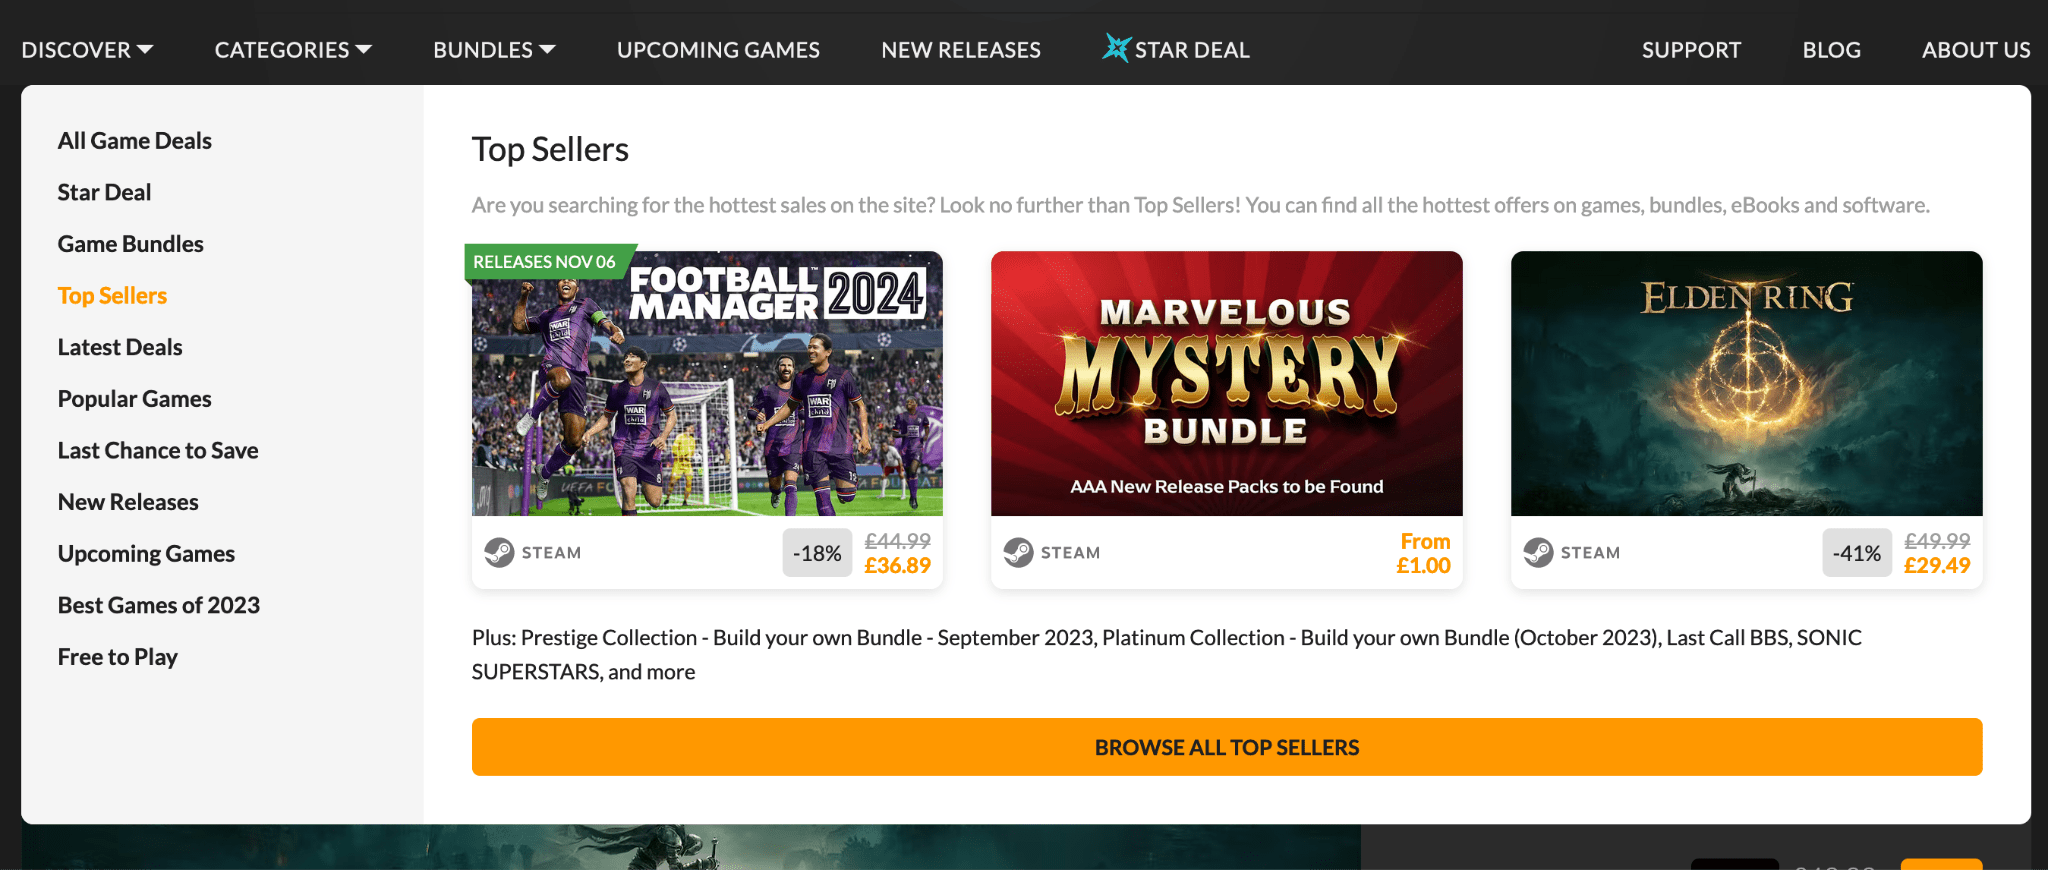

By doing this, you’ll significantly increase the amount of PageRank flowing to them, helping their rankings and improving the user experience by prominently displaying key products.
Link to related categories from specification tables
Here’s another internal linking tip. Some websites link product details to related categories on their site.
Here’s another Fanatical example. They provide game details such as the publisher, genre, themes, and features of each game on their product pages. All these details connect to related categories on their site.
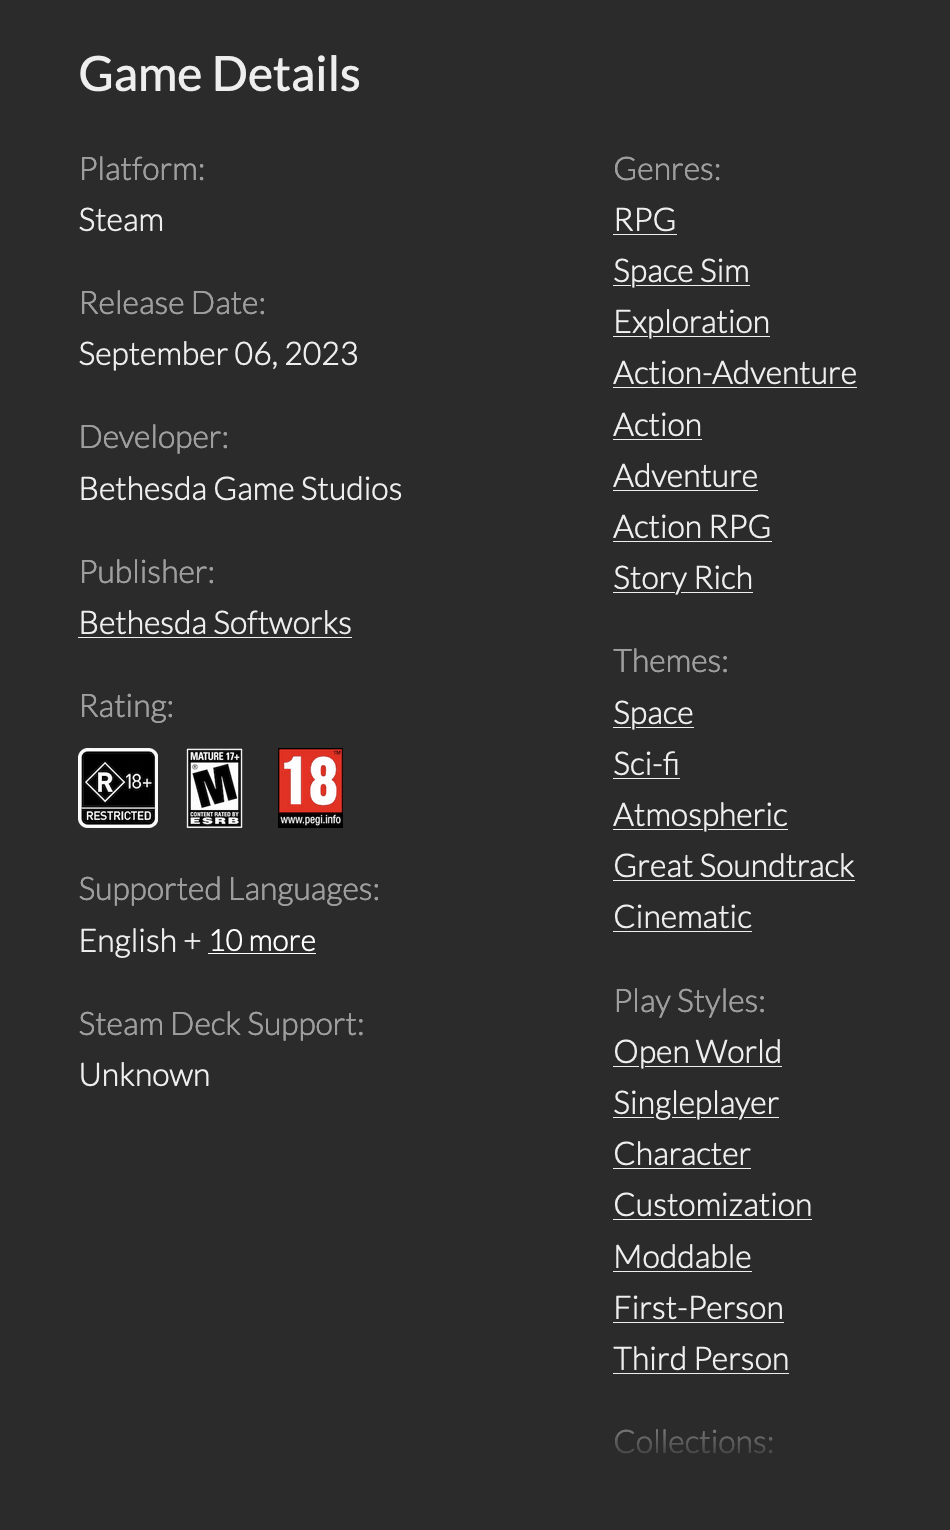

They’ve inserted internal links in these detail tables, helping ranking signals flow to categories.
This practice can also apply to other sectors. For instance, a skincare retailer might link product ingredients to category pages targeting searches for products containing that ingredient.
Managing product variants correctly is crucial for the SEO of a product page. Variants are minor changes in a product. For example, a car may have different colors or engine sizes. You need to have the right strategy for your variants because:
- It impacts whether you’ll show in Google Shopping.
- Variants are usually near-duplicates. If ranking signals aren’t consolidated across multiple variants, they are diluted between them rather than consolidated into one stronger product page.
Think about using URL parameters or path segments if you want to internally link to specific product variants. This gives each variant a unique URL like “/t-shirt/green” or “/t-shirt?color=green”. It can make your site structure clearer for users and search engines.
But don’t forget to use canonical tags in this case. Choose one product variant URL as the canonical URL for the product. If you use optional query parameters for variants, pick the URL without any parameters as the canonical one.
For example, if you sell T-shirts in different colors and used URLs like the below:
- /t-shirt?color=green
- /t-shirt?color=blue
- /t-shirt?color=red
You would make “/t-shirt” the canonical URL for all T-shirt variants. This helps Google understand how different product variants relate to each other.
<!-- Canonical URL for all variants: -->
<link rel="canonical" href="https://www.example.com/t-shirt" />
However, it’s worth considering whether you really need different URLs for each product variant. If:
- Users aren’t searching for variants based on your keyword research.
- There’s no advantage to having separate listings on Google Shopping.
- You don’t want to list variants on category pages.
Then you might prefer to use just one product page URL and manage variant client-side using AJAX. This way, all variants are shown on one page, and customers can select their preferred variant on one URL.
XML sitemaps help enhance the crawling and indexing of your content. This is particularly useful for big e-commerce stores.
XML sitemaps aren’t a new concept, but I do suggest using the <lastmod> attribute in your XML sitemaps if you offer many products. Here’s an example of what that looks like:
<url>
   <loc>https://www.yourwebsite.com/blue-widget</loc>
   <lastmod>2023-09-25</lastmod>
</url>
Note that I’m not recommending including <changefreq> or <priority>. Google or Bing uses neither of these, so they’re safe to remove.
When you add <lastmod>, Google more efficiently detects changes to your products. This approach saves crawl budget, especially for sites that have many changes. Sites can use this attribute to let Google know about content updates.
In ecommerce, managing discontinued and out-of-stock products is not just about inventory management. It’s a crucial aspect of user experience and search engine optimization.
Addressing these products correctly can determine whether a potential customer stays on your website or bounces off.
Understand the value of discontinued pages
Beyond inventory considerations, recognize that these pages, especially ones with high traffic or inbound links, can carry significant SEO weight. Pages with value should always be redirected to a relevant product or category.
Handle temporarily out-of-stock products
- Keep the product page live if a restock is anticipated.
- Label the product as “out of stock,” providing clarity and preventing user frustration.
- Offer notifications for restocks, ensuring return visits.
- Suggest alternative products, catering to the user’s purchase intent.
Manage permanently discontinued products
- Retain the page if it has a high search demand, but ensure users are presented with alternatives or clear communication about the product status.
- If there is low demand, redirect users to a related product that is a new version of the old product. If that isn’t possible, consider redirecting to a category with a notice explaining the discontinuation and offering alternatives.
- Consider re-using the URL without redirecting if the product is the same but a small change to a previous product.
- Use HTTP Status 410 for products not returning and without significant SEO or user value. It informs search engines to deindex the page.
Remember to tidy up site navigation:
- Regularly audit and remove internal links to old products.
- Update XML sitemaps and on-site search functionalities.
By implementing this strategy, you maintain SEO value and ensure a seamless and informative experience for your users, enhancing brand trust and loyalty.
Not every product page warrants equal attention from search engines. This is especially true for industries with intricate product variants, where sheer volume could dilute the overall impact of your site’s SEO efforts.
Take, for instance, a diamond retailer. A single diamond can have countless variants based on cut, clarity, carat, color, and other distinguishing features. When you multiply these variations across numerous diamonds, you end up with a staggering number of individual product pages.
Here’s why this is an SEO issue:
- Content quality: If you have 100,000s of product variants for items like a diamond, it’s very likely the content between each variant will be very similar.
- Indexing overload: Search engines probably won’t index thousands of product pages that have only slight differences. There’s usually no search interest in these minor variations. This could hurt your site’s SEO, particularly if the pages are not of high quality. Moreover, this situation will likely lead to diluted ranking signals between all these pages.
- User experience: For industries with extensive variations like diamonds, users often prefer browsing categories or filters to narrow down their choices. They also don’t tend to search for specific diamond variants. They’ll search more broadly for shapes or sizes.
The way forward:
- Emphasize categories: Instead of focusing on individual product pages, prioritize categories like “Princess Cut Diamonds” or “1-Carat Diamonds.” These category pages can then be optimized for relevant search queries, driving traffic more effectively.
- Use noindex strategically: Implement the noindex directive for product pages that don’t need to be discovered by search engines. This ensures that search engines focus on your category pages that users actually search for.
- Don’t use <a href> links to products: Instead, use JS to load them. This method helps avoid too much crawling of pages marked with noindex, wasting crawling resources. You might consider using robots.txt. However, based on my experience, if you continue using <a href> links, Google might index your product pages. It sees the links and assumes they’re significant while not being able to see the noindex because you’ve blocked page crawling.
This method is effective for certain types of sites in particular situations. You need to apply it thoughtfully. Also, a well-organized category page structure is necessary to make the most of it.
Final thoughts
Navigating the intricacies of product page SEO can be daunting, but with the insights from this guide, the journey becomes more manageable.
Remember, it’s not just thinking of ranking signals, but providing value to your audience. As you optimize, keep your end-user at the forefront, and success will follow.
Have a question about optimizing product pages? Find me on X.


![How AEO Will Impact Your Business's Google Visibility in 2026 Why Your Small Business’s Google Visibility in 2026 Depends on AEO [Webinar]](https://articles.entireweb.com/wp-content/uploads/2026/01/How-AEO-Will-Impact-Your-Businesss-Google-Visibility-in-2026-400x240.png)
![How AEO Will Impact Your Business's Google Visibility in 2026 Why Your Small Business’s Google Visibility in 2026 Depends on AEO [Webinar]](https://articles.entireweb.com/wp-content/uploads/2026/01/How-AEO-Will-Impact-Your-Businesss-Google-Visibility-in-2026-80x80.png)


