SEO
SEO Best Practices for Migrating to Shopify

Imagine the despair you would feel seeing your new Shopify store’s organic traffic tank, sales evaporate, and page 1 rankings drop from search results.
After spending months building out your new Shopify site, sleepless nights going back and forth with web designers and developers, nail-biting hours spent refreshing your Analytics, and waiting for sales to trickle in again, let’s just say, migrating to a new ecommerce platform can be a daunting task.
But don’t worry, this won’t be you.
By following these SEO best practices for migrating to Shopify, you can eliminate the anxiety and pave the way for a smooth transition to your new Shopify store.
Why Migrate To Shopify?
Shopify is the global leader in supporting independent ecommerce brands to branch out and grow their store on their own terms.
It’s a great alternative to the likes of Amazon, allowing merchants more control over their brand and marketing.
In 2021, merchants sold $175.4 billion in sales through the Shopify platform.
They’ve recently welcomed onboard some massive brands like Hello Fresh and French Connection.
With an inexhaustible library of apps and access to Shopify marketing experts and developers, it’s a comprehensive and attractive platform for taking your business to the next level.
Migrating To Shopify
If you’re ready to take the plunge and migrate your ecommerce store over to Shopify, take the time to understand the SEO implications of migration.
The last thing any business owner wants is to lose all their hard-earned domain authority, backlinks, and organic traffic.
Regardless of how large or small your business is, migrating to a new ecommerce platform is not an easy process but heed this warning don’t migrate your store to Shopify without a plan.
If you don’t plan and execute a migration correctly, organic traffic can be cut by 50% within weeks of migrating.
For instance, while migrating, a web designer treated the new website as a whole new business.
When migration occurred, there were no 301 redirects in place, resulting in 404 pages and crawl errors everywhere.
These errors signaled to the Google bots to stop crawling the pages.
As you can imagine, it didn’t take long for traffic to flatline.
No crawling means no indexing and no indexing means no URLs will show in search results.
And just like that, you can kiss your hard-earning SEO goodbye.
Pre-Migration
1. Set Up The New Shopify Store
Signing up and selecting a plan is the first step.
Select a Shopify theme according to your needs.
Use this as an opportunity to refresh the canonical link structure and SEO setup of your store. Consider the following.
- Navigation structure – Are your top-ranking pages or highest value collections or products accessible through your site’s navigation? Does the flow of your navigation make it easy for your customer to find what they are looking for?
- Collections – Shopify utilizes ‘collections’ to group similar products. These are critical pages for SEO, and you want to ensure your products are categorized logically.
- Pages – Now is the perfect time to audit and review the key pages of your store. In Shopify, ‘pages’ are informational in nature and include your ‘About’ page, ‘Contact’ page, ‘Shipping and Delivery’ pages, etc. Pages like these are important trust signals for your site’s SEO.
- Products – These are your transactional pages, and keywords will most likely be transactional in nature. Shopify automatically creates product URLs based on the product name, but you can edit these as you create or review your products. If there are changes to an already published product, an automatic 301 redirect is created to the new URL.
- Blog – Shopify hosts your blog content within its own platform. Now is the time for a content audit to make sure you’re capitalizing on your blog and not migrating useless content.
2. Review Canonical Link Structure
The canonical link structure tells search engines which page you want to rank.
For example, if you have a variant of a product or a product included in multiple collections, new URLs are automatically created for each.
Allowing these URLs to rank can cause indexing bloat and may take away from your SEO efforts in getting the original product or collection to rank.
You can set your canonical link structure to point back to the original product or collection you wish to rank for using a simple line of code known as a rel canonical tag,
For example, the URL: myonlineshop.com/collections/shoes/products/brown-shoe
or myonlineshop.com/products/brown-shoe?variant=123856445631
will have a canonicalized URL to:
myonlineshop.com/products/brown-shoe.
You can check whether rel canonical is in use by viewing the page source of a couple of pages, collections, or products, and searching for ‘rel canonical’ in the HTML code.
If it is not in use or used incorrectly, the following code can be added between the <head> and </head> lines of your theme.liquid file in Shopify:
<link rel=”canonical” href=”{{ canonical_URL }}” />
So in our example, the rel canonical tag will look like this:
<link rel=”canonical” href=”https://myonlineshop.com/products/brown-shoe” />
If your store contains over 100 SKUs, you likely use tags on collections to filter.
This produces a collection URL like https://myonlineshop.com/collections/shoes/brown.
It’s rare to index these because of the difficulty in editing the content in a way that is different from the parent collections (the exception is if you have a large inventory strategy to capture search intent).
In this case, you want the tagged collection URL to canonicalize to the parent collection.
Find:
<link rel=”canonical” href=”{{ canonical_URL }}” />
And replace it with:
{% if template contains ‘collection’ and current_tags -%}
<link rel=”canonical” href=”{{ shop.url }}{{ collection.url }}{% if current_page > 1 %}?page={{ current_page }}{% endif %}” />
{%- else -%}
<link rel=”canonical” href=”{{ canonical_url }}” />
{%- endif %}
3. Backup Everything
Backup your old website.
The best way to do this varies by platform.
Do a full Screaming Frog scan to capture key SEO data so you can recrawl the list of URLs for 301 status post-migration.
Export the scan to review the data later.
4. Setup 301 Redirects From Old Url To New Shopify URL
This is the most critical step for SEO in migration to Shopify.
You will need to set up 301 redirects from your old website URLs to the new Shopify URLs.
If your domain changes, a domain redirect is not enough.
Each page, collection, and product that you are migrating from your old site will need an appropriate 301 redirect set up.
The easiest way to set up 301 redirects is to export your old domain’s site index either directly from your store following the instructions, or using a program like Screaming Frog.
Using a Google sheet, you can then map out your 301 redirects to your new Shopify URLs.
It’s time-intensive but important to get right.
From an SEO perspective, you don’t want to risk losing valuable backlinks and page authority you may have gained over the years to singular pages.
Redirect won’t come into effect in Shopify unless the old page has been deleted.
You can use Screaming Frog to double-check that all URLs have been correctly redirected.
5. Consider Internationalization
You can run a multi-lingual, multi-regional brand under a single Shopify account.
The best international strategy for a single business is usually multiple Shopify accounts because it allows complete customization of theme, layout, messaging, product offering, and fulfillment.
The primary SEO factor to consider for internationalization SEO is hreflang tags.
We strongly suggest using the Multi-Store Hreflang Tags app to configure hreflang tags across multiple stores.
That way, you avoid duplicate content, pass rank value between alternate pages, avoid 404s, and get the flexibility to customize URL handles to suit the language native to users.
Hundreds of Shopify stores are sabotaging their SEO by keeping the same language structure in their URL handles across all stores. An English store should contain English handles while a Spanish store should contain Spanish handles.
Here’s a screenshot of the allbirds.com homepage.
 Screenshot from Allbirds, taken February 2022
This is a great example of how even huge global brands can get it wrong.
Allbirds have nine domains serving different countries and languages and there is no cross-referencing between their hreflang tags.
With the correct hreflang tags, you can let Google know the most relevant store to serve in the search results and immediately take customers to the right store straight from the search results.
This will also leverage your local SEO, allowing each store to more aggressively compete on local SERPs rather than against each other.
6. Timing
Migrate outside a peak period.
You’re asking for a death wish doing it on BFCM.
Plan your resources accordingly and make sure to have all your key staff available should anything turn sour.
7. Migrate Content
To perform the actual migration of content, Cart2Cart is recommended. This enables the automated transfer of your store’s content without impacting your existing shopping cart.
Their service supports over 85 ecommerce platforms.
A handy tool on their website shows the services they support and what they cover.
 Screenshot from Cart2Cart, taken February 2022
8. Update Internal Linking Structure
Once you have successfully migrated all of your content, you will notice your new redirects come into effect for internal links.
This isn’t ideal as an SEO best practice to have all links taking the user directly to the URL rather than via a 301 redirect.
While a redirect helps to pass on link authority, it’s important not to rely on them when links can be updated directly.
I’ve seen many clients stuck in the pattern of redirecting redirects, creating an awful redirect chain which often results in broken links and a terrible customer experience.
A program such as Ahrefs makes it easy to identify 301 redirects or any 404 broken internal links that have resulted from the migration.
These can easily be remedied by simply going to the page where the 301 or 404 is occurring, and updating the link to the most appropriate new Shopify URL.
Post-Migration
1. Annotate Launch In Google Analytics
In Google Analytics, select Audience and then Overview.
From here you can click the Create new annotation button.
It’s important to mark the date in Analytics of when the migration took place so you can monitor any traffic or sales changes.
 Screenshot from Google Analytics, taken February 2022
2. Submit New Sitemap To Google And Bing
Open Google Search Console and under Index, select Sitemaps.
Submit your new sitemap.
You can find your sitemap in Shopify at yourdomain.com/sitemap.xml.
Within that parent sitemap, are child sitemaps for each content type.
Proceed to do the same for Bing.
3. Submit Change Of Address Request In Google Search Console And Complete Bing Site Move Tool
This step is only needed if the domain URL changes.
Google has detailed instructions of when and how to use this tool.
 Screenshot from Google Search Console, taken February 2022
4. Check That Google Analytics And Search Console Are Functioning Correctly
Log into both Google Analytics and Google Search Console to make sure all your traffic data is being picked up for your new store.
After 24 hours, you will have more data to determine whether sales and traffic are properly attributed.
There are two reports in Google Analytics that provide the easiest feedback for this:
Channel sales report: A correct setup will show various sales channels being attributed. A broken setup will report most sales coming from referrals or showing incorrect revenue data.
Shopping Behaviour report: This report should display full data including cart abandonment statistics.
Keep in mind these are just benchmarks and there are still many ways incorrectly set up Google Analytics.
Shopify transactions reflected in Analytics, does not ensure correct setup.
For more detailed information about setting up data reporting in Google Analytics for your Shopify store, refer to this guide.
5. Outreach To Highest-authority Backlinks To Get Them To Update To New URLs If Possible.
Use a tool like Ahrefs or Moz to generate a backlink report.
From here, you can review which websites hosting backlinks to your store are worth reaching out to.
The goal is to get any 301 or 404 links updated to your new URLs.
This is also providing the website host value in keeping their content up to date and creating a better reader experience.
Win-win!
For SEO purposes, it’s always best practice to have URLs taking the user to the direct URL in mention, rather than via a 301 redirect.
If it points to a 404 page, and the website host is unwilling or unresponsive to updating the URL for you, the best you can do is create a 301 redirect for the 404 page.
6. Recrawl The Old Website
Now is the time to recrawl the URL from your old website and correct any outstanding 404 broken links.
Setup 301 redirects if needed.
Check and check again.
Did I mention to check again?
7. Monitor 404s
There are several Shopify apps, such as Link Monitor and Easy Redirects, which will automatically monitor and report 404s as they arise.
Ahrefs also does the job with their site audit tool.
Otherwise, you can create a custom Google Analytics report to monitor and rectify 404 errors.
Shopify Migration Success Is Possible
While not every migration to Shopify will be all rainbows and butterflies, following these steps can help get the best possible results.
There’s zero need to migrate and lose all your hard-earned SEO wins.
You’ve worked hard for them and with these SEO best practices for migrating to Shopify, you can take them with you.
More resources:
Featured Image: fatmawati achmad zaenuri/Shutterstock
SEO
How To Write ChatGPT Prompts To Get The Best Results

ChatGPT is a game changer in the field of SEO. This powerful language model can generate human-like content, making it an invaluable tool for SEO professionals.
However, the prompts you provide largely determine the quality of the output.
To unlock the full potential of ChatGPT and create content that resonates with your audience and search engines, writing effective prompts is crucial.
In this comprehensive guide, we’ll explore the art of writing prompts for ChatGPT, covering everything from basic techniques to advanced strategies for layering prompts and generating high-quality, SEO-friendly content.
Writing Prompts For ChatGPT
What Is A ChatGPT Prompt?
A ChatGPT prompt is an instruction or discussion topic a user provides for the ChatGPT AI model to respond to.
The prompt can be a question, statement, or any other stimulus to spark creativity, reflection, or engagement.
Users can use the prompt to generate ideas, share their thoughts, or start a conversation.
ChatGPT prompts are designed to be open-ended and can be customized based on the user’s preferences and interests.
How To Write Prompts For ChatGPT
Start by giving ChatGPT a writing prompt, such as, “Write a short story about a person who discovers they have a superpower.”
ChatGPT will then generate a response based on your prompt. Depending on the prompt’s complexity and the level of detail you requested, the answer may be a few sentences or several paragraphs long.
Use the ChatGPT-generated response as a starting point for your writing. You can take the ideas and concepts presented in the answer and expand upon them, adding your own unique spin to the story.
If you want to generate additional ideas, try asking ChatGPT follow-up questions related to your original prompt.
For example, you could ask, “What challenges might the person face in exploring their newfound superpower?” Or, “How might the person’s relationships with others be affected by their superpower?”
Remember that ChatGPT’s answers are generated by artificial intelligence and may not always be perfect or exactly what you want.
However, they can still be a great source of inspiration and help you start writing.
Must-Have GPTs Assistant
I recommend installing the WebBrowser Assistant created by the OpenAI Team. This tool allows you to add relevant Bing results to your ChatGPT prompts.
This assistant adds the first web results to your ChatGPT prompts for more accurate and up-to-date conversations.
It is very easy to install in only two clicks. (Click on Start Chat.)
For example, if I ask, “Who is Vincent Terrasi?,” ChatGPT has no answer.
With WebBrower Assistant, the assistant creates a new prompt with the first Bing results, and now ChatGPT knows who Vincent Terrasi is.
 Screenshot from ChatGPT, March 2023
You can test other GPT assistants available in the GPTs search engine if you want to use Google results.
Master Reverse Prompt Engineering
ChatGPT can be an excellent tool for reverse engineering prompts because it generates natural and engaging responses to any given input.
By analyzing the prompts generated by ChatGPT, it is possible to gain insight into the model’s underlying thought processes and decision-making strategies.
One key benefit of using ChatGPT to reverse engineer prompts is that the model is highly transparent in its decision-making.
This means that the reasoning and logic behind each response can be traced, making it easier to understand how the model arrives at its conclusions.
Once you’ve done this a few times for different types of content, you’ll gain insight into crafting more effective prompts.
Prepare Your ChatGPT For Generating Prompts
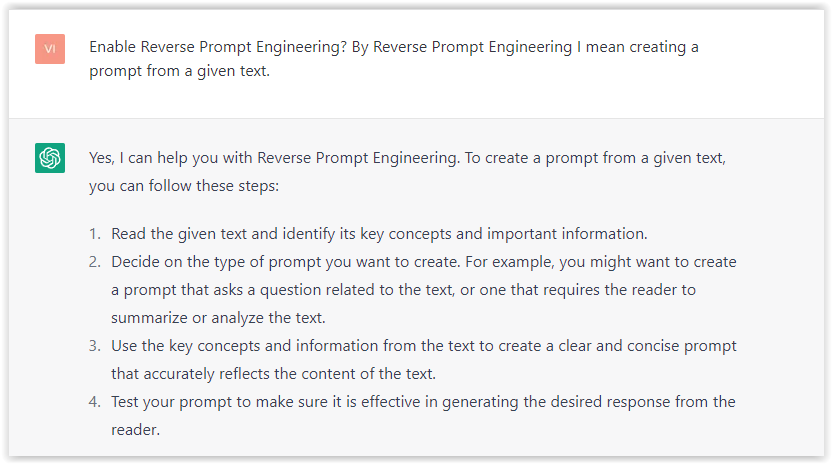
First, activate the reverse prompt engineering.
- Type the following prompt: “Enable Reverse Prompt Engineering? By Reverse Prompt Engineering I mean creating a prompt from a given text.”
 Screenshot from ChatGPT, March 2023
ChatGPT is now ready to generate your prompt. You can test the product description in a new chatbot session and evaluate the generated prompt.
- Type: “Create a very technical reverse prompt engineering template for a product description about iPhone 11.”
 Screenshot from ChatGPT, March 2023
The result is amazing. You can test with a full text that you want to reproduce. Here is an example of a prompt for selling a Kindle on Amazon.
- Type: “Reverse Prompt engineer the following {product), capture the writing style and the length of the text :
product =”
 Screenshot from ChatGPT, March 2023
I tested it on an SEJ blog post. Enjoy the analysis – it is excellent.
- Type: “Reverse Prompt engineer the following {text}, capture the tone and writing style of the {text} to include in the prompt :
text = all text coming from https://www.searchenginejournal.com/google-bard-training-data/478941/”
 Screenshot from ChatGPT, March 2023
But be careful not to use ChatGPT to generate your texts. It is just a personal assistant.
Go Deeper
Prompts and examples for SEO:
- Keyword research and content ideas prompt: “Provide a list of 20 long-tail keyword ideas related to ‘local SEO strategies’ along with brief content topic descriptions for each keyword.”
- Optimizing content for featured snippets prompt: “Write a 40-50 word paragraph optimized for the query ‘what is the featured snippet in Google search’ that could potentially earn the featured snippet.”
- Creating meta descriptions prompt: “Draft a compelling meta description for the following blog post title: ’10 Technical SEO Factors You Can’t Ignore in 2024′.”
Important Considerations:
- Always Fact-Check: While ChatGPT can be a helpful tool, it’s crucial to remember that it may generate inaccurate or fabricated information. Always verify any facts, statistics, or quotes generated by ChatGPT before incorporating them into your content.
- Maintain Control and Creativity: Use ChatGPT as a tool to assist your writing, not replace it. Don’t rely on it to do your thinking or create content from scratch. Your unique perspective and creativity are essential for producing high-quality, engaging content.
- Iteration is Key: Refine and revise the outputs generated by ChatGPT to ensure they align with your voice, style, and intended message.
Additional Prompts for Rewording and SEO:
– Rewrite this sentence to be more concise and impactful.
– Suggest alternative phrasing for this section to improve clarity.
– Identify opportunities to incorporate relevant internal and external links.
– Analyze the keyword density and suggest improvements for better SEO.
Remember, while ChatGPT can be a valuable tool, it’s essential to use it responsibly and maintain control over your content creation process.
Experiment And Refine Your Prompting Techniques
Writing effective prompts for ChatGPT is an essential skill for any SEO professional who wants to harness the power of AI-generated content.
Hopefully, the insights and examples shared in this article can inspire you and help guide you to crafting stronger prompts that yield high-quality content.
Remember to experiment with layering prompts, iterating on the output, and continually refining your prompting techniques.
This will help you stay ahead of the curve in the ever-changing world of SEO.
More resources:
Featured Image: Tapati Rinchumrus/Shutterstock
SEO
Measuring Content Impact Across The Customer Journey

Understanding the impact of your content at every touchpoint of the customer journey is essential – but that’s easier said than done. From attracting potential leads to nurturing them into loyal customers, there are many touchpoints to look into.
So how do you identify and take advantage of these opportunities for growth?
Watch this on-demand webinar and learn a comprehensive approach for measuring the value of your content initiatives, so you can optimize resource allocation for maximum impact.
You’ll learn:
- Fresh methods for measuring your content’s impact.
- Fascinating insights using first-touch attribution, and how it differs from the usual last-touch perspective.
- Ways to persuade decision-makers to invest in more content by showcasing its value convincingly.
With Bill Franklin and Oliver Tani of DAC Group, we unravel the nuances of attribution modeling, emphasizing the significance of layering first-touch and last-touch attribution within your measurement strategy.
Check out these insights to help you craft compelling content tailored to each stage, using an approach rooted in first-hand experience to ensure your content resonates.
Whether you’re a seasoned marketer or new to content measurement, this webinar promises valuable insights and actionable tactics to elevate your SEO game and optimize your content initiatives for success.
View the slides below or check out the full webinar for all the details.
SEO
How to Find and Use Competitor Keywords
Competitor keywords are the keywords your rivals rank for in Google’s search results. They may rank organically or pay for Google Ads to rank in the paid results.
Knowing your competitors’ keywords is the easiest form of keyword research. If your competitors rank for or target particular keywords, it might be worth it for you to target them, too.
There is no way to see your competitors’ keywords without a tool like Ahrefs, which has a database of keywords and the sites that rank for them. As far as we know, Ahrefs has the biggest database of these keywords.
How to find all the keywords your competitor ranks for
- Go to Ahrefs’ Site Explorer
- Enter your competitor’s domain
- Go to the Organic keywords report
The report is sorted by traffic to show you the keywords sending your competitor the most visits. For example, Mailchimp gets most of its organic traffic from the keyword “mailchimp.”


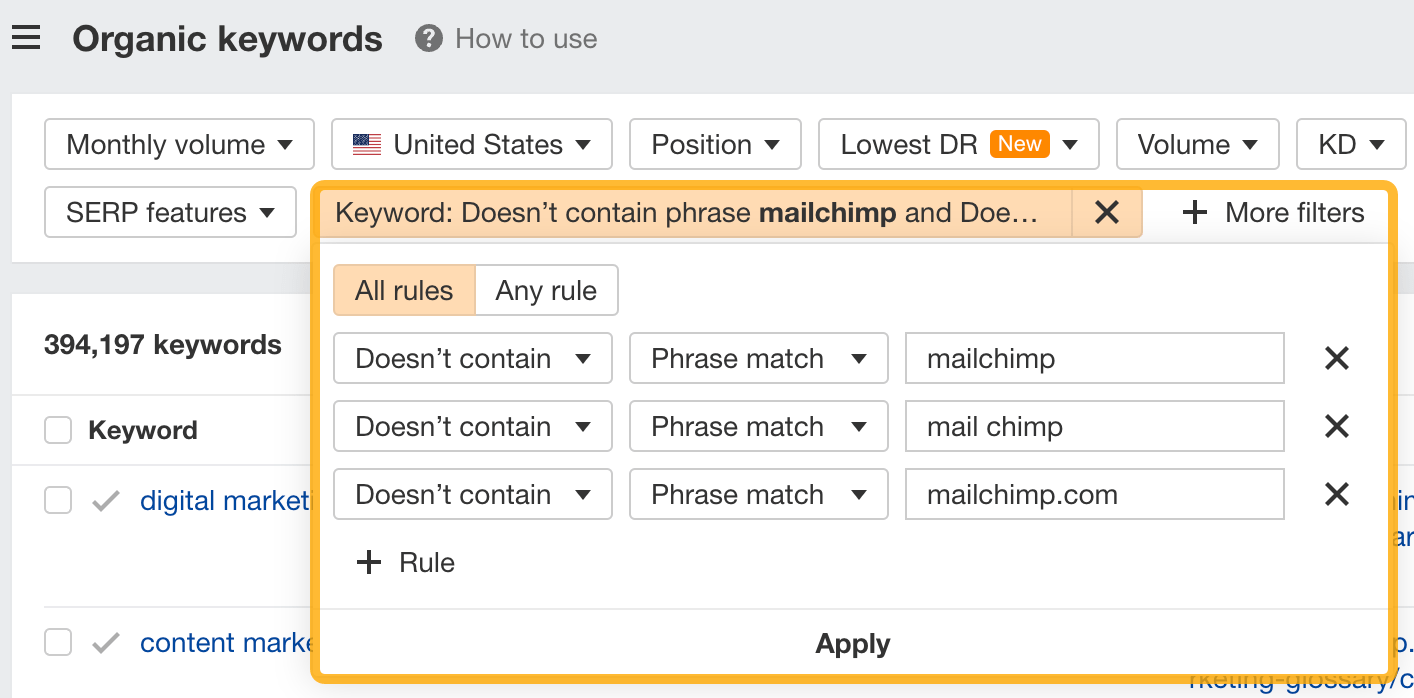
Since you’re unlikely to rank for your competitor’s brand, you might want to exclude branded keywords from the report. You can do this by adding a Keyword > Doesn’t contain filter. In this example, we’ll filter out keywords containing “mailchimp” or any potential misspellings:

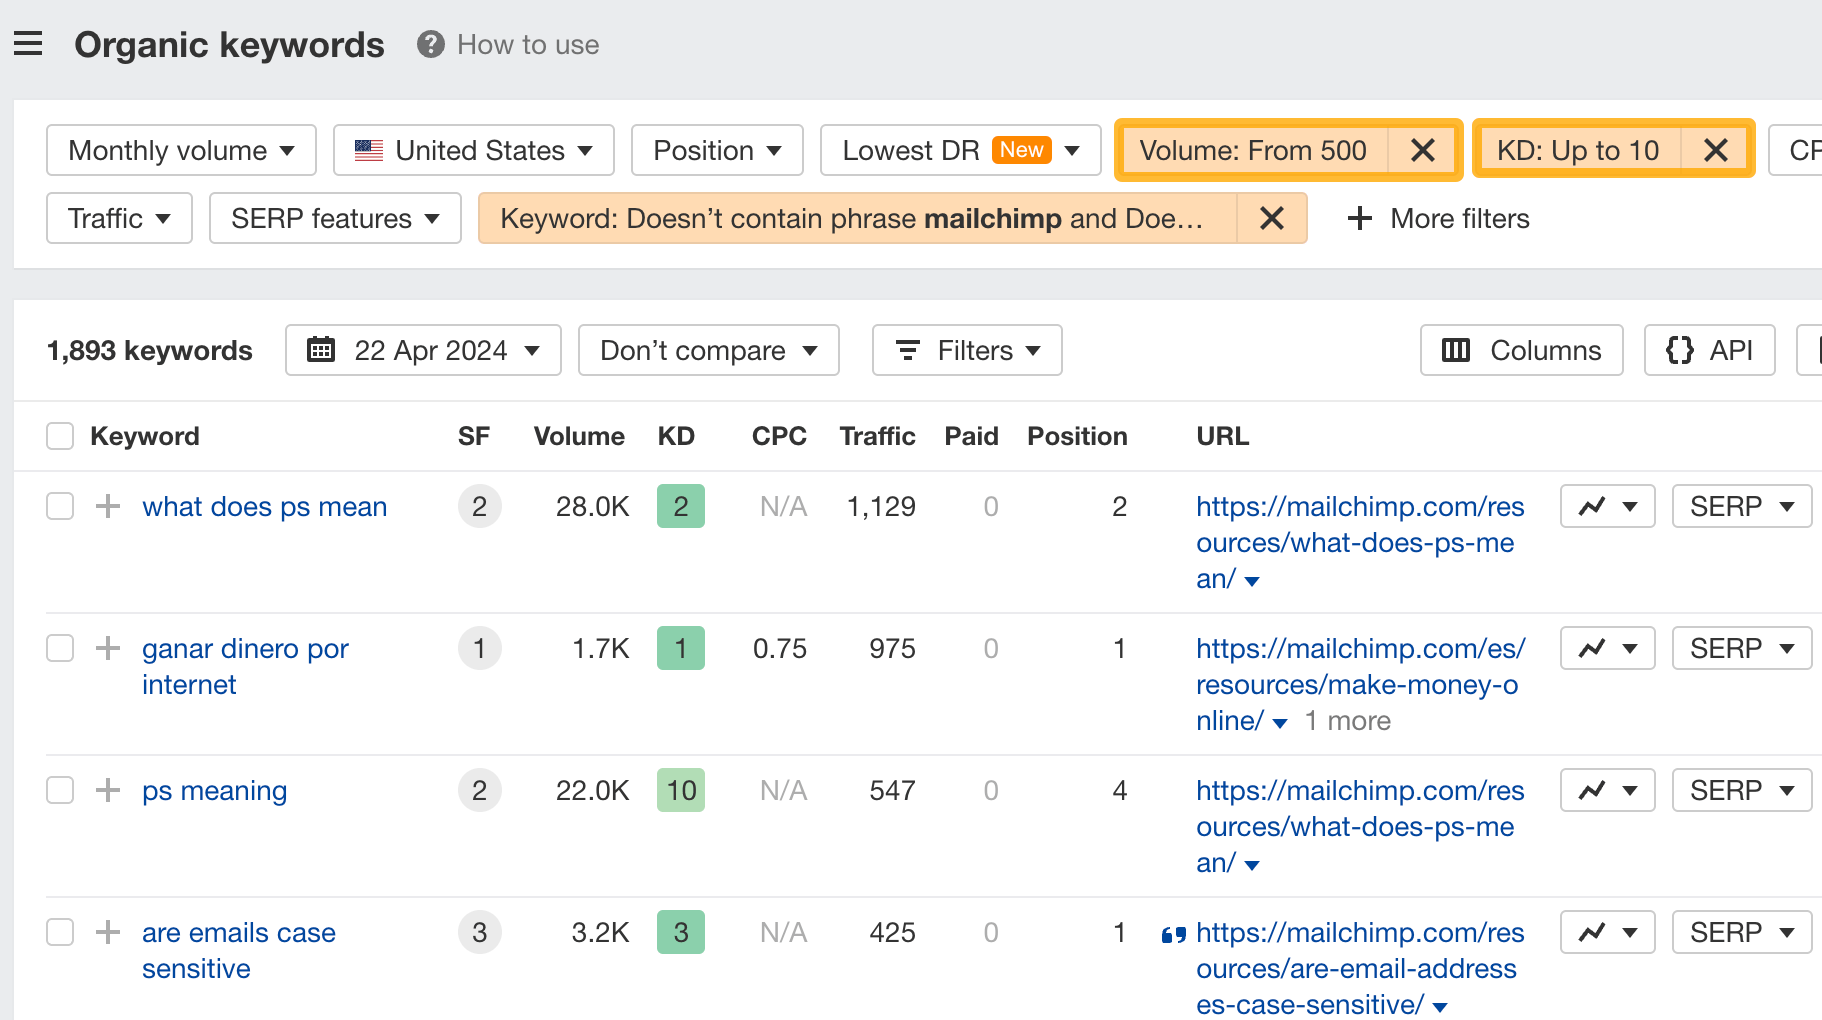
If you’re a new brand competing with one that’s established, you might also want to look for popular low-difficulty keywords. You can do this by setting the Volume filter to a minimum of 500 and the KD filter to a maximum of 10.

How to find keywords your competitor ranks for, but you don’t
- Go to Competitive Analysis
- Enter your domain in the This target doesn’t rank for section
- Enter your competitor’s domain in the But these competitors do section
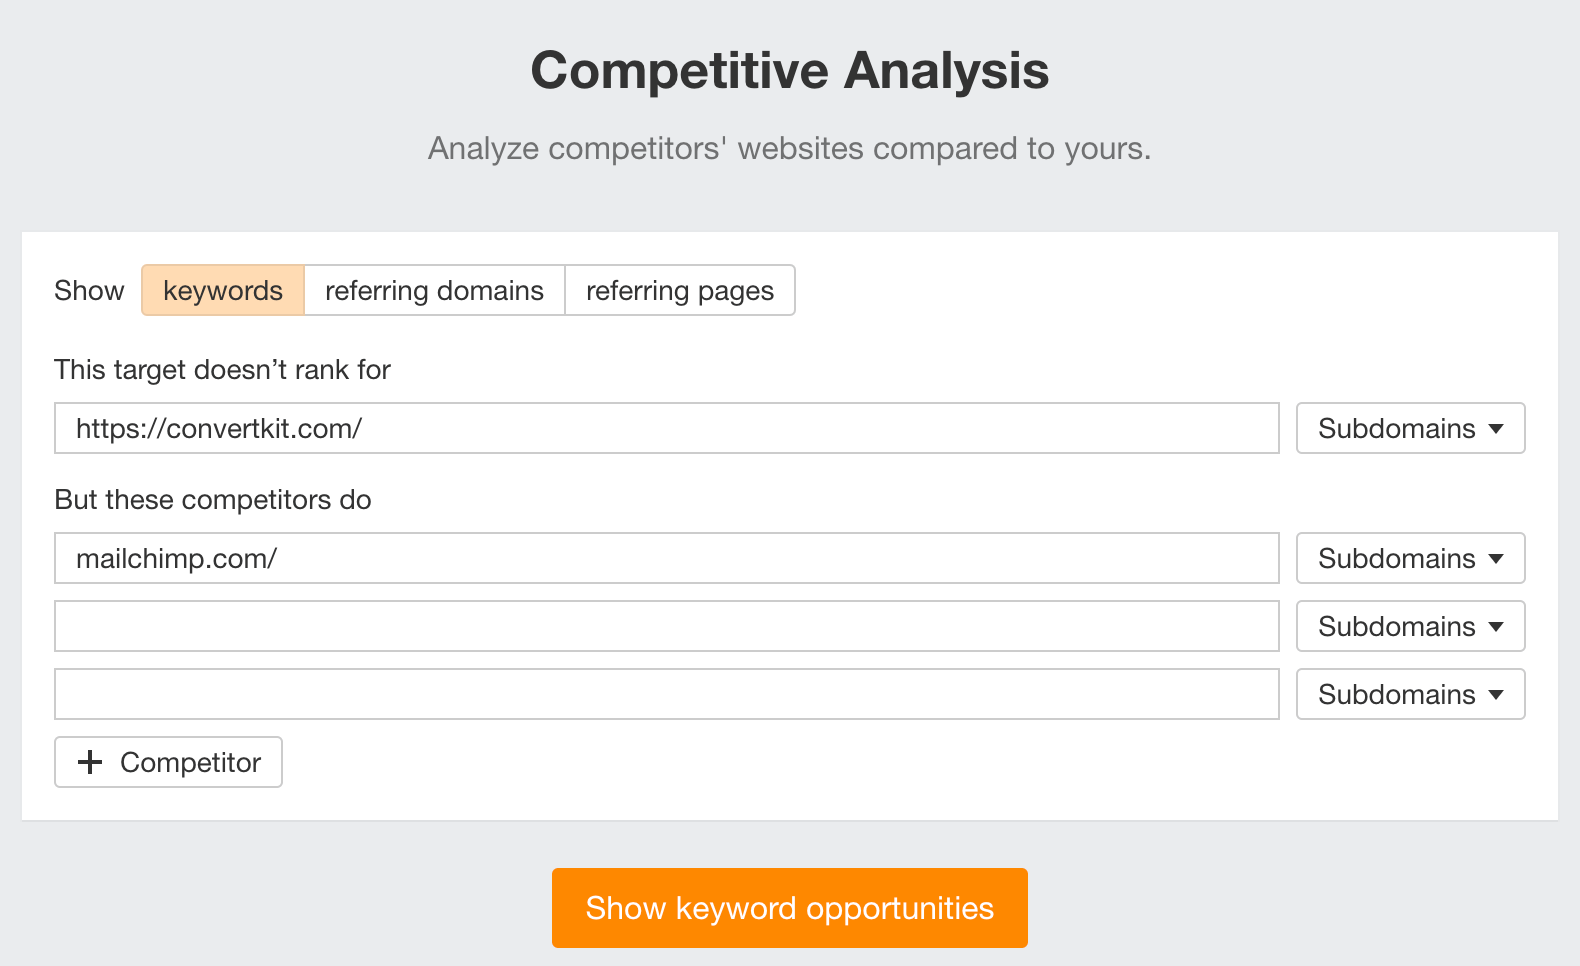

Hit “Show keyword opportunities,” and you’ll see all the keywords your competitor ranks for, but you don’t.
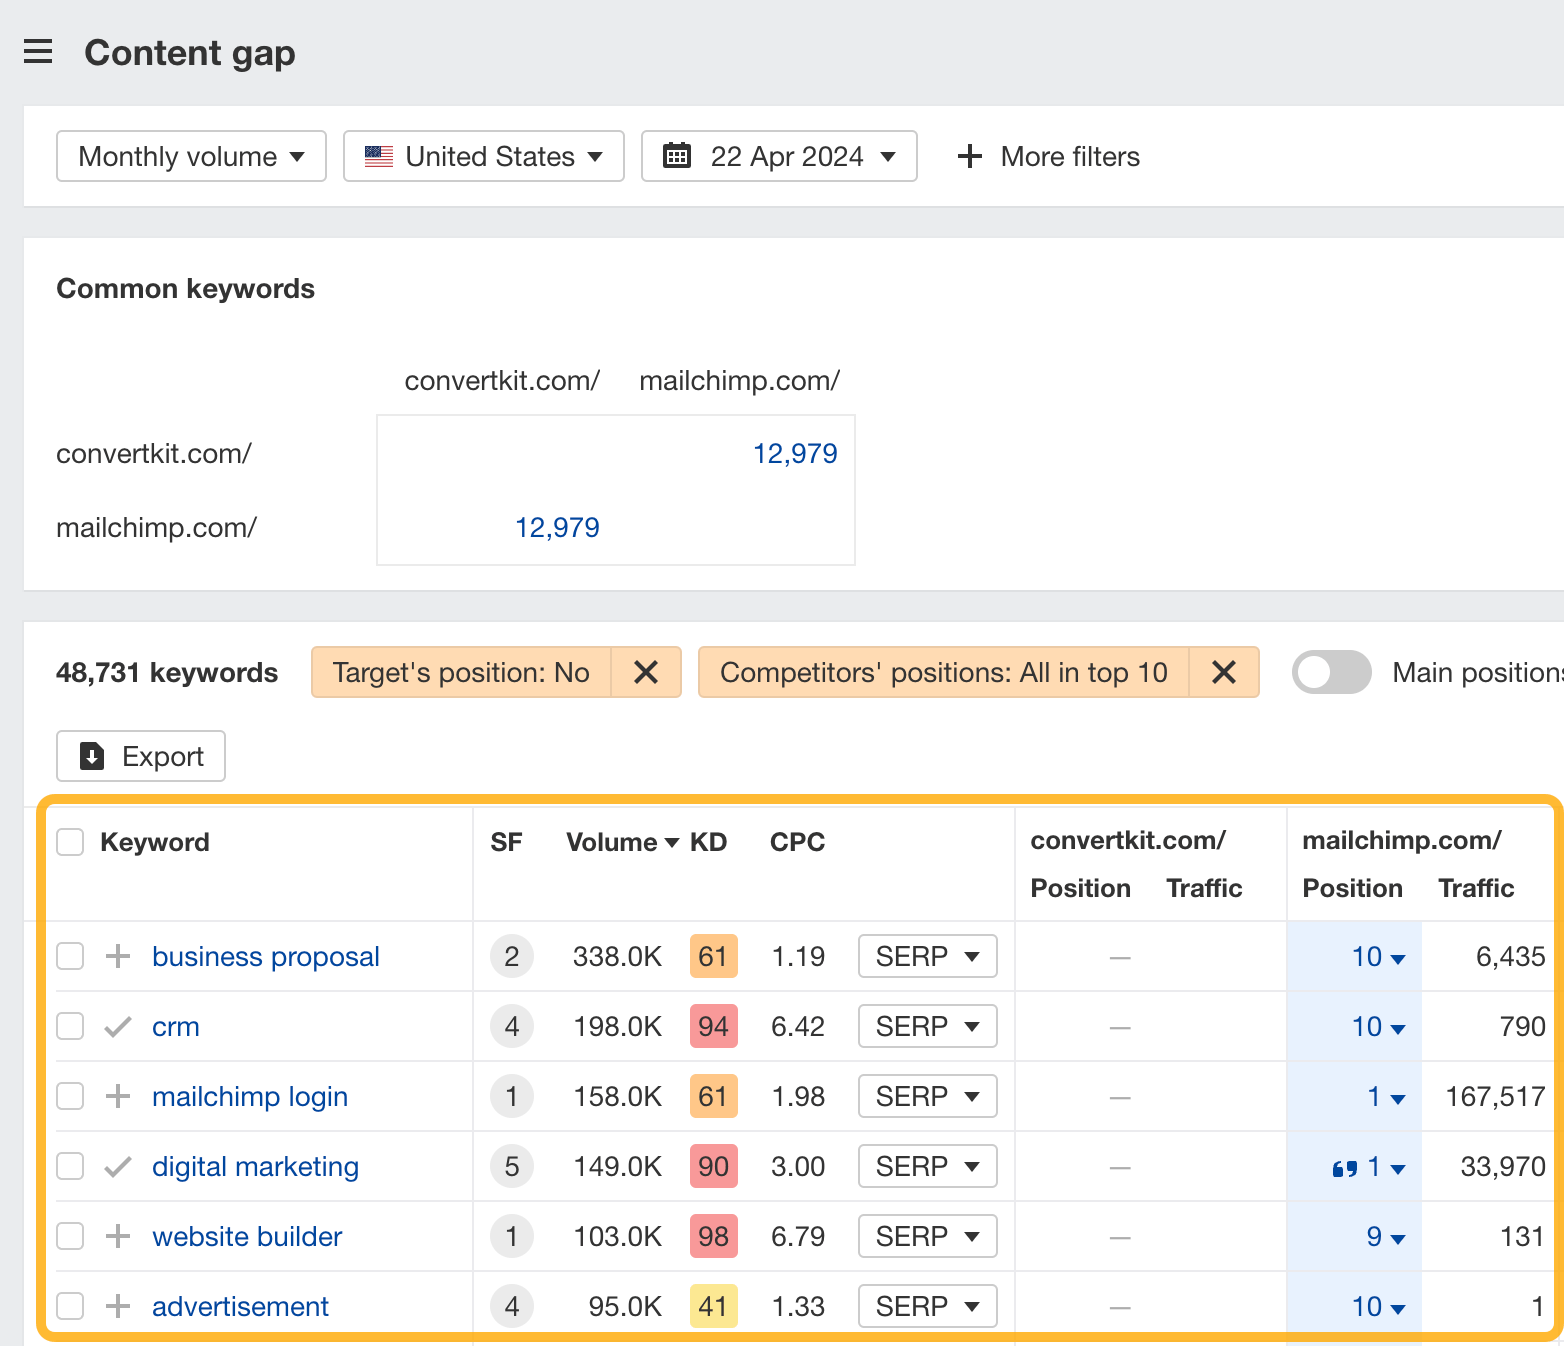

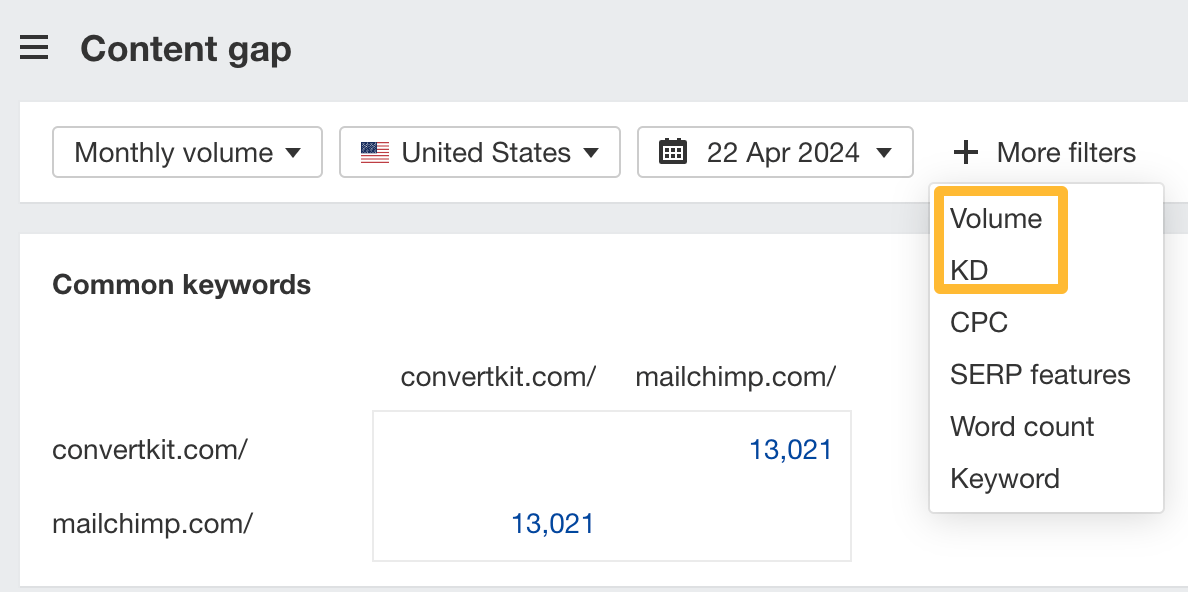
You can also add a Volume and KD filter to find popular, low-difficulty keywords in this report.

How to find keywords multiple competitors rank for, but you don’t
- Go to Competitive Analysis
- Enter your domain in the This target doesn’t rank for section
- Enter the domains of multiple competitors in the But these competitors do section
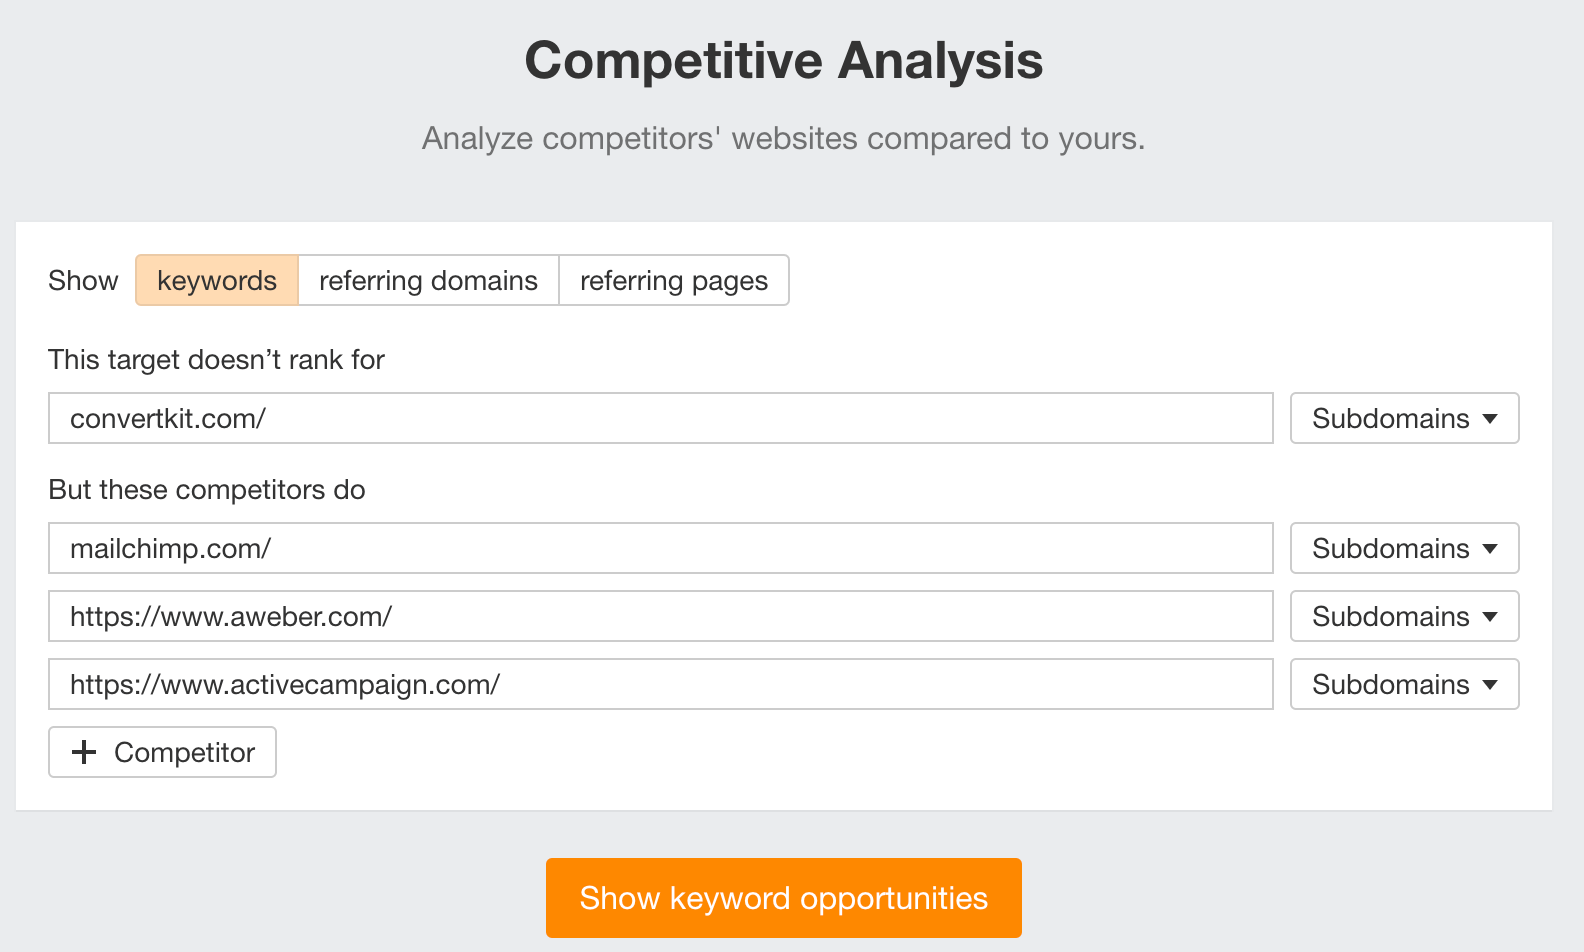

You’ll see all the keywords that at least one of these competitors ranks for, but you don’t.
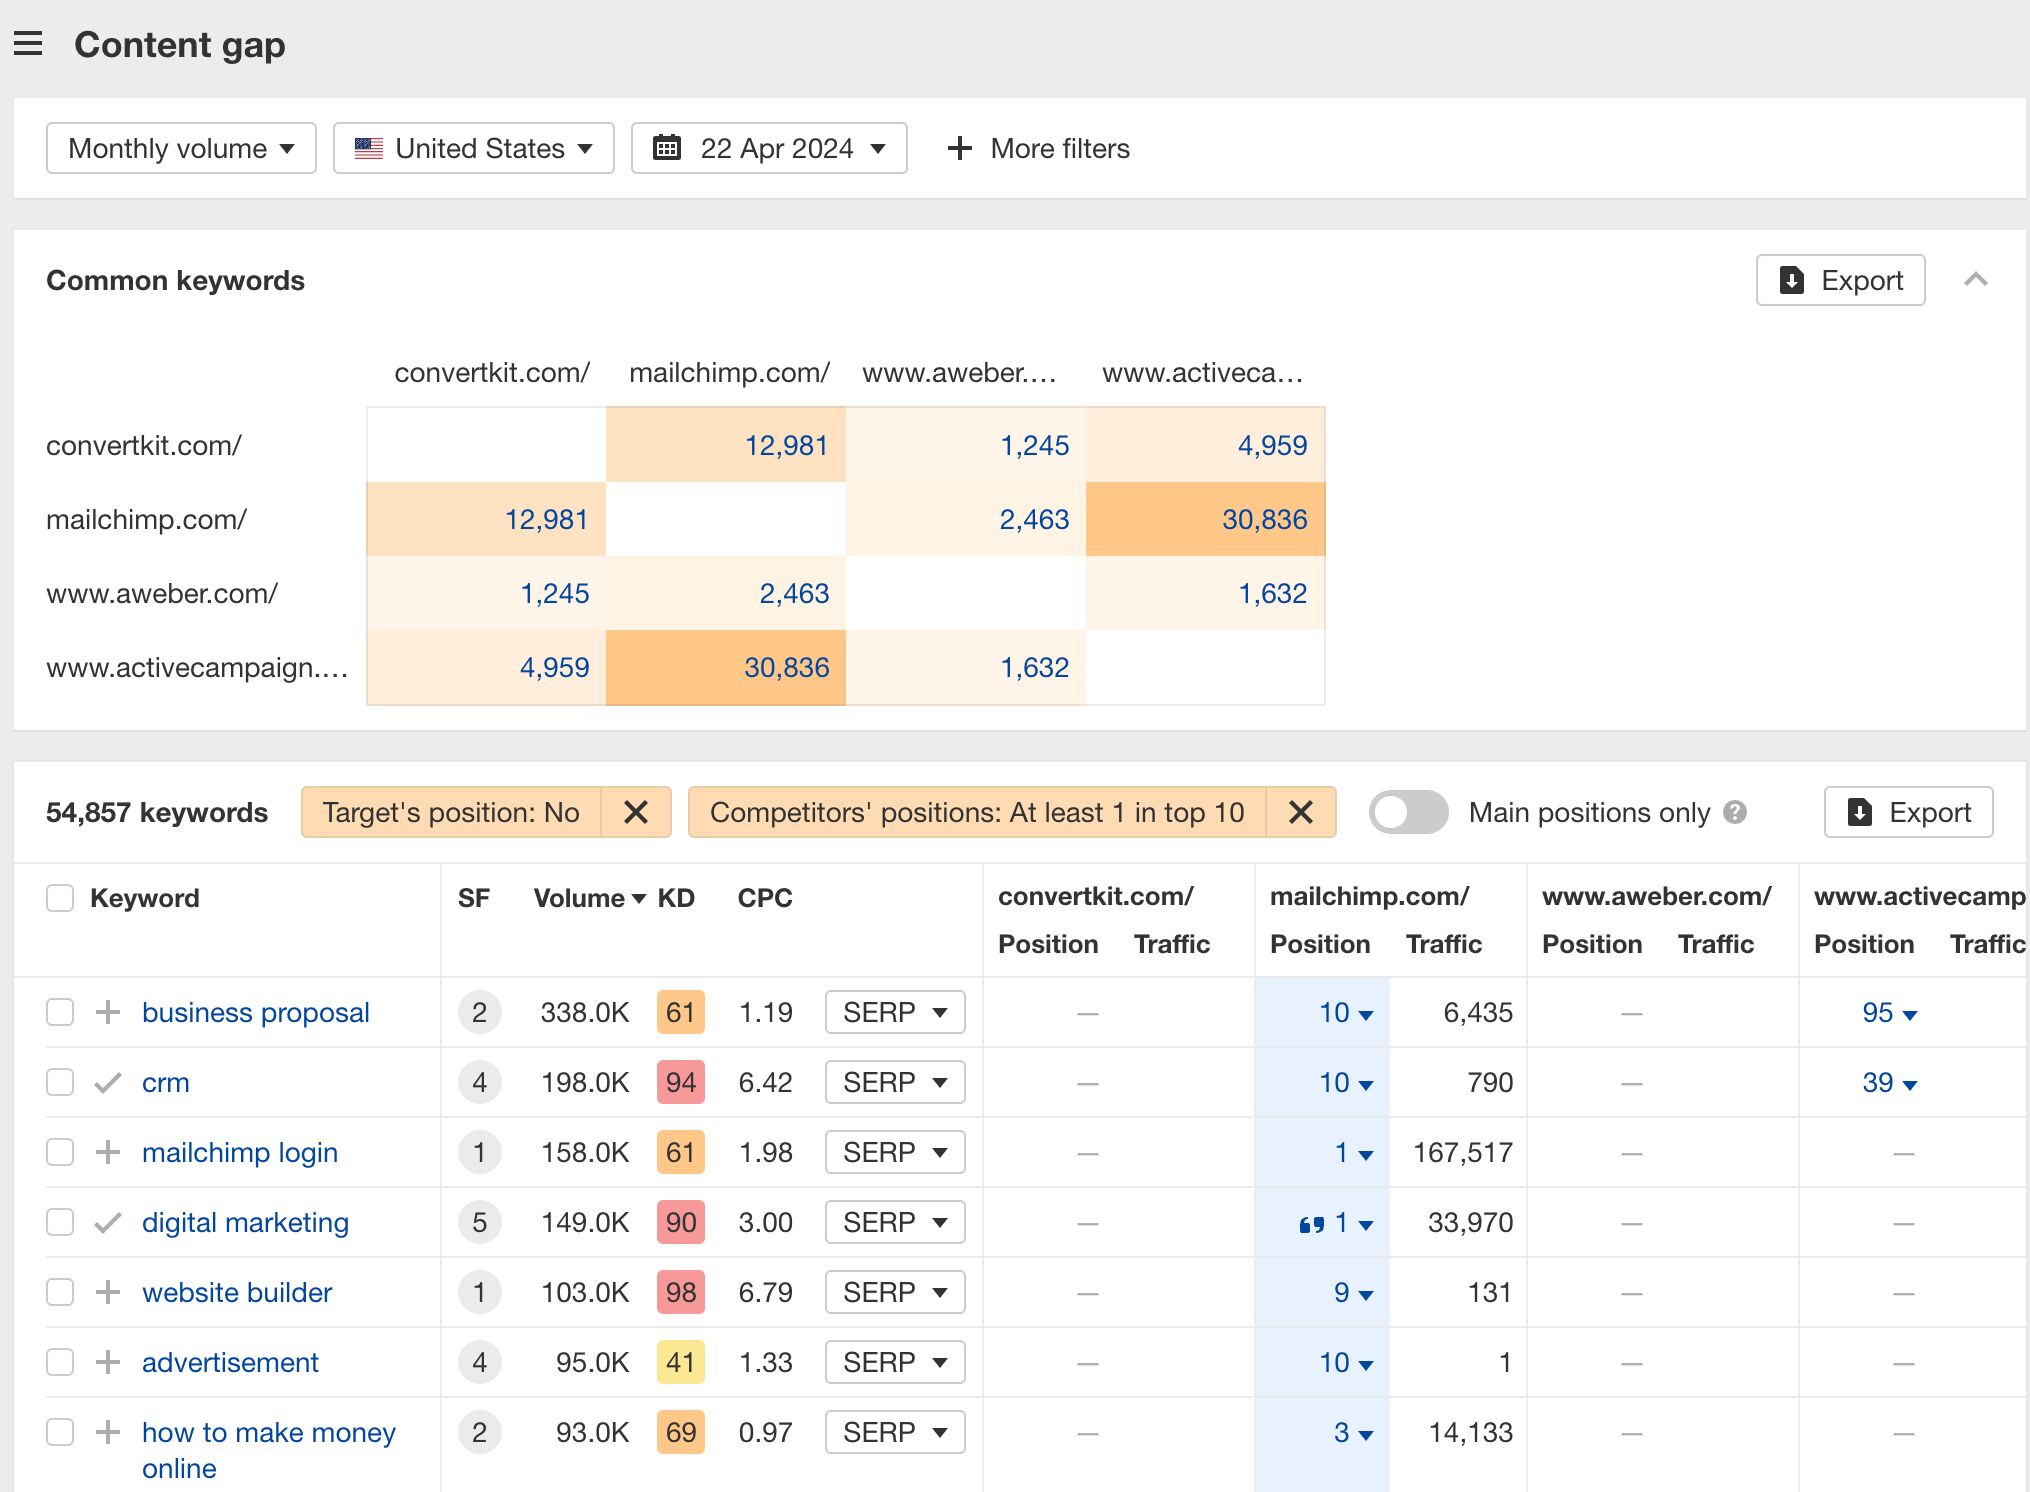

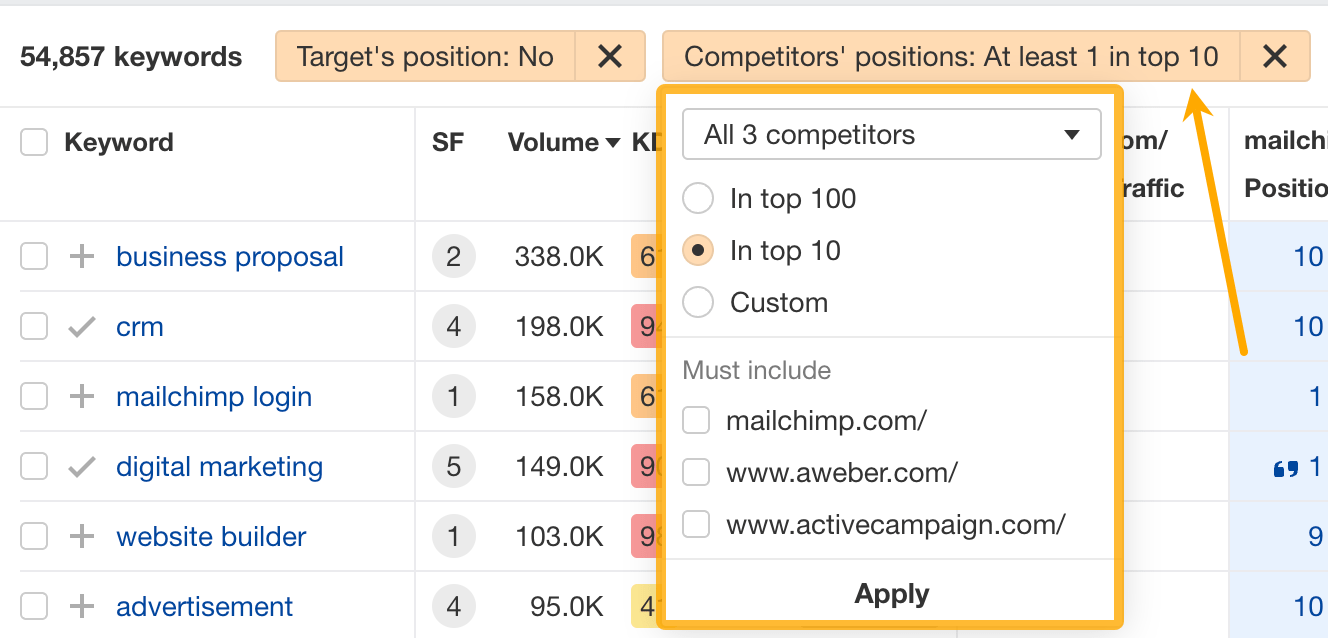
You can also narrow the list down to keywords that all competitors rank for. Click on the Competitors’ positions filter and choose All 3 competitors:

- Go to Ahrefs’ Site Explorer
- Enter your competitor’s domain
- Go to the Paid keywords report
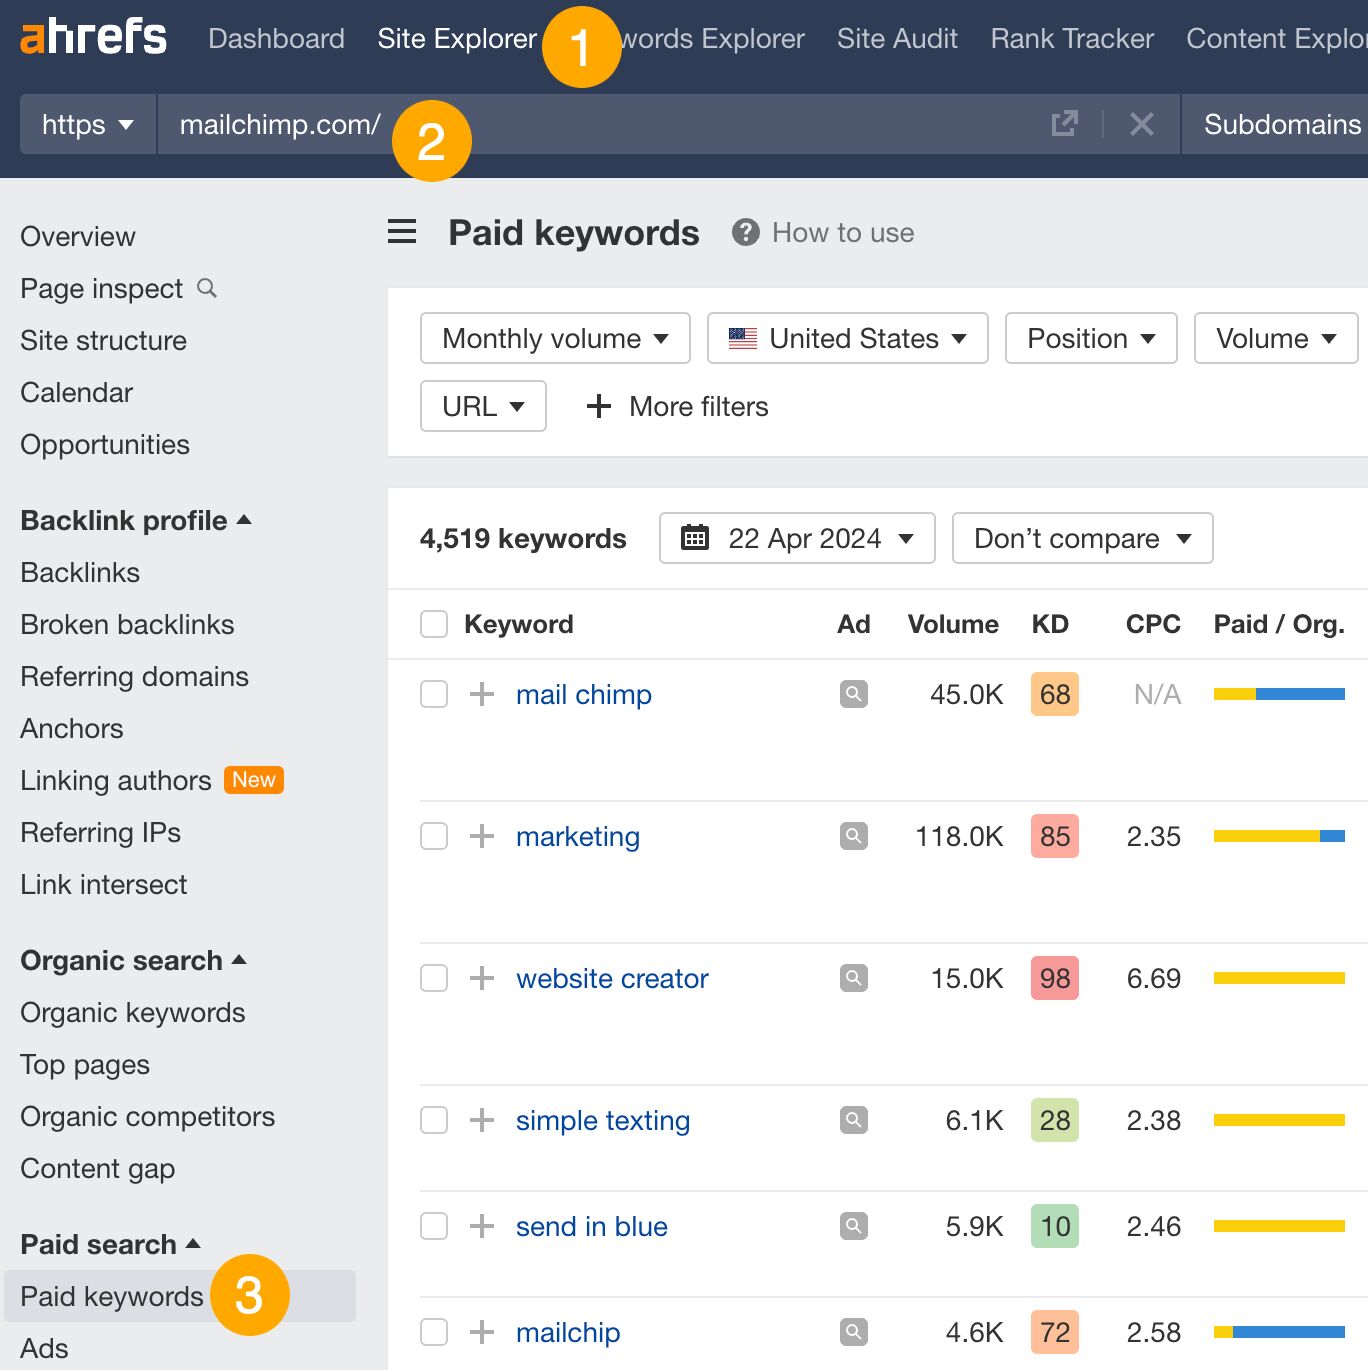

This report shows you the keywords your competitors are targeting via Google Ads.
Since your competitor is paying for traffic from these keywords, it may indicate that they’re profitable for them—and could be for you, too.
You know what keywords your competitors are ranking for or bidding on. But what do you do with them? There are basically three options.
1. Create pages to target these keywords
You can only rank for keywords if you have content about them. So, the most straightforward thing you can do for competitors’ keywords you want to rank for is to create pages to target them.
However, before you do this, it’s worth clustering your competitor’s keywords by Parent Topic. This will group keywords that mean the same or similar things so you can target them all with one page.
Here’s how to do that:
- Export your competitor’s keywords, either from the Organic Keywords or Content Gap report
- Paste them into Keywords Explorer
- Click the “Clusters by Parent Topic” tab
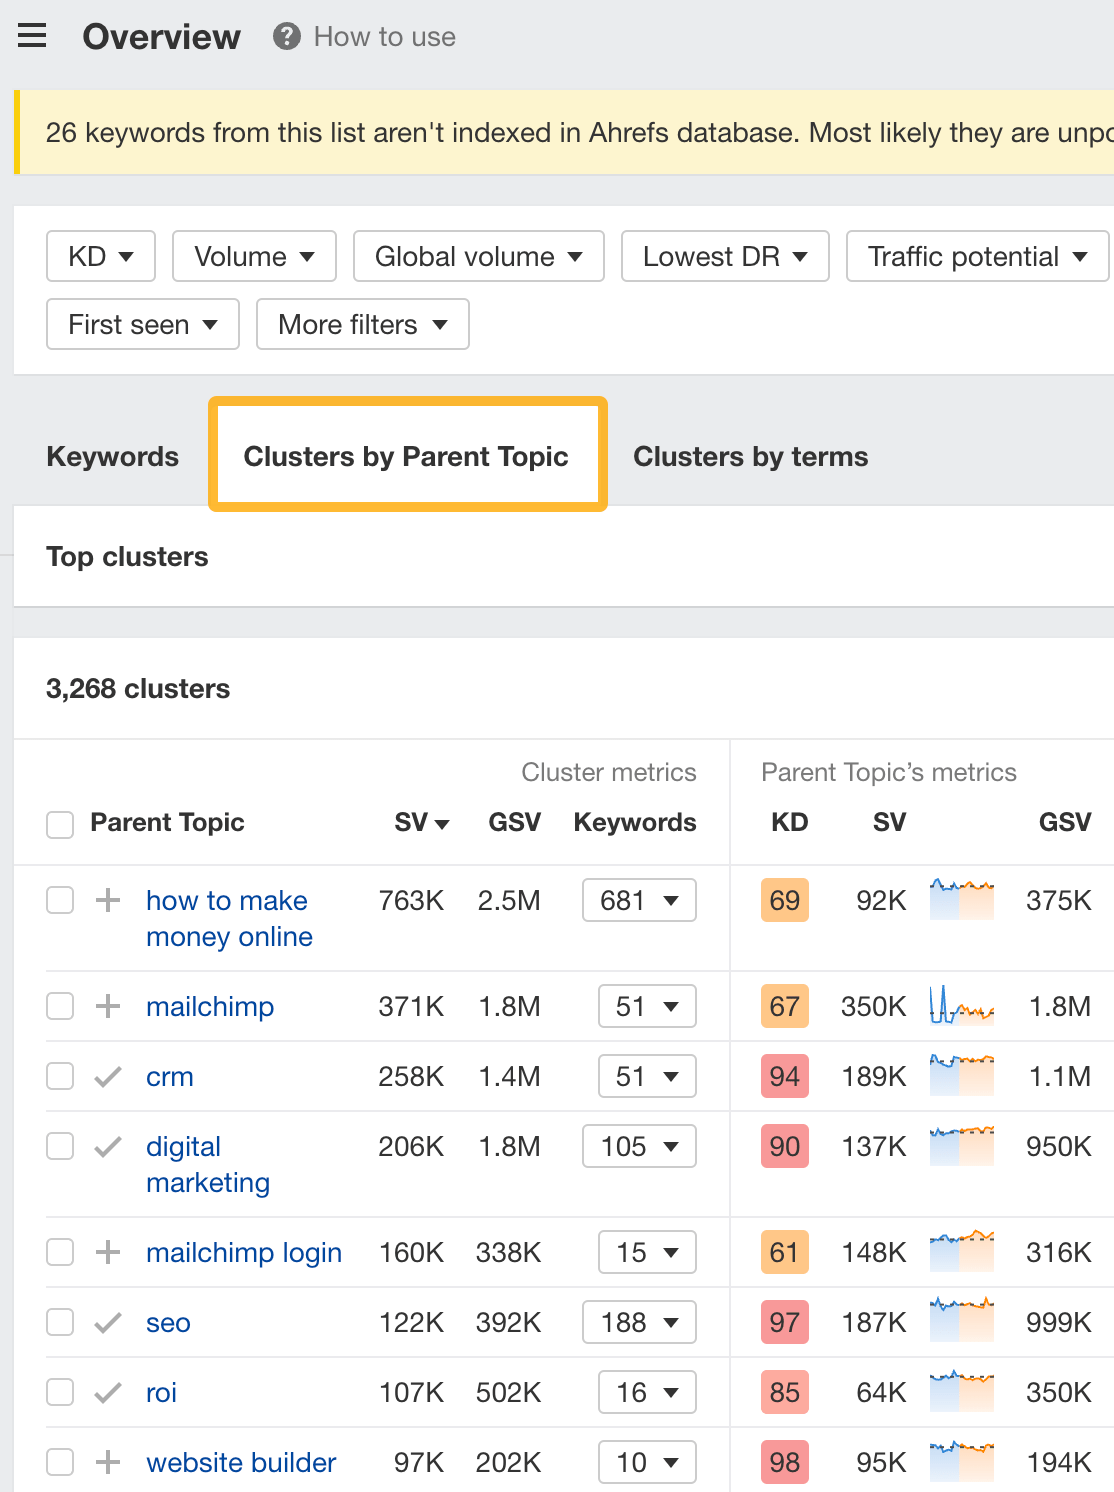

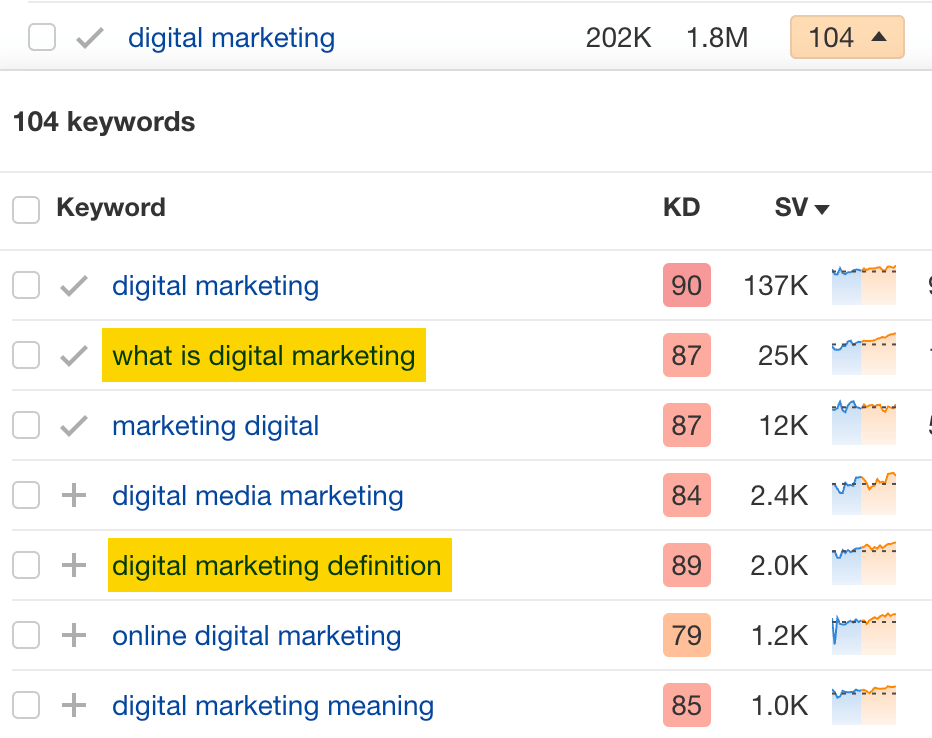
For example, MailChimp ranks for keywords like “what is digital marketing” and “digital marketing definition.” These and many others get clustered under the Parent Topic of “digital marketing” because people searching for them are all looking for the same thing: a definition of digital marketing. You only need to create one page to potentially rank for all these keywords.

2. Optimize existing content by filling subtopics
You don’t always need to create new content to rank for competitors’ keywords. Sometimes, you can optimize the content you already have to rank for them.
How do you know which keywords you can do this for? Try this:
- Export your competitor’s keywords
- Paste them into Keywords Explorer
- Click the “Clusters by Parent Topic” tab
- Look for Parent Topics you already have content about
For example, if we analyze our competitor, we can see that seven keywords they rank for fall under the Parent Topic of “press release template.”


If we search our site, we see that we already have a page about this topic.


If we click the caret and check the keywords in the cluster, we see keywords like “press release example” and “press release format.”
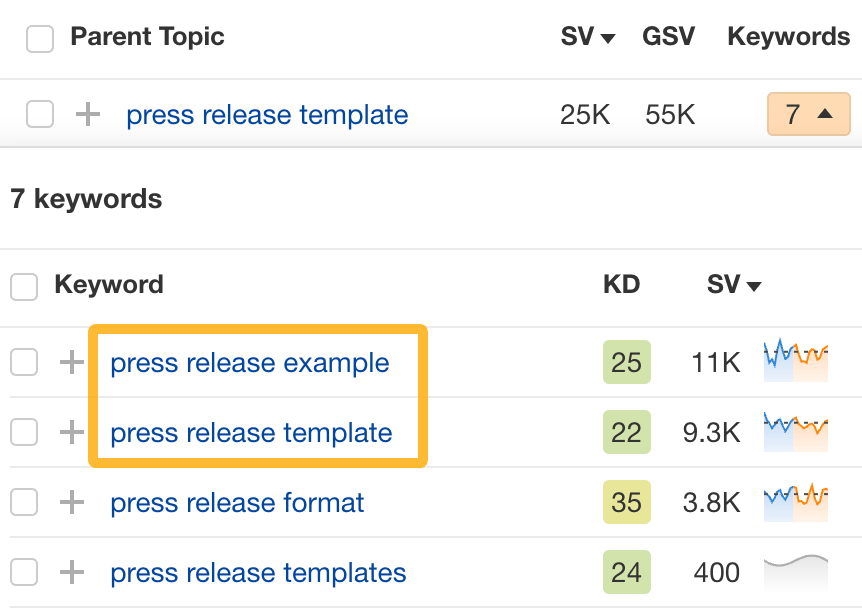

To rank for the keywords in the cluster, we can probably optimize the page we already have by adding sections about the subtopics of “press release examples” and “press release format.”
3. Target these keywords with Google Ads
Paid keywords are the simplest—look through the report and see if there are any relevant keywords you might want to target, too.
For example, Mailchimp is bidding for the keyword “how to create a newsletter.”


If you’re ConvertKit, you may also want to target this keyword since it’s relevant.
If you decide to target the same keyword via Google Ads, you can hover over the magnifying glass to see the ads your competitor is using.
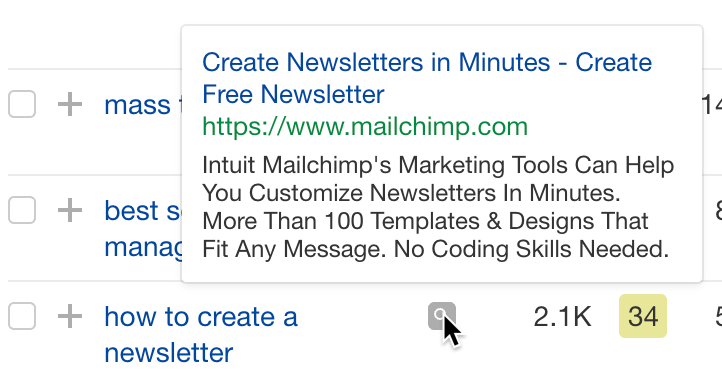

You can also see the landing page your competitor directs ad traffic to under the URL column.


Learn more
Check out more tutorials on how to do competitor keyword analysis:
-

 PPC5 days ago
19 Best SEO Tools in 2024 (For Every Use Case)
-
SEARCHENGINES7 days ago
Daily Search Forum Recap: April 17, 2024
-

 SEO7 days ago
An In-Depth Guide And Best Practices For Mobile SEO
-
SEARCHENGINES6 days ago
Daily Search Forum Recap: April 18, 2024
-
SEARCHENGINES5 days ago
Daily Search Forum Recap: April 19, 2024
-

 MARKETING6 days ago
Ecommerce evolution: Blurring the lines between B2B and B2C
-

 SEO6 days ago
2024 WordPress Vulnerability Report Shows Errors Sites Keep Making
-
 WORDPRESS5 days ago
How to Make $5000 of Passive Income Every Month in WordPress


You must be logged in to post a comment Login