Connect with us

WORDPRESS

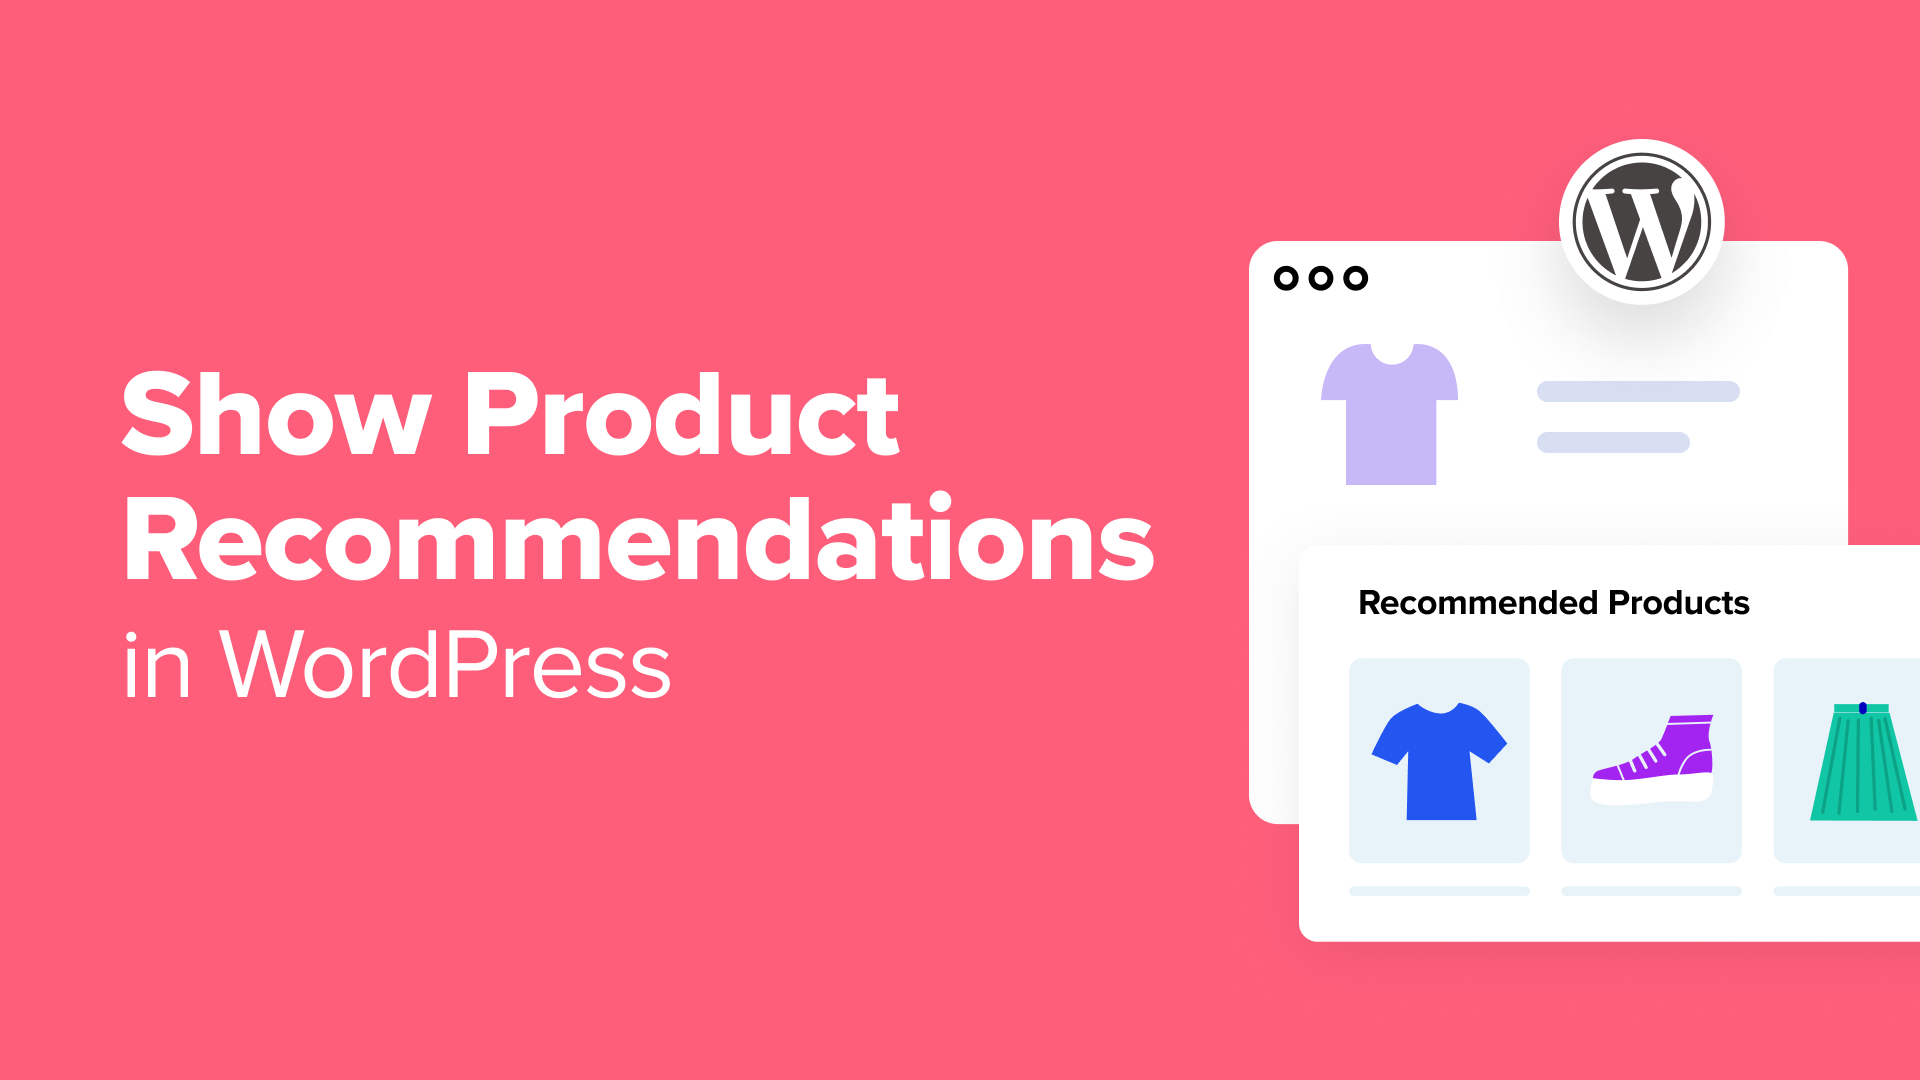
How to Show Product Recommendations in WordPress (7 Easy Ways)
Published

on

How to Show Product Recommendations in WordPress (7 Easy Ways)

Do you want to show product recommendations in WordPress?

Displaying product recommendations can encourage users to make additional purchases, boosting your sales and revenue. It can also improve user engagement by convincing visitors to stay longer on your site.

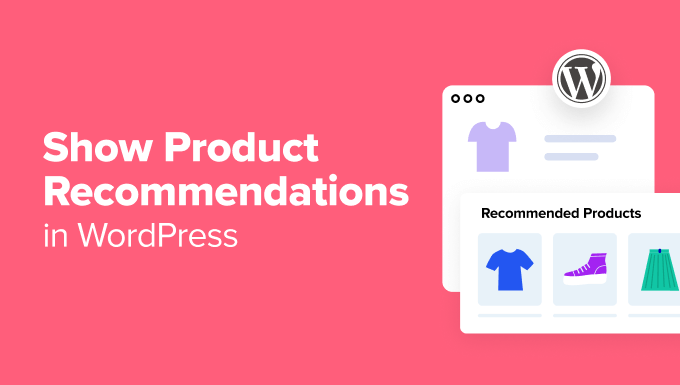
In this article, we will show you how to easily show product recommendations in WordPress, step by step.
Show Product Recommendations in WordPress

Why Show Product Recommendations in WordPress?

If you have an online store, then showing product recommendations on the cart or checkout page can increase the average order value on your site.

By suggesting relevant products, you can help customers discover items they might be interested in, leading to a more satisfying shopping experience.

For instance, if a customer purchases a hat in your clothing store, you can recommend sunglasses because both these options protect from the sun and are often bought together.

You can show these recommendations as a slide-in cart, order bump, upsell, or cross-sell products, and even send automated emails to users upon purchase to gain traction.

Having said that, let’s take a look at how to easily show product recommendations in WordPress.

For this tutorial, we will be using multiple methods, so you can use the links below to jump to the one of your choice:

Method 1: Show Product Recommendations on the Products Page

If you want to show relevant recommendations on the products page, then this method is for you.

You can easily do this using the default upsell feature in WooCommerce, so you won’t need any other plugin for this method.

Upsells basically means recommending a more premium version of the product the user is purchasing. However, you can also add other relevant products in this section.

First, you must visit the Products » Add New page from the WordPress dashboard to create a new product. You can also edit an existing one if you want.
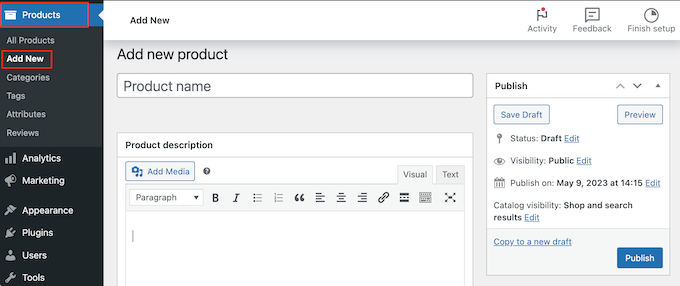
How to add a new product in WooCommerceHow to add a new product in WooCommerce

Once you have added the details, scroll down to the ‘Product Data’ section and switch to the ‘Linked Products’ tab from the left column.

Here, you can add different products to your WooCommerce store in the ‘Upsell’ section. To do this, just enter the name of the product, and you will be shown the search results from which you can choose a product to add.
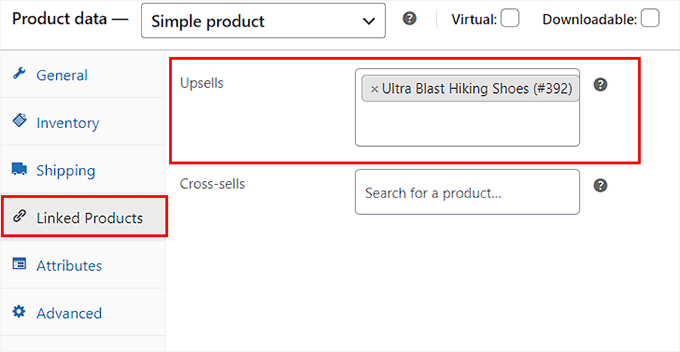
Add products in the Upsell sectionAdd products in the Upsell section

After that, scroll back to the top and click the ‘Publish’ button to store your settings and make your product live.

Now, visit your WooCommerce store to view the upsell products under the ‘You may also like’ section.
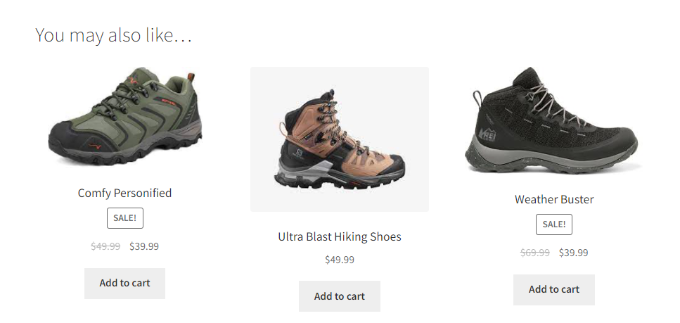
View upsell productsView upsell products

For more details, see our tutorial on how to upsell products in WooCommerce.

Method 2: Show Product Recommendations on the Cart Page

If you want to display product recommendations on the cart page just as the customer is moving to the checkout, then this is the method to use.

WooCommerce offers the default cross-sell option that allows you to show relevant and complementary products without using any plugin.

First, open the product of your choice in the WooCommerce editor and scroll down to the ‘Product Data’ section.

Here, switch to the ‘Linked Products’ tab where you can add relevant products to be displayed on the carts page in the ‘Cross-sells’ section.
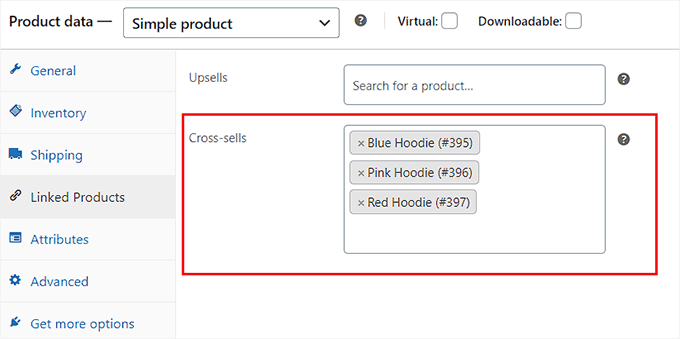
Add products in the cross sell sectionAdd products in the cross sell section

Once you are done, just click the ‘Publish’ or ‘Update’ button at the top to store your settings.

Now, visit your store and add a product in the cart to head over to the Cart page. Here, you will notice that the product recommendations are displayed in the ‘You may be interested in…’ section.
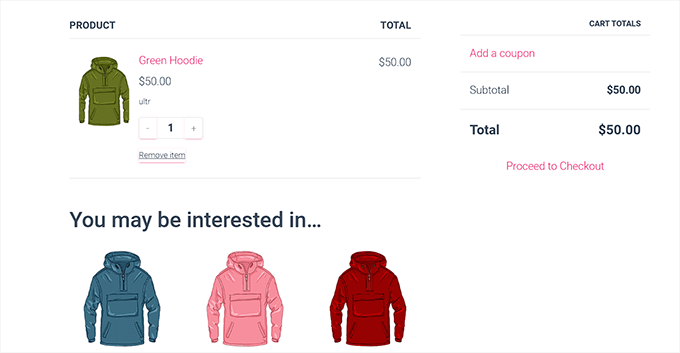
Cross sell product recommendations previewCross sell product recommendations preview

Method 3: Show Product Recommendations as a Sliding Cart

You can use this method if you want to show product recommendations in a sliding cart.

FunnelKit is a popular WooCommerce plugin that lets you add a sliding cart to your store and also show relevant recommendations within this cart to encourage users to make more purchases.

First, you need to install and activate the Sliding WooCommerce Cart by FunnelKit plugin. For details, see our tutorial on how to install a WordPress plugin.

Upon activation, head to the FunnelKit » Cart page and toggle the ‘Enable Cart’ switch to ‘On.’
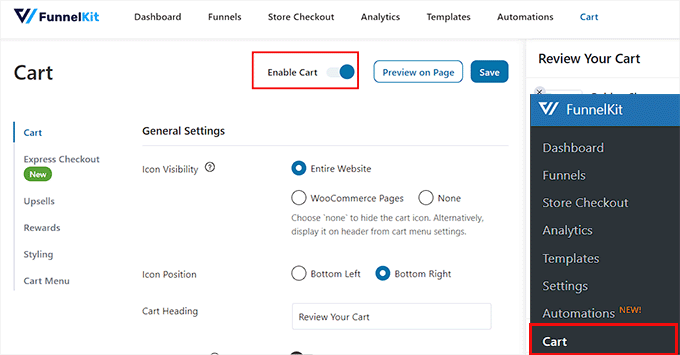
Enable sliding cartEnable sliding cart

After that, you can select the sliding cart visibility, icon position, coupon field, summary, and checkout settings from the section below. For more details on this, see our tutorial on how to easily add a sliding cart in WooCommerce.

Once satisfied, you must switch to the ‘Upsells’ column from the left and toggle the ‘Enable Cart Upsells’ switch to ‘On.’

Note: Keep in mind that you will need the pro version of the plugin to unlock the upsells feature.
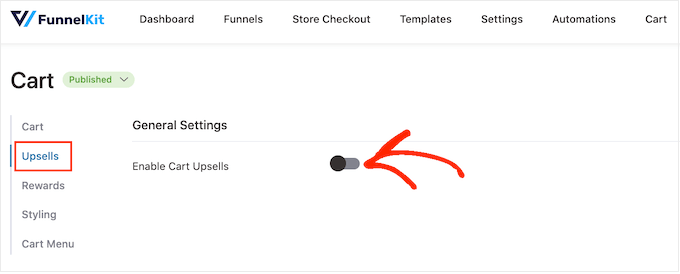
How to add upsells and cross-sells to WooCommerceHow to add upsells and cross-sells to WooCommerce

This will open new settings on the page from where you can configure the display layout for product recommendations. You will be able to see a preview for each layout style on the right corner of the screen.

After that, you must select if you want to show cross-sell or upsell products as recommendations. You can also choose the ‘Both’ option.

Then, you can add a heading to be displayed at the top of product recommendations and choose the number of recommendations to be displayed.
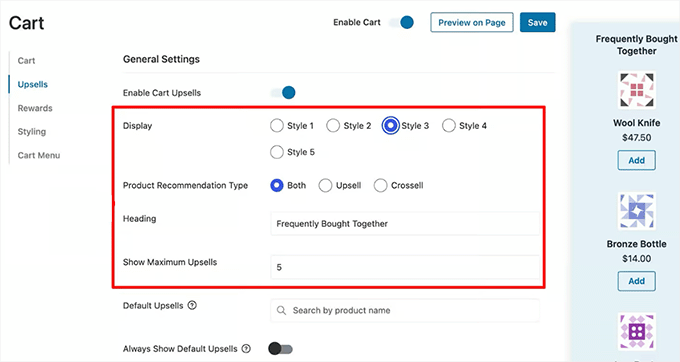
Configure upsell and cross sell settingsConfigure upsell and cross sell settings

Once that is done, scroll down to the ‘Upsells and Cross-Sells’ section to view the list of all the products on your online store.

From here, expand a product’s tab and click the ‘Add Upsell’ or ‘Add Cross Sell’ button to add recommendations.

Remember that upsell products are like the premium version of the product that the customer has added to the cart, while cross-sell products are the ones that are related to the product the user is purchasing.
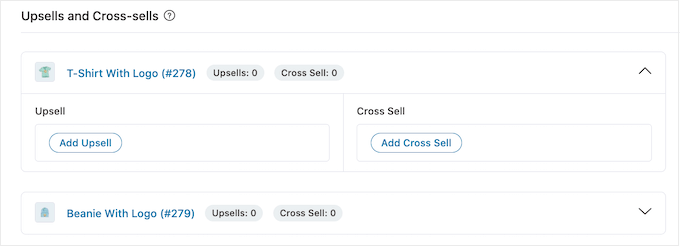
FunnelKit's advanced conversion featuresFunnelKit's advanced conversion features

Upon clicking on one of the buttons, a popup will open on the screen from where you can search and add the product that you want to be displayed in the recommendations.

You can follow the same process for all the products on your online store.

Adding a linked product on your online storeAdding a linked product on your online store

Once you are done, just click the ‘Save’ button at the top to store your settings.

You can now visit your WooCommerce to view the sliding cart with product recommendations.
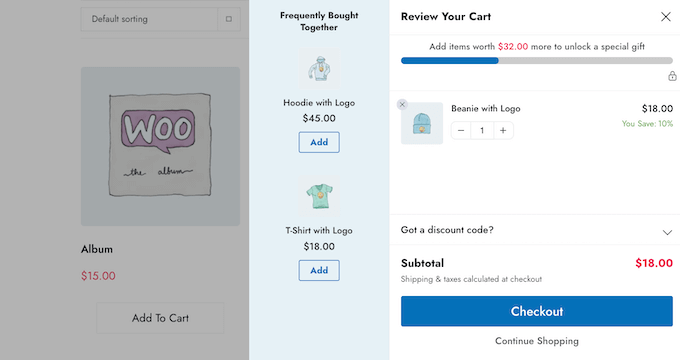
An example of a cross-sell promotion, created using FunnelKit Funnel BuilderAn example of a cross-sell promotion, created using FunnelKit Funnel Builder

Method 4: Show Product Recommendations as Order Bumps

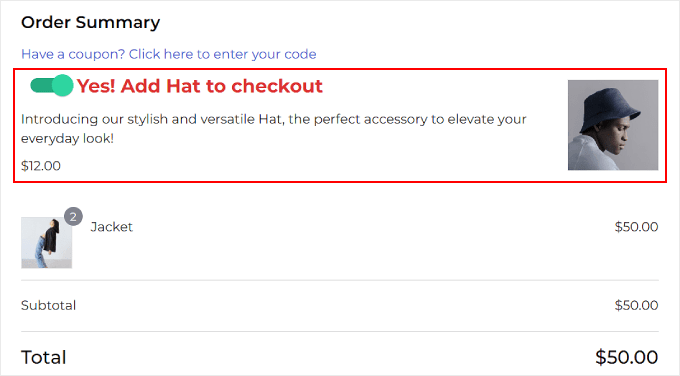
Use this method to display relevant product recommendations as an order bump, which is a technique used on the checkout page to show relevant products to customers at a lower price point.

This can often convince them to buy it right before finishing the checkout process.

To create order bumps, you will need to install and activate the Funnelkit Builder. For details, see our step-by-step guide on how to install a WordPress plugin.

Note: FunnelKit Builder has a free plan, but you will need the pro version to unlock the order bumps feature.

Upon activation, visit the FunnelKit » Settings page from the admin sidebar and switch to the ‘License’ tab in the left column.

Then, enter your license key and click the ‘Activate’ and ‘Save Changes’ button to store your settings. You can get this information from your account on the FunnelKit website.
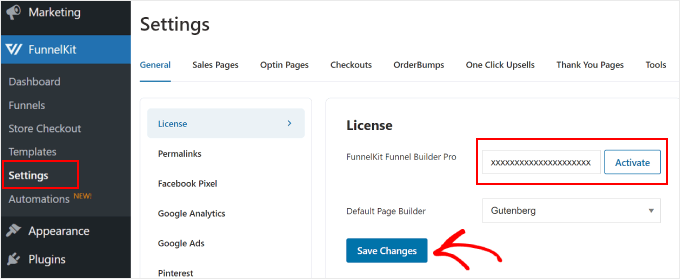
Activating the FunnelKit license keyActivating the FunnelKit license key

Next, you will need to create a checkout page on your WooCommerce store using FunnelKit. For more information on this, see our tutorial on how to customize your WooCommerce checkout page.

Once that is done, go to the FunnelKit » Store Checkout page from the WordPress dashboard and click the ‘Add Order Bump’ button.
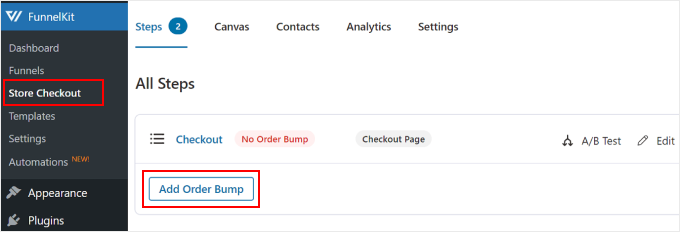
Clicking the Add Order Bump button on FunnelKitClicking the Add Order Bump button on FunnelKit

This will open a popup where you must add a name for the order bump that you are creating and click the ‘Add’ button.

The plugin will now add the order bump to your checkout funnel. Here, click the ‘Edit’ button to start the process.
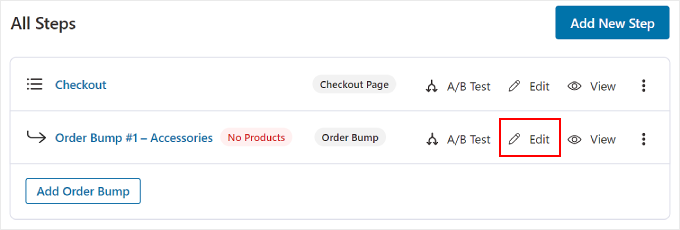
Clicking the Edit button on an order bump in FunnelKitClicking the Edit button on an order bump in FunnelKit

This will take you to a new screen where you must click the ‘Add Product’ button to open a popup.

Here, just type and add the products that you think will complement the buyers’ purchase and then click the ‘Add Product’ button.
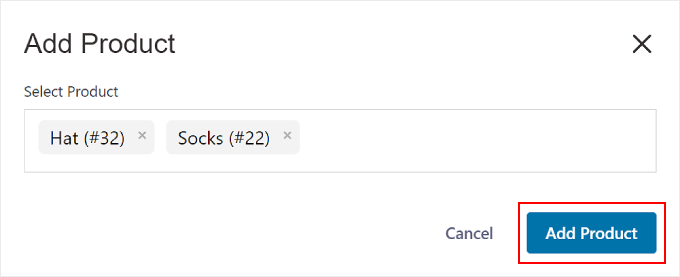
Adding products to a FunnelKit order bumpAdding products to a FunnelKit order bump

Next, you can select a discount type for the products that you chose from the dropdown menu and can even offer more than one quantity for each item to customers.

Once you have done that, just click the ‘Save Changes’ button to store your settings.
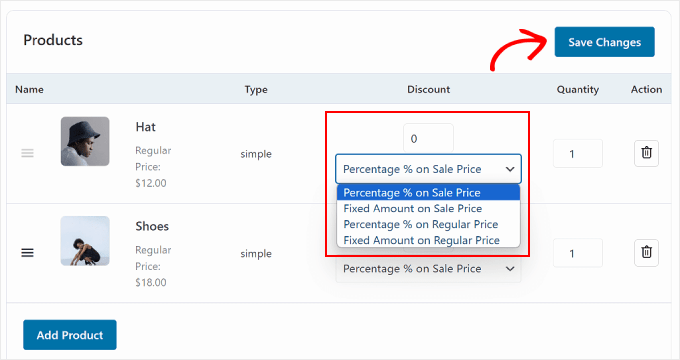
Configuring the product offer's discount type in FunnelKitConfiguring the product offer's discount type in FunnelKit

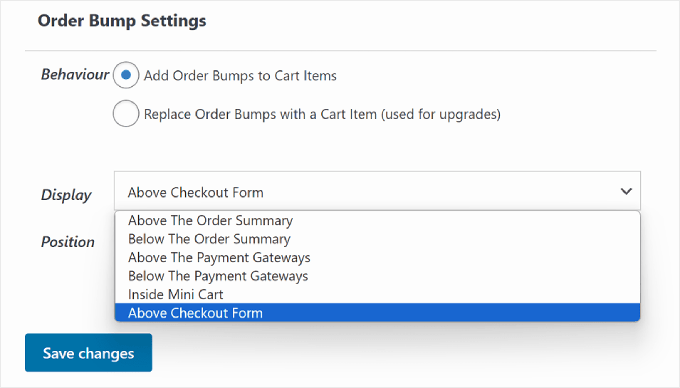
Then, scroll down to the ‘Order Bump Settings’ section, where you can select the order bump’s behavior and display position during checkout.

For instance, if you select the  ‘Add Order Bumps to Cart Items’ option as the bump behavior, then customers will be suggested these products to add as an extra purchase.

However, when choosing ‘Replace Order Bumps with a Cart Item (used for upgrades)’, you give customers the option to replace their purchase by upgrading to a higher-end version of the product.

FunnelKit's Order Bump Settings sectionFunnelKit's Order Bump Settings section

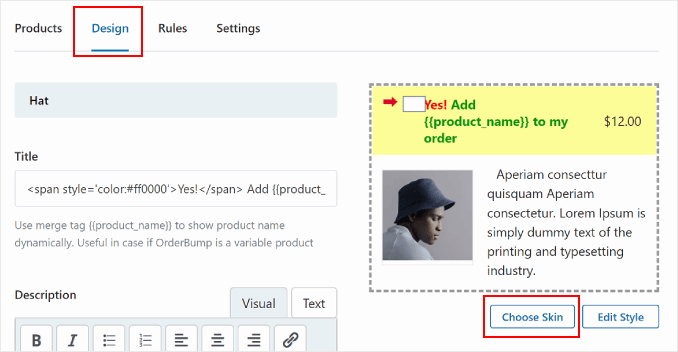
After that, switch to the ‘Design’ tab from the top. Here, you can configure how the order bump offer will look to customers.

You can add a title and description and change the text colors, background color, toggle color, border, font size, price display, and box padding and width. Once you are satisfied, just click the ‘Save’ button to store your settings.

Clicking Choose Skin in the FunnelKit Order Bump Design tabClicking Choose Skin in the FunnelKit Order Bump Design tab

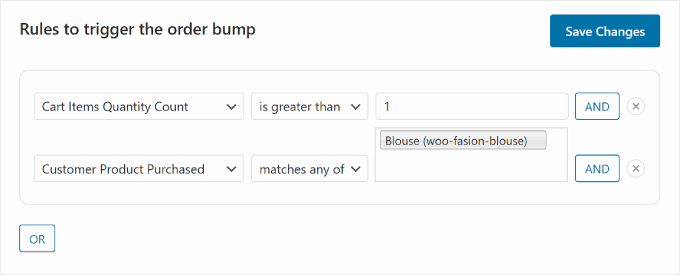
Now, it is time for you to switch to the ‘Rules’ tab, where you have to click the ‘Add Rules’ button.

This will display some new settings on the screen that you can use to display the order bump for specific products. The rules can be based on the cart, customer, geography, or date and time.

For example, if you want to display the order bump on the checkout for a specific product, then you must choose the ‘Customer Product Purchased’ option from the dropdown menu on the right.

After that, just add the product name in the text field on the right and click the ‘Save Changes’ button to store your settings.

An example of the order bump trigger rules in FunnelKit using the AND buttonAn example of the order bump trigger rules in FunnelKit using the AND button

Now, visit your WooCommerce to view the order bump on the checkout page of a specific product.

If you want to know more about trigger rules for order bumps, then you can see our beginner’s guide on how to create an order bump in WooCommerce.

What FunnelKit's order bump looks like in checkoutWhat FunnelKit's order bump looks like in checkout

Method 5: Offer Post-Purchase Recommendations With Emails

If you want to send a post-purchase recommendation email to customers, then this method is for you. For this, you will need FunnelKit Automations, which is a powerful automation plugin.

You can create a workflow with it that will automatically send a recommendation email to users sometime after their purchase.

First, you need to install and activate the FunnelKit Automations plugin. For instructions, see our tutorial on how to install a WordPress plugin.

Note: You can sign up for the FunnelKit free plan to do this.

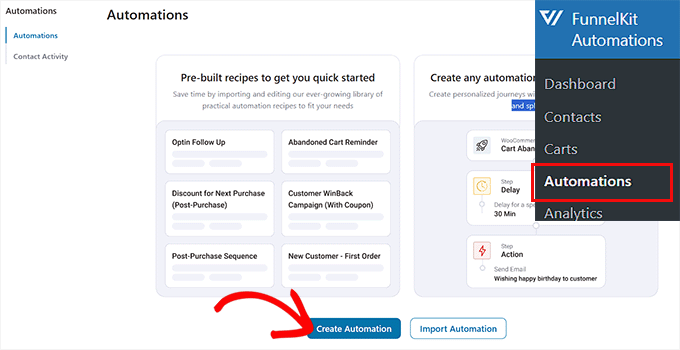
Upon activation, visit the FunnelKit Automations » Automations page from the WordPress dashboard and click the ‘Create Automation’ button.

Click the Create Automation buttonClick the Create Automation button

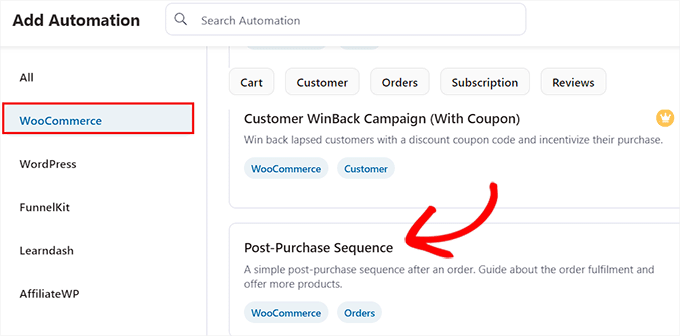
This will take you to the ‘Add Automations’ page, where you will see a list of premade templates offered by the plugin.

From here, switch to the ‘WooCommerce’ tab and select the ‘Post Purchase Sequence’ template.

Select post purchase sequence templateSelect post purchase sequence template

Doing that will open a preview of the automated workflow in a new tab from where you must click the ‘Import Recipe’ button.

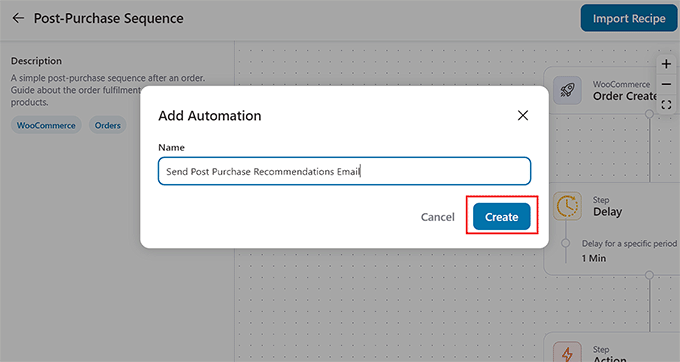
This will open a new prompt. Here, add the name for the workflow that you are making and click the ‘Create’ button.

Import a recipe and add a name for itImport a recipe and add a name for it

The FunnelKit Automation editor will now be launched on the screen. You can start by clicking on the ‘Order Created’ tab. This is the trigger that will start the workflow.

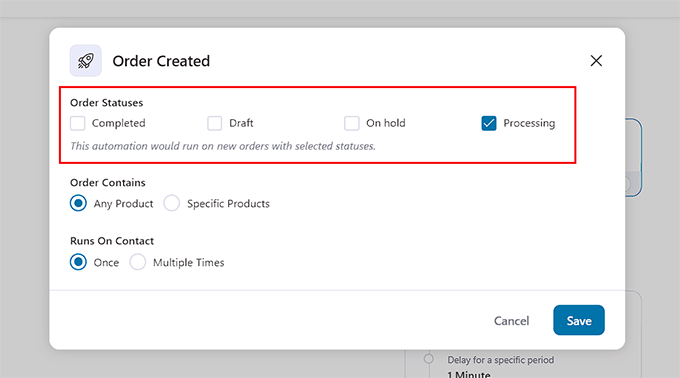
A popup will appear on your screen, where you will have to select the order status. For instance, if you select the ‘Processing’ option, then the email will be sent to users after they place their order.

However, when choosing the ‘Completed’ option, customers will receive an email after they get the order at their address. Just configure these settings and click the ‘Save’ button.

Select the order statusSelect the order status

Once you do that, click the ‘Delay’ tab.

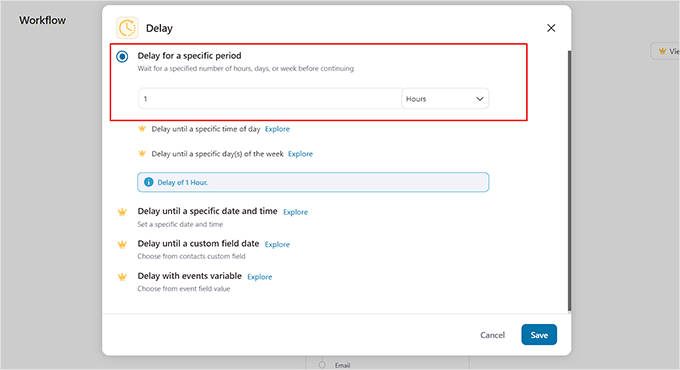
This will open the prompt on the screen where you can choose how long after the purchase the email should be sent to users. For example, you can choose 1 hour from the dropdown menu.

After that, click the ‘Save’ button to store your settings.
Choose a delay period for your emailChoose a delay period for your email

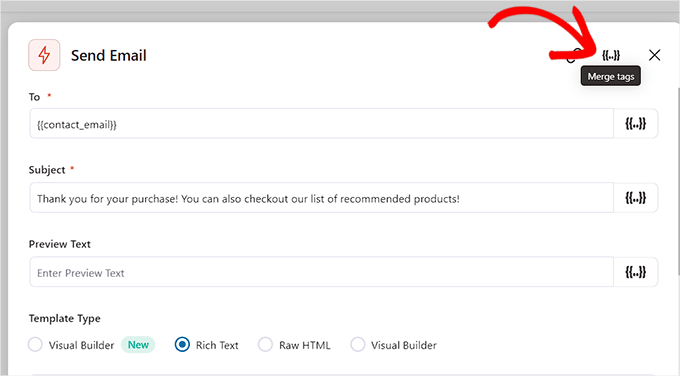
Next, click the ‘Action’ tab in the editor to open its settings in the popup. Here, you can start by configuring the subject line of the email.

Then, click the ‘Merge Tags’ option at the top.

Click the Merge tags buttonClick the Merge tags button

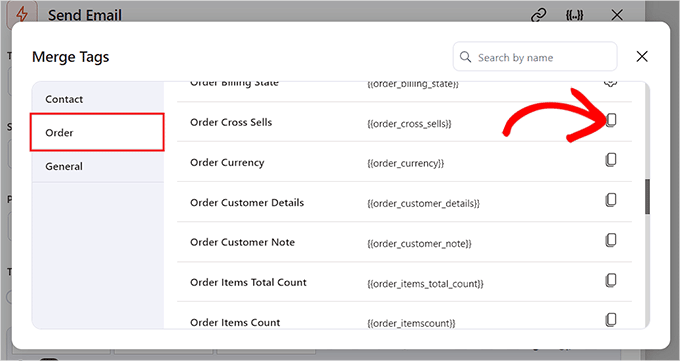
On doing that, a popup will open up where you have to switch to the ‘Orders’ tab.

Next, scroll down to the ‘Order Cross Sells’ option and click the copy button next to it.

Click the Copy button next to the Cross Sells optionClick the Copy button next to the Cross Sells option

The prompt will now automatically close, and you can scroll down to the text builder in the ‘Action’ popup.

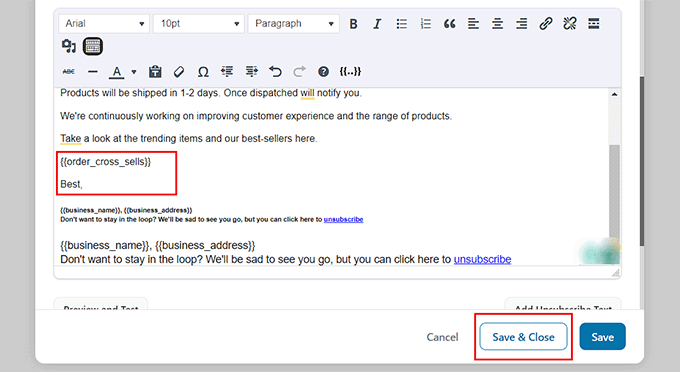
Here, you can change the email content according to your liking and add the cross-sells tag. Now, users will see a list of relevant products that you added for the purchased product using WooCommerce or FunnelKit.

Once you are done, just click the ‘Save and Close’ button.

Add the merge tag in the text editor and click the 'Save' buttonAdd the merge tag in the text editor and click the 'Save' button

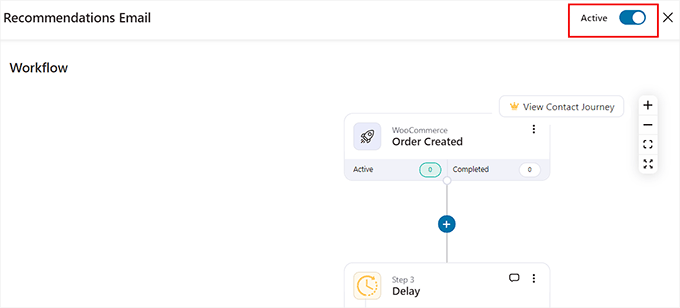
You can now view your automated workflow again to see if you want to make any changes.

After that, toggle the ‘Inactive’ switch at the top to ‘Active’.

Activate the workflowActivate the workflow

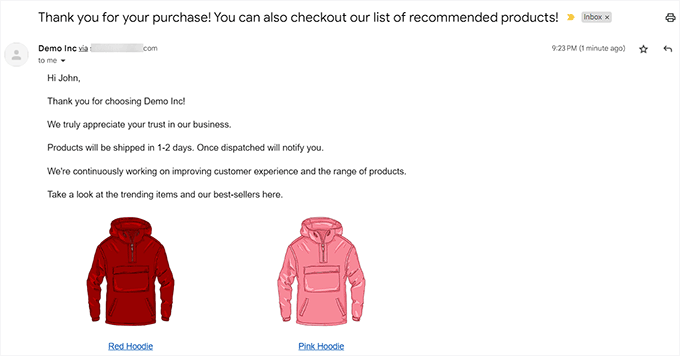
Now, your customers will receive an email with product recommendations exactly an hour after purchase.

Recommended products email previewRecommended products email preview

If you want to show product recommendations in popups, then this method is for you.

For this, you will need OptinMonster, which is the best lead generation and conversion optimization tool on the market. It allows you to create popups, gamified spin the wheels, banners, and floating bars using its premade templates and visual editor.

It also has exit intent technology that lets you display product popups to users just as they are planning to leave your store.

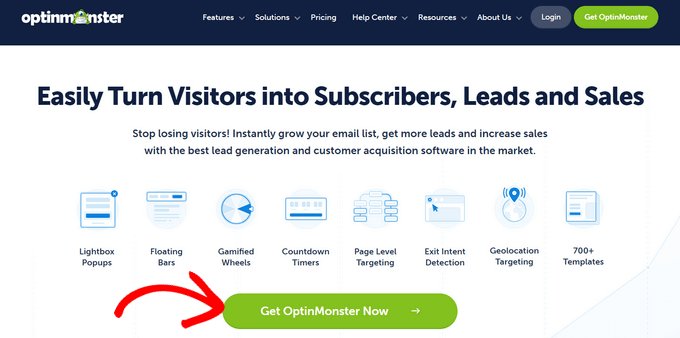
To create a product recommendation popup, you will need to create an account on the OptinMonster website.

Click the Get OptinMonster Now buttonClick the Get OptinMonster Now button

Once you do that, open your WordPress dashboard and install the free OptinMonster plugin, which will connect your website with the tool.

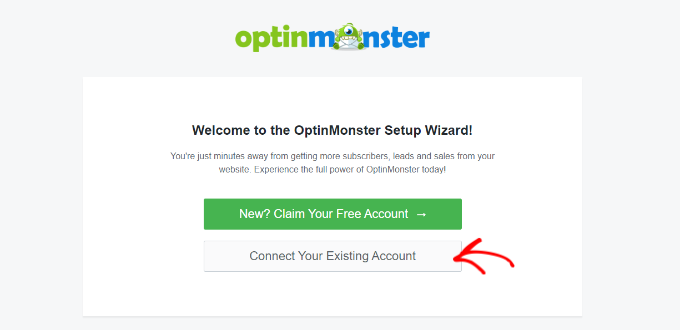
Upon activation, the OptinMonster setup wizard will open up, where you must click the ‘Connect Your Existing Account’ button. You can then follow the onscreen instructions to complete the process.

Connect your existing accountConnect your existing account

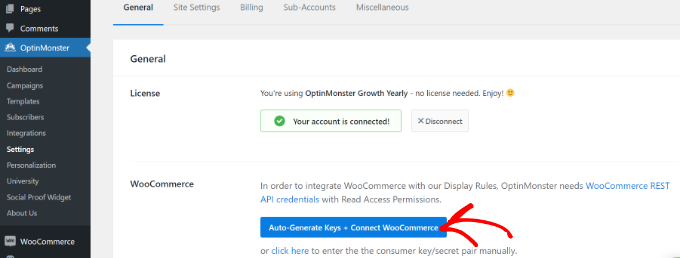
Next, visit the OptinMonster » Settings page and click the ‘Auto Generate Keys + Connect WooCommerce’ button.

If you don’t do this, then campaigns created with OptinMonster won’t be shown in your store.

Auto generate keys and connect WooCommerceAuto generate keys and connect WooCommerce

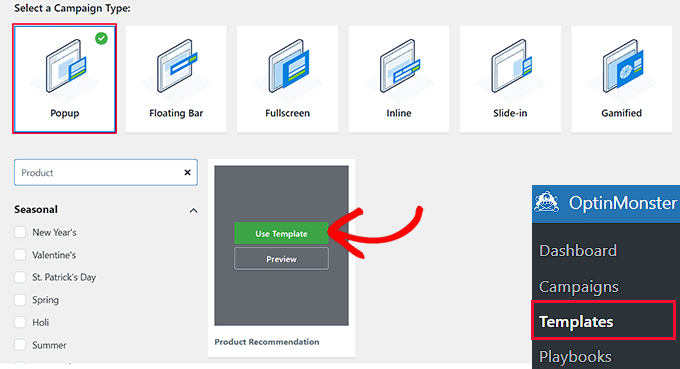
Once that is done, head over to the OptinMonster » Templates page from the WordPress dashboard and select ‘ Popup’ as the campaign type.

Next, click the ‘Use Template’ button for a template that you want to use. For this tutorial, we have used the ‘Product Recommendations’ template.

Choose a template for the product recommendation popupChoose a template for the product recommendation popup

This will open a prompt where you can add a name for the campaign that you are creating.

Once you do that, OptinMonster’s drag and drop builder will be launched on the screen. Here, you can use different blocks to add an image, details, and CTA for a product. For more instructions, see our tutorial on how to create a WooCommerce popup to increase sales.

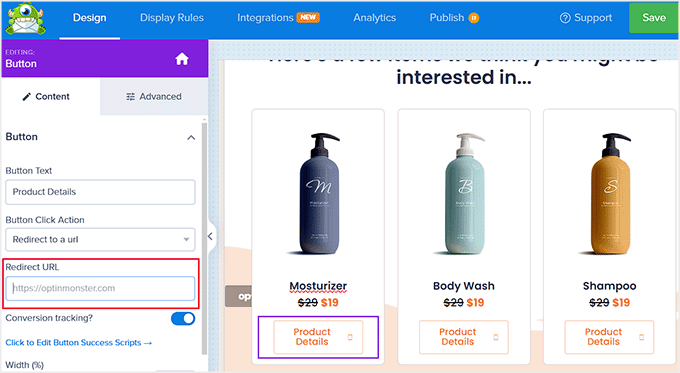
Then, click the ‘Product Details’ button in the popup preview to open its settings in the left column. You can now add the URL for the product’s page in the ‘Redirect URL’ field.

Add product URL in the popupAdd product URL in the popup

Now, switch to the ‘Display Rules’ tab from the top. Here, you will be setting conditions for the product recommendation popup appearance.

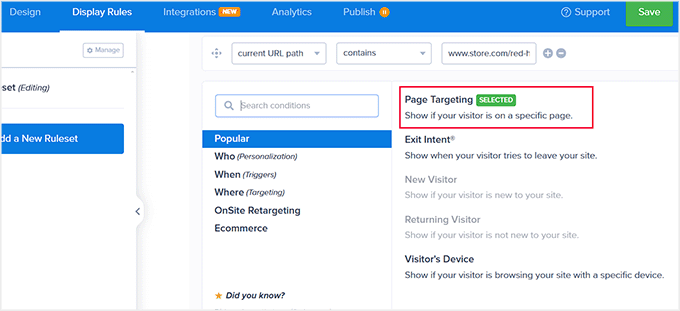
To do this, open the ‘Time on Page’ dropdown menu and choose the ‘Page Targeting’ option.

This will allow you to show your popup to users on a specific product’s page, letting you cross-sell or upsell the product.

Upon choosing this option, select ‘contains’ from the dropdown menu in the middle and then add the URL of the product page where you want to display the specific recommendation popup.

Choose page targeting for product recommendation popupChoose page targeting for product recommendation popup

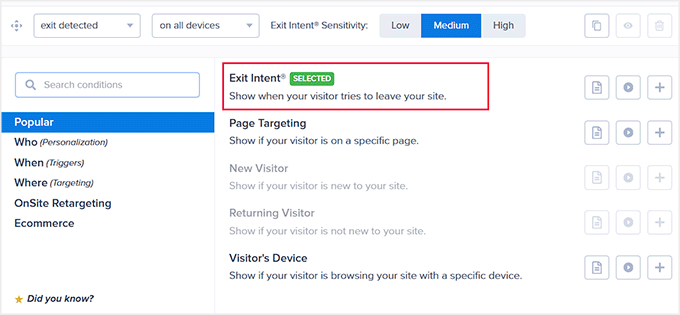
You can also choose the ‘Exit Intent’ option to display the popup as the user is about to leave your store.

If you want, you can change the feature’s intensity to show it to more customers.

Use exit intent technology for popupsUse exit intent technology for popups

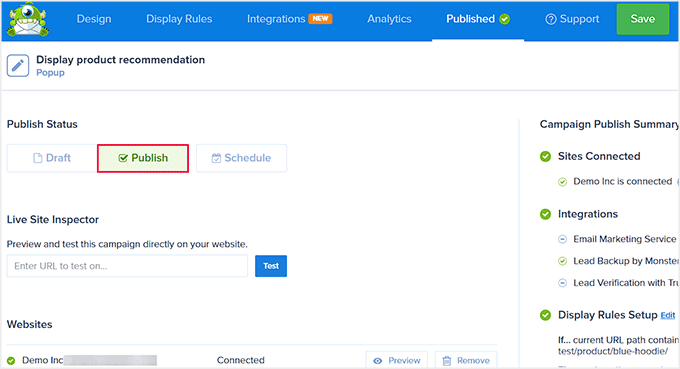
Finally, switch to the ‘Publish’ tab from the top.

Here, click the ‘Publish’ button to make your popup live. Then, click the ‘Save’ button to store your settings.

Publish the product recommendations popupPublish the product recommendations popup

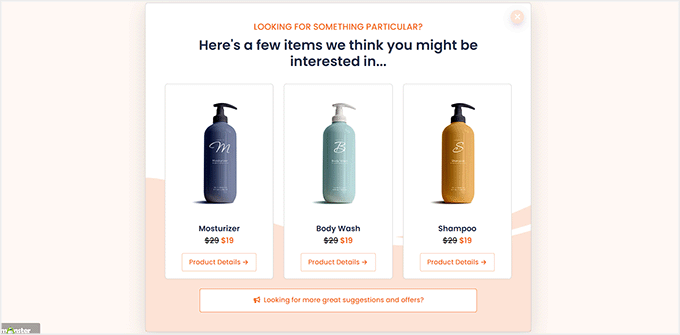
You can now visit your online store to view the product recommendations popup in action.

If you selected a specific page for the popup, then you must head to that page to view the results.

Product recommendations popup previewProduct recommendations popup preview

Method 7: Display Product Recommendations in Easy Digital Downloads

If you sell digital downloads on your online store, then the above methods may not be suitable for you.

In that case, you can use Easy Digital Downloads, which is the best plugin for selling digital goods, to show product recommendations.

First, you need to install and activate Easy Digital Downloads. For details, see our guide on how to install a WordPress plugin.

Note: EDD has a free plan, but you will need the pro version to unlock the Cross-sell and Upsell add-on.

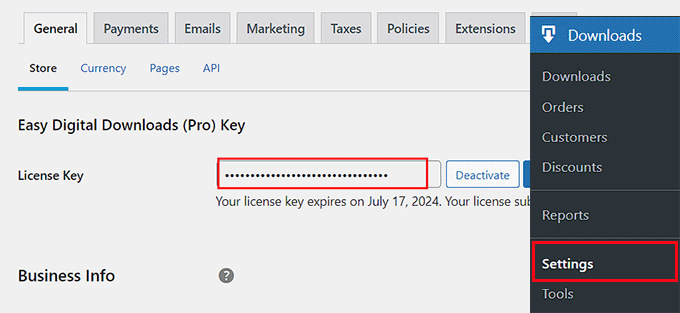
Upon activation, visit the Downloads » Settings page from the WordPress admin sidebar to enter your license key. You can get information from under your account on the EDD website.

Then, click the ‘Activate’ button.

Add a license key for your easy digital downloads pluginAdd a license key for your easy digital downloads plugin

Once you have done that, you must set up your store to start selling products. For instructions, see our beginner’s guide on how to sell digital downloads in WordPress.

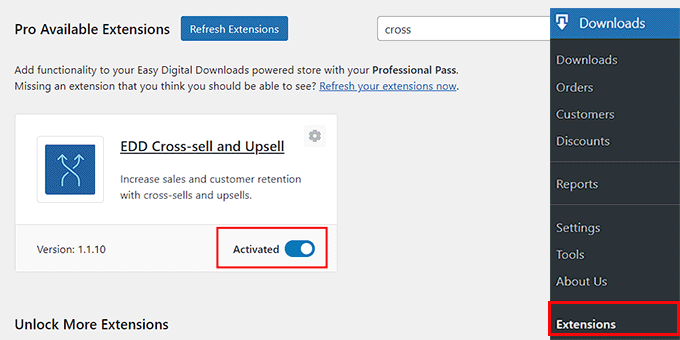
Next, head over to the Downloads » Extensions page and locate the ‘EDD Cross-sell and Upsell’ addon, and click the ‘Install’ button under it.

Once the addon is installed, it will automatically show an activated toggle like this:

Activate the EDD Cross-sell Upsell addonActivate the EDD Cross-sell Upsell addon

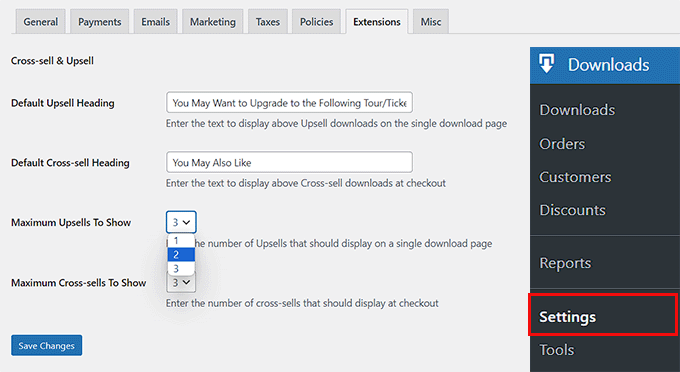
Now, it’s time for you to visit the Downloads » Settings page and switch to the ‘Extensions’ tab.

From here, you can configure the heading for upsell and cross-sell products. Remember that the upsell products are like a premium version of the product the user is purchasing, while cross-sell products are the ones that are related to the purchased products.

You can add your headings according to your liking and also adjust the number of product recommendations to be shown from the dropdown menus.

After that, just click the ‘Save Changes’ button to store your settings.
Add headings for cross sell and upsell sectionsAdd headings for cross sell and upsell sections

Now, open the digital product where you want to add product recommendations.

Once the block editor appears, simply scroll down to the ‘Cross-sell and Upsell’ section, where you can add custom headings for each section.

If you don’t add a heading, then the default headings you configured will be added to the page.

After that, select the upsell product recommendations from the dropdown menu. You can follow the same process for cross-sell products as well.
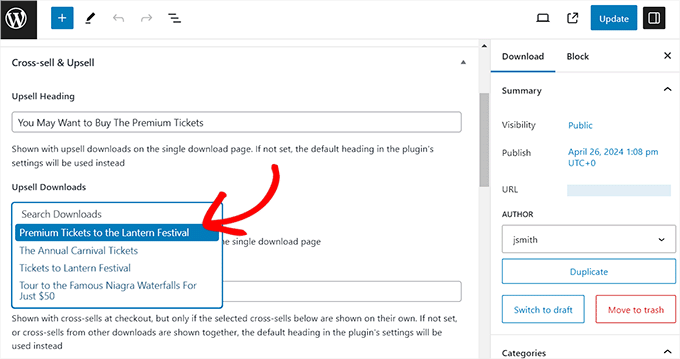
Add upsell and cross-sell productsAdd upsell and cross-sell products

Once you are done, just click the ‘Update’ or ‘Publish’ button to store your settings.

Now open the product page on the website front-end, and you will see that the upsell product will be recommended on the product page.

Upsell product recommendation previewUpsell product recommendation preview

On the other hand, the cross-sell products will be recommended to users when they are on the checkout page.

This is how the cross-sell products looked on our demo website.

Cross-sell product recommendation previewCross-sell product recommendation preview

Bonus: Properly Set Up eCommerce Tracking In WordPress

Once you have added product recommendations, it is time for you to set tracking for your online store to find your top-selling products, see which campaigns perform the best, and understand how people find and use your website.

This will help you find what kind of products customers are likely to buy along with others in your store. For example, you may notice that anyone who is buying sunscreen is also purchasing a hat.

With this information, you can show relevant product recommendations to customers and boost your conversions.

To do this, you will need MonsterInsights, which is the best Google Analytics solution on the market.
MonsterInsights WebsiteMonsterInsights Website

Upon plugin activation, simply connect your website with Google Analytics. For details, see our tutorial on how to install Google Analytics in WordPress.

Then, head over to the Insights » Addons page from the WordPress dashboard and install the eCommerce addon.
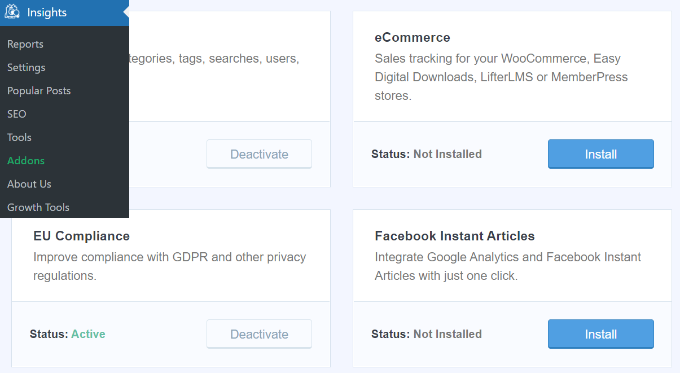
Enable eCommerce trackingEnable eCommerce tracking

Now visit the Insights » Settings page and switch to the ‘eCommerce’ tab. Here, you must toggle the ‘Use Enhanced eCommerce’ switch to ‘On.’

Once you do that, MonsterInsights will start recording analytics and find the data you need, including conversion rate, transactions, revenue, average order value, and top products.
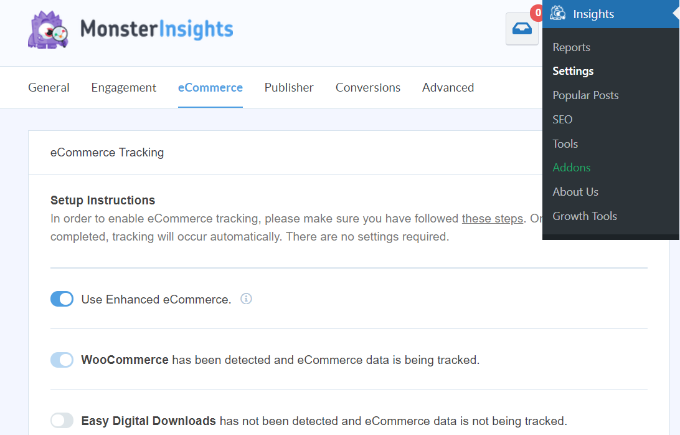
Use enhanced ecommerce optionUse enhanced ecommerce option

For details, see our tutorial on how to properly set up eCommerce tracking in WordPress.

We hope this article helped you learn how to show product recommendations in WordPress. You may also like to see our beginner’s guide on how to pass payment processing fees to customers in WordPress and our top picks for the best email marketing services to grow your email list.

If you liked this article, then please subscribe to our YouTube Channel for WordPress video tutorials. You can also find us on Twitter and Facebook.


Source link

Keep an eye on what we are doing
Be the first to get latest updates and exclusive content straight to your email inbox.
We promise not to spam you. You can unsubscribe at any time.
Invalid email address

WORDPRESS

Internal blog post reveals Automattic’s plan to enforce the WordPress trademark using ‘nice and not nice lawyers’

Published

on

By

stylized WordPress logo

Matt Mullenweg, the WordPress co-founder and Automattic CEO, has been embroiled in a very public and legal fight with WP Engine these last few weeks over the use of WordPress as a trademark and fees Automattic believes WP Engine owes to the WordPress project — sparring that has resulted in WP Engine issuing legal demands of its own.

But Automattic’s position on the matter did not materialize overnight. 

According to an internal blog post a source shared with TechCrunch, Automattic was crafting a plan to get significantly stricter about trademark enforcement across WordPress and its e-commerce platform WooCommerce since at least the beginning of the year. Separate sources have confirmed the authenticity of the post.

The message — penned by Automattic’s then-chief legal officer Paul Sieminski in January 2024 on the company’s “P2” (a version of WordPress aimed at internal communications) — outlined a plan for how Automattic would approach this strategy, through direct negotiations with companies and via legal action from “nice and not nice lawyers and trademark enforcers.” And Automattic potentially would register further trademarks going forward.

“We will be using a multi-pronged strategy that will involve some additional trademark registrations … legal cease-and-desist letters, and a formal paid licensing program for the partners,” Sieminski noted. (He left the company in April 2024.)

This is effectively what has played out. 

In July, the WordPress Foundation filed trademark applications for both “Managed WordPress” and “Hosted WordPress,” which are pending in status. And Automattic issued a cease-and-desist letter to WP Engine at the end of last month. Neither Automattic nor the WordPress Foundation has yet to publish any further guidance, however, on fair use. 

The WordPress Foundation, a nonprofit, has owned the trademark for WordPress since 2010, when Mullenweg founded Automattic as a commercial entity to sit on top of the open source framework. 

Mullenweg’s reasoning for transferring that trademark to the foundation was that, even if there were a changing of the guard at Automattic, the trademark would remain safe with the foundation and the open source project could live on. 

Automattic holds the exclusive commercial license for WordPress, and its recent actions signal a major shift in how it’s positioning itself as a guardian. 

In addition to giving some context to Automattic’s recent legal actions, the internal blog post also underscores how tension has escalated in the WordPress ecosystem, where the collaborative aspects of open source projects have had to be balanced against business interests. 

Many contributors and developers have pointed out how this fight could negatively impact the WordPress community. That would be a change from past form since Automattic previously appeared to have a less adversarial relationship with prominent players in the ecosystem. It had even been an investor in WP Engine to spur more ecosystem activity. It was bought out, we have learned and confirmed, when Silverlake took a controlling stake in WP Engine in 2018.

The internal post — which only refers to Automattic, no mention of WP Engine or other companies building on the WordPress framework — is primarily focused on the “WordPress” trademark, including its circular logo. Sieminski emphasized Automattic is the only company allowed to use these in its name and branding.

He also clarified Automattic’s role around WordPress.org. The initiative “doesn’t involve creating or explaining any new rules” beyond its trademark policy, he writes.

Google also makes an appearance in the post — primarily as a vehicle for enabling abuse of the trademark.

“A brief perusal of Google Ads and hosting company landing pages will turn up a lot of ‘Managed WordPress,’ or companies that offer ‘WordPress Hosting.’” he wrote. “Is this OK? Can we clamp down on these things? The answers are … no, and yes.”

Automattic, he wrote, would seek to work with Google to keep it from amplifying companies and links that misused the branding. “Overall, they can help but we cannot rely on them 100%,” he added.

The post covers trademarks related to WooCommerce, Automattic’s Shopify competitor that it acquired in 2015. WooCommerce is 100% owned by Automattic, and Automattic is following the same enforcement strategy for it and its “Woo” branding. Enforcement, the counsel wrote in the internal blog post, “will probably be easier and cleaner because it’s less of a community asset.” (WooCommerce itself is also open source.)

There are some murky areas in the dispute that Automattic has with WP Engine and WordPress trademark enforcement. One of these concerns the trademarks that were filed in July 2024. In a conversation with TechCrunch last month, Mullenweg claimed he didn’t know who filed these on behalf of the Foundation, or why. He said that he doesn’t know about day-to-day operations of the Foundation and volunteers are the ones who handle it. 

The Foundation has three directors, including Mullenweg. The others are Mark Ghosh, who sold his website, a popular WordPress blog, to Mullenweg in 2014, and Chele Farley, a former Republican politician whose campaign Mullenweg lent money to. Both of them have been almost invisible from Foundation activities or speaking about the WordPress ecosystem.

For now, the focus of the dispute has been between Mullenweg and WP Engine. “If there are violations of the trademark, of course, we need to enforce our trademark. I’m not aware of any others that are as egregious or as harmful as WP Engine,” Mullenweg told TechCrunch in late September.

We reached out to Automattic for comment for this story and Mullenweg replied directly. He did not give a direct answer to the question of whether the dispute with WP Engine was a one-off or setting a precedent for further action. 

“We do trademark enforcement all the time! It’s part of protecting the trademark,” he wrote. “Usually it’s pretty minor, and a UDRP or email takes care of it. However, WP Engine’s misuse of the WordPress and WooCommerce trademarks was so intrinsic to their business it required a more substantive deal, which I honestly thought was going to happen (it makes sense, from a business point of view) prior to [the September WordPress conference] WordCamp, which is why we allowed them to sponsor [the U.S. event].”

He added that the company was “upgrading a lot of our legal team right now.”

You can contact this reporter at [email protected] or on Signal: @ivan.42

Source link

Keep an eye on what we are doing
Be the first to get latest updates and exclusive content straight to your email inbox.
We promise not to spam you. You can unsubscribe at any time.
Invalid email address
Continue Reading

WORDPRESS

Mastering WordPress for E-commerce: Proven Strategies to Boost Your Online Store

Published

on

By

Mastering WordPress for E-commerce: Proven Strategies to Boost Your Online Store

With over 5 billion internet users worldwide, businesses are now tapping into E-commerce to expand market reach, which was inaccessible through traditional brick-and-mortar stores. However, success doesn’t end with merely establishing an E-commerce website. 

Tools are needed to do well in this competitive market. One tool is the Content Management System (CMS), which provides the framework and functionality needed for businesses to create, optimize and manage their online stores. 

WordPress dominates the CMS market, and surely using it will help in your business success. However, it takes the right and proven strategies to boost your online store, and this article is here for that. 

Why Choose WordPress for an E-commerce Website?

In the early days of WordPress, they were used primarily for blogging, but they have been adding more features and plugin libraries. Now, 43.5% of all websites are using WordPress, which shows its influence in content creation and digital management worldwide. 

Source

Among other CMS platforms, WordPress dominates the market – holding 62.6% shares. This highlights the benefits WordPress offers to its users.

  • Flexibility and Customization

WordPress offers customization options through its library of themes and plugins. The open-source nature of WordPress allows deep customization, where businesses can create features and functionalities tailored to their branding.

WordPress, being an open-source software, is free to use. Though there are premium themes and plugins that can be bought, they are more affordable than other e-commerce platforms when it comes to subscription fees. 

Google now uses mobile versions of a site’s content, which makes mobile-friendly websites important. WordPress themes are mobile-responsive, making online stores seamless across all devices. Also, this design will allow businesses to cater for users who prefer smartphones and tablets when shopping.  

WordPress comes with search engine optimization (SEO), where businesses can improve the visibility of their stores in search engine results. You can customize links, meta tags, and mobile responsiveness to enhance the website’s SEO performance.

As the leading CMS platform, you’ll have access to an active and vast community of developers, designers and users who can provide resources, including tutorials, documentation, forums, and professional support.

Setting up Your WordPress E-commerce Store

Businesses should establish a WordPress-based E-commerce store — from choosing a hosting provider to selecting themes and plugins — to set up their online business for success.

1. Choose the Right Hosting Provider

Cyberattacks are increasing due to reliance on IT systems, and e-commerce is their prime target because they handle and store sensitive information – from customers’ names, payment card data, and addresses to birthdates. This is why choosing the right hosting provider is important for security and speed. 

A good host helps make sure that your website has fast loading times to retain customers and improve conversion rates, as a slow website negatively impacts sales because of high bounce rates. Choose a hosting provider that provides security features, such as SSL certificates, firewalls, and regular backups that protect your data.

2. Install and Configure E-commerce Plugins

After choosing the hosting provider, install the e-commerce plugins needed for the functionality of your website. Select a responsive, fast-loading customizable theme that is mobile-friendly, such as Storefront, Shopkeeper and Astra, as they are known for ease of customization and speed – a significant portion of online shopping on mobile devices.

3. Select a Suitable E-commerce Theme

A theme will make a store appealing to the users, reflecting its brand. You can use WooCommerce, a leading WordPress plugin. With it, you can set up product pages, manage inventory, handle payments, and customize aspects of your stores.

Other plugins are also plugins available for your needs, such as:

  • Easy Digital Downloads – selling digital products
  • WP eCommerce – more traditional e-commerce experience
  • Ecwid – integrating store with social media platforms

Optimizing Your WordPress Store for Conversions

After setting up your WordPress E-commerce store, you need to optimize it for conversions, as one of any other business’s goals is to enhance UX and increase sales conversions. Strategies for optimization include:

Craft a Seamless User Experience (UX)

Site structure and navigation play a role in creating a seamless user experience (UX), affecting how customers interact with your website. Key points in improving these are having simple navigation, effective product pages and a streamlined checkout process.

  • Simple Navigation: Ensure that your website is intuitive. Organize your menu and make essential information accessible. Your structure should also let users find what they need easily with just a few clicks.
  • Effective Product Pages: Product pages should be visually appealing and informative by incorporating high-quality images, detailed descriptions, pricing, and customer reviews, helping customers make decisions.
  • Streamlined Checkout Process: Customers won’t complete the checkout process if it takes too long, so simplify it by minimizing the number of steps and using autofill options on forms and multiple payment methods for convenience.

Utilize Effective Call-to-Actions

Call-to-actions are buttons on your site, telling customers the action to take and driving sales to the e-commerce site. Make your CTAs stand out using contrasting colors and clear action-oriented text, which encourages users to take action. For example, “Add to Cart”, “Get Started”, or “Buy Now”.

You may also experiment with different formats and placements using A/B testing to determine which version yields the highest conversion rates based on real user data.

Implement Trust Signals and Security Measures

Building trust with potential customers through trust signals and security measures helps increase conversions to your e-commerce store, as customers will feel confident in their purchasing decisions.

  • Make sure that your website has SSL certification for secure connections of transactions. You may also reassure customers about their safety during shopping by displaying security badges and trust seals.
  • Positive feedback can influence potential buyers’ decisions as it establishes the trust and credibility of your brand, so encourage customers to leave reviews.
  • Consider money-back guarantees, easy return policies, and transparent shipping information to alleviate concerns about purchasing from an online store.

Ensuring Optimal Store Performance

A well-performing website not only enhances customer satisfaction but also encourages repeat visits, increasing conversions and sales. Maintaining high performance for your WordPress e-commerce store provides a positive user experience and favorable search engine rankings.

Regular Site Maintenance and Updates

Regular updates and maintenance help protect your site from vulnerabilities and improve performance. Neglecting these can slow loading times, broken features and security risks.

You can use tools (Google PageSpeed Insights, GTmetrix, or Pingdom) to monitor site performance, as they provide insights into loading speeds, help identify any issues affecting user experience, and suggest improvements.

Managing and Securing Customer Data

As customers trust you with sensitive information, you should maintain high standards of data protection that not only comply with regulations but also build customer confidence.

  • Comply with regulations by being transparent about data collection and usage practices.
  • Regularly back up your website to safeguard against data loss that may potentially be due to hacking or technical failures.
  • Schedule backups based on update frequency–daily for active sites or weekly for less frequently updated ones.

Scaling Your WordPress E-commerce Store

As your business grows, scaling your WordPress e-commerce store becomes essential to meet increasing demand and ensure a seamless shopping experience for customers.

Expand Product Lines and Categories

Expanding your offerings is a natural way to scale your e-commerce store. You can identify market trends and opportunities and manage inventory efficiently to meet customer demand.

  • Identify market trends and opportunities: Conduct regular market research, analyze customer feedback and observe competitors to stay attuned to market trends. You can use Google Trends and social media analytics to spot emerging opportunities for your brand.
  • Managing inventory: Tracking your inventory can help you streamline operations and prevent stockouts or overstock situations. Inventory management tools like TradeGecko or Zoho can help you track stock levels, manage orders, and forecast demands.

Enhance Site Performance for High-traffic

As your business grows, your e-commerce store visitors will also increase. Optimizing images, minimizing HTTP requests, and leveraging caching help handle this high traffic and maintain optimal performance. Your site should be able to handle spikes in traffic without compromising user experience.

A Content Delivery Network allows users to access data from the nearest location, which reduces latency. Additionally, a clean database helps improve site speed to cater to higher traffic. Consider removing unnecessary data such as spam comments, post revisions, and unused plugins.

Integrate Third-Party Platforms and Services

Integrating third-party platforms improves your site’s functionality and user experience.

  • Select payment gateways that offer flexibility and security.
  • Make sure that shipping options are easy to configure.
  • Provide real-time tracking information.

CRM can also help track customer interactions, manage leads, and automate marketing efforts. This allows businesses to tailor communications based on customer behavior and maintain customer relationships effectively.

Case Studies: Successful E-commerce Sites Built with WordPress

1729302966 470 Mastering WordPress for E commerce Proven Strategies to Boost Your Online

Lugz is a footwear brand that rebuilds its website using WordPress and WooCommerce to maximize performance, efficiency and conversions. With these, they were able to streamline enterprise resource planning integration and minimize time to create data structure and import product data.

1729302966 164 Mastering WordPress for E commerce Proven Strategies to Boost Your Online

French Today helps you speak French in actual conversions. This successful e-commerce website is powered by WordPress and WooCommerce sold over 20 recorded audiobooks with a vast collection of blog posts on language and culture in France.

Final Thoughts: WordPress Is a Go-to CMS for E-commerce

WordPress offers e-commerce businesses opportunities to build, optimize, and scale online stores successfully. With the right strategies, it can be a go-to CMS for e-commerce ventures looking to thrive in the competitive digital marketplace. 

Start your journey to e-commerce success and explore the potential of WordPress to power your online store today!

Featured image by Shoper on Unsplash


Source link
Keep an eye on what we are doing
Be the first to get latest updates and exclusive content straight to your email inbox.
We promise not to spam you. You can unsubscribe at any time.
Invalid email address
Continue Reading

WORDPRESS

Top 4 WordPress Shortcuts to Save You Time and Boost Productivity

Published

on

By

Top 4 WordPress Shortcuts to Save You Time and Boost Productivity

While there are no shortcuts to success, there are shortcuts to a more efficient workflow. We may not think about them much, but these keyboard shortcuts have helped millions of people make their daily—even hourly—workflows faster and more efficient. 

Some of our favorite shortcuts at WordPress.com help us bypass menus, create post drafts with a single click, quickly access bulk management options, and effortlessly find useful blocks in the editor. Let’s take a look and see how you can use these same shortcuts right now.

1. Command Palette with ctrl+K (or cmd+K)

First up is the Command Palette—think of it like a Swiss Army knife for your site. 

What It Does: Instead of clicking around menus and hunting for the right setting or page, you can press ctrl+K on Windows or cmd+K on Mac to instantly open a WordPress-specific search bar. From there, you can access pages, posts, settings, and even plugins. It’s your shortcut to just about anything you need in WordPress. The Command Palette is accessible when you are logged into your site and have a Block theme activated. 

How to Use It: Press ctrl+K on Windows or cmd+K on Mac to open the command palette. Start typing what you’re looking for, like “new post” or “theme settings,” and hit enter when the option pops up. Voilà! You’re instantly taken where you need to go.

Productivity Boost: This shortcut is a lifesaver when you’re deep in your workflow and don’t want to break your concentration by clicking through menus. It’s especially useful for developers or site owners juggling multiple tasks.

2. Quick Post drafts from the toolbar

If you’ve ever been struck by a brilliant idea while browsing your site, you know the frustration of having to navigate to the dashboard to jot it down. Enter the Quick Post Draft shortcut! This lets you start a new post directly from the admin toolbar without breaking your flow.

What It Does: Start drafting a post from anywhere on your WordPress site (while logged in) by clicking the “+ New” icon in the admin toolbar and selecting “New Post.” No more navigating to the dashboard, and no more interruptions.

How to Use It: While logged in, click the “+” icon in the toolbar, select “New Post,” and start typing. That’s it! You’re already in draft mode, ready to get your thoughts down. Simply save the post as a draft for later, or let those creative juices fly right then and there.

Productivity Boost: This is perfect for those moments when inspiration strikes, whether you’re looking at your homepage or checking your latest blog post. Instead of wasting time going to the dashboard and clicking through menus, you’re writing instantly.

Where to find the +New button.

3. Bulk Edit posts, pages, or products

If you’re managing a large WordPress site with a lot of content, you’re probably familiar with the hassle of updating multiple posts or products, one by one. The Bulk Edit feature can save you loads of time by letting you edit several posts, pages, or WooCommerce products all at once.

Note: In order to use the Bulk Edit feature for Posts, ensure you’re using the Classic view. Follow this support guide for more details.

What It Does: You can modify categories, tags, status, author, and more across multiple items in just a few clicks. Whether you’re managing a blog, an eCommerce store, or a portfolio, bulk editing makes site management much faster.

How to Use It: Go to the Posts, Pages, or Products section of your WordPress dashboard. 

Screenshot of the WordPress.com dashboard.

Select the items you want to update using the checkboxes on the left-hand side, choose “Bulk actions,” then select “Edit.” Clickk Apply.

Where to find Bulk Actions.

From there, you can change multiple settings at once, including categories, tags, and visibility.

Screenshot of the Bulk Edit window.

Productivity Boost: This shortcut is a game-changer for anyone managing content-heavy or product-rich sites. You can handle mass updates without touching each individual post or product, making it a must-have for developers, content managers, and site owners.

4. Use / to search for blocks in Gutenberg

If you’re using the Gutenberg block editor, you might have found yourself scrolling endlessly through the block library to find the exact block you need. Well, guess what? You don’t have to! The slash-command (/) lets you search for any block instantly, speeding up your workflow.

What It Does: Typing / followed by the block name (like /image or /heading) pulls up the block you need instantly and without endless scrolling.

How to Use It: While in the Gutenberg editor, type / followed by the name of the block you want to add (e.g., /image or /quote). Select the block from the dropdown, and boom, you’re good to go!

Example of the / search function in use.

Productivity Boost: This shortcut is a massive time-saver for anyone working in the block editor. Whether you’re building complex layouts or writing a blog post, it eliminates the need to manually search for blocks.

Ready to save time with keyboard shortcuts?

There you have it—four simple yet powerful shortcuts that can dramatically improve your WordPress experience. Whether you’re looking to speed up content creation, navigate more efficiently, or manage large batches of posts, these tips will help you work smarter, not harder. 

And remember, WordPress is packed with these kinds of hidden gems, so don’t hesitate to explore and find even more ways to streamline your workflow.

Time is precious—let WordPress help you make the most of it. Looking for a powerful managed WordPress host? Check out WordPress.com’s plans that offer unmatched speed, unstoppable security, and unlimited site visitors.


Join 112.8M other subscribers

Source link

Keep an eye on what we are doing
Be the first to get latest updates and exclusive content straight to your email inbox.
We promise not to spam you. You can unsubscribe at any time.
Invalid email address
Continue Reading

Trending