Connect with us

WORDPRESS

How to Prevent Overselling Out of Stock Items in WordPress
Published

on

How to Prevent Overselling Out of Stock Items in WordPress

Recently, one of our readers asked us how they can prevent overselling out of stock items in their online store.

When a customer purchases an item that isn’t available, it can lead to disappointment, loss of trust, and a negative user experience. However, you can reduce refunds and improve customer satisfaction by not allowing out of stock items to be sold.

In this article, we will show you how to easily prevent overselling out of stock items in WordPress, step by step.
Prevent Overselling Out of Stock Items in WordPress

Why Prevent Customers From Buying Out of Stock Items in WordPress?

If you have an online store, then overselling out of stock items can lead to customer disappointment and complicate order fulfillment.

For example, if you sell clothes and a customer places an order for a shirt that isn’t available, then you may have to manually adjust orders, track down a replacement, or contact the customer about product substitutions.

This can damage your brand reputation heavily and users may even leave negative customer reviews on your WordPress site.

By improving your inventory management, you can ensure that you always have the items customers want and can inform them if they go out of stock. Doing this will boost your sales, reduce complaints, and enhance your store’s credibility.

Having said that, let’s see how to easily prevent overselling out of stock items in WordPress with WooCommerce, Easy Digital Downloads, and WP Simple Pay.

You can use the links below to jump to the method of your choice:

Prevent Overselling Out of Stock Items in WooCommerce

If you have a WooCommerce store, then this method is for you.

You can easily prevent overselling products by visiting the WooCoomerce » Settings page from the WordPress dashboard and switching to the ‘Products’ tab.

Once you do that, click on the ‘Inventory’ link. This will open some new settings on your page where you must check the ‘Enable stock management’ option.
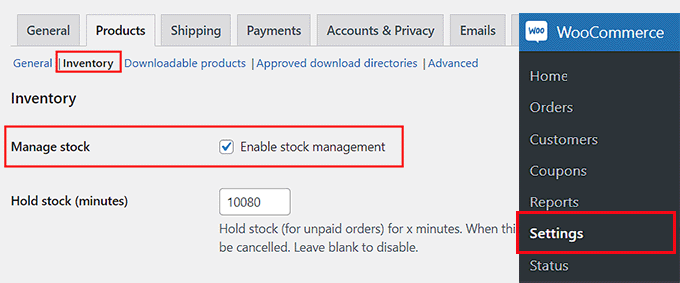
Check the 'Enable Stock Management' option on the Settings pageCheck the 'Enable Stock Management' option on the Settings page

After that, scroll down to the ‘Notifications’ section and check the ‘Enable low stock notifications’ and ‘Enable out of stock notifications’ options.

You will now receive an email notification when a product has low stock or goes out of stock.

Now, you can add the email address where you want to receive these notifications next to the ‘Notification recipient(s)’ option. You can also add multiple email addresses by separating them with a comma.
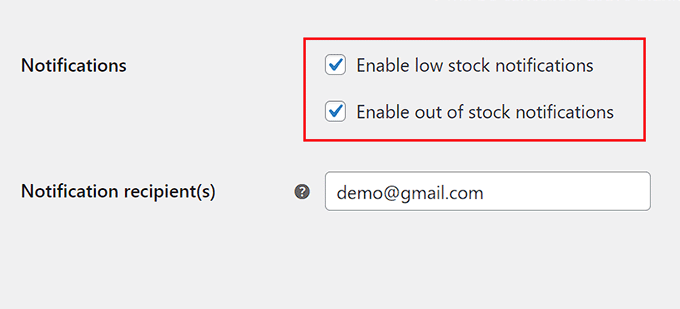
Enable low stock and out of stock notifications for your productsEnable low stock and out of stock notifications for your products

Next, you can add the low stock threshold according to your liking. You will be sent an email when the product stock reaches this amount.

For instance, if you are selling a customized jewelry piece and have set the low stock threshold to 2, then you will get an email when your store has only 2 of the jewelry pieces left.

Next, you will see the ‘Out of stock threshold’ option, which you can leave as is. This setting will change a product’s status to ‘Out of Stock’ automatically once the stock reaches zero.

Additionally, you can check the ‘Hide out of stock items from the catalog’ option. This means that out of stock items won’t be displayed in your shop’s product catalog when users browse through your store.
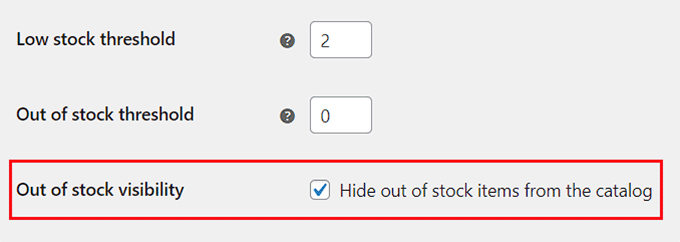
Configure low stock and out of stock threshold and out of stock products visibilityConfigure low stock and out of stock threshold and out of stock products visibility

Then, you can also configure the ‘Stock display format’ option from the dropdown menu.

For instance, if you want to show the stock quantity of each product to your users, then you can select that option.

You can choose the ‘Only show quantity remaining in stock when low’ option if you want the users to know when only 2 items for that product are left in the inventory. This option can create a sense of urgency among visitors and may encourage them to buy your products.

However, if you don’t want to display stock quantity at all, then you can pick the ‘Never show quantity remaining in stock’ option.

Finally, click the ‘Save changes’ button to store your settings.
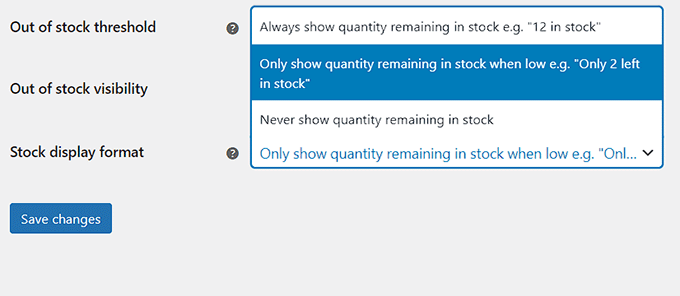
Configure stock display format according to your likingConfigure stock display format according to your liking

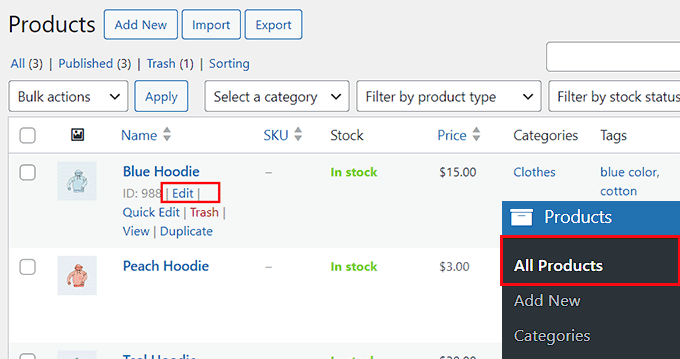
Now you must visit the Products » All Products page from the WordPress dashboard to configure the stock quantity of individual items.

To do this, click the ‘Edit’ link under any product.

Edit a product by clicking on the linkEdit a product by clicking on the link

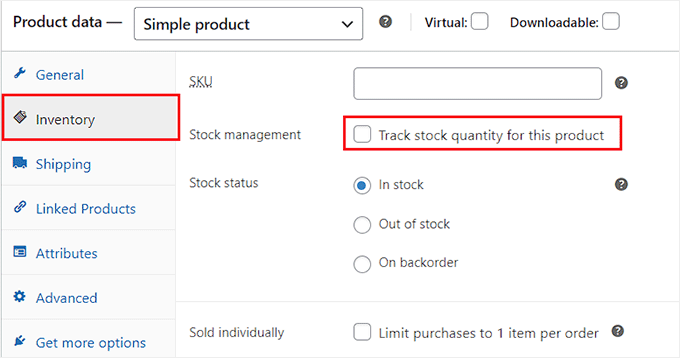
This will open a new screen, where you must scroll down to the ‘Product Data’ section and switch to the ‘Inventory’ tab.

Next, check the box next to the ‘Stock management’ option.

Check the stock management optionCheck the stock management option

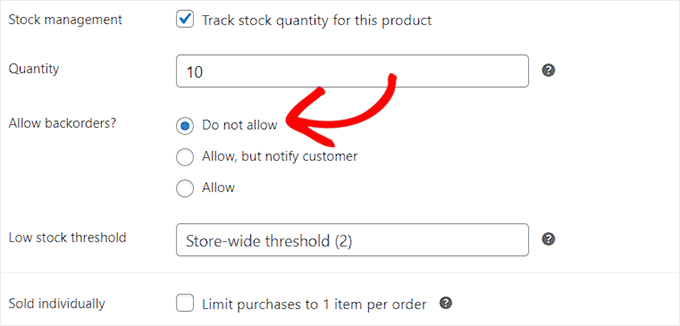
This will open some new settings and you can start by adding the quantity for the product you are editing. For instance, if you are selling a blue colored hoodie and have 10 items of it in stock, then you can add that value next to the ‘Quantity’ option.

Once you do that, you must select the ‘Do not allow’ option for the ‘Allow backorders?’ setting.

Backorders are like pre-orders for out of stock items. Now, customers won’t be able to place orders for unavailable items and there will be less chance of user dissatisfaction.

Disable backorders for productsDisable backorders for products

After that, you can add a low stock threshold for the product. If you don’t configure this setting, then the storewide low stock threshold that you configured earlier will be applied for the individual product.

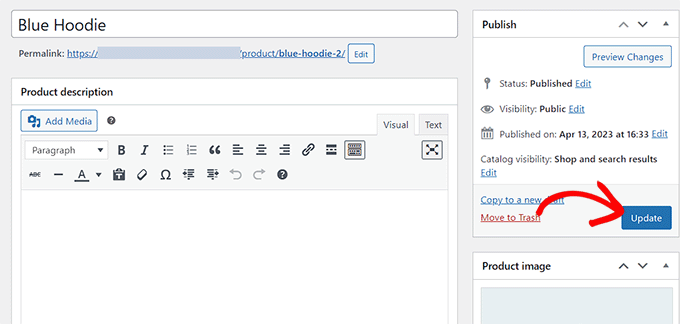
Finally, click the ‘Update’ button at the top to store your settings. You have now successfully prevented overselling out of stock products in WooCommerce.

Click Update button to store your settings after managing the product inventoryClick Update button to store your settings after managing the product inventory

Prevent Overselling Out of Stock Items in Easy Digital Downloads

If you sell items via Easy Digital Downloads, then this method is for you.

Easy Digital Downloads is the best WordPress plugin for selling digital products like music, eBooks, spreadsheets, software, and more.

Usually, vendors do not need to create a purchase limit for digital files. However, if you are selling items on your such as tickets to an event with a specific limit or an expiration date, then you will have to prevent overselling sold-out tickets.

You can easily do this using the plugin’s Purchase Limit extension.

First, you will need to install and activate the Easy Digital Downloads plugin. For detailed instructions, see our step-by-step guide on how to install a WordPress plugin.

Note: EDD has a free plan. But you will need the pro plan of the plugin to unlock the Purchase Limit addon.

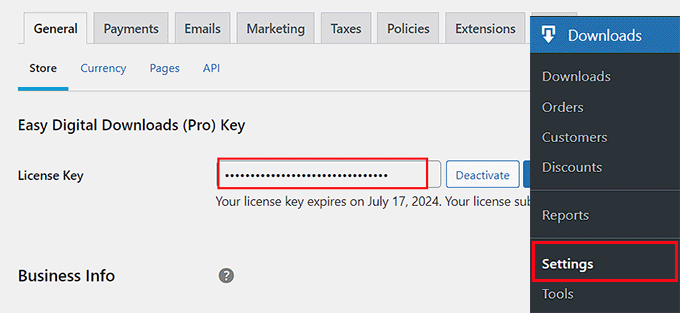
Upon activation, head to the Downloads » Settings page from the WordPress admin sidebar and enter your license key.

You can find this information in your account on the Easy Digital Downloads website.

Add a license key for your easy digital downloads pluginAdd a license key for your easy digital downloads plugin

Next, you must set up your store and add digital products. For detailed instructions, you can see our beginner’s guide on how to sell digital downloads in WordPress.

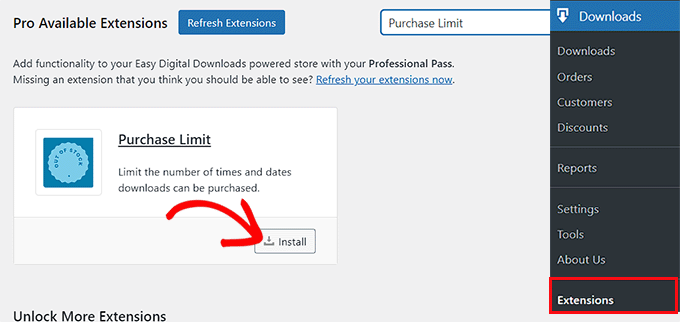
Once you have done that, visit the Downloads » Extensions page from the WordPress dashboard.

Here, you must locate the ‘Purchase Limit’ extension and click the ‘Install’ button under it.

Download and activate the purchase limit extensionDownload and activate the purchase limit extension

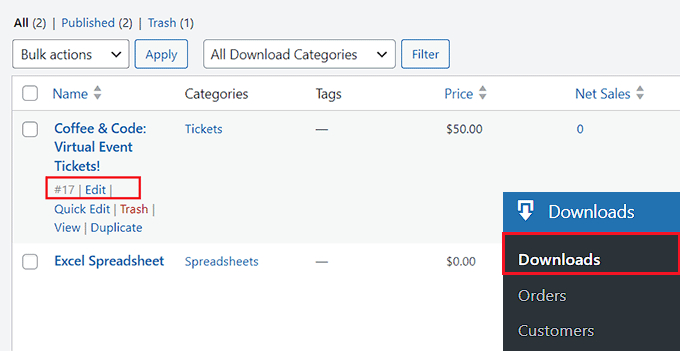
After that, go to the Downloads menu tab from the admin dashboard. Here, you will see a list of all the digital downloads you created for your site.

Simply click the ‘Edit’ link under the product where you want to set a purchase limit.

Click the Edit link under the digital productClick the Edit link under the digital product

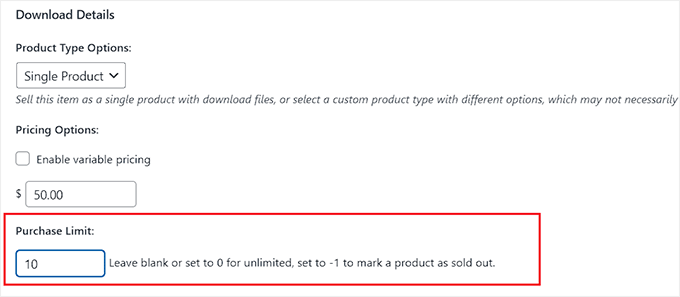
This will open the block editor, where you must scroll down to the ‘Download Details’ section.

Here, you can type the number of tickets or copies of the digital product that you are selling under the ‘Purchase Limit’ option.

For instance, if you have ten tickets to sell for an event, then you can add 10 as the value in the field. When your store sells these 10 tickets, your purchase button text will change to ‘Sold Out’ automatically.

This way, you won’t be able to oversell out-of-stock products to customers.

Set a purchase limit for your productSet a purchase limit for your product

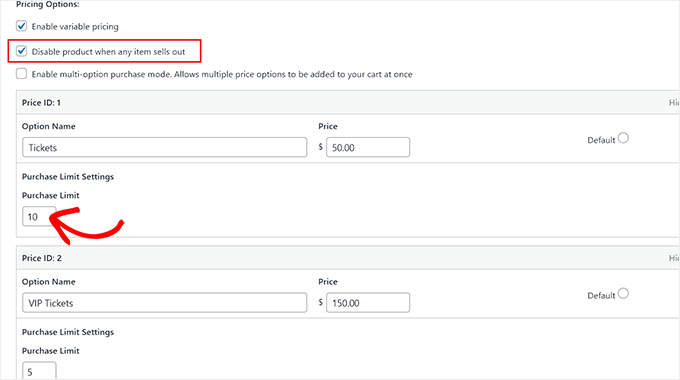
If you have added multiple price options for your digital product, then you can also set different purchase limits for various packages.

For example, if you have 10 normal tickets and 5 VIP ones to sell for an event, then you can set different purchase limits for them.

You can also check the ‘Disable product when any item sells out’ option. This feature is only available if you have multiple pricing plans for a product.

This means that your product will be removed from the catalog once it sells out.

Set different purchase limits for the various pricing packages of a digital productSet different purchase limits for the various pricing packages of a digital product

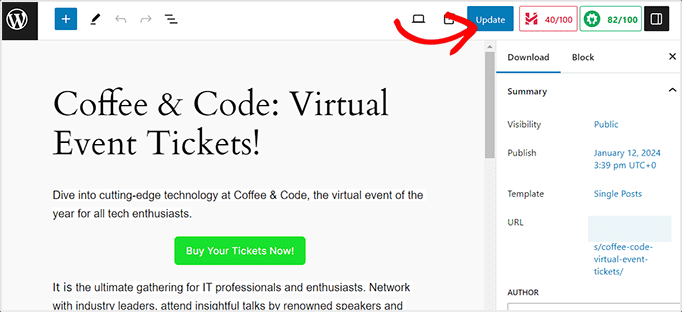
Finally, go back to the top of the page and click the ‘Update’ or Publish’ button to store your settings.

You have now successfully prevented overselling your out of stock digital product.

Publish or Update your digital productPublish or Update your digital product

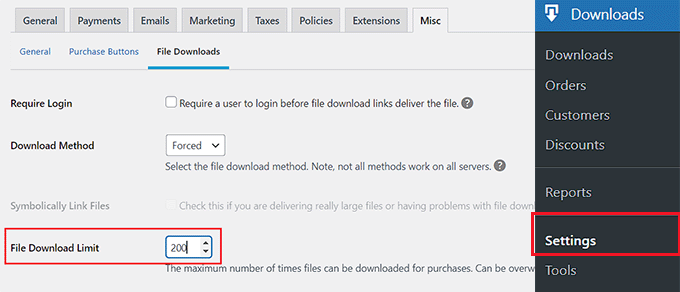
If you want to set a default purchase limit for all the digital products on your website, then you can do that by visiting the Downloads » Settings page and switching to the ‘Misc’ tab.

Next, click on ‘File Downloads’ to open more settings on the page.

From here, set a default limit for all your products by typing a value next to the ‘File Download Limit’ option.

Add a default download limit for all your digital productsAdd a default download limit for all your digital products

This will be the maximum number of times each file can be purchased and downloaded from your site. Once that limit is reached, the product status will then automatically change to ‘Sold Out’.

Once you are done, don’t forget to click the ‘Save Changes’ button to store your settings.

Prevent Overselling Out of Stock Items in WP Simple Pay

If you use WP Simple Pay on your website, then this method is for you.

WP Simple Pay is the best WordPress Stripe plugin on the market that makes it super easy to add a payment form to your website.

It is an ideal choice if you have a membership site that accepts subscription payments or if you host workshops like cooking lessons, dance classes, coding, and more.

You may have a limited number of subscriptions to offer or a limited number of openings for your class and do not want to oversell your services or subscriptions. In that case, you can easily avoid overselling using WP Simple Pay’s purchase restrictions feature.

First, you need to install and activate the WP Simple Pay plugin. For detailed instructions, see our step-by-step guide on how to install a WordPress plugin.

Note: WP Simple Pay has a free plan but you will need the pro plan of the plugin to unlock the purchase restrictions feature.

Upon activation, a setup wizard will be launched on the screen where you must click the ‘Let’s Get Started’ button.
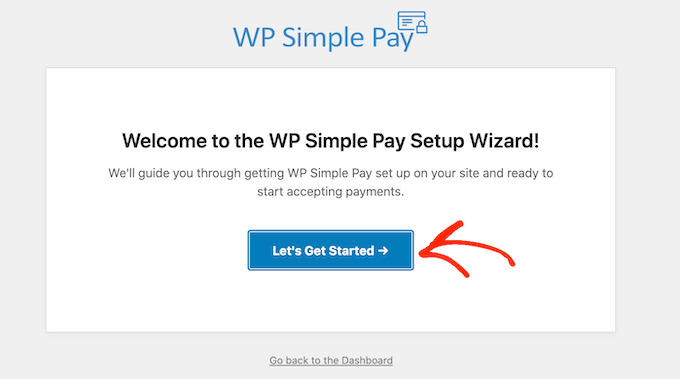
WP Simple PayWP Simple Pay

You will be guided to the first step, where you must add your license key and click the ‘Activate and Continue’ button.

You can find this information in your account on the WP Simple Pay website.
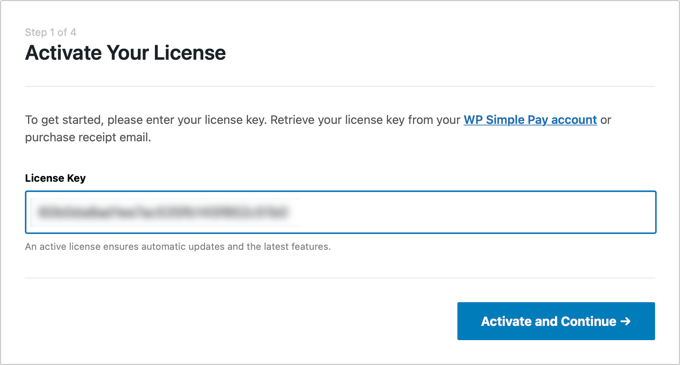
You’ll Be Asked to Enter Your WP Simple Pay License KeyYou’ll Be Asked to Enter Your WP Simple Pay License Key

Next, you have to connect your Stripe account with the plugin.

To do this, click the ‘Connect with Stripe’ button.
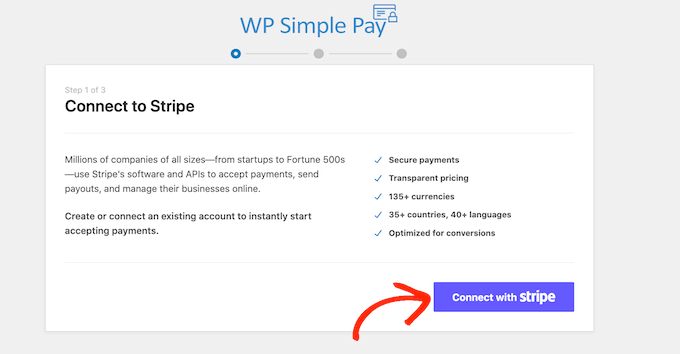
How to connect your WordPress website to StripeHow to connect your WordPress website to Stripe

After that, you must log in to your Stripe account to connect it with WP Simple Pay. Once you do that, you must configure the other setup wizard steps.

For more information, see our tutorial on how to create WordPress forms with a payment option.

Next, visit the WP Simple Pay » Add New page from the WordPress admin sidebar. This will take you to the ‘Select a template’ page where you can click the ‘Use Template’ under any template.

For this tutorial, we will be creating a simple payment form.
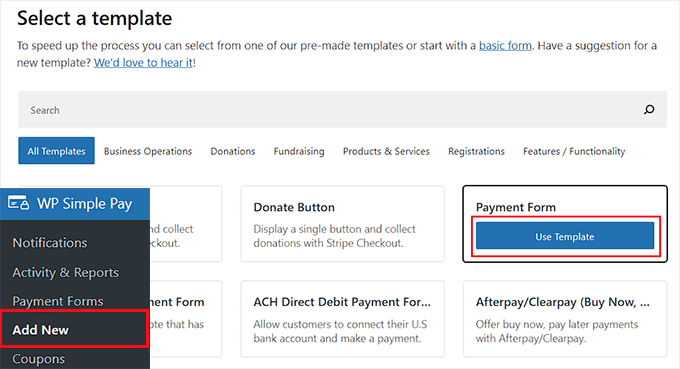
Use the payment form template by clicking the 'Use Template' button under itUse the payment form template by clicking the 'Use Template' button under it

This will launch the form builder, where you can start by adding a title and description for your form.

After that, you can select ‘On-site payment form’ as the type and then switch to the ‘Payment’ tab.
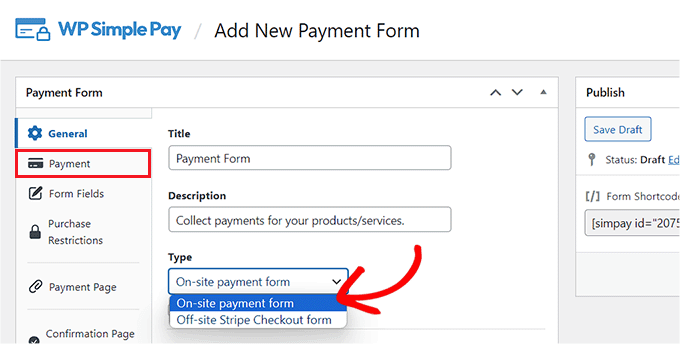
Add a name for your form and switch to the Payment tabAdd a name for your form and switch to the Payment tab

Here, you can scroll down to the ‘Price Options’ section and add an amount for your product or service.

You can also add multiple price options by clicking on the ‘Add Price’ button.
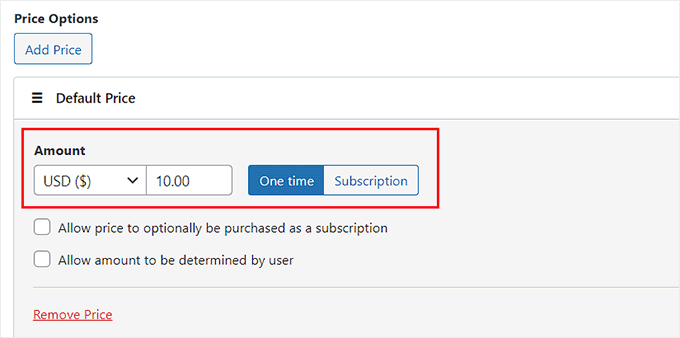
Add amount for your payment formAdd amount for your payment form

Then, you can scroll down to the ‘Payment Methods’ section and check the box next to the payment method you want to add to your site.

You can add AliPay, Klarna, AfterPay, and any other methods that you like.
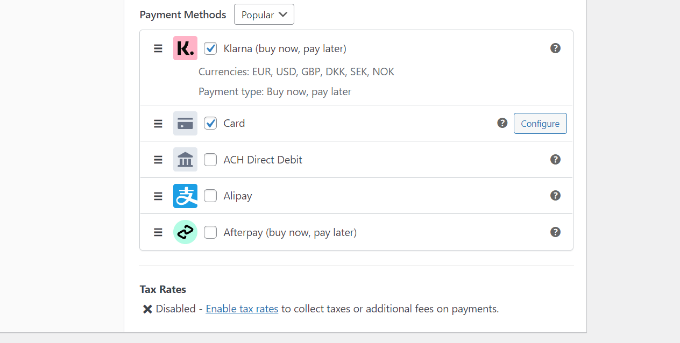
Select Klarna payment methodSelect Klarna payment method

Once you have done that, you can switch to the ‘Form Fields’ tab to add, rearrange, or delete fields in the form according to your liking.

For more detailed instructions, see our tutorial on how to accept payments with Stripe in WordPress.
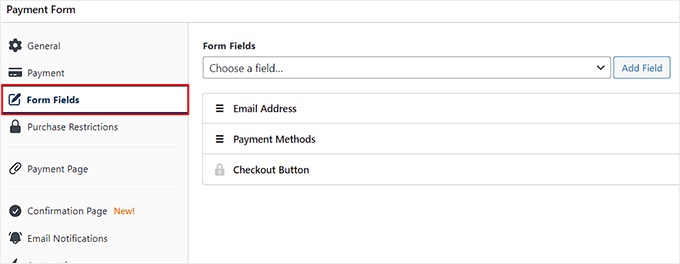
Choose form fields for your payment formChoose form fields for your payment form

Next, switch to the ‘Purchase Restrictions’ tab and check the ‘Hide the payment form after a set number of payments’ option.

Once you do that, type the number of subscriptions that you want to sell with your form.

For example, if you run a dance class and have room for 15 students only, then you can type the number 15 into the ‘All payments count towards a single limit’ field. This means that once 15 users fill out your form and pay the fees, the form will be hidden from other users, preventing overselling.

However, if you have multiple pricing plans in your form, then you can select the ‘Each price option has its own limit’ option and add the availability number for individual pricing packages.
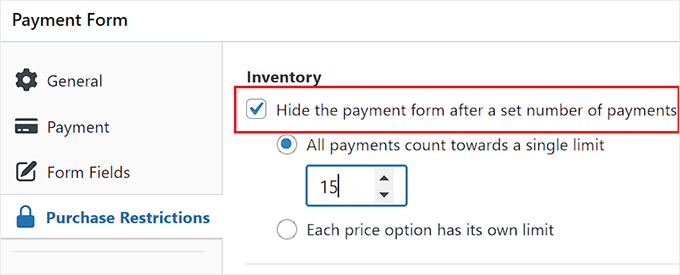
Configure the purchase restrictions to prevent overselling with your payment formConfigure the purchase restrictions to prevent overselling with your payment form

Next, you can switch to the ‘Payment Page’ tab and check the ‘Enable a dedicated payment page’ option.

You can now create a custom page for your payment form by adding a permalink, color scheme, image, and footer text. Once you are done, don’t forget to click the ‘Publish’ button to store your settings.

You have now successfully prevented overselling your membership subscriptions or classes with WP Simple Pay.
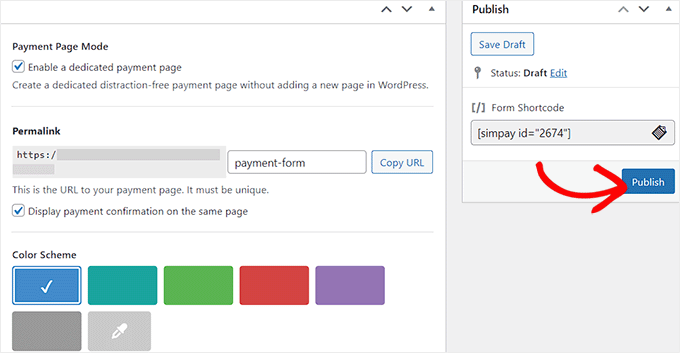
Publish your payment form with purchase restrictionPublish your payment form with purchase restriction

Bonus! Inventory Management Tips for Your Online Store

Apart from preventing overselling out of stock products, here are some other inventory management tips that can help boost traffic to your online store and lead to more conversions.

For instance, you should regularly count your physical inventory to avoid any discrepancies between your online store record and actual products. You can also categorize your products based on popularity, value, and lead time for better management.

You must also analyze the past sales trends in your store to predict future demand and adjust your inventory levels accordingly. You can easily do this using MonsterInsights, which is the best analytics solution on the market.
The MonsterInsights Google Analytics pluginThe MonsterInsights Google Analytics plugin

The plugin can show you an overview report for metrics like total sales, revenue, average order value, and conversion rate. You can adjust the reports to analyze older data by setting a custom date range easily.

For more details, see our guide on how to properly set up eCommerce tracking in WordPress.

Additionally, you should keep an eye on industry trends and competitor activity to predict any changes in demand for your product.

You can do this with Google Trends. For more information, see our tutorial on how to use Google Trends to improve SEO and grow your business.
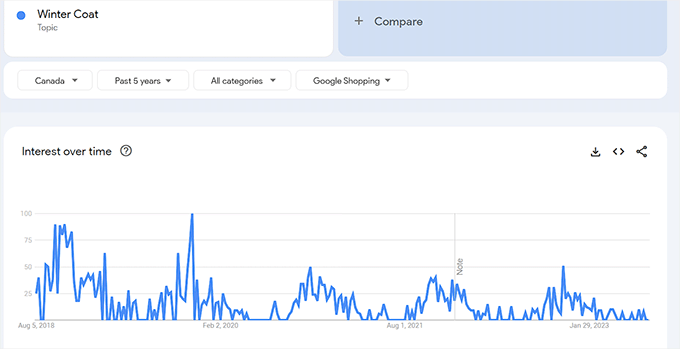
Google Shopping ads trendsGoogle Shopping ads trends

Some other tips for better inventory management include adding discount offers for less popular items and organizing your inventory according to product type.

Using all these tips will help you get ahead of your competitors and ultimately get more sales.

We hope this article helped you learn how to prevent overselling out of stock items in WordPress. You may also want to see our beginner’s guide on how to increase WooCommerce sales and our top picks for the best WooCommerce themes for your store.

If you liked this article, then please subscribe to our YouTube Channel for WordPress video tutorials. You can also find us on Twitter and Facebook.


Source link

Keep an eye on what we are doing
Be the first to get latest updates and exclusive content straight to your email inbox.
We promise not to spam you. You can unsubscribe at any time.
Invalid email address

WORDPRESS

New WordPress.com Themes for June 2024 – WordPress.com News

Published

on

By

New WordPress.com Themes for June 2024 – WordPress.com News

Five of our favorite new themes.

The WordPress.com team is always working on new design ideas to bring your website to life. Check out the latest themes in our library, including great options for crafters, legal firms, and artists.


Craftfully is a magazine-style WordPress theme designed for all things homemade, DIY, crafts, and hobbies. Utilizing plenty of white pace, lighter colors, and playful fonts, this theme delightfully evokes a sense of playfulness and DIY creativity. Below a prominent featured section and newsletter sign-up box, a two-column layout displays the “Latest Posts” as well as a short bio and social links. Craftfully is more than just a theme, it’s a canvas for your imagination.

Click here to view a demo of this theme.


New WordPresscom Themes for June 2024 – WordPresscom News

Though Portia is simple in its design and layout, it sends a powerful message: your firm is the best in the industry. With a focus on conveying professionalism, stability, and dependability, Portia is built with legal firms in mind, but is versatile enough to work for any business that relies on trustworthiness and respectability. You won’t find any rock-the-boat design elements here. It’s all about communicating the right information at the right time.

Click here to view a demo of this theme.


New WordPresscom Themes for June 2024 – WordPresscom News

Kiosko is a sleek and modern WooCommerce theme tailored for online stores specializing in art prints and home goods. With its high contrast black and white design, Kiosko offers a minimalist aesthetic that puts the spotlight on your products. It’s straightforward and effective, meaning you can focus on your art and your sales rather than your infrastructure.

Click here to view a demo of this theme.


Our newest collection of beautiful, opinionated themes for bloggers, businesses, and creatives.

Dark Academia is a blog theme with a dark, moody aesthetic. Its sophisticated layout will especially stand out to visitors. The sticky left half features your site’s name and the primary navigation menu, while the right half scrolls through your latest posts. This style is perfect for blogs focused on literature, history, and fashion, and it’s naturally deal for those who appreciate the Dark Academia vibe. The elegant and immersive reading experience will make your site memorable for anyone who happens by it.

Click here to view a demo of this theme.


1719291364 318 New WordPresscom Themes for June 2024 – WordPresscom News

OnyxPulse is a sleek WordPress theme with a modern, minimalist design, perfect for blogs about design, future trends, and innovation. Its grid layout and high-contrast visuals are ideal for showcasing cutting-edge content and engaging a tech-savvy audience. The striking black-and-white color palette and sharp design elements are sure to catch your visitors’ eye. For the typography, we’ve opted for Chakra Petch, a square sans-serif font; its sharply tapered corners are a perfect match for this theme.

Click here to view a demo of this theme.


To install any of the above themes, click the name of the theme you like, which brings you right to the installation page. Then click the “Activate this design” button. You can also click “Open live demo,” which brings up a clickable, scrollable version of the theme for you to preview.

Premium themes are available to use at no extra charge for customers on the Explorer plan or above. Partner themes are third-party products that can be purchased for $99/year each on the Creator plan and above.

You can explore all of our themes by navigating to the “Themes” page, which is found under “Appearance” in the left-side menu of your WordPress.com dashboard. Or you can click below:


Join 111.5M other subscribers

Source link

Keep an eye on what we are doing
Be the first to get latest updates and exclusive content straight to your email inbox.
We promise not to spam you. You can unsubscribe at any time.
Invalid email address
Continue Reading

WORDPRESS

Five Takeaways from WordCamp Europe 2024 (From a First-Time WordCamp Attendee) – WordPress.com News

Published

on

By

Five Takeaways from WordCamp Europe 2024 (From a First-Time WordCamp Attendee) – WordPress.com News

This year’s WordCamp Europe was held in Torino, Italy, the capital city of the Piedmont region in northern Italy. Torino is known for its rich automotive history, beautiful architecture, and, of course, incredible food.

From June 13-15, 2024, over 2,500 folks from the WordPress community, including many of us from the WordPress.com team, came together to learn, connect, and give back to the WordPress project that powers over 43% of the entire internet.

I joined the WordPress.com team back in January of this year, so WordCamp Europe 2024 was my first WordCamp experience. In today’s post, I thought it might be interesting to hear about the conference from a first-timer, especially if you’re considering attending a WordCamp or WordPress meetup in the future. 

Here are my top five takeaways from my very first WordCamp:

1. In-person connection is powerful.

If your typical workday looks similar to mine––sitting at a desk at your house all day by yourself––going to a conference as large as WordCamp Europe may be a wee bit out of your comfort zone. It certainly was out of mine.

That said, I’ve recently found myself craving in-person connection after the pandemic and working almost exclusively from home for over eight years. Not only did attending this conference just get me out of my normal routine, it allowed me to connect with folks who love the tool I’ve used personally and professionally for over a decade: WordPress.

I staffed the WordPress.com booth, so I had a ton of opportunities to chat with other business owners, developers, creators, and makers over the course of the conference. I actually talked with a few fellow self-taught women developers like me, and I walked away feeling inspired, motivated, and just really thankful to be a part of this community.

But the best conversations happened in places I wouldn’t have expected: over spritzes, grabbing a cafe at the venue, or just walking around the city.

Embracing connection was a big focus of Matt’s final keynote speech during the event, and I couldn’t agree more. Events like WordCamps allow for swapping ideas, collaborating and troubleshooting, and experiencing a sense of community that you just don’t get while sitting behind a computer. 

That said, if large-scale conferences like a flagship WordCamp just aren’t for you, try checking out a local WordPress meetup to connect with other like-minded folks in your community.

2. It takes a ton of people to make WordCamps great.

One of the most moving parts of WordCamp Europe was at the very end when all of the volunteers and organizers were called to the stage; it’s truly amazing just how many people need to be involved to make an event like WordCamp actually happen.

People in black tshirts on a stage with a blue background and other people sitting in chairs facing the stage
Screenshot from the WordCamp Europe 2024 livestream on YouTube

Everything was smooth and well-organized, and the volunteers and organizers could not have been more helpful. Their enthusiasm about the event, WordPress, and community in general throughout the conference was infectious.

WordCamps and local WordPress meetups are always looking for volunteers; donating your time and expertise for events and meetups like this are a great way to give back to the WordPress project and community.

And if you’re an organizer of your local WordPress meetup, check out this post for information on how you can get a free WordPress.com website for your local meetup.

3. Contributor Day isn’t intimidating for a first-timer.

I’ve never contributed to WordPress core, but it was one of my goals for this year. That’s why I was so excited to participate in Contributor Day at WordCamp Europe.

If you’re unfamiliar with Contributor Day, it’s an event that usually kicks off a WordCamp. Teams focus on contributing to the WordPress open source project, with groups focused on code, support, translations, sustainability, inclusion, and more.

After listening to all of the team presentations, I decided to join the Accessibility team. Accessibility is something that has always interested me, but it’s also something I don’t have a ton of experience with.

That said, my inexperience wasn’t just accepted, it was actively welcomed.

people sitting around circular tables and #wceu on a wall

Once I got to the Accessibility team table, I was immediately greeted and welcomed. Then I paired with a fellow contributor, Marco Acato from Acato Digital Agency, to test the accessibility of a new theme for the WordPress theme repository.

I learned so much, asked a ton of questions, and felt surprisingly accomplished after just a few hours of testing this theme. We were actually able to publish feedback for the theme developer at the end of the day as well. 

Contributor Day gave me an even deeper appreciation for the entire community that supports the WordPress project every single day. So much work and effort goes into maintaining and improving this tool that millions of websites across the world rely on to run their businesses, amplify their messages, and stay in touch with others. I felt so grateful to have been a part of it during Contributor Day and would encourage any other first-timers to attend a Contributor Day in the future as well.

Luckily, WordPress core is always looking for volunteers and contributors; check out this guide or the new Contributor Mentorship Program if you’re interested in becoming a contributor yourself.

4. Torino was a great host city, and the WordCamp team made navigating a new city easy.

Between attending Contributor Day and sessions, to checking out sponsor booths and attending side events, I didn’t think we’d have a ton of time to actually see the city or Torino.

I actually had plenty of time to explore with my coworkers, eat pizza every single day, and scope out the best gelato spots outside of conference hours. 

a gelato cup filled with two different colors of gelato with a spoon sticking out of it

The WordCamp Europe team did a great job preparing attendees to make the most of our time in the city as well; their travel guides helped me feel confident navigating the city and finding some of the foods that come from this area in Italy.

As a first-timer in Torino, I really appreciated the extra work that the WordCamp team did to ensure everyone had a chance to explore and experience the city.

5. Pizza really is poetry.

I would be remiss to not mention the food that we ate during our time in our host city! While we like to say that “Code is poetry” around here, so is pizza. 

One of my very favorite memories from the event was the branding. The design team for WordCamp Europe 2024 added subtle nods to our host country throughout the venue, which was incredibly clever and well-done.

a sign that says 'Code is Poetry (...but so is pizza)' and #wceu

And while pizza is indeed poetry, it’s even better when shared amongst coworkers, friends, and people who get excited about the same things that excite you.

five people sitting at a table with three large pizzas on top

Wrapping up

I loved my time at WordCamp Europe, and I’m already looking forward to the next time I can connect face-to-face with the WordPress community. 

Were you at WordCamp Europe this year? Leave a comment with your favorite memory from the event below.


Join 111.4M other subscribers

Source link

Keep an eye on what we are doing
Be the first to get latest updates and exclusive content straight to your email inbox.
We promise not to spam you. You can unsubscribe at any time.
Invalid email address
Continue Reading

WORDPRESS

Inside WordPress.com’s World-Class Security Features – WordPress.com News

Published

on

By

Inside WordPress.com’s World-Class Security Features – WordPress.com News

You can rest easy knowing that you have the web’s best security guards working on your behalf.

It’s never been easier to create a website—especially with WordPress.com—but keeping that site secure can be challenging. When you host with WordPress.com, though, we do the heavy lifting for you and let you focus on the fun of creating your dream website. Whether you’re a blogger, entrepreneur, or hobbyist, our top-notch security features safeguard your site day and night so that you don’t need to stress. 

Whether you’ve known about it or not, we’ve long been scanning and monitoring your site’s files to catch and remove threats. Let’s dig in just a bit more. 

Built-in protection at your fingertips

Scan history is available on higher-tier plans

Using Automattic’s homegrown Jetpack software, every WordPress.com site is scanned on a daily basis for dangerous plugins, themes, malware, and other vulnerabilities. Once weaknesses are spotted, our security team swiftly resolves the issues, updating or reverting files as needed depending on the problem. 

Perhaps the best part is that we offer this peace of mind for free, on every plan. This certainly isn’t the case everywhere. Many WordPress hosts charge for the type of protection that WordPress.com offers on all of our website plans.  

Plus, you don’t have to do a thing to activate or maintain these security features. Our scanning tools are up and running as soon as your site is created. You can rest easy knowing that you have the web’s best security guards working on your behalf.

Why does website security even matter? 

It’s possible you’ve never before thought of the importance of website security. The reality of the modern web, however, is that bad actors are out there looking to take advantage of you and your site’s visitors. 

If your site is hacked, it’s liable to cause serious damage to your reputation and your livelihood (not to mention your emotional well-being). Hackers can manipulate your website’s data, steal information from you or your users (including passwords), install and execute malicious code, and even distribute the malicious code to your visitors, infecting their sites and machines. It’s not an insignificant problem or threat, that’s for sure. 

Jetpack’s web application firewall (WAF) monitors every request to your site and blocks requests from anything malicious. Our team of security experts continually updates the web application firewall’s rules to ensure you are protected against the most up‑to‑date threats. You don’t have time for downtime. 

Even more robust security tools are available 

1718839563 143 Inside WordPresscoms World Class Security Features – WordPresscom News

On our higher-tier plans you also have access to the scan history, which shows a record of all previous threats on your site. Additionally, you’ll have access to real-time backups, real-time security scans, malware removal, spam protection, and vulnerability notifications for core code and plugins.

Set it and forget it 

At WordPress.com, we want you dreaming big rather than spending your energy worrying about your website’s security. This is why we provide automatically-installed best-in-class monitoring with no extra charge, on every single plan. 

And our security features will grow right alongside you; whether your dream is to blog about your adorable cats, highlight your stunning landscape photography, or build a home base for your budding technology startup, we have your back. Learn more about all our security features or get started building right now:


Join 111.4M other subscribers

Source link

Keep an eye on what we are doing
Be the first to get latest updates and exclusive content straight to your email inbox.
We promise not to spam you. You can unsubscribe at any time.
Invalid email address
Continue Reading

Trending