WORDPRESS
How to Sell a Single Product Online with WordPress (3 Ways)
Are you looking for ways to create a one-product store using WordPress?
Selling a single product is perfect for small businesses and solopreneurs who focus on limited physical or digital goods. However, many business owners don’t know where to get started.
In this article, we will show you how to sell a single product online with WordPress.
Why Sell a Single Product Online using WordPress?
When you think of selling products online, you might think of marketing a wide variety of items. However, that’s not always necessary.
You can sell a single product online and create a one-product online store. This is easier to run and manage, as you don’t have to look at inventory for multiple products, update website pages for each goods, or create business processes for handling multiple items.
It is also cheaper to sell a single product online. You will not need a lot of resources to create and run an online store. For example, you can opt for the cheapest or free website hosting to set up an eCommerce website.
Focusing on a single product helps create an authority in a particular niche. You will be better able to cater to your audience’s needs and improve your product. It also helps in creating specialized marketing campaigns that convert.
That said, let’s look at different ways to sell a single product online with WordPress. We will cover 3 methods, so you can click the link below to jump to any section:
Method 1: Sell a Single Product with Shipping using WooCommerce
WooCommerce is the most popular eCommerce platform in the world, used by millions of small and large businesses. It was developed as an extension of WordPress, where users can sell products and services online.
WooCommerce is a perfect choice if you sell physical goods online and want to offer shipping. The platform offers lots of features and supports multiple WordPress plugins and tools.
To get started, you will need a WordPress hosting service, a domain name, and an SSL certificate.
A web hosting service allows you to store all your website files and data. A domain name is the website address that users will enter on the internet to visit your site (like wpbeginner.com). An SSL certificate secures your website and lets you accept online payments safely.
You can follow our step-by-step guide to WooCommerce to choose the right hosting service and properly install WooCommerce in WordPress.
That said, here is a breakdown of basic steps you can follow to create a single product store using WooCommerce.
Setting Up Payment Methods in WooCommerce
Once you’ve signed up for a hosting plan and set up WooCommerce on your WordPress site, you can go ahead and add payment methods.
Simply head to the WooCommerce » Settings page from the WordPress admin panel. From here, go to the ‘Payments’ tab.
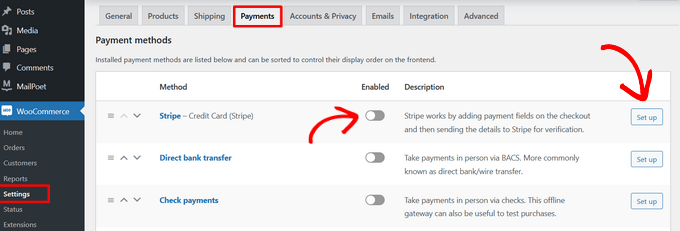
Next, you can set up different payment gateways to collect online payments.
For example, you can use Stripe, PayPal, Apple Pay, Google Pay, direct bank transfer, and other methods.
Adding Shipping Zones to WooCommerce Store
With WooCommerce, you can set up different shipping zones for your one-product store.
Simply go to WooCommerce » Settings from your WordPress dashboard and click the ‘Shipping’ tab.
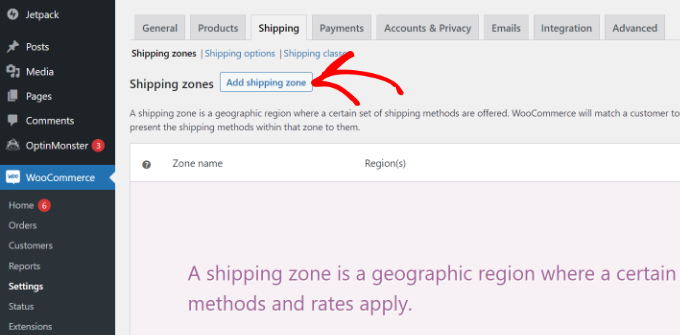
Next, you can go to the ‘Shipping zones’ option under the Shipping tab. From here, simply click the ‘Add shipping zone’ option.
After that, you can enter the details of the shipping zone, like a name, regions, and shipping methods.
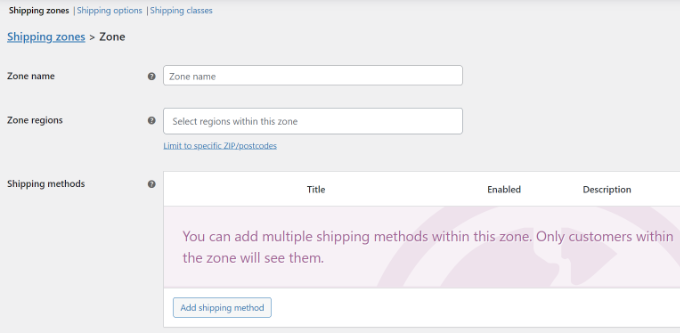
WooCommerce offers 3 types of shipping methods.
For instance, you can offer free shipping, charge a flat rate, or offer local pickup.
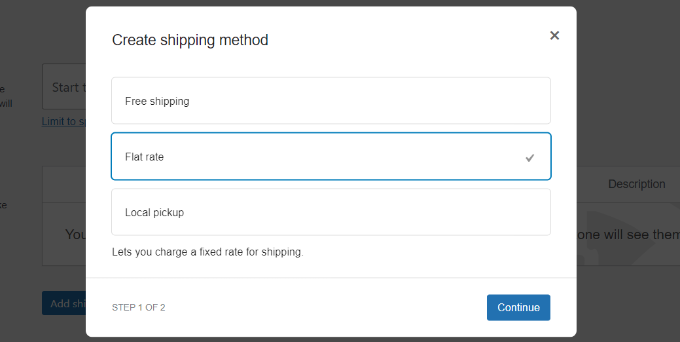
We will choose the ‘Flat rate’ option for this tutorial.
Go ahead and enter the details, and then click the ‘Save Changes’ button.
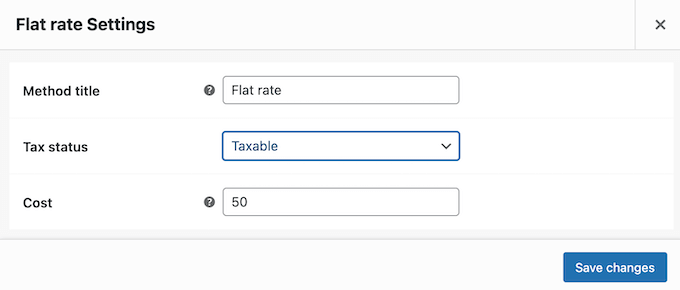
Now, you can repeat this step to add as many shipping regions as you want.
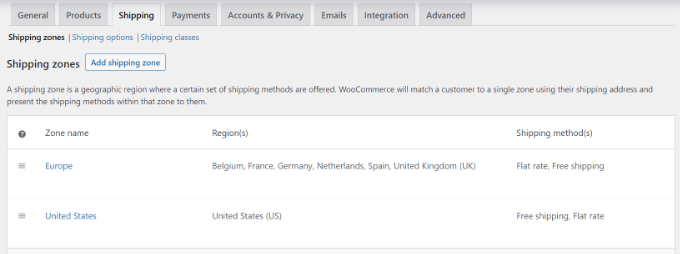
After that, head back to the Shipping Zones page in WooCommerce Shipping settings. Here, you will see the details of your different shipping regions.
Select and Customize a WooCommerce Theme
The next step is to choose a theme for your one-product eCommerce store.
The best part is that you get to choose from different free and premium themes. However, it can get overwhelming to pick the right theme, so we have handpicked the best WooCommerce themes for you.
If you still need help choosing a theme, then please see our guide on 9 things to consider when selecting a perfect WordPress theme.
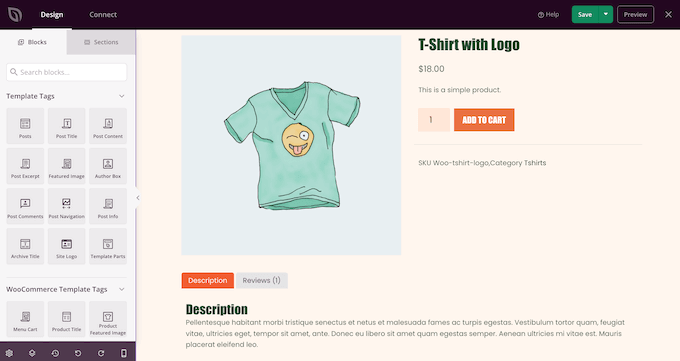
Besides that, there are many WordPress theme and landing page builders (like SeedProd) that you can also use to create a custom eCommerce store.
You can choose a template, edit it using the drag-and-drop feature, add WooCommerce blocks, and more without editing code.
To learn more, please see our guide on how to create a custom WordPress theme without coding.
Adding Your Product to WooCommerce
Next, you can add your single product to the WooCommerce store.
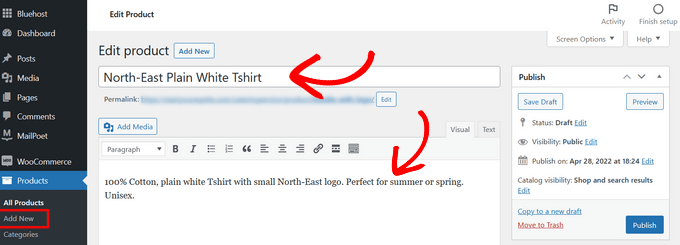
Simply head to Products » Add New from the WordPress dashboard to get started. From here, enter the title of your product and a description.
After that, you can scroll down to the ‘Product Data’ box.
Here, you’ll find options for entering the price, sales price, shipping costs, managing inventory, and more.
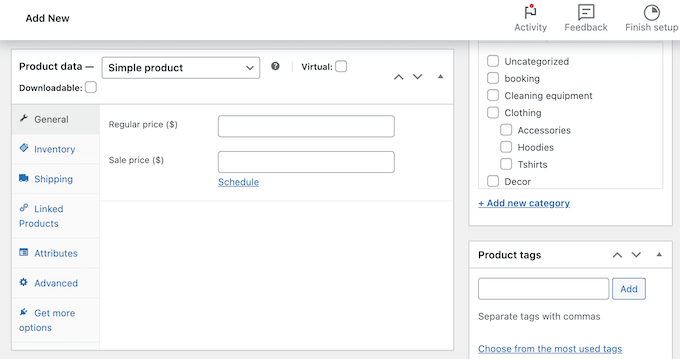
Next, you can add product images from the panel on the right.
WooCommerce also lets you create a product gallery to go along with the main product image.
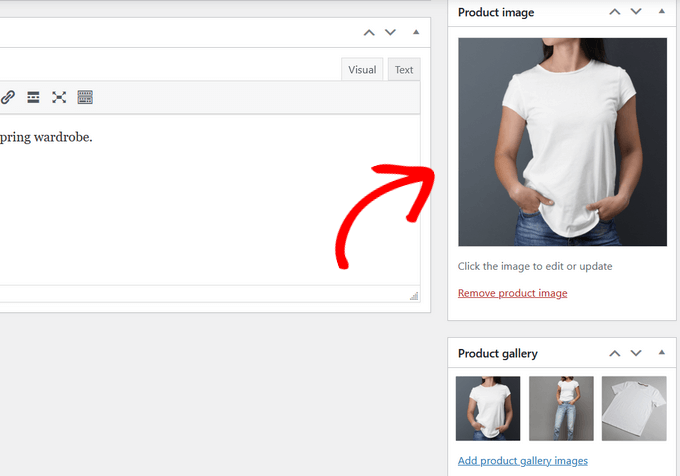
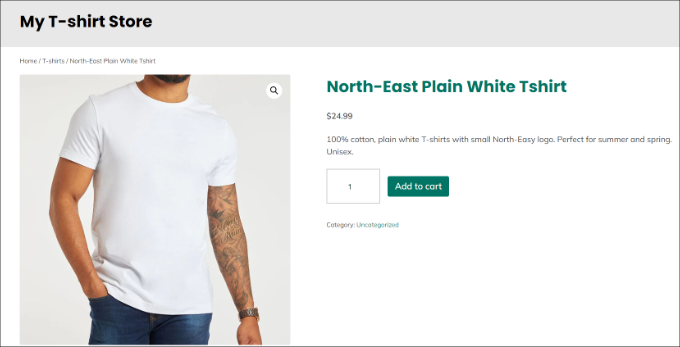
Once you’ve added the images, simply publish your product.
Now, you can simply visit your website to view the single product WooCommerce store.
Method 2: Sell a Single Digital Product using Easy Digital Downloads
This method is perfect if you’re selling a digital product like an ebook, digital art, illustration, software, music, online course, and more.
The best way to sell a single digital product is by using Easy Digital Downloads. It is a popular eCommerce platform that makes it super easy to sell any kind of digital product.
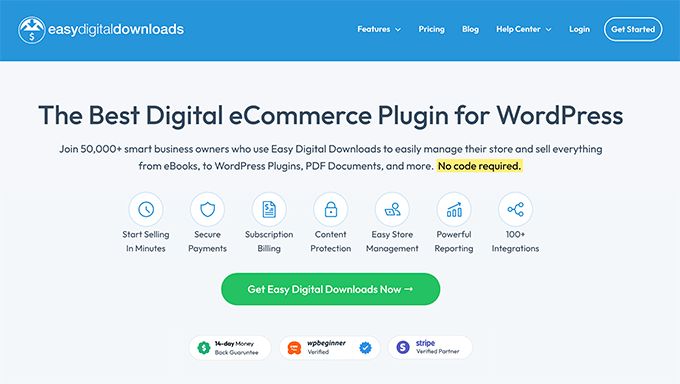
The best part is that you can get started for free with Easy Digital Downloads.
There is also a premium version that offers advanced features, like email marketing tools support, additional payment options, email support, and more.
First, you’ll need to install and activate the Easy Digital Downloads plugin. If you need help, then please see our guide on how to install a WordPress plugin.
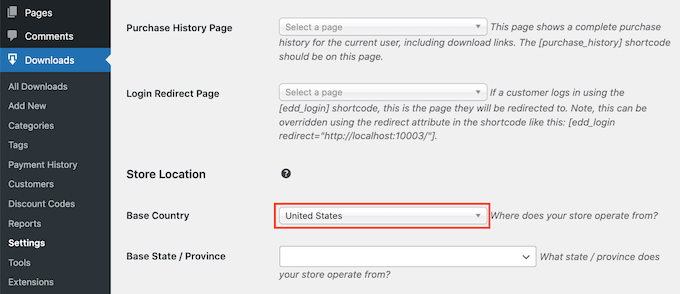
Upon activation, you can go to Downloads » Settings from your WordPress dashboard and set your store’s base location.
Setting Up Payment Gateways in Easy Digital Downloads
After that, you’ll need to add payment gateways to your Easy Digital Downloads store.
To start, simply head to the Payments » Gateways in the Easy Digital Downloads settings page.
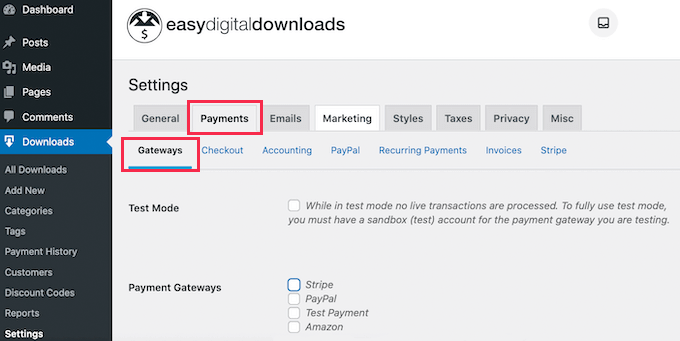
Easy Digital Downloads supports popular online payment methods, including Stripe, PayPal, Amazon, and more.
You can simply select which payment options to show on your single product store.
Do note that you’ll need to individually connect each payment option with your website.
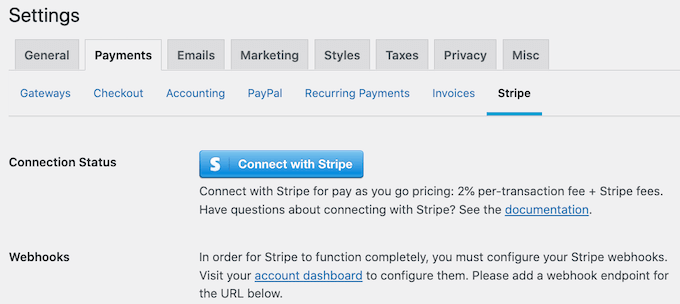
For example, if you select Stripe, then you can head to the ‘Stripe’ tab under the Payment settings page. From here, you’ll need to click the ‘Connect with Stripe’ button and follow the onscreen instructions.
Adding Your Digital Product in Easy Digital Downloads
After setting up Easy Digital Downloads, you can now create your first digital product.
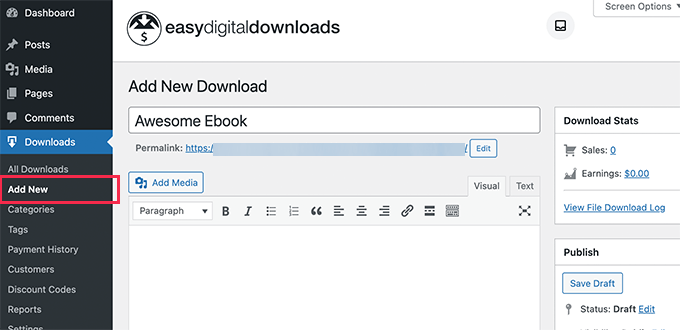
Simply head to Downloads » Add New from your WordPress admin panel to get started. From here, enter a name for your product.
Next, you can scroll down to the Download Prices section.
By default, Easy Digital Downloads will offer your product for free. You’ll need to set a price for your digital product to make money online.

After that, you can scroll down to the ‘Download Files’ section.
Here, simply upload the digital product that you’d like to sell using WordPress.
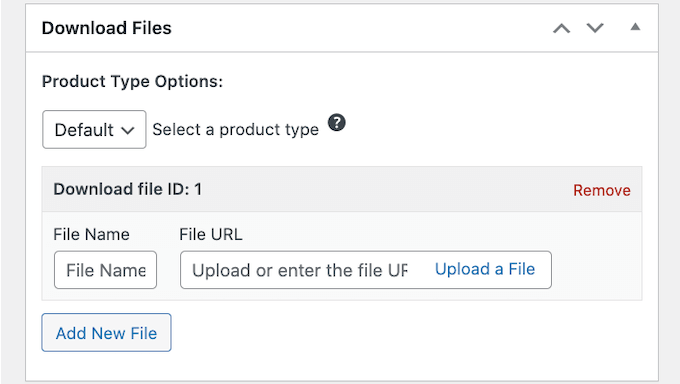
Once you’ve uploaded the product, the last thing to do is add a download image.
Simply click the ‘Set Download Image’ option from the panel on the right and select a picture.
Next, you can go ahead and publish your digital product.
Now, simply visit your WordPress website to see the single digital product in action.

To learn more, please see our detailed guide on how to sell digital downloads on WordPress.
Method 3: Sell a Single Online Service using WP Simple Pay
Are you offering any type of online service or product and want to collect payments from your clients and customers?
The easiest way to do that is by using WP Simple Pay. It is the best WordPress Stripe plugin that helps collect one-time and recurring payments in WordPress without setting up an eCommerce store.
For this tutorial, we will use the WP Simple Pay Pro plan because it includes more form templates for collecting online payments. There is also a WP Simple Pay free version you can use to get started.
Setting Up WP Simple Pay in WordPress
First, you’ll need to install and activate the WP Simple Pay plugin. If you need help, then please see our guide on how to install a WordPress plugin.
Upon activation, you will see the WP Simple Pay setup wizard. Go ahead and click the ‘Let’s Get Started’ button.

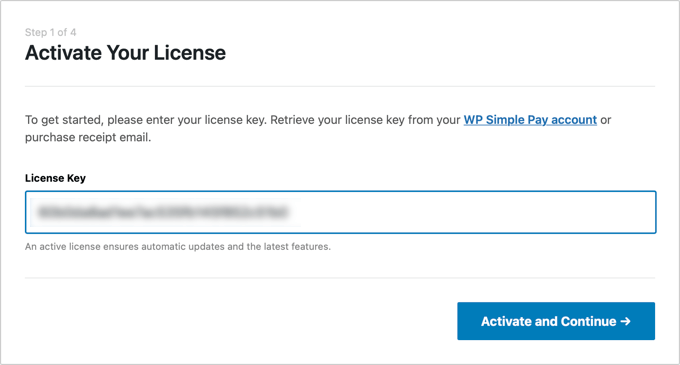
Next, you will need to enter the license key and click the ‘Activate and Continue’ button.
You can find the license key in your WP Simple Pay account area.
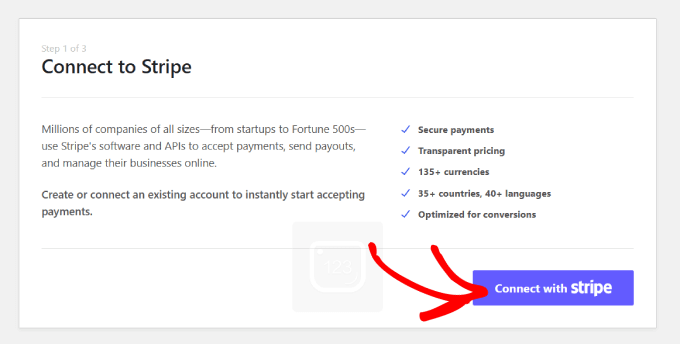
Next, you will need to connect your Stripe account with the plugin. If you don’t have a Stripe account, then don’t worry. The setup wizard will walk you through the process of creating a new account.
Simply click the ‘Connect with Stripe’ button to continue.
Once you’ve connected Stripe with WP Simple Pay, the next step is to configure the email notifications.
For instance, you can enable options to send a payment receipt email to customers, email upcoming invoices, and send payment notifications.
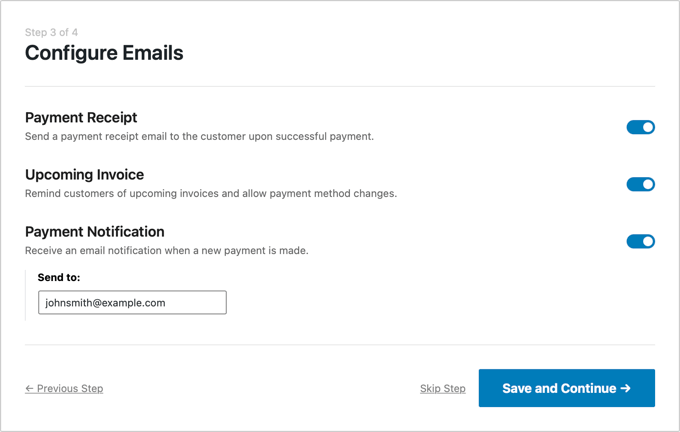
Once that’s done, simply click the ‘Save and Continue’ button.
The final step in the setup process is to create a payment form. You can click the ‘Create a Payment Form’ button to get started.
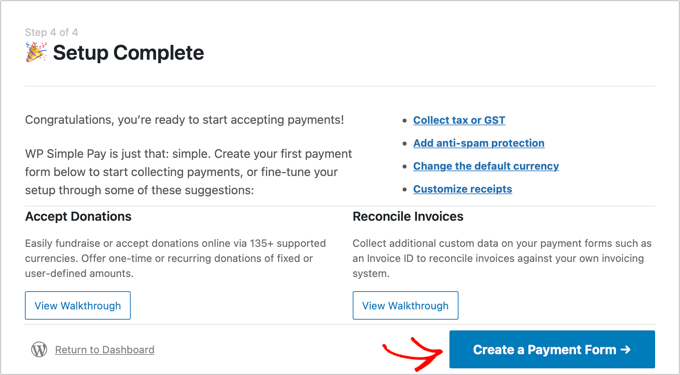
Creating a Payment Form to Sell a Service or Product
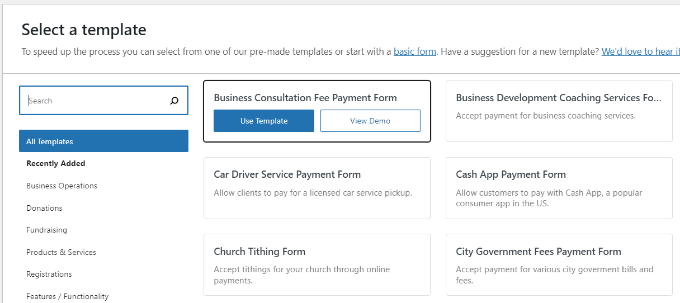
Next, you will need to choose a form template.
WP Simple Pay offers different templates that you can use for the online service you’d like to sell.
For example, we will use the ‘Business Consultation Fee Payment Form’ template.
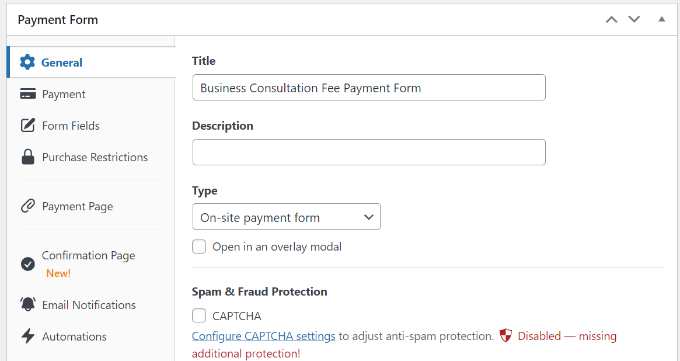
After that, you can customize the payment form.
Under General settings, you can rename the form, add a description, show the form on-site or off-site Stripe checkout form, and more.
Next, you will need to switch to the ‘Payment’ tab.
From here, you can scroll down to the Price Options section. Go ahead and enter a price for your single online service or product.
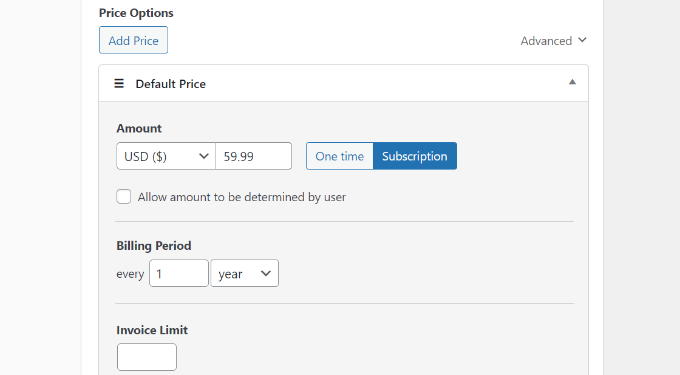
The plugin also lets you collect a one-time payment or create a subscription. If you choose the ‘Subscription’ option, then you can choose the Billing Period.
Next, you can scroll down and select Payment Methods to offer your customers. For instance, users can pay via credit/debit card, ACH direct debit, Alipay, and more.
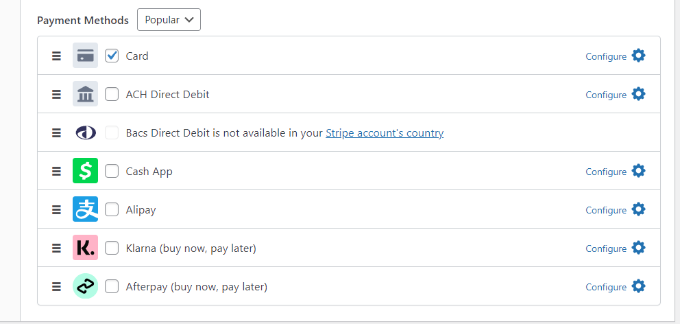
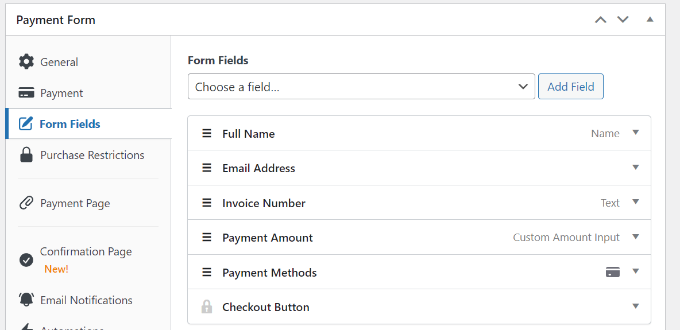
After that, you will need to switch to the ‘Form Fields’ tab.
Here, you can edit the existing form fields in the template, add new ones, and rearrange their order by simply dragging and dropping them.
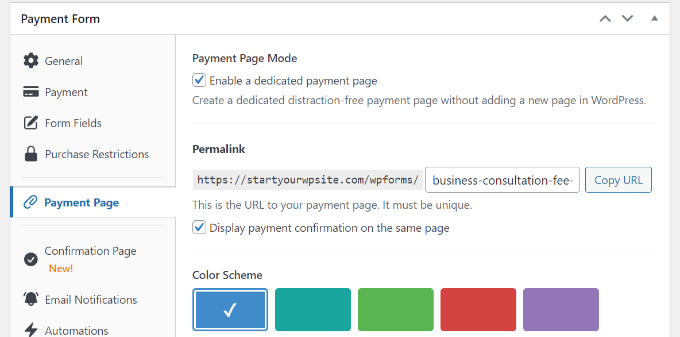
WP Simple Pay also lets you create a dedicated payment page to sell a single service or product.
You can head to the ‘Payment Page’ tab and click the ‘Enable a dedicated payment page’ option. After that, simply edit the permalink of the page, select a color scheme, show a header image/logo, and more.
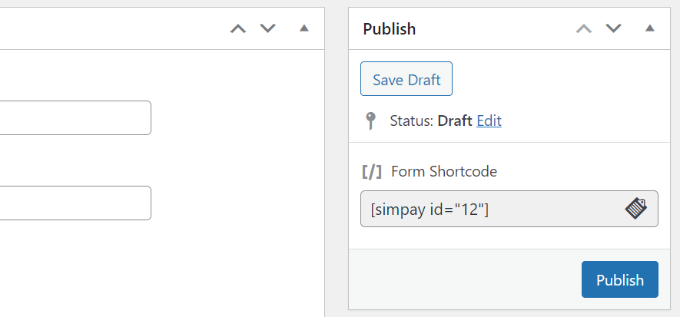
Once you’re done, you can publish your payment form.
You’ll find the ‘Publish’ button in the panel on the right.
You have successfully created a payment form to sell a single product or service.
Simply visit your site to see the dedicated page with the payment form in action.
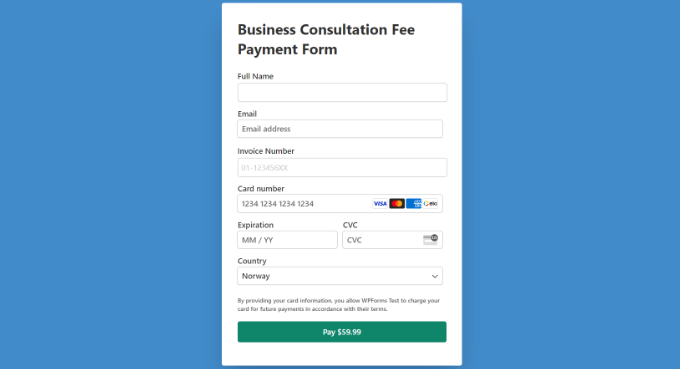
You can also display the payment form anywhere on your site on any page or post.
Simply head to the WordPress content editor and add a WP Simple Pay block. From here, select your payment form from the dropdown menu.
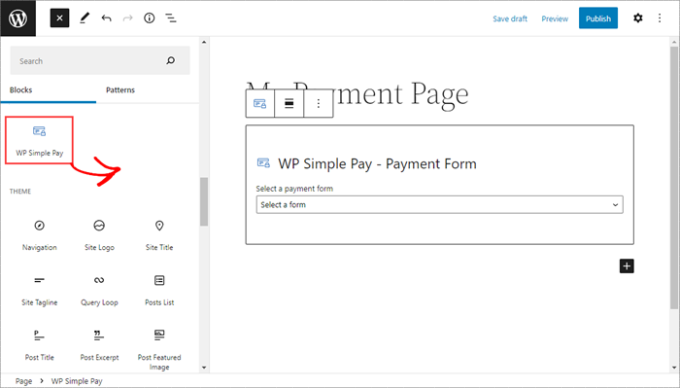
After that, go ahead and publish or update your page or post.
Alternative Method: Another way to sell a single product or service online without setting up a shopping cart or installing an eCommerce platform is by using WPForms. It is the best form plugin for WordPress and offers lots of templates and features.
The best part is that WPForms supports popular payment gateways like Stripe, PayPal, Authorize.net, and more. You can simply choose a form template, customize the form fields, enable the payment options, and start collecting online payments for your services or products.
For more details, please see our guide on how to create an online order form in WordPress.
We hope this article helped you learn how to sell a single product online with WordPress. You may also want to see our guide on how to start a podcast and the best SEO plugins and tools.
If you liked this article, then please subscribe to our YouTube Channel for WordPress video tutorials. You can also find us on Twitter and Facebook.
WORDPRESS
Automattic demanded web host pay $32M annually for using WordPress trademark
“WPE’s nominative uses of those marks to refer to the open-source software platform and plugin used for its clients’ websites are fair uses under settled trademark law, and they are consistent with WordPress’ own guidelines and the practices of nearly all businesses in this space,” the lawsuit said.
Mullenweg told Ars that “we had numerous meetings with WPE over the past 20 months, including a previous term sheet that was delivered in July. The term sheet was meant to be simple, and if they had agreed to negotiate it we could have, but they refused to even take a call with me, so we called their bluff.” Automattic also published a timeline of meetings and calls between the two companies going back to 2023.
Mullenweg also said, “Automattic had the commercial rights to the WordPress trademark and could sub-license, hence why the payment should go to Automattic for commercial use of the trademark. Also the term sheet covered the WooCommerce trademark, which they also abuse, and is 100 percent owned by Automattic.”
Automattic alleged “widespread unlicensed use”
Exhibit A in the lawsuit includes a letter to WP Engine CEO Heather Brunner from a trademark lawyer representing Automattic and a subsidiary, WooCommerce, which makes a plugin for WordPress.
“As you know, our Client owns all intellectual property rights globally in and to the world-famous WOOCOMMERCE and WOO trademarks; and the exclusive commercial rights from the WordPress Foundation to use, enforce, and sublicense the world-famous WORDPRESS trademark, among others, and all other associated intellectual property rights,” the letter said.
The letter alleged that “your blatant and widespread unlicensed use of our Client’s trademarks has infringed our Client’s rights and confused consumers into believing, falsely, that WP Engine is authorized, endorsed, or sponsored by, or otherwise affiliated or associated with, our Client.” It also alleged that “WP Engine’s entire business model is predicated on using our Client’s trademarks… to mislead consumers into believing there is an association between WP Engine and Automattic.”
WORDPRESS
WP Engine sues WordPress co-creator Mullenweg and Automattic, alleging abuse of power
Web hosting provider WP Engine has filed a lawsuit against Automattic, and WordPress co-founder Matt Mullenweg, accusing them of extortion and abuse of power. The lawsuit comes after nearly two weeks of tussling between Mullenweg, who is also CEO of Automattic, and WP Engine over trademark infringement and contributions to the open-source WordPress project.
WP Engine accused Automattic and Mullenweg of not keeping their promises to run WordPress open-source projects without any constraints and giving developers the freedom to build, run, modify and redistribute the software.
“Matt Mullenweg’s conduct over the last ten days has exposed significant conflicts of interest and governance issues that, if left unchecked, threaten to destroy that trust. WP Engine has no choice but to pursue these claims to protect its people, agency partners, customers, and the broader WordPress community,” the company said.
The case document, filed in a court in California, also accused Mullenweg of having a “long history of
obfuscating the true facts” about his control of WordPress Foundation and WordPress.org
The story so far
Mullenweg had criticized WP Engine for infringing WordPress and WooCommerce trademarks. He called them the “Cancer of WordPress” and also called out WP Engine’s private equity partner, Silver Lake, for not caring about the open-source community.
Later, WP Engine sent a cease-and-desist letter, asking Mullenweg and Automattic to withdraw these comments. Automattic then sent its own cease-and-desist, accusing WP Engine of infringing WordPress and WooCommerce trademarks.
Notably, Mullenweg banned WP Engine on September 25 from accessing WordPress.org resources, including plug-ins and themes, and preventing WP Engine customers from updating them. Two days later, Mullenweg provided a temporary reprieve and unblocked WP Engine until October 1.
On Wednesday, Automattic published a proposed seven-year term sheet that it had sent to WP Engine on September 20, asking the hosting company to pay 8% of its gross revenues per month as a royalty fee for using the WordPress and WooCommerce trademarks.
Alternatively, WP Engine was given the option to commit 8% by deploying employees to contribute to WordPress’s core features and functionalities, or a combination of both people hours and money.
WP Engine didn’t accept these terms, which included a probation on forking plugins and extensions from Automattic and WooCommerce.
You can contact this reporter at [email protected] or on Signal: @ivan.42
WORDPRESS
How Open Source Collaboration Enhances Studio – WordPress.com News
It’s now time for Part 3 of our “Building Studio in Public” series! In today’s post, we’ll explore how the Studio app connects with other open source projects, with a focus on its key relationship with WordPress Playground. We’ll also dive into the benefits and challenges of this symbiotic relationship, showing how both projects mutually benefit from improvements and bug fixes.
If you’re following the series, be sure to check out past posts:
As a reminder, Studio is our free and open source local WordPress development app.
How Studio connects to other open source projects
Studio relies on various open source projects, with the primary one being WordPress Playground which provides a local WordPress server, handling everything from running PHP code to serving static files and managing a database. This allows developers to test WordPress sites, plugins, and themes in a local, sandboxed environment.
WordPress Playground utilizes Emscripten to compile the PHP interpreter to WebAssembly, enabling PHP to run in the browser and other platforms—a significant leap for WordPress development.
By way of WordPress Playground, Studio also makes use of other open source tools like the SQLite integration plugin.
Studio itself is open source, which means the codebase is available for review, contribution, and forking by the community. This openness fosters collaboration, encourages innovation, and enables rapid identification and resolution of issues.
Because of the open source nature of Studio and the projects it uses like WordPress Playground, we are not blocked by missing or undesired behavior of our libraries but can instead help uncover issues or opportunities for enhancement in these projects and contribute the necessary fixes and improvements. Instead of building workarounds, we can directly enhance Studio’s performance and capabilities by submitting fixes to the actual problems.
This creates a virtuous cycle of improvement, showcasing how open source collaboration drives innovation and helps solve complex challenges.
Challenges we discovered working with WordPress Playground
WordPress Playground is powerful, but since it makes WordPress run in an unusual environment–the browser instead of a server–some things work differently than developers expect. While using it to power Studio allows us to achieve all the good things, like a fast setup, we also had to overcome some challenges:
- Cross-platform compatibility: Ensuring that WordPress Playground runs smoothly on different operating systems (Windows, macOS, Linux) and across browsers requires extensive testing and fine-tuning.
- Performance: Managing multiple resources (PHP interpreter, WordPress site, database, and file system) while running multiple sites in Studio can strain performance. You can learn more about how we maintain high performance in Studio here.
- Plugin and theme compatibility: Although WordPress Playground creates a full environment for running sites, some plugins and themes rely on extensions that are not included in WordPress Playground by default. Adjustments are often necessary to accommodate support for the different plugins and themes.
- Database handling: WordPress Playground uses an SQLite database instead of MySQL, fundamentally altering how WordPress operates. This shift requires adaptations for database queries and compatibility with plugins and themes.
These complexities sometimes lead to incompatibilities, bugs, or performance issues. However, we believe the benefits of WordPress Playground far outweigh the challenges, and we are committed to addressing them by contributing to the Playground project. Thus not only Studio works better, but everyone who uses Playground has a better experience.
In turn, Studio also benefits from contributions from other Playground users.
Our recent contributions to WordPress Playground and other open source projects
As part of our contributions to the Studio app, we recently focused on improving the compatibility of plugins, themes, and workflows in sites. The following are some of the fixes we made that contributed to the projects.
MySQL database compatibility
With a pull request, we helped improve the compatibility of sites connecting to MySQL databases, making Studio more flexible in handling various site configurations and expanding its capability to support more diverse WordPress setups.
Symlink support
We submitted two contributions (PR 1, PR 2) to add crucial support for handling symlinks in sites, greatly improving file system compatibility and flexibility. This enhancement significantly improves the development workflow, enabling developers to maintain cleaner project structures and more efficiently manage their themes and plugins across multiple projects. It also facilitates easier version control and collaboration by allowing links to external repositories without duplicating files.
Windows media upload fix
A fix resolved critical issues with uploading media on sites when using the Windows version of the Studio app, ensuring a smoother experience for Windows users. This contribution addressed a significant functionality gap, ensuring that Studio provides a consistent and reliable media management experience across all supported operating systems.
WordPress core and extension upgrades
Another contribution fixed the process of upgrading versions of WordPress, plugins, and themes. This improvement streamlined the update process within Studio, allowing developers to maintain their WordPress installations and associated extensions easily.
WooCommerce compatibility
This pull request significantly improved compatibility with the WooCommerce plugin, expanding Studio’s utility for e-commerce development. This contribution addressed specific database queries and operations that were incompatible with the SQLite database used in sites created with Studio. The SQLite integration plugin involves different complexities to allow seamless integration with the WordPress ecosystem, and this contribution addresses one of the main pain points of using WooCommerce in local WordPress environments.
cURL extension compatibility
We contributed the ability to enable the cURL extension on PHP used with Playground which turned out to be a requirement by a significant number of plugins for external API calls or remote data fetching. This broadens the range of plugins that can be used effectively within Studio and WordPress Playground.
File creation compatibility
A fix improved compatibility with plugins that create files using umask to set file permissions, enhancing the file system operations. This was crucial for plugins that generate caches, create custom CSS or JavaScript files, or manage uploads in non-standard ways. By resolving these file operation issues, we ensured that a broader range of plugins could function correctly within Studio, providing a more accurate representation of how sites would behave in a production environment.
All the above examples demonstrate how collaborative contributions help Studio evolve, making it more compatible with the vast array of plugins and themes in the WordPress ecosystem.
How to contribute
If this post has inspired you to contribute to open source projects (we’re big fans), here’s how you can get involved with some of our favorite open source projects:
Together we can build incredible tools for the community! 🙂
Ready to build?
If this information has piqued your interest, or if you’re developing WordPress sites, start leveraging the power of Studio today. It’s free, it’s open source, and it seamlessly integrates into your development workflow.
After downloading Studio, connect it to your WordPress.com account (free or paid) to unlock features like Demo Sites.
Join 112.5M other subscribers
-
WORDPRESS2 days ago
WordPress biz Automattic details WP Engine deal demands • The Register
-
SEARCHENGINES4 days ago
Daily Search Forum Recap: September 30, 2024
-
SEO6 days ago
Yoast Co-Founder Suggests A WordPress Contributor Board
-
SEARCHENGINES7 days ago
Google’s 26th Birthday Doodle Is Missing
-
SEO6 days ago
6 Things You Can Do to Compete With Big Sites
-
SEARCHENGINES5 days ago
Google Volatility With Gains & Losses, Updated Web Spam Policies, Cache Gone & More Search News
-
SEARCHENGINES3 days ago
Daily Search Forum Recap: October 1, 2024
-
SEO5 days ago
An In-Depth Guide For Businesses