A website can change the world. If you’re a student, we’d like to help you get started with that.
WORDPRESS
How to Create an Order Bump for WooCommerce (Step by Step)
Do you want to add an order bump to WooCommerce and increase your sales?
An order bump is a tactic that encourages shoppers to buy more products than they initially planned. It’s an easy and popular strategy to boost sales by offering a relevant product or a special deal during checkout.
In this guide, we will show you how to create an order bump in your WooCommerce store. This way, you can get more profits without putting in a lot of extra effort.
Why Should You Add an Order Bump in WooCommerce?
In eCommerce, an order or checkout bump is a common strategy that can increase the average order value (AOV). It encourages customers to spend more money when making a purchase by offering them extra products or deals during checkout.
If you run an online store, then an order bump can easily boost your sales and revenue without much effort.
Instead of launching an elaborate marketing campaign, all you need to do is showcase related products that the customer may be interested in. By doing this, you make it convenient for buyers to add more items with just a single click.
Typically, eCommerce plugins or software don’t offer an order bump feature by default. For example, if you are using WooCommerce, then you will need a WordPress plugin to enable checkout bumps.
Now, let’s take a look at how to create an order bump for WooCommerce.
How to Create an Order Bump in WooCommerce
The best way to create an order bump in WooCommerce is with FunnelKit Builder, which is an advanced WooCommerce sales funnel platform. It lets you easily optimize your store pages to get more conversions and revenue.
We recommend using FunnelKit Builder because it has a lot of rules and settings that you can configure for your order bump. This way, you can tailor it precisely to your website visitors.
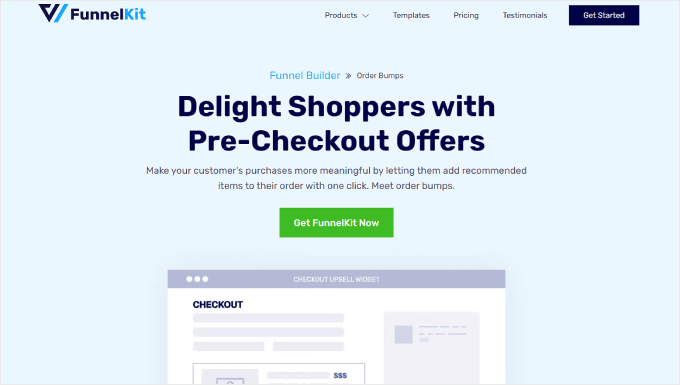
Plus, FunnelKit comes with templates to boost your online store sales, cart abandonment funnels to recover lost potential revenue, and dashboard analytics to see your store’s performance.
This guide will use the FunnelKit Builder Pro Plus plan, as the order bump feature is available in that version and higher.
Once you have access to the plugin zip file and license key, you can install the plugin. For more information, check out our guide on how to install a WordPress plugin.
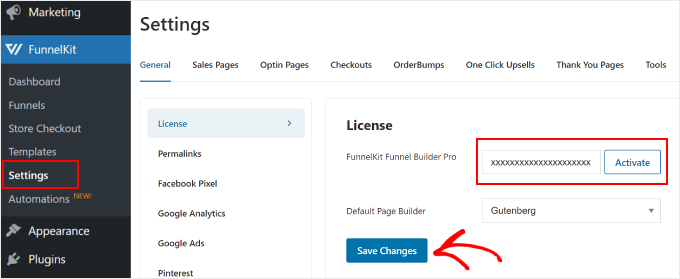
Then, you need to activate the license key. To do this, simply go to FunnelKit » Settings from your WordPress dashboard, navigate to the ‘General’ tab, and select ‘License.’
Copy and paste the license key into the ‘FunnelKit Funnel Builder Pro’ field and select the default page builder you are using. After that, just click ‘Activate’ and then ‘Save Changes.’
Once you’ve done that, you will need to set up your WooCommerce checkout page. For details on how to do that using FunnelKit, you can read our article on how to customize your WooCommerce checkout.
Now that you’ve configured the checkout page, let’s add an order bump to it. All you need to do is go to FunnelKit » Store Checkout. Then, click on the ‘Add Order Bump’ button.
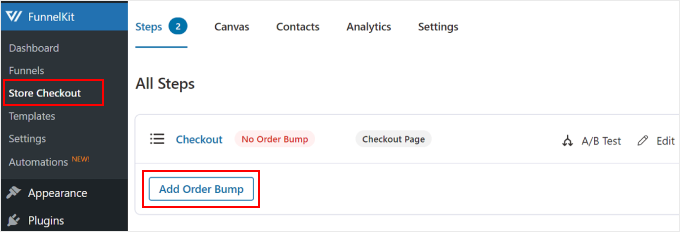
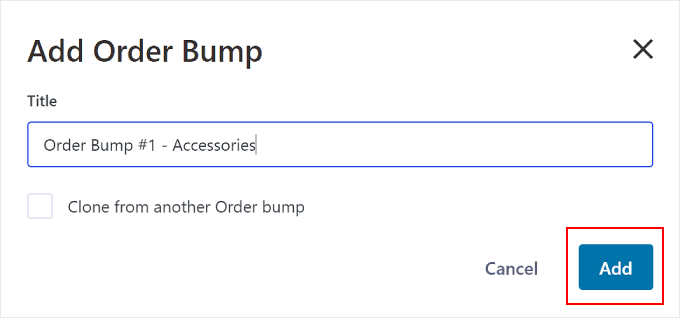
A popup will appear asking to name the order bump. This will come in handy if you have multiple order bumps and need to pick between them.
Once you’ve filled out a name, click ‘Add.’
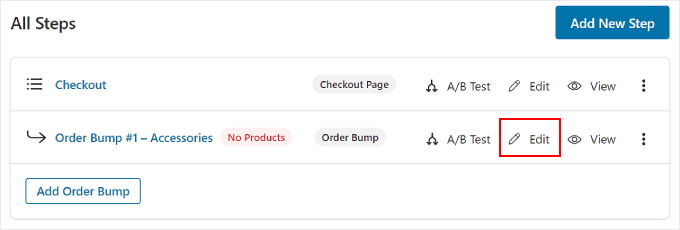
Now, you should see the order bump has been added to your checkout funnel.
To continue with the next steps, go ahead and click the ‘Edit’ button.
Adding and Configuring Your Order Bump Offer
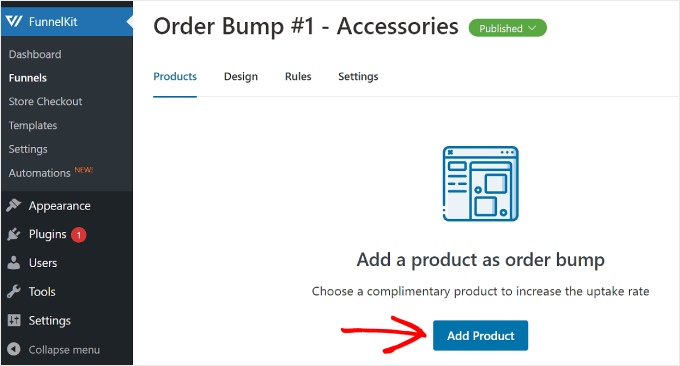
Now, you need to add complementary products to your checkout page.
With FunnelKit, you can adjust the rules to trigger the order bump. For this step, you will pick which purchase should cause the special offer to appear during checkout.
Then, click the ‘Add Product’ button.
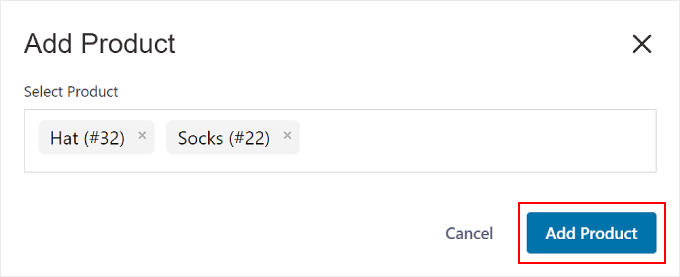
Now, a popup window will appear, asking you to select the products.
Here, you can enter multiple products that you think will complement the buyer’s purchase. Once done, hit the ‘Add Product’ button.
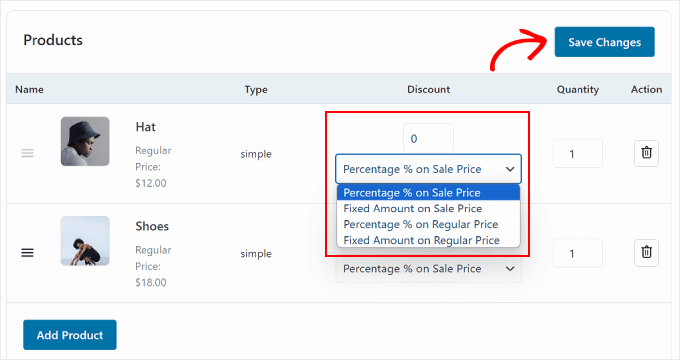
After that, you can configure the product offer. Just select one of the discount types: Percentage % on Sale Price, Fixed Amount on Sale Price, Percentage % on Regular Price, or Fixed Amount on Regular Price.
If you want, then you can also offer more than one quantity of the item.
Once the settings look good, just click ‘Save Changes’ at the top.
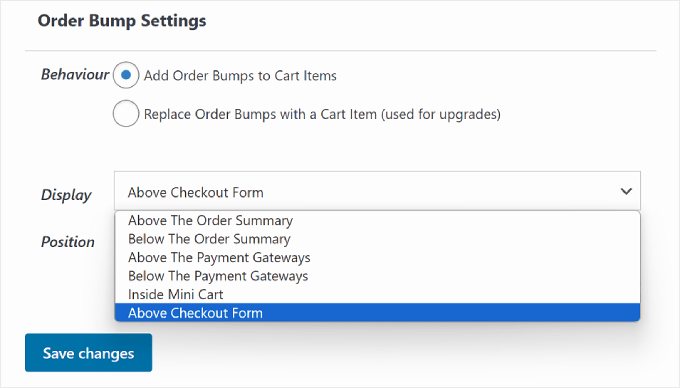
Scrolling down, you’ll find the Order Bump Settings section.
This is where you can adjust the order bump’s behavior and display position during checkout.
There are two ‘Behaviour’ options. One is ‘Add Order Bumps to Cart Items,’ which allows customers to add the suggested product as an extra purchase in their cart.
The second option is ‘Replace Order Bumps with a Cart Item (used for upgrades).’ With this, customers can choose to replace their purchase by upgrading to a higher-end version of the product.
For example, let’s say your online store sells a subscription product for 3 and 6 months, and your customer chooses to buy the 3-month period subscription. You can show an offer to upgrade to the 6-month period instead to provide more value for money.
Or, let’s say your eCommerce website sells coffee-related products, and a customer is purchasing coffee beans only. You can add an order bump that replaces their bean purchase with a bundle of coffee beans with a grinder.
When picking the Display Position, we recommend choosing a location that catches the shopper’s attention before they finalize their purchase. This way, the order bump is easily noticeable and doesn’t disrupt the customer journey.
In this case, anywhere in the order summary, mini cart, or checkout form is best.
When you are happy with the settings, just click ‘Save Changes.’
Customizing the Order Bump Design
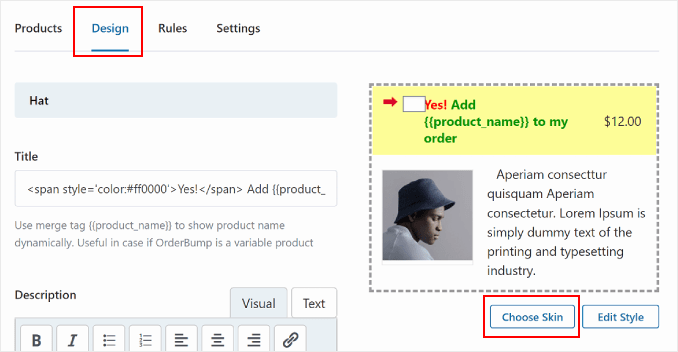
Now, let’s scroll back up to the ‘Design’ tab and start changing how the order bump looks.
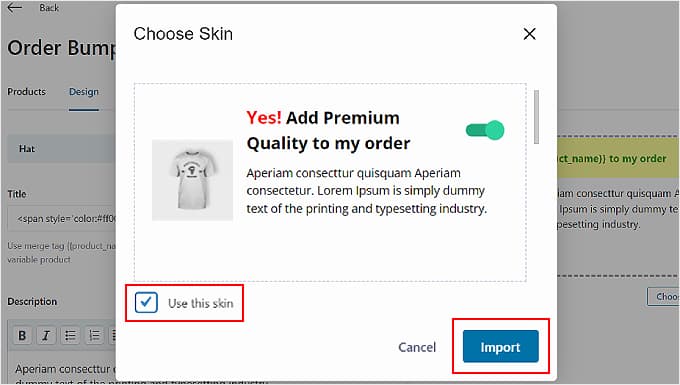
First things first, you need to pick a skin for the order bump. To do that, click the ‘Choose Skin’ button below the order bump preview.
Next, a popup will appear with several skin options to choose from.
If there is a design you like, just tick the ‘Use this skin’ checkbox and hit the ‘Import’ button.
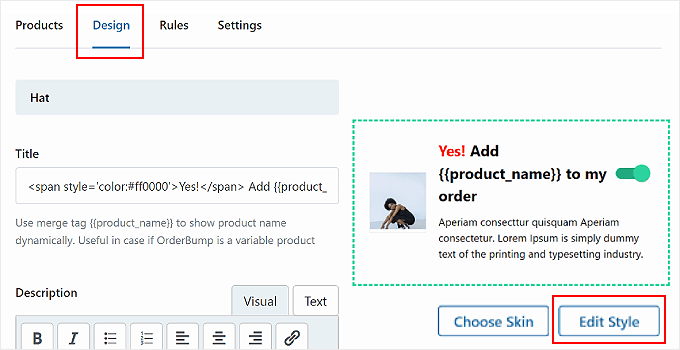
To edit the design further, go back to the Design tab.
After that, simply click ‘Edit Style’ below the order bump preview.
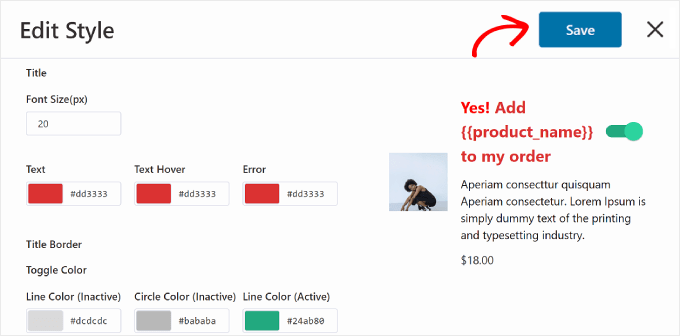
Some elements you can change on this page are the text colors, background color, toggle color, border, font size, price display, and box padding and width.
To finalize the design changes, click the ‘Save’ button on the top right corner. Then, click ‘X’ to return to the Design tab.
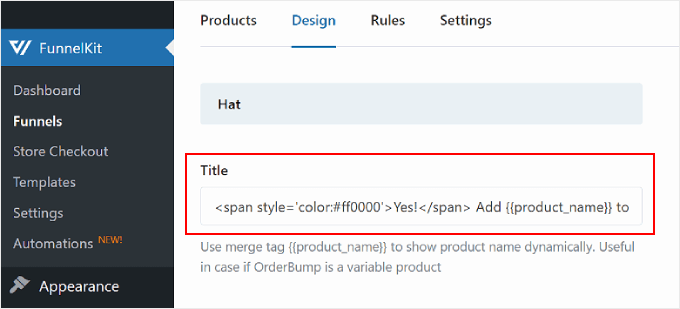
Now, you can edit the text content of the order bump.
In the ‘Title’ section, you can change the call-to-action text for the order bump.
FunnelKit has inserted some HTML code for the text colors in this field, so make sure not to completely replace the content with your own.
You can also keep the merge tag {{product_name}}
to display the product name dynamically.
Below the Title is the ‘Description’ field. Feel free to use this space to briefly describe your offer.
For instance, if you want customers to upgrade to a longer subscription, then you can write, ‘Upgrade to our 6-month plan now and get unlimited access to exclusive content, ad-free browsing, and priority customer support.’
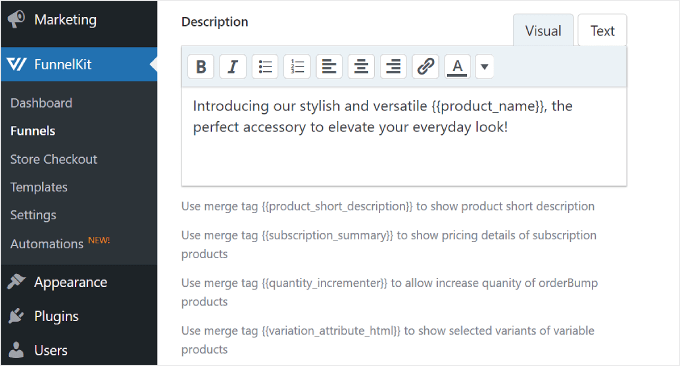
Additionally, you can use the following merge tags to make your order bump more informative and user-friendly:
{{product_short_description}}
reuses your product’s short description.{{subscription_summary}}
reuses your subscription information details.{{quantity_incrementer}}
allows you to increase the number of order bump products.{{variation_attribute_html}}
displays variants of variable products.
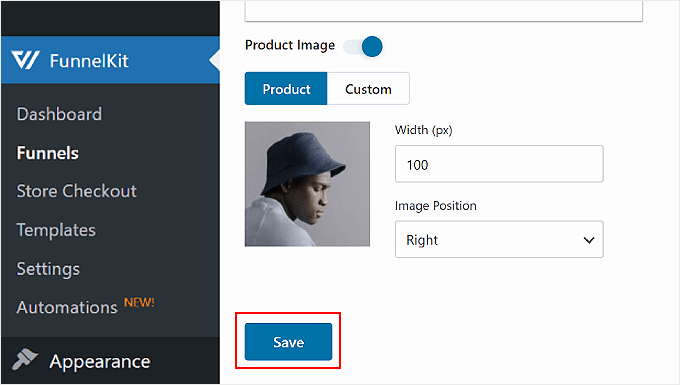
The last setting allows you to choose an image to use in the order bump. You can use the product’s default image, upload a custom one, or not display an image at all.
Once you’ve chosen an image, you can edit its width and positioning. Then, click the ‘Save’ button to finalize all of the design changes.
Setting the Rules to Trigger the Order Bump
So far, we’ve configured the order bump products and design. Now, let’s set up the conditional logic that will make the order bump appear when a customer is checking out.
To do this, simply navigate to the ‘Rules’ tab from the previous tab. After that, click ‘Add Rules.’
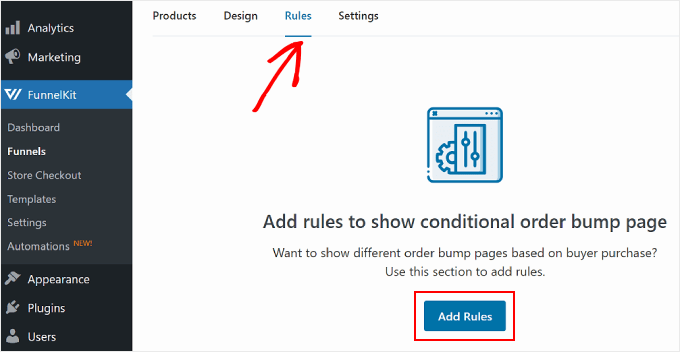
You can set multiple rules to make the order bump appear during checkout. The rules can be based on the cart, customer, geography, date and time, and/or the type of checkout page you are using.
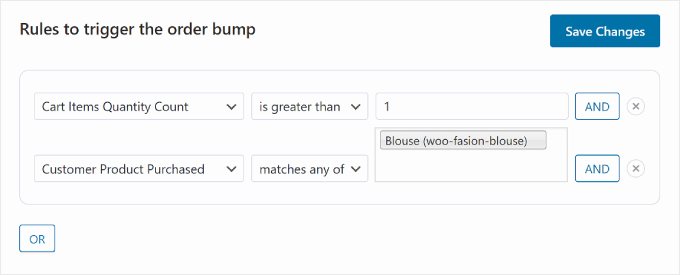
You can also combine multiple conditions in one rule using the ‘AND’ button.
In the example below, the order bump will only be triggered if the customer purchases more than 1 item quantity and they are buying a blouse.
Now, if you click the ‘OR’ button below a rule, you can choose for the order bump to appear with another, different condition.
For instance, you could set an ‘OR’ condition where the order bump appears if the customer is buying either a blouse or a jacket. This gives you the option to promote different items based on customer preferences.
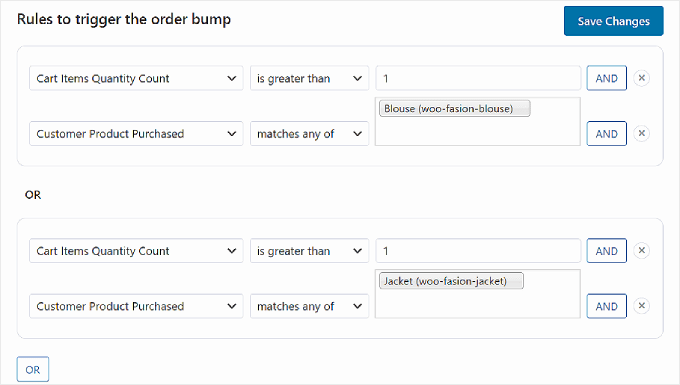
Once you are happy with the order bump rules, simply click the ‘Save Changes’ button in the top right corner.
Setting the Priority to Trigger the Order Bump
The last step is to configure the order bump priority. This setting is useful if you are running multiple order bumps whose rules may overlap, and you need to decide which offer should appear first.
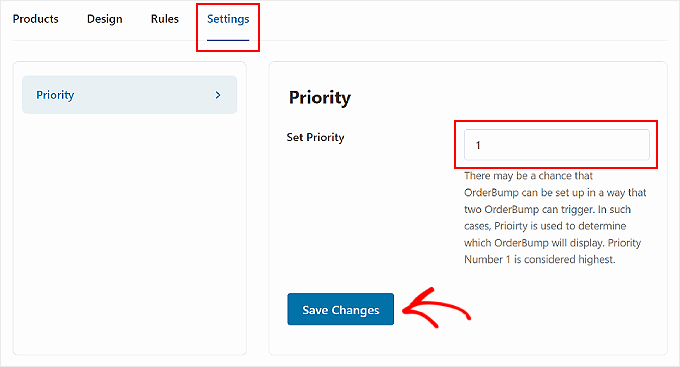
To modify the priority, go ahead and switch to the ‘Settings’ tab. Then, fill out a number in the ‘Set Priority’ field. Note that 1 is the highest, which means the order bump is more likely to appear than the other order bumps.
Once you are finished with this setting, click ‘Save Changes.’
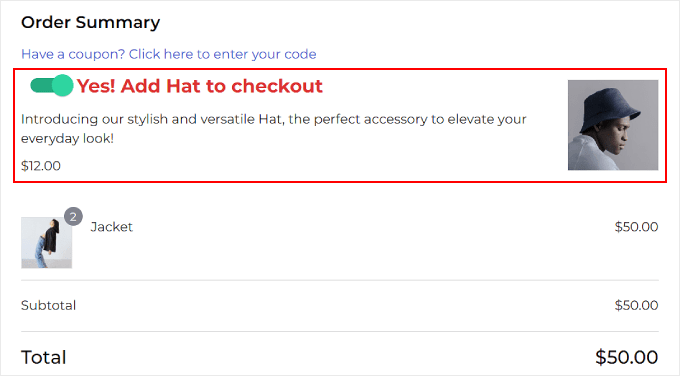
You can now test your checkout process to see what the WooCommerce order bump looks like.
Here’s an example of how it looks on our demo website.
How to Optimize Your Order Bump and Get More Revenue
Now that you know how to create an order bump in WooCommerce, you might be wondering how to optimize the order bump and get more sales.
You will need to know your customer preferences and buying behaviors so that you can tailor your offers to match their needs. For example, if your audience often buys tech gadgets, then you can show compatible accessories as order bumps.
The best way to track customer behavior on your website is with an eCommerce analytics plugin. MonsterInsights allows you to connect your website with Google Analytics and see all your online store’s data within your WordPress dashboard.
For example, you can see your conversion rate, most popular products, average order value, and more.
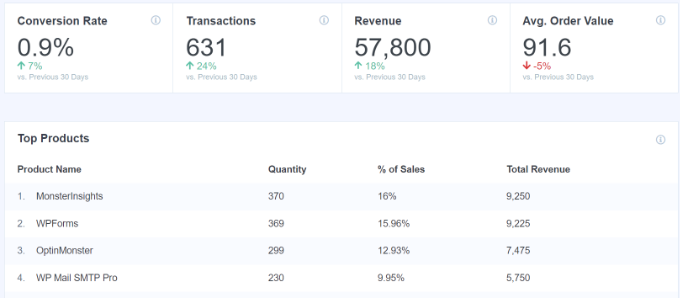
For more details, you can see our guide on how to set up WooCommerce conversion tracking.
We hope this article helped you learn how to create an order bump for WooCommerce. You may also want to check out our list of the best WooCommerce plugins and our guide on how to create a WooCommerce buy-one-get-one offer.
If you liked this article, then please subscribe to our YouTube Channel for WordPress video tutorials. You can also find us on Twitter and Facebook.
WORDPRESS
Free Websites for Students – WordPress.com News
Your online presence is paramount to the success and well-being of your future self. Whether it’s for sharing your latest creative project, building an impressive portfolio, or simply expressing your ideas, owning a personal website gives you the power to control your online identity. It’s a space where you can showcase your work, share your story, and set yourself apart in a sea of digital noise.
A simple website can, in fact, change the world.
You are the future of the web
At WordPress.com, we know that students are at the forefront of driving online culture. Michael Dell founded Dell while he was a student at the University of Texas. Google came to life when Larry and Sergey were at Stanford. Mark Zuckerberg was 19 when he started Facebook. We could keep going.
To kickstart your own world-changing ideas, we want to give you a free website.
Starting this week, university students can get a free Premium WordPress.com website for one year. We’re offering this opportunity to the first 1,000 students who sign up.
Investing in yourself—here’s what you get with a WordPress.com premium plan
A website is more than a tool. It’s an investment in your future. As the job market becomes increasingly competitive, having an online space where you can display your work, write about your passions, and connect with like-minded people is invaluable. From resumes to portfolios to blogs, your WordPress.com site will grow as you do.
Here’s what’s included when you take advantage of this free website offer:
- Free custom domain name for the first year: Choose a personalized domain that reflects your identity.
- Premium themes: Kickstart your site with professionally designed, fully customizable templates.
- 13 GB of storage: Plenty of room to host your photos, videos, and other media, with ownership that’s entirely yours.
- SSL certificate: Your site is secure and protected by industry-standard encryption.
- Ad-free experience: Build and manage your site without ads distracting your visitors.
No matter what you’re creating, WordPress.com’s Premium plan gives you all the tools you need to succeed.
How to secure your free website
Here’s how you can grab this amazing deal:
- Submit the interest form ASAP: Head over to our campaign landing page and fill out the form with your details. Be quick—only the first 1,000 students will get the free site!
- Verify your student status: After you’ve submitted the form, you’ll receive an email asking you to verify your student status through VerifyPass. This step ensures that our offer goes to real students.
- Claim your free website: Once your student status is verified, you’ll receive a unique coupon code that allows you to create a new Premium plan website for free.
- Build your site: Choose your domain, select a theme, and start building!
This offer is perfect for students looking to stand out in their personal and professional journeys. Don’t miss out on this chance to create a space that’s truly your own.
Get started right away
Having your own website is a game-changer in an online world increasingly controlled by social media algorithms. You’ll stand out by breaking the mold and announcing yourself as an individual, unmoved by the platform of the moment.
WordPress.com is here to help you take that leap.
Take control of your digital identity. Sign up now and claim your free website while spots are still open!
Join 112.1M other subscribers
WORDPRESS
Our Partner Directory Has Arrived – WordPress.com News
The partner directory connects your agency with new customers.
Since we launched the Automattic for Agencies program earlier this summer, we’ve helped agencies save thousands of dollars and countless developer hours.
Today, we’re making it easier than ever for agencies to connect with potential clients by presenting the new WordPress.com Partner Directory. This directory lists top-tier agencies for our customers who are looking for a partner for their web development projects.
If your agency’s growth is top of mind, there’s no better time to join Automattic for Agencies. In addition to saving time and money, your company could be eligible for a listing in our official partner directory, paving the way for more qualified leads and, ultimately, happy clients.
Get your agency in front of eager customers
When someone needs a professional website, it can be hard to find the right agency to work with. Sifting through search engine results and going through credentials takes a lot of time and energy, which can leave them exhausted before they even get to your digital door. With the launch of the partner directory, we’re making it easier for consumers to find and connect with vetted, talented agencies—like yours.
When you apply to the agency directory, your application will be reviewed to assess critical areas like security, performance, and adherence to different business requirements. Accepted agencies can showcase their profile across the Woo, Jetpack, and Pressable brand directories via a single listing.
Visit our knowledge base for information about detailed application steps and criteria for inclusion as well as agency tiering and benefits.
Join Automattic for Agencies today
In addition to our curated directory, the Automattic for Agencies program brings together powerful hosting and a professional suite of plugins and tools in a flexible platform that allows your team to focus on building beautiful and functional websites.
At its core, Automattic for Agencies allows for the bulk purchasing and reselling of WordPress.com hosting plans (along with WooCommerce and Jetpack plugins). Our platform also equips you with direct referrals and invoicing, license management, and monitoring tools to assess security and performance needs across all your sites.
As an added bonus, Automattic for Agencies gives your agency access to volume discounts for your clients. Your first WordPress.com site starts at $30 per month; but with ten or more sites, the price drops to just $10 per site, per month. (All WordPress.com sites purchased through the agency program are on our powerful Business plan.)
Those savings coupled with our referral incentives make Automattic for Agencies a potent combination for growing your agency’s offerings and profitability.
Get started today and connect with new clients
Ultimately, our goal is to funnel more business your way, so that you can keep doing what you do best.
Join 112.1M other subscribers
WORDPRESS
20 Must-Know WordPress Stats Defining the Leading Platform in 2024
I’ve always enjoyed dabbling in illustration, and at one point, I had a WordPress blog to showcase my artwork. Back then, I didn’t really think much about how big of an impact WordPress had on the web— I was just focused on sharing my art. Recently, however, I started wondering just how many people actually use WordPress and what kind of influence it has across the internet.
Knowing these numbers can be pretty useful, not just for big businesses or marketers but for anyone who uses the platform. Whether you’re a creator like me or someone looking to build an online presence, understanding WordPress stats can help you stay ahead of trends and make better decisions.
So, let’s examine 20 WordPress stats that are shaping 2024.
WordPress Usage
1. Almost half of the world’s websites use WordPress
WordPress powers a massive 43.4% of all websites, making it the dominant platform in the web development space. It’s popular because it’s flexible, easy to use, and open-source, making it simple for both beginners and pros to build websites fast. Plus, its huge library of themes, plugins, and active community make it an excellent choice for all kinds of sites, from blogs to online stores.
2. WordPress rules the CMS market share
WordPress dominates the content management system (CMS) market with a huge 62.5% share. Its simple setup, wide range of features, and ability to adapt to sites of all sizes have solidified its position as the top choice for many users.
3. WordPress 6.6 is leading the Pack
WordPress 6.6 has been downloaded over 79 million times, making it the most used version to date. This is obviously due to its version’s improved features, performance boosts, and security updates, which encourage users to upgrade. Its widespread adoption also reflects how WordPress consistently meets user expectations with every new release.
4. WordPress powers a fourth of the top 10,000 websites
WordPress holds a solid 25.38% share among the top 10,000 websites worldwide. This indicates that even highly visited and complex sites trust WordPress. Its ability to handle heavy traffic and advanced features shows it’s not just for small blogs but also a favorite among major players.
5. Top languages in WordPress
English dominates WordPress with 71% of users, followed by Spanish at 4.7%, and Indonesian at 2.4%. This indicates that WordPress has a strong global presence but remains most popular in English-speaking regions. The platform’s multilingual support likely helps attract users from non-English-speaking countries.
6. Number of people who visit WordPress sites every month
Every month, over 409 million people land on WordPress sites. This highlights its widespread use and popularity across different types of websites worldwide.
7. Monthly page views on WordPress
With more than 20 billion page views each month, WordPress handles a massive amount of traffic. This shows how heavily the platform is relied upon for hosting and delivering content.
8. New posts created monthly on WordPress
WordPress users create around 70 million new posts each month. This highlights how actively people use the platform to share fresh content, from personal blogs to professional articles.
Every month, 77 million new comments are made on WordPress sites. This level of interaction shows strong community engagement and the platform’s ability to foster conversations between content creators and their audiences.
10. WordPress User Intent
According to a Q4 2023 WordPress survey, 55.1% of users use the platform for personal or passion projects, showing it remains a favorite for individual content creators. Meanwhile, 48.8% of users build sites as services for clients, demonstrating the platform’s popularity among freelancers and agencies. Another 43.1% use it to run their businesses, reflecting WordPress’s role as a strong business tool.
Interestingly, 36.7% use it for their employer or place of work, proving it’s also trusted in professional environments. Fewer users, around 13.7%, focus on school or academic purposes, and 8.1% of respondents said none of the above, which could indicate niche or alternative uses.
WordPress Commerce
11. WooCommerce dominates the ecommerce world
WooCommerce powers approximately 36.18% of active eCommerce stores based on the provided data. This is likely due to its seamless integration with WordPress, which is widely used for websites. Its customizable features and vast plugin library allow businesses to tailor their stores without heavy upfront costs. Additionally, it’s user-friendly for beginners yet powerful enough for larger businesses. This balance of affordability and scalability makes it a popular choice.
12. WooCommerce sees strong growth in 2024 Q2
WooCommerce saw a 46% year-over-year increase in active stores in Q2 2024. The surge suggests more businesses are choosing WooCommerce for its affordability and integration with WordPress.
13. Top product categories for WooCommerce stores in 2024
Home & Garden products are the most popular category for WooCommerce stores, with 5.3% of stores selling these items. Apparel follows closely at 4.8%, while Business & Industrial products account for 3.7%.
WordPress Plugins
14. WordPress’s plugin collection continues to grow
WordPress now has over 59,000 plugins that allow users to add features like SEO tools, security, and eCommerce functions. These plugins make it easy to customize websites without needing advanced coding skills.
15. Most popular WordPress plugins
In a 2023 survey, the most used WordPress plugin is Yoast SEO, with 23.3% usage, leading over the others. Close behind is the Classic Editor, with 18.4%, followed by WooCommerce at 17.3%, which is also highly popular.
Wordfence rounds out the top four with 15.6%, showing solid use among WordPress users. These plugins are favored for WordPress SEO, editing, e-commerce, and security, reflecting their importance in website management.
WordPress Themes
16. WordPress theme variety
WordPress offers over 12,000 free themes, providing users with a wide array of options for building and customizing their websites. In addition to this extensive collection, other marketplaces and platforms offer premium themes with advanced features and designs.
17. Top WordPress themes among the top 1 million websites
Hello Elementor continues to dominate with 14,452 websites, representing 1.45% of the top 1 million websites. Astra Theme follows with 10,904 websites, holding a 1.09% market share. Divi is close behind, powering 10,782 websites, securing a 1.08% share.
WordPress Security
18. Security vulnerabilities in WordPress
According to research by Sucuri, 60.04% of analyzed websites had at least one backdoor, while 52.6% contained some form of SEO spam. Notably, 95.62% of these compromised websites were running on WordPress, highlighting the platform’s large user base and potential security risks if not properly managed.
19. Malware targeting WordPress security plugins
Research published in 2023 by Snicco & WeWatchYourWebsite revealed that up to 14% of malware tampers with WordFence, the most popular WordPress security plugin. Hackers often exploit old or unsupported plugins to gain access to websites. These outdated plugins may contain unpatched vulnerabilities, making it easier for attackers to inject malicious code or bypass security measures.
20. Increase in abandoned WordPress plugins and themes
In 2023, the Patchstack team reported 827 abandoned plugins and themes to the WordPress team, a significant increase from the 147 reported in 2022. Of these, 58.16% were permanently removed from the plugin repository, emphasizing the growing issue of outdated and unsupported plugins on the platform.
Wrapping up
The latest WordPress statistics paint a vivid picture of why it continues to reign as the go-to platform for businesses and individuals worldwide. Its unparalleled reach, endless customization options, and vibrant community make it a top choice for creating everything from personal blogs to dynamic, high-traffic websites.
Yet, with such widespread popularity comes the inevitable downside—WordPress is also a frequent target for cyberattacks. Fortunately, the platform continuously evolves, offering robust security updates and a vast array of plugins to safeguard against threats.
-
SEARCHENGINES7 days ago
Daily Search Forum Recap: September 11, 2024
-
WORDPRESS6 days ago
14 Tools for Creating and Selling Digital Products (Expert Pick)
-
SEARCHENGINES5 days ago
Daily Search Forum Recap: September 12, 2024
-
WORDPRESS5 days ago
How to Connect Your WordPress Site to the Fediverse – WordPress.com News
-
GOOGLE6 days ago
Google Warns About Misuse of Its Indexing API
-
SEARCHENGINES4 days ago
Daily Search Forum Recap: September 13, 2024
-
SEO5 days ago
OpenAI Claims New “o1” Model Can Reason Like A Human
-
SEO6 days ago
How to Build a Fandom by Talent-Scouting Great Content