Connect with us

WORDPRESS

How to Offer Shipment Tracking in WooCommerce (Step by Step)

Published

on

How to Offer Shipment Tracking in WooCommerce (Step by Step)

Are you looking for a way to add shipment tracking to your WooCommerce store?

With shipment tracking, customers can get real-time updates on their orders. This way, they can keep track of an upcoming delivery and enjoy a worry-free shopping experience.

In this article, we will show you how to add shipment tracking to WooCommerce to increase your customer satisfaction.
How to Offer Shipment Tracking in WooCommerce

Why Should You Add Shipment Tracking to WooCommerce?

By adding shipment tracking functionality to WooCommerce, you can increase customer trust in your brand.

When customers have no idea where their package is, this can make them worried and suspicious of your business. Giving your buyers order tracking after checkout can provide them with some peace of mind that their item is on its way.

Plus, as a store owner, having shipment tracking details in WooCommerce can help you track exactly where a package is at any given time. If there is a problem or a delay, then you can easily get in touch with the shipping company and tell your customer about the situation. This allows you to provide better customer service.

Overall, WooCommerce shipment tracking is a simple way to keep everyone in the loop and make your customers happy.

With that in mind, let’s look at how to add tracking information to your WooCommerce website. Here is a quick summary of the steps we will cover in our tutorial:

Step 1: Install and Activate the Advanced Shipment Tracking for WooCommerce Plugin

For this tutorial, we will use the Advanced Shipment Tracking for WooCommerce plugin. It is one of the top-rated WooCommerce shipping plugins on the market, and it can easily add tracking numbers to your customer account pages and order emails.

Plus, this free plugin has built-in integrations with over 300 shipping services, like FedEx, DHL, and USPS. International options like DPD, Canada Post, and Australia Post are also available.

We will use the free version of the plugin in our tutorial. If you need more advanced features, then you can use the Advanced Shipment Tracking Pro plan.

The Pro plan comes with third-party add-ons from platforms like Printful, ShipStation, and AfterShip. Plus, it is compatible with TrackShip, a post-shipping platform that can automate order status tracking for customers.

You can start by installing and activating the Advanced Shipment Tracking for WooCommerce plugin. For a step-by-step guide, check out our tutorial on how to install a WordPress plugin.

Step 2: Configure the Plugin Settings

Now, we will configure the WooCommerce shipment tracking plugin’s settings.

At this point, you will see that there is a ‘Shipment Tracking’ option in your WooCommerce menu. Go ahead and click on it to open the plugin page.
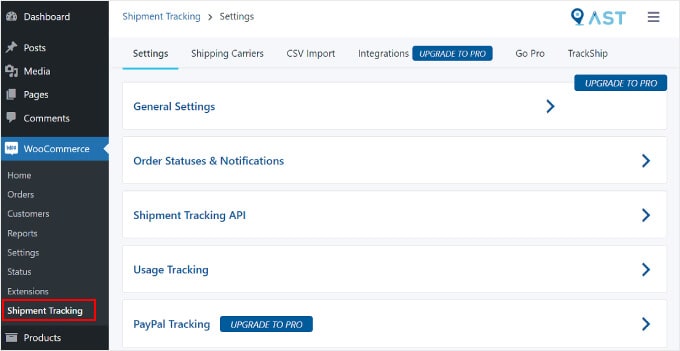
Opening the Advanced Shipment Tracking plugin page on WordPressOpening the Advanced Shipment Tracking plugin page on WordPress

On this page, there are several areas you will want to configure.

Settings

This tab contains several settings to customize your WooCommerce order tracking functionality. One is ‘General Settings’.

In the ‘Add Tracking Order action’ section, you can select the types of order statuses to display on your WooCommerce Order page.

With the ‘Order Emails Display’, you can choose which order status emails will contain a tracking URL to send to customers. The tracking information will also be available on the customer’s View Order or My Account page.

For Pro users, you can also create custom order statuses.
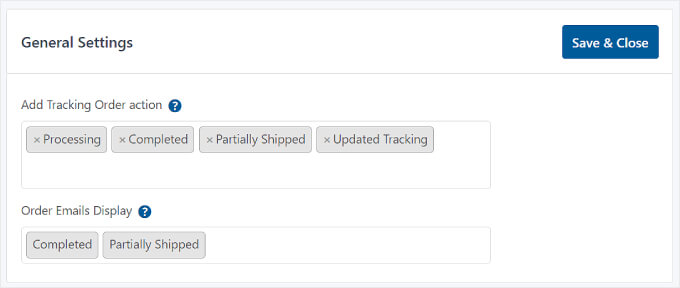
Advanced Shipment Tracking's General Settings sectionAdvanced Shipment Tracking's General Settings section

Below that is ‘Order Statuses & Notifications.’ Here, you can change if the status should say ‘Completed’ or ‘Shipped’ when the order is finished.

To edit how the order status email notification looks, you can click on the gear icon next to ‘Rename the “Completed” Order status label to “Shipped”‘.
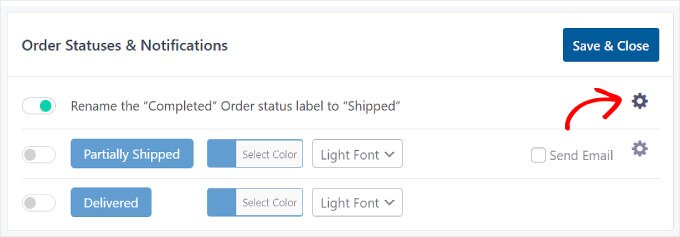
Advanced Shipment Tracking's Order Statuses & Notifications settingsAdvanced Shipment Tracking's Order Statuses & Notifications settings

You will then arrive at the ‘Email Customizer’, which looks like the WordPress Theme Customizer.

Here, you can modify the design and content of the WooCommerce order and shipping email templates.
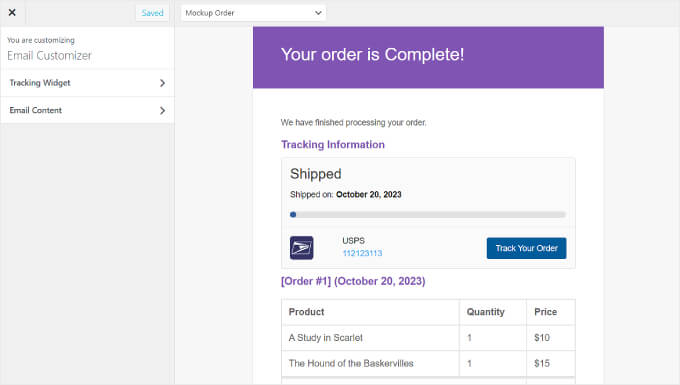
Advanced Shipment Tracking's Email CustomizerAdvanced Shipment Tracking's Email Customizer

Next is ‘Shipment Tracking API’.

This feature lets you update tracking numbers from third-party services and complete orders from external systems. This setting allows you to adjust the shipping date format when tracking information is updated from other platforms.

Unless you are using a specialized third-party platform to manage your shipping, there is no need to change this setting, and you can leave it as is.

Advanced Shipment Tracking's API settingsAdvanced Shipment Tracking's API settings

Under that setting, you will find the ‘Usage Tracking’ menu.

In this section, you can choose to get email notifications for security and feature updates and share some basic WordPress environment information with the plugin’s developers.
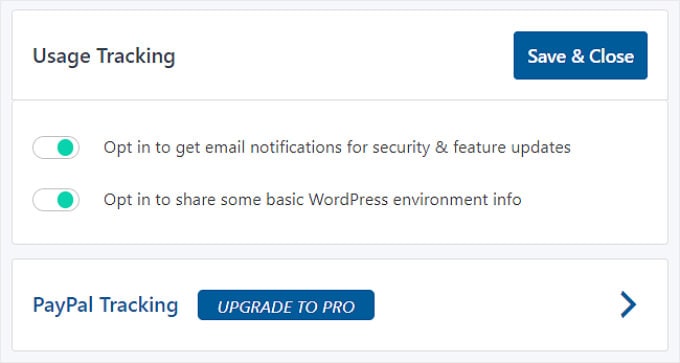
Advanced Shipment Tracking's Usage Tracking settingsAdvanced Shipment Tracking's Usage Tracking settings

At the bottom, you will see that you can also enable PayPal order tracking if you upgrade to the Pro version of Advanced Shipment Tracking. This feature will automatically send the order tracking code and status from WooCommerce to PayPal when orders have been marked ‘Shipped’ or ‘Completed’.

Once you have finished editing each shipment tracking setting, simply click the ‘Save & Close’ button.

Shipping Carriers

In the ‘Shipping Carriers’ tab, you can find over 300 shipping providers that have integrated with the Advanced Shipment Tracking plugin.

To add a shipping service to WooCommerce, just click ‘Add Shipping Carriers’.

Adding a new shipping carrier on Advanced Shipment TrackingAdding a new shipping carrier on Advanced Shipment Tracking

A window will appear on the left side of the page.

Go ahead and type in your shipping carrier’s name in the search bar and click ‘Add’ to insert them into your list.
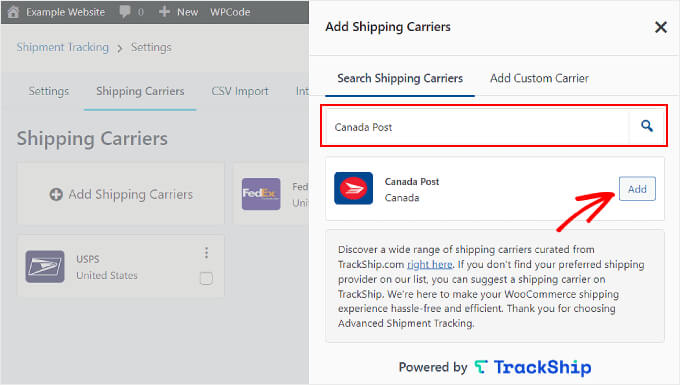
Searching for a new shipping carrier on Advanced Shipment TrackingSearching for a new shipping carrier on Advanced Shipment Tracking

At this stage, it’s also a good idea to see if your WooCommerce site already has a shipping calculator on the checkout page. This feature can help visitors easily calculate the shipping cost of their order.

If you need help, see our guide on how to add a shipping calculator to your WordPress site.

Step 3: Add Shipment Tracking Info to Your Orders

After configuring all the plugin’s settings, let’s start adding shipment tracking details to your orders in WooCommerce.

There are two ways to do this, and we will cover both methods.

Adding Shipment Tracking Info to Individual Orders

If you have a small inventory, then you can insert the shipment tracking info into individual orders.

To do this, simply go to WooCommerce » Orders. You will now see that there are ‘Status’ and ‘Shipment Tracking’ columns in your orders list.

Then, select an order to add the tracking number to. In this example, we will use order #101.
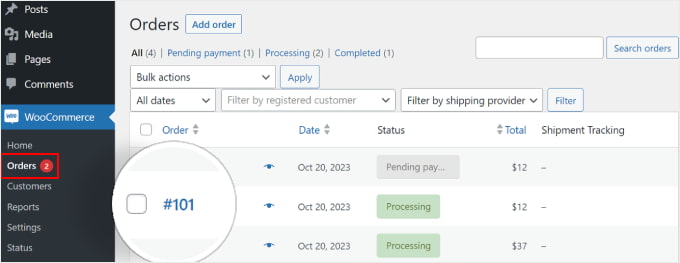
Choosing an order on WooCommerce's Orders pageChoosing an order on WooCommerce's Orders page

Alternatively, you can click the ‘Add Order’ button at the top if you are manually inserting a customer order.

After that, you will see a ‘Shipment Tracking’ section on the right side of the order page. Go ahead and click the ‘Add Tracking Info’ button.
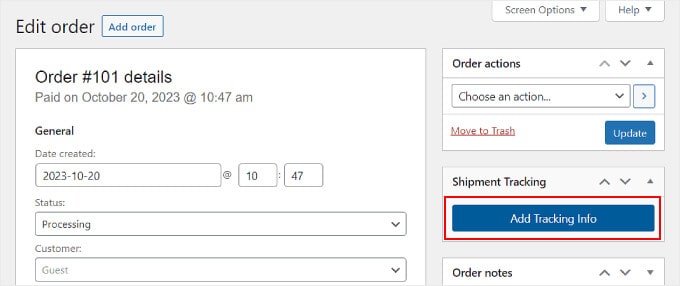
Selecting the Add Tracking Info button on the Edit order pageSelecting the Add Tracking Info button on the Edit order page

Now, a window will appear on the right side of the order page. You can insert the appropriate information in the Tracking number, Shipping Provider, and Date shipped fields.

If the order has been shipped, just tick the ‘Completed’ or ‘Shipped’ box. Otherwise, you can leave it alone.

That’s it! All you need to do now is click the ‘Fulfill Order’ button.
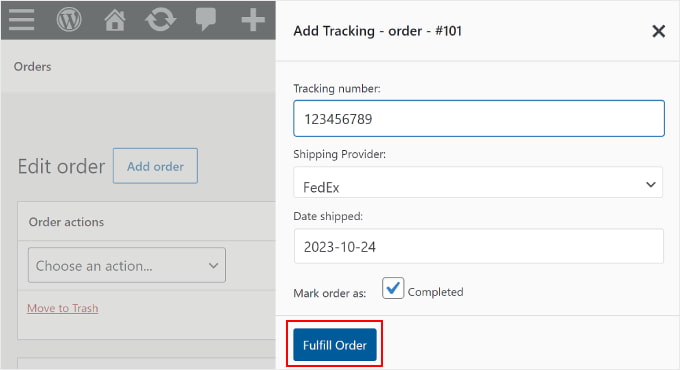
Filling out an order's tracking information on the Orders pageFilling out an order's tracking information on the Orders page

If you ticked the ‘Completed’ or ‘Shipped’ box, then clicking the ‘Fulfill Order’ button will automatically send an order email notification to the customer. The email includes a tracking link.

In some cases, you may not want to tick the ‘Completed’ or ‘Shipped’ box because the package has not been sent yet.

In that case, if you want to send the customer an email notification that their order has been delivered, then simply go back to the same order.

Then, in the ‘Order # details’ section, click on the ‘Status’ dropdown menu and change it to ‘Completed’ or ‘Shipped’. After that, click the ‘Update’ button inside the ‘Order actions’ section.
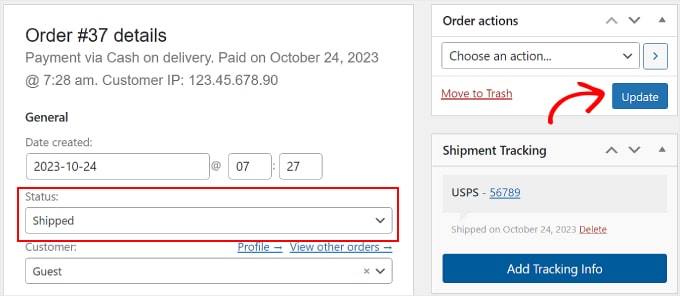
Changing an order status on WooCommerceChanging an order status on WooCommerce

Bulk Import Your Shipment Tracking Data to Your Orders

If you have a large inventory, then it’s better to create a spreadsheet CSV file of your orders with their tracking information. You can then bulk import this file to the Advanced Shipment Tracking plugin.

This way, you won’t have to manually input the order tracking details for each shipped item.

Before we continue with this method, make sure that the CSV file you have includes the following shipping tracking information:

  • Order ID
  • Shipping service
  • Tracking number
  • Order delivery date
  • Shipped status, where 1 indicates the order has been shipped, and 0 indicates it has not

Here’s a CSV file sample that the plugin provides for its users:
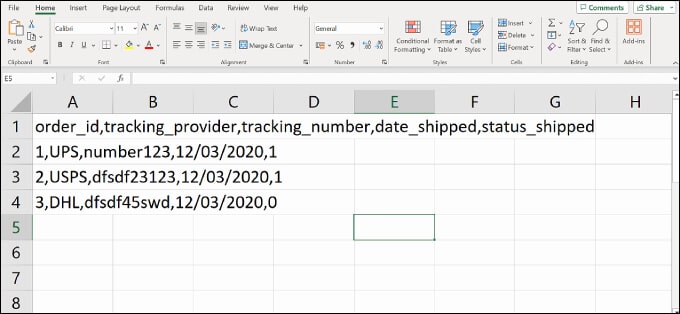
Advanced Shipment Tracking's CSV sample fileAdvanced Shipment Tracking's CSV sample file

To import a CSV file to the plugin, navigate to WooCommerce » Shipment Tracking.

Then, simply switch to the ‘CSV Import’ tab.
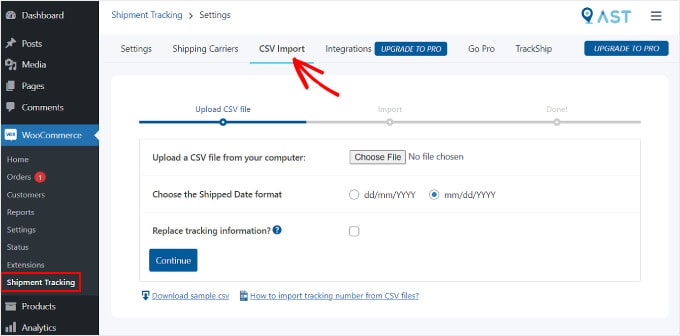
Navigating to the CSV Import tab on the Advanced Shipment Tracking plugin pageNavigating to the CSV Import tab on the Advanced Shipment Tracking plugin page

Here, you can click the ‘Choose File’ button and select your spreadsheet. Then, just pick a date format.

If you want to replace the existing tracking details for all the orders, then tick the ‘Replace tracking information?’ box.

Otherwise, you can leave the setting as is. The plugin will add the new tracking information next to the data that’s already there on the order tracking page.

Once done, you can click the ‘Continue’ button to start importing the file.

Choosing a CSV file to import with the Advanced Shipment Tracking pluginChoosing a CSV file to import with the Advanced Shipment Tracking plugin

After the upload is completed, you will get a notification like the one below.

If some imports fail, you can use the previous method of adding the order tracking information individually.
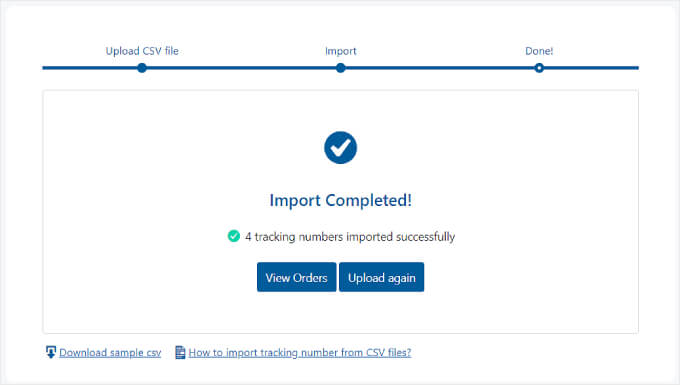
The Import Completed message by the Advanced Shipment Tracking pluginThe Import Completed message by the Advanced Shipment Tracking plugin

Step 4: Test Your Order Tracking Email Notifications

To make sure the shipment tracking runs smoothly, it’s good to preview and test your WooCommerce emails to see if the plugin works.

If you want to do this, you can go to your online store and place an order like a regular customer would. You should use your own email address so that you can see what the email notification looks like.

Then, go back to your WordPress admin panel, find your fake order, and add false tracking information by following the instructions in Step 3. You can use random numbers like ‘123456789’.

If you set the order status to ‘Completed’ or ‘Shipped’ and you receive an email with your order tracking link, then this means the tracking works.

Here’s what the email should look like. If you click the ‘Track Your Order’ button, it will lead you to the shipping provider’s website.
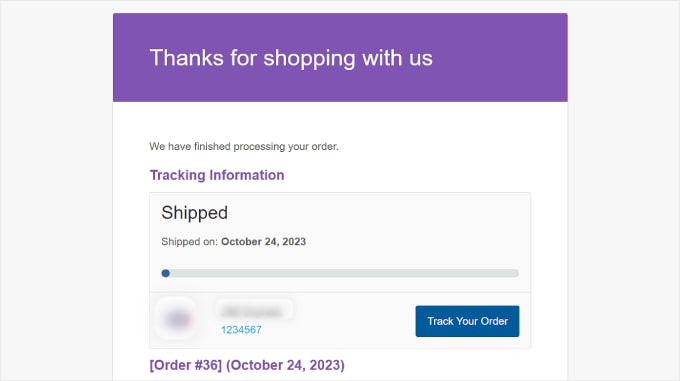
Order email notification example from Advanced Shipment Tracking pluginOrder email notification example from Advanced Shipment Tracking plugin

Bonus: Optimize Your WooCommerce Pages

Giving customers their order tracking link is just one way to optimize the customer journey in WooCommerce. However, don’t forget to improve other parts of your online store as well, like the design of your eCommerce storefront.

A user-friendly, visually appealing website can make it easier for customers to navigate your store and buy items. Not only can this boost customer satisfaction, but it will also encourage repeat purchases.

While WooCommerce comes with default store pages, not all of them may suit your business needs.

This is where SeedProd comes in. It is the best WordPress page builder plugin that makes it easy to design your WooCommerce online store.
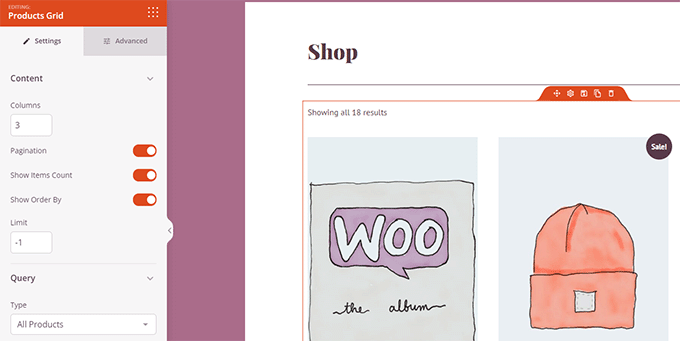
Edit product gridEdit product grid

With SeedProd, you won’t need any technical experience to make your WooCommerce site easy to navigate. You can easily customize your checkout, product pages, landing pages, and more with its handy drag-and-drop tool and page templates.

If you need a hands-on guide, head over to our tutorial on how to edit WooCommerce pages without code.

We hope this article has helped you with setting up shipment tracking on your WooCommerce website. You may also want to see our list of the best WooCommerce plugins and our guide on how to create a WooCommerce popup to boost sales.

If you liked this article, then please subscribe to our YouTube Channel for WordPress video tutorials. You can also find us on Twitter and Facebook.


Source link

Keep an eye on what we are doing
Be the first to get latest updates and exclusive content straight to your email inbox.
We promise not to spam you. You can unsubscribe at any time.
Invalid email address

WORDPRESS

How to Connect Your WordPress Site to the Fediverse – WordPress.com News

Published

on

By

How to Connect Your WordPress Site to the Fediverse – WordPress.com News

Make it easier for your audience to engage with you by connecting your site to the fediverse.

You created your website for a reason. Whether it’s showing off your art, passing on family recipes, or selling boutique high-performance yo-yos. (That may or may not be Doc Pop’s example.) You created your website to reach an audience and to communicate directly with that audience.

Wouldn’t it be great if there was an easier way for you to connect with them and make it easier for them to follow you and engage with your content online? In this final episode of the Fediverse Files, ‪Doc Pop walks you through how to connect your WordPress site to the Fediverse using ActivityPub.

Federate your website today and get 25% off a WordPress.com Business or Commerce hosting plan by using coupon code federate25—or click below:


Join 112M other subscribers

Source link

Keep an eye on what we are doing
Be the first to get latest updates and exclusive content straight to your email inbox.
We promise not to spam you. You can unsubscribe at any time.
Invalid email address
Continue Reading

WORDPRESS

14 Tools for Creating and Selling Digital Products (Expert Pick)

Published

on

By

14 Tools for Creating and Selling Digital Products (Expert Pick)

Creating and selling digital products is a great way to earn passive income and share your expertise with a global audience. But you’ll need the right tools to make it happen. Otherwise, you might waste time and money on complicated systems that don’t deliver results.

At WPBeginner, we’ve been creating digital products for over a decade, and we’ve had a lot of success using Easy Digital Downloads to sell our plugins and software. That being said, we know that other businesses might have different needs for their own online stores.

Since a lot of you have asked about what the best tools are, we’ve come up with this guide to help you choose.

We’ll share our top picks for making and selling everything from eBooks to online courses. These are tools we’ve tested ourselves, and we even use some of them in our own business.

3 Must-Have Tools for Creating and Selling Digital Products

No time to read? Here are our top 3 picks of the best platforms to make and sell digital products online:

🥇1st Place

Beacon logo

Beacon

Best for: Creating lead magnets

Pricing: Free to $99/mo

Key features: Drag-and-drop editor, templates, blog content import

Read more

🥈2nd Place

Easy Digital Downloads

Easy Digital Downloads

Best for: Selling digital downloads

Pricing: Free to $349.65/yr

Key features: Unlimited downloads, licensing, discounts

Read more

🥉 3rd Place

MemberPress logo

MemberPress

Best for: Membership sites and courses

Pricing: $179.50 to $399.50/yr

Key features: Content protection, drip content, courses

Read more

How We Tested the Best Tools to Sell Digital Products

We take our recommendations seriously, and our testing process reflects that.

Firstly, some of the tools we’ve recommended are ones we use every day in our own business.

For example, we’ve been using Easy Digital Downloads for years to sell our WordPress plugins. This hands-on experience gives us confidence in recommending this tool, as we know its strengths and limitations firsthand.

You also might notice that we’ve featured some of these tools in our other product review articles. That’s because we’ve found them consistently reliable and effective.

For other tools, our experience comes from using them for specific tutorials or projects. Through this process, we’ve discovered their strengths for particular purposes.

We’ve also tested popular options to see if they live up to their claims. Our process involved checking the tool’s features, testing it to see if it actually works as promised, and evaluating its value for money. We’ve also assessed how easy the tool is to use, especially for beginners.

Finally, we’ve paid close attention to customer reviews, like the ones from WPBeginner Solution Center. We know that sometimes we might miss certain contexts or use cases, so these reviews help complement our perspective. They’ve given us insights into how the tools perform in real life.

With that in mind, let’s check out our list of tools to create and sell digital products. We’ve divided this article into two sections, and you can skip to your preferred section using the quick links below:

Why Trust WPBeginner?

We’ve been helping people with WordPress and online businesses for over 16 years. Our team doesn’t just read about these tools – we use them every day. Our goal is to help you find the best solution for your needs, not just promote products. That’s why we test each product thoroughly on our own websites to understand what truly works.

Want to know more? Check out our detailed editorial process.

Best Tools to Create Digital Products

Whether you’re looking to generate passive income or explore new digital products to sell online, these tools can help you create various kinds of digital products efficiently and professionally.

We’ve selected a range of digital content creation tools, including some free options, to help you grow your digital product business.

1. Beacon (Lead Magnets)

beacon

Beacon is a freemium lead magnet tool that we use ourselves to create various types of content for email marketing campaigns. With its easy drag-and-drop interface, you can create digital products like eBooks, workbooks, checklists, and even video lookbooks.

What we like about Beacon is its simplicity. After signing up for a free account, you’ll go through a straightforward onboarding wizard. By answering a few questions about your goals, you can quickly select a template and start customizing it in the drag-and-drop editor.

Select the ebook option in Beacon dashboard

Beacon is designed to be as easy to use as possible, making it accessible even if you’re new to creating lead magnets. Whether you’re a seasoned marketer or just starting out, you’ll find the process intuitive and straightforward.

However, it’s worth noting that some users might find the templates a bit basic and not as stylish as they’d like.

Beacon's interface

Additionally, during our testing, we occasionally encountered issues when trying to delete certain pre-existing elements in templates. Keep this in mind when customizing your lead magnets.

Pros of Beacon:

  • Easy setup and use for quick lead magnet creation
  • Ability to import blog content directly into lead magnets
  • Dozens of templates from various industry categories and seasons
  • Multiple embedding options like inline forms, horizontal bars, and content upgrades

Cons of Beacon:

  • Templates may appear basic or less stylish compared to some alternatives
  • Some difficulty in deleting pre-existing elements in templates

Pricing: Beacon offers a free plan that includes 1 lead magnet per month, 100 leads, 1 user account, 1,000 monthly pageviews, and 500MB file storage. Paid plans range from $19 to $99 per month, with higher tiers allowing for more lead magnets and additional features.

Why we chose Beacon: We picked Beacon because it’s really easy to use for making lead magnets, which has helped us with our own email marketing. It’s simple, flexible, and has a free option, making it great for all kinds of businesses, even if you can’t customize designs too much.

2. Canva (Beginner-Friendly Graphic Design)

Canva

Canva is a popular freemium tool for graphic design that works well as a digital products maker. We’ve found Canva particularly useful for creating eye-catching social media posts and professional-looking eBooks. Many other people have also used Canva to create custom templates and sell them to fellow users.

Compared to Beacon, Canva’s designs are generally more stylish and varied. It offers a wide range of design options, including social media posts, presentations, documents, resumes, print products, websites, and videos.

Web design ideas made with Canva AI image generator

Besides a drag-and-drop editor, the platform provides pre-made color palettes, font sets, design elements, and more. You can also draw on your own designs.

That being said, Canva can sometimes be slow to use, especially when working with more complex designs. And if you use Canva on mobile or tablet, you might have to be even more patient with its performance.

Pros of Canva:

  • Easy to use while still producing professional designs
  • Huge design library with over 1 million templates, 1000 design types, and 3 million stock photos
  • Powerful premium features like AI tools and team collaboration features
  • Video editing feature is also available for creating video products like online courses

Cons of Canva:

  • Can be slow to use at times, especially with more complex designs
  • We noticed the mobile app can be a bit laggy compared to the desktop version

Pricing: Canva offers a free plan with 5GB of cloud storage. Paid plans range from $15 to $30 per month, offering more storage, premium stock photos/videos, AI tools, and team management features. A 30-day free trial is available for paid plans.

Why we chose Canva: Canva’s ease of use and professional-quality designs make it perfect for creating a wide variety of digital products to sell. For many businesses, it’s become an irreplaceable tool for quick, high-quality graphic design.

3. Google Workspace (Digital Resources)

Google Workspace landing page

Google Workspace may not be the most design-friendly tool compared to specialized platforms. That said, its widespread use makes it highly accessible. We use it across our businesses to improve efficiency and communication, but the Workspace suite can also be used to create digital products.

Many people already use these products in their daily lives or work, but they might not know how to maximize their potential. This is where you can step in and offer ready-to-use templates that enhance their Google Workspace experience.

Plus, with the recent integration of Gemini, Google’s AI assistant, using the platform for digital product creation has become even easier. We’re a big fan of it ourselves here at WPBeginner to speed up our workflow and communication.

We’ve seen numerous success stories with this approach. For instance, Luke Scarpino on TikTok shared a Google Sheets template for efficient travel packing. His video went viral, and he now sells a pro packing template, showcasing the potential for monetizing these digital resources.

Luke Scarpino's travel packing spreadsheet on TikTok

Pros of Google Workspace:

  • Free to get started
  • Gemini integration helps with AI content creation
  • Accessible and familiar to a wide audience who already use these products
  • Easy collaboration features for team projects

Cons of Google Workspace:

  • May not be the most flexible for complex designs
  • Limited customization options compared to specialized design tools

Pricing: Google Workspace is free for basic use. For additional features like custom domains, advanced security, and more storage, prices range from $3.60 to $ 18 per user per month.

Why we chose Google Workspace: Its massive user base provides a ready market for your digital products. With the Gemini AI integration, it’s an ideal platform for creators to sell templates and resources despite some design limitations.

4. Adobe Illustrator (Logos/Digital Illustrations)

Adobe Illustrator landing page

If you’re looking to create and sell licensed digital art, Adobe Illustrator is a powerful tool to consider.

We have used it in the past to create featured images and other graphics for our blog posts. It’s a popular vector graphics software used by professionals to create digital illustrations.

While Adobe products are known for their higher price point, they’re often seen as a worthwhile investment, and we feel the same way. There is a learning curve, but once mastered, Illustrator offers great perks.

For one, designs made with Illustrator are highly scalable. This is great for creating logos, custom fonts, and other digital illustrations with income potential. Additionally, the designs you create in Illustrator are suitable for professional printing, which opens up more monetization opportunities.

Pros of Adobe Illustrator:

  • Creates scalable designs, perfect for logos and illustrations
  • Industry-standard, lending professional credibility to your work
  • Versatile for various projects: web graphics, mobile apps, infographics, prints, logos
  • Integrates well with other Adobe products for professional work

Cons of Adobe Illustrator:

  • Can be overwhelming for beginners
  • Costly subscription model
  • Requires a powerful computer for optimal performance

Pricing: Adobe Illustrator costs $22.99 per month. Alternatively, you can get the Adobe Creative Cloud suite, which includes 20+ Adobe apps, for $59.99 per month. A 7-day free trial is available.

Why we chose Adobe Illustrator: Adobe Illustrator’s versatility makes it an excellent choice for artists looking to create and sell high-quality digital art, despite its steeper learning curve and cost.

5. MPL-Publisher (WordPress eBook/Audiobook Creator)

MPL-Publisher landing page

MPL-Publisher is a WordPress plugin that helps you turn multiple blog posts into an eBook or audiobook you can sell. It makes creating and selling digital content from your WordPress website easier.

We downloaded and thoroughly tested this plugin to check out all its features. And our favorite thing about the plugin is how well MPL-Publisher works with WordPress.

Once installed, you can easily add your book details, make a cover, adjust the design, and choose which posts to include.

Filtering Posts in MPL-Publisher

The process is pretty straightforward, which is why we talked about it in our guide on making eBooks in WordPress. We also liked being able to edit the content to make it fit better in an eBook format and save the book as a MOBI, PDF, or audiobook file.

However, MPL-Publisher’s templates aren’t as fancy as those in Beacon or Canva. If you want to make big changes to how your eBook looks, you might need to know some custom CSS.

Pros of MPL-Publisher:

  • Works well with WordPress and easily imports posts
  • Offers multiple eBook download formats like ePub, audiobook, and PDF
  • Lets you edit post content in the plugin for better eBooks

Cons of MPL-Publisher:

  • Offers fewer template options than some other tools and may require CSS knowledge for advanced customization
  • Book cover editor only available in the paid version

Pricing: MPL-Publisher has a free version with 50 chapters per book and 2 book designs. The premium version costs $49 per site and includes no ads, unlimited books, and a book cover maker.

Why we chose MPL-Publisher: This plugin is great for turning WordPress blog posts into sellable eBooks or audiobooks. It’s user-friendly and offers various export options, making it a good choice for WordPress users who want to sell digital content.

6. Audacity (Music and Audio Products)

Audacity landing page

Do you have a knack for sound and enjoy working with audio? If so, you can use Audacity as a digital products maker, turning your talent into money by creating various audio goods.

Audacity is a free audio editing and recording app that works on Windows, Mac, and Linux computers. While music production is an obvious choice, you don’t need to be musically gifted to benefit from this tool.

You can also make audiobooks, record guided meditations, capture nature sounds for relaxing tracks, create podcast intros, or even design sound effects for games or videos.

That said, we have to admit that using Audacity wasn’t always easy because its layout looks a bit old-fashioned. However, since the software is open-source, we discovered lots of helpful YouTube tutorials and a big community of users ready to assist.

Pros of Audacity:

  • Free and open-source
  • Has a helpful community of users
  • Comes with built-in effects and works with audio.com resources
  • Works on different types of computers

Cons of Audacity:

  • The interface looks outdated
  • Not the best for multitrack music recording and editing

Pricing: Audacity is completely free to use, with no need to buy a license.

Why we chose Audacity: Even though it looks a bit old, Audacity is a powerful, free tool for making many kinds of audio products. Its open-source nature, supportive community, and flexibility make it a great choice for beginners in digital audio creation.

7. Adobe Photoshop (Photo Editing)

Adobe Photoshop landing page

Unlike Illustrator, Adobe Photoshop focuses more on editing photos and making graphics that don’t need to be as easily resized. We have used it extensively across our business to create and edit attractive and professional-looking images.

With Photoshop, you can edit photos to sell as stock images, create mockups for various products, design custom brushes or photo presets, and even make digital planners or bullet journals. The software’s flexibility makes it great for creating many different digital products.

We know that Photoshop can be hard to learn, especially compared to simpler tools like Canva. But once you get used to it, you can do so much more. It’s expensive, but it can be worth it if you’re serious about making professional-quality digital products.

Pros of Adobe Photoshop:

  • Good for creating many types of visual digital products
  • Works with many file types like JPEG, PNG, GIF, TIFF, and PDF
  • Lots of tutorials and courses are available to help you learn Adobe Photoshop
  • Many brushes and filters online you can download to boost creativity

Cons of Adobe Photoshop:

  • It is expensive, and some extra tools like brushes/filters cost more
  • Takes time to learn how to use it well
  • Needs a powerful computer to run smoothly

Pricing: Adobe Photoshop costs $22.99 per month. Or, you can get the Adobe Creative Cloud package, which includes over 20 Adobe apps, for $59.99 per month.

Why we chose Adobe Photoshop: Even though it’s not easy to learn, Photoshop is incredibly versatile and powerful for high-quality digital product creation. Its wide range of features and how well it works with other Adobe products make it a great choice for serious digital creators.

8. Create Block Theme (WordPress Block Themes)

Create Block Theme plugin banner

WordPress block themes are becoming more popular, but there aren’t as many of them as classic themes or themes made with page builders. This means you have a chance to create and sell your own block themes.

The good news is you can use the free Create Block Theme plugin to make your themes. We’ve used it to change our block themes and make custom designs. It’s also great for making child block themes.

From our experience, it’s an easier way to create block themes, even if you’ve never done it before. You can design your theme right in WordPress, which makes it less scary if you’re new to custom theme development.

Saving a child block theme's changes using the Create Block Theme plugin

However, keep in mind that this plugin only works for block themes. Right now, not as many people use block themes, so your market might be small. But as more people start using the full site editor in WordPress, block themes will likely become more popular.

Pros of Create Block Theme:

  • Works well with the full site editor
  • Easy to use and helps you design themes visually
  • Lets you make new themes based on themes you’re already using

Cons of Create Block Theme:

  • You can only use it to make block themes, not other types

Pricing: Create Block Theme is free to use.

Why we chose Create Block Theme: This plugin makes it possible for more people to create themes, even if they don’t know how to code. As block themes become more common, Create Block Theme is a great way for WordPress users to start selling their own themes.

9. Divi (WordPress Themes Made With Divi)

Divi landing page

If you’ve been using WordPress for a while, you probably know about Divi. It’s a popular tool for building pages and themes, and we rank it third in our theme builder review.

But did you know you can also make and sell Divi child themes and layouts on their creative marketplace?

Divi is widely used, which means there are lots of people who might want to buy your themes or layouts. We’ve also found the platform to be really easy for beginners to use, thanks to its drag-and-drop design, customizable parts, and dynamic content features.

Look at DiviFlash as an example. It’s a Divi plugin that’s been featured on HubSpot.

DiviFlash landing page

You could create something like this, too!

One thing to keep in mind is that everything you submit to the Divi marketplace is checked by the Elegant Themes team. This helps ensure quality but can also slow down how quickly your products or updates are available to buy.

Pros of Divi:

  • Easy to learn, so you can make layouts or child themes quickly
  • You get 70% of each sale you make on the Divi Marketplace
  • Lots of potential customers because Divi is so popular

Cons of Divi:

  • The review process can slow down your product releases and updates
  • You need to keep updating your products to work with the latest version of Divi

Pricing: Yearly plans cost from $89 to $277 per year, with a 30-day money-back guarantee. You can also pay once for lifetime access, which costs $249 to $297.

Why we chose Divi: Divi gives you a great chance to sell to lots of WordPress users who want custom themes and layouts. It’s easy to use and has a big marketplace, making it a great place for creators to design and sell digital products that could become very popular.

10. Camtasia (Video Digital Products)

Camtasia landing page

If you’re comfortable being on camera, you might be good at creating video digital products like online courses. Camtasia is a great tool for this kind of work. It ranks second in our list of video editing software.

We recommend Camtasia over other tools because it has a built-in screen recording feature. This means you can easily capture what’s happening on your computer screen while you’re teaching. It even records audio and mouse movements, which is really helpful for step-by-step tutorials.

Camtasia isn’t just for recording. You can also edit your videos using its many features like filters, transitions, on-screen text, animations, sound effects, and even royalty-free video clips. So, even if you don’t want to be on camera, you can still use Camtasia to create videos made from other clips.

Overall, Camtasia has worked well for us so far. However, some users have reported that it doesn’t always run smoothly on Mac computers.

Pros of Camtasia:

  • All-in-one solution: screen recording, audio recording, and mouse recording
  • Lots of editing resources: 30 filters, 150 transitions, unlimited royalty-free music
  • AI detection for filler words like ‘um’ and ‘uh’
  • Easier to use compared to other platforms like Adobe Premiere Pro

Cons of Camtasia:

  • Some users report performance issues on Mac

Pricing: Camtasia costs between $134.91 and $375.25 per year. You can try it for free for 7 days.

Why we chose Camtasia: Its combination of easy-to-use screen recording and comprehensive editing tools makes it ideal for producing and selling high-quality videos, even for those new to video creation.

Best Platforms to Sell Digital Products

Now that you’ve created your digital products, the next step is finding the right place to sell and market your digital products. The platforms we’re about to discuss can help you grow your business and optimize your sales process.

You may notice we don’t include digital product marketplaces on our list. That’s because of some long-term problems with using them, which is explained very well in this expert quote:

Third-party marketplaces do make sign-up easy and have a low initial cost. However, you’ll end up paying high transaction fees of up to 30% for every product you sell. You also don’t own your own data; you just rent it.

Your product listings, customer information, and purchase data are all stored on someone else’s server. Migrating to a different platform later can be extremely difficult, if not impossible.

Chris KlosowskiChris Klosowski, Easy Digital Downloads founder

1. Easy Digital Downloads (Digital Products Only)

The Easy Digital Downloads eCommerce and digital marketplace plugin

Easy Digital Downloads (EDD) is the tool we use to sell our premium WordPress plugins and digital downloads. Over the years, it’s proven to be a reliable solution that has helped grow our business and thousands of others.

For more details, see our complete Easy Digital Downloads review.

For instance, EscapeRoomGeeks uses EDD to sell printable Escape Room Kits, while SetSailStudios sells downloadable fonts through this platform.

Set Sail Studios Make Money Selling Unique Fonts

We love EDD because it makes it so simple to set up an online store for digital products. The onboarding wizard guides you through the setup process step by step, so it’s hard to get lost.

Another great feature is its automation capabilities. These streamline our workflows by collecting recurring subscription payments, offering content upgrades, and managing renewals. This saves us a lot of time and effort in managing our digital products.

Setting up recurring payments using a digital eCommerce plugin

The only downside we can think of is that EDD doesn’t allow physical products. However, this focus on digital products means its features are optimized for selling downloads.

Pros of Easy Digital Downloads:

  • Easy setup with guided onboarding
  • Automatically creates eCommerce pages like checkout and receipt
  • Unlimited file downloads with no bandwidth charges
  • Powerful software licensing support
  • Flexible discount options
  • You can add a free trial to your products

Cons of Easy Digital Downloads:

  • Limited to digital products only, which is not ideal if you plan to expand into physical products

Pricing: There’s a free version available with basic features like Stripe, PayPal, Apple/Google Pay integration, shopping cart, and basic eCommerce reporting.

Paid plans range from $89.55 to $349.65 per year for more advanced features, payment options, and unlimited products. To get the best deal out of your purchase, you can use our Easy Digital Downloads coupon code and claim a 50% discount.

Why we chose Easy Digital Downloads: As longtime users, we can vouch for EDD’s reliability and effectiveness in selling digital products. Its user-friendly setup and powerful features make it an excellent choice for anyone looking to start their digital download business.

We also recommend using SiteGround’s EDD Hosting to make sure your website is online at all times.

2. MemberPress (Memberships/Online Courses)

MemberPress

MemberPress stands out as a top choice for creating subscription-based content or online courses. We’ve personally used this plugin for our WPBeginner video membership site, which has significantly helped us grow our email list.

For more information, see our MemberPress review.

MemberPress makes setting up a membership site straightforward. It automatically creates essential pages for pricing, login, account, and a thank you message for your users. This saves you time and ensures a professional setup from the start.

What we love about MemberPress the most is its membership-specific features. It offers drip content, a client portal, group memberships, and add-ons for specific types of services like online coaching. This way, you don’t need to install another plugin to build your membership business.

Restricting content based on membership level

With MemberPress, you can easily restrict access to specific content based on membership tiers, individual members, or a combination of both. This means you can create tailored experiences for different membership levels, ensuring your premium content stays exclusive.

One critique we have for MemberPress is it doesn’t have any free version. That being said, it’s a worthy investment, especially considering everything you’re getting in just one platform.

Pros of MemberPress:

  • Flexible content protection rules for various scenarios
  • Optimized for memberships with features like drip content (releasing lessons over time) and subscription billing
  • Easy setup process with automatic page creation for a membership website
  • Supports unlimited membership levels
  • Compatible with major payment gateways, including PayPal, Stripe, and Authorize.net

Cons of MemberPress:

  • No free version available

Pricing: MemberPress offers annual plans starting from $179.50 and going up to $399.50 per year. The basic plan allows usage on one website and includes unlimited members, unlimited courses, and no transaction fees. A 14-day money-back guarantee is available.

Also, feel free to use our MemberPress coupon code to save up to 50% off of your plan.

Why we chose MemberPress: It’s an excellent all-in-one solution for anyone serious about creating a membership or online course platform. Our experience with the plugin has shown us that it can handle even complex membership structures with ease.

Alternative: Not a fan of MemberPress for online courses? Check out Thrive Apprentice, another powerful platform.

3. WooCommerce (Physical + Digital Products)

WooCommerce

WooCommerce is the most popular WordPress eCommerce plugin and is used by millions of online stores. We’ve used it ourselves and can see why it’s so widely loved.

First off, WooCommerce is free. You can start selling immediately without spending a dime, using payment options like bank transfer, cash on delivery, and PayPal.

We also like how it creates important store pages for you, such as checkout and product pages, which saves you hours of work.

eCommerce reports, in the WordPress dashboard

Another great thing about WooCommerce is how flexible it is. There are tons of WooCommerce extensions you can add to make your store do more. This means you only pay for extra features you actually need.

Our personal favorite is FunnelKit, which is a plugin that helps boost sales by optimizing your checkout, adding order bumps, and more.

One downside is that there are so many WooCommerce extensions that it can feel a bit overwhelming at first. Plus, there is no direct support. That being said, the WooCommerce community is very large, so it’s easy to find resources to help with your issues.

Pros of WooCommerce:

  • Free and easy to set up
  • Works for both digital and physical products (great if you sell ebooks and printed books, for example)
  • Lots of free and paid extensions to improve your store and sales
  • Built-in analytics to track how your store is doing

Cons of WooCommerce:

  • The huge number of extensions can be confusing
  • No official support team (but the community is very helpful)

Pricing: WooCommerce itself is free, but plugins can cost anywhere from $1 to $299 per year.

Why we chose WooCommerce: We love how WooCommerce can handle both digital and physical products and that you can customize it with plugins to fit exactly what you need. It’s free to start with, and there’s a big community to help you out.

If you’re interested in using WoCoomerce, we recommend using the Bluehost WooCommerce hosting to get your online store up and running.

You can find out more about the platform in our WooCommerce review.

4. WP Simple Pay (Single-Product Online Store)

WP Simple Pay

WP Simple Pay is an excellent choice for those looking to sell a single product or service without the complexity of a full eCommerce platform. We’ve found it to be one of the most straightforward Stripe payment plugins, making it perfect for small businesses just starting out.

For more details, see our WP Simple Pay review.

In our experience, Stripe’s ease of use for both merchants and customers is unparalleled. The setup for businesses is not as lengthy as other platforms, so long as your entity is legitimate. Plus, your customers can make payments directly on your site without needing their own Stripe account.

We’ve tested numerous Stripe plugins, and this one stands out for its simplicity. You only need to connect your website to Stripe and create a payment form, and that’s it. The 70+ form templates covering various business types save you time and ensure your payment form looks professional.

Adding custom fields to a payment form

The drag-and-drop form builder also lets you customize the payment form using its built-in field options. This way, the form can be tailored to perfectly match your payment form needs.

Unfortunately, Stripe is not available in all countries. So, if you need an alternative, you might need to look at another payment form like WPForms.

Pros of WP Simple Pay:

  • Free version available
  • No transaction fees, which keeps more money in your pocket
  • Easy setup and customization with form templates and drag-and-drop builder
  • Accepts 14+ payment methods, including Apple Pay and Google Pay
  • Automatic tax calculation setup for accurate pricing

Cons of WP Simple Pay:

  • Some countries may not be able to use Stripe

Pricing: WP Simple Pay offers a free version for basic needs. Paid plans start from $49.50 and go up to $299.50 per year. The most affordable plan allows usage on one site, with unlimited payment forms/transactions and no transaction or monthly fees.

You can also use our WP Simple Pay coupon code to get 50% off of your first purchase.

Why we chose WP Simple Pay: We picked WP Simple Pay because it makes it incredibly easy to set up Stripe payments on WordPress. It’s simple to use, highly customizable, and has smart features like automatic tax calculation.

What Are the Best Platforms for Creating and Selling Digital Products?

In this list, we’ve reviewed a lot of different platforms for digital product creation, but the best one depends on your needs.

If you want to make free guides or eBooks to get more email subscribers, Beacon is our top pick. We use it ourselves and really like how easy it is.

You can quickly make eBooks, workbooks, and checklists without any design skills. It’s great for beginners and pros alike, with a free plan and cheap paid options if you need more features.

Next, we recommend Easy Digital Downloads for anyone starting to sell digital products. We’ve used it for years to sell our WordPress plugins, and it works really well.

EDD makes it simple to set up your store, automate sales, and offer discounts. Just remember, it’s only for digital items, not physical ones.

If you want to create a membership website or sell online courses, go with MemberPress. We used it for our WPBeginner video lessons, and it helped us get more email subscribers. It has everything you need, like drip content and ways to manage different membership levels.

Creating and Selling Digital Products FAQs

Now that we’ve gone through our list of the best tools for creating and selling digital products online, let’s answer some frequently asked questions:

Which is the easiest digital product to create and sell?

eBooks, printables, and templates are popular types of digital products that beginners can create and sell quickly. These digital product ideas require minimal technical skills and can be made using tools like Beacon, Canva, or Google Docs.

Just make sure to create these products based on your existing knowledge or skills. For more inspiration, check out our list of the most popular digital products you can sell online.

How and where do I create digital products as a beginner?

As a beginner, you can start creating digital products using free or low-cost tools like Beacon, Canva, or Google Docs. Choose a product type that aligns with your skills, and use platforms like Easy Digital Downloads to start selling digital products online.

Can you really make money selling digital products?

Yes, you can definitely make money selling digital products. In fact, our founder, Syed Balkhi, is a great example of this, as he’s been successfully selling digital products like freemium WordPress plugins for years. 

The key is to create high-quality products that solve real problems for your audience. For more insights, check out this article on key lessons learned by Chris Klosowski (Easy Digital Downloads founder) after selling digital downloads for over a decade.

More Expert Tips to Start a Digital Product Business

If you’re looking for more tips about starting a digital product business, you may also be interested in these articles:

We hope this article has helped you discover the best tools for creating and selling digital products. You may also want to check out our expert picks of the best WordPress jQuery plugins and our list of excellent WordPress website examples you should check out.

If you liked this article, then please subscribe to our YouTube Channel for WordPress video tutorials. You can also find us on Twitter and Facebook.


Source link

Keep an eye on what we are doing
Be the first to get latest updates and exclusive content straight to your email inbox.
We promise not to spam you. You can unsubscribe at any time.
Invalid email address
Continue Reading

WORDPRESS

The Secrets of One of the World’s Largest Ad-Free Blogs – WordPress.com News

Published

on

By

The Secrets of One of the World’s Largest Ad-Free Blogs – WordPress.com News

There are no secrets about how PostSecret handles millions of visitors.

Since moving PostSecret to WordPress.com in 2013, Frank Warren’s iconic platform has empowered millions to share their secrets in a safe place. In the last ten years, that simple mission has propelled PostSecret to become one of the most highly trafficked ad-free blogs on the planet. In this video, Frank dives into the origins of his project and how Automattic’s tools help bring the mission to life.

Learn more about PostSecret and get an exclusive coupon when you click below:

Or, apply coupon code PostSecret15 at checkout for 15% off any plan.


Join 108.9M other subscribers

Source link

Keep an eye on what we are doing
Be the first to get latest updates and exclusive content straight to your email inbox.
We promise not to spam you. You can unsubscribe at any time.
Invalid email address
Continue Reading

Trending