WORDPRESS
Maximizing Customer Data Collection with Custom Registration Fields in WooCommerce

In today’s digital age, data is king; for online retailers, customer data is everything. With the help of customer data, businesses can get valuable insights into the buying patterns of their customers. Custom registration fields are one of the best ways to collect customer data. This blog post will discuss how to maximize customer data collection with custom registration fields in WooCommerce.
What are Custom Registration Fields in WooCommerce?
Custom registration fields are additional fields that can be added to the registration form on your WooCommerce website. By default, WooCommerce only collects basic customer information such as name, email address, and billing and shipping address. However, adding custom registration fields allows you to collect additional information such as date of birth, gender, occupation, and more.
Why Maximize Customer Data Collection?
Today, customer data is nothing less than a gold mine for online sellers. As per the study, as of January 2023, there were 5.16 billion internet users worldwide, which is 64.4% of the global population.
You can get valuable insights into your customers’ preferences, behaviors, and buying patterns through customer data collection. You can use customer-centric data to create targeted marketing campaigns, personalized product recommendations, and more. Also, customer data can help you improve your website and make it more user-friendly.
How to Maximize Customer Data Collection with Custom Registration Fields in WooCommerce?
• Identify the Data You Want to Collect

When identifying the data you want to collect through custom registration fields, it’s essential to consider what information will be most helpful to your business. This will depend on your industry, your business goals, and the type of products or services you offer.
Following are a few examples of data that you might want to collect:
- Personal information such as name, email address, and phone number
- Demographic information such as age, gender, and location
- Information about customers’ preferences and interests, such as favorite products or styles
- Information about customers’ behavior, such as purchase history and frequency
By collecting this type of data, you can better understand your customers and tailor your marketing efforts accordingly. For example, if many of your customers are interested in a particular product type, you can focus your marketing efforts on that category.
• Add Custom Registration Fields to Your Website
Once you have identified the data you want to collect, you can add custom registration fields to your WooCommerce website. There are a few different ways to do this, but one of the easiest is to use a plugin such as WooCommerce Registration Fields or Advanced Custom Fields.
With these plugins, you can easily add custom fields to your registration form and customize the fields to collect the specific information you want. You can also choose whether the fields are required or optional.
• Make Fields Required
To maximize your data collection efforts, make the custom registration fields required. This means that customers can only complete the registration process after filling in all of the required fields.
By making the fields required, you ensure that you collect as much data as possible from each customer. This data can be invaluable in helping you better understand your customers and tailor your marketing efforts accordingly.
• Use the Data for Marketing Campaigns

Finally, you can use the data you collect through custom registration fields to create targeted marketing campaigns. For example, if you collect information about customers’ birthdays, you can create special birthday offers for customers on their special day. Similarly, if you collect information about customers’ preferences or interests, you can use this information to create targeted email campaigns or social media ads.
By using customer data to create targeted marketing campaigns, you can increase the effectiveness of your marketing efforts and drive more sales for your business.
• How to Add Custom Registration Form Fields
The steps will manually guide you to add custom registration fields to your WooCommerce site.
1st Step: Enable “Customer Registration”
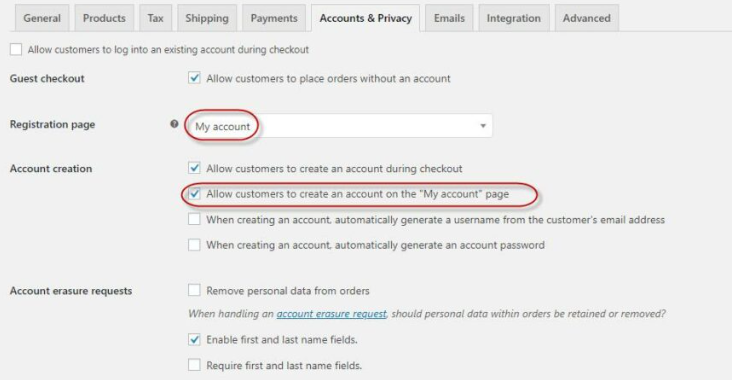
The first step is to enable the “WooCommerce registration forms” on the account login page. To implement,
Navigate to WooCommerce > Settings > Accounts
Checkmark “Enable Customer Registration” on the ‘My Account’ page.

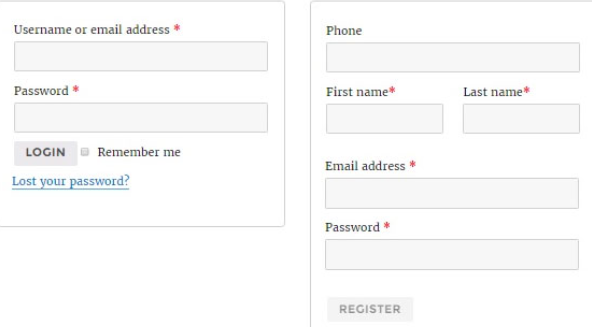
Once you enable the option, you can see the WooCommerce registration as a front-end version.
2nd step: Insert Custom Code in Functions.PHP File
The default WooCommerce registration form has limited relevant fields, making it relatively simplistic. However, it is possible to enhance the form by adding additional fields of your preference.
To achieve this, simply add the following code to the functions.php file in your theme folder. This will enable you to incorporate new fields, including first and last name, phone number, and other custom fields you may require.
function wooc_extra_register_fields() {?>
<p class=”form-row form-row-wide”>
<label for=”reg_billing_phone”><?php _e( ‘Phone’, ‘woocommerce’ ); ?></label>
<input type=”text” class=”input-text” name=”billing_phone” id=”reg_billing_phone” value=”<?php esc_attr_e( $_POST[‘billing_phone’] ); ?>” />
</p>
<p class=”form-row form-row-first”>
<label for=”reg_billing_first_name”><?php _e( ‘First name’, ‘woocommerce’ ); ?><span class=”required”>*</span></label>
<input type=”text” class=”input-text” name=”billing_first_name” id=”reg_billing_first_name” value=”<?php if ( ! empty( $_POST[‘billing_first_name’] ) ) esc_attr_e( $_POST[‘billing_first_name’] ); ?>” />
</p>
<p class=”form-row form-row-last”>
<label for=”reg_billing_last_name”><?php _e( ‘Last name’, ‘woocommerce’ ); ?><span class=”required”>*</span></label>
<input type=”text” class=”input-text” name=”billing_last_name” id=”reg_billing_last_name” value=”<?php if ( ! empty( $_POST[‘billing_last_name’] ) ) esc_attr_e( $_POST[‘billing_last_name’] ); ?>” />
</p>
<div class=”clear”></div>
<?php
}
add_action( ‘woocommerce_register_form_start’, ‘wooc_extra_register_fields’ );
If you reload the page after inserting the code, you’ll see that the fields have been updated on the WooCommerce registration form.

“billing_” before the respective field name. This ensures that the information the customer enters is correctly processed and associated with the appropriate billing details.
Now that we understand how to add custom fields to our registration form, let’s look at a comprehensive list of WooCommerce form fields. This will help us further enhance our website’s functionality and user experience, providing customers with a seamless shopping experience.
· billing_first_name
· billing_last_name
· billing_state
· billing_country
· billing_city
· billing_phone
· billing_company
· billing_address
· billing_email
· billing_postcode
3rd Step: Form Fields Validation
After custom field creation, you must validate the newly inserted form fields.
For structure field validation, insert the accompanying code lines towards the end of the functions.php file in the theme folder.
/**
* register fields Validating.
*/
function wooc_validate_extra_register_fields( $username, $email, $validation_errors ) {
if ( isset( $_POST[‘billing_first_name’] ) && empty( $_POST[‘billing_first_name’] ) ) {
$validation_errors->add( ‘billing_first_name_error’, __( ‘Error: First name is required!’, ‘woocommerce’ ) );
}
if ( isset( $_POST[‘billing_last_name’] ) && empty( $_POST[‘billing_last_name’] ) ) {
$validation_errors->add( ‘billing_last_name_error’, __( ‘Error: Last name is required!.’, ‘woocommerce’ ) );
}
return $validation_errors;
}
add_action( ‘woocommerce_register_post’, ‘wooc_validate_extra_register_fields’, 10, 3 );
The code above validates the $_POST array and generates an error message if any values are missing or incorrect. It also allows for customized validation rules to be applied to specific fields.
4th Step: Save Your Values in the Database
Now, we have to save the values in the database. For value insertion in the database, put the following function in the theme’s functions.php file.
/**
* Below code saves extra fields.
*/
function wooc_save_extra_register_fields( $customer_id ) {
if ( isset( $_POST[‘billing_phone’] ) ) {
// Phone input filed which is used in WooCommerce
update_user_meta( $customer_id, ‘billing_phone’, sanitize_text_field( $_POST[‘billing_phone’] ) );
}
if ( isset( $_POST[‘billing_first_name’] ) ) {
//First name field which is by default
update_user_meta( $customer_id, ‘first_name’, sanitize_text_field( $_POST[‘billing_first_name’] ) );
// First name field which is used in WooCommerce
update_user_meta( $customer_id, ‘billing_first_name’, sanitize_text_field( $_POST[‘billing_first_name’] ) );
}
if ( isset( $_POST[‘billing_last_name’] ) ) {
// Last name field which is by default
update_user_meta( $customer_id, ‘last_name’, sanitize_text_field( $_POST[‘billing_last_name’] ) );
// Last name field, which is used in WooCommerce
update_user_meta( $customer_id, ‘billing_last_name’, sanitize_text_field( $_POST[‘billing_last_name’] ) );
}
}
add_action( ‘woocommerce_created_customer’, ‘wooc_save_extra_register_fields’ );
Wrap Up
Custom registration fields in WooCommerce are a powerful tool for collecting customer data. You can maximize your customer data collection efforts by identifying the data and adding custom registration fields to your website. Data utilization allows you to make marketing campaigns seamlessly successful, make personalized product recommendations, drive sales, and grow your business.


