Connect with us
Cloak And Track Your Affiliate Links With Our User-Friendly Link Cloaking Tool, Try It Free

WORDPRESS

Your Quick Guide in 2023

Published

on

Your Quick Guide in 2023

Selling digital downloads is a great way to earn some passive income from a one-time investment in creating an ebook, audio file, webinar, and more. You can make decent money by automating the process without having to fulfill every order on your own. All you have to do is learn how to sell digital downloads on WordPress. 

Fortunately, selling your new files is a piece of cake. All you really need are a few easy-to-use tools. Depending on your needs, you can choose one from this list of the top plugins for WordPress sites that cater to a digital download model.

In this article, we walk you through the step-by-step instructions to help you start selling digital downloads in less than an hour. And if your product is already created and ready to go, this article is for you! 

Let’s dive in.

Plugins to Sell Digital Downloads on WordPress 

The easiest way to sell digital downloads on WordPress is through a robust plugin. Once your site is set up and hosted, you can easily venture over to the plugin library and browse the options. 

To make your decision easier, we have included this handy guide to the top plugins that you should consider. 

Easy Digital Downloads

Perhaps the most highly recommended plugin to help you sell digital downloads on WordPress is Easy Digital Downloads. It might be a little more expensive than some of the other options on the market, but it’s well worth the expense if you’re serious about your digital products. 

Not to mention, it has a free option that will likely give you all the tools you need to start to sell downloads with minimal hassle. 

On the front end, it is extremely user-friendly and takes just minutes to set up (we’ll cover how to do this in the second half of this article). In fact, you will find that once your digital product has already been created, you can get it ready to download for your customer in less than a half hour — even less if you’re particularly savvy with WordPress’s web hosting control panel. 

It allows you to take credit card payments using most of the major gateways, including Stripe, Apple Pay, Google Pay, and even PayPal. 

Pros


  • Takes just a few minutes to set up
  • Works with most payment processors
  • Easy to set up payment gateway
  • Can add whole pages into your menu or use shortcode to embed the cart
  • Compatible with all WordPress themes

Cons


  • Can be a bit expensive for users who are just getting started (except for free version)
  • No lifetime sales option (only annual subscriptions)

Pricing: Easy Digital Downloads starts at $99.50 per year and scales to $499.50 per year depending on how many sites you use it for and the features included. 

You can also try it out on the free version. We will use that in the latter half of this article as we walk you through the steps to upload digital downloads onto your web hosting account. 

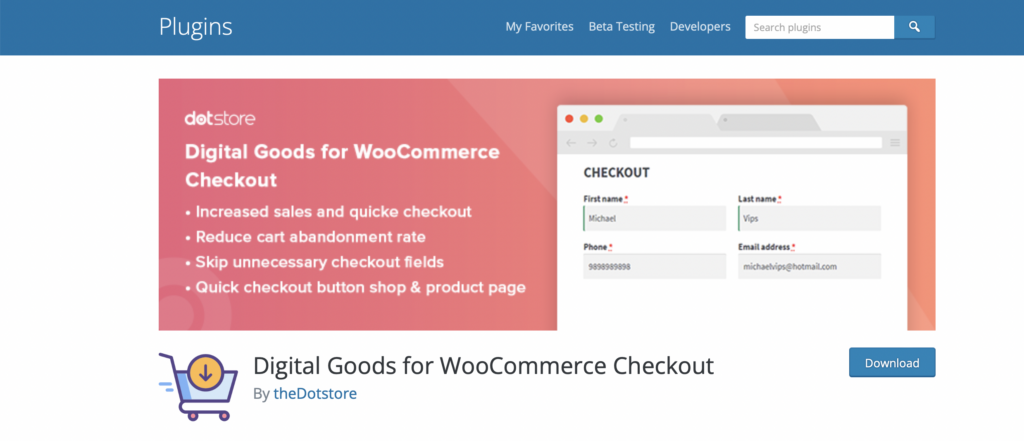
WooCommerce Checkout for Digital Goods
1674934480 729 Your Quick Guide in 2023

This plugin might be a better fit if you are already using WooCommerce on your site. It allows you to keep things simple by only using a single type of checkout process, regardless of whether you are selling physical products or digital ones. 

One of the benefits of the WooCommerce Checkout for Digital Goods is that streamlines the checkout process for your customers. While some plugins require customers to enter a shipping address, this one bypasses it because it understands that it is unnecessary when sales tax doesn’t need to be calculated. 

Check out our full WooCommerce review to see if this is right for you and your site. 

Pros


  • Streamlined checkout process
  • Allows for digital products ranging from PDFs and music to ebooks and audio
  • Robust free version
  • Minimal setup required

Cons


May need to upgrade to Pro to get more advanced features

Pricing: You can try the WooCommerce plugin for free, but a subscription to the premium membership will set you back about $29 per year. This isn’t bad, considering how robust the software can be. 

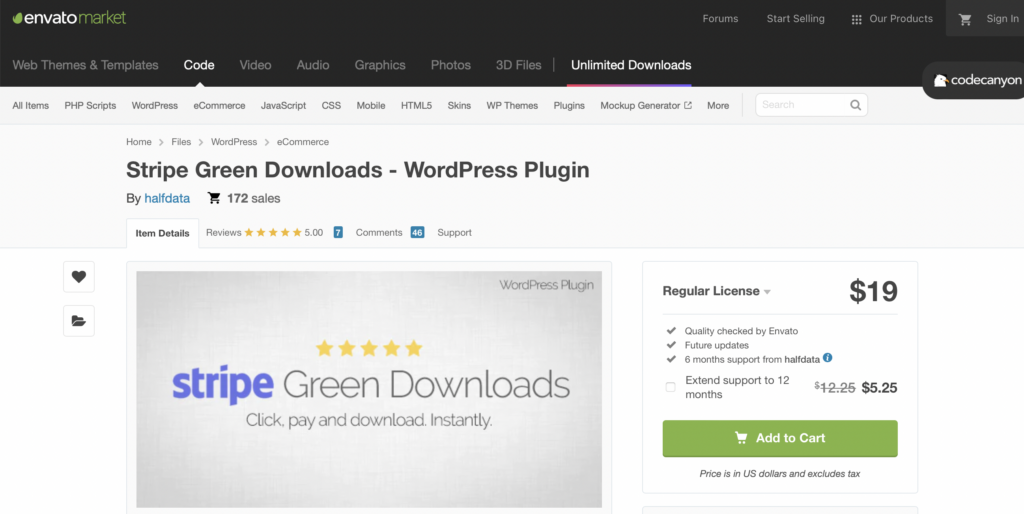
Stripe Green Downloads
1674934481 596 Your Quick Guide in 2023

Website owners who are concerned about customers paying for the digital download might prefer to trust one of the leading payment processors: Stripe. The Stripe Green Downloads plugin for WordPress makes it a cinch to accept all major credit cards, but you can also do free digital products as well. 

With this plugin, your customers will get encrypted download links valid for a certain length of time (set by you). 

Pros


  • Integration with the well-known Stripe platform
  • Encrypted download links
  • Email verification to you and the customer after successful payment
  • Available for multisite installation

Cons


Might be more challenging to set up and use

Pricing: If you only want your customers to access free downloadable files, Stripe Green Downloads is just $19. If you plan to sell digital products for a fee, it is $95. 

WordPress Simple PayPal Shopping Cart
1674934481 667 Your Quick Guide in 2023

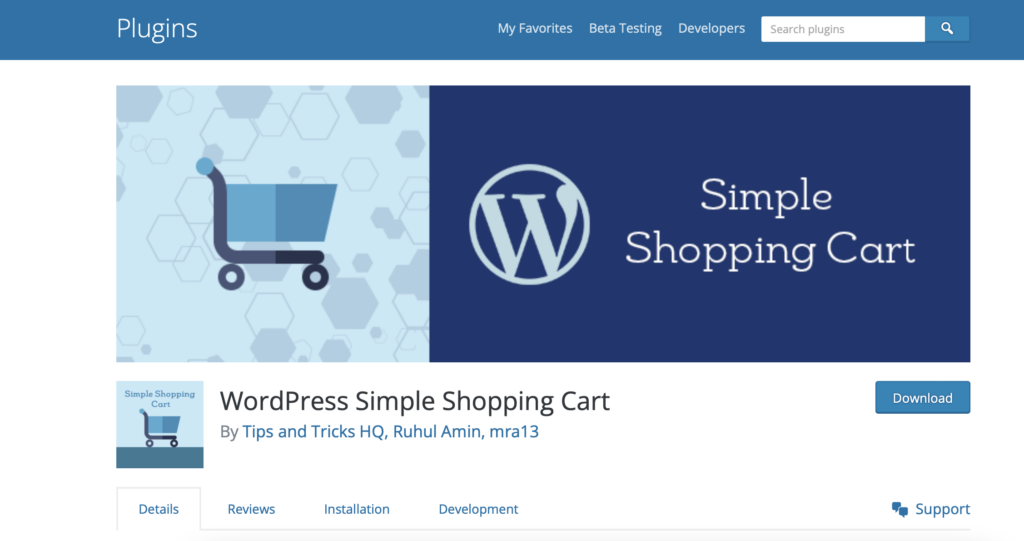
Website owners who want a free option to round out their online store will want to consider whether PayPal has the solution they need. The WordPress Simple PayPal Shopping Cart gives you the flexibility to include an “add to cart” button on any page. You will guide your readers through making their cart and then take payment through the highly trusted PayPal platform. 

When finished with the transaction, buyers will get an email with a link to their new digital files. 

Pros


  • Very lightweight solution to keep your site running smoothly
  • Affordable for a highly trusted name in payment gateways
  • Compatible with any type of digital download (PDF, ebook, mp3, audio, etc.)
  • Create coupons to help sell digital downloads faster

Cons


  • Takes a few more steps to set up selling digital downloads

Pricing: Enjoy selling digital files for your website with this free plugin. 

How to Use Easy Digital Downloads Plugin 

If you have made it this far, chances are that you already have a WordPress website ready for your downloadable files. We will assume that you already have a page designated for your digital downloads as we walk through how to use the Easy Digital Downloads system. 

On the other hand, here is more information on starting a WordPress site if you aren’t at this point yet: Best WordPress courses to help you get started.

Installing the App

From the lefthand sidebar on your WordPress dashboard, navigate to the plugins section and select “add new.” 

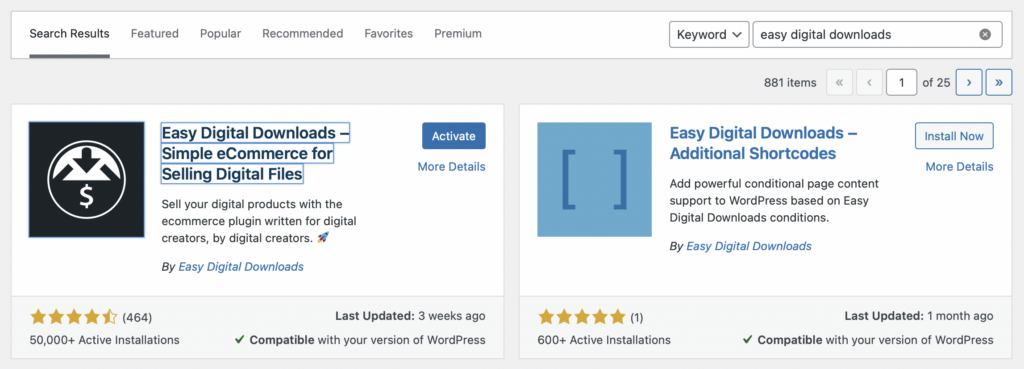
Type in “easy digital downloads” in the search bar to pull up the free plugin and select “install.” 
1674934481 673 Your Quick Guide in 2023

When it is finished downloading, you will select the “activate” button that appears in the same spot where the “install” button once showed. This will get you set up for the plugin and allow you to get started with selling digital downloads in the next step. 

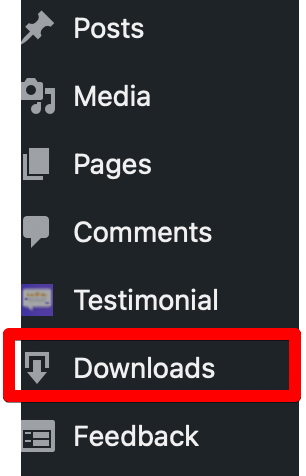
You will know when the plugin is active because it will pop up with a new option on your sidebar titled “Downloads.” 
1674934481 669 Your Quick Guide in 2023

Settings

Before you can start to sell digital products, you will need to configure the settings on your new plugin. Here are a few of the things that you will need to modify prior to selling. 

Address
1674934481 133 Your Quick Guide in 2023

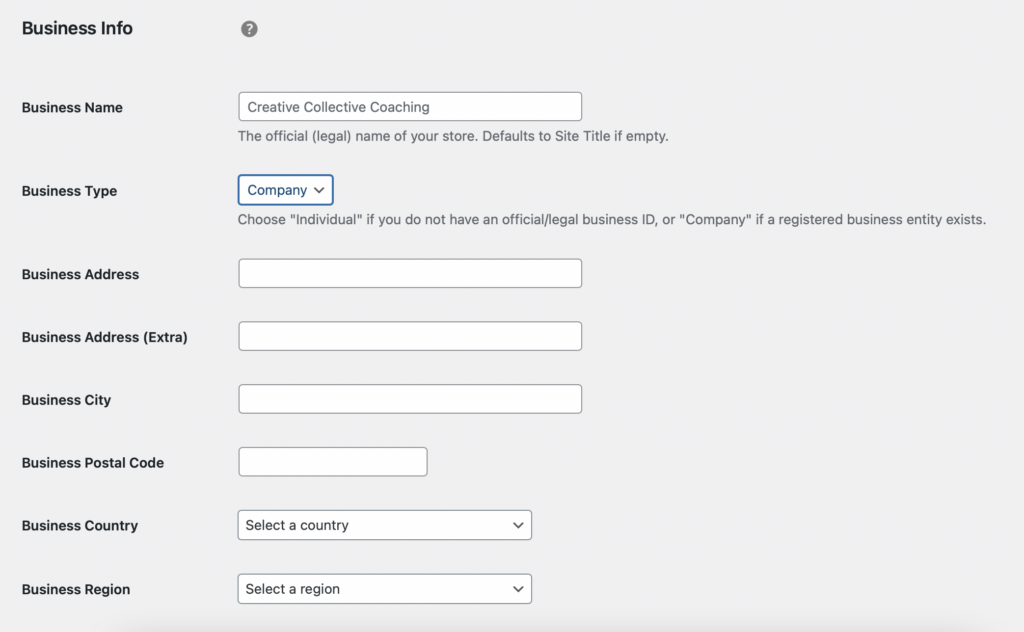
First, you will have to update the settings for your digital downloads, including the physical address for your store. Even if you don’t have a storefront in your city, the address listed here is used to calculate sales tax if and when necessary. 

Once you have filled out the information, click “save changes” at the bottom of the screen. 

Payments
1674934481 955 Your Quick Guide in 2023

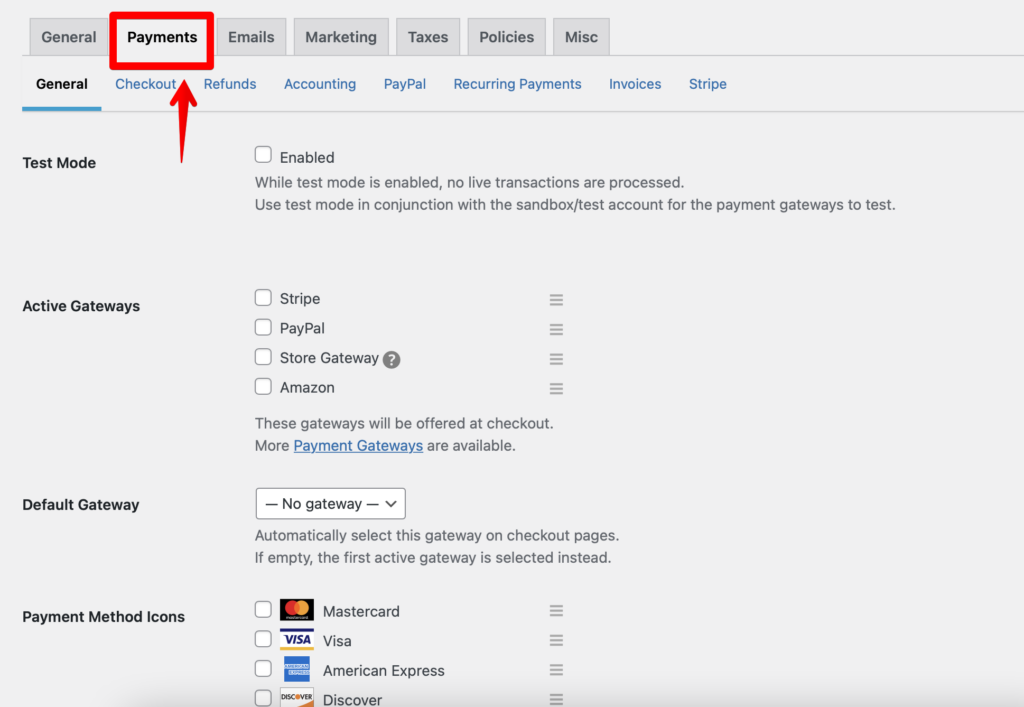
While you are on the settings screen, you will need to configure your payment settings. This may not be as important if you are only selling free digital downloads, but you want to fill it out if you will be selling digital products on your website. 

Easy Digital Downloads makes it simple to accept payments from the gateways of your choosing. Active payment gateways include: 

  • Stripe
  • PayPal
  • Store gateway
  • Amazon

As a bonus, you can even select a default gateway that automatically populates for your customers. This means that you can choose the gateway that charges you the fewest fees for your product or service, hoping that your customer will not think to change it. 

Click on “save changes” when finished with this screen. 

Configure PayPal or Stripe

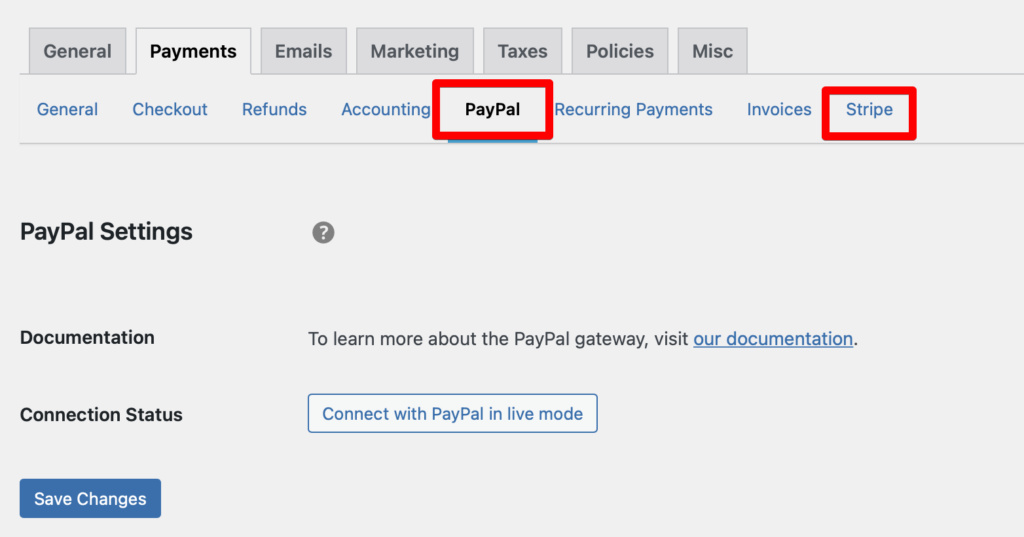
However, you aren’t quite done setting up your payment processors yet. Depending on what options you select, you may need to head to another tab. For instance, PayPal and Stripe both have separate tabs that you will need to visit if you intend to accept payments using these methods. 
1674934482 888 Your Quick Guide in 2023

Click on the appropriate tab for the payments you plan to accept. 

From here, it will walk you through how to connect your new payment platform with your website. Stripe takes a little bit longer to set up than PayPal does, but both are relatively user-friendly and take just a few clicks of the mouse to get where you want to go. 

Don’t forget to select “save changes” at the bottom of the screen when finished with each page. 

Adding a Digital Product 

Now that you have the foundation laid to start to sell digital products, it is time to focus your attention on actually creating your digital product. This requires just a few steps and is easy even for users who are just getting used to their WordPress website.

Here is a quick look at how you can add your digital downloads to your store. 

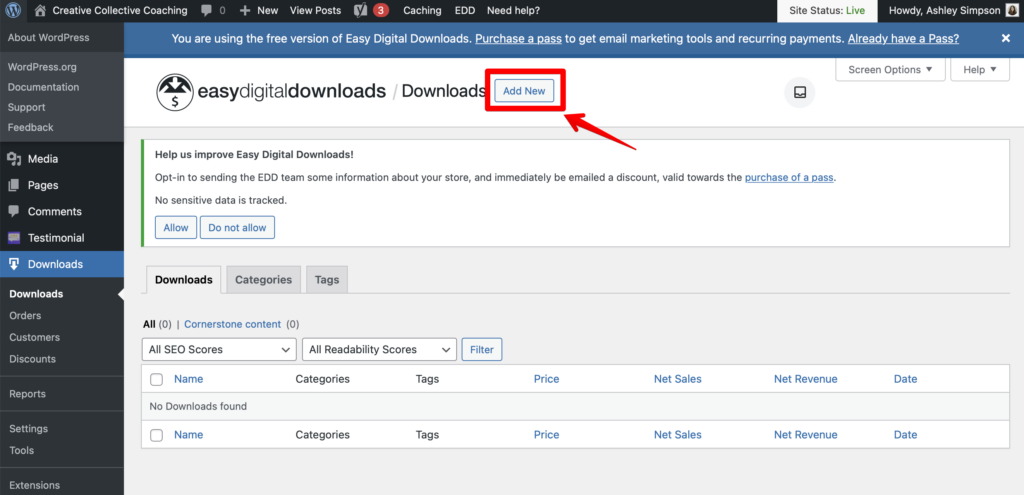
  • On the left sidebar from your WordPress dashboard, select “downloads” again. 
  • Next to the header on the new page, you will see the button that says “add new.” Click here. 
1674934482 70 Your Quick Guide in 2023
  • Enter a title for your digital downloads at the top of the screen. 
  • Fill out the description information, which is what your site visitors will see about your file when they visit this screen. 
1674934482 64 Your Quick Guide in 2023
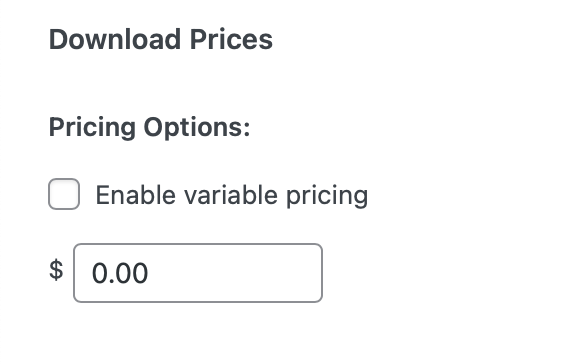
  • Underneath this section, you will see the option to set a price for your digital download. You can leave this section as-is (the default setting is $0.00 or free) if you intend to use it for a lead magnet to drive sales for your store. However, you can also set it up to charge a fair price for the download of your digital products. 
1674934482 37 Your Quick Guide in 2023
  • After entering the price, you will need to actually upload your digital downloads for your customers to review. You’re almost there! Under the price section, you will see “Download Files.” Enter the name of your new product and then enter the URL or upload the file. 
1674934482 866 Your Quick Guide in 2023
  • If you are uploading it, simply click the link icon to the right of the box and it will give you a popup where you can select a download from the media library or upload a new one. 

Set Up Yoast

If you are also using Yoast SEO (and we recommend that you do!), you can configure the page to match up with your other SEO efforts. Add in a keyword, alter the meta description, and even set the slug for the page. 

Business owners who intend to advertise their new digital download on social media may want to select the social media tab on Yoast, upload an image that represents their new offer, and change the description for social posts. 

Publish Your Digital Downloads

Once you finish with all of the setup wizard on this screen, you can officially publish your product! Head up to the top of the page and in the upper right-hand corner, you will see the telltale blue button that allows you to “Publish” your new product. 

That’s all you have to do to create a page that allows you to sell a digital download! 

Add Your Download to a Webpage

Sometimes, you may want to consider adding your digital downloads to the menu of your website. This allows it to be more easily found. After all, nobody is going to know how to click through your link if they don’t even know it exists. Fortunately, there are just a few extra clicks involved to get that digital product onto your website menu. 

Navigate to the dashboard home and select “Appearances” on the left-hand side. Click “Menus” to get started. 

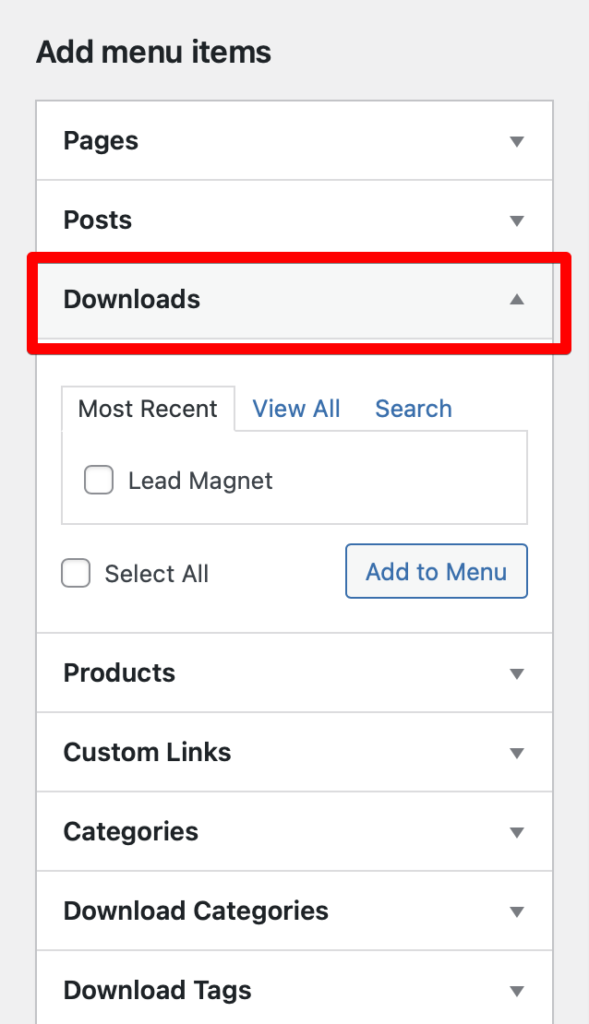
You will see several categories pop up on the left side. Scroll down to the third option, titled “downloads.” Click the box next to the download that you would like to add to your menu and then click on “add to menu.”
1674934482 811 Your Quick Guide in 2023

This will move it over to the screen on the right, where you can rearrange your pages until they make sense to you. 

Using Shortcode

Alternatively, you may not want to create an entire page for your new lead magnet or download. In this case, you may instead prefer to place the download on another page. You may even show it on your blog posts that advertise the download. The good news is that you have another option if this describes you. 

1674934482 443 Your Quick Guide in 2023
  • Open up your download product page and click the gear icon at the top of the screen. 
  • Scroll down until you get to the “download settings” section. 
  • At the bottom of this download files section, you will find the “purchase shortcode.” Copy this shortcode. 
  • Next, on the page where you want to sell downloads on WordPress, add a block of shortcode. Paste this description in the box and save. 

This will make learning how to sell digital downloads on WordPress quick and easy from any page of your website. 

Tracking Results and Downloads on WordPress

Once you have your download uploaded and organized on your website with Easy Digital Downloads, you need to start tracking it. This allows you to uncover how many people are accessing your page, clicking the download option, and more. 

The easiest way to track your results is to download MonsterInsights. Head over to your MonsterInsights dashboard and click on the e-commerce tab. You will see an option for Easy Digital Downloads here and check the box. 

All you have to do is head to “Insights” > “Reports” > “eCommerce”. This allows you to see how your digital products are faring in the marketplace. 

The Verdict: How to Sell Digital Downloads on WordPress

Selling physical products is mostly a thing of the past for people looking to set up more passive income streams. If you want to sell digital goods to your audience but don’t want to be responsible for fulfilling all those orders on your own, you need software that will automate the process for you. 

Easy Digital Downloads offers just that. But it isn’t the only option if you want to sell digital downloads on WordPress. Consider some of the other top WordPress plugins on our list to expand your payment gateway and make your checkout page a breeze. 

If you don’t already have a WordPress website set up, then you may want to consider how you can start today. Learn more about setting up your site in some of these articles here: 


Source link

Keep an eye on what we are doing
Be the first to get latest updates and exclusive content straight to your email inbox.
We promise not to spam you. You can unsubscribe at any time.
Invalid email address

WORDPRESS

A Match Made in WordPress Heaven – WordPress.com News

Published

on

By

Maximize Your Agency’s Potential by Partnering With Automattic and WordPress.com – WordPress.com News

Endoh Collaborative harnesses the power of Automattic for Agencies to spend more time on their clients.

Endoh Collaborative is blazing a unique and powerful trail as a queer-owned, feminist digital agency. Their aim is to create effective, engaging, and accessible websites and visual brands to help nonprofits, purpose-driven businesses, and progressive organizations. Ultimately, Endoh wants to empower their clients to grow, thrive, and make a lasting positive impact.

Aiding Endoh in their journey is Automattic for Agencies. With a unified dashboard—including site overviews and real-time monitoring—as well as a host of other client management tools, Endoh gained freedom and efficiency, allowing them to spend time on their clients rather than their infrastructure.

Become an Automattic partner and gain access to discounted pricing, commissions on referrals, premier support, and cutting‑edge tooling.


Join 112.1M other subscribers

Source link

Keep an eye on what we are doing
Be the first to get latest updates and exclusive content straight to your email inbox.
We promise not to spam you. You can unsubscribe at any time.
Invalid email address
Continue Reading

WORDPRESS

Customizable Footer Credits Are Here  – WordPress.com News

Published

on

By

Customizable Footer Credits Are Here  – WordPress.com News

Whether it’s “Made with love and WordPress” or “Bob Ross rocks,” you can now customize footer credits on your website.

From the earliest days of WordPress.com, the bottom of every site on our platform has featured a default phrase in the footer credit area. Today, we’re handing the reigns over to you: every website using a block theme, on every plan, can customize the footer credit to say anything at all. 

That footer space offers a small and potent opportunity to showcase your creativity and unique tastes. Whether you’re buttoned up or just plain silly or somewhere between, visitors will get a little hint as to the personality behind the brand. 

Examples: 

  • Made with love and WordPress
  • Brought to you by the best minds on the planet
  • Handmade with care since 2003  
  • Bob Ross rocks  

Okay, that last one was my six-year-old daughter’s idea. But you get the picture: you have total freedom to display anything you want in the footer credit—or nothing at all. Of course we’d be honored if you still include WordPress.com in your footer, but no harm, no foul if not. 

Not using a block theme? Make the switch 

This new customization is only available on sites using block themes. These are themes that use blocks for every part of the site, whereas “classic” themes are still utilizing CSS and other coded elements. 

You can find out which type of theme your site is using by hovering over “Appearance” in the left-side menu of your dashboard. If you see “Editor,” you’re using a block theme. If you don’t, you’re using a classic theme. 

We’re big advocates of using block themes, as these unlock the most powerful WordPress features available today. If you need help converting your theme, check out this handy guide

How to customize your site’s footer credit 

In about 30 seconds flat, you can have a custom footer credit: 

  1. Access your Site Editor from the “Edit Site” button in the top menu bar when on your website’s homepage. You can also find it from “Appearance” on the left-side menu of your main dashboard. (Click here if you need help finding it.
  2. Scroll down to the footer credit (i.e. “Designed with WordPress”) 
  3. Edit the text as you would in any other block on your site. 
  4. Save your changes and you’re all set. 

Keep in mind that you can edit and add nearly any block in the footer area—text, social links, images, buttons, etc. 

Just like that, you have more options at your fingertips. That’s what we’re always striving for at WordPress.com. If you’re not on a block theme yet, we strongly encourage you to make that switch. Choose one today: 

Let us know in the comments what you think of this new feature and always feel free to drop in ideas for other things you’d like to see. 


Join 112.1M other subscribers

Source link

Keep an eye on what we are doing
Be the first to get latest updates and exclusive content straight to your email inbox.
We promise not to spam you. You can unsubscribe at any time.
Invalid email address
Continue Reading

WORDPRESS

How to Limit Purchase Quantity in WordPress (Step by Step)

Published

on

By

How to Limit Purchase Quantity in WordPress (Step by Step)

Imagine that you are running a WooCommerce store, and suddenly, one of your products goes viral. Orders start flooding in, and you are super happy! But then you realize some customers are buying up your entire stock in one go.

This might sound great at first, but there’s a problem. This leaves other customers empty-handed, creates stock shortages, and can even lead to unfair market practices like reselling and price-gouging.

In this article, we will show you how to limit purchase quantity in WordPress to help balance inventory levels.

limit-the-quantity-of-products-purchased-in-WordPress-OG

Why Limit Purchase Quantity in WordPress?

Stock management can make or break your store’s reputation. Limiting purchase quantities makes sure that all customers will receive their orders and you never sell a product that isn’t in stock.

You ensure a more even distribution of your products by setting a cap on how many units a customer can purchase at once. This way, more customers get a chance to buy what they want, you avoid going out of stock, and you maintain a fair shopping environment.

It’s all about balancing the scales to keep your store running smoothly and your customers happy.

Without this limit, you risk a few big buyers dominating your sales, which can lead to frustrated customers who miss out and might not return. It also helps you manage your inventory better and prevents anyone from not getting the products they want.

That said, let’s take a look at how to limit purchase quantity in WordPress. We’ll cover three ways to do it, and you can use the quick links below to jump to the method you want to use:

Method 1: Limiting Purchase Quantity in WordPress With WooCommerce

Chances are, if you are researching how to limit purchase quantity in WordPress, then you have an online store.

Most store owners who sell physical products need to restrict the quantity to avoid out-of-stock purchases, which would simply lead to refunds.

For WooCommerce store owners, you’re going to need to buy and download the Min/Max Quantities extension.

If you need help with this, then please see our ultimate WooCommerce tutorial.

Then, go to Products » All Products. From here, you need to click ‘Edit’ under the product to which you want to add restrictions.

edit productedit product

From here, scroll down to the Product Data section. In the General tab, you’ll see the option to enter the minimum and maximum quantities.

The ‘Group of’ field means that you can enter the quantity that the product must be purchased in multiples.

minimum maximum quantity woocommerceminimum maximum quantity woocommerce

From here, all you have to do is save the product, and the purchase limit will be in effect!

Method 2: Limiting Purchase Quantity in WordPress With WP Simple Pay

If you don’t have a complete eCommerce store, then WP Simple Pay is the best solution for selling products in WordPress.

WP Simple Pay is the best Stripe payments plugin that allows you to accept one-time and recurring payments without setting up a shopping cart.

For example, here’s a few use cases where WP Simple Pay could be helpful for limiting purchase quantity:

  • Event tickets: You can allow more people to attend by limiting ticket purchases from each individual.
  • Service bookings: You can use WP Simple Pay for appointment bookings like consultations or personal training sessions. Limiting the number of bookings per customer ensures fair access to your time and services.
  • Membership fees: When selling memberships, you can limit the number of purchases to prevent abuse or fraudulent signups for your membership site.

You will first need to install and activate the WP Simple Pay plugin. For more details, please see our guide on how to install a WordPress plugin.

Once activated, you’ll be taken to the setup wizard. This wizard guides you through the process of integrating Stripe, making it easy to connect your Stripe account with your site.

Click on ‘Let’s Get Started’ to begin.

The WP Simple Pay WordPress payment pluginThe WP Simple Pay WordPress payment plugin

Continue with the setup wizard to link your WordPress site to Stripe.

You then need to click ‘Connect with Stripe.’

connect-stripe-to-wpsimplepayconnect-stripe-to-wpsimplepay

Next, you’ll need to create a new Stripe account or connect an existing one to your site.

All you will have to do is type in your email and password for your Stripe account.

From here, you can select your account and hit ‘Connect.’

Connect Stripe to WP Simple PayConnect Stripe to WP Simple Pay

Once you’ve successfully connected Stripe to your site, it’s time to create an order form and set purchase quantity limits for your products.

You’ll go to WP Simple Pay » Add New. From there, you’ll see a variety of pre-built templates to choose from.

While this works for any form template, we will use the payment form template for this tutorial.

Hover over ‘Payment Form’ and click ‘Use Template.’

create payment formcreate payment form

After choosing your preferred form template, you will be directed to the General settings page, where you can tailor your payment form to your needs.

This is where you can adjust the title, description, and form type to meet your specific needs.

If you prefer to host the payment form on your own site, select ‘On-site payment form’ under Type. Alternatively, if you want to host the form on Stripe’s checkout page, then choose ‘Off-site Stripe checkout.’

Event tickets payment formEvent tickets payment form

Next, click on the ‘Payment’ tab, where you can configure Price Options. Here, you can offer multiple price options within a single form.

By default, you’ll see one price option set at $10.

For this tutorial, we’re adding two price options, which we will label as “Premium Access” and “Standard Access.”

standard access and premium accessstandard access and premium access

In this case, Premium Access is our top-tier product with very limited availability and a price of $100, while Standard Access is our most affordable option at $10.

Next, let’s set limits on the purchase quantities for the price options we have added.

To do this, click on ‘Purchase Restrictions’ on the left. Under ‘Inventory,’ you’ll be able to create the purchase limit.

WP Simple Pay offers two ways to restrict purchases. You can either set a default limit for all price options on your Stripe payment form or configure separate limits for each price option.

In this example, we’ve set a restriction of 10 for all ticket purchases.

restrict purchase limitrestrict purchase limit

You can also configure a specific limit for each price. Just select ‘Each price option has its own limit’ and set the purchase limit for each option.

So here, we’ve limited the Premium Access to 5 and the Standard Access to 10.

restrict purchase quantityrestrict purchase quantity

Once a product’s purchase limit has been reached, customers won’t be able to buy it.

Now, if your payment form is ready to go, you can hit the ‘Publish’ button on the right side of the screen.

publish payment formpublish payment form

All that is left to do is add your new payment form to your website. To embed the form, navigate to the post or page where you want to publish it.

Click on the + icon and then add the WP Simple Pay block.

WP simple pay blockWP simple pay block

Next, just select the payment form you’ve created. The form should appear in the block editor.

Finally, just click ‘Publish.’

publish event tickets formpublish event tickets form

Finally, you’ll want to preview the form to see how it looks on the front end.

You can even make a test payment to make sure the restriction works as intended.

preview event ticket formpreview event ticket form

Method 3: Limiting Purchase Quantity in WordPress With Easy Digital Downloads

Generally, digital products don’t require stock control. However, for situations like selling virtual tickets or other “digital” items with limited availability, the ability to limit the total number of purchases can be very useful.

Adding a limit can also add FOMO and create real scarcity without having to use a countdown timer.

If you sell digital products such as courses, ebooks, or templates, then you’ll want to use Easy Digital Downloads. The core Easy Digital Downloads plugin doesn’t include stock tracking by default, but you can easily add this functionality with a simple extension.

Note: You can purchase the Purchase Limit extension separately, or if you have the Professional Pass subscription plan, it’s free to download.

First, you’ll need the Purchase Limit extension.

After purchasing and installing it, navigate to the edit screen of the product you want to set a purchase limit on.

You can do this by going to the Downloads » Downloads page and then clicking ‘Edit’ on the digital product you’d like to make changes to.

edit digital downloadedit digital download

If you haven’t created a digital product yet, then just follow our beginner’s guide on how to sell digital downloads on WordPress.

Next, scroll down under Download Details. A new option titled ‘Purchase Limit’ should appear.

You can set the number to the quantity that can be purchased. If you leave the number at 0, customers can purchase an unlimited quantity. But if you set it at -1, the product will be marked as sold out.

purchase limit eddpurchase limit edd

You can also set the purchase limits if you have multiple pricing options. Simply click ‘Show advanced settings’ and then the ‘Purchase Limit Settings’ will appear.

Then, add the purchase limit you’d like for each pricing option.

variable pricing purchase limit eddvariable pricing purchase limit edd

Then, simply update your digital product page.

There you have it! You now have three methods for restricting the purchase quantity, and you can use the preferred solution based on your needs.

We hope this article helped you learn how to limit purchase quantity in WordPress. You may also want to see our expert pick of the best WooCommerce plugins for your store or our tutorial on how to increase WooCommerce sales.

If you liked this article, then please subscribe to our YouTube Channel for WordPress video tutorials. You can also find us on Twitter and Facebook.


Source link

Keep an eye on what we are doing
Be the first to get latest updates and exclusive content straight to your email inbox.
We promise not to spam you. You can unsubscribe at any time.
Invalid email address
Continue Reading

Trending