Connect with us

SEO

How To Set Up Your First Paid Search Campaign

Published

on

How To Set Up Your First Paid Search Campaign

Paid search advertising is a powerful way to drive traffic and conversions for your brand.

However, setting up your first campaign can feel overwhelming if you’re new to the game. Even if you’re a PPC pro, it can be hard to keep up with all the changes in the interfaces, making it easy to miss key settings that can make or break performance.

In this guide, you’ll find the essential steps to set up a successful paid search campaign, ensuring you’re equipped with the knowledge to make informed decisions that lead to positive results.

Step 1: Define Your Conversions & Goals

Establishing clear goals and understanding what constitutes a conversion is the foundation of a successful paid search campaign.

This clarity ensures that every aspect of your campaign is aligned with your business objectives.

Identify Your Key Performance Indicators (KPIs)

In order to identify those KPIs, it’s crucial to understand the overarching business objectives. Begin by mapping out your broader business goals.

Ask yourself, “Am I aiming to increase sales, generate leads, boost website traffic, or enhance brand awareness?”

From there, you can define specific KPIs for each objective. Some examples include:

  • Sales: Number of transactions, revenue generated.
  • Leads: Number of form submissions, phone calls, appointments created.
  • Traffic: Click-through rate (CTR), number of sessions.
  • Brand Awareness: Impressions, reach.

Set Up Conversion Tracking

Knowing your goals is one thing, but being able to accurately measure them is a completely different ballgame.

Both Google and Microsoft Ads have dedicated conversion tags that can be added to your website for proper tracking.

Additionally, Google Analytics is a popular tool to track conversions.

Choose what conversion tags you need to add to your website and ensure they’re added to the proper pages.

In this example, we’ll use Google Ads.

To set up conversion tracking using a Google Ads tag, click the “+” button on the left-hand side of Google Ads, then choose Conversion action.

Screenshot from Google Ads, September 2024

You’ll choose from the following conversions to add:

  • Website.
  • App.
  • Phone calls.
  • Import (from Google Analytics, third party, etc.).

After choosing, Google Ads can scan your website to recommend conversions to add, or you have the option to create a conversion manually:
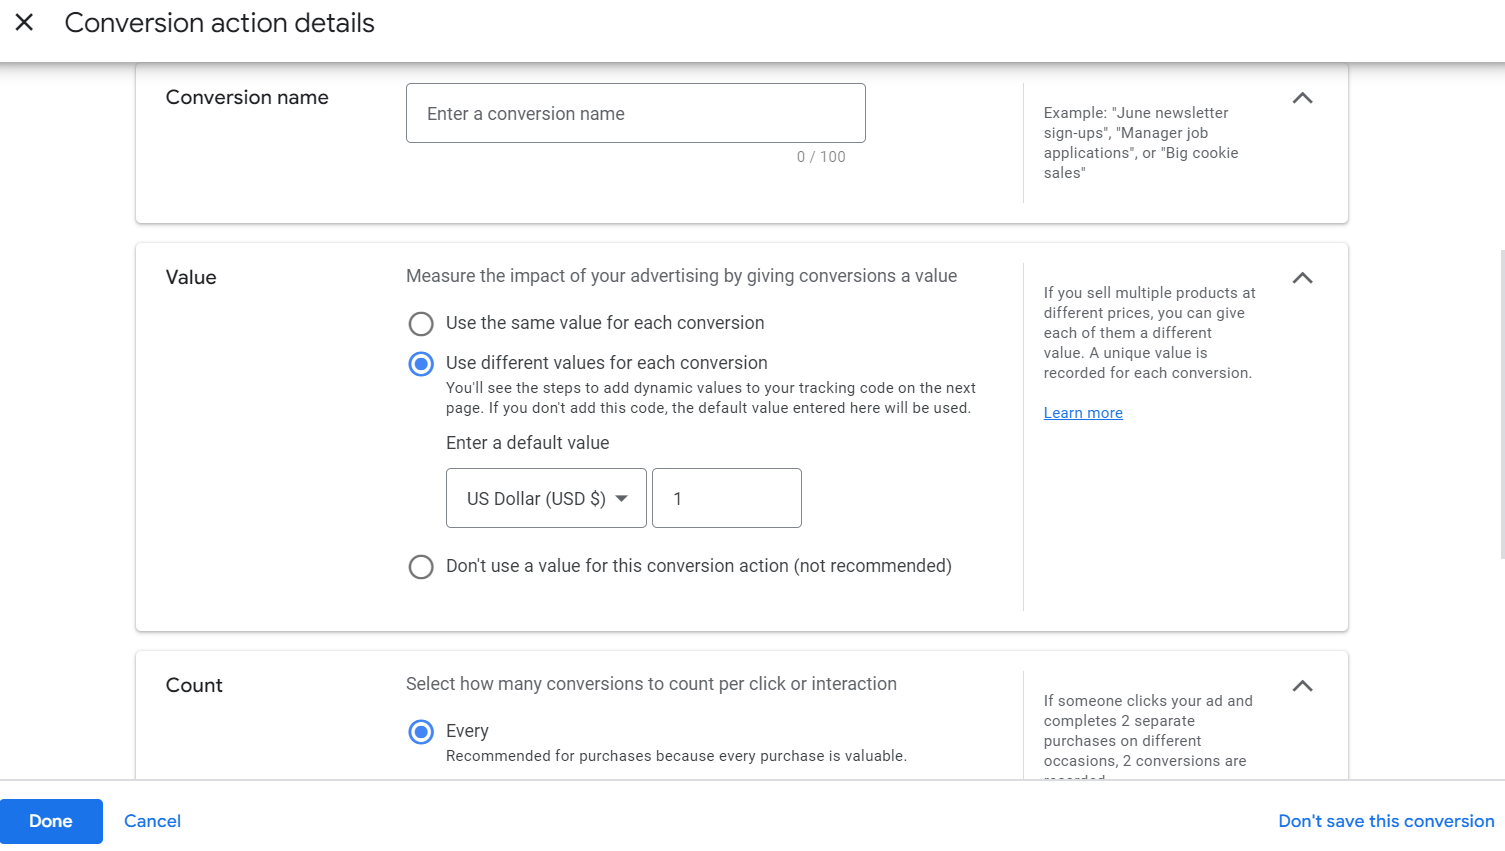
How to create a manual conversion action in Google Ads.Screenshot from Google Ads, September 2024

During this step, it’s essential to assign value(s) to conversions being created, as well as the proper attribution model that best represents your customer journey.

Most PPC campaigns are now using the data-driven model attribution, as opposed to a more traditional “last click” attribution model. Data-driven attribution is especially helpful for more top-of-funnel campaigns like YouTube or Demand Gen campaign types.

After the conversion has been created, Google provides the necessary code and instructions to add to the website.
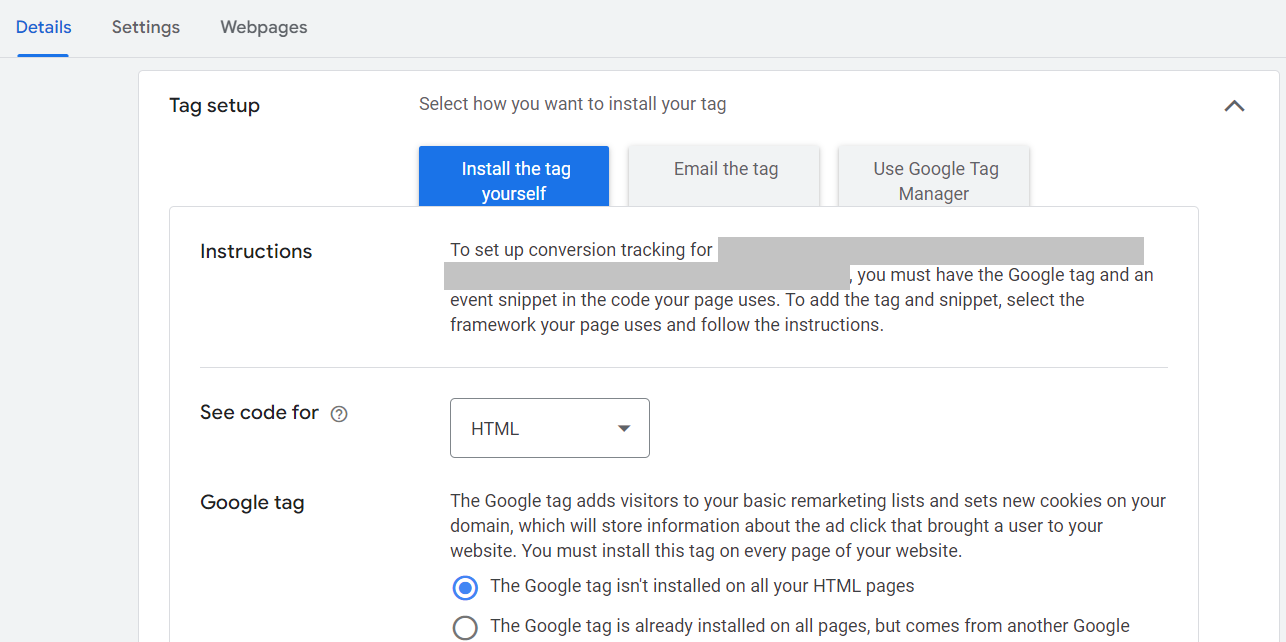
Google Ads conversion code snippet exampleScreenshot from Google Ads, September 2024

Enable Auto-Tagging

Setting up auto-tagging from the get-go eliminates the need to append UTM parameters to each individual ad, saving you time during setup.

It also allows for seamless data import into Google Analytics, enabling detailed performance analysis within that platform.

To enable auto-tagging at the account level, navigate to Admin > Account settings.

Find the box for auto-tagging and check the box to tag ad URLs, then click Save.

Turn on auto-tagging in Google Ads in the account settings.Screenshot from Google Ads, September 2024

Step 2: Link Any Relevant Accounts

Linking various accounts and tools enhances your campaign’s effectiveness by providing deeper insights and seamless data flow.

Now, this step may come sooner if you plan to import conversions from Google Analytics into Google Ads, as the accounts will have to be linked prior to importing conversions.

To link accounts, navigate to Tools > Data manager.

Where to find Linked Accounts in Google Ads.Screenshot from Google Ads, September 2024

You can link accounts such as:

  • Google Analytics.
  • YouTube channel(s).
  • Third-party analytics.
  • Search Console.
  • CRM tools (Salesforce, Zapier, etc.).
  • Ecommerce platforms (Shopify, WooCommerce, etc.).
  • Tag Manager.
  • And more.

Step 3: Conduct Keyword Research & Structure Your Campaign

Now that you’ve got the foundations of goals and conversions covered, it’s time to complete some keyword research.

A robust keyword strategy ensures your ads reach the right audience, driving qualified traffic to your site.

Start With A Seed List

Not sure where to start? Don’t sweat it!

Start by listing out fundamental terms related to your products or services. Consider what your customers would type into a search engine to find you.

Doing keyword research into search engines in real-time can help discover additional popular ways that potential customers are already searching, which can uncover more possibilities.

Additionally, use common language and phrases that customers use to ensure relevance.

Use Keyword Research Tools

The Google Ads platform has a free tool built right into it, so be sure to utilize it when planning your keyword strategy.

The Google Keyword Planner gives you access to items like:

  • Search volume data.
  • Competition levels.
  • Keyword suggestions.
  • Average CPC.

All these insights help not only determine what keywords to bid on but also help form the ideal budget needed to go after those coveted keywords.

When researching keywords, try to identify long-tail keywords (typically, these are phrases with more than three words). Long-tail keywords may have lower search volume but have higher intent and purchase considerations.

Lastly, there are many paid third-party tools that can offer additional keyword insights like:

These tools are particularly helpful in identifying what competitors are bidding on, as well as finding gaps or opportunities that they are missing or underserving.

Group Keywords Into Thematic Ad Groups

Once you have your core keywords identified, it’s time to group them together into tightly-knit ad groups.

The reason for organizing them tightly is to increase the ad relevance as much as possible. Each ad group should focus on a single theme or product category.

As a good rule of thumb, I typically use anywhere from five to 20 keywords per ad group.

Another item to keep in mind is which match types to use for keyword bidding. See the example below from Google on the three keyword match types available:
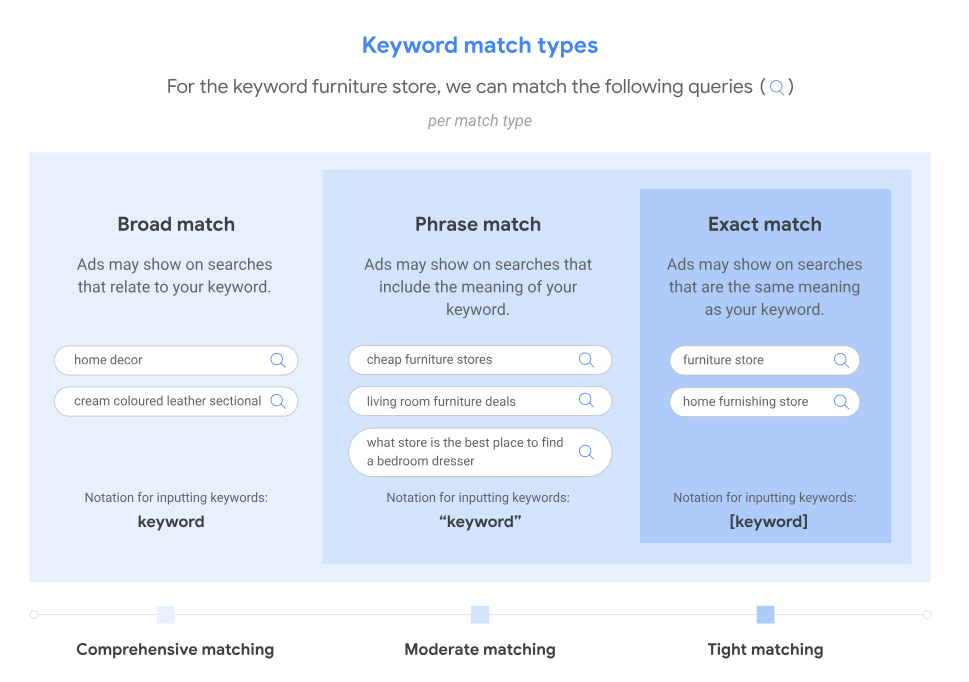
The difference in keyword match types in Google AdsImage credit: support.google.com, September 2024

Create A Hierarchical Campaign Structure

Once your ad groups have been segmented, it’s time to build the campaign structure(s).

You’ll want to divide your account into campaigns based on broader categories, such as:

  • Product lines.
  • Geographic regions.
  • Marketing goals.
  • Search volume.

For example, you can create one campaign for “Running Shoes.” Within that campaign, you create three ad groups:

  • Men’s running shoes.
  • Women’s running shoes.
  • Trail running shoes.

Now, there may be times when you have a keyword with an abnormally higher search volume than other keywords within a particular category.

Depending on your budget, it may be worth segmenting those high-volume search term(s) into its own campaign solely for better budget optimization.

If a high-volume keyword is grouped into ad groups with low-volume keywords, it’s likely that most of the ads served will be for the high-volume keyword.

This then inhibits the other low-volume keywords from showing, and can wreak havoc on campaign performance.

Utilize Negative Keywords

Just as the keywords you bid on are crucial to success, so are the negative keywords you put into place.

Negative keywords can and should be added and maintained as ongoing optimization of any paid search campaign strategy.

The main benefit of negative keywords is the ability to exclude irrelevant traffic. They prevent your ads from showing on irrelevant searches, saving budget and improving CTR over time.

Negative keywords can be added at the ad group, campaign, or account level.

Step 4: Configure Campaign Settings

Now that you’ve got the campaign structure ready to go, it’s time to start building and configuring the campaign settings.

Campaign settings are crucial to get right in order to optimize performance towards your goals.

There’s something to be said with the phrase, “The success is in the settings.” And that certainly applies here!

Choose The Right Bidding Strategy

You’ll have the option to choose a manual cost-per-click (CPC) or an automated bid strategy. Below is a quick rundown of the different types of bid strategies.

  • Manual CPC: Allows you to set bids for individual keywords, giving you maximum control. Suitable for those who prefer more hands-on management.
  • Target Return on Ad Spend (ROAS): Optimizes bids to maximize revenue based on a target ROAS you set at the campaign level.
  • Target Cost Per Acquisition (CPA): Optimizes bids to achieve conversions at the target CPA you set at the campaign level.
  • Maximize Conversions: Sets bids to help get the most conversions for your budget.

Set Your Daily Budget Accordingly

Review your monthly paid search budget and calculate how much you can spend per day throughout the month.

Keep in mind that some months should be different to account for seasonality, market fluctuations, etc.

Additionally, be sure to allocate campaign budgets based on goals and priorities to maximize your return on investment.

You’ll also want to keep in mind the bid strategy selected.

For example, say you set a campaign bid strategy with a Target CPA of $30. You then go on to set your campaign daily budget of $50.

That $50 daily budget would likely not be enough to support the Target CPA of $30, because that would mean you’d get a maximum of two conversions per day, if that.

For bid strategies that require a higher CPA or higher ROAS, be sure to supplement those bid strategies with higher daily budgets to learn and optimize from the beginning.

Double-Check Location Settings

When choosing locations to target, be sure to look at the advanced settings to understand how you’re reaching those users.

For example, if you choose to target the United States, it’s not enough to enter “United States” and save it.

There are two options for location targeting that many fail to find:

  • Presence or interest: People in, regularly in, or who’ve shown interest in your included locations.
  • Presence: People in or regularly in your included locations.
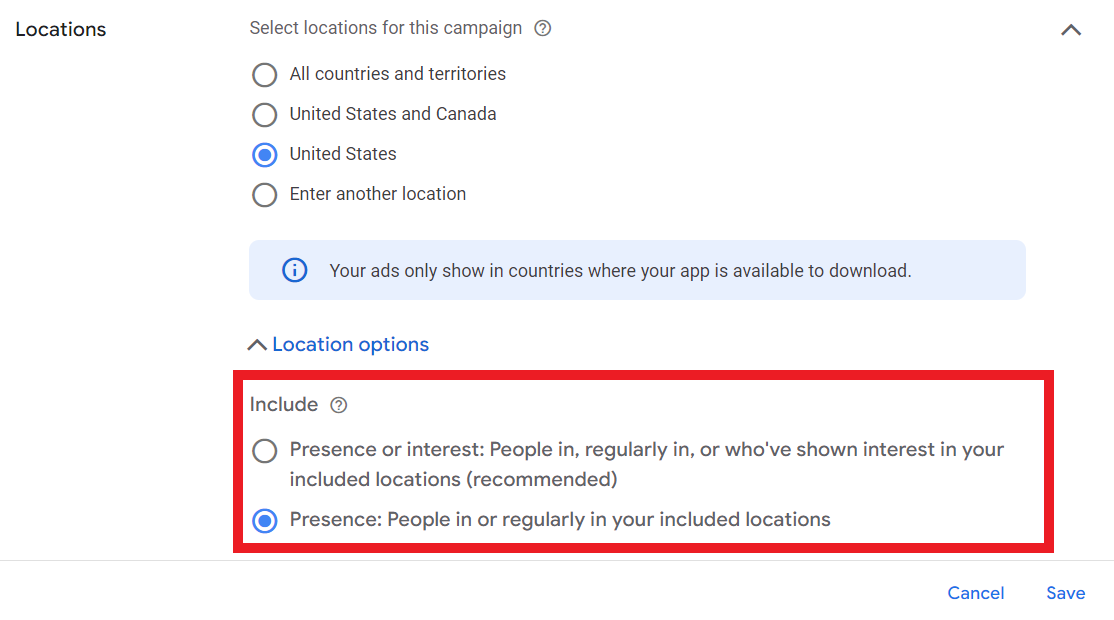
Location settings in Google AdsScreenshot from Google Ads, September 2024

Google Ads defaults to the “presence or interest” setting, which I’ve seen time and time again where ads end up showing outside of the United States, in this example.

Again, the success is in the settings.

There are more settings to keep in mind when setting up your first paid search campaign, including:

  • Ad scheduling.
  • Audience targeting.
  • Device targeting.
  • And more.

Step 5: Write Compelling Ad Copy

Your ad copy is the gateway to attracting qualified customers.

Crafting the perfect mix of persuasion and relevancy into your ad copy can significantly impact your campaign’s success.

Create Attention-Grabbing Headlines

The headline is the most prominent part of the ad copy design on the search engine results page. Since each headline has a maximum character limit of 35 characters, it is important to make them count.

With Responsive Search Ads, you can create up to 15 different headlines, and Google will test different variations of them depending on the user, their search query, and multiple other factors to get that mix right.

Below are some tips for captivating a user’s attention:

  • Use Primary Keywords: Include your main keywords in the headline to improve relevance and Quality Score.
  • Highlight Unique Selling Points (USPs): Showcase what sets your product or service apart, such as free shipping, 24/7 support, or a unique feature.
  • Incorporate Numbers and Statistics: Use numbers to catch attention, like “50% Off” or “Join 10,000+ Satisfied Customers.”
  • Include a Strong Call-to-Action (CTA): Encourage immediate action with phrases like “Buy Now,” “Get a Free Quote,” or “Sign Up Today.”

Write Persuasive Descriptions

Description lines should complement the headline statements to create one cohesive ad.

Typically, two description lines are shown within any given ad. Each description line has a 90-character limit.

When creating a Responsive Search Ad, you can create four different descriptions, and then the algorithm will show variations of copy tailored to each individual user.

  • Expand on Headlines: Provide additional details that complement your headline and reinforce your message.
  • Address Pain Points: Highlight how your product or service solves specific problems your audience faces.
  • Use Emotional Triggers: Appeal to emotions by emphasizing benefits like peace of mind, convenience, or excitement.
  • Incorporate Keywords Naturally: Ensure the description flows naturally while including relevant keywords to maintain relevance.

Make Use Of Ad Assets (Formerly Extensions)

Because of the limited character count in ads, be sure to take advantage of the myriad of ad assets available as complements to headlines and descriptions.

Ad assets help provide the user with additional information about the brand, such as phone numbers to call, highlighting additional benefits, special offers, and more.

Some of the main ad assets used include:

  • Sitelinks.
  • Callouts.
  • Structured Snippets.
  • Calls.
  • And more.

You can find a full list of available ad assets in Google Ads here.

Step 6: Ensure An Effective Landing Page Design

You’ve spent all this time crafting your paid search campaign strategy, down to the keyword and ad copy level.

Don’t stop there!

There’s one final step to think about before launching your first paid search campaign: The landing page.

Your landing page is where users land after clicking your ad. An optimized landing page is critical for converting traffic into valuable conversions and revenue.

Ensure Relevancy And Consistency

The content and message of your landing page should directly correspond to your ad copy. If your ad promotes a specific product or offer, the landing page should focus on that same product or offer.

Use similar language, fonts, and imagery on your landing page as in your ads to create a cohesive user experience.

Optimize For User Experience (UX)

If a user lands on a page and the promise of the ad is not delivered on that page, they will likely leave.

Having misalignment between ad copy and the landing page is one of the quickest ways to waste those precious advertising dollars.

When looking to create a user-friendly landing page, consider the following:

  • Mobile-Friendly Design: Ensure your landing page is responsive and looks great on all devices, particularly mobile, as a significant portion of traffic comes from mobile users.
  • Fast Loading Speed: Optimize images, leverage browser caching, and minimize code to ensure your landing page loads quickly. Slow pages can lead to high bounce rates.
  • Clear and Compelling Headline: Just like your ad, your landing page should have a strong headline that immediately communicates the value proposition.
  • Concise and Persuasive Content: Provide clear, concise information that guides users toward the desired action without overwhelming them with unnecessary details.
  • Prominent Call-to-Action (CTA): Place your CTA above the fold and make it stand out with contrasting colors and actionable language. Ensure it’s easy to find and click.

Step 7: Launch Your Campaign

Once you’ve thoroughly completed these six steps, it’s time to launch your campaign!

But remember: Paid search campaigns are not a “set and forget” strategy. They must be continuously monitored and optimized to maximize performance and identify any shifts in strategy.

Create a regular optimization schedule to stay on top of any changes. This could look like:

  • Weekly Reviews: Conduct weekly performance reviews to identify trends, spot issues, and make incremental improvements.
  • Monthly Strategy Sessions: Hold monthly strategy sessions to assess overall campaign performance, adjust goals, and implement larger optimizations.
  • Quarterly Assessments: Perform comprehensive quarterly assessments to evaluate long-term trends, budget allocations, and strategic shifts.

When it comes to optimizing your paid search campaign, make sure you’re optimizing based on data. This can include looking at:

  • Pause Underperforming Keywords: Identify and pause keywords that are not driving conversions or are too costly.
  • Increase Bids on High-Performing Keywords: Allocate more budget to keywords that are generating conversions at a favorable cost.
  • Refine Ad Copy: Continuously test and refine ad copy based on performance data to enhance relevance and engagement.
  • Enhance Landing Pages: Use insights from user behavior on landing pages to make data-driven improvements that boost conversion rates.

Final Thoughts

Setting up your first paid search campaign involves multiple detailed steps, each contributing to the overall effectiveness and success of your advertising efforts.

By carefully defining your goals, linking relevant accounts, conducting thorough keyword research, configuring precise campaign settings, crafting compelling ad copy, and optimizing your landing pages, you lay a strong foundation for your campaign.

Remember, the key to a successful paid search campaign is not just the initial setup but also ongoing monitoring, testing, and optimization.

Embrace a mindset of continuous improvement, leverage data-driven insights, and stay adaptable to maximize your campaign’s potential.

More resources: 


Featured Image: vladwel/Shutterstock

Source link

Keep an eye on what we are doing
Be the first to get latest updates and exclusive content straight to your email inbox.
We promise not to spam you. You can unsubscribe at any time.
Invalid email address

SEO

Google Warns Against Over-Reliance On SEO Tool Metrics

Published

on

By

Google Warns Against Over-Reliance On SEO Tool Metrics

In a recent discussion on Reddit’s r/SEO forum, Google’s Search Advocate, John Mueller, cautioned against relying too heavily on third-party SEO metrics.

His comments came in response to a person’s concerns about dramatic changes in tool measurements and their perceived impact on search performance.

The conversation was sparked by a website owner who reported the following series of events:

  1. A 50% drop in their website’s Domain Authority (DA) score.
  2. A surge in spam backlinks, with 75% of all their website’s links acquired in the current year.
  3. An increase in spam comments, averaging 30 per day on a site receiving about 150 daily visits.
  4. A discrepancy between backlink data shown in different SEO tools.

The owner, who claimed never to have purchased links, is concerned about the impact of these spammy links on their site’s performance.

Mueller’s Perspective On Third-Party Metrics

Mueller addressed these concerns by highlighting the limitations of third-party SEO tools and their metrics.

He stated:

“Many SEO tools have their own metrics that are tempting to optimize for (because you see a number), but ultimately, there’s no shortcut.”

He cautioned against implementing quick fixes based on these metrics, describing many of these tactics as “smoke & mirrors.”

Mueller highlighted a crucial point: the metrics provided by SEO tools don’t directly correlate with how search engines evaluate websites.

He noted that actions like using disavow files don’t affect metrics from SEO tools, as these companies don’t have access to Google data.

This highlights the need to understand the sources and limitations of SEO tool data. Their metrics aren’t direct indicators of search engine rankings.

What To Focus On? Value, Not Numbers

Mueller suggested a holistic SEO approach, prioritizing unique value over specific metrics like Domain Authority or spam scores.

He advised:

“If you want to think about the long term, finding ways to add real value that’s unique and wanted by people on the web (together with all the usual SEO best practices as a foundation) is a good target.”

However, Mueller acknowledged that creating unique content isn’t easy, adding:

“Unique doesn’t mean a unique combination of words, but really something that nobody else is providing, and ideally, that others can’t easily provide themselves.

It’s hard, it takes a lot of work, and it can take a lot of time. If it were fast & easy, others would be – and probably are already – doing it and have more practice at it.”

Mueller’s insights encourage us to focus on what really matters: strategies that put users first.

This helps align content with Google’s goals and create lasting benefits.

Key Takeaways

  1. While potentially useful, third-party SEO metrics shouldn’t be the primary focus of optimization efforts.
  2. Dramatic changes in these metrics don’t reflect changes in how search engines view your site.
  3. Focus on creating unique content rather than chasing tool-based metrics.
  4. Understand the limitations and sources of SEO tool data

Featured Image: JHVEPhoto/Shutterstock

Source link

Keep an eye on what we are doing
Be the first to get latest updates and exclusive content straight to your email inbox.
We promise not to spam you. You can unsubscribe at any time.
Invalid email address
Continue Reading

SEO

A Guide To Robots.txt: Best Practices For SEO

Published

on

By

A Guide To Robots.txt: Best Practices For SEO

Understanding how to use the robots.txt file is crucial for any website’s SEO strategy. Mistakes in this file can impact how your website is crawled and your pages’ search appearance. Getting it right, on the other hand, can improve crawling efficiency and mitigate crawling issues.

Google recently reminded website owners about the importance of using robots.txt to block unnecessary URLs.

Those include add-to-cart, login, or checkout pages. But the question is – how do you use it properly?

In this article, we will guide you into every nuance of how to do just so.

What Is Robots.txt?

The robots.txt is a simple text file that sits in the root directory of your site and tells crawlers what should be crawled.

The table below provides a quick reference to the key robots.txt directives.

Directive Description
User-agent Specifies which crawler the rules apply to. See user agent tokens. Using * targets all crawlers.
Disallow Prevents specified URLs from being crawled.
Allow Allows specific URLs to be crawled, even if a parent directory is disallowed.
Sitemap Indicates the location of your XML Sitemap by helping search engines to discover it.

This is an example of robot.txt from ikea.com with multiple rules.

Example of robots.txt from ikea.com

Note that robots.txt doesn’t support full regular expressions and only has two wildcards:

  • Asterisks (*), which matches 0 or more sequences of characters.
  • Dollar sign ($), which matches the end of a URL.

Also, note that its rules are case-sensitive, e.g., “filter=” isn’t equal to “Filter=.”

Order Of Precedence In Robots.txt

When setting up a robots.txt file, it’s important to know the order in which search engines decide which rules to apply in case of conflicting rules.

They follow these two key rules:

1. Most Specific Rule

The rule that matches more characters in the URL will be applied. For example:

User-agent: *
Disallow: /downloads/
Allow: /downloads/free/

In this case, the “Allow: /downloads/free/” rule is more specific than “Disallow: /downloads/” because it targets a subdirectory.

Google will allow crawling of subfolder “/downloads/free/” but block everything else under “/downloads/.”

2. Least Restrictive Rule

When multiple rules are equally specific, for example:

User-agent: *
Disallow: /downloads/
Allow: /downloads/

Google will choose the least restrictive one. This means Google will allow access to /downloads/.

Why Is Robots.txt Important In SEO?

Blocking unimportant pages with robots.txt helps Googlebot focus its crawl budget on valuable parts of the website and on crawling new pages. It also helps search engines save computing power, contributing to better sustainability.

Imagine you have an online store with hundreds of thousands of pages. There are sections of websites like filtered pages that may have an infinite number of versions.

Those pages don’t have unique value, essentially contain duplicate content, and may create infinite crawl space, thus wasting your server and Googlebot’s resources.

That is where robots.txt comes in, preventing search engine bots from crawling those pages.

If you don’t do that, Google may try to crawl an infinite number of URLs with different (even non-existent) search parameter values, causing spikes and a waste of crawl budget.

When To Use Robots.txt

As a general rule, you should always ask why certain pages exist, and whether they have anything worth for search engines to crawl and index.

If we come from this principle, certainly, we should always block:

  • URLs that contain query parameters such as:
    • Internal search.
    • Faceted navigation URLs created by filtering or sorting options if they are not part of URL structure and SEO strategy.
    • Action URLs like add to wishlist or add to cart.
  • Private parts of the website, like login pages.
  • JavaScript files not relevant to website content or rendering, such as tracking scripts.
  • Blocking scrapers and AI chatbots to prevent them from using your content for their training purposes.

Let’s dive into examples of how you can use robots.txt for each case.

1. Block Internal Search Pages

The most common and absolutely necessary step is to block internal search URLs from being crawled by Google and other search engines, as almost every website has an internal search functionality.

On WordPress websites, it is usually an “s” parameter, and the URL looks like this:

https://www.example.com/?s=google

Gary Illyes from Google has repeatedly warned to block “action” URLs as they can cause Googlebot to crawl them indefinitely even non-existent URLs with different combinations.

Here is the rule you can use in your robots.txt to block such URLs from being crawled:

User-agent: *
Disallow: *s=*
  1. The User-agent: * line specifies that the rule applies to all web crawlers, including Googlebot, Bingbot, etc.
  2. The Disallow: *s=* line tells all crawlers not to crawl any URLs that contain the query parameter “s=.” The wildcard “*” means it can match any sequence of characters before or after “s= .” However, it will not match URLs with uppercase “S” like “/?S=” since it is case-sensitive.

Here is an example of a website that managed to drastically reduce the crawling of non-existent internal search URLs after blocking them via robots.txt.

Screenshot from crawl stats reportScreenshot from crawl stats report

Note that Google may index those blocked pages, but you don’t need to worry about them as they will be dropped over time.

2. Block Faceted Navigation URLs

Faceted navigation is an integral part of every ecommerce website. There can be cases where faceted navigation is part of an SEO strategy and aimed at ranking for general product searches.

For example, Zalando uses faceted navigation URLs for color options to rank for general product keywords like “gray t-shirt.”

However, in most cases, this is not the case, and filter parameters are used merely for filtering products, creating dozens of pages with duplicate content.

Technically, those parameters are not different from internal search parameters with one difference as there may be multiple parameters. You need to make sure you disallow all of them.

For example, if you have filters with the following parameters “sortby,” “color,” and “price,” you may use this set of rules:

User-agent: *
Disallow: *sortby=*
Disallow: *color=*
Disallow: *price=*

Based on your specific case, there may be more parameters, and you may need to add all of them.

What About UTM Parameters?

UTM parameters are used for tracking purposes.

As John Mueller stated in his Reddit post, you don’t need to worry about URL parameters that link to your pages externally.

John Mueller on UTM parametersJohn Mueller on UTM parameters

Just make sure to block any random parameters you use internally and avoid linking internally to those pages, e.g., linking from your article pages to your search page with a search query page “https://www.example.com/?s=google.”

3. Block PDF URLs

Let’s say you have a lot of PDF documents, such as product guides, brochures, or downloadable papers, and you don’t want them crawled.

Here is a simple robots.txt rule that will block search engine bots from accessing those documents:

User-agent: *
Disallow: /*.pdf$

The “Disallow: /*.pdf$” line tells crawlers not to crawl any URLs that end with .pdf.

By using /*, the rule matches any path on the website. As a result, any URL ending with .pdf will be blocked from crawling.

If you have a WordPress website and want to disallow PDFs from the uploads directory where you upload them via the CMS, you can use the following rule:

User-agent: *
Disallow: /wp-content/uploads/*.pdf$
Allow: /wp-content/uploads/2024/09/allowed-document.pdf$

You can see that we have conflicting rules here.

In case of conflicting rules, the more specific one takes priority, which means the last line ensures that only the specific file located in folder “wp-content/uploads/2024/09/allowed-document.pdf” is allowed to be crawled.

4. Block A Directory

Let’s say you have an API endpoint where you submit your data from the form. It is likely your form has an action attribute like action=”/form/submissions/.”

The issue is that Google will try to crawl that URL, /form/submissions/, which you likely don’t want. You can block these URLs from being crawled with this rule:

User-agent: *
Disallow: /form/

By specifying a directory in the Disallow rule, you are telling the crawlers to avoid crawling all pages under that directory, and you don’t need to use the (*) wildcard anymore, like “/form/*.”

Note that you must always specify relative paths and never absolute URLs, like “https://www.example.com/form/” for Disallow and Allow directives.

Be cautious to avoid malformed rules. For example, using /form without a trailing slash will also match a page /form-design-examples/, which may be a page on your blog that you want to index.

Read: 8 Common Robots.txt Issues And How To Fix Them

5. Block User Account URLs

If you have an ecommerce website, you likely have directories that start with “/myaccount/,” such as “/myaccount/orders/” or “/myaccount/profile/.”

With the top page “/myaccount/” being a sign-in page that you want to be indexed and found by users in search, you may want to disallow the subpages from being crawled by Googlebot.

You can use the Disallow rule in combination with the Allow rule to block everything under the “/myaccount/” directory (except the /myaccount/ page).

User-agent: *
Disallow: /myaccount/
Allow: /myaccount/$


And again, since Google uses the most specific rule, it will disallow everything under the /myaccount/ directory but allow only the /myaccount/ page to be crawled.

Here’s another use case of combining the Disallow and Allow rules: in case you have your search under the /search/ directory and want it to be found and indexed but block actual search URLs:

User-agent: *
Disallow: /search/
Allow: /search/$

6. Block Non-Render Related JavaScript Files

Every website uses JavaScript, and many of these scripts are not related to the rendering of content, such as tracking scripts or those used for loading AdSense.

Googlebot can crawl and render a website’s content without these scripts. Therefore, blocking them is safe and recommended, as it saves requests and resources to fetch and parse them.

Below is a sample line that is disallowing sample JavaScript, which contains tracking pixels.

User-agent: *
Disallow: /assets/js/pixels.js

7. Block AI Chatbots And Scrapers

Many publishers are concerned that their content is being unfairly used to train AI models without their consent, and they wish to prevent this.

#ai chatbots
User-agent: GPTBot
User-agent: ChatGPT-User
User-agent: Claude-Web
User-agent: ClaudeBot
User-agent: anthropic-ai
User-agent: cohere-ai
User-agent: Bytespider
User-agent: Google-Extended
User-Agent: PerplexityBot
User-agent: Applebot-Extended
User-agent: Diffbot
User-agent: PerplexityBot
Disallow: /
#scrapers
User-agent: Scrapy
User-agent: magpie-crawler
User-agent: CCBot
User-Agent: omgili
User-Agent: omgilibot
User-agent: Node/simplecrawler
Disallow: /

Here, each user agent is listed individually, and the rule Disallow: / tells those bots not to crawl any part of the site.

This, besides preventing AI training on your content, can help reduce the load on your server by minimizing unnecessary crawling.

For ideas on which bots to block, you may want to check your server log files to see which crawlers are exhausting your servers, and remember, robots.txt doesn’t prevent unauthorized access.

8. Specify Sitemaps URLs

Including your sitemap URL in the robots.txt file helps search engines easily discover all the important pages on your website. This is done by adding a specific line that points to your sitemap location, and you can specify multiple sitemaps, each on its own line.

Sitemap: https://www.example.com/sitemap/articles.xml
Sitemap: https://www.example.com/sitemap/news.xml
Sitemap: https://www.example.com/sitemap/video.xml

Unlike Allow or Disallow rules, which allow only a relative path, the Sitemap directive requires a full, absolute URL to indicate the location of the sitemap.

Ensure the sitemaps’ URLs are accessible to search engines and have proper syntax to avoid errors.

Sitemap fetch error in search consoleSitemap fetch error in search console

9. When To Use Crawl-Delay

The crawl-delay directive in robots.txt specifies the number of seconds a bot should wait before crawling the next page. While Googlebot does not recognize the crawl-delay directive, other bots may respect it.

It helps prevent server overload by controlling how frequently bots crawl your site.

For example, if you want ClaudeBot to crawl your content for AI training but want to avoid server overload, you can set a crawl delay to manage the interval between requests.

User-agent: ClaudeBot
Crawl-delay: 60

This instructs the ClaudeBot user agent to wait 60 seconds between requests when crawling the website.

Of course, there may be AI bots that don’t respect crawl delay directives. In that case, you may need to use a web firewall to rate limit them.

Troubleshooting Robots.txt

Once you’ve composed your robots.txt, you can use these tools to troubleshoot if the syntax is correct or if you didn’t accidentally block an important URL.

1. Google Search Console Robots.txt Validator

Once you’ve updated your robots.txt, you must check whether it contains any error or accidentally blocks URLs you want to be crawled, such as resources, images, or website sections.

Navigate Settings > robots.txt, and you will find the built-in robots.txt validator. Below is the video of how to fetch and validate your robots.txt.

2. Google Robots.txt Parser

This parser is official Google’s robots.txt parser which is used in Search Console.

It requires advanced skills to install and run on your local computer. But it is highly recommended to take time and do it as instructed on that page because you can validate your changes in the robots.txt file before uploading to your server in line with the official Google parser.

Centralized Robots.txt Management

Each domain and subdomain must have its own robots.txt, as Googlebot doesn’t recognize root domain robots.txt for a subdomain.

It creates challenges when you have a website with a dozen subdomains, as it means you should maintain a bunch of robots.txt files separately.

However, it is possible to host a robots.txt file on a subdomain, such as https://cdn.example.com/robots.txt, and set up a redirect from  https://www.example.com/robots.txt to it.

You can do vice versa and host it only under the root domain and redirect from subdomains to the root.

Search engines will treat the redirected file as if it were located on the root domain. This approach allows centralized management of robots.txt rules for both your main domain and subdomains.

It helps make updates and maintenance more efficient. Otherwise, you would need to use a separate robots.txt file for each subdomain.

Conclusion

A properly optimized robots.txt file is crucial for managing a website’s crawl budget. It ensures that search engines like Googlebot spend their time on valuable pages rather than wasting resources on unnecessary ones.

On the other hand, blocking AI bots and scrapers using robots.txt can significantly reduce server load and save computing resources.

Make sure you always validate your changes to avoid unexpected crawability issues.

However, remember that while blocking unimportant resources via robots.txt may help increase crawl efficiency, the main factors affecting crawl budget are high-quality content and page loading speed.

Happy crawling!

More resources: 


Featured Image: BestForBest/Shutterstock

Source link

Keep an eye on what we are doing
Be the first to get latest updates and exclusive content straight to your email inbox.
We promise not to spam you. You can unsubscribe at any time.
Invalid email address
Continue Reading

SEO

Google Search Has A New Boss: Prabhakar Raghavan Steps Down

Published

on

By

Google Search Has A New Boss: Prabhakar Raghavan Steps Down

Google has announced that Prabhakar Raghavan, the executive overseeing the company’s search engine and advertising products, will be stepping down from his current role.

The news came on Thursday in a memo from CEO Sundar Pichai to staff.

Nick Fox To Lead Search & Ads

Taking over Raghavan’s responsibilities will be Nick Fox, a longtime Google executive with experience across various departments.

Fox will now lead the Knowledge & Information team, which includes Google’s Search, Ads, Geo, and Commerce products.

Pichai expressed confidence in Fox’s ability to lead these crucial divisions, noting:

“Throughout his career, Nick has demonstrated leadership across nearly every facet of Knowledge & Information, from Product and Design in Search and Assistant, to our Shopping, Travel, and Payments products.”

Raghavan’s New Role

Raghavan will transition to the newly created position of Chief Technologist.

He will work closely with Pichai and other Google leaders in this role to provide technical direction.

Pichai praised Raghavan’s contributions, stating:

“Prabhakar’s leadership journey at Google has been remarkable, spanning Research, Workspace, Ads, and Knowledge & Information. He led the Gmail team in launching Smart Reply and Smart Compose as early examples of using AI to improve products, and took Gmail and Drive past 1 billion users.”

Past Criticisms

This recent announcement from Google comes in the wake of earlier criticisms leveled at the company’s search division.

In April, an opinion piece from Ed Zitron highlighted concerns about the direction of Google Search under Raghavan’s leadership.

The article cited industry analysts who claimed that Raghavan’s background in advertising, rather than search technology, had led to decisions prioritizing revenue over search quality.

Critics alleged that under Raghavan’s tenure, Google had rolled back key quality improvements to boost engagement metrics and ad revenue.

Internal emails from 2019 were referenced. They described a “Code Yellow” emergency response to lagging search revenues when Raghavan was head of Ads. This reportedly resulted in boosting sites previously downranked for using spam tactics.

Google has disputed many of these claims, maintaining that its advertising systems do not influence organic search results.

More Restructuring

As part of Google’s restructuring:

  1. The Gemini app team, led by Sissie Hsiao, will join Google DeepMind under CEO Demis Hassabis.
  2. Google Assistant teams focused on devices and home experiences will move to the Platforms & Devices division.

Looking Ahead

Fox’s takeover from Raghavan could shake things up at Google.

We may see faster AI rollouts in search and ads, plus more frequent updates. Fox might revisit core search quality, addressing recent criticisms.

Fox might push for quicker adoption of new tech to fend off competitors, especially in AI. He’s also likely to be more savvy about regulatory issues.

It’s important to note that these potential changes are speculative based on the limited information available.

The actual changes in leadership style and priorities will become clearer as Fox settles into his new role.


Featured Image: One Artist/Shutterstock

Source link

Keep an eye on what we are doing
Be the first to get latest updates and exclusive content straight to your email inbox.
We promise not to spam you. You can unsubscribe at any time.
Invalid email address
Continue Reading

Trending