SEO
How to Automate Dull SEO Tasks

Some SEO processes involve repetitively clicking things on a screen. Not the best use of your time.
With the right tools, however, you can automate various SEO processes—and free up resources for tasks that need more creative, human input.
In this post, I’ll share two examples of how I automate SEO tasks.
Imagine being able to record and email article assignments to writers in seconds using a simple form like this:
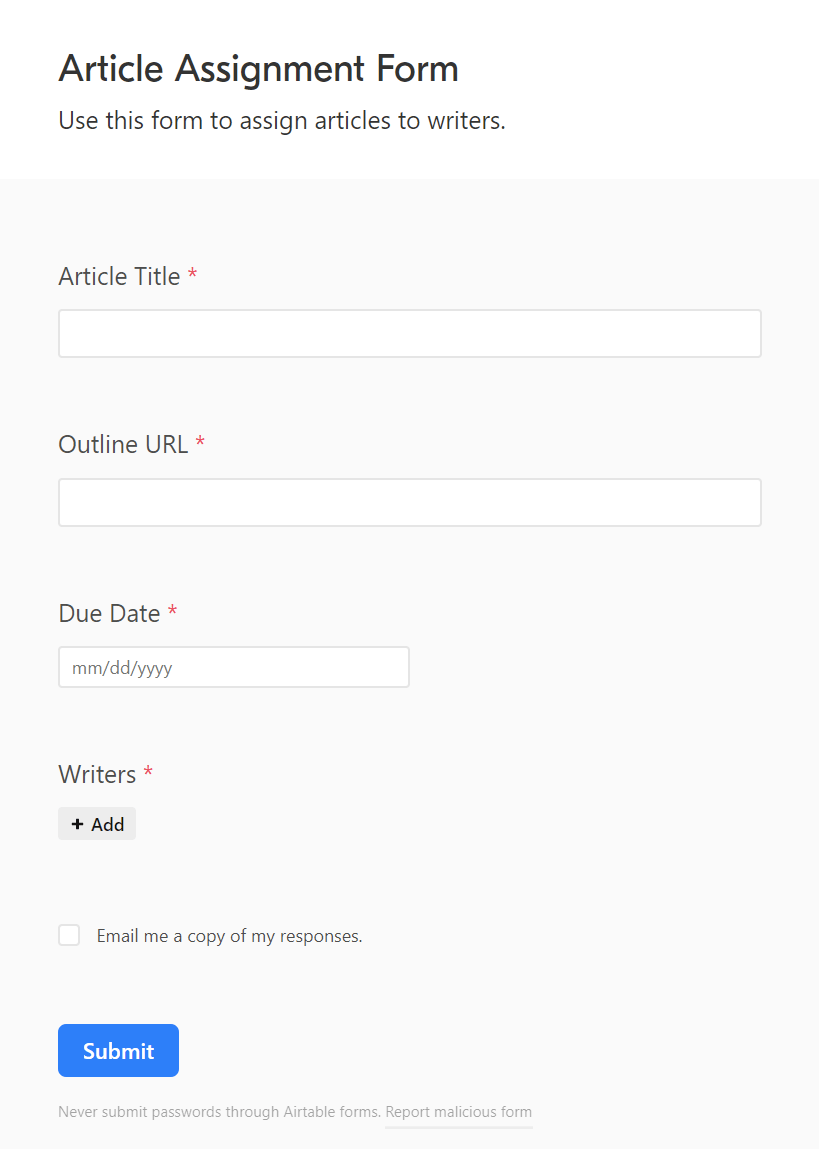
Let’s look at how to set this up.
1. Set up an Airtable database for your writer and article data
Sign up for Airtable and create a new database with a table called “Writers.” The table should have columns for your writers:

In the same Airtable database, create a separate table called “Articles.”
Set up columns in this table for your:
- Article titles.
- Article outline links.
- Article due dates.
- Assigned writer (set this column up as a linked record to your “Writers” table so that Airtable can retrieve data on your writers from it).

You’ll also need to add a lookup field to pull the writer’s email address from the “Writers” table.
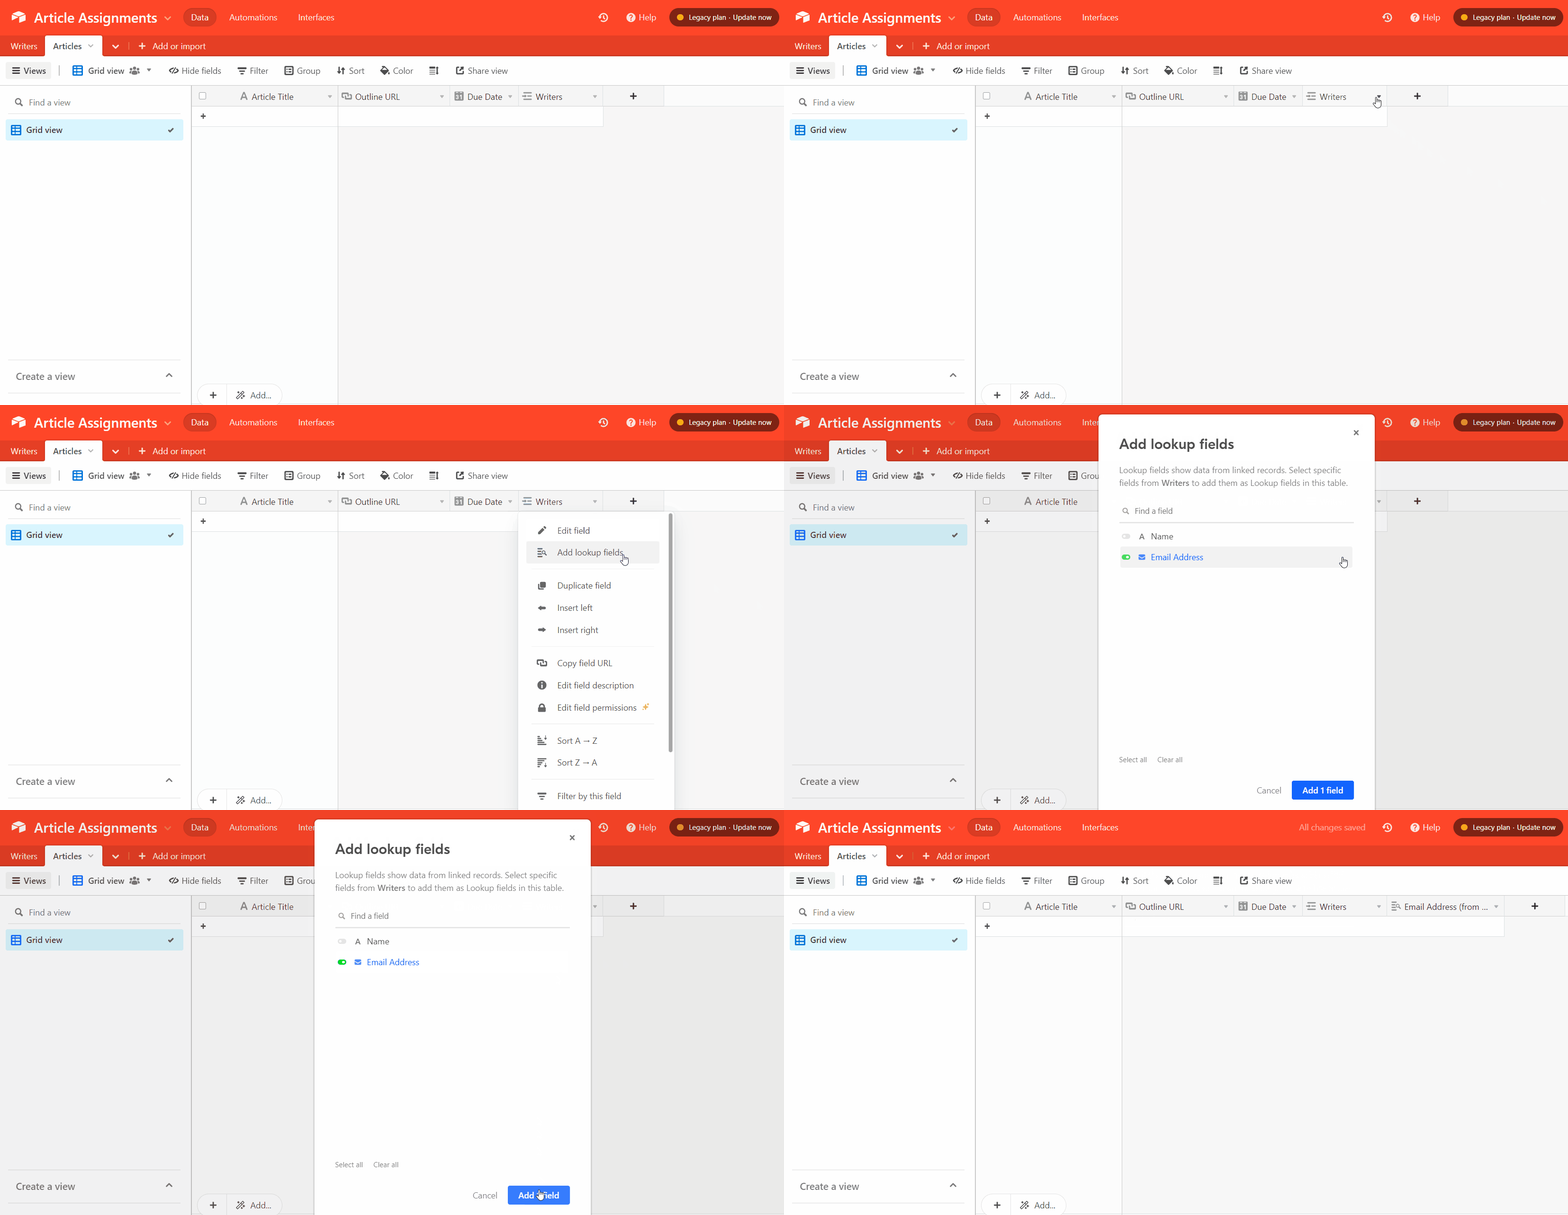
2. Create an Airtable article assignment form
Next, create an article assignment form for the “Articles” table. You’ll use this form to add new article assignments to the “Articles” table.
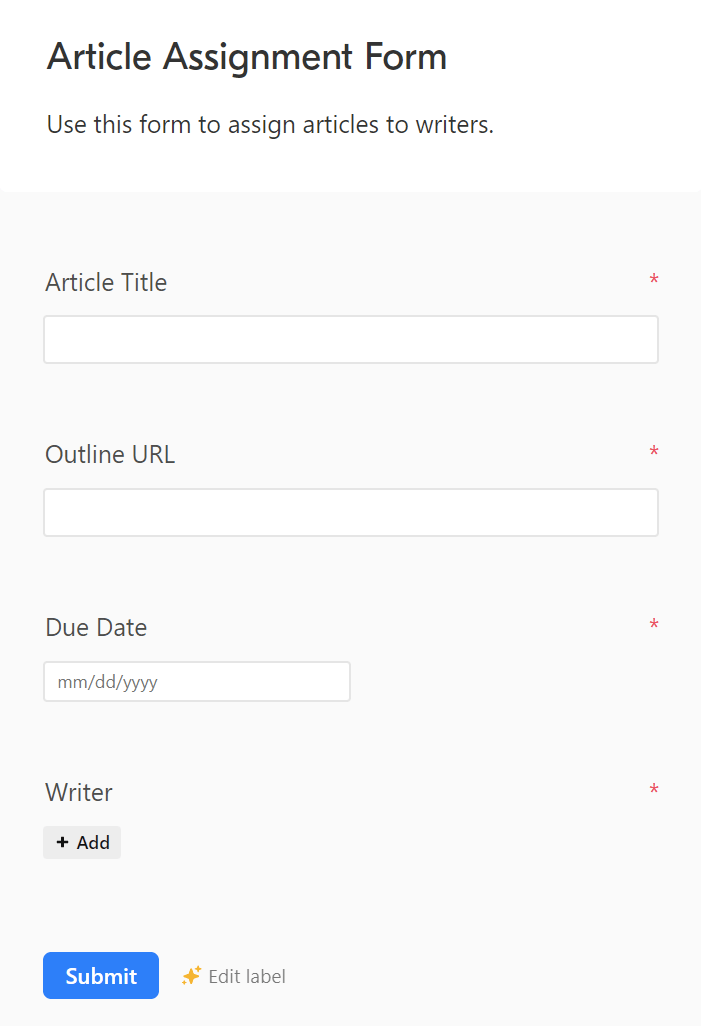
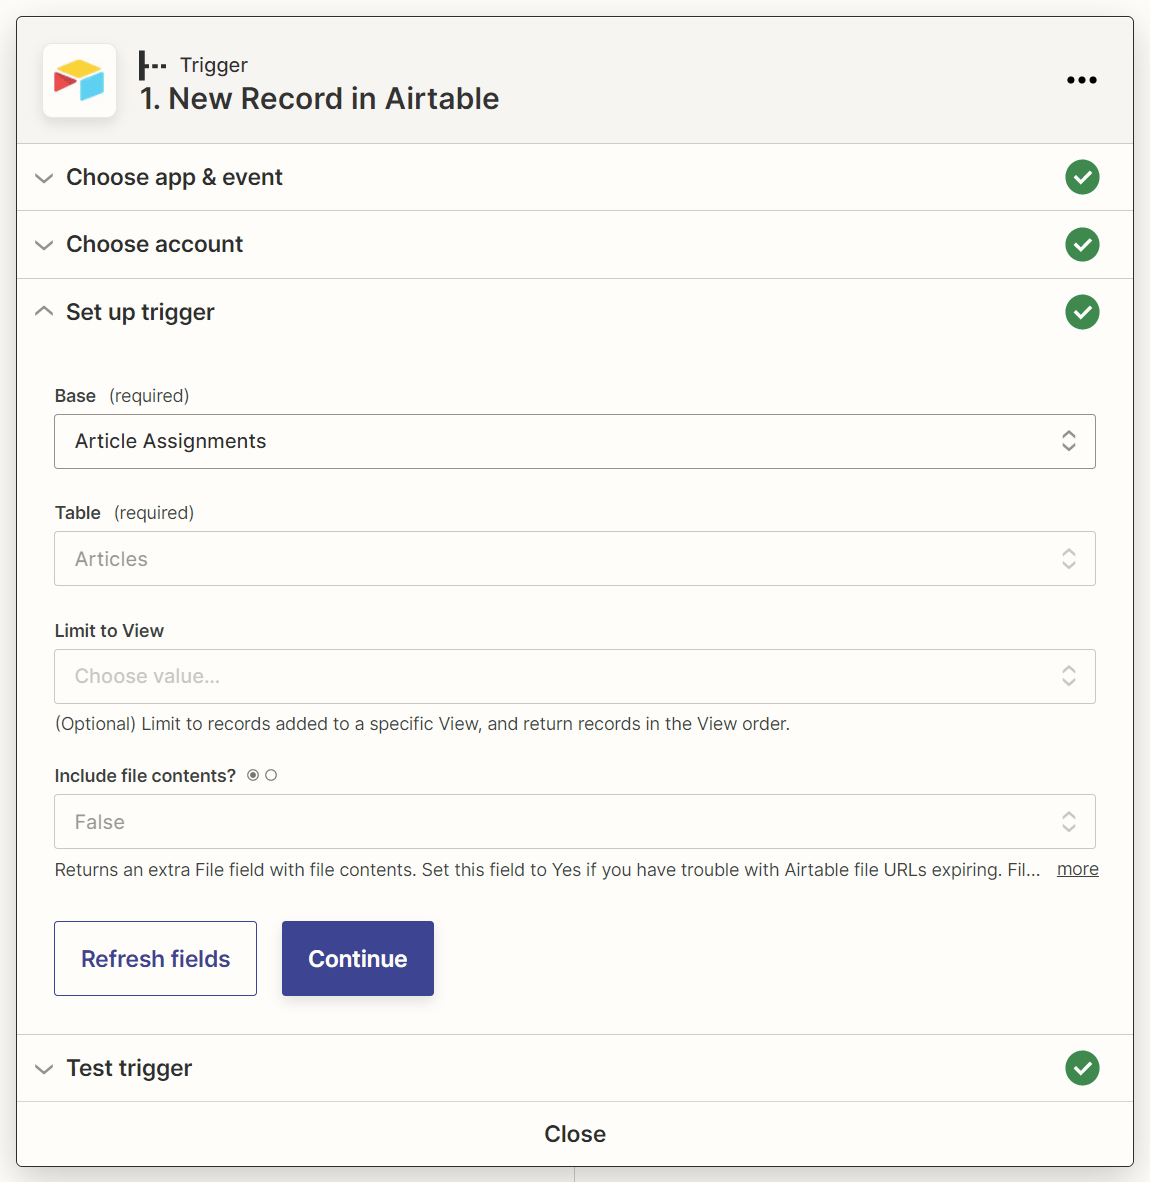
3. Set up a new Zapier automation with a “New Record in Airtable” trigger
When you submit your details on the new article assignment via the Airtable form, Airtable will automatically record the new article assignment in your “Articles” table. So that’s the first step of the article assignment workflow sorted.
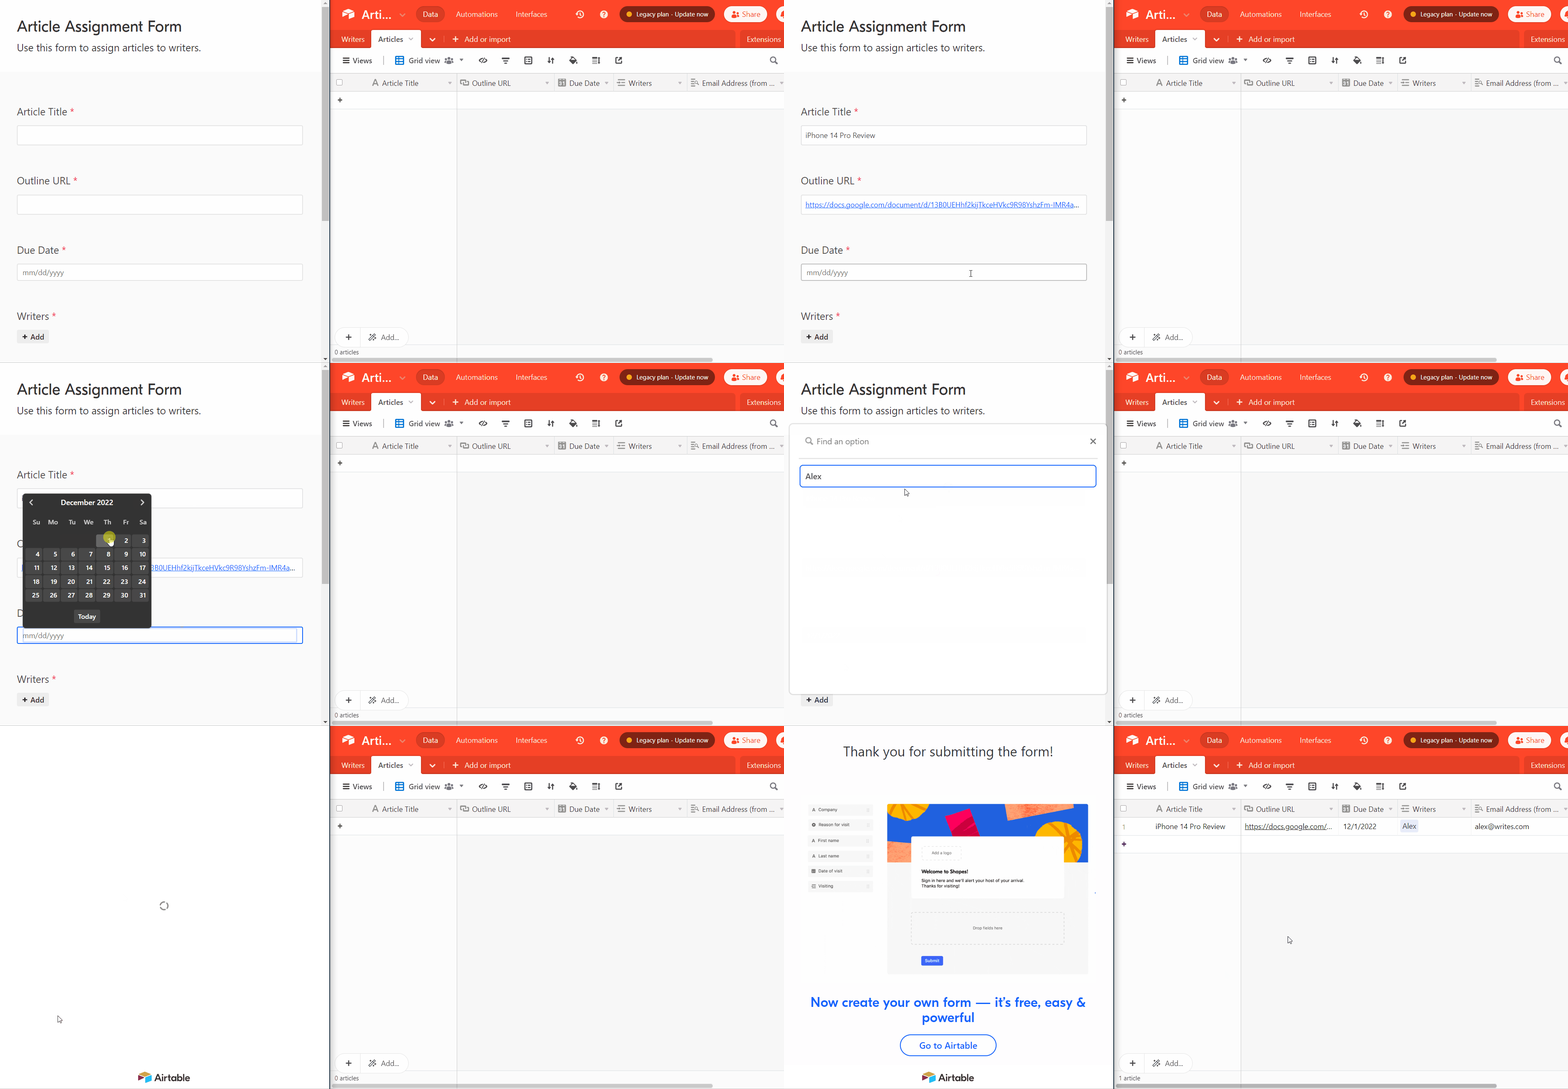
Now, we’ll use the Zapier workflow automation tool to automate the next three steps in the workflow—namely:
- Create a shared Google Drive submission folder for the article.
- Create a Google Doc submission document in the shared Google Drive folder.
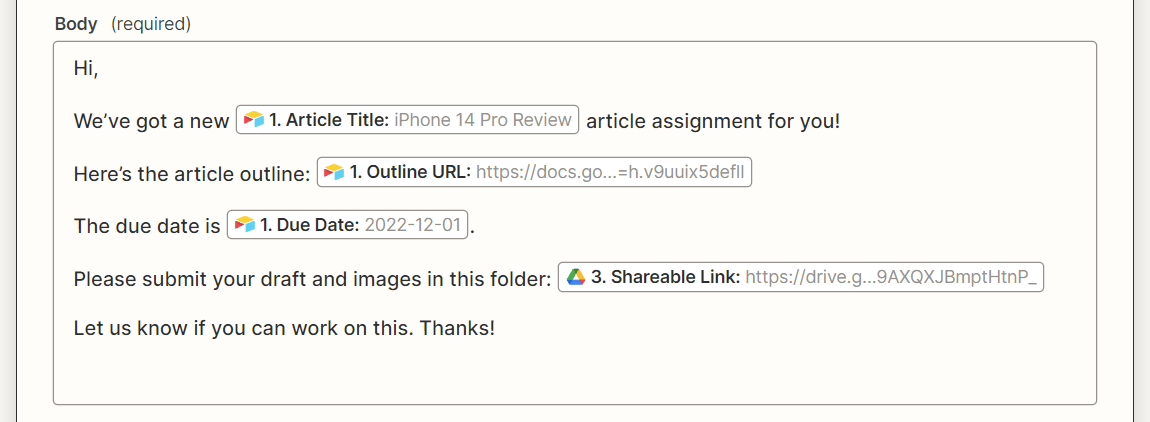
- Use Gmail to email the writer the article title, outline link, due date, and link to the shared Google Drive submission folder.
Sidenote.
Instead of Zapier, you can also use any other workflow automation tool, such as Make, as long as the tool supports the automation triggers and actions you’ll need.
In Zapier, create a new automated workflow (also known as a “Zap”) with:
- Airtable as the trigger app.
- New Record as the trigger event.
With this trigger, your Zap will start running when you add a new record to Airtable (such as by submitting your Airtable article assignment form).
4. Add a “Create Folder in Google Drive” action step to your Zap
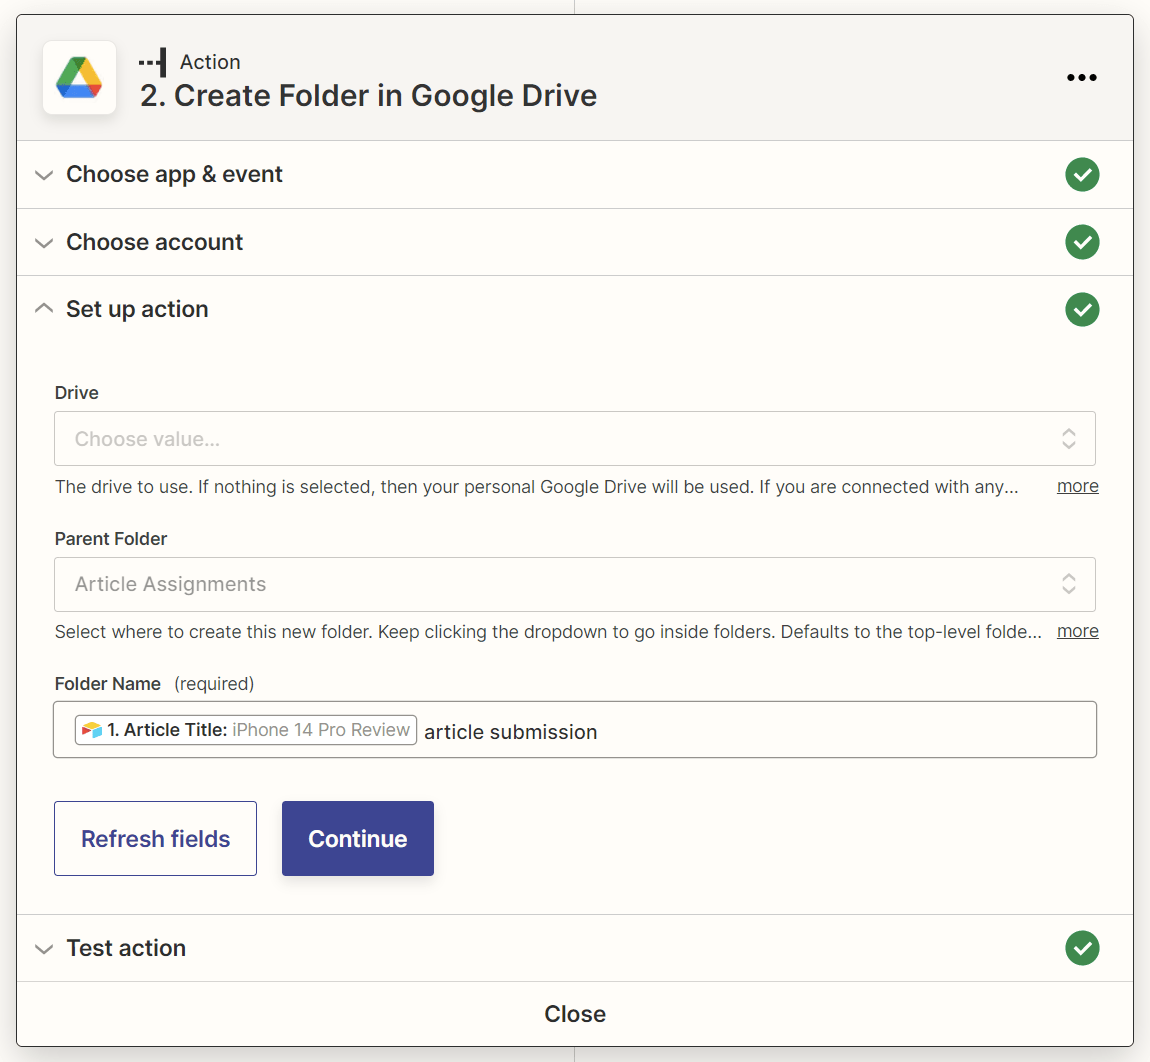
Next, add an action step with:
- Google Drive as the action app.
- Create Folder as the action event.
For the action step’s “Parent Folder” field, select the Google Drive folder in which the new submission folder should be created.
Also, provide a name for the submission folder in the “Folder Name” field. You can map the article title data from Airtable here to name your submission folder after the article’s title.
5. Add an “Add File Sharing Preference in Google Drive” action step to your Zap
The Google Drive folder created by your Zap will have its sharing permissions disabled by default, so let’s add an action step to grant folder access to anyone who has the link to the folder.
This action step should have:
- Google Drive as the action app.
- Add File Sharing Preference as the action event.
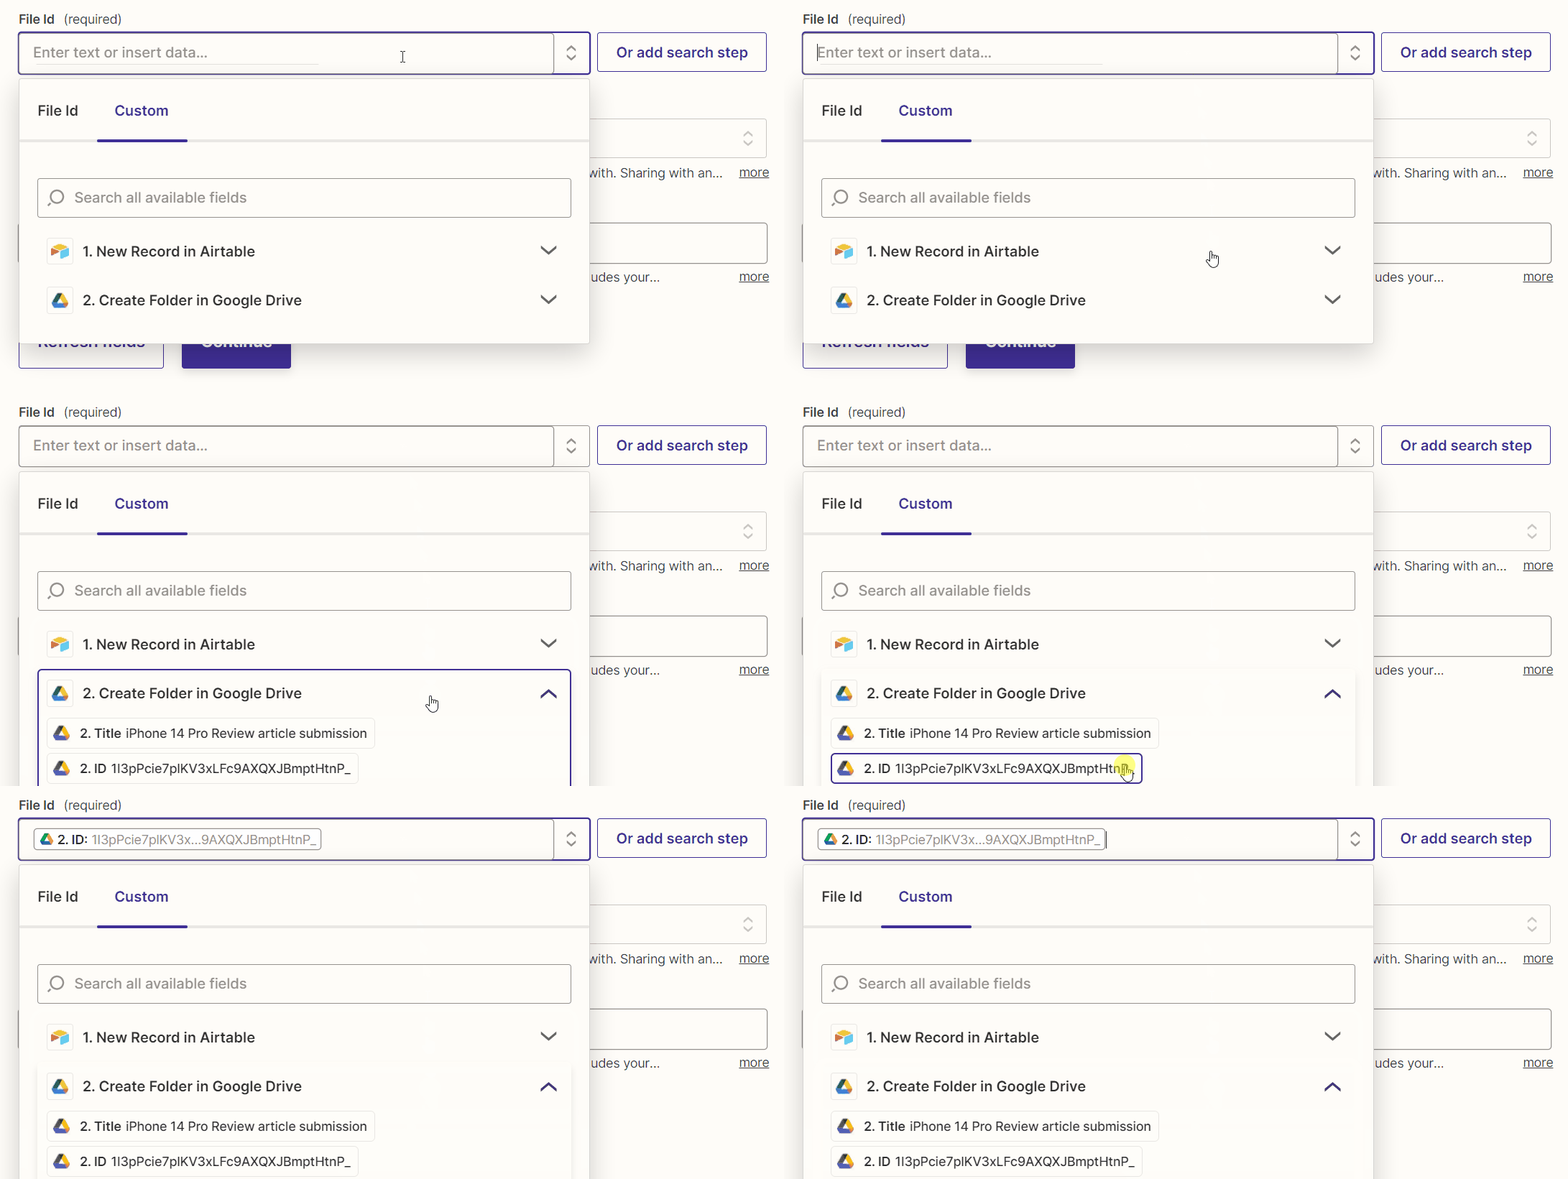
Map the file ID of the Google Drive folder created in the previous action step to the “File Id” field of this action step.
In addition, set the “Sharing Preference” field to “Anyone on the internet who has the link can edit.”

6. Add a “Create Document from Text in Google Docs” action step to your Zap
Now, let’s set up the Google Doc that the writer will use to submit their draft.
We’ll have the Zap create this submission Google Doc in the shared Google Drive submission folder. And since the Google Drive folder will have general access enabled, anyone with the link to the Google Drive folder—and this includes you—will also automatically get access to the Google Doc.
No more frustration over writers forgetting to grant access to their Google Docs!
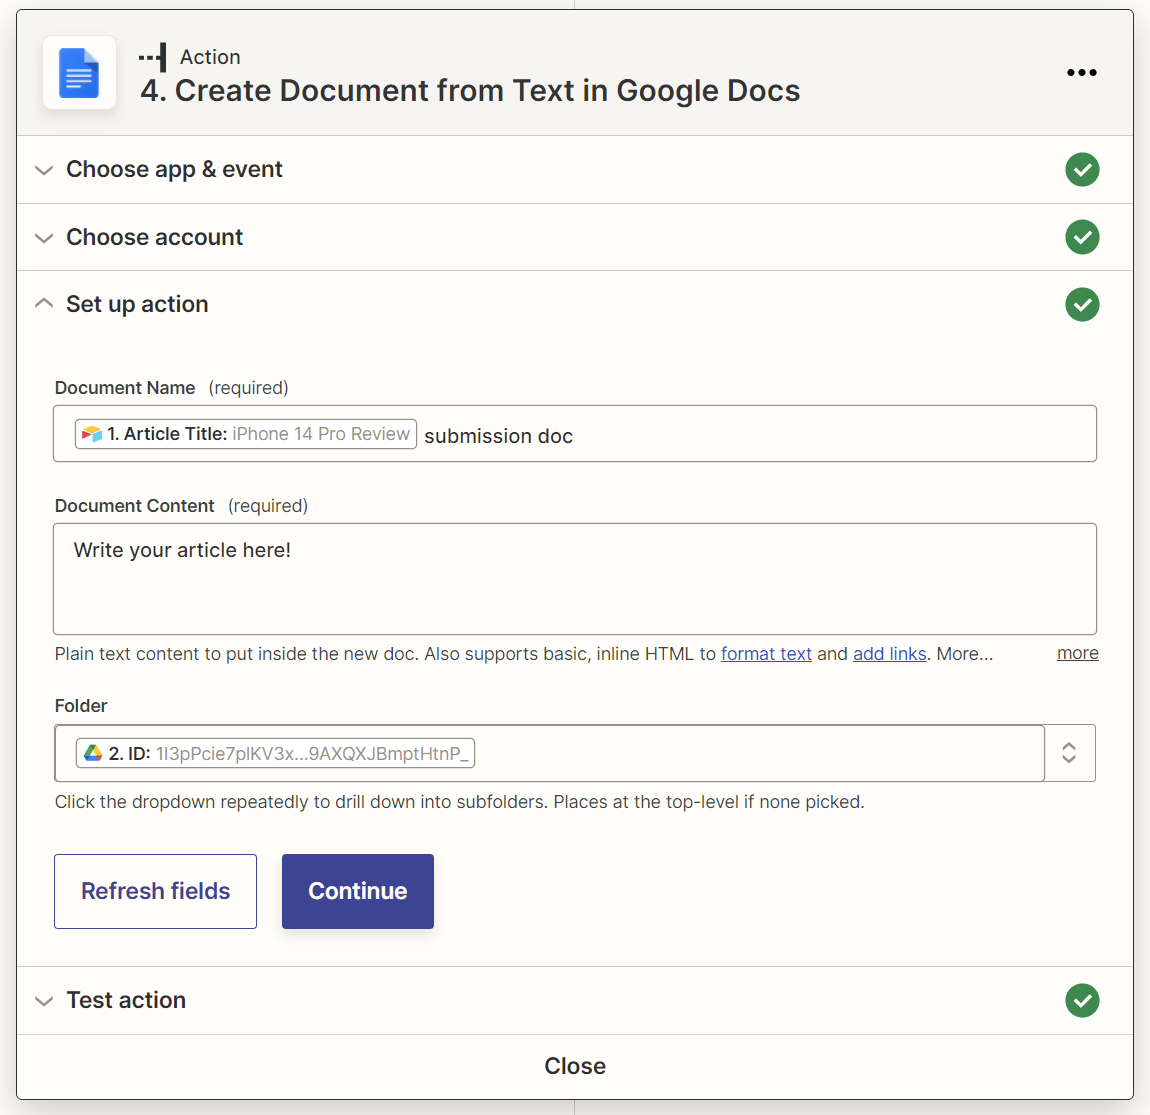
So add a new action step to your Zap with:
- Google Docs as the action app.
- Create Document from Text as the action event.
Map the article title data from Airtable to the action step’s “Document Name” field, and the folder ID of the shared Google Drive folder to the “Folder” field.
You’ll also need to include some default text in the Google Doc, such as “Write your article here!”
7. Add a “Send Email in Gmail” action step to your Zap
Finally, we’ll get the Zap to use your Gmail account to email the writer the article title, outline link, due date, and link to the shared Google Drive submission folder.
Add a last action step to your Zap with:
- Gmail as the action app.
- Send Email as the action event.
Map the writer’s email address from Airtable to the “To” field for this action step. Also, map the article title, outline link, due date, and Google Drive submission folder link in the email body.
I also recommend adding your own email address to either the “Cc” or “Bcc” field so you get a copy of the automated email (and can confirm it’s been sent).
Once you’re happy with your Zap, hit the Publish button to activate your automation!
Finding email addresses for link building outreach can be a massive pain.
After all, most prospects don’t advertise their email addresses publicly. And even if you’ve managed to dig up their email addresses (or guess them using trial and error), there’s no guarantee they work.
But using Ahrefs’ Content Explorer, you can generate a huge Google Sheets list of link building prospects that looks like this:

Then as you fill out the “Approve?” column for each prospect with data—such as “Yes” or “Approved”—a Zapier automation will automatically do all these for you:
- Find the prospect’s email address using the Hunter email lookup tool
- Add the email address to your Google Sheet list of prospects
- Verify the email address using the NeverBounce email verification tool
- Add the verified email address to the Woodpecker.io email outreach tool so you can start sending customized outreach emails
Here’s how to set this up.
1. Get your list of prospects
Launch Ahrefs’ Content Explorer and search for link prospects.
For example, if you recently published a marketing survey with unique insights and statistics, you may want to look for marketing statistics pages to pitch. To do this, simply run an “In title” search for “marketing statistics.”
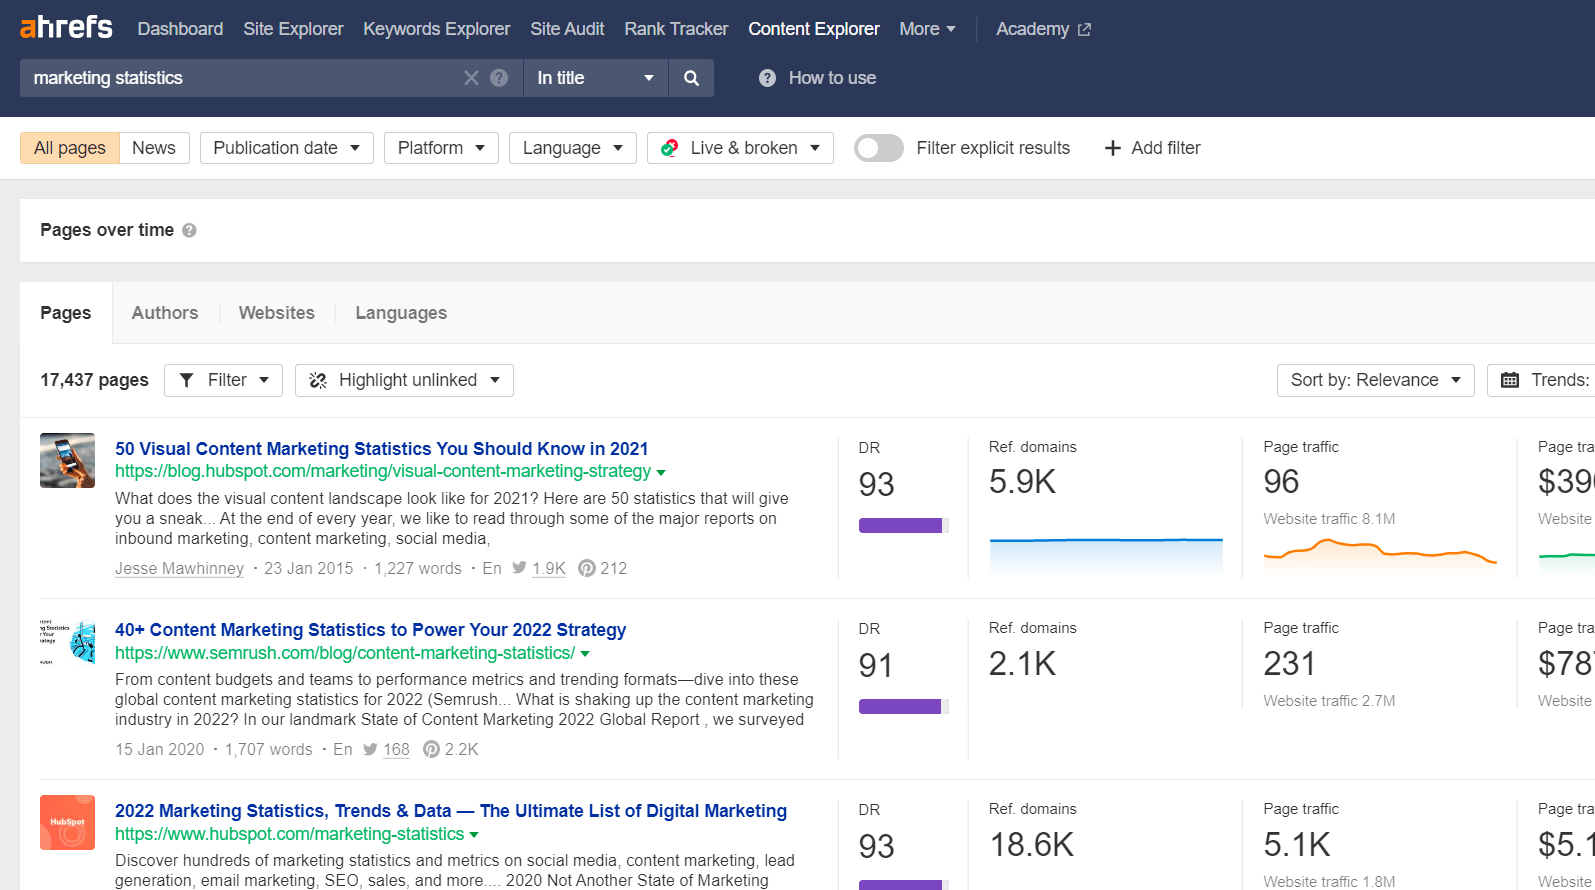
Next, filter your results to show only webpages that are:
- In English (unless you’re targeting webpages in another language).
- Live, as it’d be weird to reach out and say, “Hey, I found you through [this webpage that no longer exists].”
- On websites with a Domain Rating (DR) of 20 to 80 because you want to prioritize pursuing backlinks from authoritative websites but also that your chances of getting backlinks from super high-authority websites are quite low.

Add a last filter to show only one page per domain (since you want to reach out to only one prospect per website).
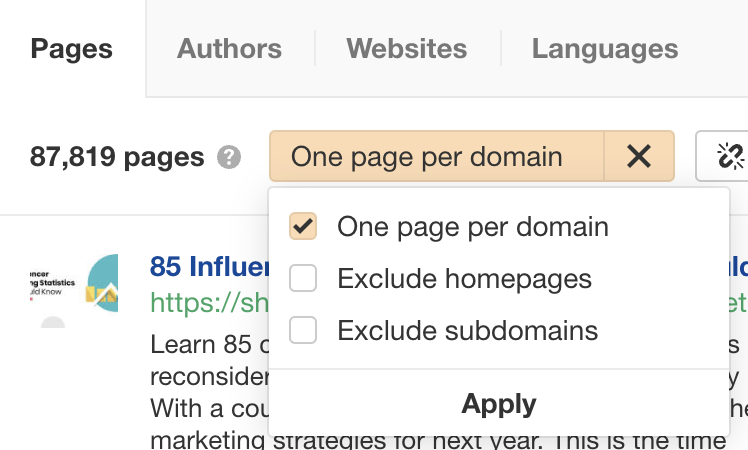
Click the Export button to export your list of prospects in a CSV file.
2. Clean up your list of prospects
As mentioned, we’ll be using Hunter to help us find our prospects’ email addresses.
Hunter uses the first names, last names, and domains of prospects to find email addresses, so we’ll clean up our list of prospects to provide Hunter with the exact data it needs.
Import your CSV list of prospects in Google Sheets and delete all columns in it except for:
- Content Title
- Content URL
- Author
Also, some of the prospects in the CSV don’t have author names, so it’s worth removing these rows from the CSV. To do this, just filter for rows with empty author names and delete them.
Next, use the SPLIT formula to split the author names into their first and last names based on the space between their names.
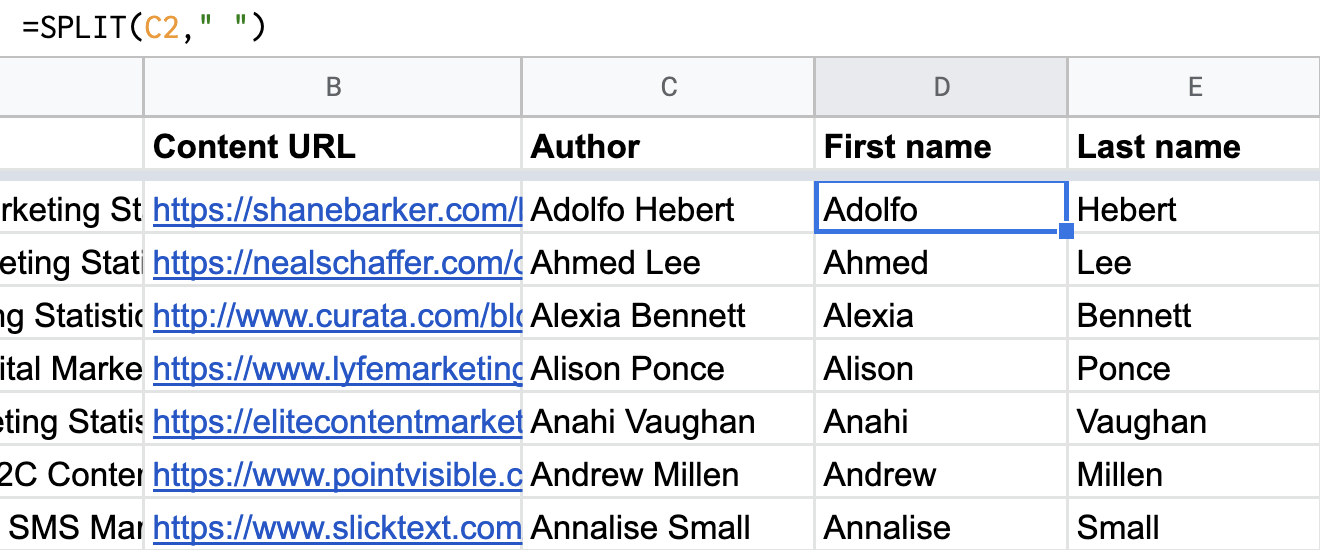
Finally, add two new columns to the sheet:
- Approve?: Adding data to this column will trigger the Zapier automation we’ll be setting up next!
- Email Address: This column will store the prospect’s email address (if found).

3. Set up a new Zapier automation with a “New or Updated Spreadsheet Row in Google Sheets” trigger
In Zapier, create a new Zap with:
- Google Sheets as the trigger app.
- New or Updated Spreadsheet Row as the trigger event.
Map the action step’s “Trigger Column” field to your Google Sheet’s “Approve?” column.
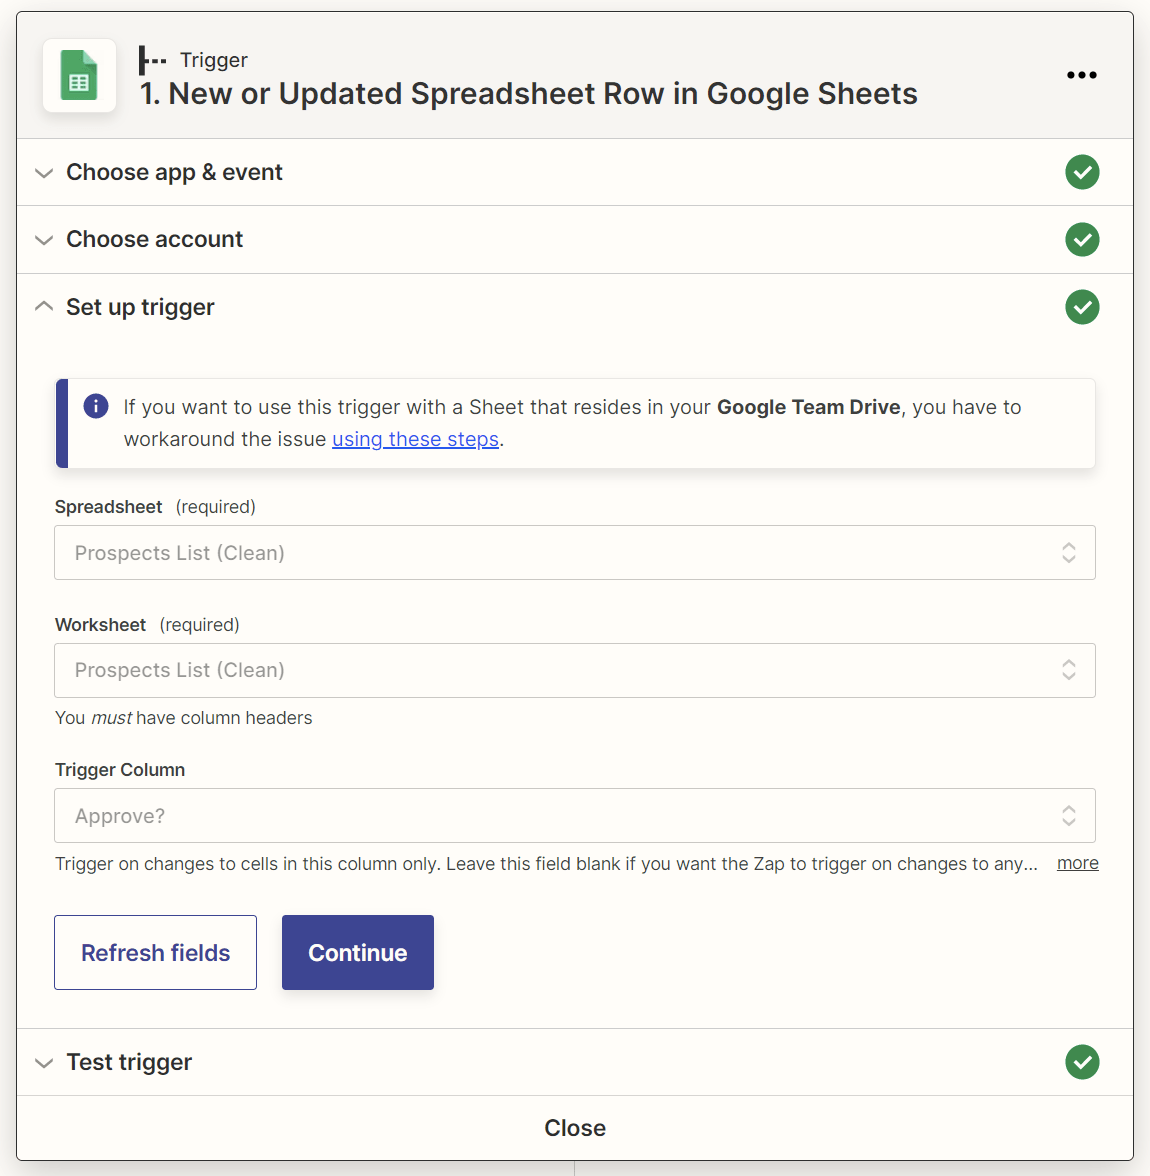
With this setup, you’ll trigger your Zap whenever you add new data—such as “Yes” or “Approved”—to the “Approve?” column for any prospect row.

4. Add a “Find Email in Hunter” action step to your Zap
Next, add a new action step with:
- Hunter as the action app.
- Find Email as the action event.
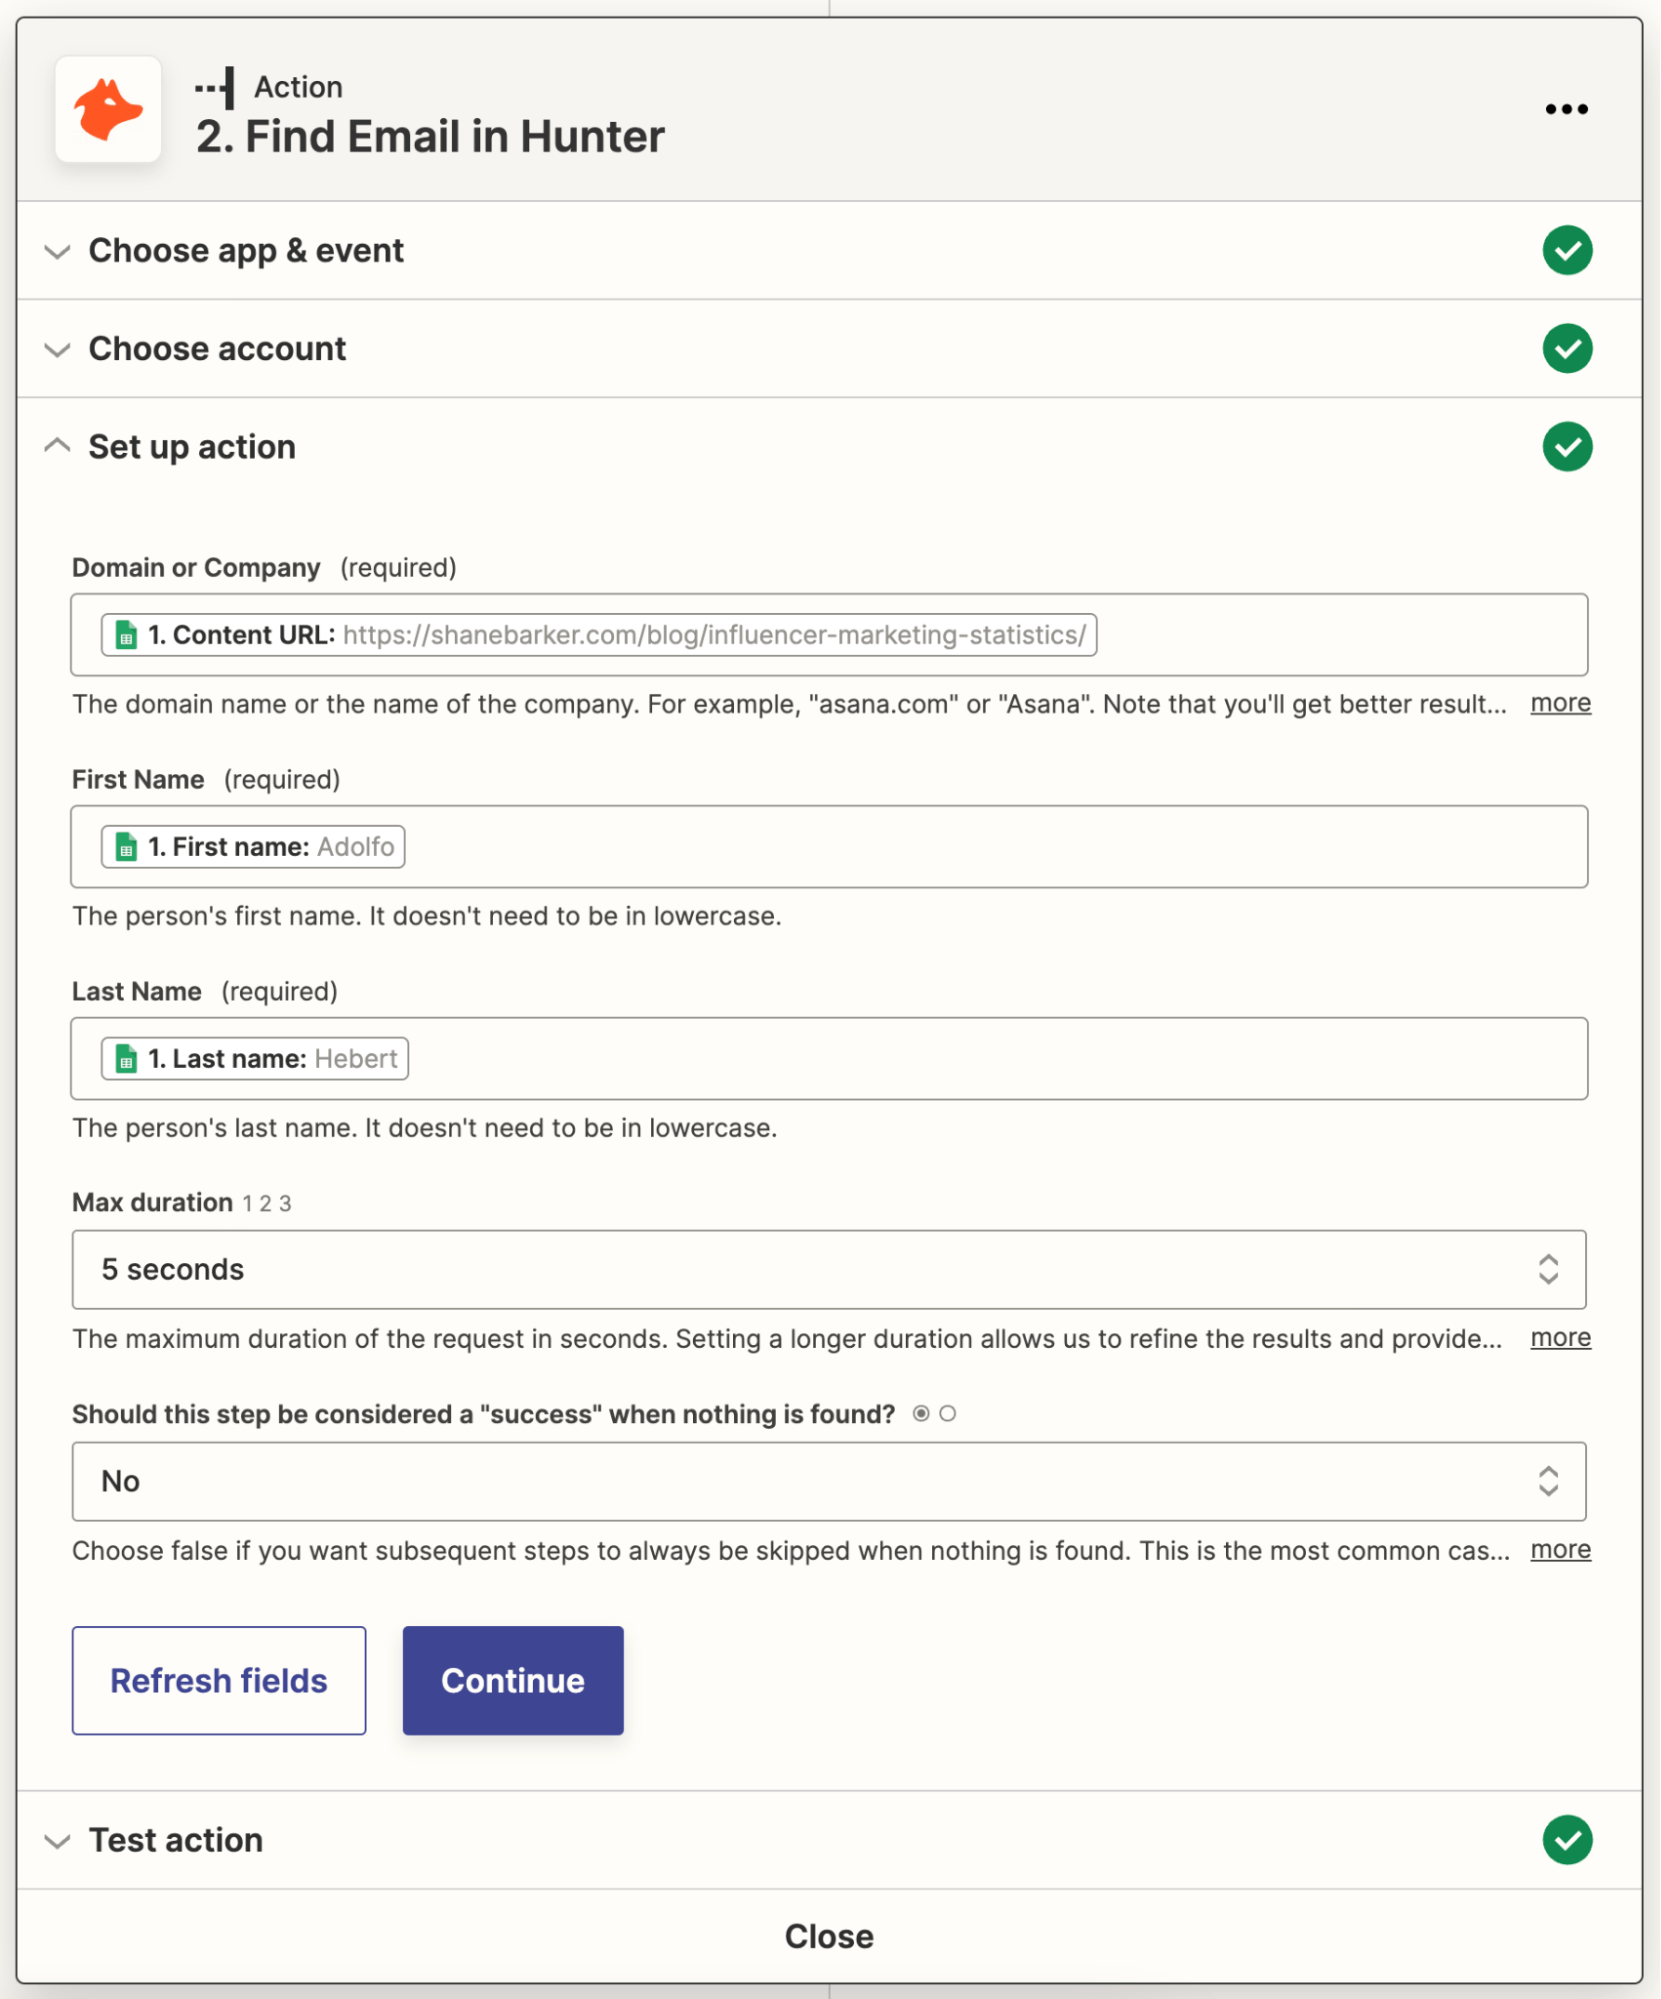
Map the “Content URL,” “First Name,” and “Last Name” columns in your Google Sheet to the “Domain or Company,” “First Name,” and “Last Name” fields for this action step, respectively.
5. Add an “Update Spreadsheet Row in Google Sheets” action step to your Zap
The next action step will update your Google Sheet with a prospect’s email address if Hunter finds it. Use:
- Google Sheets as the action app.
- Update Spreadsheet Row as the action event.
Map the Row Number of the updated row in the trigger step to this action step’s “Row” field.
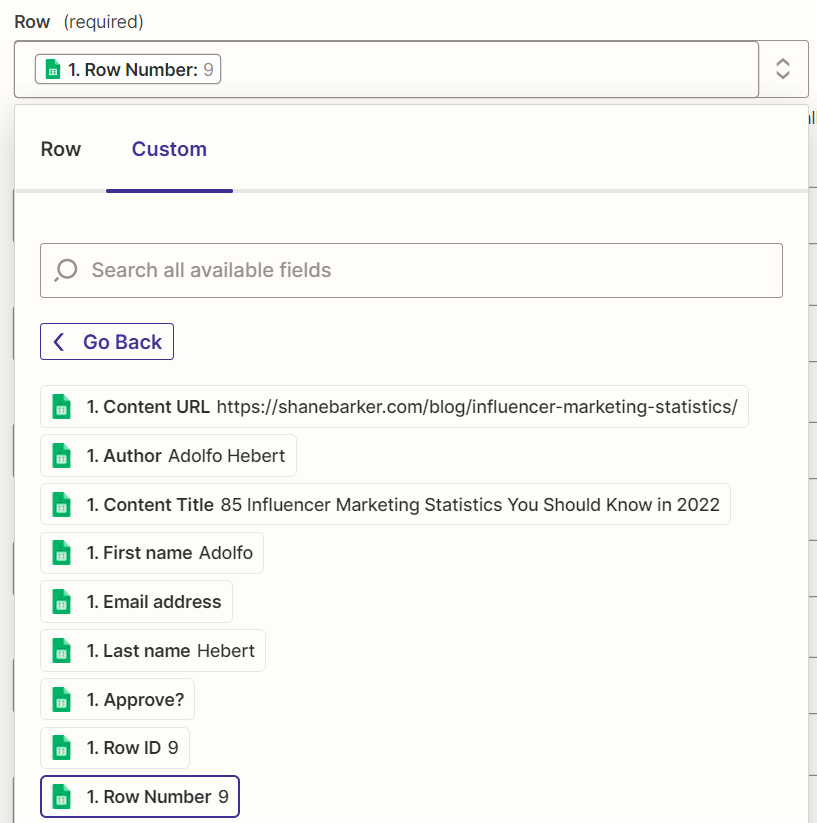
Also, map the email address that Hunter found in the previous action step to the “Email Address” field of this action step.

Sidenote.
This email address does not exist. It is for demo purposes only.
6. Add a Filter action that lets the Zap continue only if Hunter has found an email address
Next, set up a Filter action that lets the Zap proceed only if the email address data found by Hunter contains the “@” symbol.
That’s because all email addresses have the “@” symbol. If Hunter happens to find an email address value that doesn’t include this symbol, we won’t want to waste time verifying it.

7. Add a “Verify Email Address in NeverBounce” action step to your Zap
Now, we’ll use NeverBounce to verify the validity of the email addresses that Hunter found. Add a new action step with:
- NeverBounce as the action app.
- Verify Email Address as the action event.
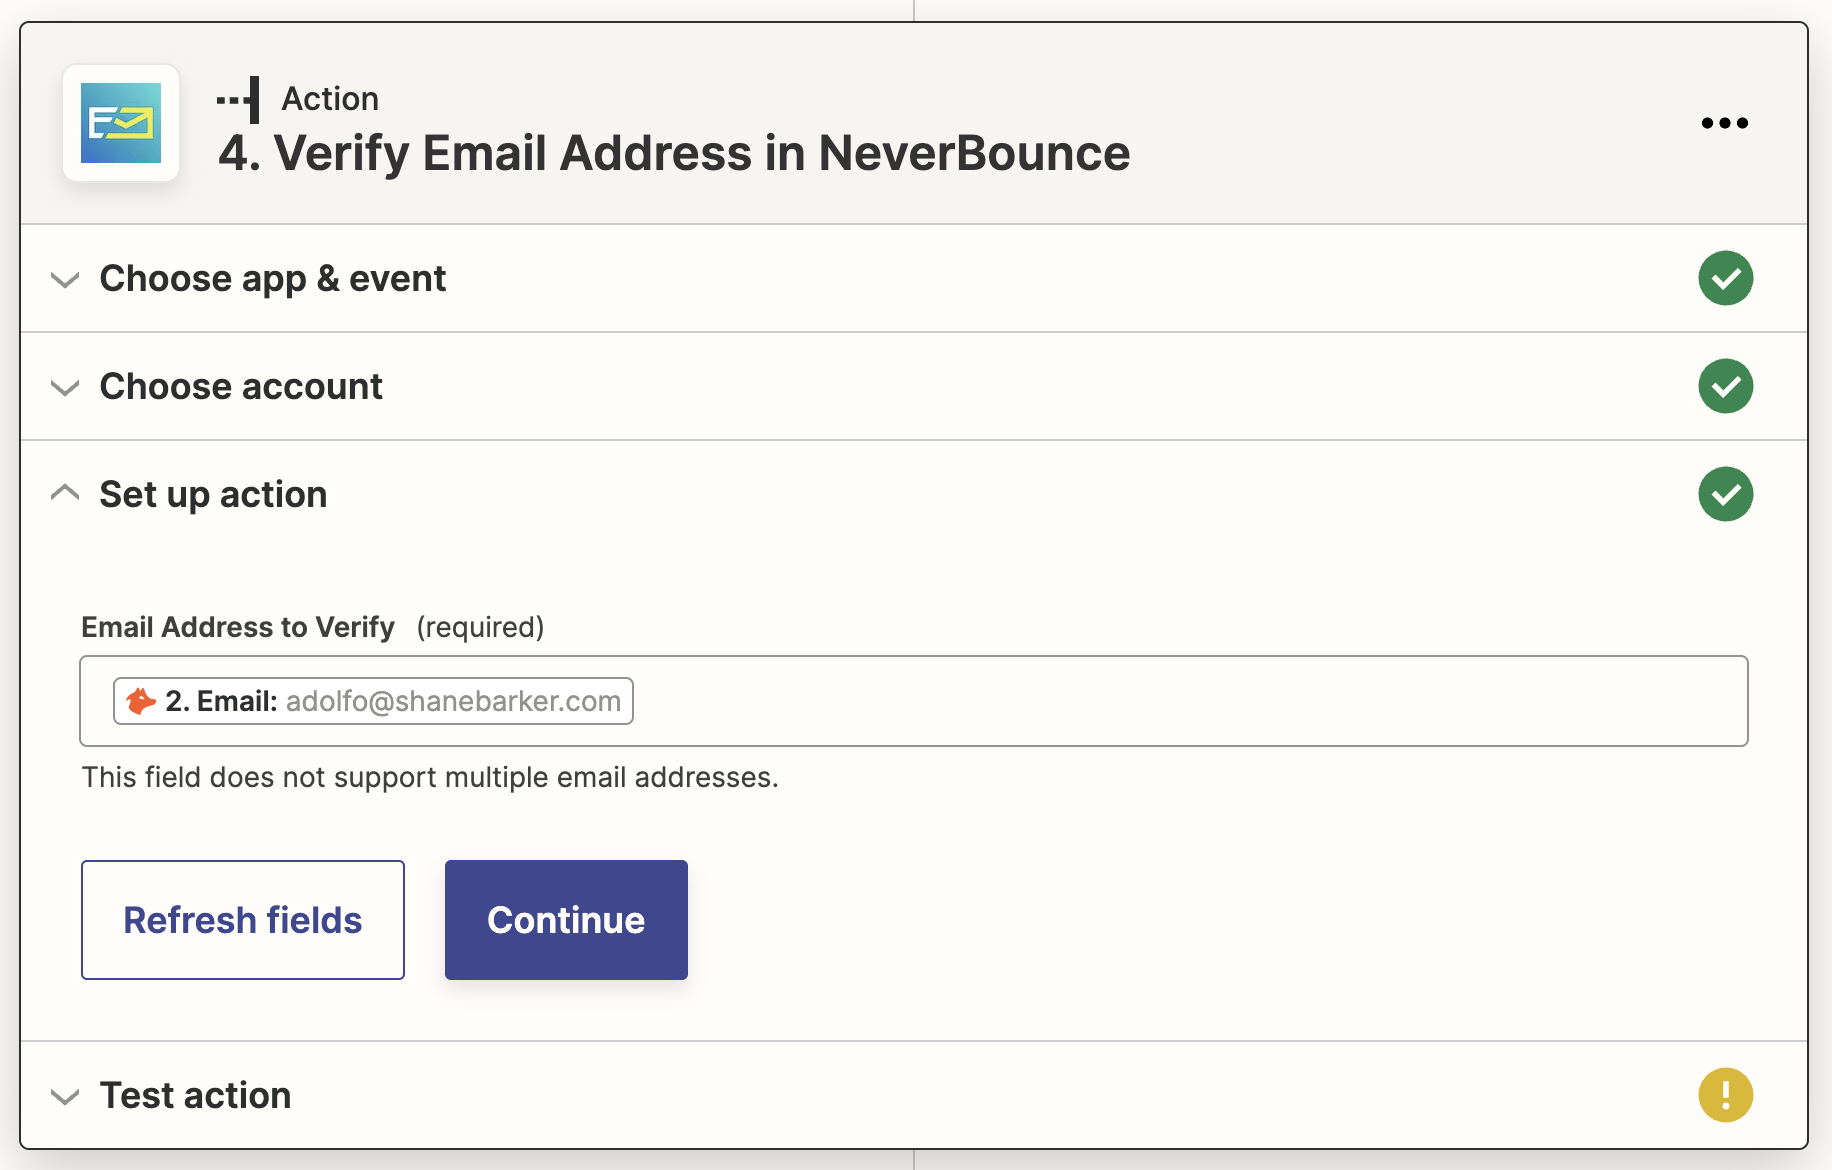
Map the email address that Hunter found to this action step’s “Email Address to Verify” field:
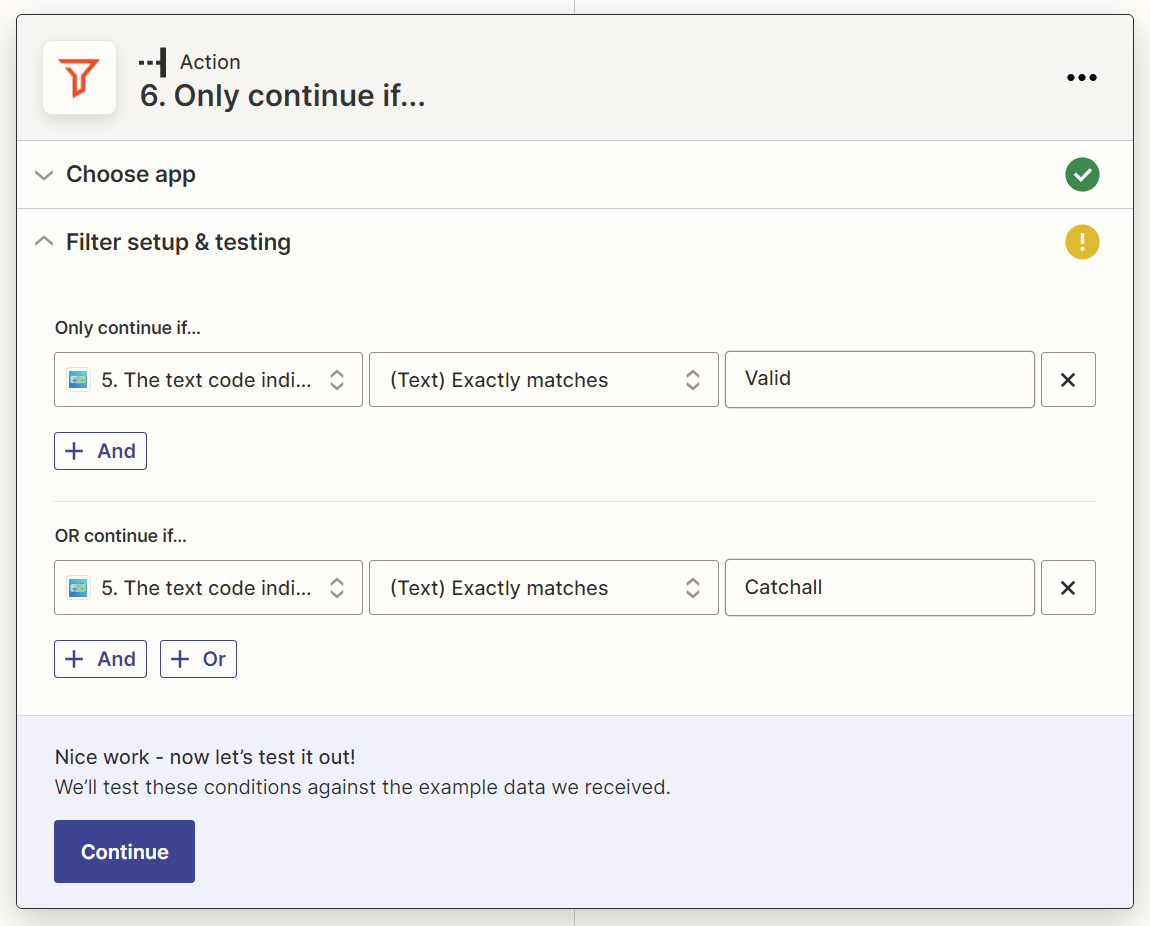
8. Add a Filter action that lets the Zap continue only if NeverBounce returns a “Valid” or “Catchall” status for the email address
When NeverBounce verifies an email address, it will return one of four status text codes: Valid, Catchall, Invalid, and Unknown. Email addresses marked with the “Valid” and “Catchall” NeverBounce status codes have the highest likelihood of being valid.
So we’ll add a Filter action that lets the Zap proceed only if an email address’s NeverBounce status text code matches either “Valid” or “Catchall” exactly.
9. Add a “Create/Update Prospect in Woodpecker.co” action step to your Zap
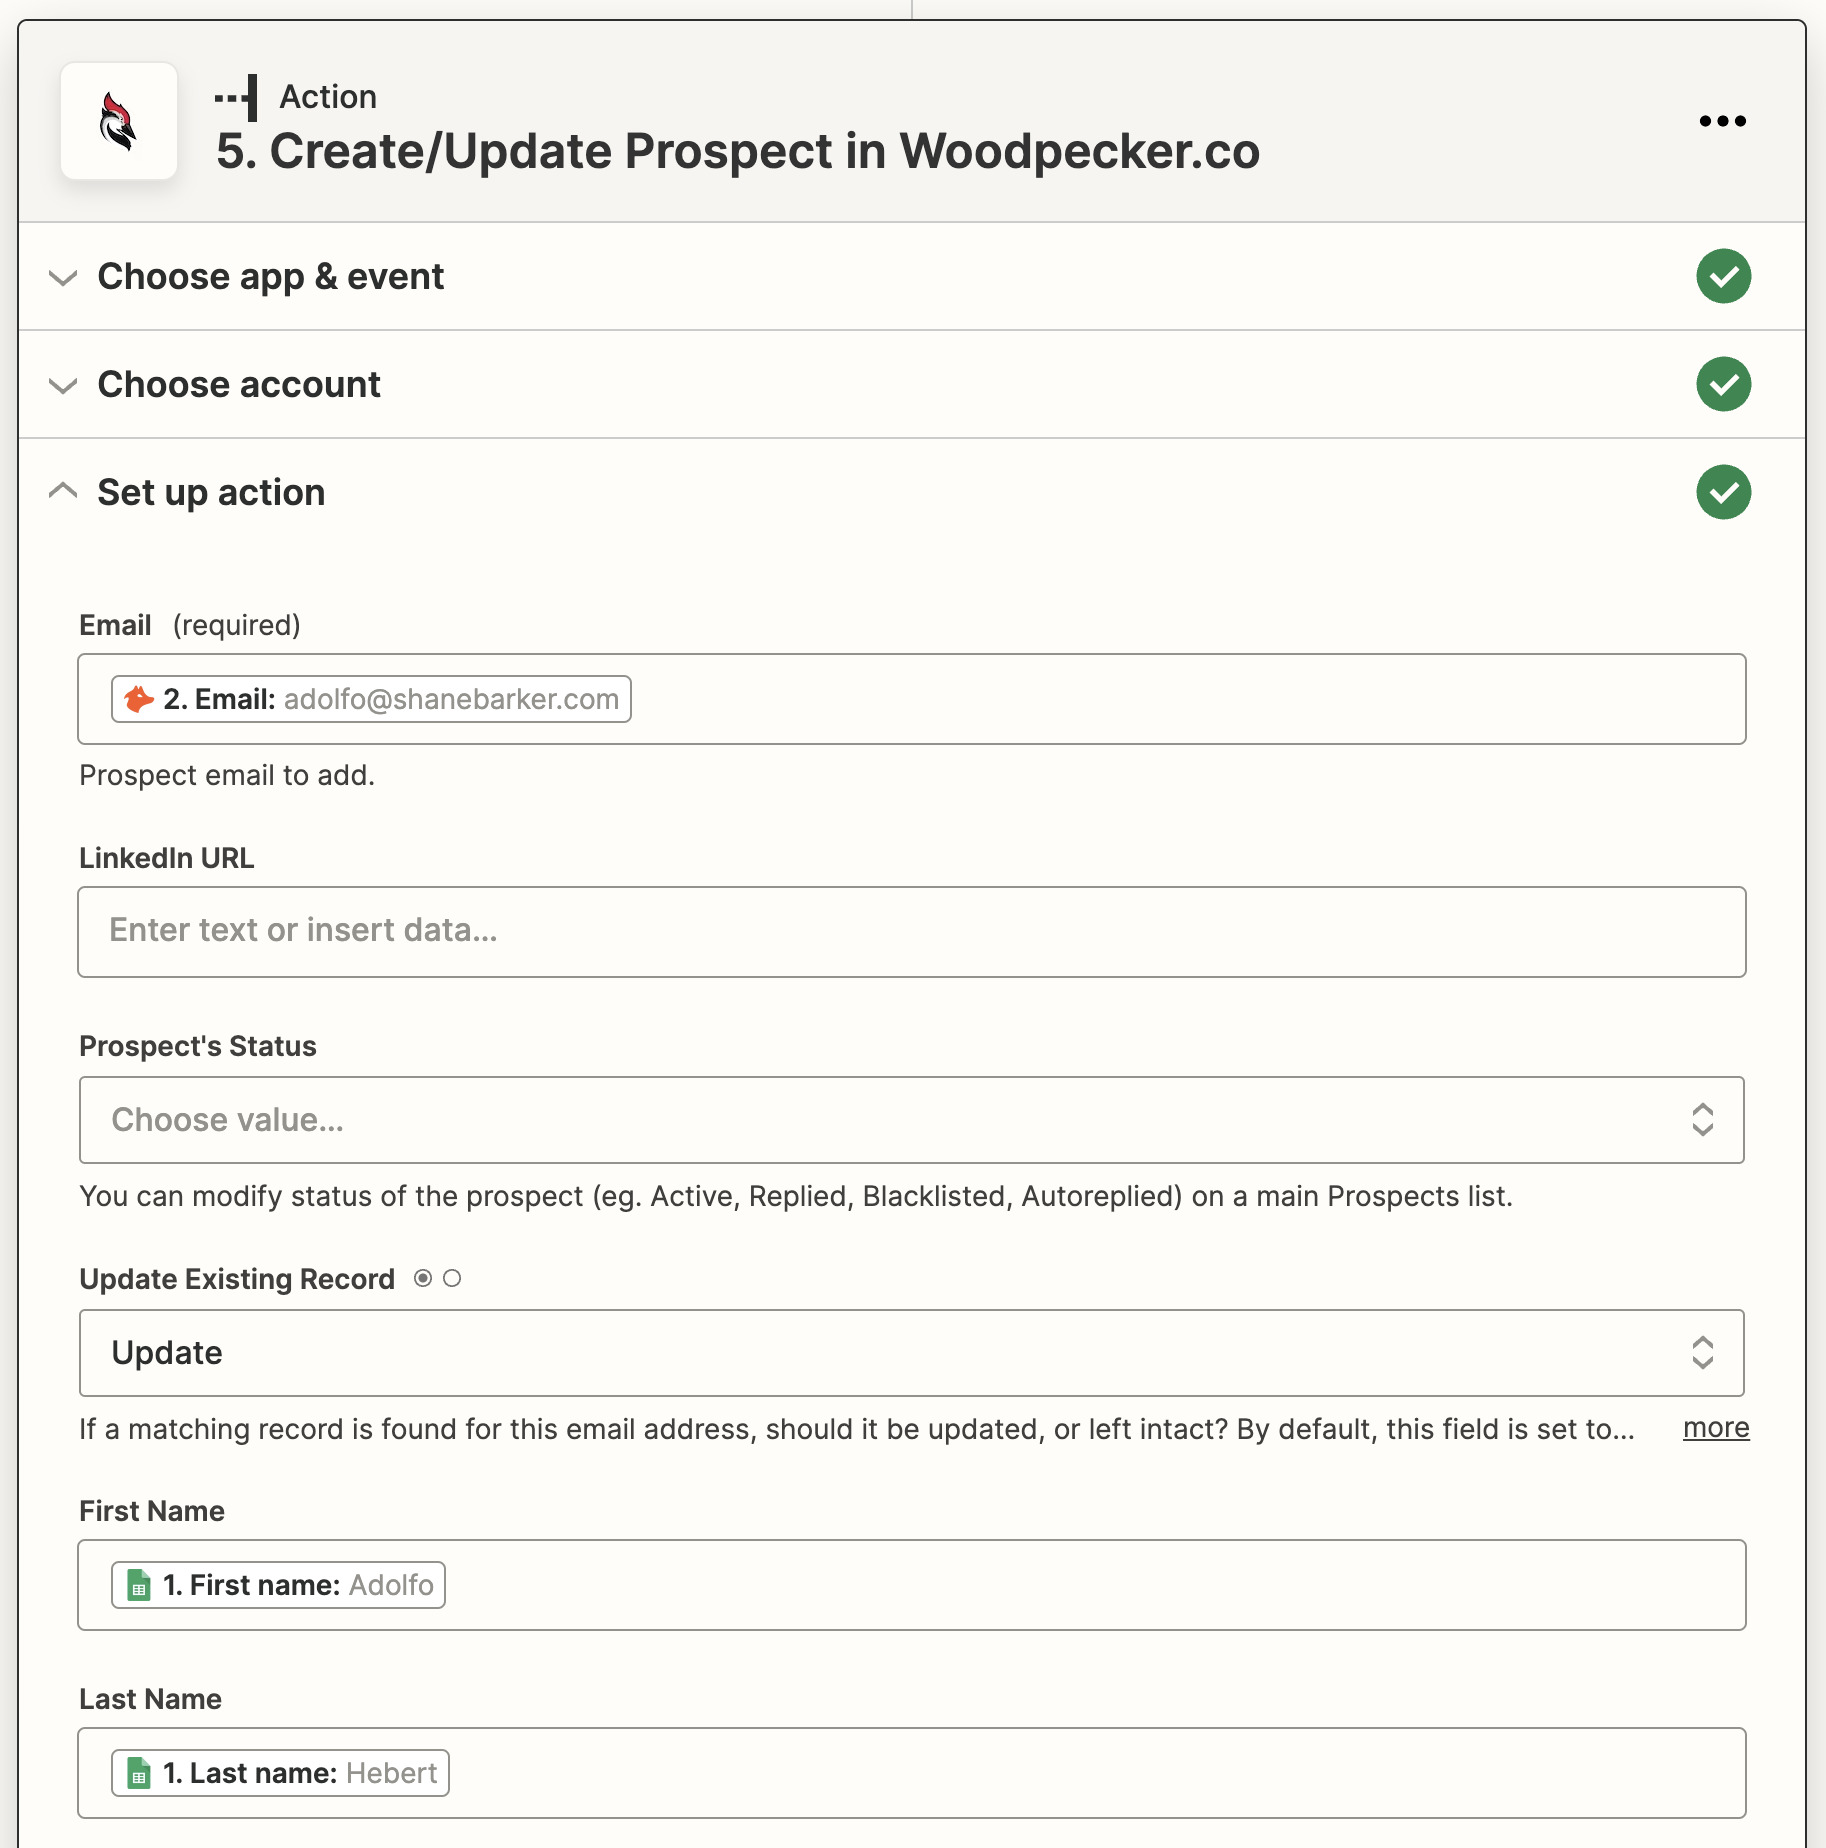
Finally, we’ll set up the Zap to add the verified email address to Woodpecker.co.
Create a last action step with:
- Woodpecker.co as the action app.
- Create/Update Prospect as the action event.
Map the verified email address to the action step’s “Email” field, and your prospect’s first and last name (as obtained from Google Sheets) to the “First Name” and “Last Name” fields, respectively.
Hit the Publish button to turn your Zap on.
Now, when you fill out the “Approve?” column for prospects in your Google Sheet, your Zap will automatically do the heavy lifting of finding and verifying their email addresses using Hunter and NeverBounce and adding the verified email addresses to Woodpecker.co.
You can then customize your link building outreach emails in Woodpecker.co for each verified email address and, hopefully, snag yourself some backlinks!
Final thoughts
SEO automation takes some initial setup, but it’s amazing to watch your processes run automatically after that. It’s almost like magic.
And apart from the SEO processes we’ve shared here, there are probably plenty others you can automate.
Think of the apps you regularly use for SEO work. If you can connect these apps using Zapier or some other workflow automation tool, automating the workflows they support is likely more than possible.
Got questions? Ping me on Twitter.


![How AEO Will Impact Your Business's Google Visibility in 2026 Why Your Small Business’s Google Visibility in 2026 Depends on AEO [Webinar]](https://articles.entireweb.com/wp-content/uploads/2026/01/How-AEO-Will-Impact-Your-Businesss-Google-Visibility-in-2026-400x240.png)
![How AEO Will Impact Your Business's Google Visibility in 2026 Why Your Small Business’s Google Visibility in 2026 Depends on AEO [Webinar]](https://articles.entireweb.com/wp-content/uploads/2026/01/How-AEO-Will-Impact-Your-Businesss-Google-Visibility-in-2026-80x80.png)


You must be logged in to post a comment Login