WORDPRESS
How to Start an Online Thrift Store Using WordPress (2024)

Are you looking to create an online thrift store website?
Many people think that to start an eCommerce business, they’ll need to create a new product. However, there’s another way. You can find pre-owned items and sell them online through a thrift store.
In this article, we will show you how to start an online thrift store using WordPress.

What is an Online Thrift Store?
A thrift store is a type of eCommerce business where you can sell used or pre-loved products. It can be anything ranging from clothes to automobiles, electronic items, toys, books, furniture, and more at bargain prices.
One of the benefits of starting an online thrift store is its low startup cost. You don’t need a lot of money to buy and maintain an inventory. Plus, the cost of building an eCommerce site is also low.
For example, if you have an expensive dress that doesn’t fit you anymore. Instead of throwing it away, you can have it cleaned and sell it online.
Besides that, it is a great side hustle to make money online. You can start small and slowly expand your business.
What Do You Need to Start an Online Thrift Store?
When it comes to starting an online store, many people think it is too complicated. However, it’s a lot simpler than you might think.
There are 3 main things you’ll need to get started:
- Domain Name – This is the name of your thrift store that people will enter in their web browser (like wpbeginner.com). Think of it as an address to your home.
- Web Hosting Service – It’s where your website lives on the internet and where all your website files are saved. You can think of it as a house for your online thrift store.
- SSL Certificate – This adds an extra layer of security to your online store, so you can easily accept online payments from customers.
It’s really that easy!
You can build an online thrift website without any technical skills, coding, or complicated setup.
We’ll show you step-by-step how to get started. Simply click the links below to jump to any section:
Choosing an eCommerce Platform for Online Thrift Store
The first and most essential step is to find the right platform for your online thrift store.
Choosing the wrong eCommerce platform can be a costly mistake for new store owners. Moving to a new service later on would mean you’ll have to re-do all the work and spend money again.
To avoid making this mistake, we’re here to help.
There are two popular eCommerce platforms that we recommend for your online thrift store: Shopify or WooCommerce (built on WordPress).
Shopify is a fully hosted eCommerce solution that lets you create an online store quickly.
However, the biggest drawback is its pricing. You’ll need to pay $25 per month, which can be quite expensive for individuals and small business owners. You also get limited payment options unless you pay extra.
This is why most users choose WordPress + WooCommerce. It is more flexible and cost-effective compared to Shopify. WooCommerce does require some setup, but it’s worth it in the long run.
To learn more details, please see our comparison of Shopify vs WooCommerce.
For this tutorial, we will walk you through how to start an online thrift store using WooCommerce + WordPress.
Select a Web Hosting Service and Install WordPress
As we mentioned earlier, you will need a domain name, web hosting service, and SSL certificate to create an online thrift store.
If purchased separately, a domain name costs around $14.99 per year, web hosting will cost around $7.99 per year, and an SSL certificate will cost roughly $69.99 per year.
This cost can go even higher if you add extra features and addons to your hosting plan.
Thankfully, our friends at Bluehost offer an exclusive offer for WPBeginner readers. You can save up to 61% on website hosting plans and get started for as little as $1.99 per month.
Bluehost is an official WordPress and WooCommerce-recommended hosting provider. The best part, you get a free domain name and SSL certificate with each hosting plan.
Note: At WPBeginner, we believe in transparency. If you sign up with Bluehost using our referral link, then we will earn a small commission at no extra cost to you (in fact, you will save money and get a free domain).
We would get this commission for recommending just about any WordPress hosting company, but we only recommend products that we personally use and believe will add value to our readers.
If you’re looking for an alternative to Bluehost, then we suggest using SiteGround WooCommerce hosting. It is another officially recommended WordPress hosting service.
To start, simply visit the Bluehost website and click the ‘Get Started Now’ button.


Next, you’ll need to select a pricing plan.
You can get started for $1.99 per month. However, Bluehost also offers an Online Store plan costing you $6.99 per month. It comes with an exclusive store theme, store analytics, and $450 worth of eCommerce plugins included in the plan.
We’ll select the ‘Online Store’ plan for this tutorial.


Next, Bluehost will ask you to enter a name for your online thrift store.
If you don’t have a domain, then simply enter a website name under the ‘Create a new domain’ section, select a domain extension, and click the ‘Next’ button.
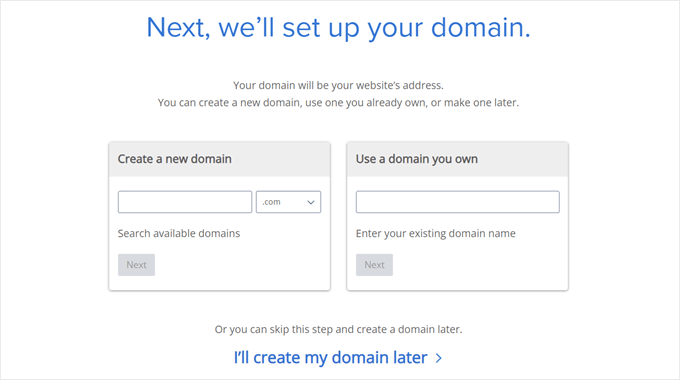

Make sure that the domain name relates to your business, is easy to pronounce and spell, and is memorable. You should also try to get a domain with a ‘.com’ extension.
If you’re not sure which name to choose, then please see our guide on how to choose the best domain name.
After that, you’ll need to provide details like name, address, email, and more to create a new account.
Bluehost will also show extra features to add to your hosting plan. We don’t recommend purchasing these additional features, as you can always add them later on.


Lastly, you’ll need to enter the payment information to complete the purchase.
Once that’s done, Bluehost will open the account dashboard from where you can manage your websites.
The best part is that Bluehost offers a one-click WordPress installation. However, if you are using another hosting provider or somehow skipped the setup step, then please see our guide on how to install WordPress for more details.
For instance, in Bluehost, you can log in to your account and navigate to the ‘Websites’ tab. From here, simply click the ‘Add Site’ button in the top corner.
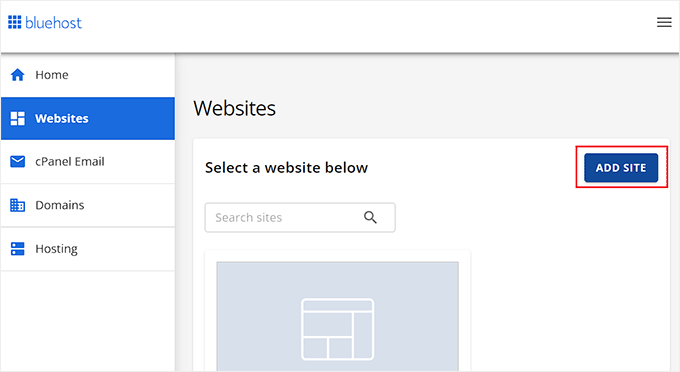

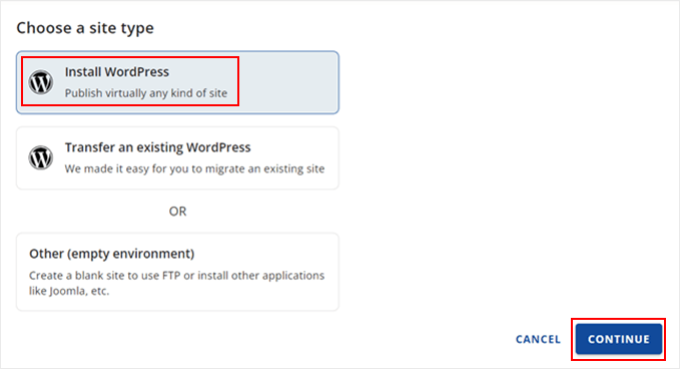
This will launch the WordPress setup wizard in Bluehost.
You can click the ‘Install WordPress’ option and click the ‘Continue’ button.

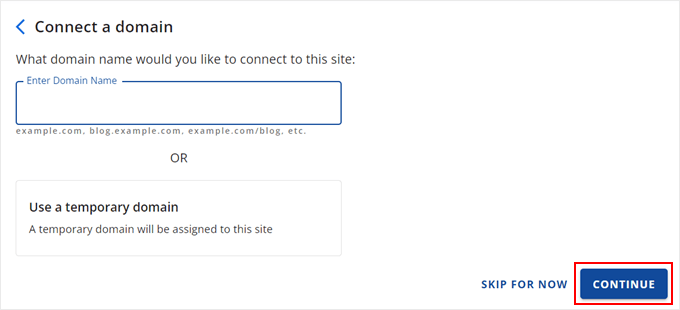
After that, you’ll be asked to enter a name for your online thrift store website.
Once you’ve entered a title, click the ‘Continue’ button.

Bluehost will now install WordPress and create your thrift store site.
After the installation is complete, you can go to the ‘Websites’ tab to see your new website. Go ahead and click the ‘Edit Site’ button to view the WordPress admin panel.
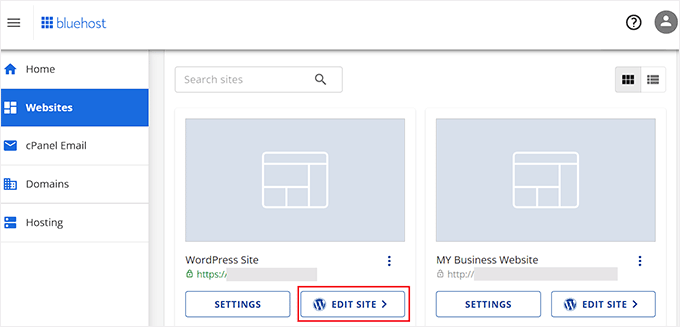

As an alternate, you can also log in to your WordPress dashboard by going to ‘yourthriftstore.com/wp-admin’ directly from the browser.
Here’s what the WordPress admin area will look like:
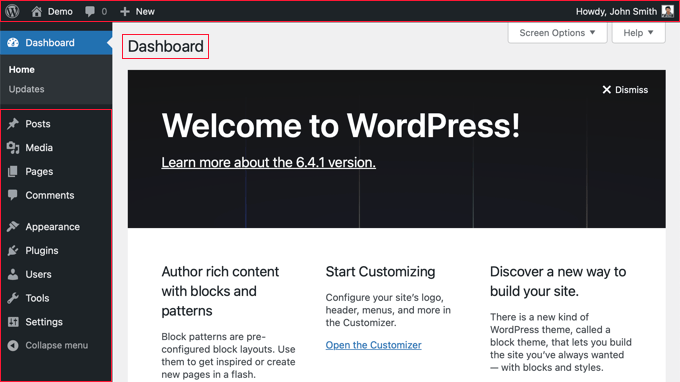

Next, you’ll need to view WordPress settings and ensure everything is set up properly.
First, you need to go to the Settings » General page and add a WordPress site title and tagline. If you’re happy with the site title, then you don’t need to change it.
A tagline acts as a small description for your thrift store. However, this is optional, and you can add it later on.
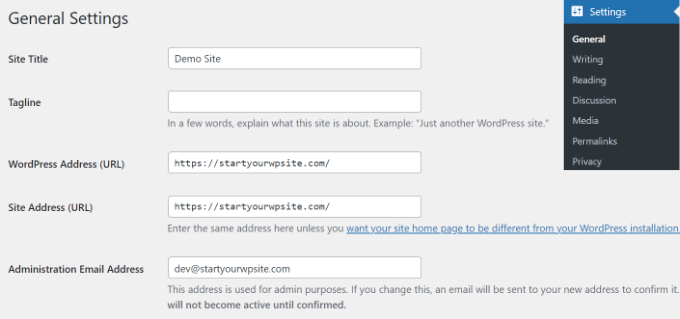

Besides that, you’ll also need to ensure that your WordPress Address (URL) and Site Address (URL) are using HTTPS instead of HTTP.
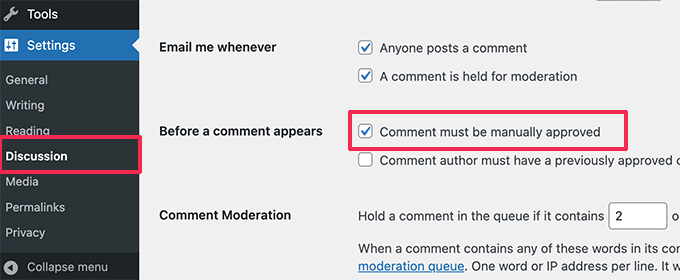
Next, you can go to the Settings » Discussions page from the admin panel and scroll down to the ‘Before a comment appears’ section.
Here, click the ‘Comment must be manually approved’ checkbox. This way, your comments will go into moderation and help prevent spam.

For more details, please see our guide on how to moderate comments in WordPress.
Setting Up WooCommerce on Your Site
The next step is to install WooCommerce on your website. It is the best eCommerce platform that’s built on top of WordPress.
First, you’ll need to install and activate the WooCommerce plugin. If you need help, then please see our guide on how to install a WordPress plugin.
Upon activation, the WooCommerce setup wizard will launch. You can click the ‘Set up my store’ button to continue.


Simply follow the onscreen instructions to complete the WooCommerce setup. If you need help, then please see our guide on how to start an online store.
Once the setup is complete, you can set up payment options on your thrift store.
WooCommerce supports some of the most popular payment gateways. You can accept credit cards, cash on delivery, bank transfers, Stripe, PayPal, and more.
Simply go to WooCommerce » Settings from your WordPress dashboard and switch to the ‘Payments’ tab.
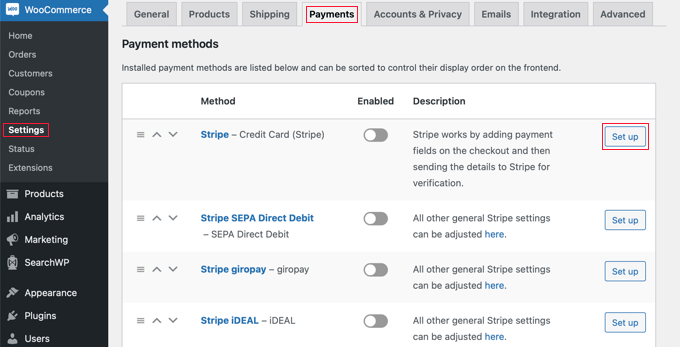

You can click the ‘Set up’ button for the payment service you’d like to add to your online thrift store.
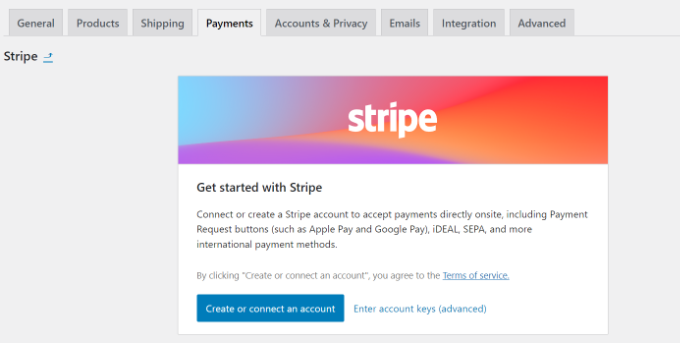
For example, let’s say you want to configure Stripe credit card payments. Simply connect your Stripe account or enter account keys to add the payment method to your store.

Another optional setting you can configure in WooCommerce is shipping zones. It lets you add different shipping methods and costs for various regions.
For more details, please see our guide on how to add a shipping calculator to your WordPress site.
Customize the WordPress Thrift Store Theme
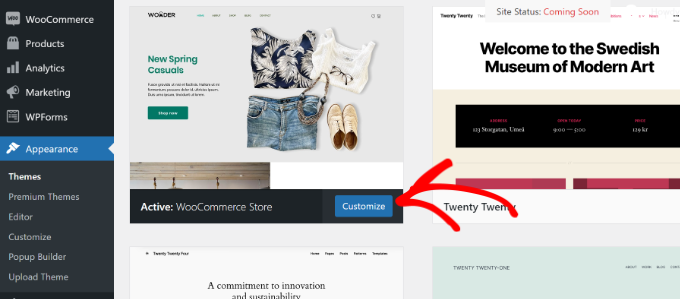
When you sign up for the Bluehost Online Store plan, you get a WordPress theme pre-installed.
Simply head to Appearance » Themes and click the ‘Customize’ button to edit the theme.

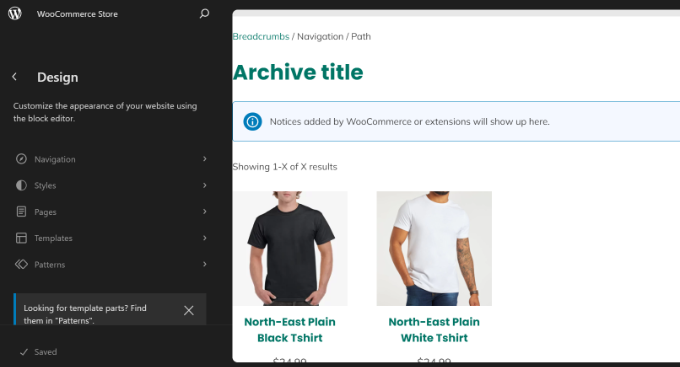
This will launch the WordPress Full Site Editor (FSE). It was first introduced in WordPress 5.9 and uses blocks to edit the theme, just like editing content in the block editor.
The goal of the full site editor is to simplify website editing and make it user-friendly.

To learn more, you can see our complete guide to WordPress full site editing.
If you don’t like the default theme, then you can simply change it. There are thousands of WordPress themes to choose from. You can see our list of the best WooCommerce WordPress themes to pick the on you like.
On the other hand, you can create a custom theme for your online thrift store using a WordPress theme builder.
For instance, SeedProd is the best theme and landing page builder that offers a drag-and-drop interface. It comes with pre-built templates, which you can easily customize without editing code.
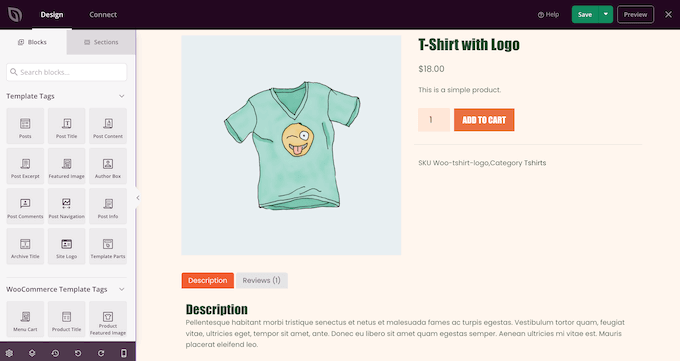

You can follow our guide on how to create a custom WordPress theme (no code).
Adding Products to Your Online Thrift Store
Now that your online thrift store is ready and set up, it’s time to add products to WooCommerce.
Simply navigate to the Products » Add New page from the admin panel. Next, you can enter a name for your product and add a brief description.
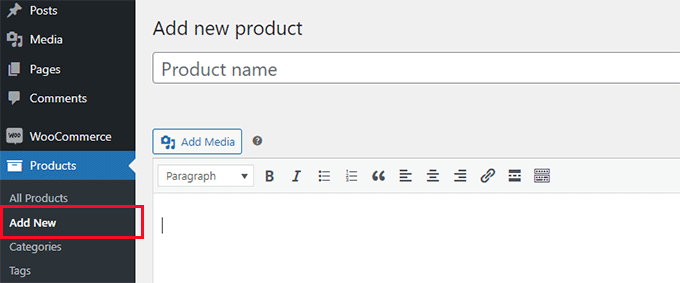

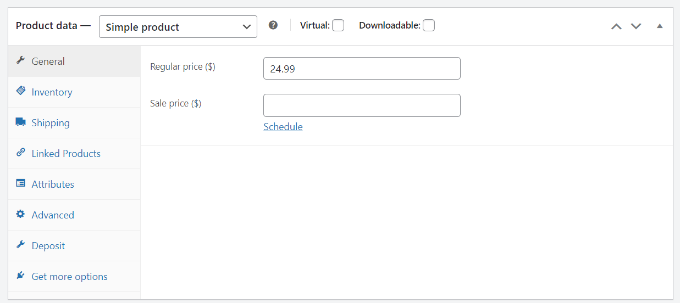
After that, you’ll need to scroll down to the ‘Product Data’ section.
Here, you can enter the price of your product under the ‘Regular price ($)’ field. There is also an option to enter a sale price for the product.

Next, you can add product images from the panel on the right.
Simply navigate to the Product Image section and add your picture. This will act as the featured image for your product.
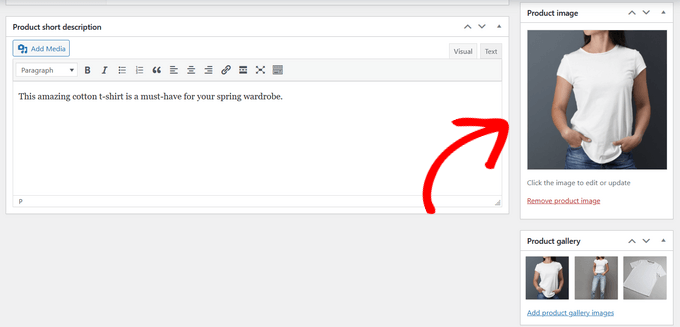

There is also an option to create a product gallery and upload other images for a product.
Once you’re done, simply click the ‘Publish’ button.
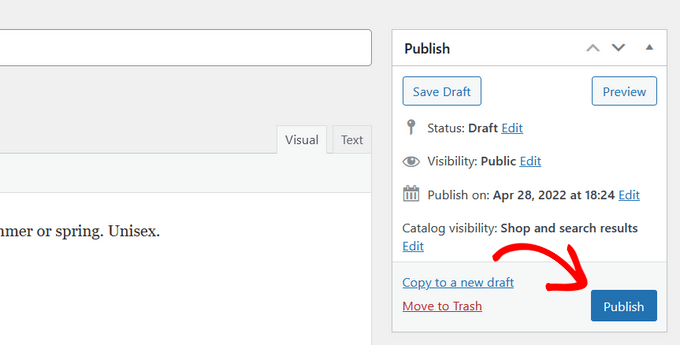

Now, you can repeat this step and add more products to your online thrift store.
You can then visit your site to see all the products listed on the store page.


Sourcing Products for Your Thrift Store
Finding products on a regular basis for your online thrift store can be a challenge for many business owners.
However, there are different places from where you can source used or pre-loved products. For instance, a quick search on other thrift stores and sites like eBay and Craigslist can help discover multiple products that you can list on your site.
Similarly, visiting flea markets, other local stores, and garage sales can also help you find the right products for your store. This is a great option if you’re selling clothes, books, and second-hand electronic items.
Another option is to allow users to upload their items for consideration on your online thrift store. This way, you’ll get to build an inventory without having to invest and simply share the revenue from the sale.
You can also create an online marketplace using WordPress where users can sell their products using your eCommerce platform. For example, people can sell their used items on your site and give you a percentage or a fee for using your site.
Add Plugins to Grow Your Traffic and Drive Sales
WordPress offers different plugins that act like apps for your website. They allow you to add extra features and functionalities and help customize your online thrift store.
For example, there are plugins for adding a contact form, product image galleries, product comparisons, gift cards, giveaways, popups, and more.
You can choose from over 59,000 free WordPress plugins. There are also premium plugins that are sold by third-party sites and developers.
If you’re not sure what to look for in a plugin before installing it, then you may want to see our guide on how to choose the best WordPress plugin.
That said, we’ve handpicked some essential plugins that you should install on your thrift store.
Add Extra Features and Functionality
- WPForms – It is the best form plugin for WordPress that lets you add a contact form to your site. You can also create other types of forms, like a file upload form, order/billing form, online payment form, and more.
- MonsterInsights – You can connect Google Analytics to your site using MonsterInsights without editing code. Using the plugin, you get insights about how users behave in your store, where they click, which products they purchase, and where they are from.
- SeedProd – It’s the best drag-and-drop builder for creating custom landing pages, layouts, and website themes without any technical knowledge.
- Envira Gallery – Create stunning image galleries for products on your online thrift store.
Website Optimization for SEO, Performance, and Conversions
Enhance Your Website Security
Other WordPress Plugins to Consider
- RafflePress – Run viral giveaways and contests on your thrift store to boost sales, social media followers, and email subscribers.
- UserFeedback – Add interactive surveys to your online store and collect user feedback. Use the data to improve user experience and satisfy customer needs.
- Smash Balloon – Display social media content on your store and boost engagement.
- Uncanny Automator – Automate workflows to save time and streamline work. Connect plugins, sites, and apps to automate your thrift store.
- Constant Contact – It is the best email marketing service that you can use for all your email needs. Easily set up email campaigns, autoresponders, A/B testing, WooCommerce integration, and more.
- WP Mail SMTP – Ensure your WordPress emails reach your customer’s inbox and don’t end up in spam. Fix email deliverability issues.
- LiveChat – Offer real-time support to customers through live chat software. Answer customer queries, improve user experience, and boost sales.
You can also take a look at our list of the best WooCommerce plugins to find more options.
At WPBeginner, our main goal is to provide helpful and beginner-friendly WordPress tutorials for non-techy users, small business owners, bloggers, and eCommerce store owners.
To help you learn more about WooCommerce and WordPress, you can follow these guides:
We hope this article helped you learn how to start an online thrift store using WordPress. You may also want to see our guide on important reasons why you should use WordPress and the best business phone services for small businesses.
If you liked this article, then please subscribe to our YouTube Channel for WordPress video tutorials. You can also find us on Twitter and Facebook.


