PPC
Google Ads for Real Estate: The Ultimate Step-by-Step Guide
Google Ads is the most powerful tool for real estate professionals who want to connect with the increasing number of home buyers and sellers turning to the internet for their property needs.
Yesterday’s real estate agents spent most of their time using antiquated marketing methods like cold-calling or postcard mailing. Today, Google Ads offers a more scalable and affordable tactic that can put your real estate business directly in front of potential clients who are searching for your services online.
In this step-by-step guide, we’re going to walk you through the entire process of setting up a Google Ads campaign so you can boost your real estate business’s exposure and connect with more home buyers and sellers.
Table of contents
The basics of Google Ads and PPC advertising
Before we jump into the how-to, let’s get some basic definitions out of the way.
What is PPC advertising?
Put simply, pay-per-click (PPC) advertising is a model where an advertiser’s ad is displayed, but they only pay for each time their ad is clicked. Since it’s cost-effective, easy to control, and can garner fast results, PPC advertising has developed into one of the most popular ways to drive traffic to websites.
What is Google Ads?
Google Ads is a PPC platform that displays your ads on Google’s search engine results pages (SERPs). The service allows you to set a budget for your campaigns, create ads targeting specific keywords, and pay only when someone clicks on your ad.
Google Ads is the leading platform for PPC advertising right now, and it’s especially powerful for real estate agents, teams, and brokerages. It supplies us with a host of useful tools, incredible reach, and a simple interface that makes it easier than ever to prospect for leads online.
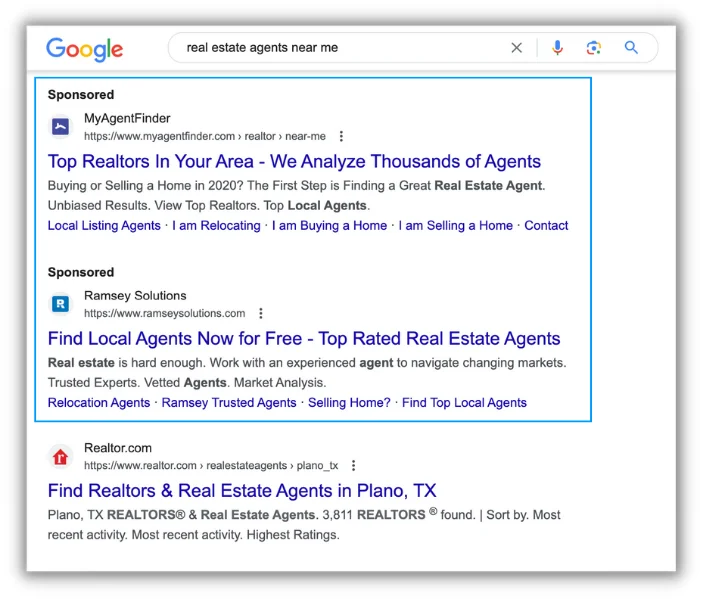
Google Ads showing up as the top results in SERPs.
The standout benefit of using Google Ads is its reach. Over 95% of search traffic goes through Google, and millions of people use Google every day to search for properties, real estate services, and related information.
How does Google Ads work?
Google Ads operates on an auction system, which can be a little confusing.
When a user on Google enters a search query, Google runs an auction to determine which ads will appear in the search results. Advertisers bid on keywords relevant to their business.
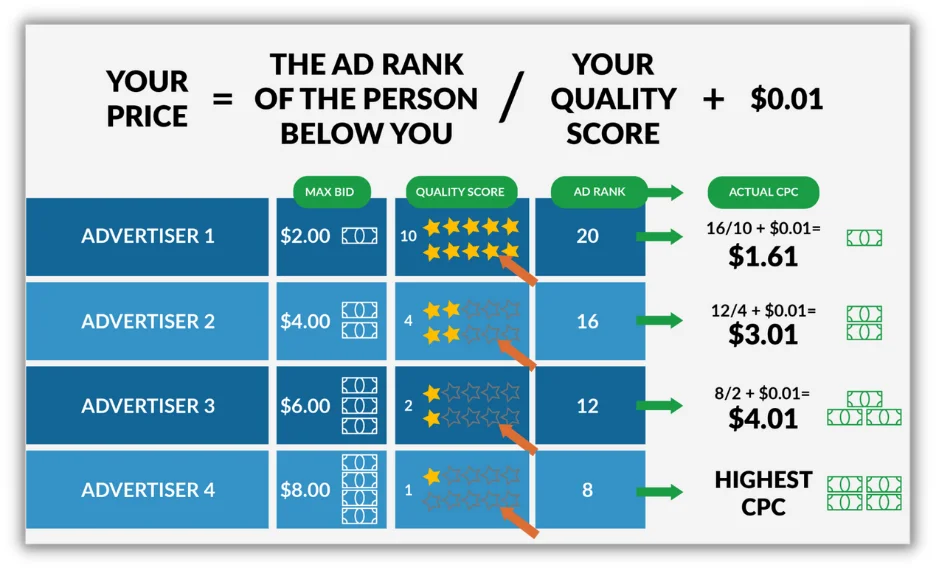
An ad’s placement is determined by a combination of bid amount and ad quality, which is calculated based on factors like expected click-through rate (CTR), ad relevance, and landing page experience.
You can learn more about how Google Ads works here.
Benefits of Google Ads for real estate professionals
When there are so many marketing platforms out there, why does Google Ads stand out? The key advantage of Google Ads for real estate pros lies in search intent.
Users who see your ads are proactively searching for exactly what your business offers. For example, someone searching “homes for sale in Miami” is likely at some point in a home buying or selling journey.
Compare Google Ads to Facebook Ads, where your ads can be targeted but are displayed to a relatively passive audience who is busy looking at cat pictures or posting about their weekend.
Google Ads enables you to target possible clients in similar ways, but to a crowd that is actively searching for real estate-related keywords, making them more likely to convert into future clients.
How to successfully set up your real estate Google Ads campaign
Now for the fun part: How to create and set up your Google Ads campaign for your real estate business.
Step 1: Create your Google Ads account
Before we hit the ground running, make sure you have a Google Ads account set up. You can go to ads.google.com to sign up.
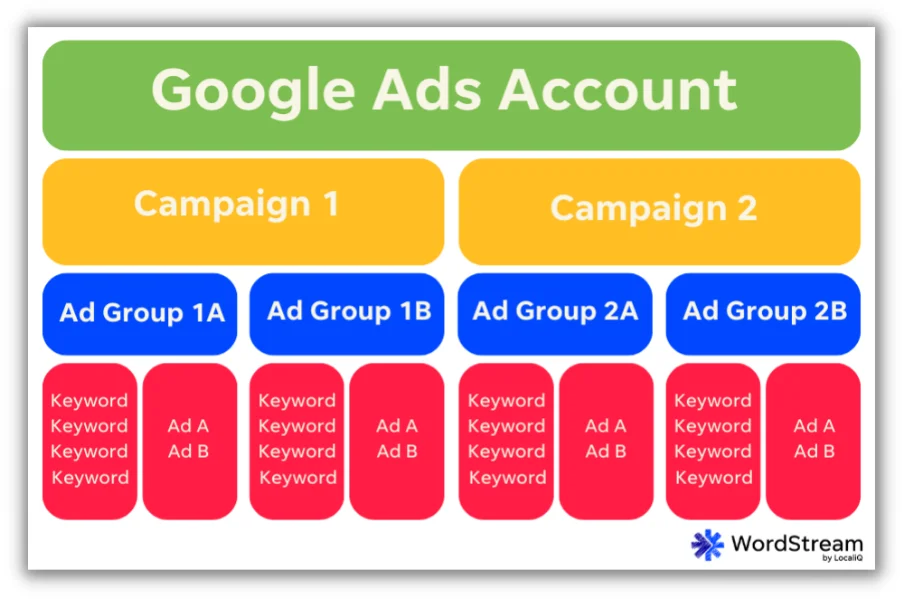
Your Google Ads account is where you maintain high-level items like billing, admin permissions, and your campaigns.
Campaigns house your ad groups, where you’ll set your budget and targeting. Each ad group will have a different set of keywords that focuses on a segment of your business. Within those ad groups, you’ll have ads that will display when users search for the keywords you specify.
Step 2: Conduct research and start planning
Once your Google Ads account is created, it’s time to think about the areas your business services and who your ideal customer is.
Is your ideal customer looking for investment properties? Waterfront homes? Searching in a specific city or neighborhood? Put together a list of five to seven cities, neighborhoods, or niches that you’d like to go after. These will eventually make up our ad groups.
For example, if you’re in Miami, you might want to go with these ad groups:
- Miami
- Miami Beach
- Fort Lauderdale
- Coral Gables
- Key Biscayne
- Hollywood
You may also want to include some categorical groups like farms and ranches or oceanfront condos depending on what is popular in your region.
Once you have your locations identified, it’s time for keyword research.
To narrow it down, use applications like the Free Keyword Tool or Google’s Keyword Planner. This will give you ideas of the search volume, competition, and potential cost for the keywords within various segments you might want to pursue.
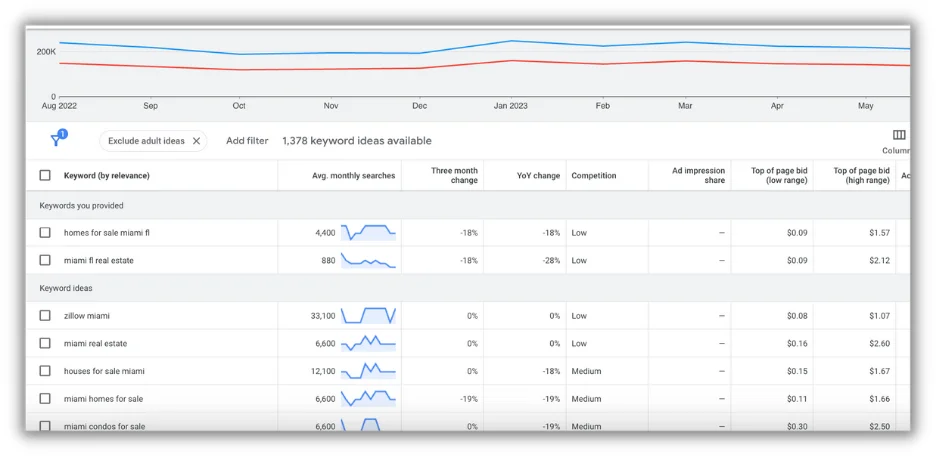
You may get more ideas in keyword tools that you didn’t previously consider. Getting these keyword ideas helps us discover the high-volume search terms that potential clients use to find properties and services like yours.
Once you have five to seven areas or niches you want to target, it’s time to get the campaign started.
Step 3: Start your campaign
When you’re in your Google Ads account, click the blue plus sign to start creating a campaign.
Choose the right campaign objective and type
The first thing you’ll do is choose a campaign objective that aligns with your goals. For real estate purposes, we typically recommend the website traffic objective, as you’re usually trying to drive visitors to your website.
Here’s a quick summary of the different campaign objectives:
- Sales: Focuses on increasing the sales and profitability of your products or services. It includes features such as bidding strategies aimed at clicks, assets, and ads that prompt the purchasing or conversion process.
- Leads: Aims to generate leads for your business by capturing the customers’ information through form submissions.
- Website traffic: Emphasizes driving traffic, and ultimately conversions, to your website.
- Brand awareness: Enhances the visibility and recognition of your brand image, not necessarily increasing website visits or leads.
- App installs and engagement: Specifically designed for promoting app installs and increasing user engagement with a mobile application.
- Local store visits: Designed to drive foot traffic to brick-and-mortar stores and increase offline sales.
- Product and brand consideration: Focused on increasing the visibility and recognition of your brand to new customers who may consider your products or services.
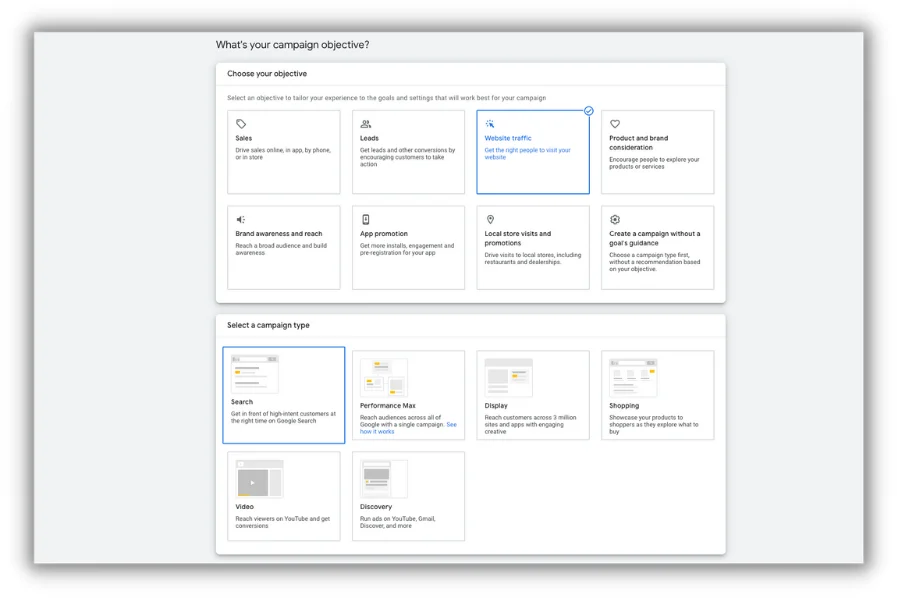
These objectives essentially tell Google what we want to accomplish with our campaigns, giving real estate businesses the ability to continually measure and optimize their ads for the best possible results.
Choose your campaign type
Next, you’re going to choose a campaign type, which determines where your ads appear.
We’re going to use a Search campaign type because we want our ads to show up in Google’s search engine results pages (SERPs) when they are showing the intent of buying or selling real estate.
Name your campaign
Finally, choose a campaign name, but don’t overthink it.
For organizational purposes, a good rule of thumb is to have your campaign name speak to your campaign objective. Something like “South Florida – Search” would be a good name going off our previous examples.
Google is going to ask you about your bidding preferences, but we’ll cover that later. For now, leave it on “maximize clicks.”
Select search networks
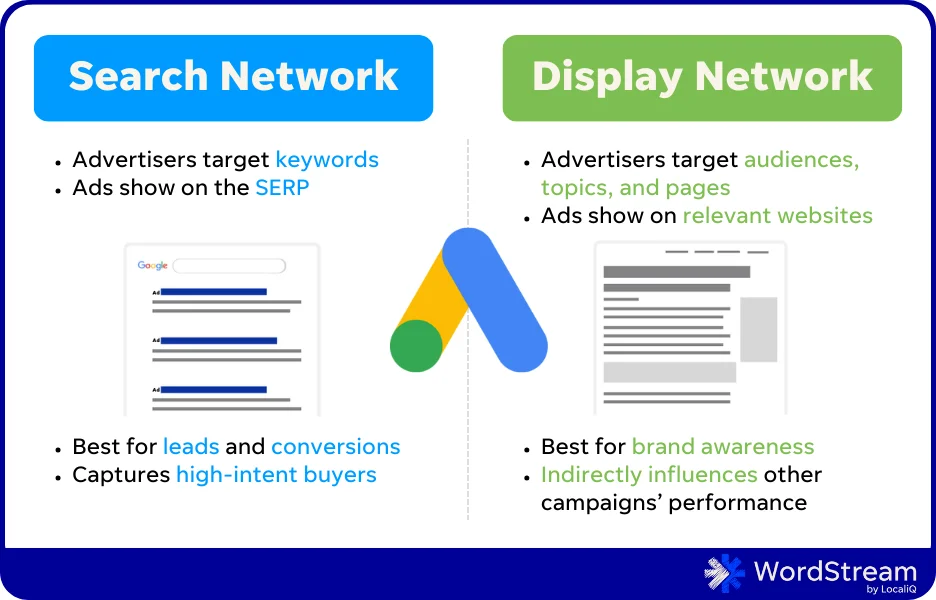
The first campaign setting to draw your attention to is the networks. By default, your ads also show on Google Search and Display networks. We recommend checking the box off for the Display Network because we only want our ads showing up within SERPs.
Choose (and exclude) locations
Now we take a look at location targeting, where you will want to enter the cities you are going to be concentrating on, as well as the areas around them. An important note is that by default, Google shows your ads to “people in, regularly in, or who’ve shown interest in your targeted locations.”
This means that your ads will show up to anyone searching your keywords, regardless of their location. However, these locations provide data about where people are clicking your ads, so it’s useful down the line.
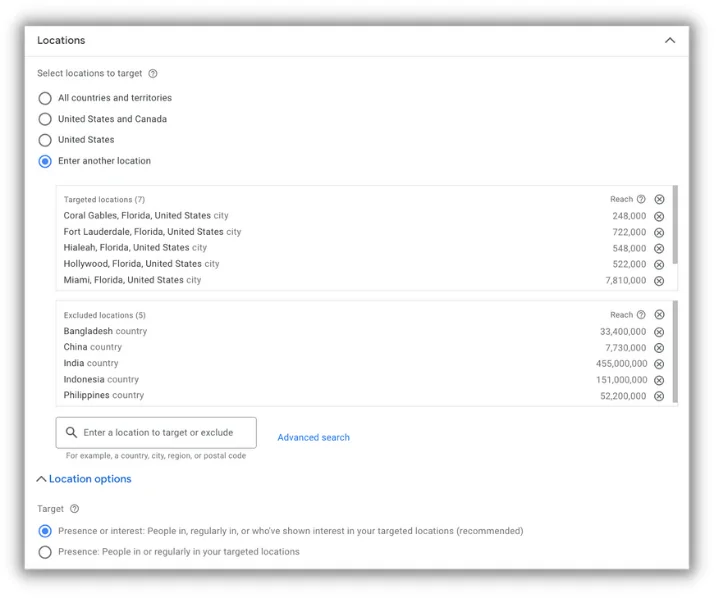
You’ll also want to add some negative locations, which blacklist your ads from showing up within those boundaries. Start by excluding countries that have a reputation for click farms and have a very low chance of delivering relevant traffic.
Some recommended negative locations to start with are:
- China
- India
- Indonesia
- The Philippines
- Bangladesh
Create audience segments to improve campaign efficiency
Lastly, we’re going to address audience segments, which will allow us to hyper-focus on Google’s in-market audiences. These are consumers who are actively researching products or services and considering buying something.
Look up “real estate” and select in-market audiences that have a “For Sale” label. If it’s relevant to your business, you can also target “Commercial,” “Homeowner,” or “For Rent” categories.
At this point, we’ve got our account created and the framework of our campaign laid out, so we’re ready to move forward.
Step 4: Set up ad groups
Ad groups are held within your campaign and organize your ads and keywords. Using the selections we chose earlier, we’re going to create five to seven ad groups.
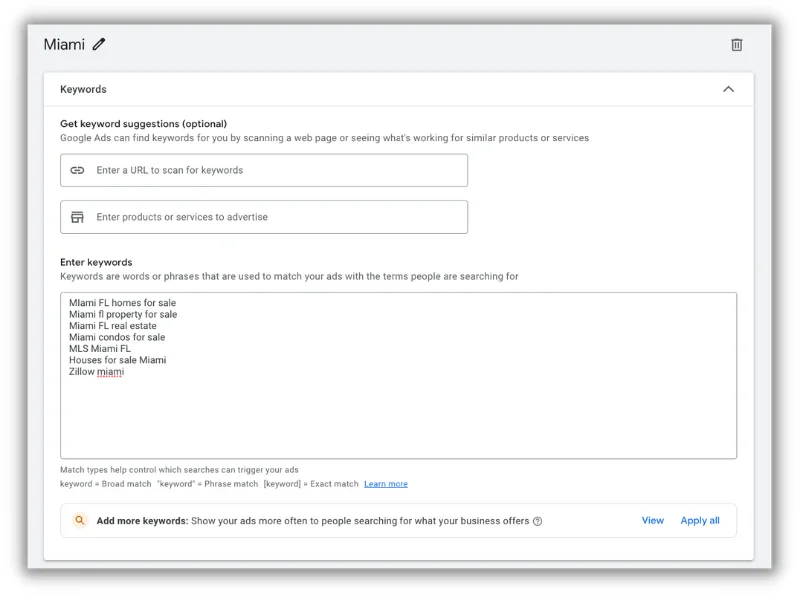
Start your first ad group by naming it the location or property type it will be targeting. We’ll name ours Miami.
Determine your keywords
You’re then going to list out the keywords that you want your ads showing up for. Based on our keyword research, we’re going to go with the following keywords:
- MIami FL homes for sale
- Miami fl property for sale
- Miami FL real estate
- Miami condos for sale
- MLS Miami FL
- Houses for sale Miami
- Zillow miami
Understand keyword match types
One thing to take note of about keywords is that Google will display your ads to search terms that are similar to the keywords you list.
However, there are different match types that tell Google how strict they need to be when determining which search terms relate to your keywords:
- Broad Match (e.g., Miami FL homes for sale): The default match type for Google Ads. With broad match, your ads show in search results for queries related to the meaning of your keywords but don’t necessarily contain the exact terms.
- Phrase Match (e.g., “Miami homes for sale”): Your ads show in search results for queries that contain the exact phrase and/or a close variation of it.
- Exact Match (e.g., [Miami FL Real Estate]): Ads show in search results for queries that match the exact term or the same meaning of the term with no other additional words.
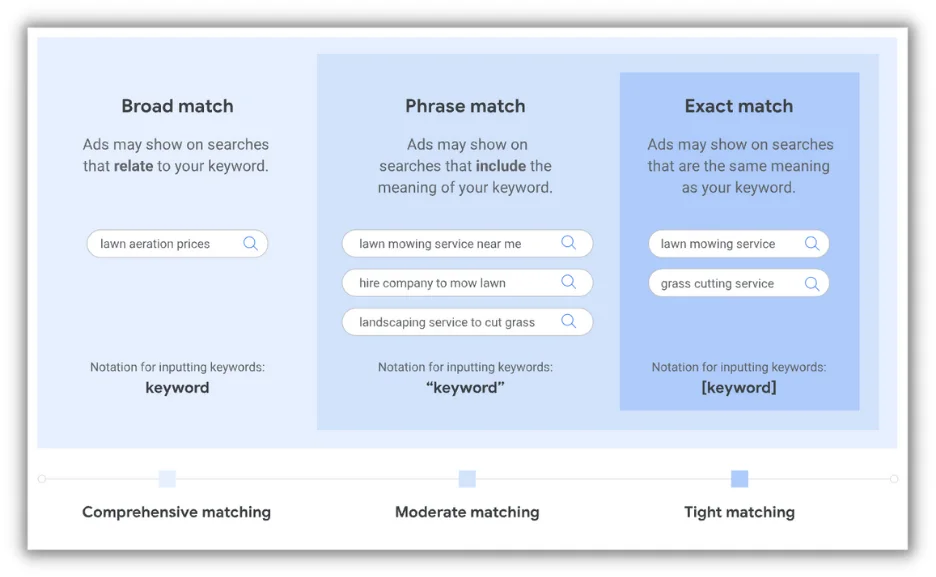
We will start by keeping all of our keywords broad match. Moving forward, you can always adjust your keyword match types if you feel like your ads are being shown improperly.
Select negative keywords to blacklist search terms
Use negative keywords as a list of search terms that you want Google to avoid showing your ads to.
These adverse terms will vary with each market, but in general, you want to consider searches that will not be made by your ideal client, or Avatar. For example, we’re going to list these negative keywords in our real estate campaign:
- Rent
- News
- Lease
- Airbnb
- Seasonal
- Rentals
- Commercial
- Cheap
- Management
Similar to our keywords, we can always tweak these negative keywords as we analyze the search terms that are triggering our ads to show up.
Step 5: Build your ads
Now it’s time to get into the core of our campaign by crafting our ads. These are responsive ads, which means that Google combines different variations of the headlines and descriptions we provide to make a final ad.
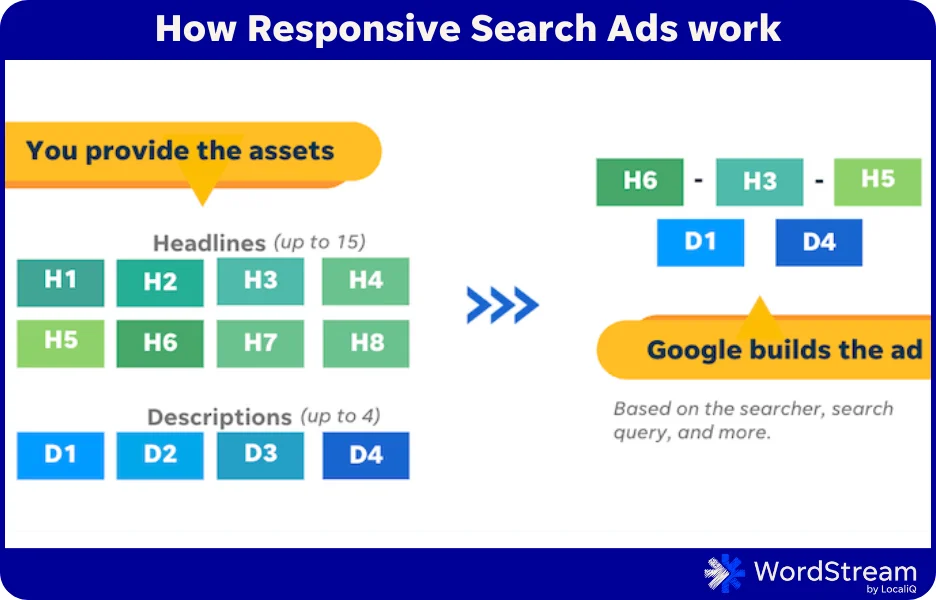
Begin your ad by inserting your final URL, which is the page a user will go to when they click your ad. This will be your landing page—we’ll have more on fine-tuning that below.
Then you’ll want to choose a display path, which allows us to simplify the final URL to look more appealing in our ad. You can get creative here, but we usually advise using straightforward and clean display paths.
Create powerful headlines and descriptions for your ad
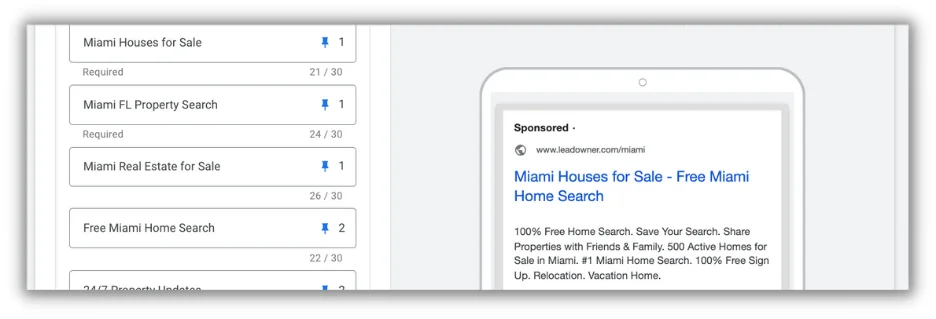
This brings us to our headlines, where we will be the main text in our ad. To create great ad headlines, you want to keep some vital tips in mind:
- Use keywords: Use the keywords you are targeting. These are, after all, what your potential clients are searching for.
- Address pain points: Think about what your ideal client is really searching for and how you can solve their problem. Offering free home valuations or listings for sale are common magnets in the real estate industry, but don’t be afraid to think of your own.
- Include data and numbers: Feel free to include things like median home prices, number of active or sold listings, or other relevant statistics.
- Use pinned placements: You can keep each headline in positions one, two, or three, using the pin to the right of each box. It’s critical to keep your headlines organized and intentional with these pins.
After that, we’re going to conjure up four descriptions, which will show up underneath the headlines. Writing winning Google Ad descriptions starts with keeping your points short and relevant and including numbers and calls to action.
Use assets to improve interaction with your ad
Now that our ads are looking sharp, we’re going to address some of the assets that are available. These are extra pieces of information, previously called extensions, that can help your ad stand out and generate conversions.
The initial asset we’ll set up is sitelinks, and these are additional links that show underneath your ad take visitors to relevant sub-niches that are under the umbrella of what you’re offering.
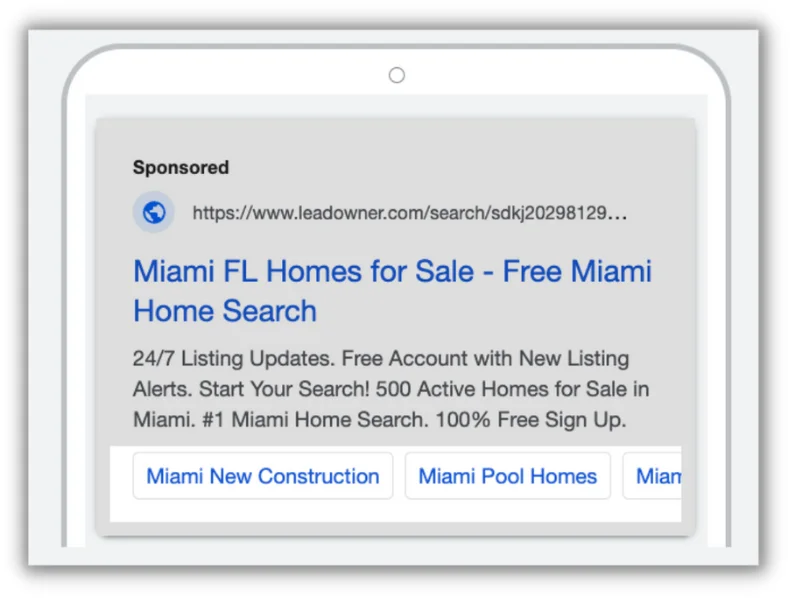
You can then list out some callouts, which are additional text that quickly tell consumers why your real estate business is unique or what you specialize in.
For example, in South Florida, we might use callouts such as relocation, first-time buyers, and luxury specialists.
There are quite a few assets that you can play around with and visualize how they improve your ad and offering. For real estate lead generation, pay close attention to the Structured Snippet, Location, and Calls assets.
The Image assets are also a wonderful way to get your ad noticed, but they can’t be used until your account is 90 days old.
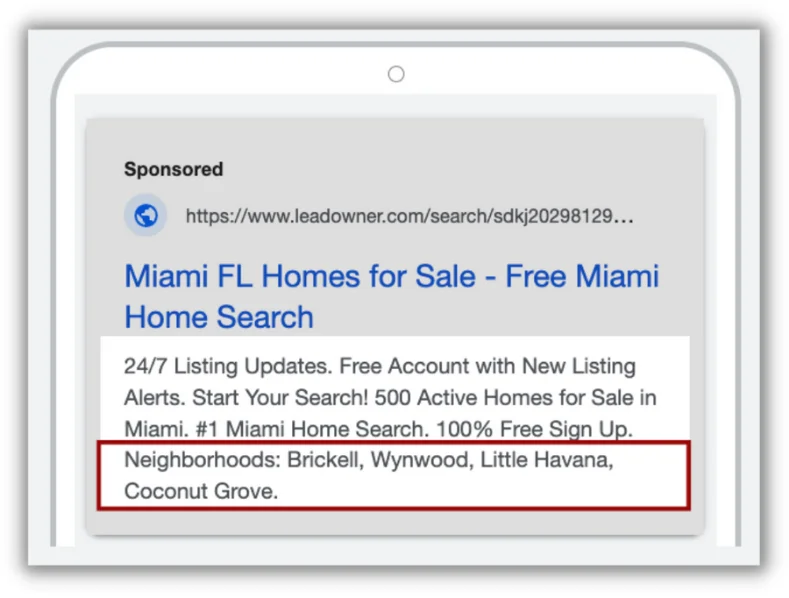
The Structure Snippet asset enables real estate companies to indicate the neighborhoods they serve.
Choose a suitable landing page
Remember the final URL we talked about? Well, let’s go over picking relevant real estate landing pages that potential clients are sent to when they click our ad.
First and foremost, the landing page you send visitors to should give them exactly what they are looking for.
If your ad group is focused on Miami, and your ad promotes “Miami Homes for Sale,” then your final URL should be active real estate listings.
An ad that has headlines about “Free Home Valuations” should take the user to a page where they can easily get just that. It’s critical in real estate lead generation to be very consistent with this rule.
A big mistake many will make is sending all visitors of every ad to some static page of their website. Then the potential customer has to dig around to find the information they really wanted in the first place.
You also want to have one clear and apparent call to action so the visitor knows what they need to do to get the piece of value you are providing them.
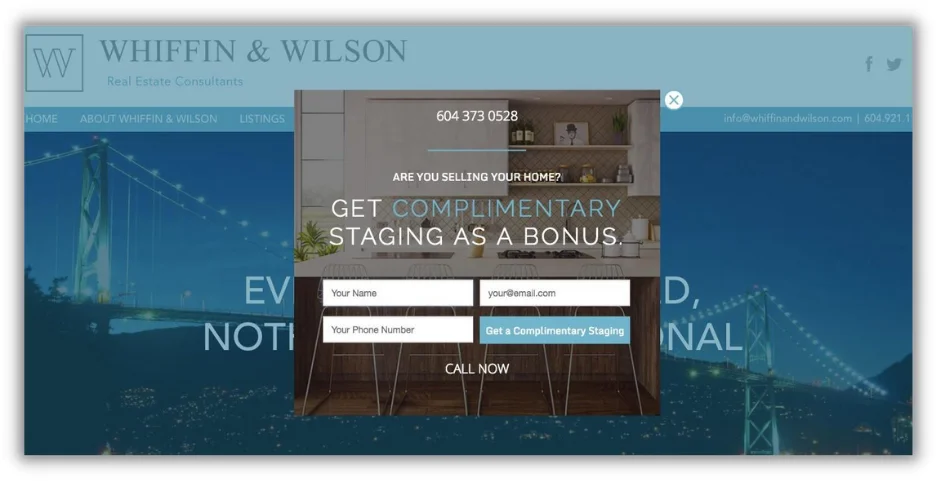
Example of a high-quality real estate landing page.
Give your target audience what they are seeking, and they will be more likely to convert and see you as the authority in the real estate space.
Step 5: Set your campaign budget
At the end of the campaign setup, you’re going to set a daily budget for Google to use. This can be changed depending on your needs or industry seasonality, so set it at whatever is comfortable for your business.
Google Ads also provides an array of bidding strategies, but we really only need to hone in on the main options:
- Maximize Clicks: An automated bidding strategy that is designed to bring you the most clicks possible using your daily budget.
- Maximize Conversions: A bidding strategy that automatically sets bids to help get the most conversions possible based on your daily budget.
- Target CPA (Cost per Acquisition): This is my recommended strategy. It sets bids to help get as many conversions as possible at the target CPA that you set.
Step 6: Set up conversion tracking
As I said before, most real estate professionals starting out with Google Ads will begin maximizing clicks, but you are definitely going to want to set up conversion tracking since we ultimately want to optimize for leads and sales.
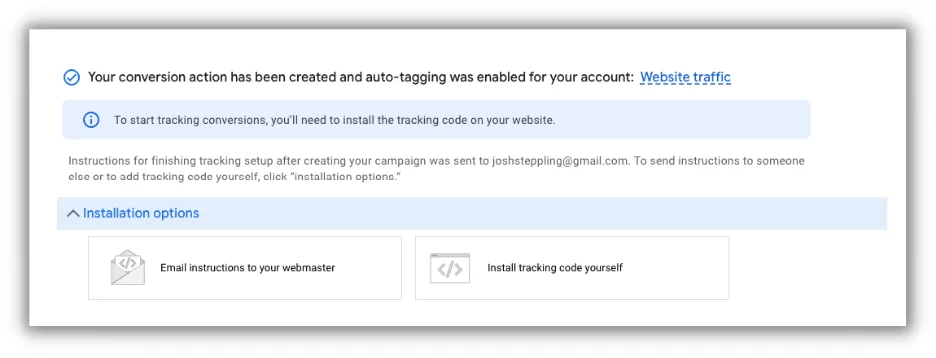
Under “Tools and Settings,” go to “Conversions” to set up a new conversion action. This will often be measured when a visitor fills out a contact form or signs up on your website, but you can also measure calls.
Follow the steps that Google provides to set up the conversion tracking on your website, and you’ll be able to accurately measure how your real estate campaigns are performing.
Keys to success with Google Ads for real estate
Now that your real estate Google Ads campaign is set up, here are some best practices to keep in mind.
1. Continually monitor key metrics
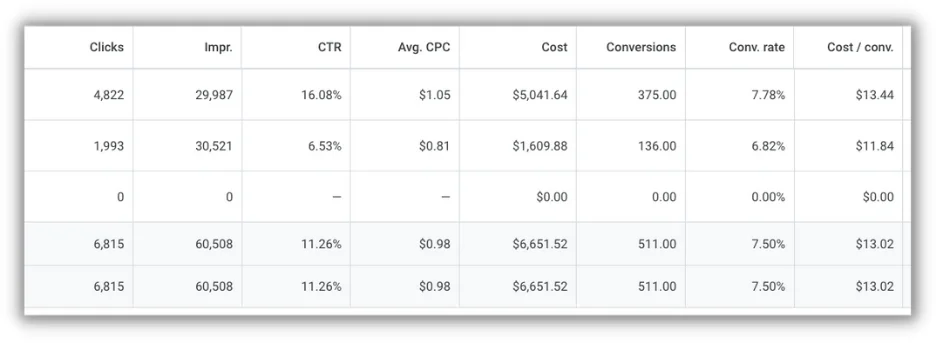
As your campaign runs, keep a close eye on critical metrics to gauge your campaign’s performance. Monitor important metrics like cost per conversion, click-through rate (CTR), cost per click (CPC), and conversion rate to assess which ads and ad groups are most effective.
We can evaluate the effectiveness of our ads by going to a Google Ads Performance Grader or a similar tool that will analyze a campaign’s performance and give us some actionable steps to improve it.
2. Review your campaign’s search terms
Regularly review the search terms that trigger your ads to show up. This insight helps you refine your keyword and negative keyword lists so that your ads only appear for relevant queries.
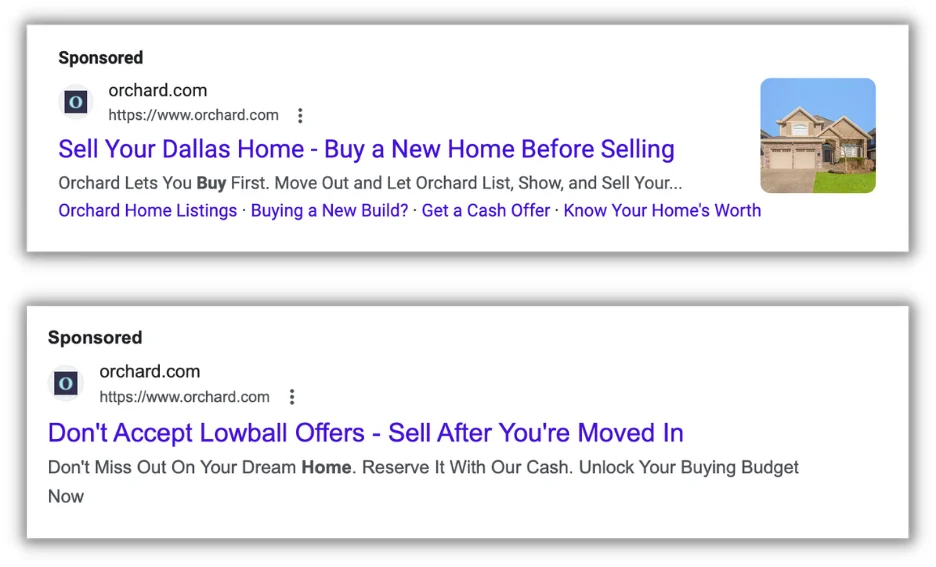
3. A/B test your ads
Test different ad variations and strategies to identify what resonates best with your potential clients. Create multiple ads with different headlines, descriptions, and calls to action to gauge which are giving you the most bang for your buck.
4. Build relationships
Don’t focus solely on getting leads. Real estate is all about building relationships and Google Ads are just an avenue to grow your database. Provide value and come from a place of contribution and you’ll have long-term success.
5. Commit to a follow-up plan
Effective follow-up is crucial in the real estate business, and it’s even more pressing in the digital sphere. Nurture leads through email campaigns, phone calls, and personal touches to keep your services top of mind.
6. Leverage technology and people
Use a strong Customer Relationship Management (CRM) system to manage leads, interactions, appointments, and sales efficiently.
Make Google Ads a win for your real estate business
Google Ads gives real estate professionals an unparalleled opportunity to scale their businesses unlike anything the industry has seen before. Setting up, managing, and continually optimizing your Google Ads account is the first step in owning your lead source rather than relying on buying leads or waiting for your phone to ring.
Use this as an evergreen cheat sheet when you’re creating or reviewing new campaigns, and remember that it’s not just about running ads. The goal is ultimately to deliver value and build relationships that continue to pay dividends for your real estate business for years to come.

![How AEO Will Impact Your Business's Google Visibility in 2026 Why Your Small Business’s Google Visibility in 2026 Depends on AEO [Webinar]](https://articles.entireweb.com/wp-content/uploads/2026/01/How-AEO-Will-Impact-Your-Businesss-Google-Visibility-in-2026-400x240.png)
![How AEO Will Impact Your Business's Google Visibility in 2026 Why Your Small Business’s Google Visibility in 2026 Depends on AEO [Webinar]](https://articles.entireweb.com/wp-content/uploads/2026/01/How-AEO-Will-Impact-Your-Businesss-Google-Visibility-in-2026-80x80.png)


