SEO
How To Change Your Default Search Engine In Chrome, Edge, Firefox & Safari
Using the search engine you like best is a preference many internet users don’t take lightly.
But it can also be tricky to configure the browser(s) you use to operate with the search engine you prefer by default each time.
So, if you want to change your default search engine to Google or any other major search engine within a specific web browser, follow the guide below. You’ll realize that changing it is a simple and fast process that greatly impacts your web-browsing experience.
Whether you use Chrome, Firefox, Safari, or Microsoft Edge, here’s how to set your preferred search engines, regardless of your device.
Change Default Search Engine In Google Chrome
Here’s how to change your default search engine in Google Chrome.
Open the Chrome browser.
Click the three solid dots in the top right corner of the browser window. This is located below where the window’s X button would be on a machine using Windows, or below the down-facing arrow that opens the Tabs menu on a Mac.
If you’re signed into Chrome, it’s located next to your Google profile’s thumbnail.
Select Settings.
Click the Search engine section on the left-hand side of the page to reveal the search engine menu.
Then click the down arrow where it says Search engine used in the address bar to reveal the different options available without manually adding a different search engine not already listed.
Select your default search engine from the list that includes Google, Ecosia, Yahoo, Bing, or DuckDuckGo.
Note: If you’ve tried to set your search engine, but it doesn’t work, you may have malware. Get help restoring your Chrome settings.
Add, Edit, Or Remove Other Search Engines
To add, edit, or remove other search engines from the list, click the Manage search engines and site search arrow below the default search engine list.
To Add A Search Engine
Scroll down below the list of default Search engines.
At Other search engines, click Add.
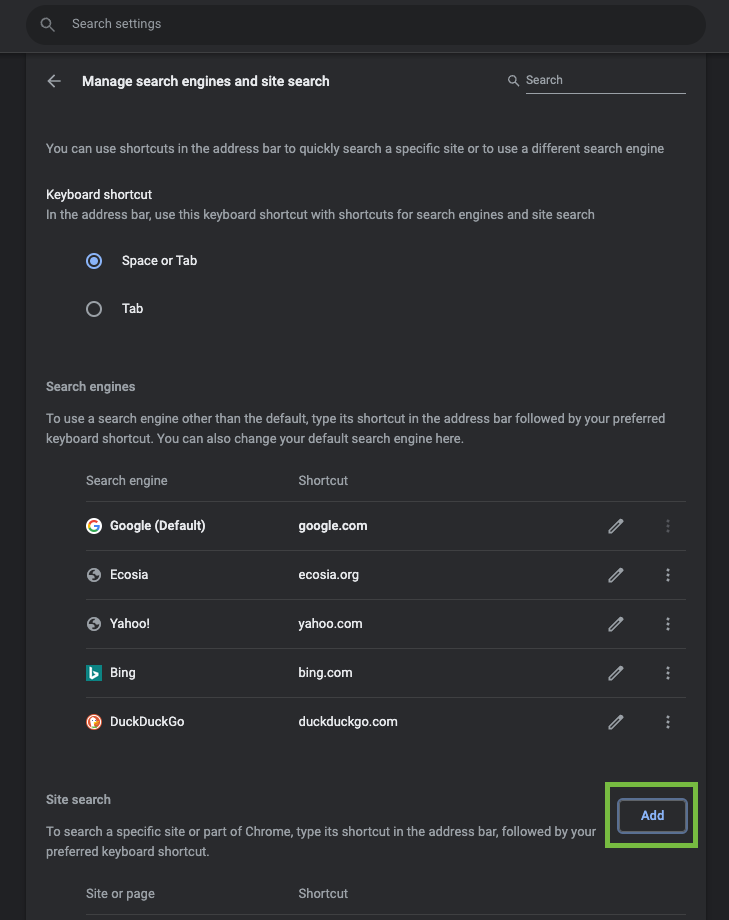
You’ll be prompted to fill out the search engine name, shortcut, and URL.
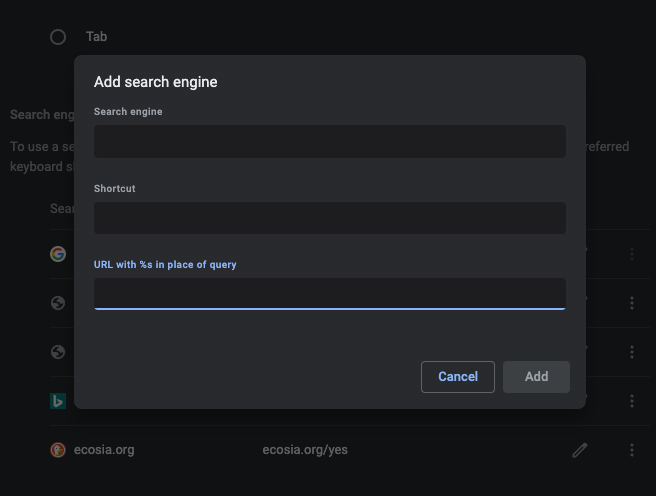
Filling Out Text Fields To Add A Search Engine In Chrome
The Search engine field should be the label or name of the search engine (i.e., Brave, Yandex, Swisscows, etc.).
The Shortcut field should be the text shortcut you want to use to engage the search engine via your browser bar.
This allows you to enter the keyword in the address bar for quick, easy access. (Of course, you can still just type your search query in the address bar to use the default search engine, too.)
“The URL with %s in place of query” field should include:
- the web address for the search engine’s results page.
- use %s where the query would go.
To find and edit the web address of the results page:
- Go to the search engine you want to add.
- Do a search.
- Copy and paste the web address of the search results page into the URL field. The address for the search results page is different from the website address.
- For example, if you search for [football], the Google search results URL is “http://www.google.com/search?q=football”.
- Replace the search term in the URL with %s.
- For example, if you were using the Google search results URL, your search engine address would be “http://www.google.com/search?q=%s”.
To Set A Default Search Engine, Edit, Or Delete
Click the Manage search engines and site search button right below the Search engine used in the address bar button.
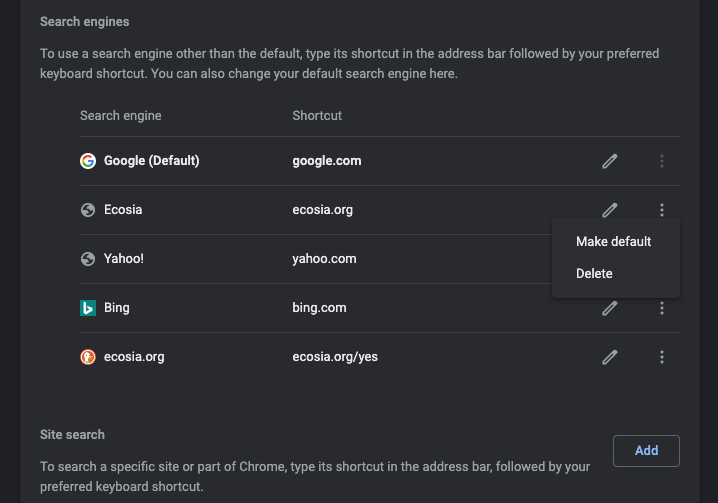
Then, scroll down to the list of search engines and click the three-dot icon on the right of the search engine you want to set to default, edit, or delete.
It will open a little box offering the user to “Make default” or “Delete” the listed search engine we are altering.
There is also a small pencil icon next to the three dots that will allow you to edit the current input, whether that be the search engine name, shortcut, or URL.
Use the pencil icon to edit the current inputs or the three-dot icon to make a search engine the default – or delete it from the list.
Change Default Search Engine In Firefox
Follow these steps to change your default search engine in Firefox.
Open the Firefox browser.
Click the hamburger menu (three solid lines) in the top-right corner of the browser window.
Select Settings from the dropdown menu.
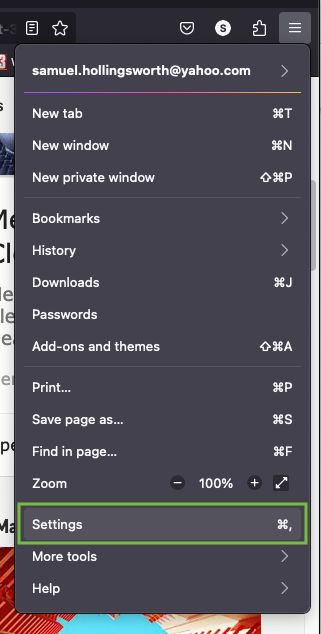
Selecting Settings will open a new tab within the same Firefox window.
On the left-side navigation, click on Search with the magnifying glass icon to access the various search-related features within Firefox.
Scroll down to the Default Search Engine section and click the drop-down menu to reveal the six different search engines that can be used as the default for the browser.
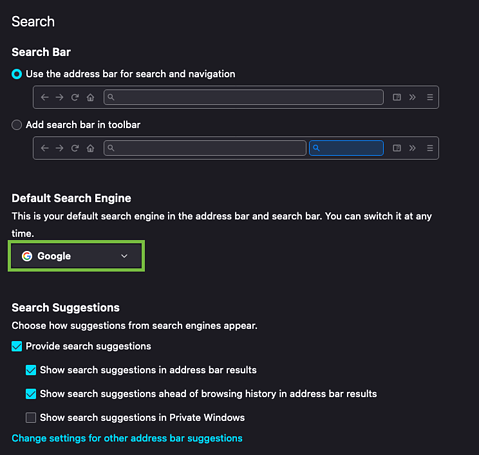
Select the search engine you want to be your default, and it updates immediately (no saving of the settings is needed).
To Add A Search Engine
To add a search engine not available in the above dropdown, scroll down to the bottom of the page and click the Find more search engines link (below a variety of other customized options, including search bar options, search suggestions, and search shortcuts).
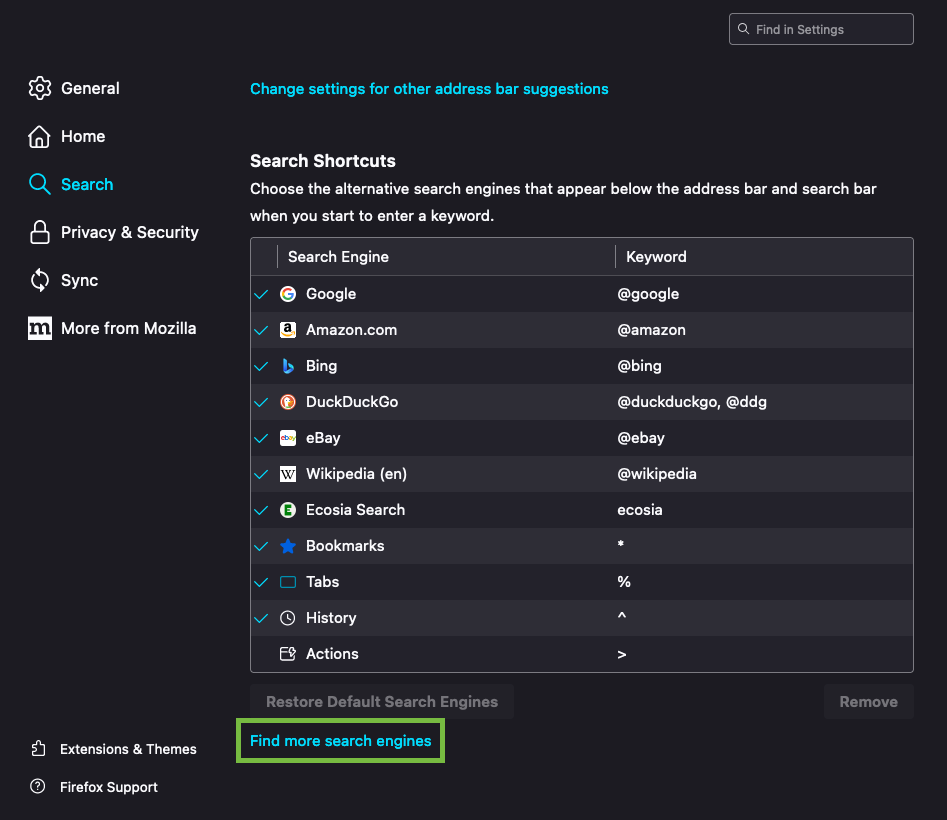
Click on Find more search engines, select the add-on(s) you want to add, and click Add to Firefox.
You can search for the search engine you are looking for or browse the extensive list shown by Firefox.
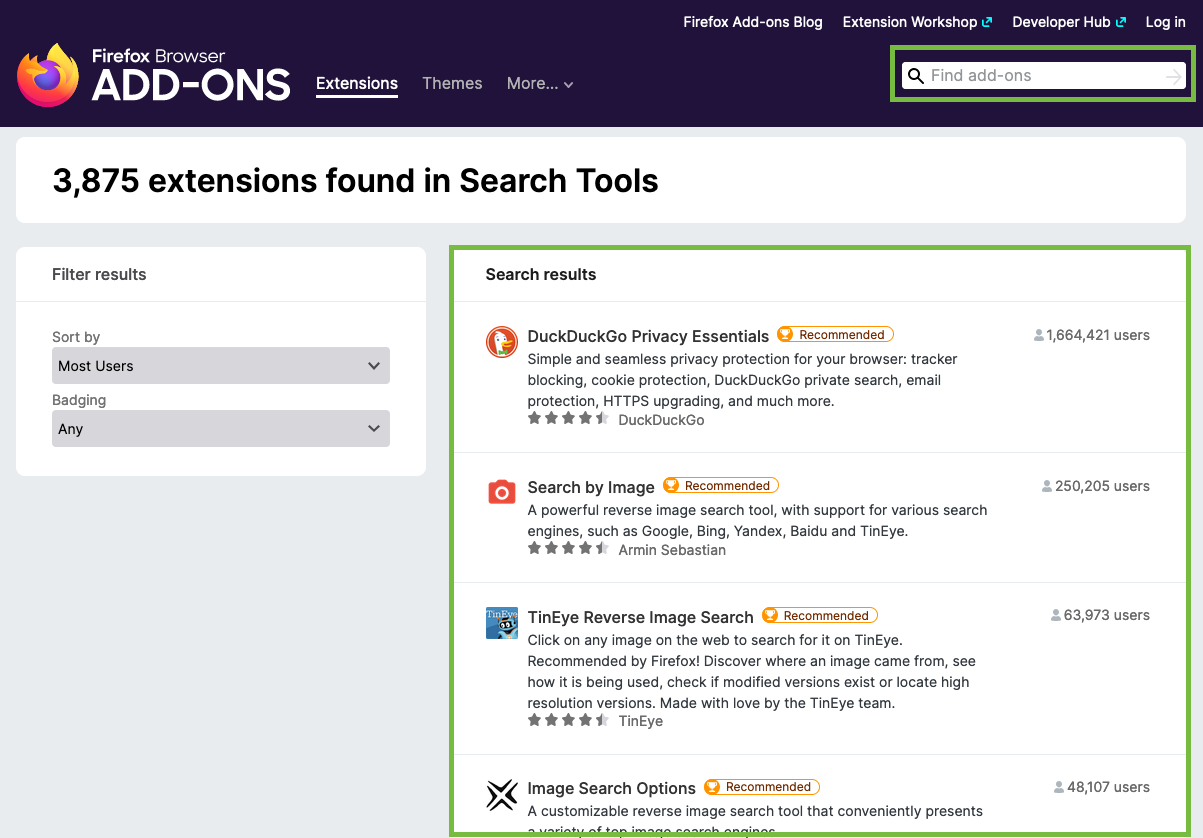
You will then be asked to give permission to add the add-on to the browser.
Once it has been added, it will show up in the list of available search engines under Default Search Engine.
To Remove A Search Engine
Scroll below the Search Shortcuts section and click on the search engine you want to remove and highlight.
Then, click the “Remove” button in the bottom right corner of that section.
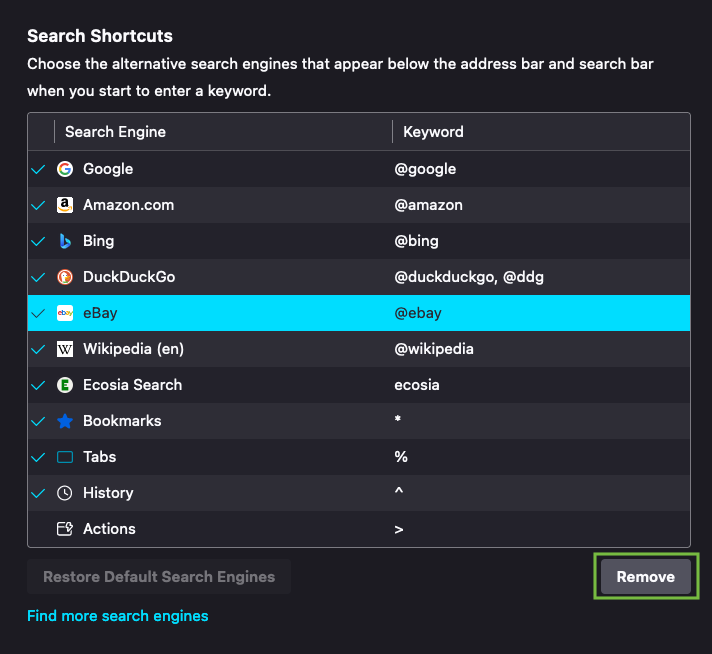
Note: If you remove a search engine that you added yourself and change your mind, you’ll have to add it again (the steps are above this section).
If you remove any of the search engines that come with Firefox by default, click Restore Default Search Engines to bring them back.
Change Default Search Engine In Microsoft Edge
Edge, Microsoft’s latest web browser, is a full reboot of its legacy Internet Explorer browser – which the company announced in June 2022 will no longer be fully supported.
Since Microsoft recommends users get Edge and use IE Mode if they want to return to the interface and functionality of Internet Explorer, we will explain how to change your default browser solely to Microsoft’s fully supported browser, Edge – and not to IE.
Here’s how to change your default search engine in Microsoft Edge:
Open the Microsoft Edge browser.
Go to the search engine website you want to default to (e.g., www.google.com).
Click on the three dots in the top right corner of the browser window under the X button.
Slide down and click Manage Add-ons.
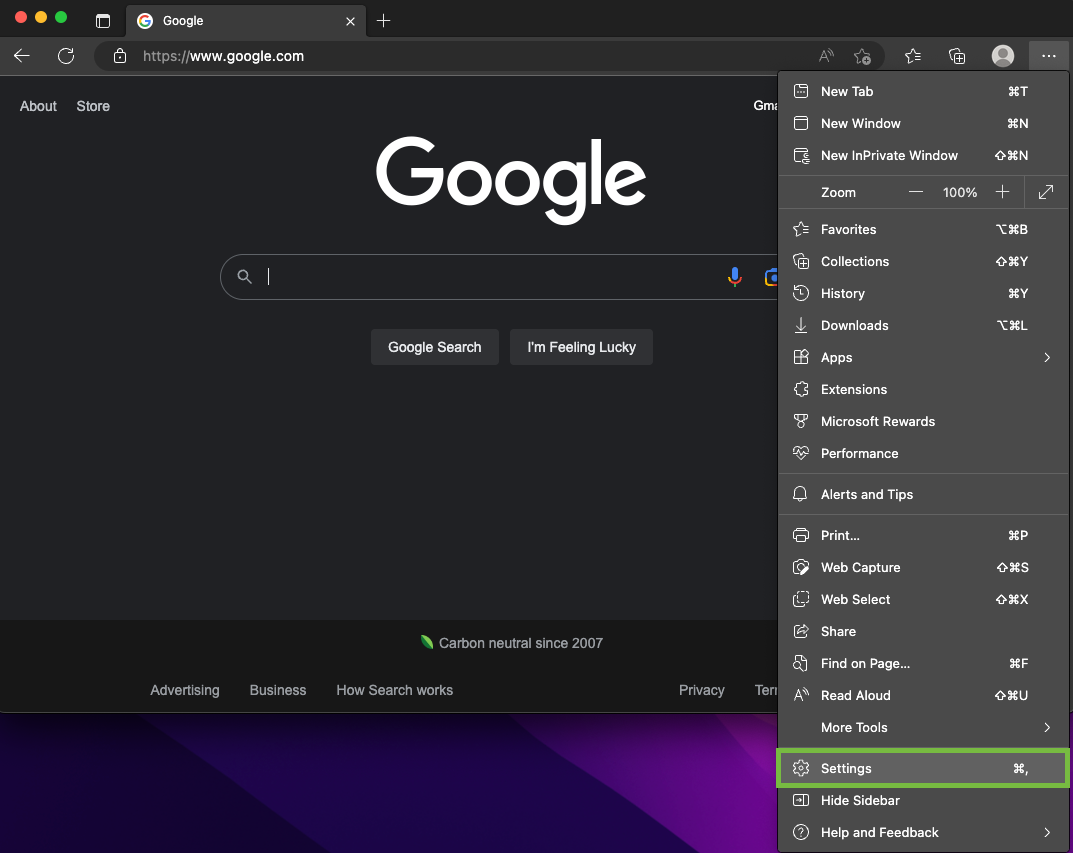
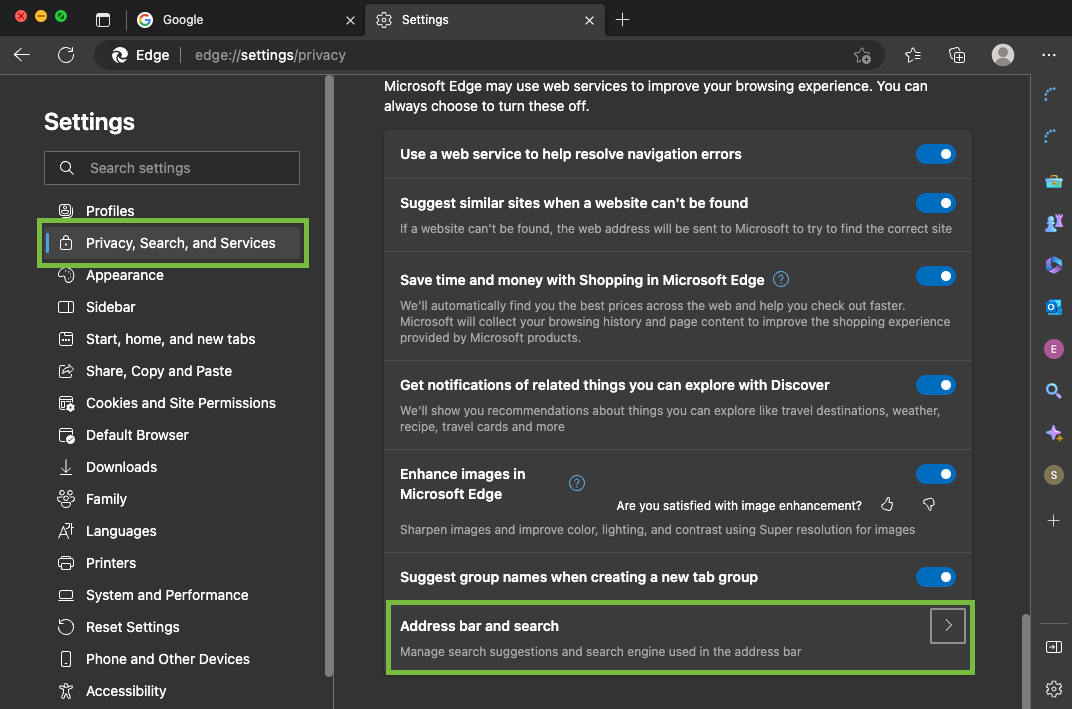
Once you’ve clicked on Settings, click Privacy, Search, and Services on the left-side panel.
Then scroll to the bottom of the page where it says Address bar and search.
Once the Privacy, Search, and Services menu opens, and choose the default search engine from the dropdown menu next to Search engine used in the address bar.
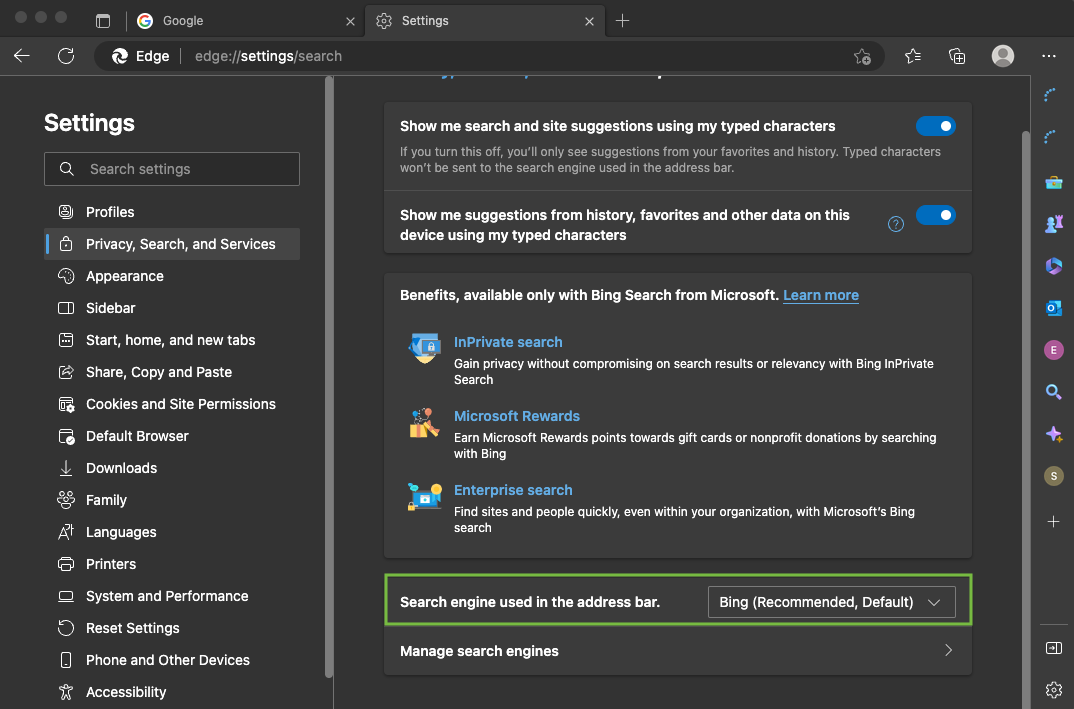
All search engines that have been used in the browser will show up as a possible default option.
If the search engine you want to designate as the default does not show up, search for it in the address bar, then go back and look – it should be an option to choose as default after that.
Change Default Search Engine In Safari For Desktop
Here’s how to change your default search engine in Safari for desktop computers.
Open the Safari browser and go to the Safari menu in the upper-left corner.
Select Preferences from that dropdown.
Once the Preferences window opens, click the Search button with the magnifying glass icon across the top menu.
Click on the search engine you want to make your default.
Change Default Search Engine In Safari For iPhone
Open Settings on your iPhone.
Scroll directly down to the Safari button with the logo and an advance arrow.
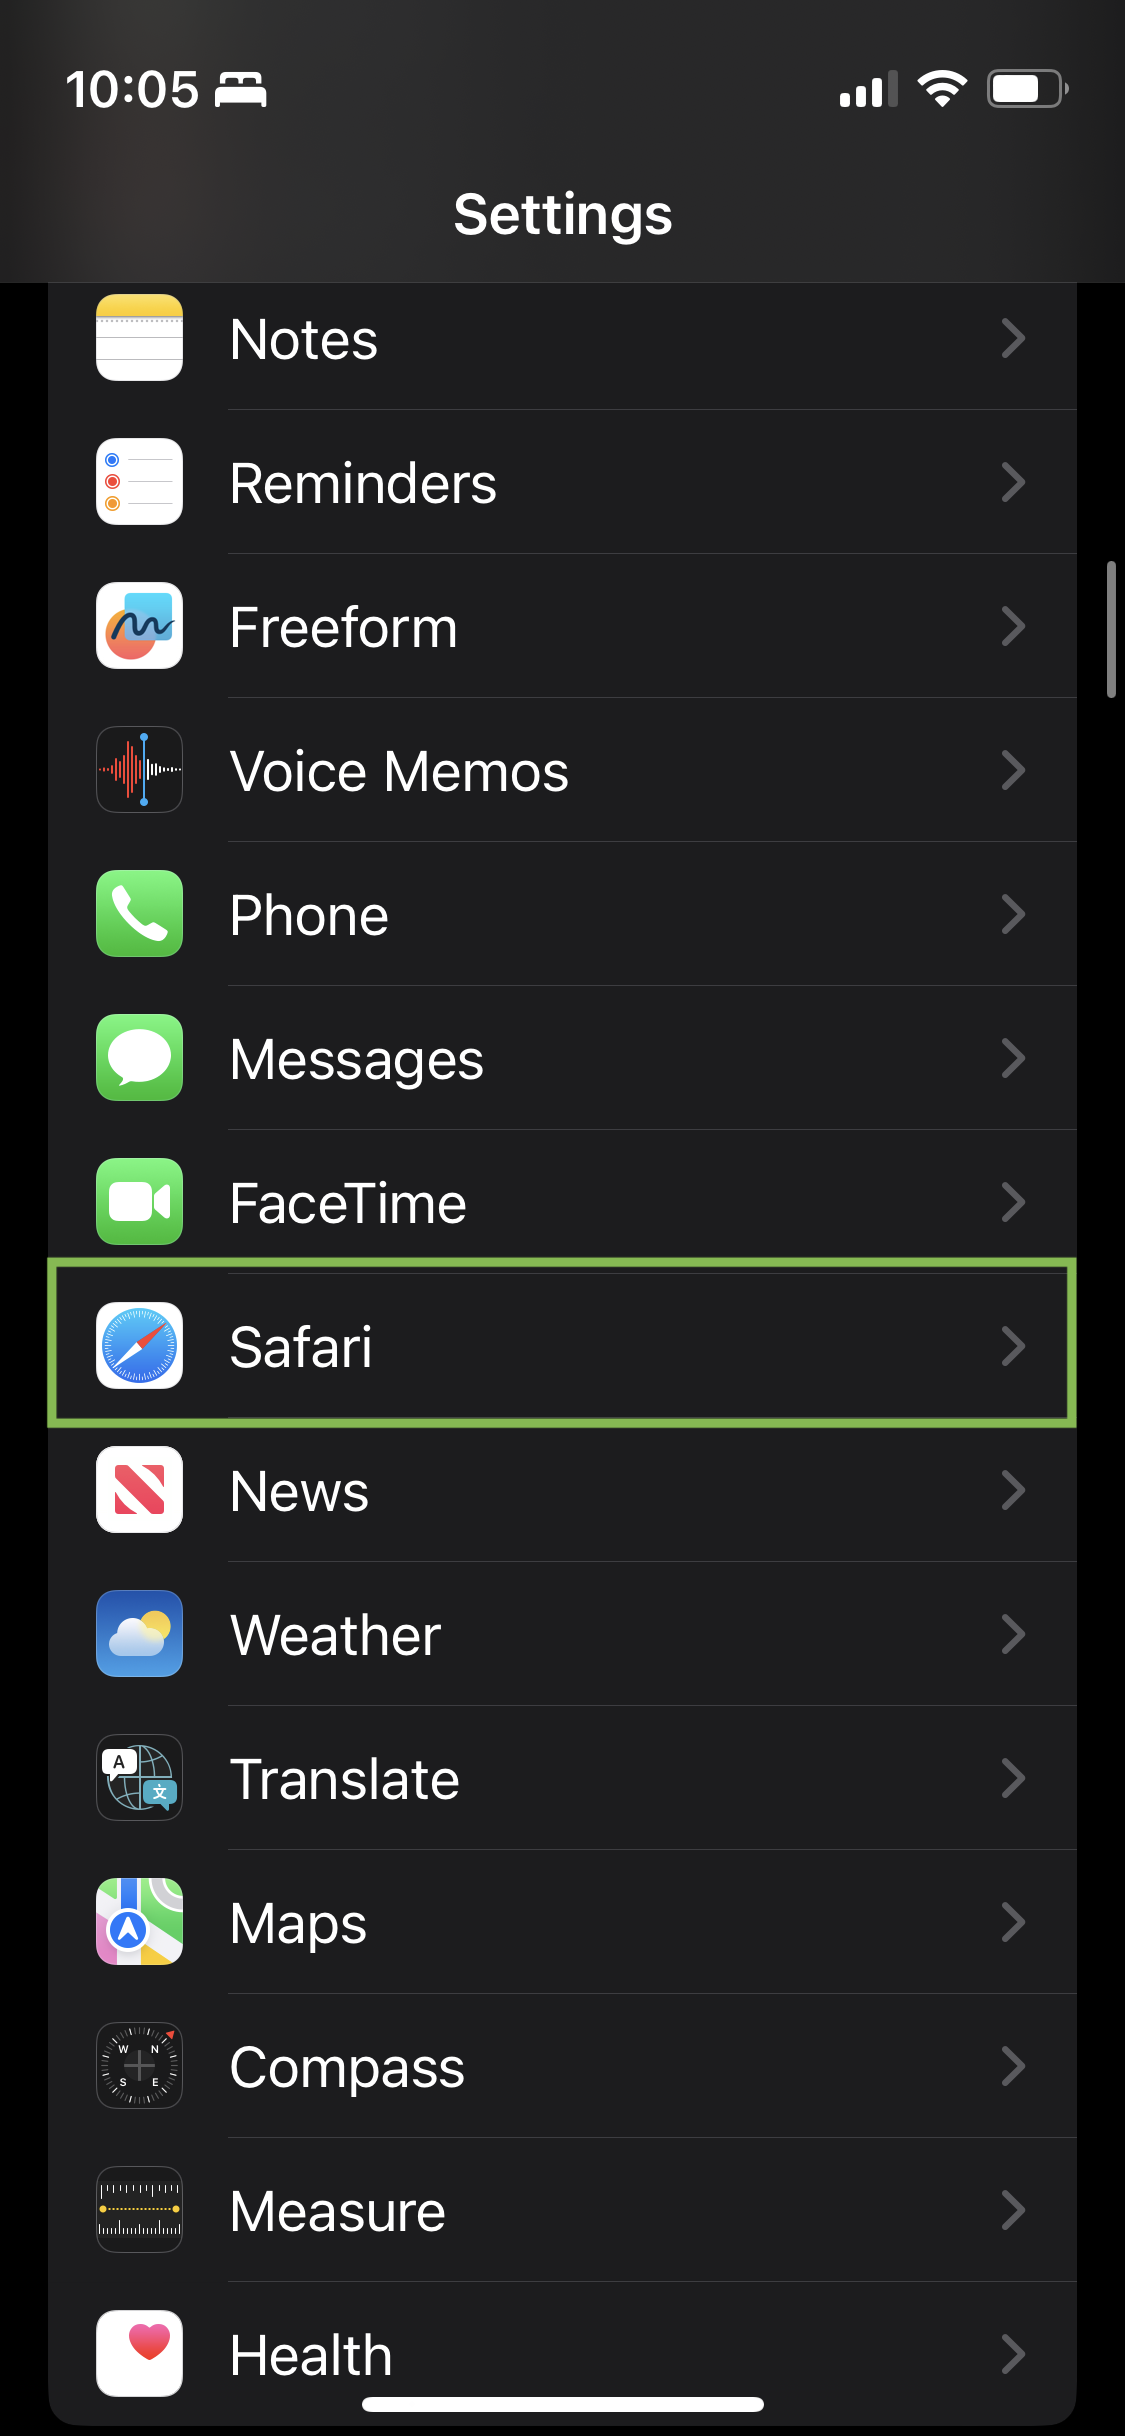
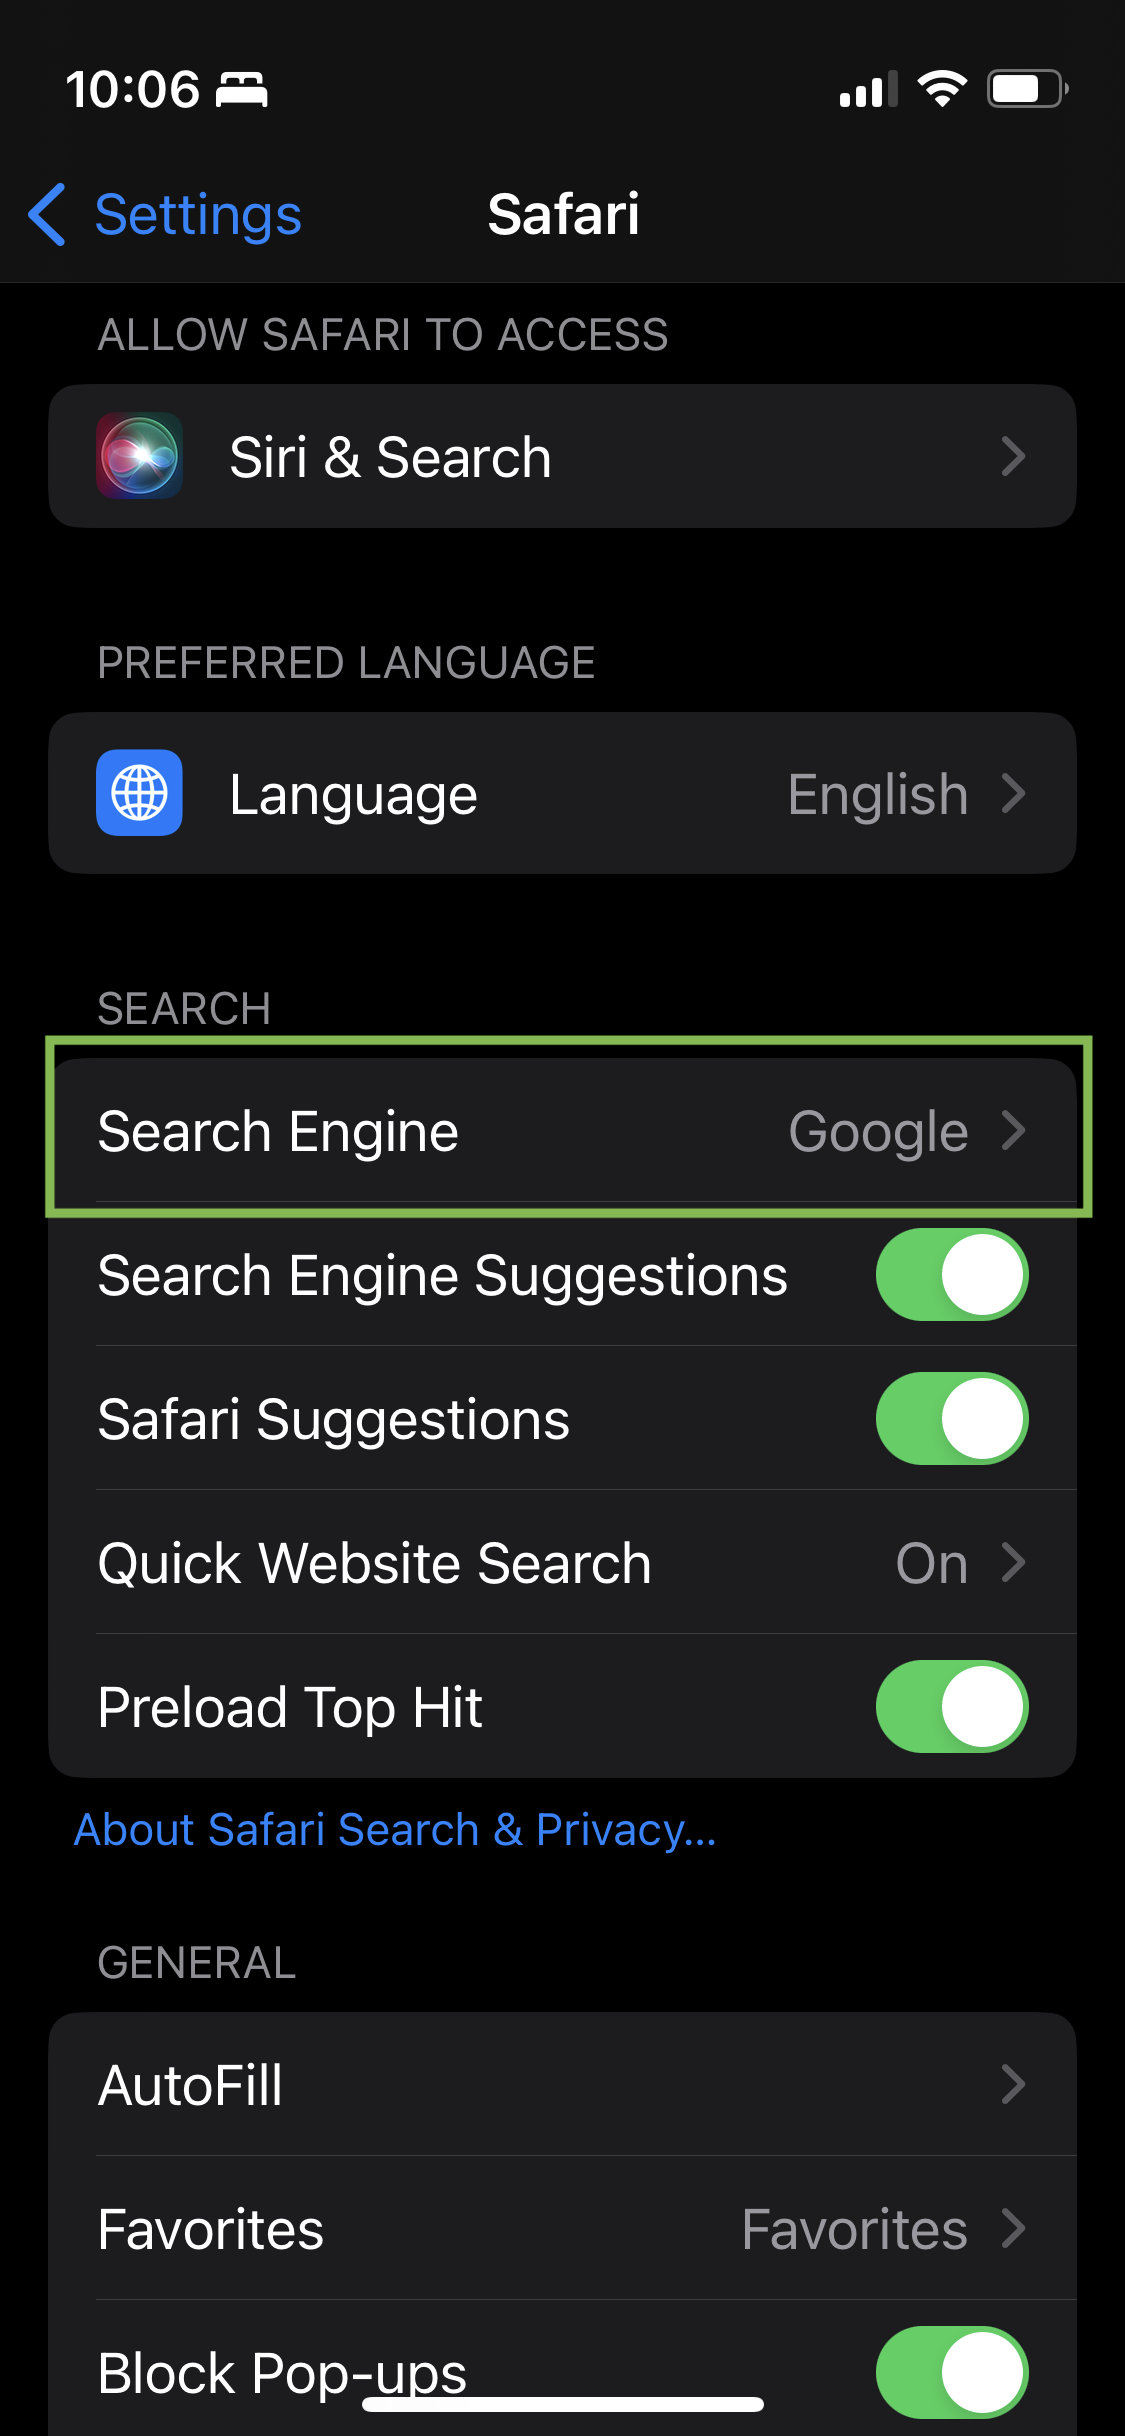
Within the Setting tab, go under the Search menu and click where it says Search Engine to pick from the default search engine options.
Change Default Search Engine In Android
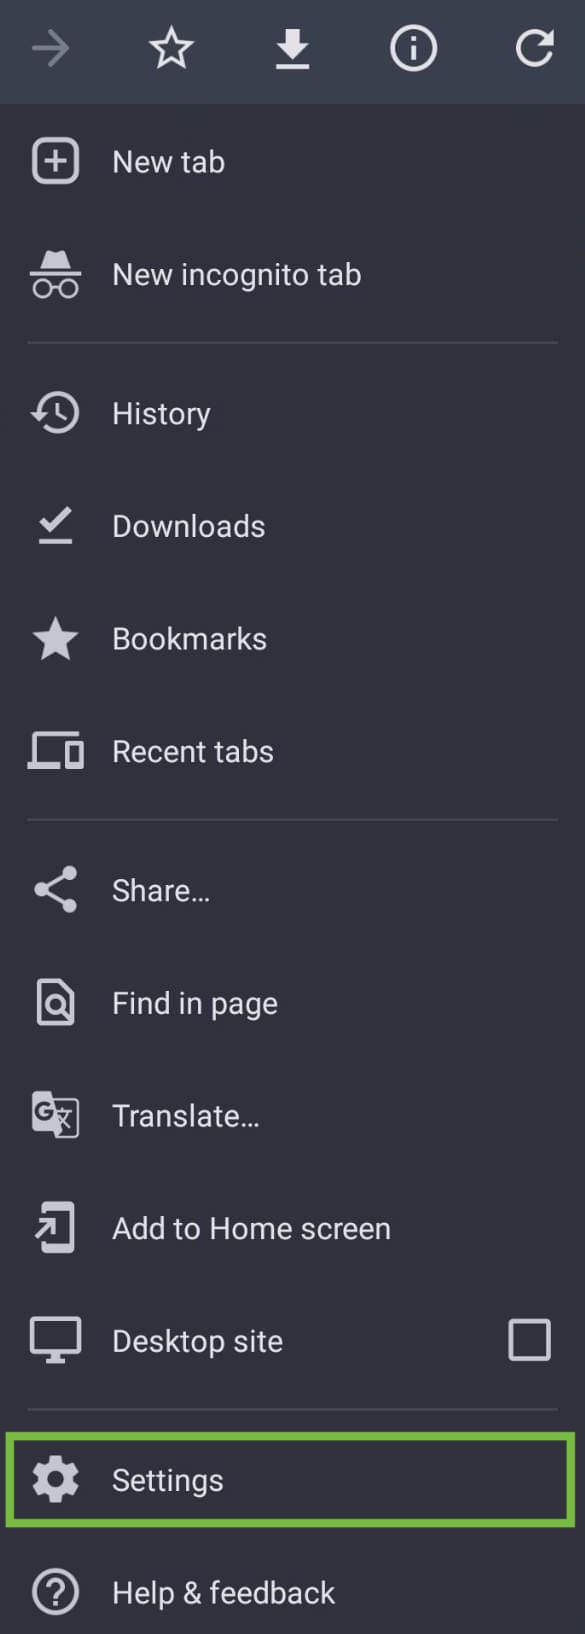
On your Android phone or tablet, open the Google Chrome app.
To the right of the address bar, tap More and then Settings.
Under Basics, tap Search engine.
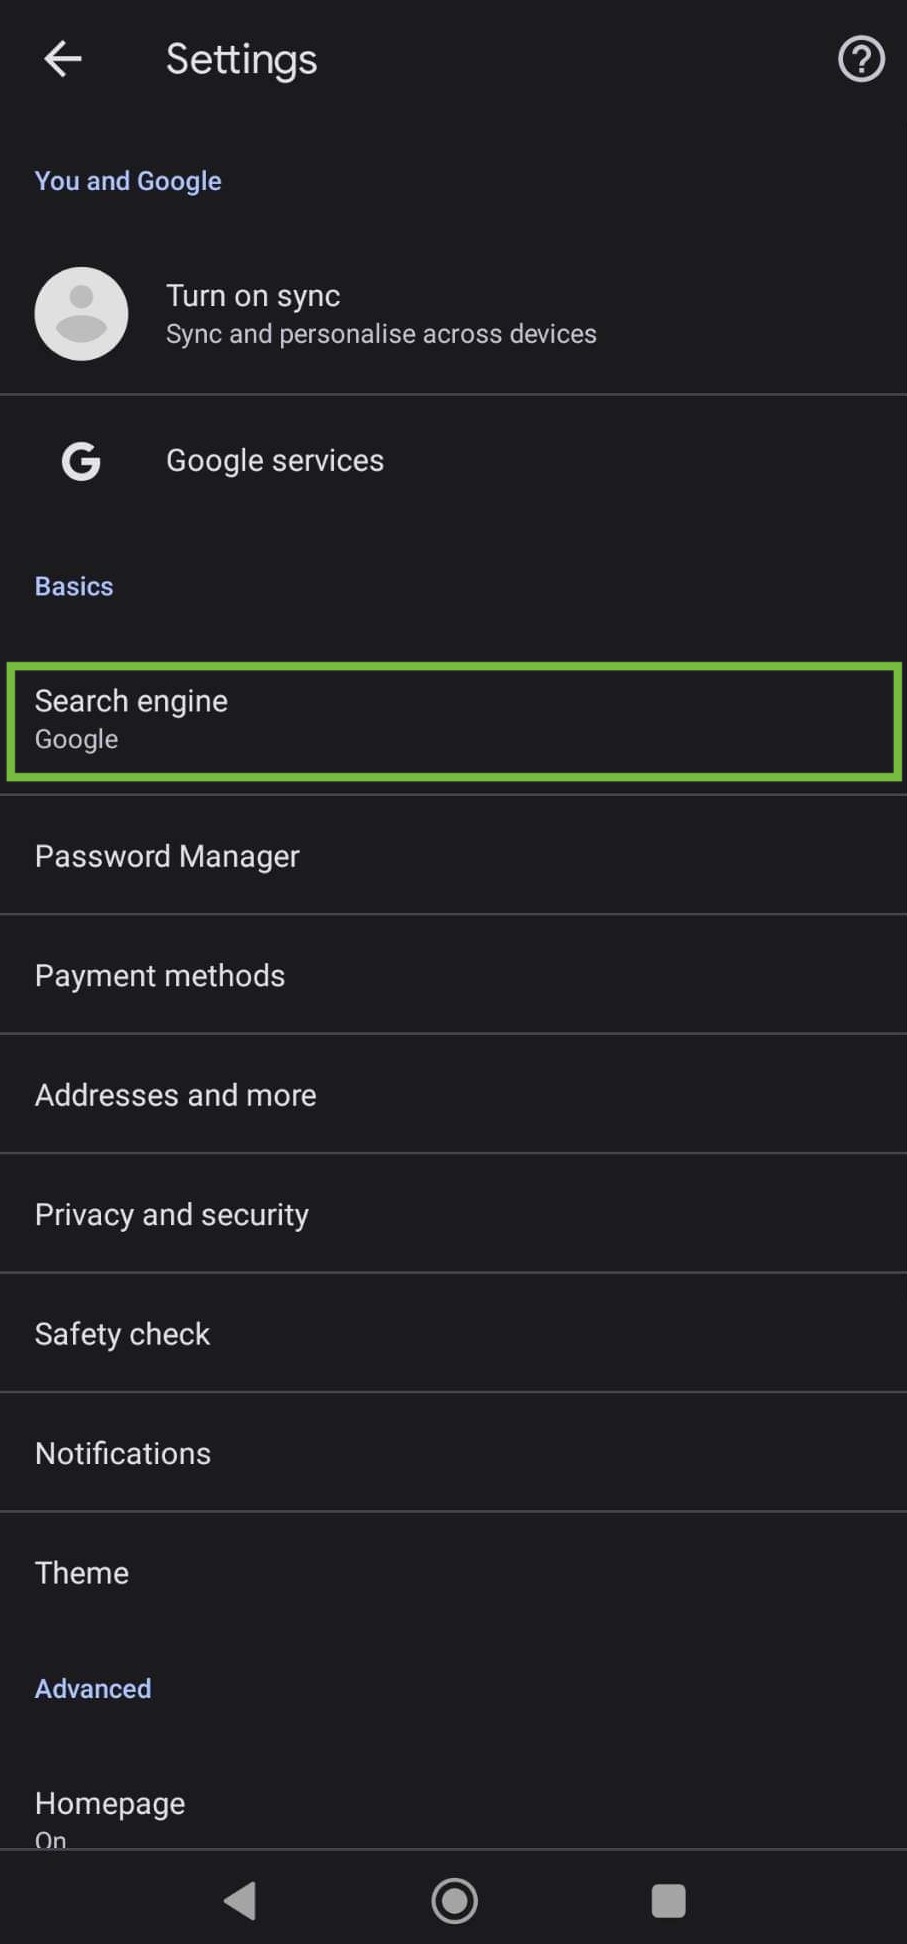
Select the search engine you want to use.
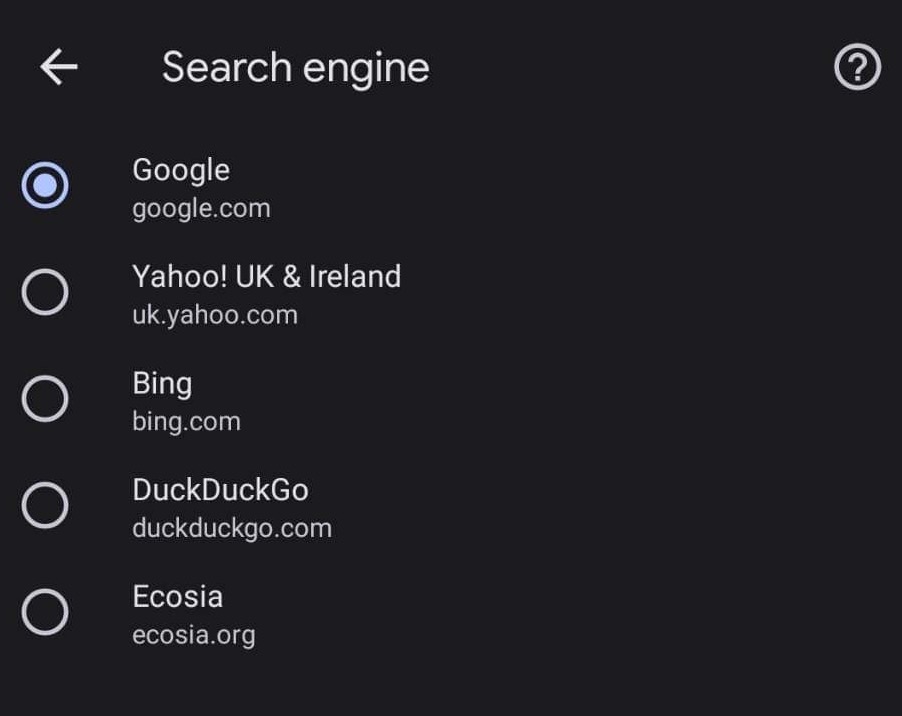
Recently visited search engines will be added as your default search engine options.
Conclusion
Regardless of the device, operating system, or browser you’re using, setting and using the default search engine you favor most impacts your results and the types of search queries you use.
It also has an immediate and long-lasting impact on your everyday web experience.
Because of this, knowing how to easily change your default search engine across any device, operating system, and browser is important.
Just like different browsers offer different experiences, so do search engines. And each one leans into different features and characteristics to add value to its users and separate itself from the competition.
Search engines constantly strive to provide the best results and information through the most satisfying user experience.
These are both crucial for customer satisfaction and loyalty. These factors also separate the best search engines from the not-so-good ones.
Update the browser(s) you use to work better for you using the abovementioned steps. Update your default search engine, and (hopefully) you won’t have to revisit it again anytime soon.
More Resources:
Featured Image: Golubovy/Shutterstock
SEO
Leverage Search Intent & Boost Your Visibility With These Expert SEO Strategies
Struggling to rank for your target keywords? You’re not alone.
The SEO landscape is more complex than ever, with search intent evolving and SERP features constantly changing.
So, how do you make sure your content aligns with Google’s evolving expectations?
Check out our webinar on September 25, 2024: “Navigating SERP Complexity: How to Leverage Search Intent for SEO.”
Tom Capper of STAT will discuss the role of search intent in SEO and how to use it to climb in the right SERPs for your brand.
Why This Webinar Is A Must-Attend Event
Ranking isn’t just about keywords anymore—it’s about understanding the intent behind each search.
We’ll cover:
- How intent is nuanced, and many keywords can support multiple intents.
- Why the same keyword can have a different intent depending where it was searched from, and on what device.
- The differences in SERP features depending on intent, and how this impacts your content strategy.
Expert Insights From Tom Capper
Leading this session is Tom Capper from STAT Search Analytics.
Capper will dive deep into searcher motivations using first-party research data and provide actionable insights to help you improve your site’s organic visibility.
Reserve your spot and find out more about how these insights can impact your ranking.
Who Should Attend?
This webinar is perfect for:
- SEO professionals looking to take their strategies to the next level
- Content managers and strategists wanting to increase the effectiveness of their work
- Enterprise professionals and digital marketers looking to blend branding, marketing, and SEO for a unified customer experience
- Anyone interested in search results and consumer behavior
Live Q&A: Get Your Questions Answered
Following the presentation, Tom will host a live Q&A session.
This is your chance to clarify misconceptions surrounding the intersection of content, search intent, and the SERPs and get expert advice on optimizing your strategies.
Don’t Miss Out!
Understanding search intent is critical to staying competitive in SEO. Reserve your spot today to ensure you’re not left behind.
Can’t attend live? Sign up anyway for the recording.
Get ready to unlock new SEO opportunities and boost your rankings. See you there!
SEO
How to Manage Local SEO for Businesses with Multiple Locations
As your business grows, the idea of expanding to multiple locations and tapping into new markets eventually becomes a possibility. And getting to this point can be exciting for business owners– but it’s also a complex process that involves the application of different strategies, especially when it comes to your SEO.
Managing SEO for multiple locations is tricky. You will want each location to show up in local searches and catch the attention of potential customers in its specific area. And this is where optimizing local SEO for multiple locations comes into play.
Understanding the Importance of Multi-Location SEO
Beyond brand consistency and quality products and/or services (which are always important), you have to consider how your new business branches can be found by an increasingly digital consumer market.
As an SEO expert, I’ve seen firsthand how important a well-crafted multi-location SEO strategy is for businesses, becoming the key to making sure that each location can attract local customers through organic search.
Multi-location SEO is more than just search engine ranking improvements. It is about connecting with local audiences on a deeper level – ensuring that your business is visible to potential customers exactly when they are searching for services or products in their area.
- Improve local search visibility. Optimizing each business location individually with relevant keywords can guarantee that your stores appear at the top of local search results – making it easier for potential customers in specific areas to find and visit your locations.
- Target qualified local audiences. Customizing multi-location SEO strategies to meet the specific needs and search behaviors of local customers can help businesses attract highly relevant and engaged customers, which may then lead to higher engagement and better conversion rates.
- Improved search rankings. Earning backlinks from local websites enhances the authority and relevance of each location, boosting your search engine rankings.
- Competitive advantage. A well-optimized multi-location SEO strategy sets your business apart from your competitors who may not be as focused on local SEO, giving you an edge in attracting local customers.
- More in-store foot traffic. Increased local visibility translates to more people discovering your business’ physical locations, driving more foot traffic, which eventually convert into more sales.
Create Separate Pages for Each Location
Instead of putting together and stuffing all the necessary information of your business onto a single page, separate pages allow you to highlight specific details unique to each location – from local addresses, contact information, down to the services and offerings available at each site.
While creating separate pages, it is important to:
- Ensure that all these pages are hosted on a single domain to consolidate your SEO efforts and boost rankings as a whole.
- Embed a Google Map for each location to enhance local visibility, user convenience, and relevance for local searches.
- Target geotagged keywords and mention the specific city or area on each page to establish your business’ presence across multiple locations.
- Include complete contact details and create location-specific content to help each location rank well in search results and drive more local traffic and engagement.
- Make sure that each of the pages have unique, optimized content, and not identical copies. Avoid simply changing just the city and state names on each page to prevent duplicate content penalties, and ensure a more targeted user experience.
- Add photos and videos to give users a better feel for each location.
Precise and localized information for each of the pages you will be creating for multiple business locations can help potential customers quickly find what they need, creating a richer and more engaging user experience. This shall improve your chances of ranking highly in search results as well.
Optimize Google My Business Listings
Each location of your business should have their own Google Business Profiles complete with accurate details – from address details, business hours, contact information, to the correct website URLs for specific business locations. This helps control how your business is displayed on both Google and Google Maps.
By the time you have created variations of GMB profiles customized to each business location, optimizing each of them follows. This involves uploading high-quality photos and videos, creating posts and publishing updates consistently, and managing and responding to reviews actively.
Of course, it is important that you encourage satisfied customers to leave reviews – and respond to it. This not only resolves issues, but builds trust among users too. It can even help boost local rankings significantly.
Keeping Google My Business listings detailed, up-to-date, and packed with positive reviews, you promote your business not only for potential customers to find and choose you, but also signals Google that each location is active and trustworthy – which further leads to higher visibility and more exposure in the search results.
Ensure Consistency in NAP Across All Listings
Consistency is key—ensure your business name, address, and phone number (NAP) are uniform across all listings. With same business names, it may signal Google that these locations belong to the same business, while the address and phone number will let them know they are simply different branches.
The more accurate your information is across the web, the higher Google’s trust in its accuracy, making it more likely for you to earn a spot in the search results.
Create Local Business Schema
Local business schema, a type of structured data markup, is a powerful strategy for optimizing local SEO, particularly for businesses with multiple locations. Schema markup is a further addition to your location pages that allows you to describe your business more accurately to search engines as you provide them with detailed information.
This makes it easier for search engines to understand and display your business in relevant search results.
Gather Customer Reviews
Reviews are successful indicators of effective business strategies, providing potential customers with genuine, unbiased insights into your business. They influence customer perceptions while playing a role in how Google ranks your business in local search results. Reviews are also great social proof because people generally trust what other customers have to say about your business more than the information that we provide on the listings.
It is then important that you make review collection part of your business practices in optimizing local SEO for multiple locations by encouraging satisfied customers to provide feedback, not just on your GMB profiles, but to other review platforms too.
How to Get Positive Customer Reviews
Getting positive feedback from customers may be tricky, but it is an effective strategy for boosting both your business’ reputation and local SEO performance. Reviews like these will ensure that you stand out in local search results while attracting a steady stream of new customers.
- Ask for reviews, especially right after a positive experience. Do not hesitate to ask satisfied customers to leave reviews by asking them directly after a purchase or service.
- Let customers know how easy leaving reviews is. Simplify the review process by providing direct links to your Google My Business, and other review sites that your business is in. QR codes on thank you pages, receipts, or in-store displays can also be effective.
- Respond to reviews. May they be positive or negative customer feedback, make sure to respond professionally. This will show that you value their insights and opinions as much, and may even establish relationships with them. When these customers see that you are taking the time to interact with them, they will feel valued and appreciated.
- Highlight positive reviews on your website. Showcase the customer reviews on your website, especially for each location. This can further boost your local SEO, and may even encourage other satisfied customers to share their experiences as well.
How to Deal with Negative Reviews
Negative reviews cannot be avoided. Yes, they can be challenging, but they also present opportunities to make improvements on your business, and even demonstrate responsiveness to customer feedback.
- Reply to negative reviews as quickly as possible. Engaging promptly demonstrates a proactive approach to customer feedback and highlights your commitment to resolving issues. This also plays a key role in preserving the reputation of your business, fostering trust with your customers, and signals to search engines that your business values and prioritizes customer relations.
- Maintain professionalism. Always respond to customer feedback in a calm, polite, and professional manner, regardless of the tone of the review. Avoid becoming defensive or confrontational, since it may discourage potential customers. Then, from here, address the issue raised by thinking and providing a solution.
- Acknowledge the issue. Always begin your response by acknowledging and recognizing the customer’s concern, and expressing genuine empathy. This helps validate their feelings and show them that you actually mind. Do not forget to offer a sincere apology for any inconvenience or difficulty they have encountered as well, regardless of who was at fault.
- Encourage positive reviews. Even with negative reviews, continue to encourage satisfied customers to share their positive experiences. Increasing the volume of this positive feedback can help in enhancing your overall rating. And the more positive reviews you get, the less impact any individual negative review will have.
Collect as many testimonials as you can, and respond to both positive and negative ones. Actively doing so shows that you value customer feedback, and are committed to excellent service – further strengthening your local SEO efforts too.
Earn Backlinks from Local Websites
Link building remains to be an important strategy for optimizing local SEO across multiple locations. Backlinks act as endorsements from reputable sources that boost business’ visibility, relevance, and authority in local search results – all of which are important ranking factors.
Focus on getting listed in local directories and citations. Create listings for each business location, keeping each information complete and accurate, to help establish your local presence within the area. You may also reach out to local bloggers for guest posting opportunities, sponsor community events, or engage with local publications by sharing newsworthy updates about your business.
Backlinks from local websites drive targeted traffic from potential customers who are geographically close to your locations, increasing the chances of conversions. This local relevance is particularly important for businesses in multiple locations, as it ensures each site gains visibility in its respective area.
Link Your Social Media
Aside from separate web pages, your different business locations also need their own social media profiles. Actively maintaining these pages can boost local SEO through location-specific content, engagement with local audiences. These profiles will also enable you to run location-targeted ads to reach potential customers in each area. Once you have this set up, remember to link your social profiles to your location pages to increase relevance.
Look at Local Competition
Want to know what’s working? Look at the top-ranking businesses in your area. Use tools like SE Ranking, Woorank, and the like to see what strategies they’re using to rank well in local search. This should give you things like content ideas, backlink profiles, citations, reviews, and other opportunities you can apply to your own location pages.
Key Takeaway
Optimizing local SEO for multiple locations really takes a lot of work – a demanding but rewarding process. If we take this approach with these strategies, it will not only ensure that each location ranks well in the appropriate searches but also build a strong digital footprint for your business. The result is a stronger connection with local customers, increased foot traffic, and ultimately, greater business success.
Implementing this multi-location SEO strategy may actually sound like a tricky approach to expand your customer base and drive growth to your business in the online market. But with these strategies that I have laid out, you can tailor your SEO efforts to suit the multiple locations of your business without spreading your resources too thin.
SEO
9 HTML Tags (& 11 Attributes) You Must Know for SEO
HTML is a markup language that forms the basis of most webpages.
It is arguably one of the most fundamental parts of technical SEO.
Using HTML elements, SEO professionals are able to communicate information about the page to users and search bots.
This can help to clarify the importance, nature, and order of content on a page, as well as its relationship to other webpages.
What Are HTML Attributes?
Attributes are additional information added to HTML elements. They sit within the element, such as:
They are values that are used to modify the element, giving additional context about it.
In the case of the HTML tag above, the attribute, rel=”canonical” modifies the link tag to say to the search bots that this URL should be considered the canonical of a set.
Format Of HTML Attributes
HTML attributes consist of a name and a value.
For example, when defining an image, the name “src” is used and the value is the file name of the image. The “alt” attribute specifies an alternative text to show if the image cannot be displayed.
Types Of HTML Attributes
Attributes are usually classified in four ways; required, optional, standard or event.
Required attributes are ones where their absence from a tag means that tag would not function correctly.
Optional ones are, as the name suggests, not required for the tag to work but can be used to specify additional information or behaviour for that tag.
There are attributes that can be used with most HTML elements, and some that are very specific.
For example, the “style” attribute can be used to define the look of an element like the colour or font size. These universal attributes are known as “standard” or “global” attributes.
There are other attributes that can only be used with certain elements. Commonly, ones that are used for SEO will modify a link tag. These are elements like “rel” and “hreflang.”
Event attributes are added to an element to define how that element should behave in response to certain actions like a user mousing over a button. These attributes define how a function should be executed.
For example, an “onclick” attribute would define what a JavaScript function should do when a user clicks a button. These attributes allow developers to create more interactive pages from HTML tags.
Why HTML Attributes Are Important
HTML attributes are important because they allow developers to add additional context and functionality to websites.
They are particularly important for SEO because they give much-needed context to tags. They are critical in how we guide the search bots in crawling and serving webpages.
Attributes allow us to easily prevent the following of certain links, or denote which pages in a set should be served to users in different countries or using other languages.
They allow us to easily signify that a page should not be indexed. A lot of the fundamental elements of technical SEO are actually controlled through HTML attributes.
Common Attributes Used In SEO
1. Name Attribute
The name attribute is used with the tag.
It is essentially a way of specifying to any bots that may visit the page if the following information applies to them or not.
For example, including means that all bots should take notice of the “noindex” directive.
You will often hear this called the “meta robots tag.”
If the following were used , only Google’s bot would need to take notice of the “noindex” directive.
This is a good way of giving commands to some search bots that are not needed for all.
2. Noindex Attribute
The “noindex” attribute is one commonly used in SEO.
You will often hear it being called the “noindex tag,” but more accurately, it is an attribute of the tag.
It’s formulated:
This piece of code allows publishers to determine what content can be included in a search engine’s index.
By adding the “noindex” attribute, you are essentially telling a search engine it may not use this page within its index.
This is useful if there is sensitive content you want to not be available from an organic search. For instance, if you have areas on your site that should only be accessible to paid members, allowing this content into the search indices could make it accessible without logging in.
The “noindex” directive needs to be read to be followed. That is, the search bots need to be able to access the page to read the HTML code that contains the directive.
As such, be careful not to block the robots from accessing the page in the robots.txt.
3. Description Attribute
The description attribute, better known as the “meta description,” is used with the tag.
The content of this tag is used in the SERPs underneath the content of the
It allows publishers to summarise the content on the page in a way that will help searchers determine if the page meets their needs.
This does not affect the rankings of a page but can help encourage clicks through to the page from the SERPs.
It is important to realize that in many instances, Google will ignore the content of the description attribute in favor of using its own description in the SERPs.
You can read more here about how to optimize your description attributes.
4. Href Attribute
As SEO professionals, we spend a lot of time chasing links.
But do you know how a link is structured and, therefore, why some links are perceived to be worth more than others?
A standard hyperlink is essentially an tag.
Its format is as follows:
anchor text of link goes here.
The tag indicates it is a link.
The href= attribute dictates the destination of the link (i.e., what page it is linking to).
The text that sits between the opening tag and the closing tag is the anchor text.
This is the text that a user will see on the page that looks clickable.
This is used for clickable links that will appear in the
The tag is used to link a resource to another and appears in the
of the page.
These links are not hyperlinks, they are not clickable. They show the relationship between web documents.
5. Rel=”nofollow”, rel=”ugc” And rel=”sponsored attributes”
The rel=”nofollow” attribute tells bots that the URL within the href attribute is not one that can be followed by them.
Using the rel=”nofollow” attribute will not affect a human user’s ability to click on the link and be taken to another page. It only affects bots.
This is used within SEO to prevent search engines from visiting a page or from ascribing any benefit of one page linking to another.
This arguably renders a link useless from the traditional SEO link-building perspective, as link equity will not pass through the link.
There are arguments to say that it is still a beneficial link if it causes visitors to view the linked-to page, of course!
Publishers can use the “nofollow” attribute to help search engines determine when a linked-to page is the result of payment, such as an advert.
This can help prevent issues with link penalties, as the publisher is admitting that the link is the result of a legitimate deal and not an attempt to manipulate the rankings.
The rel=”nofollow” attribute can be used on an individual link basis like the following:
anchor text of link goes here
Or it can be used to render all links on a page as “nofollow” by using it in the
like a “noindex” attribute is used:
You can read more here about when to use the rel=”nofollow” attribute.
6. How Google Uses The Rel=”nofollow” Attribute
In 2019, Google announced some changes to the way it used the “nofollow” attribute.
This included introducing some additional attributes that could be used instead of the “nofollow” to better express the relationship of the link to its target page.
These newer attributes are the rel=”ugc” and rel=”sponsored.”
They are to be used to help Google understand when a publisher wishes for the target page to be discounted for ranking signal purposes.
The rel=”sponsored” attribute is to identify when a link is the result of a paid deal such as an advert or sponsorship. The rel=”ugc” attribute is to identify when a link has been added through user-generated content (UGC) such as a forum.
Google announced that these and the “nofollow” attribute would only be treated as hints.
Whereas previously, the “nofollow” attribute would result in Googlebot ignoring the specified link, it now takes that hint under advisement but may still treat it as if the “nofollow” is not present.
Read more here about this announcement and how it changes the implementation of the rel=”nofollow” attribute.
7. Hreflang Attribute
The purpose of the hreflang attribute is to help publishers whose sites show the same content in multiple languages.
It directs the search engines as to which version of the page should be shown to users so they can read it in their preferred language.
The hreflang attribute is used with the tag. This attribute specifies the language of the content on the URL linked to.
It’s used within the
of the page and is formatted as follows:
It’s broken down into several parts:
- The rel=”alternate,” which suggests the page has an alternative page relevant to it.
- The href= attribute denotes which URL is being linked to.
- The language code is a two-letter designation to tell the search bots what language the linked page is written in. The two letters are taken from a standardized list known as the ISO 639-1 codes
The hreflang attribute can also be used in the HTTP header for documents that aren’t in HTML (like a PDF) or in the website’s XML sitemap.
Read more here about using the hreflang attribute correctly.
8. Canonical Attribute
The rel=”canonical” attribute of the link tag enables SEO professionals to specify which other page on a website or another domain should be counted as the canonical.
A page being the canonical essentially means it is the main page, of which others may be copies.
For search engine purposes, this is an indication of the page a publisher wants to be considered the main one to be ranked, the copies should not be ranked.
The canonical attribute looks like this:
The code should sit in the
of the page. The web page stated after the “href=” should be the page you want the search bots to consider the canonical page.
This tag is useful in situations where two or more pages may have identical or near-identical content on them.
9. Uses Of The Canonical Attribute
The website might be set up in such a way that this is useful for users, such as a product listing page on an ecommerce site.
For instance, the main category page for a set of products, such as “shoes”, may have copy, headers, and a page title that have been written about “shoes.”
If a user were to click on a filter to show only brown, size 8 shoes, the URL might change but the copy, headers, and page title might remain the same as the “shoes” page.
This would result in two pages that are identical apart from the list of products that are shown.
In this instance, the website owner might wish to put a canonical tag on the “brown, size 8 shoes” page pointing to the “shoes” page.
This would help the search engines to understand that the “brown, size 8 shoes” page does not need to be ranked, whereas the “shoes” page is the more important of the two and should be ranked.
Issues With The Canonical Attribute
It’s important to realize that the search engines only use the canonical attribute as a guide, it is not something that has to be followed.
There are many instances where the canonical attribute is ignored and another page selected as the canonical of the set.
Read more about how to use the canonical attribute correctly.
10. Src Attribute
The src= attribute is used to reference the location of the image that is being displayed on the page.
If the image is located on the same domain as the container it will appear in, a relative URL (just the end part of the URL, not the domain) can be used.
If the image is to be pulled from another website, the absolute (whole) URL needs to be used.
Although this attribute doesn’t serve any SEO purpose as such, it is needed for the image tag to work.
11. Alt Attribute
The above image tag example also contains a second attribute, the alt= attribute.
This attribute is used to specify what alternate text should be shown if the image can’t be rendered.
The alt= attribute is a required element of the tag, it has to be present, but can be left blank if no alternative text is wanted.
There is some benefit to considering the use of keywords within an image alt= attribute. Search engines cannot determine with precision what an image is of.
Great strides have been made in the major search engines’ ability to identify what is in a picture. However, that technology is far from perfect.
As such, search engines will use the text in the alt= attribute to better understand what the image is of.
Use language that helps to reinforce the image’s relevance to the topic the page is about.
This can aid the search engines in identifying the relevance of that page for search queries.
It is crucial to remember that this is not the primary reason for the alt= attribute.
This text is used by screen readers and assistive technology to enable those who use this technology to understand the contents of the image.
The alt= attribute should be considered first and foremost to make websites accessible to those using this technology. This should not be sacrificed for SEO purposes.
Read more about how to optimize images.
The More You Know About How Webpages Are Constructed, The Better
This guide is an introduction to the core HTML tag attributes you may hear about in SEO.
There are many more that go into making a functioning, crawlable, and indexable webpage, however.
The crossover between SEO and development skill sets is vast.
As an SEO professional, the more you know about how webpages are constructed, the better.
If you want to learn more about HTML and the tag attributes that are available with it, you might enjoy a resource like W3Schools.
More resources:
Featured Image: BestForBest/Shutterstock
-
SEARCHENGINES7 days ago
Daily Search Forum Recap: September 10, 2024
-
SEARCHENGINES5 days ago
Daily Search Forum Recap: September 11, 2024
-
WORDPRESS5 days ago
14 Tools for Creating and Selling Digital Products (Expert Pick)
-
WORDPRESS7 days ago
Roadmap Update – WordPress.com News
-
SEO7 days ago
Expert Embedding Techniques for SEO Success
-
SEARCHENGINES4 days ago
Daily Search Forum Recap: September 12, 2024
-
SEO7 days ago
7 Strategies to Lower Cost-Per-Lead
-
WORDPRESS6 days ago
The Secrets of One of the World’s Largest Ad-Free Blogs – WordPress.com News