WORDPRESS
Internal Linking for SEO: The Ultimate Guide of Best Practices
Are you looking for the best practices to maximize the SEO benefits of internal links?
Internal links play an important role in search engine optimization (SEO). They help search engines discover your content and rank them higher in search results.
In this article, we’ll list the best practices to use for internal linking for SEO.
How Does Internal Linking Improve SEO in WordPress?
Internal links are links between posts on your own website. Having internal links is important for your WordPress SEO. They help search engines like Google crawl your website and discover new content to index and rank.
Generally, the more links a page has pointing to it, the more likely it is to rank higher in search results. That means that you can use internal links to point to important pages on your site as a way to increase their traffic.
Internal links also help your visitors easily find related articles and provide a better user experience overall. This can also help increase pageviews and reduce your bounce rate.
That being said, let’s take a look at the best practices for improving SEO by adding internal links in WordPress. Since this is a comprehensive guide, we have included a table of contents for easier navigation.
- Make Internal Linking a Habit
- Monitor Your Internal Link Performance in WordPress
- Improve Your WordPress Site’s Internal Linking With a Plugin
- Display a List of Your Most Popular Posts in WordPress
- Create List Posts That Roundup Other Articles in WordPress
- Get Google Sitelinks for Your WordPress Site
- Preload Links in WordPress for Faster Loading Speeds
- Find and Fix Broken Links in WordPress
- Update Internal Link URLs When Moving a Site to a New Domain
- Use MediaWiki Syntax to Quickly Add Internal Links in WordPress
- Track Which Internal Links Are Clicked in WordPress
- Enable Breadcrumbs in WordPress or WooCommerce
1. Make Internal Linking a Habit
We recommend that you make a habit of linking to your older articles from your new articles.
It’s a great way to develop a contextual relationship between your new and old posts. It also allows you to pass relevant link juice to your older articles.
Because internal links play such an important role in SEO, we have even made it part of our pre-publish blog post checklist for WPBeginner writers.
You can also edit your older articles to add links to your newer content whenever you publish. Many successful bloggers dedicate time to adding internal links that point to new articles on a weekly or monthly basis.
This will help you boost your pageviews, increase the time users spend on your site, and ultimately will improve the SEO score of your individual blog posts and pages.
WordPress makes it easy to search for your old posts right inside the post editor. Simply select the text you want to link and click on the link button in the toolbar that appears.
A text pop-up will appear below your highlighted words. Then, you can start typing to search for the older articles you want to link to.

To learn more, see our beginner’s guide on how to add a link in WordPress.
2. Monitor Your Internal Link Performance in WordPress
It’s helpful to see your website’s SEO performance in terms of links by using a tool such as the Links Report in Google Search Console. This is a helpful starting point for working out how to improve internal linking on your site.
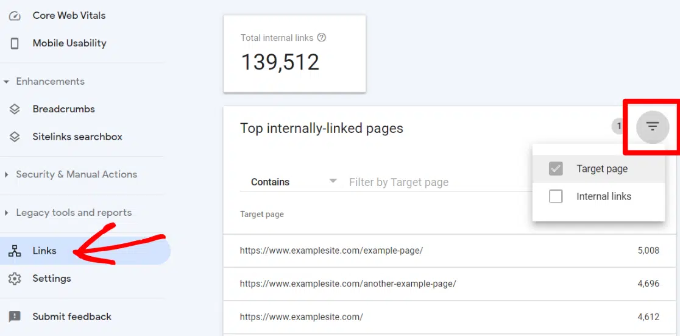
The Links Report will show you how many pages are linking to this page. You can compare it with other pages and see whether pages with more internal links are ranking higher than posts with many internal links.
If you find that posts with more links do rank higher, then you can go ahead and start adding internal links to pages that you want to rank higher. For the details, see our guide on using Google Search Console to effectively grow your website traffic.
Just make sure you are only linking to the article when it makes sense. Adding links where they don’t make sense creates a bad user experience.
Another way to monitor the impact of internal linking is to see which keywords are gaining or losing position. All in One SEO makes this extremely easy with the Search Statistics feature.
Once you connect the plugin with Google Search Console, All in One SEO will fetch your Google Search Console data and present it under All in One SEO » Search Statistics.
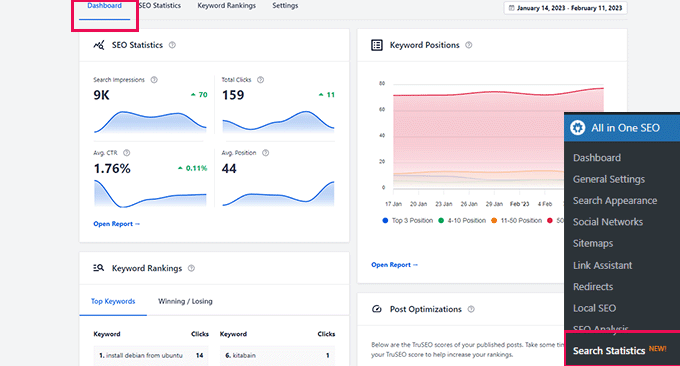
The keyword positions chart shows a graph of your site’s keyword positions.
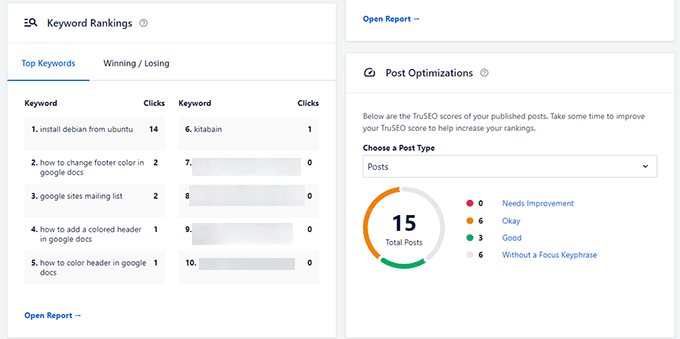
Below this, you’ll see the Keyword Rankings overview box. This shows your top 10 keywords, and if you use them for internal links they are very likely to be clicked.
3. Improve Your WordPress Site’s Internal Linking With a Plugin
If you’re not sure which posts you want to link to, then you will often find it faster to add internal links in WordPress using an internal linking plugin.
We recommend using All in One SEO. It includes a unique Link Assistant feature that lets you add links to your old and new content without having to open up the post. Plus, it provides link recommendations, detailed link reports, and much more.
To set up the plugin, see our guide on how to set up All in One SEO for WordPress correctly. After that, simply navigate to All in One SEO » Link Assistant in your WordPress dashboard.
Link Assistant will crawl every link on your website and then show a comprehensive list report.
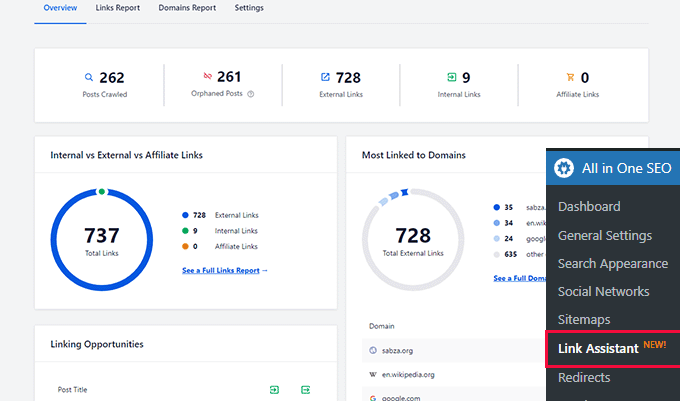
The report will show you an overview of the links with total counts for internal, external, and affiliate links. It will also show you the number of orphaned posts that have not yet been linked to from another post or page.
You can switch to the Links Report tab for detailed information on all your links. Here you’ll see a list of all your posts and pages with columns for internal, external, and affiliate links.
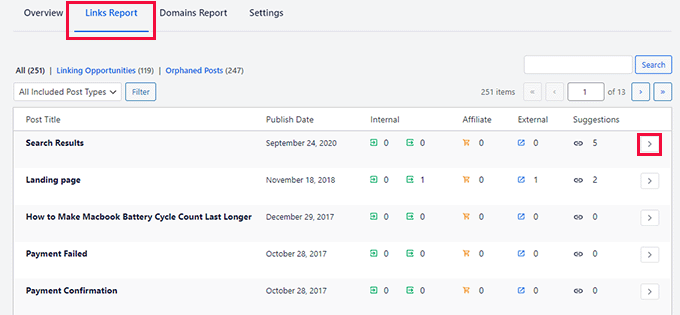
It will also show a number of suggestions where you can add links.
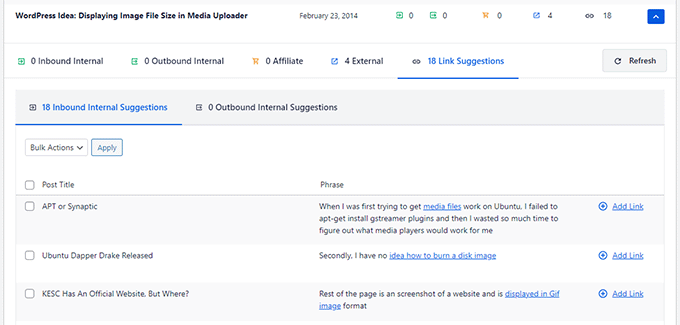
For more details, you can click on the right arrow button next to a post or page. This will show all links organized in different tabs. From the suggestions tab, you can quickly view link suggestions and add links without directly editing a post or page.
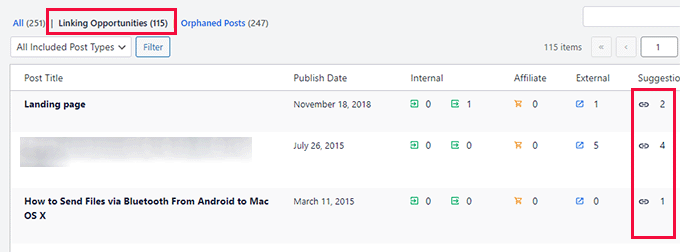
Link Assistant also helps you discover more internal linking opportunities.
You can switch to the ‘Linking Opportunities’ tab to see suggestions about how to improve the internal linking on your website, and also see the list of orphaned posts so you can add links to them.
Another plugin useful for internal linking is Semrush SEO Writing Assistant because it can help you keep track of links inside your article.
For example, it lets you know when your article has too many or too few internal links and also suggests ways you can improve your links.

This tool also comes in handy if you have other authors working on articles. Editors can quickly see if the article includes internal links to other posts on your website.
We show you how to use this plugin step-by-step to improve your SEO in our guide on how to use the SEO Writing Assistant in WordPress.
4. Display a List of Your Most Popular Posts in WordPress
You can use a WordPress popular posts plugin to point users toward the articles that other users have already found helpful. These plugins automatically create a list of internal links to your most popular content.
Popular posts are usually your most successful content, which means they are more likely to increase user engagement, conversions, and sales. They are also a good opportunity for internal linking to your other less popular articles.
For example, MonsterInsights has a feature that allows you to show your popular articles anywhere on your WordPress site. You can use also use inline popular posts to show articles inside your content.

If you want to show articles in the sidebar or at the end of your content, then you can select the Popular Post Widget. MonsterInsights even lets you display your top-performing products anywhere on your eCommerce store.
You can learn more in our guide on how to display popular posts in WordPress.
5. Create List Posts That Roundup Other Articles in WordPress
Another way to increase the number of internal links on your WordPress blog is to create roundups of your existing content. You do this by creating a new post that mentions your best articles on a certain subject to give a detailed overview of the topic.
In fact, you’re reading a post like that now.
Luckily, there are some plugins that make this job easy. For example, WP Tasty Roundups allows you to quickly repurpose your existing content into beautiful roundup posts that rank in search results.
All you need to do is type one or two keywords into the built-in search functionality, and the plugin will automatically pull images, titles, descriptions, and links from relevant posts into your roundup list.

6. Get Google Sitelinks for Your WordPress Site
Sitelinks are a feature on Google search engine results pages (SERPs) where additional sub-pages appear under a website in the search results.
These are often internal links to the most popular pages of that website.

The top 3 spots on Google get the most clicks. When sitelinks are shown for a website, it takes up the same amount of space as three regular search listings.
Having this much screen space dedicated to your site significantly increases your overall click-through rate. Simply put, more visitors will visit your website from the keyword.
While there is no guaranteed way to get Google to show sitelinks for your website, it certainly helps to create lots of internal links to your most important posts and pages.
You can learn more in our guide on how to get Google sitelinks for your WordPress site.
7. Preload Links in WordPress for Faster Loading Speeds
Link preloading is a browser technology that will load links in the background before a site visitor clicks them. This makes your website seem faster, which can improve SEO.
Because loading speed is one of the top indicators for search engine rankings and user engagement, when your internal pages are preloaded, your visitors are more likely to stay on your website longer.
They are more likely to view more pages because they’re loading instantly.
The easiest way to preload links is by using the Flying Pages plugin. It simply adds intelligent preloading to make sure preloading won’t crash your site or even slow it down.

We show you how to set up the plugin step-by-step in our guide on how to preload links in WordPress for faster loading speeds.
8. Find and Fix Broken Links in WordPress
Broken links are bad for your website’s SEO. Search engine crawlers find new content on your website by following internal links, so a broken link can stop them from indexing a new post.
They also negatively impact user experience because broken links will return a 404 error. If a visitor clicks on a link and is unable to find a page they’re looking for, then they may leave.

You can easily find and fix broken links on your WordPress website using All in One SEO.
AIOSEO offers a powerful redirection manager that helps track 404 errors on your website and lets you set up permanent 301 redirects to fix broken links.
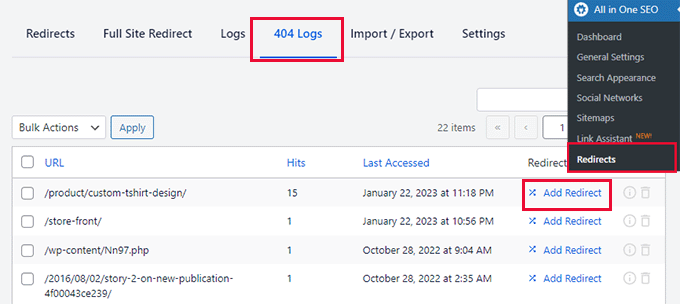
To learn more, see our detailed guide on how to find and fix broken links in WordPress.
9. Update Internal Link URLs When Moving a Site to a New Domain
If you ever move your WordPress site to a new domain name, then it is important to update all internal link URLs. Otherwise, you will have lots of broken links.
You should start by changing the WordPress address and site URL by visiting the Settings » General page from your WordPress dashboard.
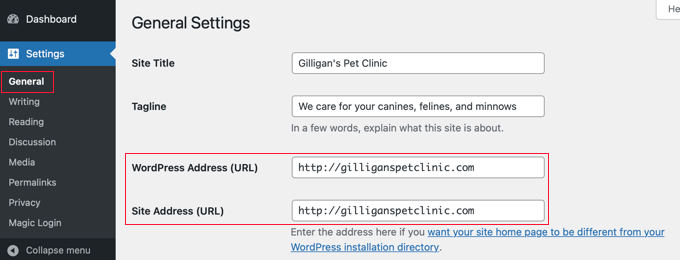
But you will also need to change the URLs of every internal link added to your posts and pages.
You’ll find the simplest way to do this in our step-by-step guide on how to easily update URLs when moving your WordPress site.
10. Use MediaWiki Syntax to Quickly Add Internal Links to WordPress
If you want to make internal linking a habit, then it helps to use the most efficient method. Since WordPress 6.0, WordPress has supported standard MediaWiki syntax to quickly add internal links when creating or editing a post.
You can now quickly add links by adding two square brackets followed by the post title. The animated gif below shows you how easy this feature is to use inside WordPress.

The link will automatically add the correct URL to the post, and use the post title as an anchor link.
If you know the title of a post (or even just part of it), then using the double square bracket method is the fastest way of creating an internal link.
11. Track Which Internal Links Are Clicked in WordPress
One of the best ways to uncover how users interact with your website is to track which internal links your visitors are clicking. Tools such as MonsterInsights can help you see which internal links your visitors are the most interested in.

You can then use these insights to improve the way you add internal links to your posts and pages.
We offer detailed instructions on tracking different types of links in our guide on how to track link clicks and button clicks in WordPress.
You might also like to see our guide on how to track user engagement in WordPress.
12. Enable Breadcrumbs in WordPress or WooCommerce
Breadcrumb navigation is a term used to describe a hierarchical navigation menu presented as a trail of links.
It’s often used as a secondary navigation that allows users to go up in the website’s hierarchy of pages.
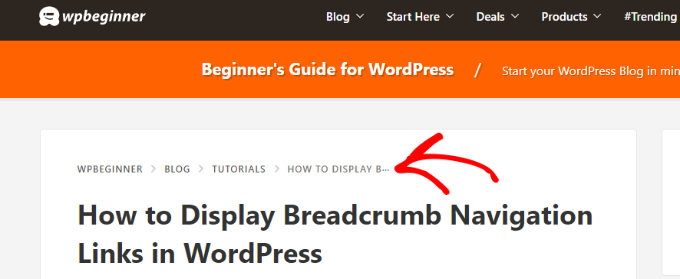
Breadcrumbs are great for internal linking because they define a clean path or trail to the page you are on.
These breadcrumbs also appear in search results giving your site an extra advantage in rankings.

We cover two ways to add breadcrumbs in our guide on how to display breadcrumb navigation links in WordPress. Most users will find Method 1 easier, using All in One SEO.
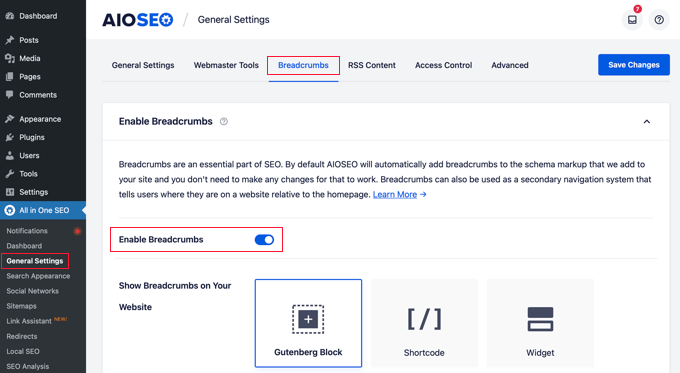
You can also use All in One SEO to enable breadcrumbs for your WooCommerce products. For details, see the fifth tip in our guide on WooCommerce SEO made easy.
We hope this tutorial helped you learn how the best internal linking practices for SEO. You may also want to see our ultimate WordPress security guide, or check out our list of tips on how to increase your blog traffic.
If you liked this article, then please subscribe to our YouTube Channel for WordPress video tutorials. You can also find us on Twitter and Facebook.
WORDPRESS
5 Must See Telegram Plugins for WooCommerce

Telegram is one of the most popular instant messaging apps for encrypted communication. You can use it for more than getting in touch with your friends though. For instance, with the right plugins, you can send store updates, deals, and order notifications to it. Here are 5 telegraph plugins for WooCommerce you shouldn’t miss:
🛠️ Divi Builder drag & drop page builder for WP
Notification for Telegram: this plugin sends Telegram messages when you receive a new order or order status changes. It lets customers add their own Telegram nickname.
WooCommerce Telegram Order Notification: another plugin that sends WooCommerce order notifications to your Telegram app. Notifications will include order number, status, customer name, and other info.

WP Telegram: this plugin integrates your WordPress site with Telegram. It can send posts automatically to Telegram when published or updated. It supports multiple channels and chats. It supports WooCommerce products and other custom post types.
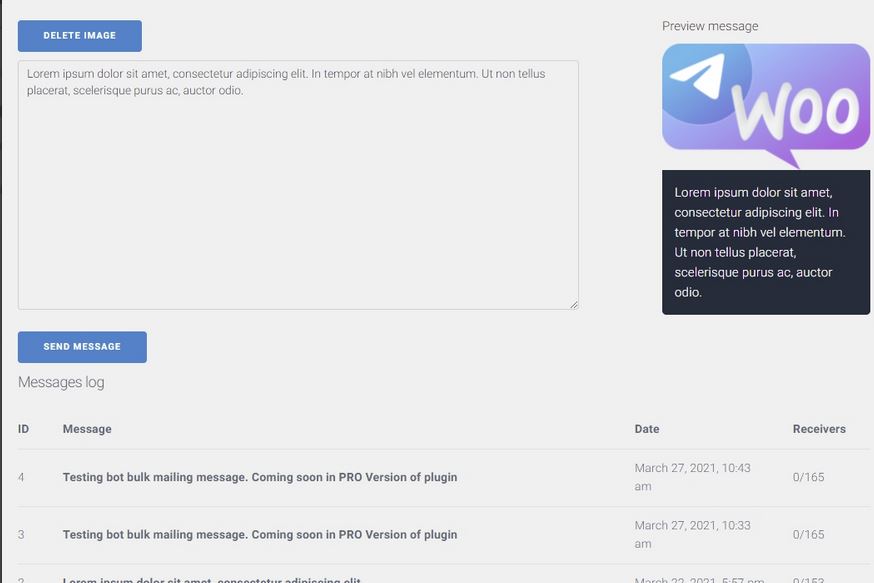
Bot for Telegram: this plugin helps you sell products via Telegram. You simply have to create a bot and add it in the setting page. It supports simple, grouped, affiliate, and variable products.
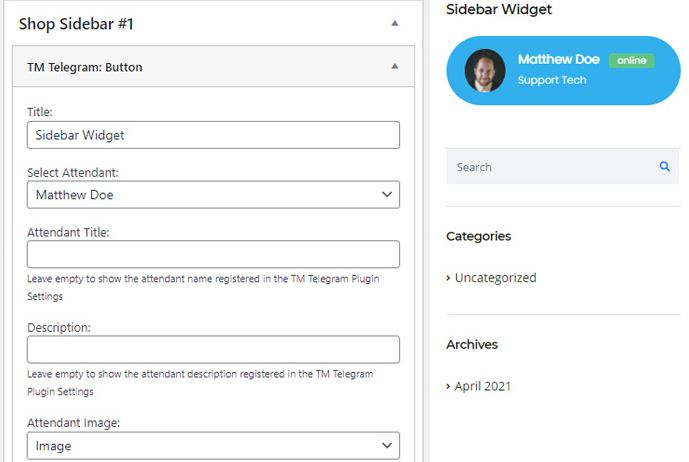
Master Telegram Chat Initiator: a handy plugin that shows a Telegram button on your WooCommerce site. It supports Elementor and WPBakery Pagebuilder. It allows for multiple agents. It has a widget that lets you show the button anywhere.
Have you found better plugins for Telegram? Please share them here.
Keep reading the article at WP Solver. The article was originally written by WordPress Jedi on 2024-01-02 10:39:43.
The article was hand-picked and curated for you by the Editorial Team of WP Archives.
WORDPRESS
The 9 Best eCommerce Hosting Providers in 2024

Are you ready to embark on a new adventure by launching an e-commerce store that will allow you to rake in some serious cash? Fortunately, you have a wide range of hosting options that will suit your new endeavor, depending on which features matter to you most and which ones fit your budget. We make it easier for you to decide with these nine best eCommerce hosting solutions.
Whether you want free SSL certificates for your online stores or are looking for budget-friendly options, we have you covered.
Start taking advantage of these hosting providers for your eCommerce sites today.
TL;DR: What are the Best eCommerce Hosting Services?
Depending on what you want from an ecommerce site, you may choose to go with one of these two services:
Bluehost: Bluehost features very inexpensive hosting that is suitable for beginners who are looking to launch their first ecommerce sites. If you want the flexibility of a WordPress site with WooCommerce and other plugins, then this is the best ecommerce hosting for you.
Shopify: If you’re a little more low-tech, the easy interface of Shopify is ideal. It is uniquely designed to be an ecommerce platform only, allowing you to sell physical and digital goods with just a few clicks. It’s a bit more expensive but might be worth it to build a robust ecommerce site that functions hands-off for you.
9 Best eCommerce Hosting Providers for Reliable Websites
When it comes to finding the best e-commerce hosting provider, there are no one-size-fits-all solutions that will work for every online store. Instead, there are various services, depending on your priorities, budget, and ease of use. Here are the top nine solutions that you might consider for a reliable website.
1. Bluehost: Best for Beginners

The first and perhaps easiest ecommerce hosting solution is Bluehost. It’s ideal for beginners and users who need an inexpensive plan for their wallets, but it will require a little bit of technical know-how. Once you sign up for their hosting, you will have a one-click install for WordPress.
From here, you can utilize the WooCommerce WordPress plugin to facilitate your ecommerce website (which is a free tool that allows you to set up shop). You can put unlimited items in your storefront, limited only by your creativity and market research.
Of course, you can also utilize the endless number of plugins available via the WordPress platform. You can get people signed up for your email newsletter, monitor your traffic, and even focus on your search engine optimization with Yoast SEO. If you can dream it, you can do it with WordPress hosting on this platform.
This is why I personally love Bluehost and use it for all of my niche sites. It’s affordable, reliable, and gets the job done.
The only real drawback of Bluehost is its storage limits. Their cheapest plan has 10 GB SSD storage and their most expensive plan will come with 100 GB SSD storage.
Pricing: Starting at $2.95 per month for Basic
2. Shopify: Best E-Commerce Hosting with Website Builder


Maybe you need something a bit more robust than Bluehost, something that can help you create an ecommerce store. Shopify is the solution you have been searching for because it acts as both your hosting provider and a website builder.
Even low-tech people with minimal coding knowledge get websites up and running quickly on Shopify. They have thousands of templates and apps you can use to customize the appearance and functionality of your storefront with their website builder. It’s a drag-and-drop editor with What You See Is What You Get (WYSIWYG), which makes it easy for a novice coder to start right away.
They have affordable transaction rates, allowing you to implement their payment gateways as quickly as possible. Plus, you get shipping discounts, inventory management tools, and 24/7 chat support.
For more information on this ecommerce platform, see our full Shopify review here.
I have built several Shopify stores and found it to be quite intuitive. I’ve been happy with the selection of themes, the ease of use, and even the pricing. It’s a little expensive compared to Bluehost, but it’s worth it to get an ecommerce business off the ground quickly.
Pricing: $29 per month and up
3. Siteground: Best for a WordPress Website


If you know that your new online store is going to be a WordPress site, then Siteground should be your first stop. Like Bluehost, Siteground features some of the best e-commerce hosting services with a quick and simple WordPress installation. You can get running quickly with plugins already installed to maintain a brand-new store.
The best part of setting up an e-commerce store with Siteground is that you can sell digital and physical goods, so your store won’t be limited as you scale and expand your offerings.
It’s also worth noting that Siteground has some of the fastest loading speeds for web hosting. Compare it to some of the others in our detailed showdown.
They tend to offer great introductory rates for the first year, but it’s worth noting that these prices are much higher if you choose to renew for the second or third year. For a comprehensive look at how this hosting provider stacks up, see our full Siteground review here.
Pricing: Starting at $2.99 per month
4. A2 Hosting: Most Affordable for Advanced Features


If you’re looking for the best eCommerce hosting at an affordable rate, then A2 Hosting might be the fit for you. It has more advanced features than Bluehost or Siteground, but it still offers a competitive price for a robust online store. What can you expect from A2 that would make you sign up now?
Take a look at the benefits of building your eCommerce website on A2:
- Fast loading times
- Free SSL certificate
- Automatic backups
- Server resources on three continents
- Good uptime.
Not only do you get premium web hosting, but you won’t pay an exorbitant fee for their services. If your budget is more in line with Siteground than Shopify, you’ll be pleasantly surprised. Advanced features don’t necessarily come with a high price tag.
Pricing: Starting at $2.99 per month
5. Hostgator: Best on a Budget


If you’re looking to build eCommerce websites on a budget, then Hostgator might be your ideal web hosting provider. Unlike Shopify, which can be a premium tool, you can take advantage of the eCommerce features on Hostgator for a third of the price.
With Hostgator’s e-commerce web hosts, you get robust features like 40 GB storage, gift card, and wishlist functionality, a free SSL certificate, a free domain for the first year, and even access to powerful tools like Yoast SEO.
Plus, you never have to worry about losing your website. They have automatic daily backups for the first year. If security features and uptime are important to you, then Hostgator has a lot to offer. But, if you want less expensive web hosting, you can also use this platform for WordPress hosting with a plugin like WooCommerce.
Compare Bluehost vs Hostgator here to see which one is the better fit for your web hosting.
Pricing: $9.95 per month for an online store
6. Liquid Web: Best for Increased Traffic


Liquid Web is a top contender for the best e-commerce hosting provider if you’re concerned about some of the less expensive options’ lower uptime. Liquid Web hosting offers a 100 percent uptime promise, so you’ll never have to worry about clients missing out on your offering.
Online stores can really benefit from this hosting provider if they’re in a hurry to start selling. Like some of the other e-commerce hosting services included here, it offers a one-click install for WordPress so that you can begin installing plugins and setting up your storefront.
They also have sixteen compliant data centers around the globe with on-site technicians.
Apart from their robust e-commerce features, they have excellent customer support. Chats are answered within the first minute in case you have any questions about your new e-commerce site.
Pricing: Managed WordPress starting at $17.50 per month
7. InMotion Hosting: Best for Quick Setup
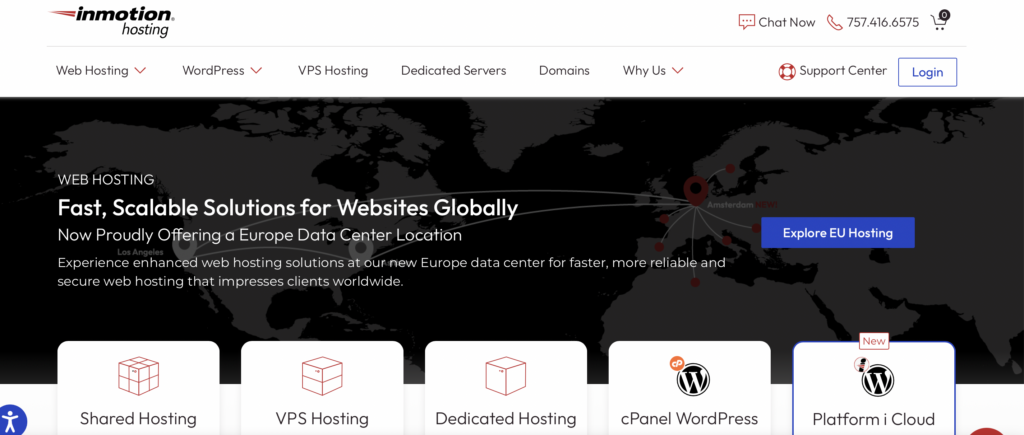

Sometimes, the most important aspect of starting online stores is simply to get off the ground. If setup speed is one of your primary concerns with your new web hosting, then InMotion Hosting may be the perfect solution for you. They use a one-click install with Softaculous, which makes setup a breeze.
Like many of the other ecommerce hosting providers, InMotion still offers a free SSL certificate for your online store, can integrate with WooCommerce and Magento, and includes cPanel for your WordPress management.
Plus, you won’t have to worry about getting in touch with customer support. Their team is available around the clock, 365 days per year. Reach out via phone, live chat, or email to get questions answered and issues resolved ASAP.
Pricing: Shared WordPress hosting starting at $3.99 per month
8. IONOS: Best Premium Hosting Provider

Getting an online store started is hard enough. IONOS aims to make it easy, acting as a premium hosting provider. Their speed is unparalleled, with fast performance and even security features like DDoS protection and automatic backups for your online store.
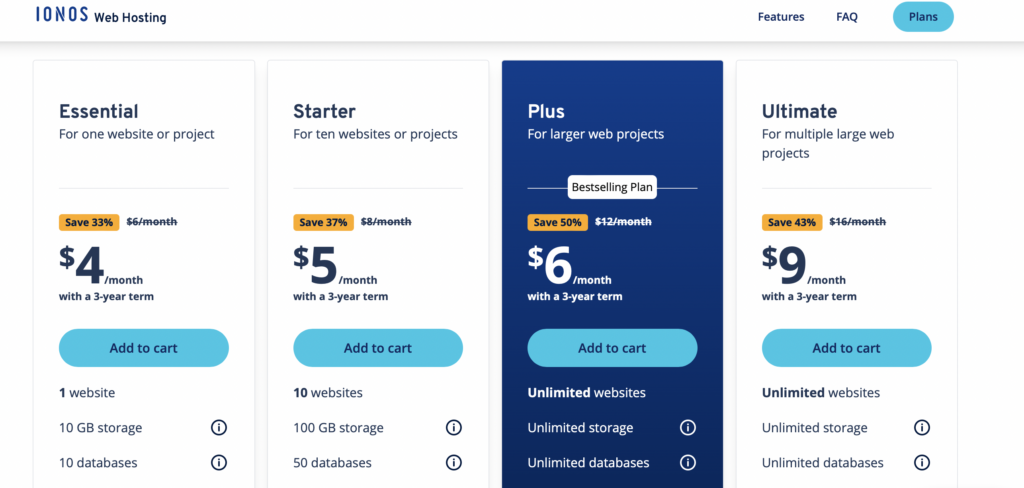
The downside to using this eCommerce hosting solution is that their most inexpensive plan is a bit more restrictive. On their Essential plan, you get only 10 GB of storage and 10 databases.
However, there are some perks to this eCommerce hosting provider as well: you get a free domain for the first year, professional email access, and daily backups. Like InMotion, they offer free 24/7 support to ensure your business has everything it needs to function at the highest level.
IONOS is a great option if you are willing to pay a little extra for your e-commerce hosting provider. It isn’t expensive enough to set you back, but it is more than Bluehost. Plus, you’ll be locked into a three-year term for your online store.
Pricing: Starts at $4 per month
9. Dreamhost: Best for Fast Loading Times


Last but not least, Dreamhost is one of the best ecommerce hosting providers because it features some of the fastest loading times on the market. Some of the other benefits their ecommerce website will include:
- Free domain
- Unlimited traffic
- One-click WordPress installer and free migrations
- Free SSL certificate
- Inexpensive email add-on.
When your online store requires better uptime, Dreamhost is also worth considering. Competitive with Liquid Web, Dreamhost features an uptime promise of upwards of 99.99 percent, which makes it extremely competitive for your e-commerce store.
If you aren’t sure whether Dreamhost is the right fit for your eCommerce business, you have nothing to lose. They feature a 97-day money-back guarantee to ensure that their service is the right fit for you.
Compare Siteground vs Dreamhost here for a head-to-head comparison.
Pricing: Starting at $2.59 per month
Final Thoughts on The Best ECommerce Hosting Options
Finding the best ecommerce hosting provider can feel overwhelming when all you want to do is launch a new online store. The good news is that there are tons of options out there so that you can find an ideal solution for your storefront.
No matter what you want to sell, how you want to host it, and what you can afford, one of these providers will work for your ecommerce website.
Which one is right for you?
Consider which benefits you need in an online store, and you’ll find a hosting provider that works for you!
WORDPRESS
Best WordPress Plugins of All Time: Updated List for 2024
Best WordPress Plugins of All Time: Updated List for 2024
WordPress continues to reign supreme as the platform of choice for millions of users worldwide in the ever-evolving landscape of website development. One key factor contributing to its popularity is the vast ecosystem of plugins, which empower users to customize and enhance their websites easily.
As we venture into 2024, the demand for innovative WordPress plugins remains stronger than ever. From SEO optimization to performance enhancement, security fortification, e-commerce solutions, and beyond, WordPress plugins offer diverse tools to meet the evolving needs of website owners and developers alike.
In this comprehensive guide, we’ll explore the top WordPress plugins for 2024, highlighting their key features and benefits and how they can elevate your website’s functionality and performance. Whether you’re a seasoned WordPress user or just getting started, these essential plugins will streamline your workflow, boost your site’s visibility, and delight visitors.
Without further ado, let’s dive into the world of WordPress plugins and discover the must-have tools for the year ahead.
Best WordPress Plugins of All Time
Top WordPress Plugins: Updated List for 2024
Key Takeaways
- Stay updated with the latest WordPress plugin trends to remain competitive in 2024.
- Invest in plugins offering comprehensive security, performance, and SEO functionality.
- Select plugins that prioritize the user experience and site management ease.
- Keep an eye on new plugin releases that could revolutionize how we interact with WordPress.
- Ensure compatibility and support when choosing plugins to protect your website investment.
- Embrace plugins that help unlock the full potential of WordPress as a digital platform.
In full transparency – some of the links on Webqo Blog are affiliate links, and if you use them to make a purchase, we will earn a commission at no additional cost to you.
Essential SEO WordPress Plugins
Effective SEO WordPress plugins are key to getting ahead in search engine results. These tools help make your site easier to find by improving its SEO. This means better site visibility and more visitors.
All-in-One SEO
A Comprehensive SEO Solution

All-in-One SEO (AIOSEO) is a top choice for managing SEO. It comes packed with features to handle all your SEO needs with ease. You can edit your SEO titles, meta descriptions, and keywords without hassle. Plus, its sitemap feature works well with Google Search Console. This helps you keep an eye on how your site is indexed.
AIOSEO is unique with its TruSEO content analysis and custom schema generator. These tools are crucial for staying relevant in searches and attracting more clicks from search results.
Yoast SEO
A Popular Choice for Optimizing WordPress Sites
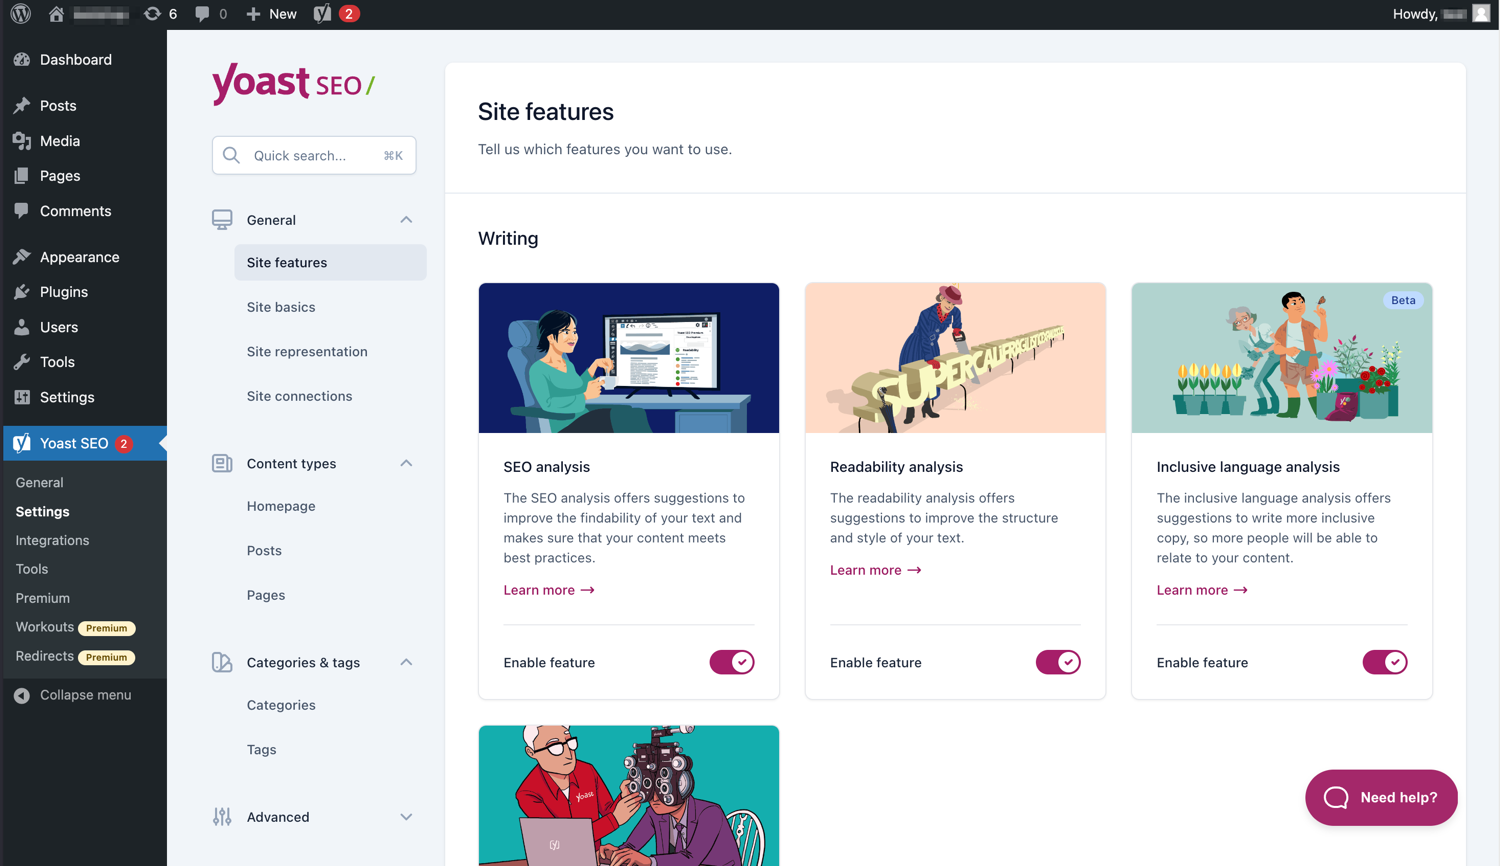

Yoast SEO is another great SEO plugin. It’s known for being easy to use. It offers a simple way to edit meta information and helpful tips for linking and schema, which can greatly improve your site’s SEO.
The free version of Yoast SEO is a good start for beginners or those on a budget. If you’re ready for more, the premium version offers extra features like social previews. This can further improve your site’s SEO.
Using these plugins can really boost your site’s performance on search engines. In today’s competitive digital world, they provide a necessary advantage. They can help your website stand out online.
Enhancing Website Performance with Caching Plugins
Website caching boosts your site’s speed and improves its user experience. Website performance caching plugins are key to faster loading times and help keep people on your site longer. In today’s digital world, using advanced WordPress caching is essential for success.
WP Super Cache
Improve Loading Speeds with Advanced Caching


WP Super Cache helps your site by creating static HTML files. Your WordPress site works faster because it’s easier on your server. This plugin is perfect for speeding up your site without spending money.
WP Rocket
An All-in-One Solution for Site Performance
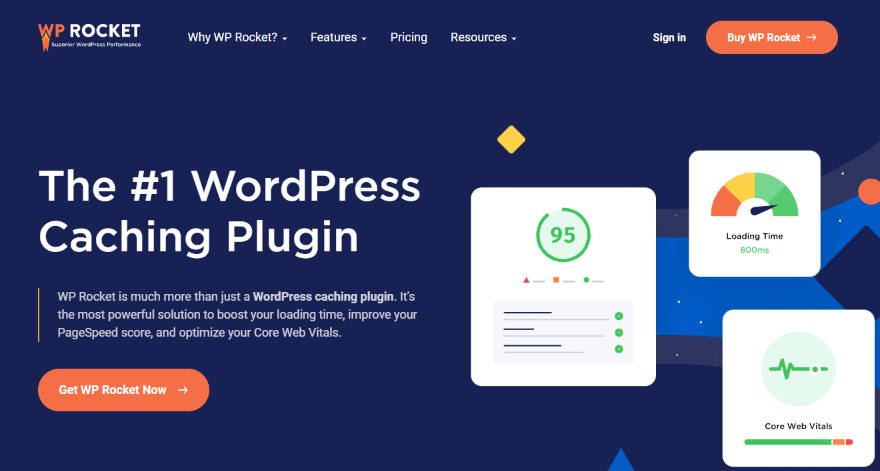

WP Rocket stands out with its comprehensive approach. It improves caching, speeds up images, optimizes databases, and more. Its easy interface lets anyone improve their site’s performance, making it a top choice for enhancement.
| Feature | WP Super Cache | WP Rocket |
|---|---|---|
| Caching Method | Static HTML file caching | Page caching, browser caching, and cache preloading |
| Optimization Tools | CDN support, cache preloading | File compression, lazy load images, database optimization |
| User-Friendliness | Basic interface suited for tech-savvy users | Simple, intuitive interface for all levels of users |
| Cost | Free | Premium (with free trial) |
Choosing between WP Super Cache and WP Rocket depends on your needs. WP Super Cache offers free options, while WP Rocket provides premium services. Both are great choices for improving your website’s performance, satisfying users, and ranking higher on search engines.
WordPress Security Essentials
Keeping your WordPress site safe from cyber threats is crucial today. Hackers are getting smarter. A secure blog protects your content and keeps your brand’s trust. Using WordPress site security solutions is essential for any site owner.
Good security steps can make or break your site. The right tools help fight off attacks, from brute force to malware. Let’s see what defenses you can use for WordPress.
- SolidWP Security Specializes in preventing unwanted intrusions and securing user credentials.
- Secupress Offers a sleek interface and powerful protection against myriad digital threats.
- WordFence Features an endpoint firewall and malware scanner engineered from the ground up to protect WordPress.
- Limit Login Attempts Reloaded Thwarts brute force attacks by restricting the number of failed login attempts.
- WPS Hide Login Enhances security by allowing the creation of custom URLs for the login page, minimizing exposure to automated attacks.
| Plugin | Core Function | User-Friendly Interface | Notable Feature |
|---|---|---|---|
| SolidWP Security | User Credential Protection | Yes | Two-Factor Authentication |
| Secupress | Digital Threat Defense | Yes | Anti-Brute Force Lockdown |
| WordFence | Firewall and Malware Scanner | Yes | Real-time IP Blocklisting |
| Limit Login Attempts Reloaded | Login Protection | Yes | Login Attempt Limiting |
| WPS Hide Login | Custom Login URL Creation | Yes | Stealth Login Page |
Remember, it’s important to layer your security. This makes it hard for hackers to get through. Using several WordPress security plugins gives you strong protection against many cyber threats.
WordPress Plugins for Creating Engaging Content
Creating engaging WordPress content is easier with the right page builder plugins. Elementor and SeedProd are top choices for design and customization. They lead page-building experience and theme customization.
Elementor
Leading the Way in Page Building


Elementor makes page building easy and fun. Its drag-and-drop interface lets you design complex layouts without coding, and its responsive editing features make WordPress design accessible and enjoyable.
SeedProd
Quickly Craft Beautiful Pages and Themes


SeedProd speeds up theme customizations and page creation. It helps users create stunning web pages quickly. Creating beautiful pages and themes becomes easy and creative with its intuitive platform.
| Feature | Elementor | SeedProd |
|---|---|---|
| Interface | Drag-and-Drop Editor | Visual Drag-and-Drop Theme Builder |
| Customization | Advanced Styling Options | Ready-to-Use Page Templates |
| Widgets/Blocks | Hundreds of Unique Widgets | Custom Blocks for Various Purposes |
| Responsiveness | Mobile Editing and Preview | Adaptive Design Features |
| Learning Curve | Minimal, User-Friendly | Very Low, Beginner-Friendly |
| Use Case | Detailed Site Builds | Quick Launches and Revisions |
Using these plugins for WordPress means more than a good-looking site. It’s about improving user experience and connecting with your audience. Elementor and SeedProd help you create content easily and effectively as digital tools evolve.
You can also check out this list of the best WordPress themes to improve your website.
Top Backup Solutions for WordPress
Every WordPress website owner needs a good backup strategy. A reliable backup plan ensures you can regain your site after hacking, server issues, or mistakenly deleting content. Using the best WordPress site backup plugins protects your data and gives you peace of mind. Let’s look at some top backup solutions trusted by the WordPress community.
BackupBuddy is a premium choice known for its ease of use and protection of multiple sites. It lets you set up scheduled and instant backups.
BlogVault is great because it saves off-site data and makes a recovery simple.
WP Time Capsule is ideal for those who prefer saving changes as they happen. It saves resources by backing up only recent changes instead of everything.
| Feature | BackupBuddy | BlogVault | WP Time Capsule |
|---|---|---|---|
| Backup Type | Full and Scheduled | Incremental | Incremental |
| Storage Options | Local and Cloud | Off-site BlogVault Servers | Choose Your Own Cloud Storage |
| Restore Capabilities | Individual File Restore | One-Click Restore | One-Click Restore |
| Price Point | Subscription-Based | Monthly/Annual Plans | Annual Subscription |
| Additional Benefits | Private Support, Customizable Backup Content | Easy Site Migrations, Performance Checks | Real-time Backup, Staging Site |
It’s key to pick the right plugin to secure WordPress data. Consider what’s most important: ease of use, reliability, and cost. Make sure the plugin you choose meets your specific requirements. Apart from these features, it’s also crucial to have ongoing support and updates. This ensures your backups stay effective as WordPress and its plugins continue to grow.
WordPress Analytics Plugins to Track Performance
Knowing your audience and your content’s impact is vital today. WordPress analytics plugins are essential for website owners who want to monitor their site’s performance. By integrating with Google Analytics, these plugins provide detailed insights and reports through MonsterInsights and ExactMetrics. They help you make smart decisions based on data.
MonsterInsights
Integrating Google Analytics into WordPress


MonsterInsights makes using Google Analytics easy. It helps you track your website’s performance without hassle. The interface turns complex data into easy-to-read reports right in your WordPress dashboard. Here’s what MonsterInsights offers:
| Feature | Description |
|---|---|
| Real-Time Stats | See what visitors are doing on your site right now. |
| Universal Tracking | Track activity across devices and campaigns for a complete view. |
| E-commerce Tracking | Learn about your customers’ buying habits to boost your ROI. |
| Custom Dimensions | Get deeper insights by tracking data like authors and post types. |
| Enhanced Link Attribution | Find out which links on your page get the most clicks and attention. |
ExactMetrics
Detailed Reporting for Informed Decisions


ExactMetrics is perfect for those who need advanced analytics. It offers detailed data to refine your strategies with its robust reporting features. Here’s what you get with ExactMetrics:
- A clear dashboard – It shows important metrics in an easy-to-understand way.
- Performance tracking – Check how load times impact the user experience.
- Demographic data – Understand who your audience is.
- Custom reports – Make reports that focus on your specific goals and KPIs.
- Affiliate link tracking – Monitor how well your affiliate links are doing to improve earnings.
Both MonsterInsights and ExactMetrics offer powerful ways to monitor your website. They integrate easily with your WordPress dashboard, keeping you informed. This helps you enhance your site’s success with every choice you make.
E-commerce Integration: Best WordPress Plugins
You need the best tools to build a strong eCommerce platform on WordPress. eCommerce WordPress plugins like WooCommerce are top choices. They offer a complete solution to integrate an online store with WordPress. With many features, WooCommerce lets business owners easily create and manage their online store. This shows how vital eCommerce site enhancement is.


However, WooCommerce is not the only option for an engaging customer shopping experience. Let’s explore the features of top WooCommerce plugins. These can boost your online store’s efficiency and appeal:
- Product Add-Ons: Allow customers to personalize products to their liking.
- WooCommerce Subscriptions: Facilitate recurring payments for subscription-based products or services.
- WooCommerce Bookings: Enable customers to book appointments, reservations, or rentals directly from your website.
- Dynamic Pricing: Set flexible pricing rules based on quantity, user role, or other criteria.
- WooCommerce Memberships: Create a membership system tied to your store, offering special discounts or exclusive products.
As your online business grows, these plugins are key. They give your customers a more dynamic, interactive, and personalized experience. Using such plugins makes operations smoother and boosts your store’s capabilities. This lets you adjust your eCommerce offerings to meet your market’s changing needs.
Every plugin plays a vital role in your online store’s success. They help your eCommerce site run smoothly, efficiently, and attractively. In today’s online market, making your customers happy is essential. These eCommerce WordPress plugins are necessary for building successful online stores. Adding these eCommerce site enhancement tools to your strategy leads to a well-managed, more engaging, and more profitable online business.
User Interaction and Forms
Making a connection with your audience is key. Adding user interaction plugins and WordPress contact forms helps a lot. This makes reaching out easier and improves everyone’s experience. It encourages more feedback and gives you useful information.
WPForms
User-Friendly Drag & Drop Contact Forms
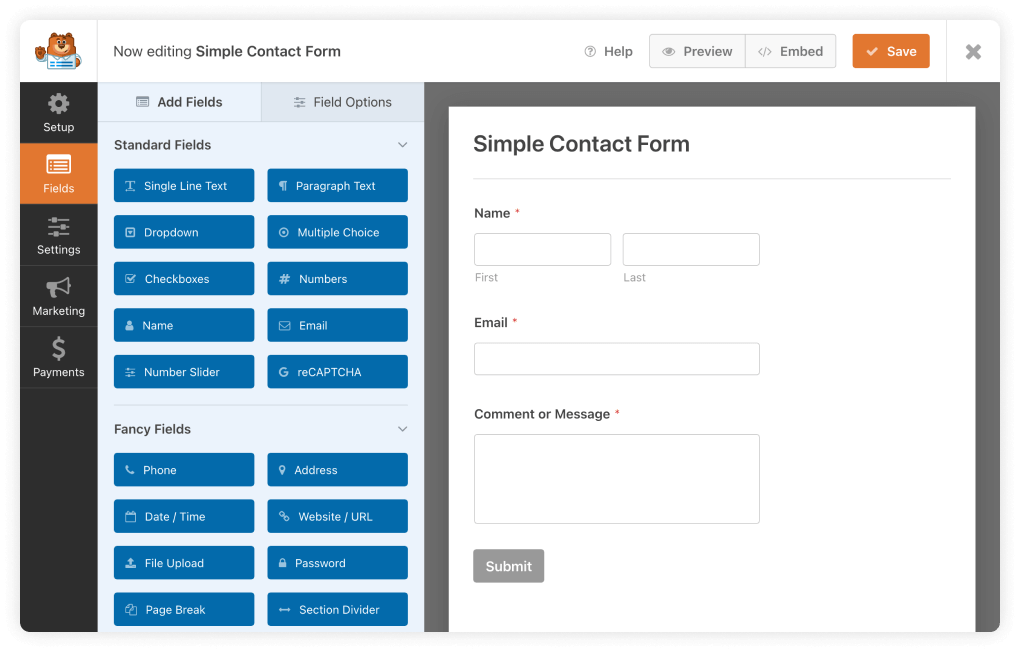

With the WPForms drag-and-drop builder, anyone can create custom contact forms. It’s easy to use, regardless of your skill level.
Gravity Forms
Advanced Forms for WordPress
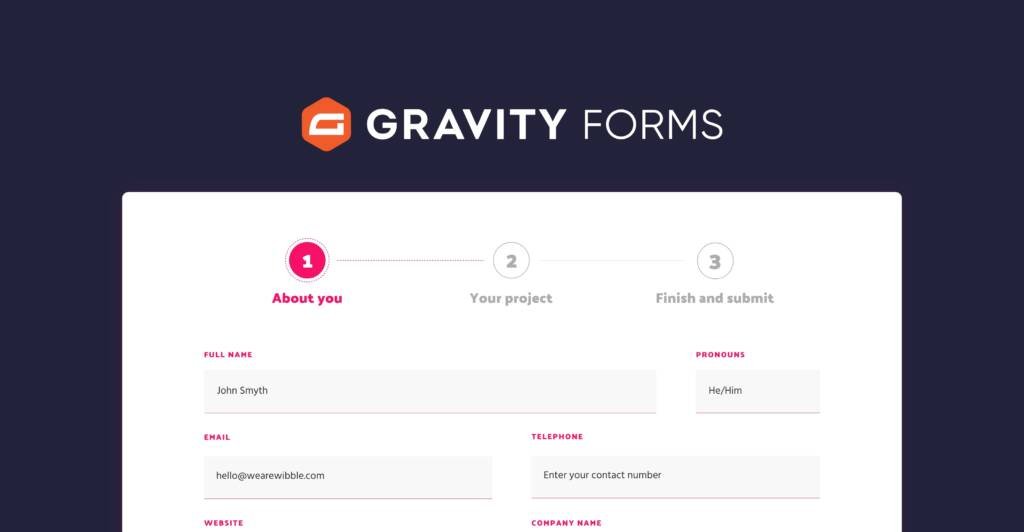

Gravity Forms’ advanced functionalities are perfect if you need something more complex. They let you customize everything, from polls to detailed order systems.
| Feature | WPForms | Gravity Forms |
|---|---|---|
| User Interface | Drag & drop, user-friendly | Developer-oriented, advanced |
| Template Availability | Extensive library of pre-built templates | Basic and advanced templates |
| Use Cases | Contact forms, newsletters, payments | Surveys, user-generated content, web applications |
| Integration | Seamless with popular services | Extended through add-ons |
| Customer Support | Documentation & priority support | Extensive knowledge base & ticket support |
Choosing between WPForms and Gravity Forms depends on your needs and expertise. Both can boost user engagement and collect important data. They push WordPress sites to be more interactive.
Email Marketing and List Building Plugins for Growth
Growing your WordPress email list is key for boosting engagement and loyalty. Effective list-building strategies help you gain a dedicated following, not just email addresses. Certain email marketing plugins are great at increasing subscription rates and improving campaigns.
OptinMonster is a top choice for email subscriber plugins. It offers easy-to-use design tools and targeted pop-ups, which increase conversion rates significantly. Plugins also help keep subscribers, capture leads, and let site owners create personalized email campaigns that speak to audiences.
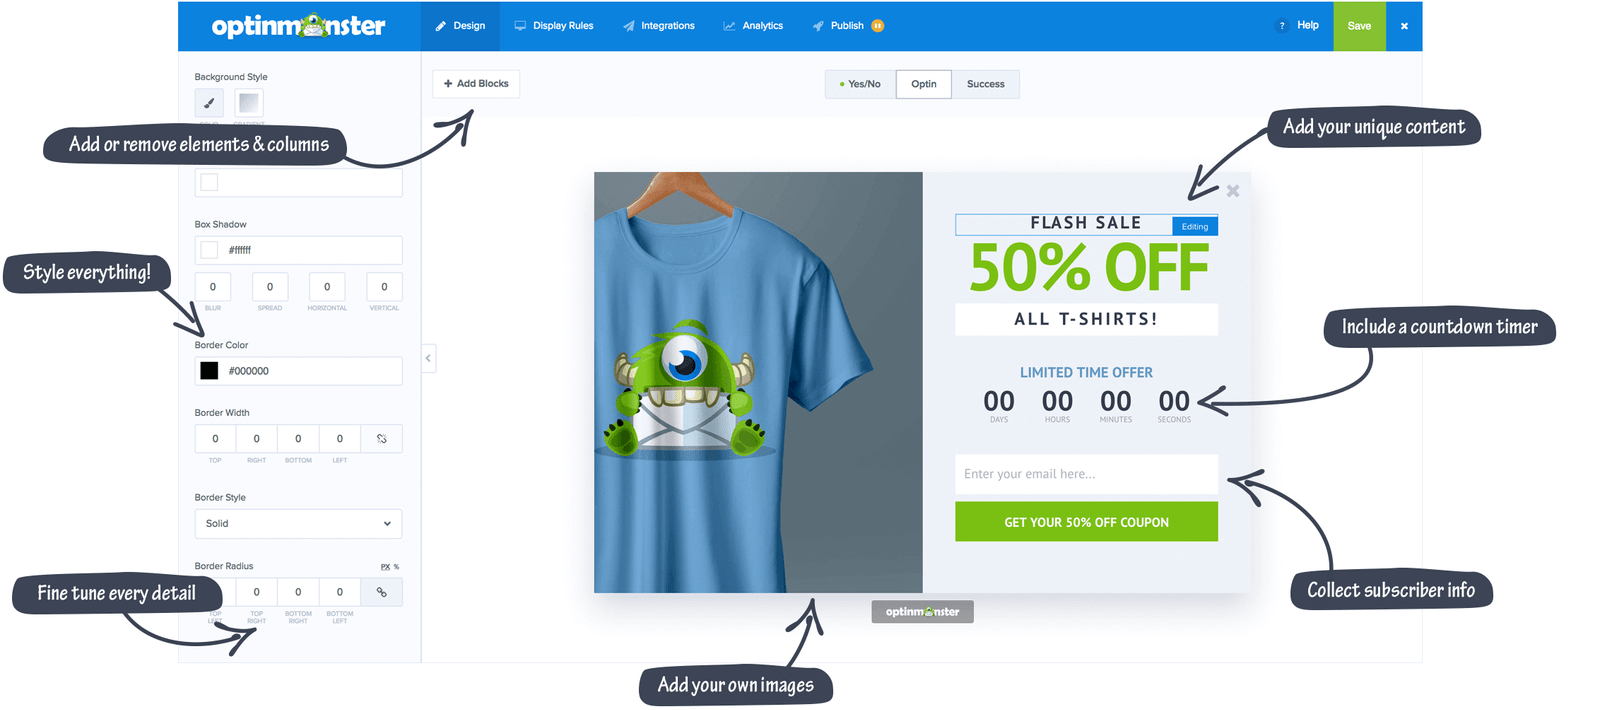

Discover plugins that add subscribers to your list and help you engage them through powerful segmentation and automated follow-ups.
Using a range of email marketing WordPress plugins is crucial. Plugins that work well with analytics and other tools help webmasters. They can offer each subscriber a personalized and data-driven journey.
- Segmentation features: For personalized experiences.
- Automated triggers: To send emails at optimal times.
- A/B Testing capabilities: To refine campaigns for better results.
- Easy opt-in form builders: To grow lists effectively.
These are key parts of strong list-building strategies. They attract and keep subscriber interest.
Growing your email list with the right plugins lays a foundation for success. As your site grows, update your strategies to keep your marketing efforts fresh and effective.
MemberPress and LMS Plugins: Building Online Communities and Courses
The need for digital learning spaces is growing. This has increased the demand for strong Learning Management Systems (LMS) that work well with WordPress. LMS plugins for WordPress are great because they let you create courses, build online communities, and make learning more engaging.
These tools are super helpful for those who create content and teach. With LMS plugins, you can create and run full online courses, which helps spread knowledge and grow communities.
LMS plugins for WordPress empower educators to reach broader audiences and transform the online learning landscape.
LearnDash
A Powerhouse for Online Course Creation
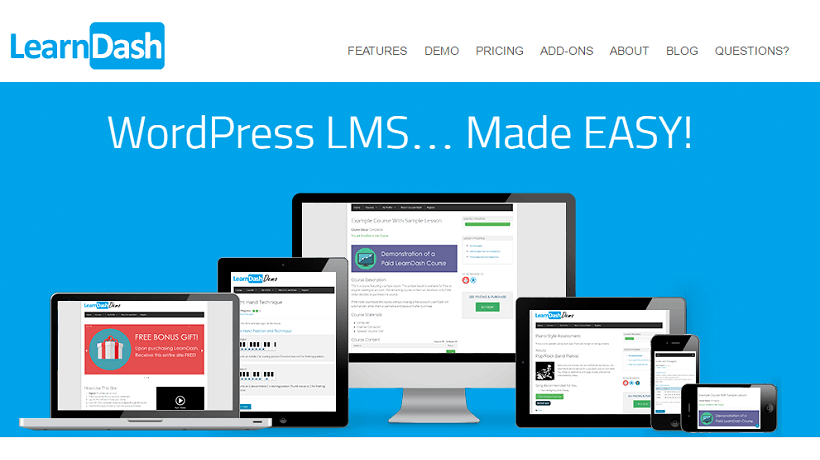

LearnDash makes creating online courses easy. It is known for its easy-to-use interface and cool features. This plugin helps you put together and deliver courses online. It includes tracking course progress, advanced quizzes, and ways to deliver courses on different levels. LearnDash is a key tool for delivering educational content online.
MemberPress
Making Membership Management Effortless
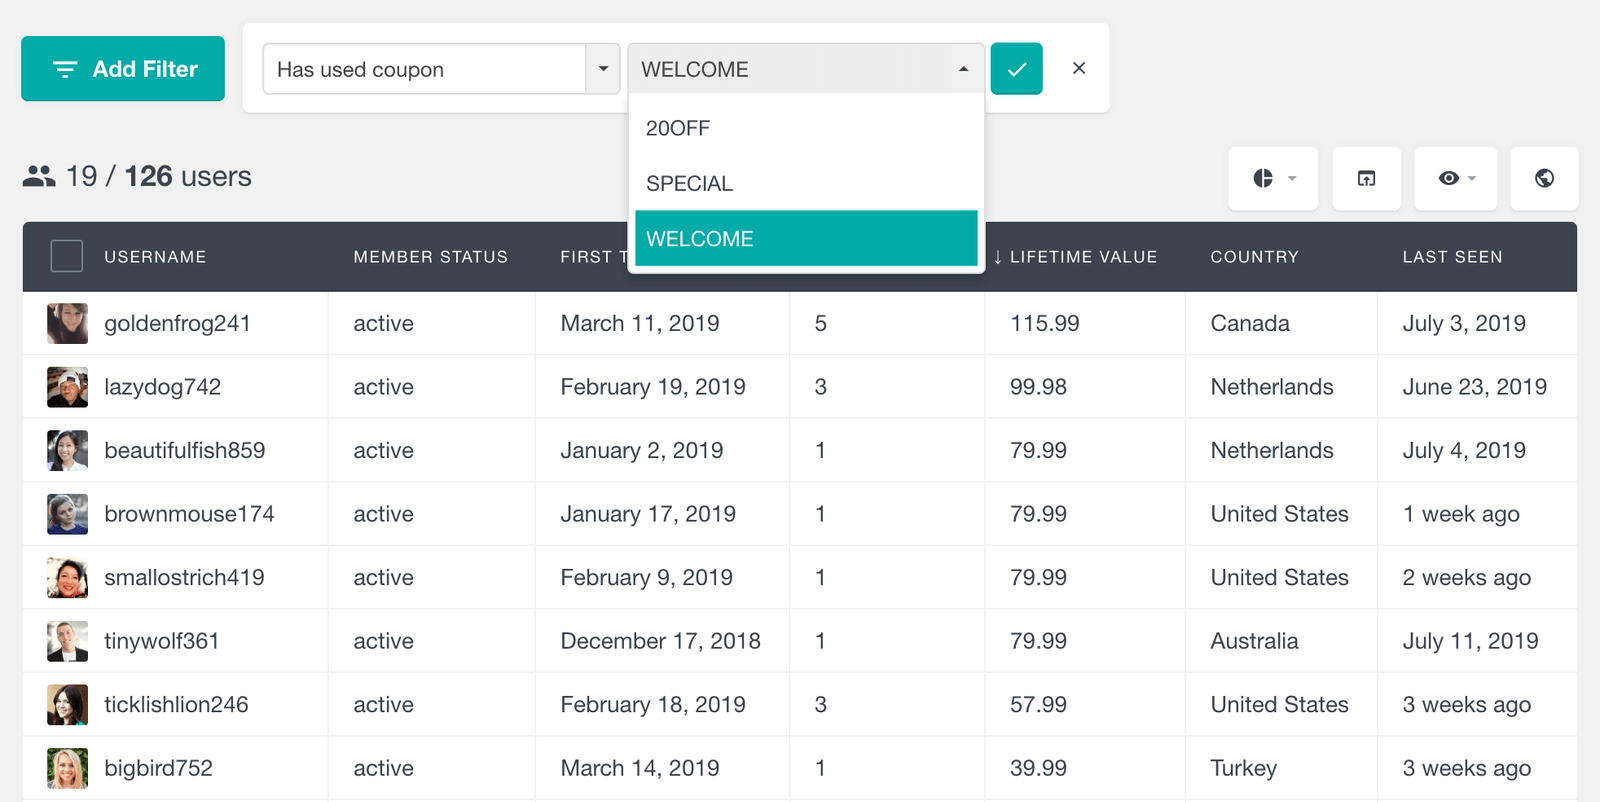

If you want to create areas for exclusive content or subscription products, MemberPress is perfect. It adds exclusivity to online communities. This plugin fits into your WordPress site and lets you create a membership site with different access levels and subscription options.
| Feature | LearnDash | MemberPress |
|---|---|---|
| Course Creation | Drag-and-drop course builder | – |
| Membership Levels | Limited support through add-ons | Unlimited levels with customizable access rules |
| Content Dripping | Scheduled content delivery | Content access based on subscription level |
| Quizzes and Assessments | Advanced quiz settings and question types | – |
| Community Building | Certificate and badge awarding system | Integration with forums and social groups |
| Subscription Management | – | Automatic billing and renewal notifications |
Using LMS plugins on your WordPress site can make it a lively place for sharing knowledge and building community. Whether managing a membership site with MemberPress or creating online courses with LearnDash, these tools make your site a center for learning and connection.
FAQs about Best WordPress Plugins
Best WordPress Plugins of All Time: Updated List for 2024
You’ll discover some frequently asked questions about the best WordPress plugins below.
What are the best WordPress plugins for 2024?
The top WordPress plugins for 2024 are designed to improve your site’s SEO and speed. They also boost security and enhance how your site works and feels. Some key plugins are All in One SEO, WP Super Cache, and WooCommerce.
Which SEO plugins are essential for WordPress sites?
Important SEO plugins for WordPress include All in One SEO and Yoast SEO. They help your site rank higher in search engine results. They do this by managing SEO titles, creating sitemaps, and analyzing your content to make it better.
How can caching plugins enhance website performance?
Caching plugins like WP Super Cache speed up your site by saving cached versions of pages. They use methods and features like file compression to make your site faster and more pleasant for visitors.
What are the top security plugins for WordPress?
For WordPress security, iThemes Security and WordFence are among the best. They protect your site from attacks, scan for risks, and manage firewalls. These steps keep your WordPress site safe from threats.
Can you recommend plugins for creating engaging content on WordPress?
Elementor and SeedProd stand out for engaging content. Elementor has many design options for building pages. SeedProd’s drag-and-drop builder lets you easily create beautiful pages and themes.
What are the best WordPress plugins for site backups?
Top backup plugins for WordPress sites include BackupBuddy and UpdraftPlus. They regularly save your data, offer easy ways to restore it, and keep your site safe from data loss or attacks.
How do social media plugins benefit WordPress websites?
Social media plugins help integrate your site with platforms like Facebook and Twitter. They make sharing content easier, increase engagement, and build a community around your brand.
Why are WordPress analytics plugins important?
Analytics plugins like MonsterInsights provide valuable insights into your website’s performance. They track visitor behavior, helping you to improve your site for better engagement and conversions.
What plugins should I use for eCommerce on WordPress?
WooCommerce is essential for running an online store on WordPress. It has features for listing products, managing inventory, and handling payments securely.
What are the best WordPress plugins for creating forms and improving user interaction?
WPForms and Gravity Forms are great for making forms on WordPress. They support everything from simple contact forms to complex surveys, boosting user interaction and data collection.
Are there effective plugins for email marketing and list building?
Email marketing is made easy with plugins like OptinMonster. They allow you to build subscription forms, launch targeted campaigns, and manage email lists effectively.
Which plugins are best for creating membership sites and online courses on WordPress?
MemberPress and LearnDash are top choices for membership sites and online courses. MemberPress helps with membership management. LearnDash is great for setting up courses, quizzes, and certifications.
Quick Links
Top WordPress Plugins: Updated List for 2024
We hope you enjoyed this post. If you did, you might want to check out these other resources:
Best WordPress Plugins Summary
As we’ve explored in this comprehensive guide, WordPress plugins are crucial in enhancing your website’s functionality, security, and performance. From SEO optimization to performance enhancement, security fortification, e-commerce solutions, and content creation, WordPress plugins offer diverse tools to meet the evolving needs of website owners and developers.
In 2024, the demand for innovative WordPress plugins continues growing as businesses and individuals seek to stay ahead in the competitive online landscape. By leveraging the top WordPress plugins highlighted in this guide, you can streamline your workflow, boost your site’s visibility, and delight visitors with an immersive browsing experience.
Whether you’re a seasoned WordPress user or just getting started, these essential plugins will enhance your website’s capabilities and help you achieve your online goals. As you embark on your journey with WordPress in 2024 and beyond, remember to stay informed about the latest tools and trends in the ever-evolving ecosystem of WordPress plugins.
Thank you for exploring the best WordPress plugins for 2024. We hope you found this guide informative and insightful, and we wish you success in creating exceptional websites powered by WordPress.
-

 SEO6 days ago
How to Use Keywords for SEO: The Complete Beginner’s Guide
-

 MARKETING7 days ago
How To Protect Your People and Brand
-

 MARKETING4 days ago
Advertising on Hulu: Ad Formats, Examples & Tips
-

 MARKETING5 days ago
Updates to data build service for better developer experiences
-

 MARKETING1 day ago
18 Events and Conferences for Black Entrepreneurs in 2024
-

 MARKETING6 days ago
The Ultimate Guide to Email Marketing
-
 WORDPRESS4 days ago
Best WordPress Plugins of All Time: Updated List for 2024
-

 WORDPRESS5 days ago
Shopify Could Be Undervalued Based On A Long-Term Horizon


