Connect with us

SEO

How To Exclude Internal Traffic In Google Analytics 4

Published

on

How To Exclude Internal Traffic In Google Analytics 4

Google Analytics 4 (GA4) is rolling out in a rush, and if you’re reading this guide, you might be having a tough time figuring out how it works.

One area that might be causing you confusion is filtering out internal traffic.

If you’re like me, you’re already missing how user-friendly Universal Analytics (UA) was – especially when it came to filtering out traffic.

In UA, you had full control over how you could filter out traffic.

See the beauty it had.

Screenshot from Google UA, May 2023

Now, I find it hard to understand why GA4 has replaced such a vital function with only an IP-based rule.

The IP-based filter is useless when your company employees are remote as, in most cases, IPs are dynamic, and it is not practical to update the list of IPs daily.

This is why we have created this guide for you to help you filter out undesired traffic – and, most importantly, internal traffic – in GA4.

What Is Internal Traffic?

“Internal traffic” refers to the web traffic that originates from you and your employees accessing your website.

Your employees’ activity can reduce the quality of your data and make it harder for you to understand what real visitors are doing on the website, and how much traffic you have.

Even though IP-based filters may not be the best way to filter our internal traffic, I would like to start with that method as the easiest path to use – and as a basis to explain how new data filters work.

How To Filter Out Traffic Based On IP

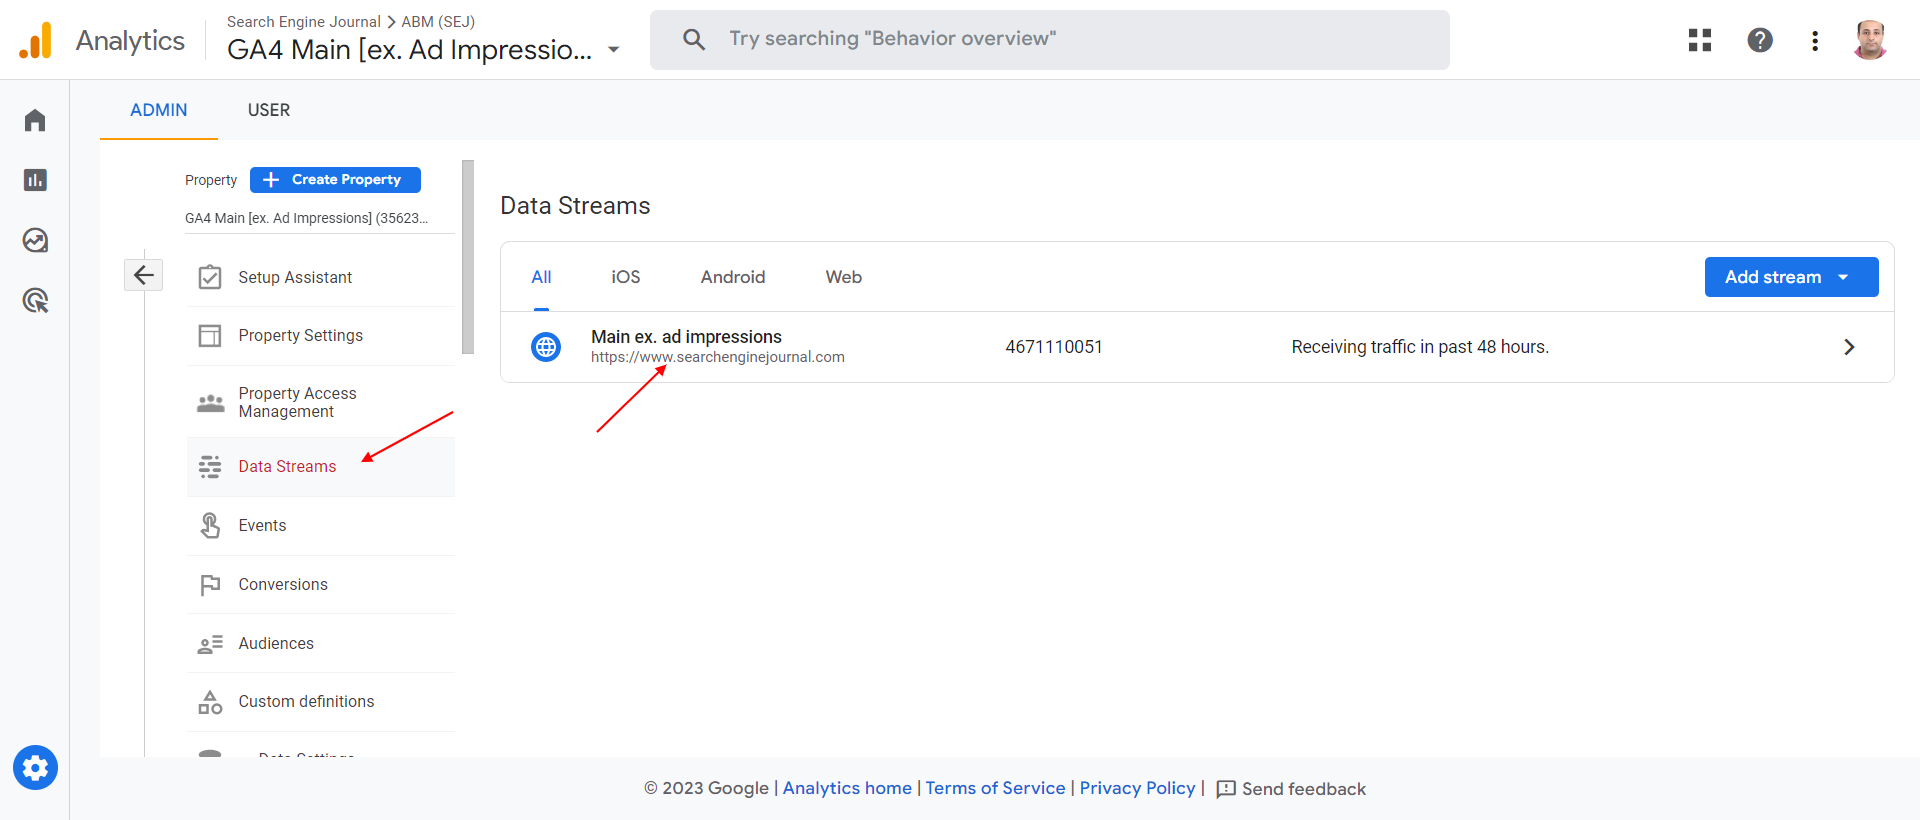
Navigate to Data Streams in GA4.

Data StreamsScreenshot from GA4, May 2023

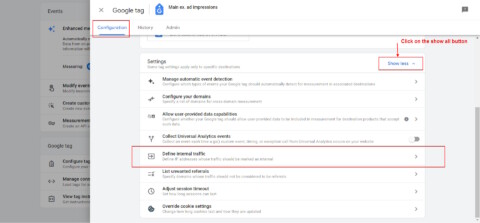
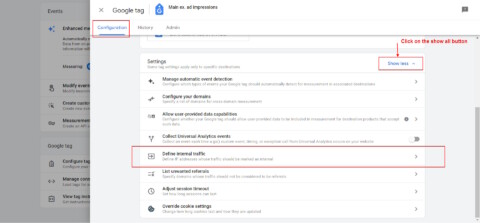
Go to Configure tag settings, click on the Show all button, and then click on Define Internal Traffic Rule.

On the popup dialog, click the Create button, and you will see a screen where you can enter the IP addresses you want to exclude.

Please note the “traffic_type=internal” parameter in the dialog.

When you create a rule, whenever it applies, it does append to the Google Analytics hits the parameter “tt=internal” which is saved in the GA4 database.

IP based filter

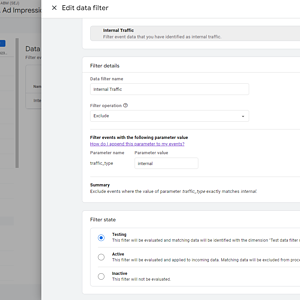
Add data filters by navigating to Data Settings then Data Filters, and clicking Create Filter button.

The basic idea is straightforward: You need to assign a value of your choice to the “traffic_type” parameter and then use data filters to remove any hits that have that same value assigned to the “traffic_type” parameter.

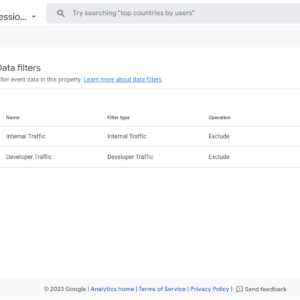
There are two options: The “Developer” filter and the “Internal Traffic” filter.

What Is The Internal Traffic Data Filter?

This filters out any traffic with the traffic_type parameter set to “internal” by default. The value of the parameter and filter name can be anything.

How Does The Internal Traffic Data Filter Work?

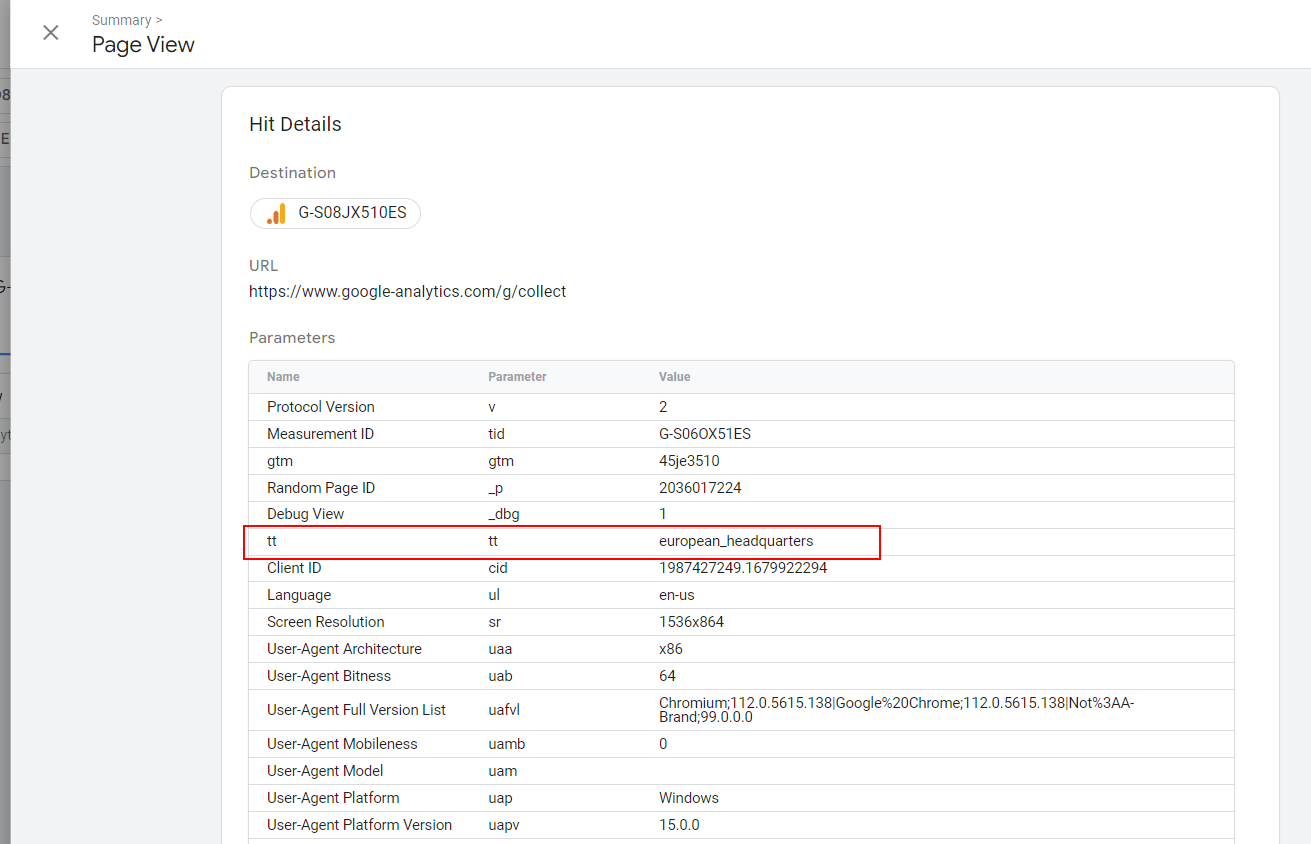
For example, you can create an IP filter rule with a parameter traffic_type=europe_headquarters and set a different IP range for your EU office.

You can create as many rules as you want with different traffic_type parameter values, and it will be sent in the hit payload (as tt a parameter) when the visitor IP matches the rule.

tt parameter in the hit payloadtt parameter in the hit payload

Then, by adding a data filter for each IP rule you’ve created, GA4 will exclude hits when traffic_type the data filter setting value matches the tt parameter of the payload  –(tt is simply an abbreviation of “traffic type”).

What Is The Developer Traffic Data Filter?

This filter excludes traffic from developers or internal traffic from a company or organization.

Similarly to the internal traffic data filter, it eliminates only data from being recorded in GA’s database, with the difference that you can still see your activity in the Debug View and its real-time reports.

That is why it is called a developer data filter.

In contrast, you can’t see events from internal traffic in Debug View when internal data filters are active.

How Does The Developer Data Filter Work?

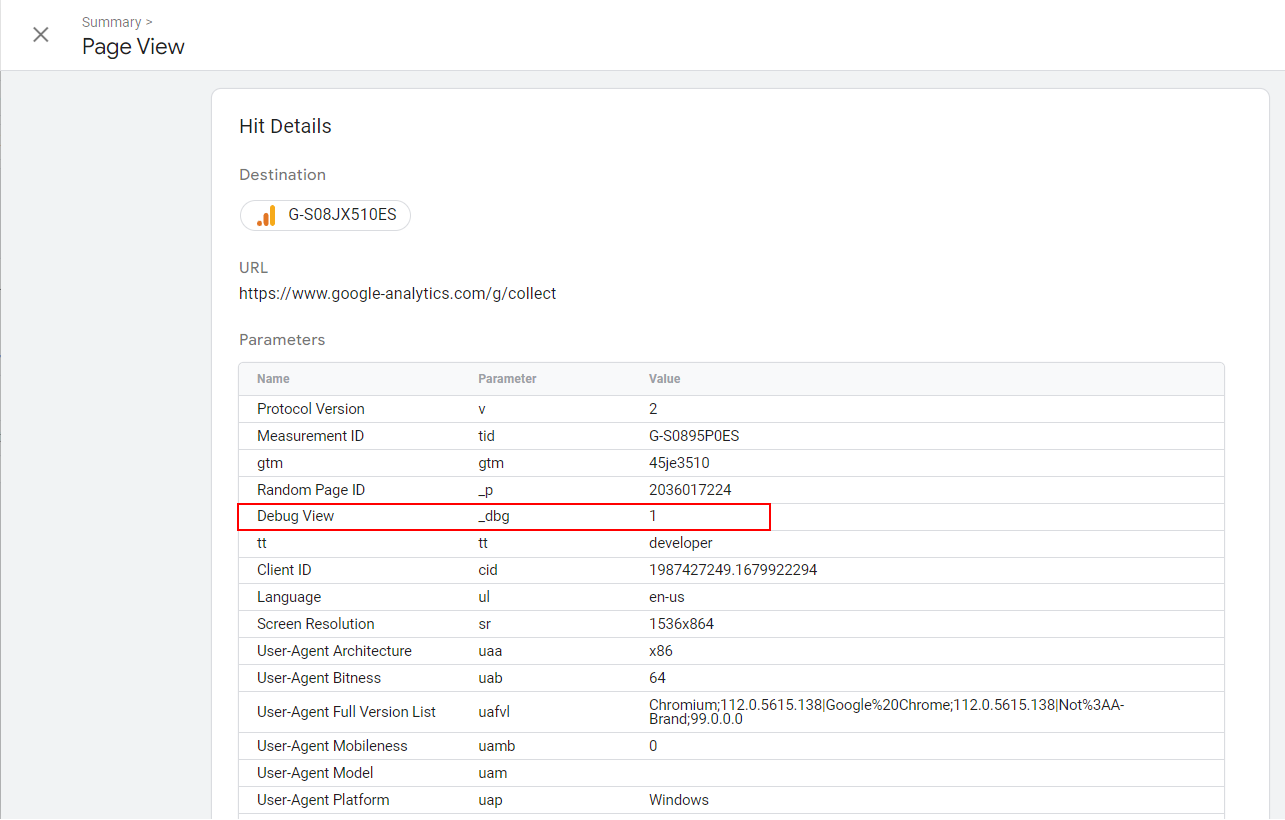
When debug mode is enabled _dbg payload parameter is included in hits.

Then, the developer data filter eliminates all hits with _dbg the parameter being recorded in the GA4 database.

Debug mode parameter is added when using the preview mode of Google Tag Manager, or when Google Analytics Debugger is used.

_dbg debug view parameter in the payload_dbg debug view parameter in the payload

Data Filter States

Data filters have three different states:

  • Testing.
  • Active.
  • Inactive.

Active and inactive states are self-explanatory, but you might be wondering what the testing state is.

In the testing mode, you can apply a filter in GA’s reports using the automatically added custom dimension “Test data filter name” equal to your data filter name.

Testing mode is a great feature that allows you to test if your filters work properly before activating them because applying a data filter permanently impacts your data.

It means the data you exclude will not be processed and won’t be accessible in Analytics.

We’ve learned how data filters work by using built-in IP filter rules.

But as I mentioned, this will not work with remote teams – and in that case, it’s better to use a cookie-based approach where you send your team a URL they can open, and their successive visits will be excluded based on the cookies.

How To Exclude Traffic In GA4 By Using Cookies

I want to be honest at the outset: Setting this up requires many steps.

You need to remember the principle.

We need to send the hits with the traffic_type parameter that we’ve set in data filters when creating them.

This means we will set a cookie on employees’ browsers and check every visit. Whenever that cookie is set, we will set the traffic_type parameter to “internal.”

Let’s say we are going to use the exclude_user query parameter.

When employees visit the URL “https://example.com/?exclude_user=1” with the query parameter “exclude_user” set to “1”, a sample cookie exclude_user will be set up.

You can send that URL to your employees to use once to open the website and set up cookies.

Please note: Keeping the names of variables the same is important for the codes below to function, and since client-side set cookies expire in seven days in Safari, your employees may need to open that URL once a week – or you can set cookies when they are logged in to your website server side.

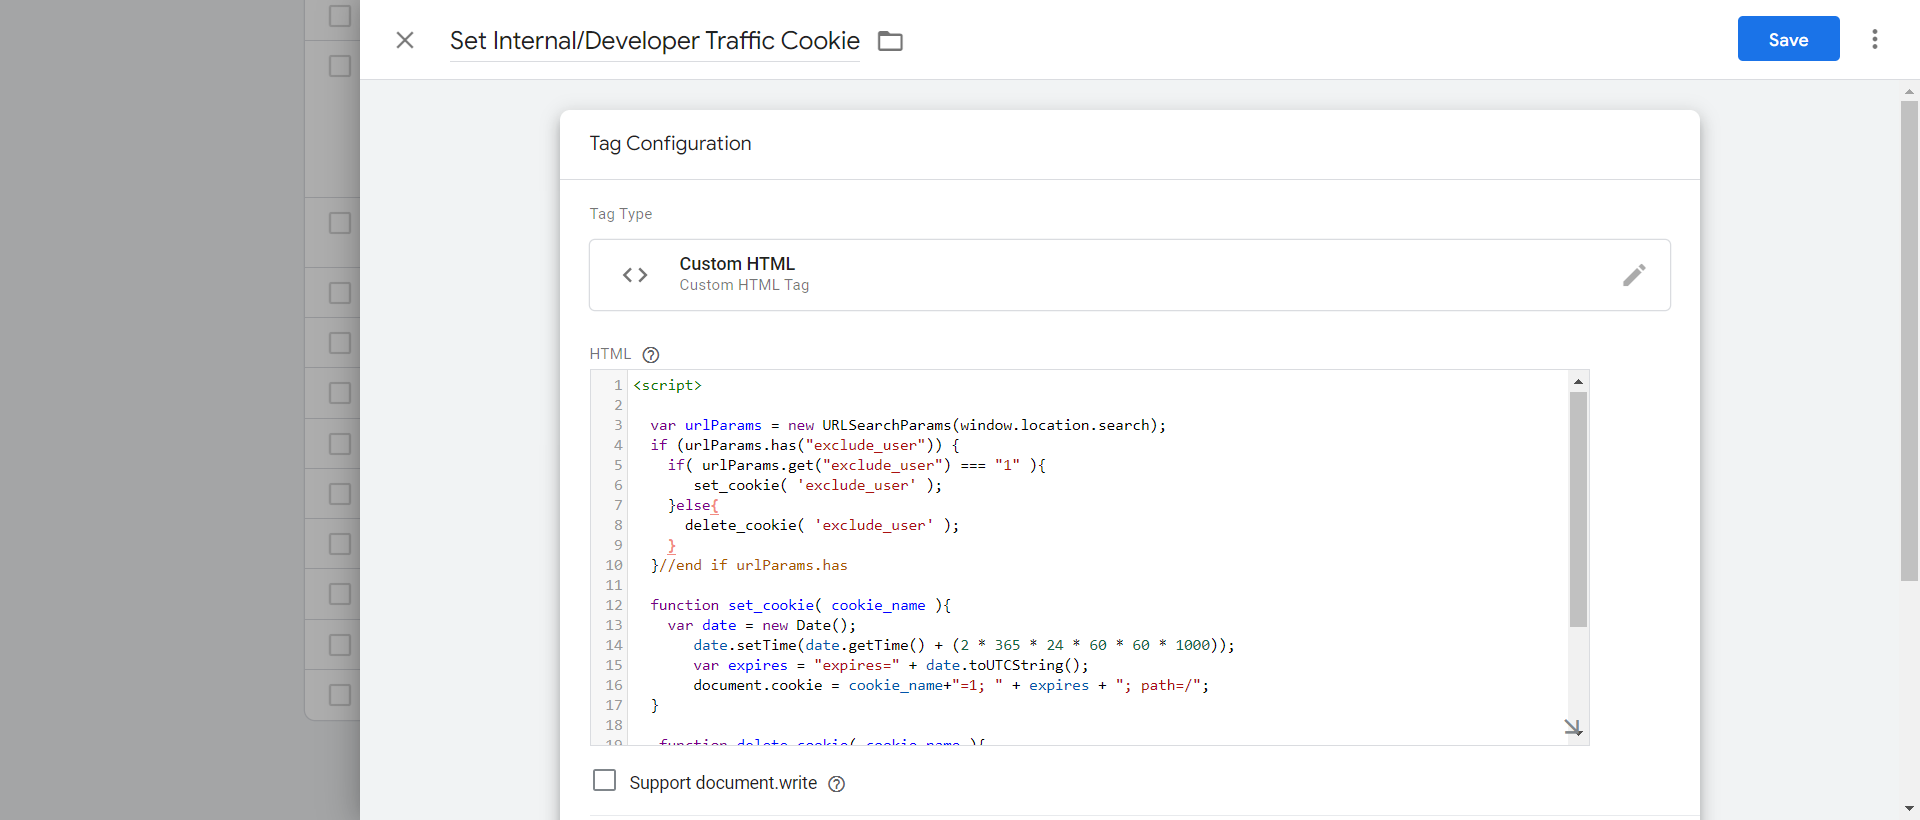
To set up a cookie when one opens the URL https://example.com/?exclude_user=1, we need to add a “custom HTML” tag in GTM with the following script and choose the firing trigger “Pageviews All Pages.”

(Hint: You can use ChatGPT for coding.)

<script>
 var urlParams = new URLSearchParams(window.location.search);
//check if exclude_user query parameter exists and set cookie
 if (urlParams.has("exclude_user")) {
   if (urlParams.get("exclude_user") === "1") {
      set_cookie('exclude_user');
   } else {
      delete_cookie('exclude_user');
  }
}

 function set_cookie(cookie_name) {
   var date = new Date();
   date.setTime(date.getTime() + (2 * 365 * 24 * 60 * 60 * 1000));
   var expires = "expires=" + date.toUTCString();
   document.cookie = cookie_name + "=1; " + expires + "; path=/";
 }

 function delete_cookie(cookie_name) {
   document.cookie = cookie_name + "=; expires=Thu, 01 Jan 1970 00:00:00 UTC; path=/;";
 }
</script>
Custom HTML tag in GTMCustom HTML tag in GTM

Add the “1st Party Cookie” type of variable with the name “Internal Cookie” and set the cookie name setting as exclude_user.

1st Party Cookie Variable1st Party Cookie Variable

It will return the value of the exclude_user cookie if it is set, or a special value undefined (not the same as the string “undefined”) if the cookie doesn’t exist.

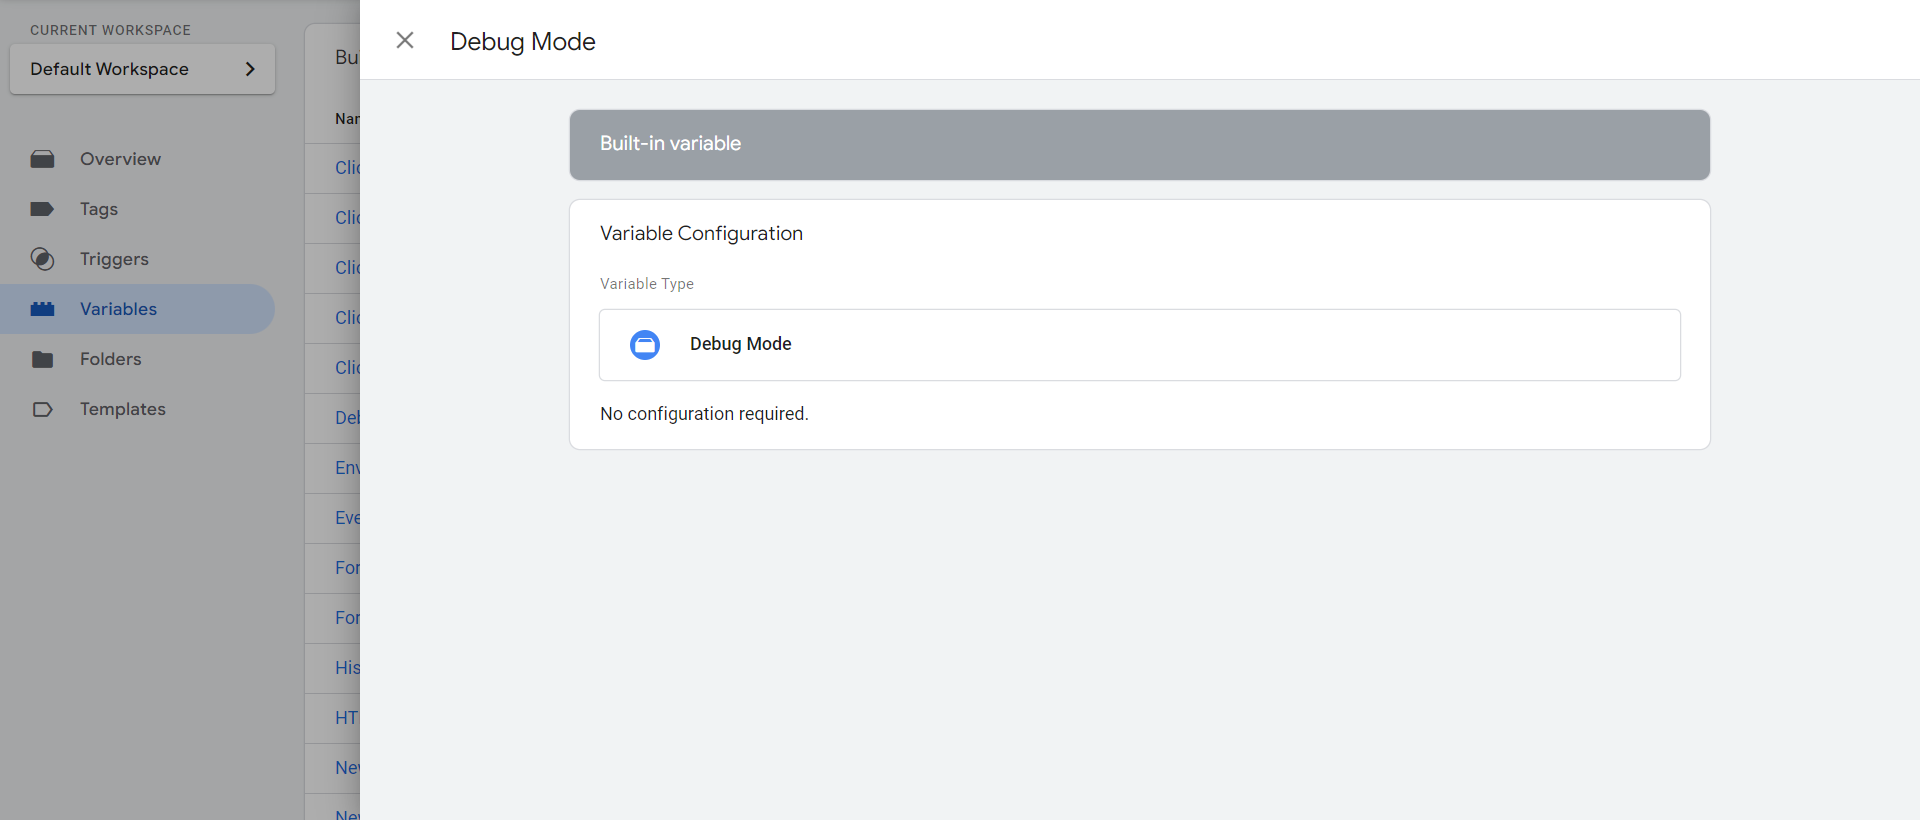
Add a built-in “Debug Mode” variable named “Debug Mode.”

Debug mode variableDebug mode variable

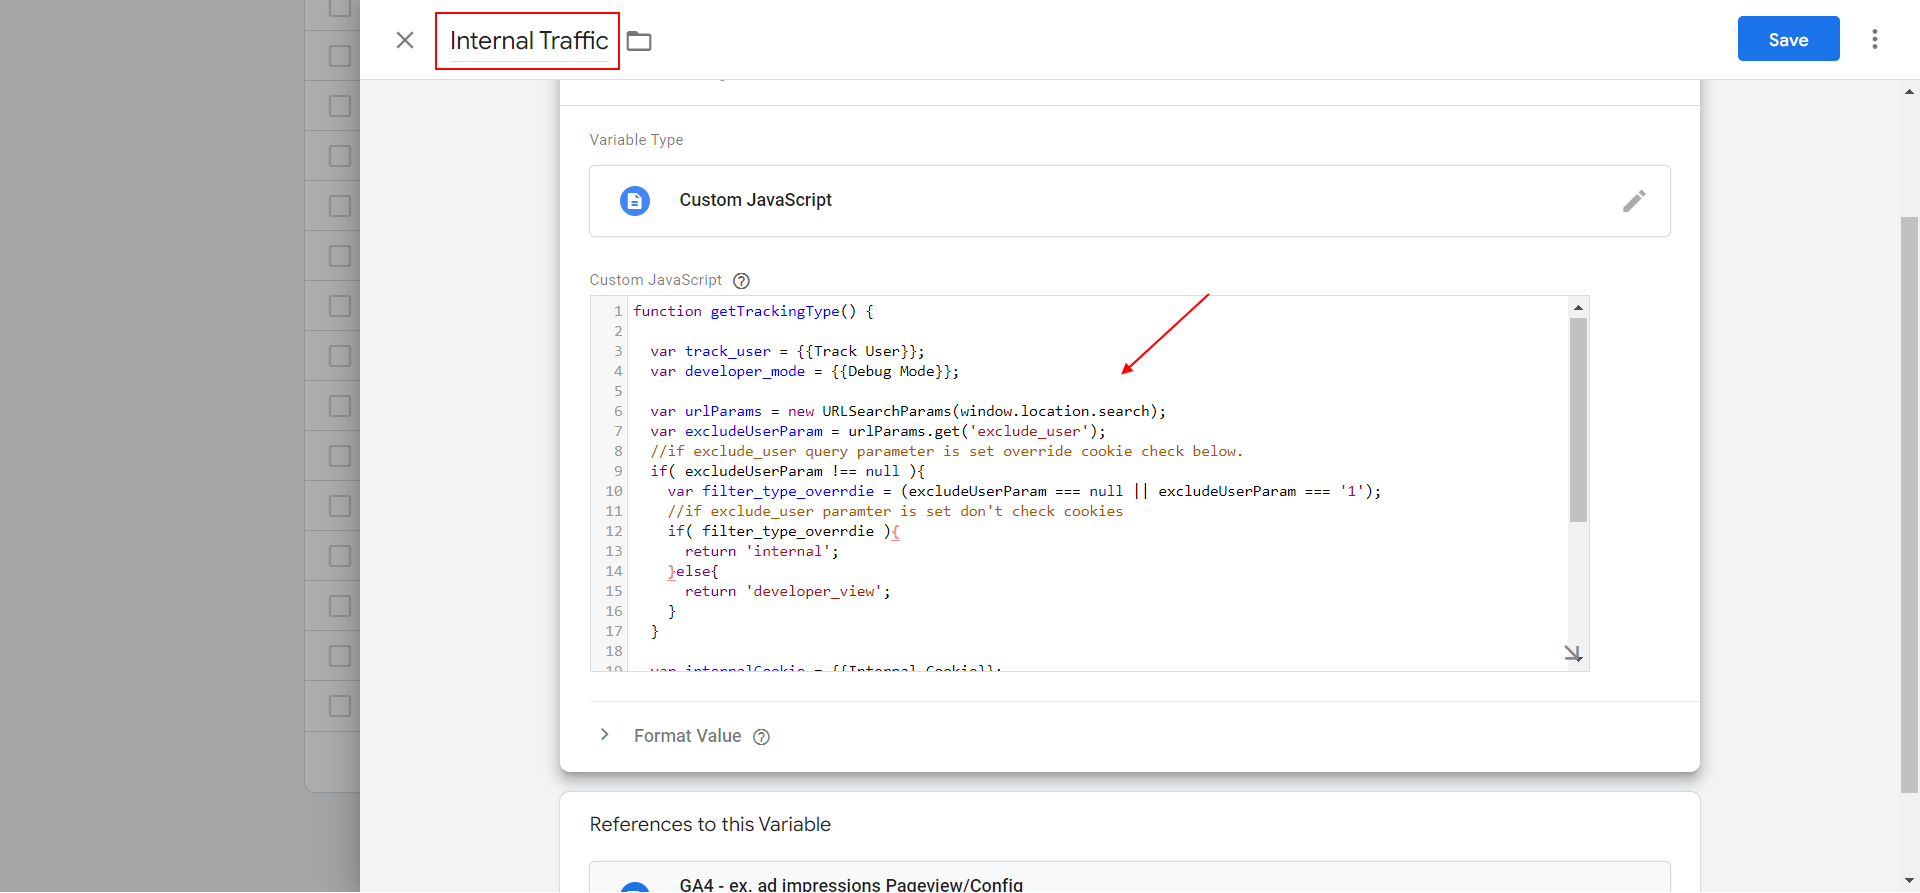
Create a JavaScript type of variable named “Internal Traffic,” copy and paste the code below into it, and save.

This JavaScript variable will return values “internal” or “developer_view”  (could be anything different than “internal”) to be set up for traffic_type parameter.

function getTrackingType() {
 var developer_mode = {{Debug Mode}};
 var urlParams = new URLSearchParams(window.location.search);
 var excludeUserParam = urlParams.get('exclude_user');
 //if exclude_user query parameter exists, override the return value.
 if( excludeUserParam !== null ){
   var filter_type_overrdie = (excludeUserParam === null || excludeUserParam === '1');
   //if exclude_user paramter is set don't check cookies
   if( filter_type_overrdie ){
     return 'internal';
   }else{
     return 'developer_view';
    }
 }
 var internalCookie = {{Internal Cookie}};
 if ( internalCookie === "1" ) {
    return 'internal';
 }
 if (developer_mode) {
    return 'developer_view';
 }
 return undefined;
}
GTM JavaScript variable where we set traffic_type parameter valueGTM JavaScript variable where we set traffic_type parameter value

It will have a different value than the internal, thus our data filter will not be filtering out our developer views, and we can debug our setup while still having an exclude_user cookie setup.

The purpose of this setup is to exclude developers from website visits when they are not testing while still allowing them to perform debugging when necessary because you need to be able to debug the setup occasionally.

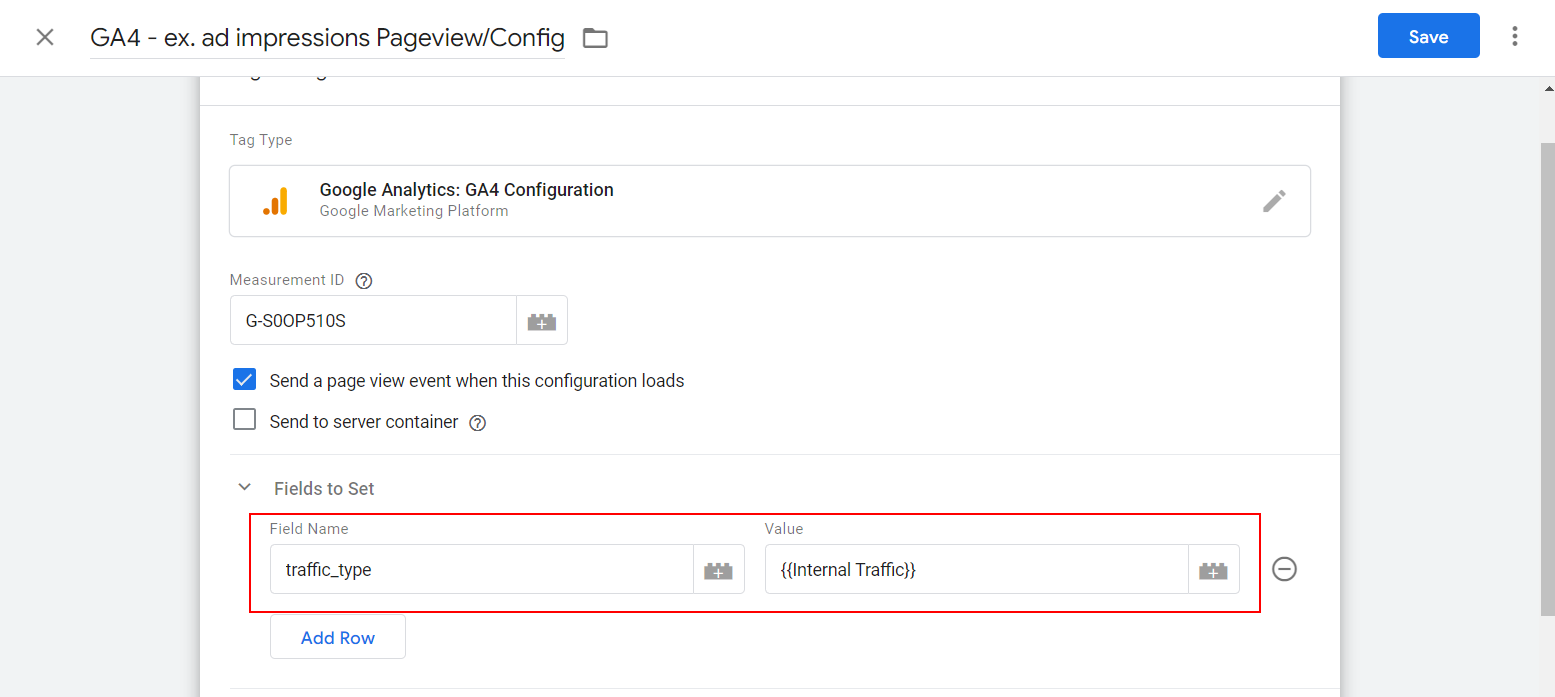
Set the traffic_type parameter to populate from the newly created {{Internal Traffic}} variable in your GA4 configuration tag.

How to setup traffic_type parameterHow to setup traffic_type parameter

Preview it in Google Tag Manager (GTM) by opening any URL of your website with the “?exclude_user=1” query string attached, and check that the “traffic_type” parameter is filled in and that the “tt” hit payload parameter is set to “internal.”

You can switch between “internal” and “developer_view” values just by changing the exclude_user query parameter value from 1 to 2.

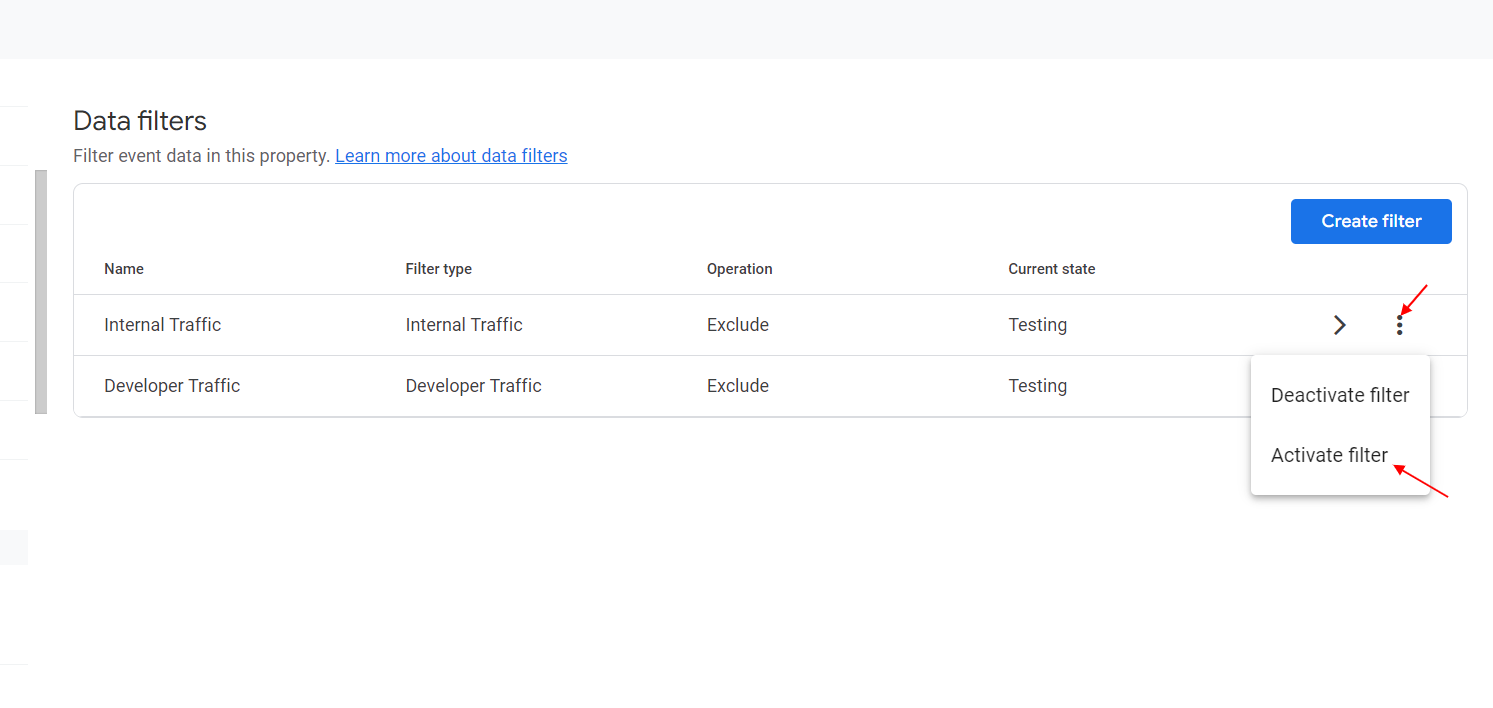
Once you are sure that the filters work properly and don’t filter out real users’ traffic by mistake, you can activate them from the data filters page, and you are done.

How to activate data filter in ga4How to activate data filter in GA4

In case you have a gtag.js implementation, you need to add a traffic_type parameter equal to “internal” to your tag configuration, as shown below.

gtag('set', { 'traffic_type': 'internal' });

For enabling debug mode, I would suggest using the Chrome extension.

But I highly recommend using a GTM setup because it is easier to scale, and on big projects, maintenance will be more cost-effective.

If you like coding, at least you can go hybrid by using GTM and pushing data parameters into the data layer on your website’s custom JavaScript.

Conclusion

I know what you are thinking after reading this guide.

The path to simplicity is overcomplicated – and where it once took seconds, you now must spend days setting up your filters properly.

You may not even have the technical knowledge required to implement the steps described in this guide.

However, here is where I would suggest using ChatGPT to get extra help.

If you need a different filter that requires additional custom coding, you can ask ChatGPT to code for you.

For example, you can ask it to create a JavaScript variable for GTM that returns “internal” when one visits your website from spammy referrals and excludes spam traffic.

The principle is simple: You should set a traffic_type=”some_value” parameter to whatever value you want and exclude any hits which have traffic_type parameter set to that value by using data filters.

I hope in the future, the Google Analytics team will add more granular and user friendly control over how you can filter your traffic, similar to Universal Analytics.

More resources: 


Featured Image: Rajat Chamria/Shutterstock


Source link

Keep an eye on what we are doing
Be the first to get latest updates and exclusive content straight to your email inbox.
We promise not to spam you. You can unsubscribe at any time.
Invalid email address

SEO

Client-Side Vs. Server-Side Rendering

Published

on

By

Client-Side Vs. Server-Side Rendering

Faster webpage loading times play a big part in user experience and SEO, with page load speed a key determining factor for Google’s algorithm.

A front-end web developer must decide the best way to render a website so it delivers a fast experience and dynamic content.

Two popular rendering methods include client-side rendering (CSR) and server-side rendering (SSR).

All websites have different requirements, so understanding the difference between client-side and server-side rendering can help you render your website to match your business goals.

Google & JavaScript

Google has extensive documentation on how it handles JavaScript, and Googlers offer insights and answer JavaScript questions regularly through various formats – both official and unofficial.

For example, in a Search Off The Record podcast, it was discussed that Google renders all pages for Search, including JavaScript-heavy ones.

This sparked a substantial conversation on LinkedIn, and another couple of takeaways from both the podcast and proceeding discussions are that:

  • Google doesn’t track how expensive it is to render specific pages.
  • Google renders all pages to see content – regardless if it uses JavaScript or not.

The conversation as a whole has helped to dispel many myths and misconceptions about how Google might have approached JavaScript and allocated resources.

Martin Splitt’s full comment on LinkedIn covering this was:

“We don’t keep track of “how expensive was this page for us?” or something. We know that a substantial part of the web uses JavaScript to add, remove, change content on web pages. We just have to render, to see it all. It doesn’t really matter if a page does or does not use JavaScript, because we can only be reasonably sure to see all content once it’s rendered.”

Martin also confirmed a queue and potential delay between crawling and indexing, but not just because something is JavaScript or not, and it’s not an “opaque” issue that the presence of JavaScript is the root cause of URLs not being indexed.

General JavaScript Best Practices

Before we get into the client-side versus server-side debate, it’s important that we also follow general best practices for either of these approaches to work:

  • Don’t block JavaScript resources through Robots.txt or server rules.
  • Avoid render blocking.
  • Avoid injecting JavaScript in the DOM.

What Is Client-Side Rendering, And How Does It Work?

Client-side rendering is a relatively new approach to rendering websites.

It became popular when JavaScript libraries started integrating it, with Angular and React.js being some of the best examples of libraries used in this type of rendering.

It works by rendering a website’s JavaScript in your browser rather than on the server.

The server responds with a bare-bones HTML document containing the JS files instead of getting all the content from the HTML document.

While the initial upload time is a bit slow, the subsequent page loads will be rapid as they aren’t reliant on a different HTML page per route.

From managing logic to retrieving data from an API, client-rendered sites do everything “independently.” The page is available after the code is executed because every page the user visits and its corresponding URL are created dynamically.

The CSR process is as follows:

  • The user enters the URL they wish to visit in the address bar.
  • A data request is sent to the server at the specified URL.
  • On the client’s first request for the site, the server delivers the static files (CSS and HTML) to the client’s browser.
  • The client browser will download the HTML content first, followed by JavaScript. These HTML files connect the JavaScript, starting the loading process by displaying loading symbols the developer defines to the user. At this stage, the website is still not visible to the user.
  • After the JavaScript is downloaded, content is dynamically generated on the client’s browser.
  • The web content becomes visible as the client navigates and interacts with the website.

What Is Server-Side Rendering, And How Does It Work?

Server-side rendering is the more common technique for displaying information on a screen.

The web browser submits a request for information from the server, fetching user-specific data to populate and sending a fully rendered HTML page to the client.

Every time the user visits a new page on the site, the server will repeat the entire process.

Here’s how the SSR process goes step-by-step:

  • The user enters the URL they wish to visit in the address bar.
  • The server serves a ready-to-be-rendered HTML response to the browser.
  • The browser renders the page (now viewable) and downloads JavaScript.
  • The browser executes React, thus making the page interactable.

What Are The Differences Between Client-Side And Server-Side Rendering?

The main difference between these two rendering approaches is in the algorithms of their operation. CSR shows an empty page before loading, while SSR displays a fully-rendered HTML page on the first load.

This gives server-side rendering a speed advantage over client-side rendering, as the browser doesn’t need to process large JavaScript files. Content is often visible within a couple of milliseconds.

Search engines can crawl the site for better SEO, making it easy to index your webpages. This readability in the form of text is precisely the way SSR sites appear in the browser.

However, client-side rendering is a cheaper option for website owners.

It relieves the load on your servers, passing the responsibility of rendering to the client (the bot or user trying to view your page). It also offers rich site interactions by providing fast website interaction after the initial load.

Fewer HTTP requests are made to the server with CSR, unlike in SSR, where each page is rendered from scratch, resulting in a slower transition between pages.

SSR can also buckle under a high server load if the server receives many simultaneous requests from different users.

The drawback of CSR is the longer initial loading time. This can impact SEO; crawlers might not wait for the content to load and exit the site.

This two-phased approach raises the possibility of seeing empty content on your page by missing JavaScript content after first crawling and indexing the HTML of a page. Remember that, in most cases, CSR requires an external library.

When To Use Server-Side Rendering

If you want to improve your Google visibility and rank high in the search engine results pages (SERPs), server-side rendering is the number one choice.

E-learning websites, online marketplaces, and applications with a straightforward user interface with fewer pages, features, and dynamic data all benefit from this type of rendering.

When To Use Client-Side Rendering

Client-side rendering is usually paired with dynamic web apps like social networks or online messengers. This is because these apps’ information constantly changes and must deal with large and dynamic data to perform fast updates to meet user demand.

The focus here is on a rich site with many users, prioritizing the user experience over SEO.

Which Is Better: Server-Side Or Client-Side Rendering?

When determining which approach is best, you need to not only take into consideration your SEO needs but also how the website works for users and delivers value.

Think about your project and how your chosen rendering will impact your position in the SERPs and your website’s user experience.

Generally, CSR is better for dynamic websites, while SSR is best suited for static websites.

Content Refresh Frequency

Websites that feature highly dynamic information, such as gambling or FOREX websites, update their content every second, meaning you’d likely choose CSR over SSR in this scenario – or choose to use CSR for specific landing pages and not all pages, depending on your user acquisition strategy.

SSR is more effective if your site’s content doesn’t require much user interaction. It positively influences accessibility, page load times, SEO, and social media support.

On the other hand, CSR is excellent for providing cost-effective rendering for web applications, and it’s easier to build and maintain; it’s better for First Input Delay (FID).

Another CSR consideration is that meta tags (description, title), canonical URLs, and Hreflang tags should be rendered server-side or presented in the initial HTML response for the crawlers to identify them as soon as possible, and not only appear in the rendered HTML.

Platform Considerations

CSR technology tends to be more expensive to maintain because the hourly rate for developers skilled in React.js or Node.js is generally higher than that for PHP or WordPress developers.

Additionally, there are fewer ready-made plugins or out-of-the-box solutions available for CSR frameworks compared to the larger plugin ecosystem that WordPress users have access too.

For those considering a headless WordPress setup, such as using Frontity, it’s important to note that you’ll need to hire both React.js developers and PHP developers.

This is because headless WordPress relies on React.js for the front end while still requiring PHP for the back end.

It’s important to remember that not all WordPress plugins are compatible with headless setups, which could limit functionality or require additional custom development.

Website Functionality & Purpose

Sometimes, you don’t have to choose between the two as hybrid solutions are available. Both SSR and CSR can be implemented within a single website or webpage.

For example, in an online marketplace, pages with product descriptions can be rendered on the server, as they are static and need to be easily indexed by search engines.

Staying with ecommerce, if you have high levels of personalization for users on a number of pages, you won’t be able to SSR render the content for bots, so you will need to define some form of default content for Googlebot which crawls cookieless and stateless.

Pages like user accounts don’t need to be ranked in the search engine results pages (SERPs), so a CRS approach might be better for UX.

Both CSR and SSR are popular approaches to rendering websites. You and your team need to make this decision at the initial stage of product development.

More resources: 


Featured Image: TippaPatt/Shutterstock

Source link

Keep an eye on what we are doing
Be the first to get latest updates and exclusive content straight to your email inbox.
We promise not to spam you. You can unsubscribe at any time.
Invalid email address
Continue Reading

SEO

HubSpot Rolls Out AI-Powered Marketing Tools

Published

on

By

HubSpot Rolls Out AI-Powered Marketing Tools

HubSpot announced a push into AI this week at its annual Inbound marketing conference, launching “Breeze.”

Breeze is an artificial intelligence layer integrated across the company’s marketing, sales, and customer service software.

According to HubSpot, the goal is to provide marketers with easier, faster, and more unified solutions as digital channels become oversaturated.

Karen Ng, VP of Product at HubSpot, tells Search Engine Journal in an interview:

“We’re trying to create really powerful tools for marketers to rise above the noise that’s happening now with a lot of this AI-generated content. We might help you generate titles or a blog content…but we do expect kind of a human there to be a co-assist in that.”

Breeze AI Covers Copilot, Workflow Agents, Data Enrichment

The Breeze layer includes three main components.

Breeze Copilot

An AI assistant that provides personalized recommendations and suggestions based on data in HubSpot’s CRM.

Ng explained:

“It’s a chat-based AI companion that assists with tasks everywhere – in HubSpot, the browser, and mobile.”

Breeze Agents

A set of four agents that can automate entire workflows like content generation, social media campaigns, prospecting, and customer support without human input.

Ng added the following context:

“Agents allow you to automate a lot of those workflows. But it’s still, you know, we might generate for you a content backlog. But taking a look at that content backlog, and knowing what you publish is still a really important key of it right now.”

Breeze Intelligence

Combines HubSpot customer data with third-party sources to build richer profiles.

Ng stated:

“It’s really important that we’re bringing together data that can be trusted. We know your AI is really only as good as the data that it’s actually trained on.”

Addressing AI Content Quality

While prioritizing AI-driven productivity, Ng acknowledged the need for human oversight of AI content:

“We really do need eyes on it still…We think of that content generation as still human-assisted.”

Marketing Hub Updates

Beyond Breeze, HubSpot is updating Marketing Hub with tools like:

  • Content Remix to repurpose videos into clips, audio, blogs, and more.
  • AI video creation via integration with HeyGen
  • YouTube and Instagram Reels publishing
  • Improved marketing analytics and attribution

The announcements signal HubSpot’s AI-driven vision for unifying customer data.

But as Ng tells us, “We definitely think a lot about the data sources…and then also understand your business.”

HubSpot’s updates are rolling out now, with some in public beta.


Featured Image: Poetra.RH/Shutterstock

Source link

Keep an eye on what we are doing
Be the first to get latest updates and exclusive content straight to your email inbox.
We promise not to spam you. You can unsubscribe at any time.
Invalid email address
Continue Reading

SEO

Holistic Marketing Strategies That Drive Revenue [SaaS Case Study]

Published

on

By

Holistic Marketing Strategies That Drive Revenue [SaaS Case Study]

Brands are seeing success driving quality pipeline and revenue growth. It’s all about building an intentional customer journey, aligning sales + marketing, plus measuring ROI. 

Check out this executive panel on-demand, as we show you how we do it. 

With Ryann Hogan, senior demand generation manager at CallRail, and our very own Heather Campbell and Jessica Cromwell, we chatted about driving demand, lead gen, revenue, and proper attribution

This B2B leadership forum provided insights you can use in your strategy tomorrow, like:

  • The importance of the customer journey, and the keys to matching content to your ideal personas.
  • How to align marketing and sales efforts to guide leads through an effective journey to conversion.
  • Methods to measure ROI and determine if your strategies are delivering results.

While the case study is SaaS, these strategies are for any brand.

Watch on-demand and be part of the conversation. 

Join Us For Our Next Webinar!

Navigating SERP Complexity: How to Leverage Search Intent for SEO

Join us live as we break down all of these complexities and reveal how to identify valuable opportunities in your space. We’ll show you how to tap into the searcher’s motivation behind each query (and how Google responds to it in kind).

Source link

Keep an eye on what we are doing
Be the first to get latest updates and exclusive content straight to your email inbox.
We promise not to spam you. You can unsubscribe at any time.
Invalid email address
Continue Reading

Trending