WORDPRESS
How to Create a Viral Waitlist Landing Page in WordPress
Are you wondering how to create a waitlist landing page for your WooCommerce store or WordPress website?
You can easily generate excitement for a product or service that hasn’t been launched yet by making a waitlist landing page. This prompts visitors to sign up for the waitlist using their email addresses and share the promotion with others.
In this article, we will show you how to easily create a viral waitlist landing page in WordPress.
Why Create a Viral Waitlist Landing Page in WordPress?
Making a waitlist landing page on your WordPress website will allow your visitors to enter their email addresses and join your waiting list.
For example, if you have a WooCommerce store that sells clothes and is about to launch a new collection for summer, then you can create a waitlist for interested users to sign up.
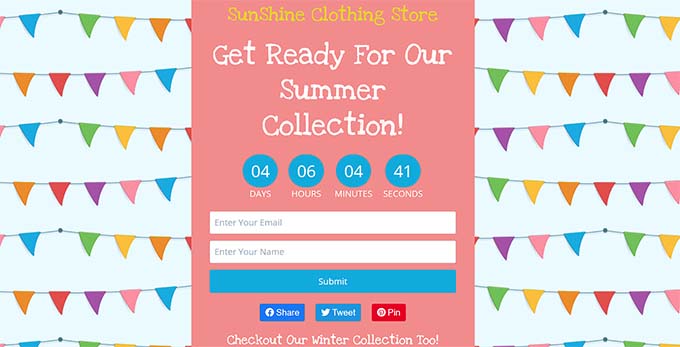
This way, interested users will get an email notification as soon as your new summer clothing collection goes live.
A viral waitlist page can also help you build your email list and social media following, making it an effective lead-generation tool for WordPress.
Moreover, it can also create a sense of urgency and excitement among potential customers, making them more likely to sign up for your waitlist.
That being said, let’s see how to easily create a viral waitlist landing page in WordPress.
How to Create a Viral Waitlist Landing Page in WordPress
You can easily create a waitlist landing page in WordPress using SeedProd. It is the best WordPress landing page plugin with a drag-and-drop builder to create themes and landing pages.
First, you need to install and activate the SeedProd plugin. For detailed instructions, you may want to see our step-by-step guide on how to install a WordPress plugin.
Note: You can also use the free version of SeedProd to create a waitlist landing page. However, some of the advanced blocks used in this tutorial will only be available with the paid plan.
Upon activation, you need to head over to the SeedProd » Settings page to enter your license key. You can find this information in your account on the SeedProd website.

Once you have done that, it’s time for you to start creating a waitlist landing page.
Step 1: Create a Waitlist Landing Page
To create a waitlist landing page, head over to the SeedProd » Landing Pages screen from the WordPress admin sidebar.
Once you are there, just click on the ‘Add New Landing Page’ button.
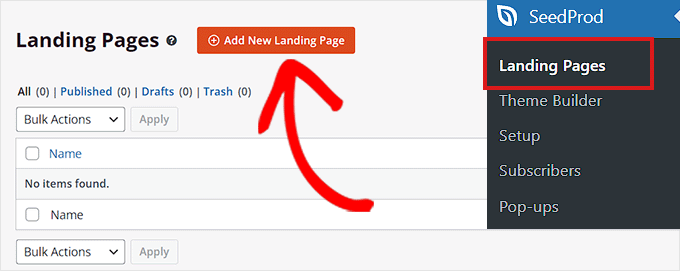
This will take you to the ‘Choose a New Page Template’ screen, where you can select a pre-made SeedProd template for your landing page.
Upon doing that, a prompt will open up on your screen, asking you to enter a page name and URL. Go ahead and enter the details and then click the ‘Save and Start Editing the Page’ button to continue.
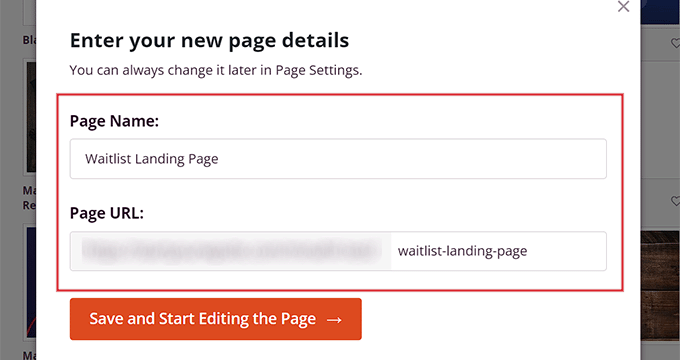
This will launch the template in SeedProd’s drag-and-drop builder. From here, you can now start customizing your waitlist landing page as you want.
Step 2: Customize Your Waitlist Landing Page
Once the drag-and-drop builder has been launched, you will notice that all the available blocks are in the left column, with a landing page preview on the right side of the screen.
From here, you can drag any block you want onto your waitlist landing page, including an image, video, button, heading, or text block.
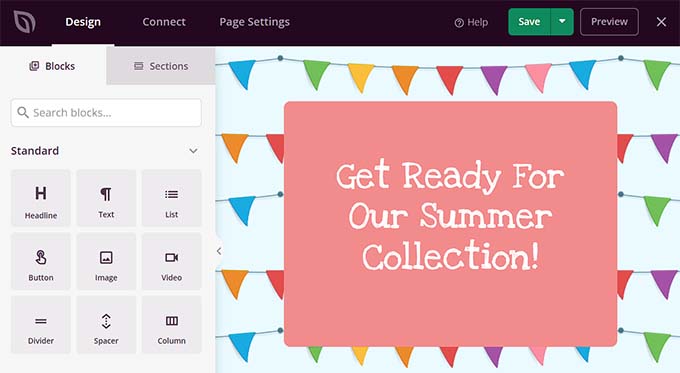
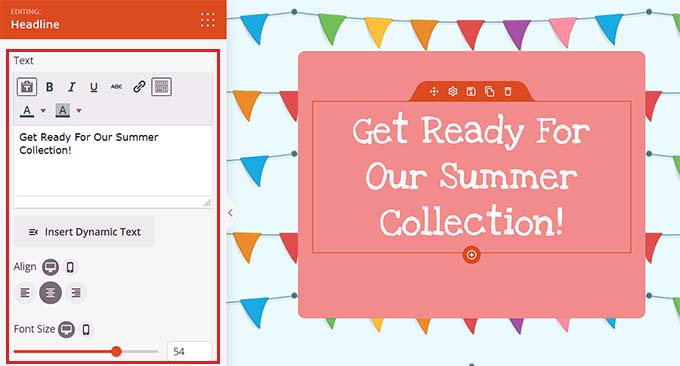
For example, if you want to add a headline for the new product that you are launching in your online store, then you can just drag and drop the Headline block onto the landing page.
Once you’ve done that, simply click on the block again to open its settings in the left column. From here, you can insert dynamic text and change the font size, alignment, color, and more.
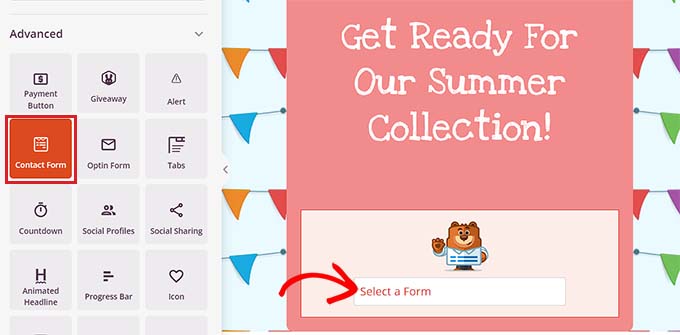
Next, scroll down to the ‘Advanced’ section in the left column. From here, you can add a giveaway, optin form, contact form, social profiles, countdown timer, and more.
Since you are creating a waitlist, you should add a contact form to your landing page. That way, your visitors can sign up for notifications when new products are available, and they can also be added to your general email list.
To do this, just drag and drop the Contact Form block from the left column onto the page.
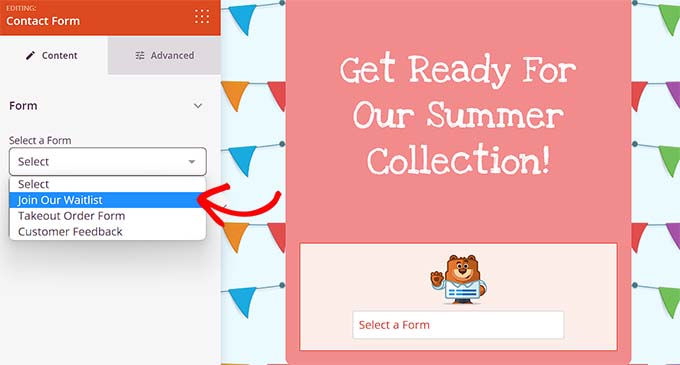
Next, click on the block to open its settings in the sidebar on the left. From here, you can select a contact form that you created with WPForms from the dropdown menu.
For more detailed instructions, you may want to see our tutorial on how to create a contact form in WordPress.
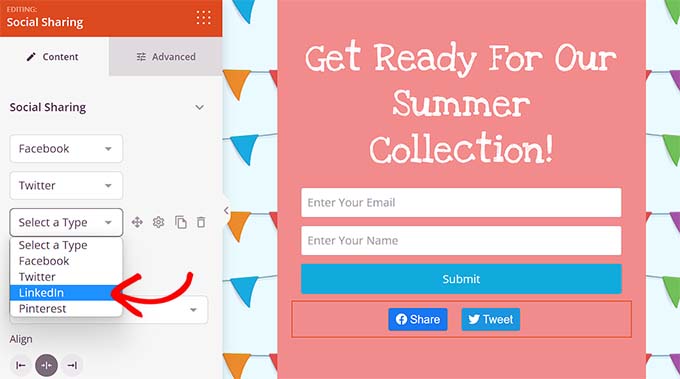
After that, you can also add the Social Sharing block to the waitlist landing page so that users will be able to share it with their friends and followers, making your waitlist viral.
Upon adding the block, click on it to configure its settings in the left column. You can now add a social media button from the dropdown menu and configure its size and alignment.
Once you’ve done that, it’s time for you to add the Countdown block from the left column to create a sense of urgency among your customers.
Next, click on the block to open its settings in the sidebar. From here, you can choose an end date, timezone, size, template, and more.
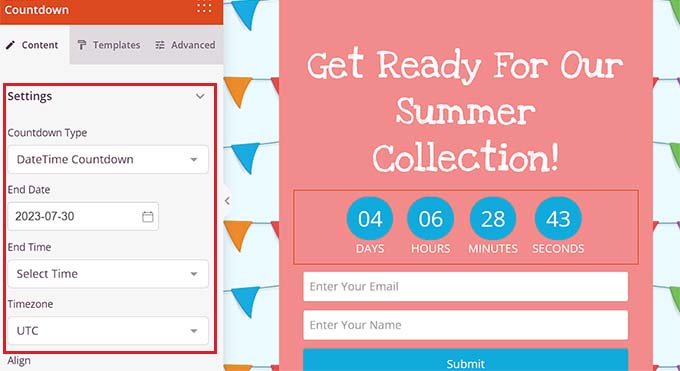
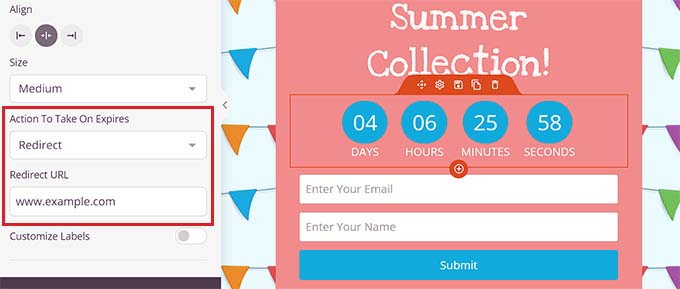
You can also choose an action to take once the countdown on your waitlist expires.
For example, if you choose the ‘Show Message’ option from the ‘Action To Take On Expires’ dropdown menu, then a message will be displayed to your customers upon waitlist expiration.
However, you can also choose the ‘Redirect’ option and add a URL that users will be redirected to if they visit the waitlist page after its expiration. This could be the WooCommerce product page with the items from your new collection.
Step 3: Add WooCommerce Blocks to Your Waitlist Landing Page
If you have a WooCommerce store, then you can also add the WooCommerce blocks offered by SeedProd. Keep in mind that the WooCommerce plugin will need to be activated for these blocks to work.
To add these blocks, just scroll down to the ‘WooCommerce’ section in the left column of the drag-and-drop builder.
From here, you can add the featured products, add to cart, or best-selling products block to your waitlist page to showcase other products from your store.
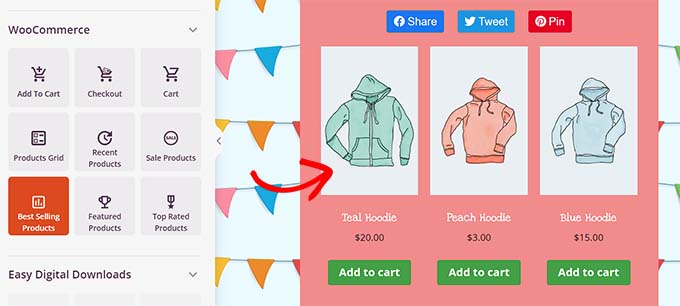
This way, users visiting your waitlist landing page will also be able to see other products that are currently available and may end up making a purchase.
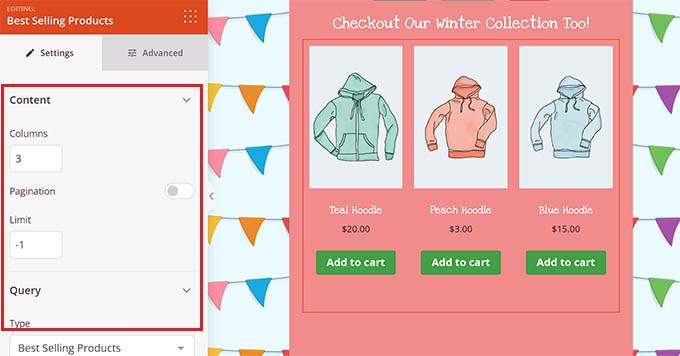
You will also be able to limit the number of products that are shown and control the block’s alignment, typography, pagination, button color, and more.
Step 4: Connect Your Waitlist With Your Email Marketing Provider
You can also connect your waitlist landing page with an email marketing provider to build your email list and capture leads.
To do this, switch to the ‘Connect’ tab at the top of the landing page builder. Then, simply choose your email marketing provider from the ‘Email Marketing’ section.
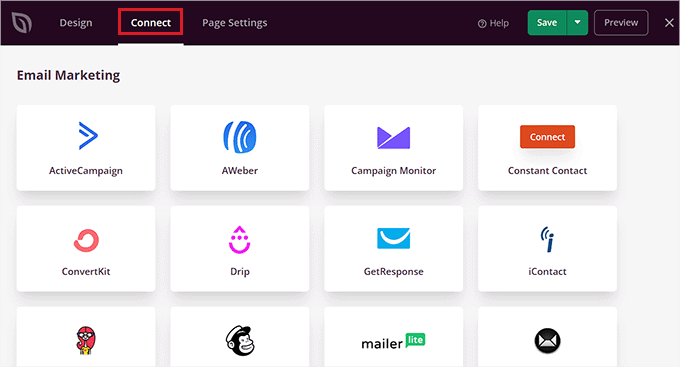
By default, SeedProd offers seamless integration with popular email marketing services like Drip, Brevo (Formerly Sendinblue), Constant Contact, AWeber, and more.
Once you have chosen your provider, you will need to provide an API key or account details, depending on the service you chose. You can get this information from the account dashboard of your email marketing service provider.
After that, just click the ‘Connect’ button to move forward.
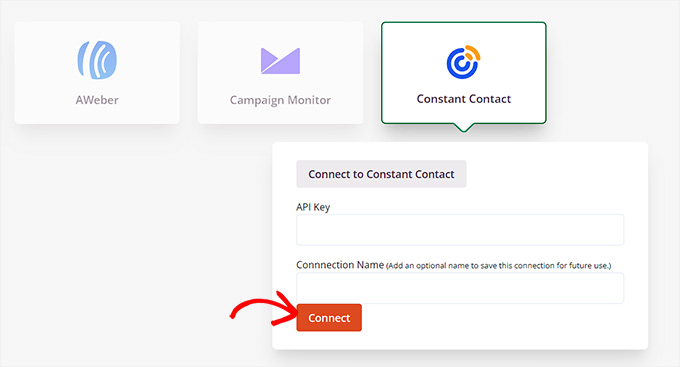
Upon connecting your SeedProd with an email marketing provider, you will also have to choose the email list that you want to use with your waitlist landing page.
Next, click on the ‘Save Integration Details’ button. You have now successfully connected your landing page with the marketing service.
Step 5: Save and Publish Your Waitlist Landing Page
Now, you need to switch back to the ‘Design’ tab from the top of the SeedProd page builder.
Once you’ve done that, click the ‘Save’ button at the top to store your settings.
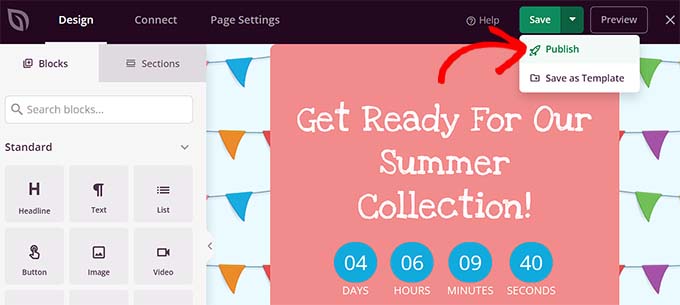
Next, open the ‘Save’ dropdown menu and click the ‘Publish’ button to make your waitlist landing page live.
Now, you can visit the landing page on your WordPress site to see how it looks.

Bonus Tips to Build Excitement and FOMO in Your Online Store
Other than designing a great landing page, you can use a few other methods to easily build excitement and FOMO among your customers. This can encourage them to sign up for your waitlist.
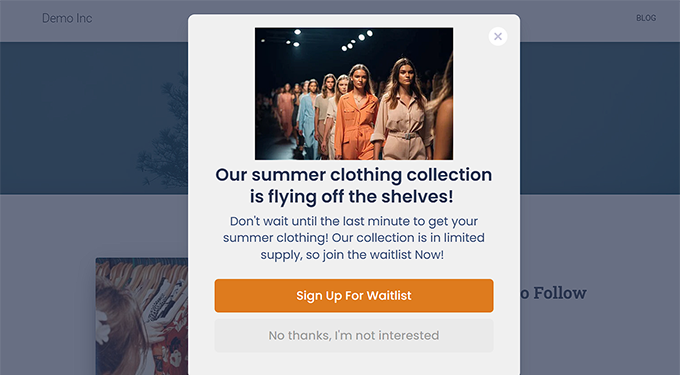
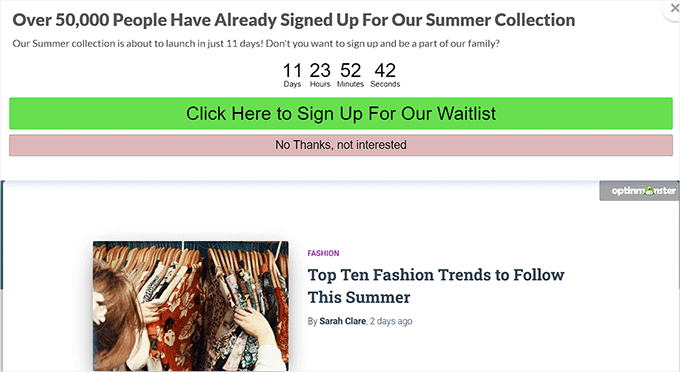
For example, you might create a personalized popup using OptinMonster that shows that a product that hasn’t been launched yet is in limited supply.
Since scarcity is a key element of FOMO, shoppers will now be more likely to sign up for your waitlist.
Other than that, you can also create website banners using Thrive Leads to show users that other visitors are already interested in your product and signing up for it.
For more detailed instructions, you may want to see our tutorial on how to use FOMO on your WordPress site to increase conversions.
Additionally, you can also build excitement and hype around the product or service that you are launching by hosting a giveaway. A viral giveaway can help you can reach a wider audience, increase your conversions, and urge more visitors to sign up for your waitlist.
For example, you can use RafflePress, which is the best WordPress giveaway plugin, to give away a few items from your new clothing collection in exchange for a referral or follow on social media.
If you are interested, then you can see our tutorial on how to run a giveaway/contest in WordPress with RafflePress.
Another tip is to run a live blogging session with your customers to further hype up the product/service that will soon be launched. This way, you will be able to interact with your audience and convince them to sign up on your waitlist landing page.
We hope this article helped you learn how to easily create a viral waitlist landing page in WordPress. You may also want to see our tutorial on how to create coming soon pages in WordPress and our comparison of the best WordPress drag and drop page builders.
If you liked this article, then please subscribe to our YouTube Channel for WordPress video tutorials. You can also find us on Twitter and Facebook.


