MARKETING
What is a CRO Test? [+ the 5 Steps to Perform Them Yourself]
![What is a CRO Test? [+ the 5 Steps to Perform Them Yourself] What is a CRO Test? [+ the 5 Steps to Perform Them Yourself]](https://articles.entireweb.com/wp-content/uploads/2023/03/What-is-a-CRO-Test-the-5-Steps-to.jpgkeepProtocol.jpeg)
Looking for a way to supercharge your marketing campaigns and boost conversions? Well, then it’s time to start running a conversion rate optimization test.
It’s an incredibly powerful toolset that can help marketers unlock valuable insights from user behavior – and significantly optimize their campaigns in the process.
In this blog post, we’ll explain what a CRO test is and the steps to run them for maximum impact.
What is a CRO test?
A conversion rate optimization (CRO) test is an experiment designed to test strategies in an effort to maximize your conversion rate.
CRO tests involve adding, re-arranging, and redesigning elements on your website. They can focus on optimizing the copy, design, or placement of your CTAs, or the length of your headlines, among other elements.
When done right, a CRO test will help you identify where to make improvements and maximize the return on your investment.
At worst, this test will serve as a gut check to ensure your current path is optimized and at the best, it will unlock new opportunities.
How to Perform CRO Tests
1. Research.
One step marketers often miss before running a CRO test is research, jumping straight from the idea to the test itself.
Once you have an idea for a test, you’ll first need to validate it through research. This can be both internal – reviewing past experiments, user research data, and analytics insights – and external by reviewing your competitors’ strategies.
The goal is to discover what has resonated with your audience in the past and if your suggested test aligns with that.
2. Design your experiment.
While you’re in the planning stage, it’s helpful to write an experiment doc.
It should include:
- Your objective – What do you aim to achieve with this CRO test?
- Your hypothesis – What do you anticipate will happen with this test? Be as specific as possible by stating the current state, what you want to test, the metric you’re measuring, and your anticipated outcome.
- Your design – This is where all the details of your experiment will live, such as:
- The type of test it is (E.g. A/B, A/B/n, multivariate)
- The pages on which the test will run
- The control and variant groups
- Duration Estimation
- Primary and secondary metrics
- Predicted impact
- Special considerations.
- Results – Once your test is complete, you can drop details of its performance in the document.
This document will serve as your source of truth for your CRO test and keep stakeholders in the know. Plus, you can reference it for future CRO tests.
3. Design your variants and build the test.
Now that you have all your ducks in a row, you can get started with building your experiment.
This step will likely take the most time as it will likely require cross-collaboration between your team, designers, and developers.
Timeline-wise, it can look something like this:
- Work with designers to develop the look and feel of the test.
- Develop copy, if necessary.
- Create tickets and assign them to team members.
- Work with developers, if applicable, to determine dev work and timeline.
- Set up the experiment in your testing tool (like HotJar or Convert) and the analytics to track results.
- Perform quality assurance (QA) tests to ensure it’s working as expected.
Once these steps are complete, you’re ready for launch.
4. Launch your test.
Once your experiment is live, the first thing you’ll want to do is QA it to ensure it’s still working as expected.
Even if you did this pre-launch, it’s not uncommon to catch bugs once the test is live. You’ll also want to check your analytics page to ensure your tracking is set up correctly.
Once that’s done, alert your stakeholders. Your test may impact other teams and their metrics so it’s important to let them know.
This also gives you an extra set of eyes who can report any issues they spot.
5. Review results.
Once your test has reached statistical significance, you can confidently review the results.
How were your metrics impacted? Was your hypothesis satisfied? What insights did you learn?
If your variation won, you can then work on implementing it. If it didn’t, there’s still opportunity there.
Even if your test produced negative results – i.e. your conversion rate decreased – you’re still gaining valuable insights about your audience.
Now that we’ve covered the steps to running a CRO test, see below a few brand examples.
CRO Test Examples
HubSpot’s Content Offer Form Design
The purpose of this experiment was to see if altering the submission form design affects users.
The hypothesis was that by redesigning forms, the user experience will improve and increase user clarity. In turn, form submission CVR would increase. The primary metric measured was form submission CVR.
The test featured four different variations of sign-up forms, which is an A/B/C/D/E design. The image below is the control variant.
![What is a CRO Test? [+ the 5 Steps to Perform Them Yourself] CRO test example: hubspot content form](https://articles.entireweb.com/wp-content/uploads/2023/03/What-is-a-CRO-Test-the-5-Steps-to.jpeg)
Results were significant as variations B and D outperformed the control variables at 96% and 100% confidence, respectively.
The image below shows variation B on the left and variation D on the right.
![What is a CRO Test? [+ the 5 Steps to Perform Them Yourself] CRO test example: submission form design](https://articles.entireweb.com/wp-content/uploads/2023/03/1677924494_951_What-is-a-CRO-Test-the-5-Steps-to.jpeg)
This demonstrates that, in the future, conversions on the blog could increase if winning form submission designs were applied to blog posts.
Optimizely’s Landing Page Headline
Optimizely was running a few PPC ads with several different types of messaging on one landing page. The landing page did not use the same terminology as the ad – instead, it read “Try it Out for Free.
So Optimizely decided to test the following theory: Aligning the copy on the landing page to the ad will result in more leads (AKA higher conversion).
![What is a CRO Test? [+ the 5 Steps to Perform Them Yourself] CRO test examples - optimizely](https://articles.entireweb.com/wp-content/uploads/2023/03/What-is-a-CRO-Test-the-5-Steps-to.png)
It worked! While the control had a 12% conversion rate, the variation led to a 39.1% increase in conversions.
HubSpot Blog’s Slide-In CTAs
Most successful blogs include a call-to-action at the end of their blog posts. It’s usually full-width – large enough for people to notice the offer and hopefully convert on it.
But are people noticing that CTA, or are they learning to tune them out?
Here at HubSpot, we were curious if our readers were developing static CTA blindness. So, we decided to run a test to see if we could increase our CTA clickthrough and conversion rates.
To accomplish this goal, we tested slide-in CTAs that would appear halfway to three-quarters of the way through a blog post.
Here’s an example of the slide-in:
![What is a CRO Test? [+ the 5 Steps to Perform Them Yourself] CRO test examples - Hubspot blog](https://articles.entireweb.com/wp-content/uploads/2023/03/1677924494_167_What-is-a-CRO-Test-the-5-Steps-to.jpeg)
To test this out, we added slide-in CTAs to 10 of HubSpot’s highest-traffic blog posts. After reaching statistically significant results, we looked at the following stats for the slide-in CTA and the static CTA at the end of the post:
- Clickthrough rate (CTR) – What percentage of visitors clicked each CTA?
- Conversion rate (CVR) – What percentage of those visitors who clicked ultimately converted on the landing page form?
- Submissions – How many total leads did each CTA ultimately generate?
In this test, the slide-in CTA had a 192% higher CTR and generated 27% more submissions – mission accomplished.
Sidekick’s Landing Page Design
This test was done many moons ago when HubSpot Sales was still Sidekick but the value’s still there.
Back then, Sidekick was a chrome extension and the original landing page included a list of all the features from the software:
- See Who Opens & Clicks on Your Emails
- Schedule Emails to be Sent Later
- Access Valuable Information About Your Contacts
But the team was curious to know if those details actually mattered. For a product as low-touch as a Chrome extension, do consumers need a laundry list of features to convert?
To answer this question, the experiment involved replacing the feature list with user testimonials.
![What is a CRO Test? [+ the 5 Steps to Perform Them Yourself] CRO test - hubspot sales](https://articles.entireweb.com/wp-content/uploads/2023/03/1677924494_378_What-is-a-CRO-Test-the-5-Steps-to.jpeg)
The testimonial beat out the feature list by 28%.
Their theory on why this change took place? The former didn’t make people curious enough to click through to the Chrome Extension installation page.
Another theory is that consumers wanted more social proof before downloading a new tool into their browser.
There you have it – a rundown of all things CRO testing. If you want more details on how to run a test of your own, check out our A/B test kit below.
MARKETING
Foundations of Agency Success: Simplifying Operations for Growth


Why do we read books like Traction, Scaling Up, and the E-Myth and still struggle with implementing systems, defining processes, and training people in our agency?
Those are incredibly comprehensive methodologies. And yet digital agencies still suffer from feast or famine months, inconsistent results and timelines on projects, quality control, revisions, and much more. It’s not because they aren’t excellent at what they do. I
t’s not because there isn’t value in their service. It’s often because they haven’t defined the three most important elements of delivery: the how, the when, and the why.
Complicating our operations early on can lead to a ton of failure in implementing them. Business owners overcomplicate their own processes, hesitate to write things down, and then there’s a ton of operational drag in the company.
Couple that with split attention and paper-thin resources and you have yourself an agency that spends most of its time putting out fires, reacting to problems with clients, and generally building a culture of “the Founder/Creative Director/Leader will fix it” mentality.
Before we chat through how truly simple this can all be, let’s first go back to the beginning.
When we start our companies, we’re told to hustle. And hustle hard. We’re coached that it takes a ton of effort to create momentum, close deals, hire people, and manage projects. And that is all true. There is a ton of work that goes into getting a business up and running.


The challenge is that we all adopt this habit of burning the candle at both ends and the middle all for the sake of growing the business. And we bring that habit into the next stage of growth when our business needs… you guessed it… exactly the opposite.
In Mike Michalowitz’s book, Profit First he opens by insisting the reader understand and accept a fundamental truth: our business is a cash-eating monster. The truth is, our business is also a time-eating monster. And it’s only when we realize that as long as we keep feeding it our time and our resources, it’ll gobble everything up leaving you with nothing in your pocket and a ton of confusion around why you can’t grow.
Truth is, financial problems are easy compared to operational problems. Money is everywhere. You can go get a loan or go create more revenue by providing value easily. What’s harder is taking that money and creating systems that produce profitably. Next level is taking that money, creating profit and time freedom.
In my bestselling book, The Sabbatical Method, I teach owners how to fundamentally peel back the time they spend in their company, doing everything, and how it can save owners a lot of money, time, and headaches by professionalizing their operations.
The tough part about being a digital agency owner is that you likely started your business because you were great at something. Building websites, creating Search Engine Optimization strategies, or running paid media campaigns. And then you ended up running a company. Those are two very different things.


How to Get Out of Your Own Way and Create Some Simple Structure for Your Agency…
- Start Working Less
I know this sounds really brash and counterintuitive, but I’ve seen it work wonders for clients and colleagues alike. I often say you can’t see the label from inside the bottle and I’ve found no truer statement when it comes to things like planning, vision, direction, and operations creation.
Owners who stay in the weeds of their business while trying to build the structure are like hunters in the jungle hacking through the brush with a machete, getting nowhere with really sore arms. Instead, define your work day, create those boundaries of involvement, stop working weekends, nights and jumping over people’s heads to solve problems.
It’ll help you get another vantage point on your company and your team can build some autonomy in the meantime.
- Master the Art of Knowledge Transfer
There are two ways to impart knowledge on others: apprenticeship and writing something down. Apprenticeship began as a lifelong relationship and often knowledge was only retained by ONE person who would carry on your method.
Writing things down used to be limited (before the printing press) to whoever held the pages.
We’re fortunate that today, we have many ways of imparting knowledge to our team. And creating this habit early on can save a business from being dependent on any one person who has a bunch of “how” and “when” up in their noggin.
While you’re taking some time to get out of the day-to-day, start writing things down and recording your screen (use a tool like loom.com) while you’re answering questions.


Deposit those teachings into a company knowledge base, a central location for company resources. Some of the most scaleable and sellable companies I’ve ever worked with had this habit down pat.
- Define Your Processes
Lean in. No fancy tool or software is going to save your company. Every team I’ve ever worked with who came to me with a half-built project management tool suffered immensely from not first defining their process. This isn’t easy to do, but it can be simple.
The thing that hangs up most teams to dry is simply making decisions. If you can decide how you do something, when you do it and why it’s happening that way, you’ve already won. I know exactly what you’re thinking: our process changes all the time, per client, per engagement, etc. That’s fine.
Small businesses should be finding better, more efficient ways to do things all the time. Developing your processes and creating a maintenance effort to keep them accurate and updated is going to be a liferaft in choppy seas. You’ll be able to cling to it when the agency gets busy.
“I’m so busy, how can I possibly work less and make time for this?”


You can’t afford not to do this work. Burning the candle at both ends and the middle will catch up eventually and in some form or another. Whether it’s burnout, clients churning out of the company, a team member leaving, some huge, unexpected tax bill.
I’ve heard all the stories and they all suck. It’s easier than ever to start a business and it’s harder than ever to keep one. This work might not be sexy, but it gives us the freedom we craved when we began our companies.
Start small and simple and watch your company become more predictable and your team more efficient.
MARKETING
Advertising on Hulu: Ad Formats, Examples & Tips

With the continued rise in streaming service adoption, advertisers are increasingly turning to OTT (over-the-top) advertising, which allows brands to reach their target audiences while they stream television shows and movies. OTT advertising is advertising delivered directly to viewers over the internet through streaming services or devices, such as streaming sticks and connected TVs. One of the most popular streaming ad-supported streaming services today is Hulu.
At just $7.99 per month (with ads) and $17.99 per month (without ads), Hulu is a great deal. And where the deals are incredible, the subscribers follow…
The formula itself is one we’re all familiar with, and it appears to be working out quite well for Hulu.
- Low prices attract more viewers
- More viewers brings more eyes to Hulu ads
- More eyes on ads brings more interested advertisers
- Advertising revenue climbs alongside impressive viewer growth
In this particular scenario, everyone wins! And the proof is in the pudding considering Hulu generated $11.2 billion in revenue in 2023.
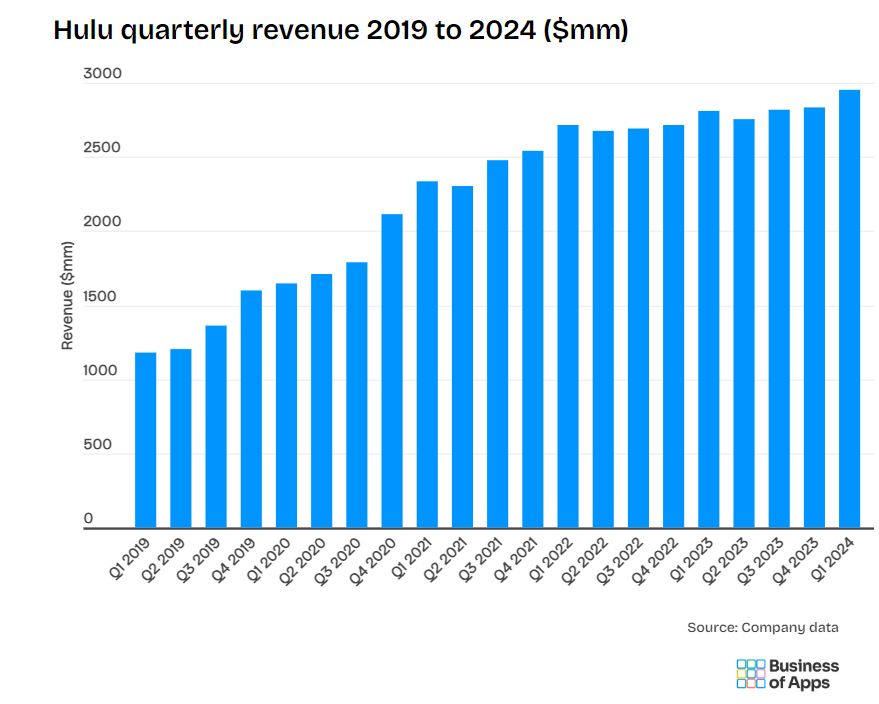
In the following article, we will cover everything you need to know about Hulu including how to advertise on Hulu, ad types available, advertising cost, best examples of Hulu ads, and more. Let’s dive right in.
What is Hulu Advertising?
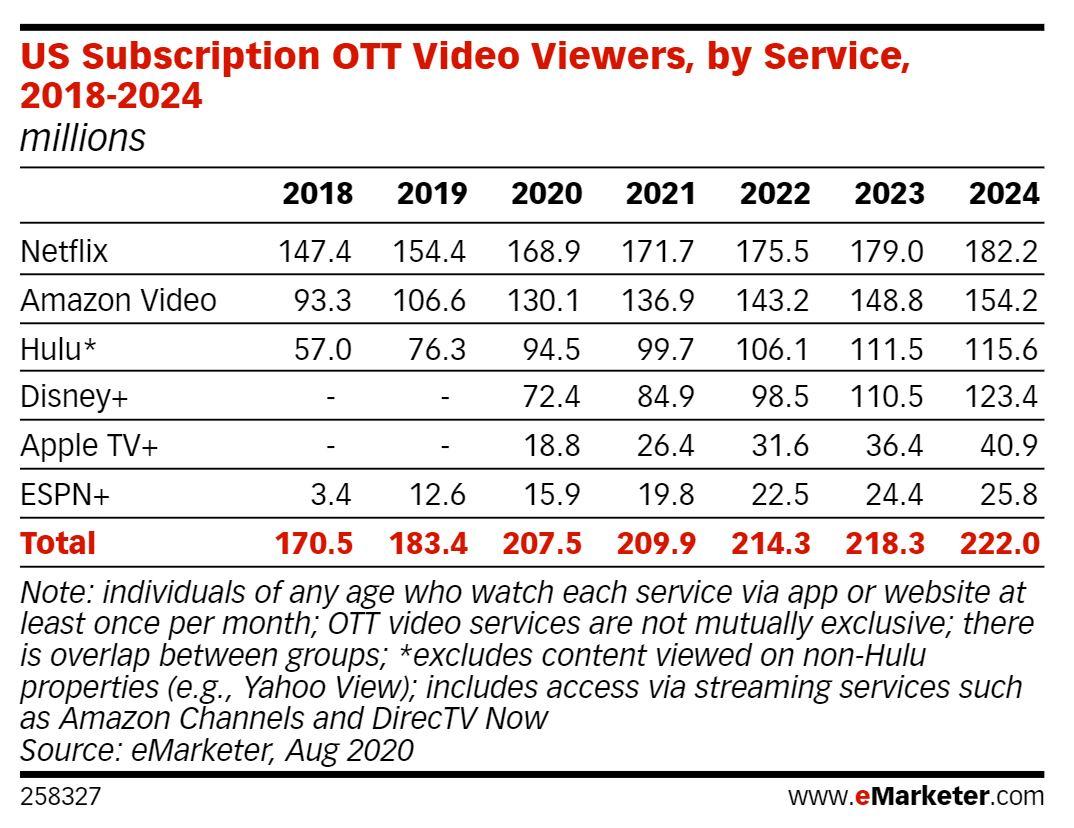
Image Source: https://www.emarketer.com/content/disney-will-become-streaming-heavyweight
Hulu is a service that offers subscription video on demand. Hulu currently has more than 50.2 million subscribers across their SVOD (ad-free subscription video on demand) and AVOD (advertising-based video on demand) plans, translating to nearly 100 million viewers in 2021. eMarketer predictions estimate that number will grow to 115.6 million viewers by 2024.
Hulu notes on their website that their ad-supported offering is their most popular. Previously shared statistics showed that in 2023, 58% of total Hulu subscribers opted for the ad-supported plan.
Hulu subscriptions can be purchased on their own, or as part of a bundle with other services. One such popular option is The Disney Bundle. The new Disney Bundle brings together the extensive Disney+ and Hulu libraries – including beloved characters, award-winning films and series, and 100 years’ worth of inspiring stories – all in one place.
Hulu’s ad-supported and ad-free plans offer subscribers a vast streaming library, inclusive of thousands of movies and TV episodes. Hulu Originals are also included in both plans, as is the ability to watch on the internet-enabled device of your choosing—TV, mobile, tablet, or laptop. As the first platform to introduce viewer-first advertising innovations, like the industry’s first interactive ad formats, Hulu continues to give viewers choice and control over their ad experience.
Outside of the primary differentiators between the two options—ads or no ads, and cost—the only additional distinction to be made is that the ad-supported version does not allow subscribers to download and watch titles on-the-go.
Hulu offers a popular option with an ad-supported tier. This utilizes OTT advertising, meaning ads are delivered directly to viewers over the internet through the Hulu platform, rather than traditional cable or satellite TV. Unlike a typical TV buy where you get a set amount of ad space, these OTT ad buys allow for granular targeting based on demographics, location, and interests, similar to what you might experience on other digital platforms. While these ads are strategically placed before, during, and potentially after your chosen content, they are not skippable. It’s also worth noting that even ad-free tiers might show a few promotional spots for certain shows or live TV events.
Hulu has its very own ad platform that includes a robust set of options for bidding, targeting, and measurement, as well as different ad experiences.
Why Advertise on Hulu?
In today’s media landscape, reaching your target audience effectively is crucial. Hulu offers a compelling advertising platform with a variety of advantages:
- Massive Reach – Tap into a vast audience of engaged viewers. Hulu boasts over 50.2 million subscribers, with their AVOD tier reaching a staggering 109.2 million viewers per month.
- Targeted Engagement – Go beyond traditional TV’s limitations. Hulu’s targeting capabilities allow you to zero in on specific demographics, interests, and even geographies. This ensures your message reaches viewers most likely to resonate with your brand.
- Cost-Effectiveness – Hulu has many buy options, which makes it accessible for any size client to run a campaign on Hulu. Hulu offers campaign minimums as low as $500, which creates a low barrier to entry for most clients. Especially, when partnering with an agency like Tinuiti, where brands can anticipate 2-3x more efficient CPMs when compared to the general market. This makes it accessible for businesses of various sizes to test and refine their advertising strategies.
- DRAX – Disney’s Real-Time Ad Exchange establishes direct connections to major media buying platforms for streamlined ad buying across Disney+ and Hulu. This integration increases automation, allowing advertisers easier access to Disney’s inventory. Partnerships with Google and The Trade Desk provide direct paths to Disney’s inventory, offering greater reach, flexibility, and transparency.
- Engaging Ad Formats – Hulu offers a variety of ad formats beyond standard video ads. Explore interactive elements to capture viewer attention and create a more immersive brand experience with Shoppable ads, pause ads, takeovers, and more.
- Brand Safety – Hulu prioritizes brand safety, ensuring your ads appear alongside high-quality content. This minimizes the risk of your brand being associated with inappropriate content.
By leveraging Hulu’s advertising solutions, you can target engaged viewers, deliver impactful messaging, and ultimately reach your marketing goals.
How Advertising on Hulu Works
Hulu offers brands of all sizes a chance to advertise on their platform. And since Hulu falls under the Disney umbrella, advertising opportunities extend beyond the Hulu platform itself. There are opportunities to buy into inventory cross ESPN, Disney+, ABC and more.
It’s important to keep in mind, the method through which you purchase ads plays a role in the measurement insights you’ll receive. Below are the three primary ways to buy ad placements on Hulu, with additional details regarding programmatic buys, and Hulu’s self-service platform.
- Purchase ads directly from Hulu sales teams
- Programmatic ad buys
- Through Hulu’s self-service platform (currently invite-only, but brands can request access)
If you’re not ready to pick up the phone and collaborate with Hulu’s sales team on a large ad buy, you’re probably going to end up using Programmatic Guaranteed ad buys or purchase ad space through the Self Service Platform. Here’s a little more information on each option:
Programmatic Guaranteed (Reserved Buys) and Private Marketplace (Auctionable)
Ads purchased through a programmatic sales team that works directly with platforms and streaming agencies, like Tinuiti. This offers advanced local and national targeting and measurement capabilities, enhanced reporting, and suite of targeting options at fixed or biddable rates.
Whether you want to target lookalike audiences, specific demographics, interest or behavioral segments, or leverage audience CRM matching for a customized group, you’ll know exactly when and where your ads showed, and be provided with robust reporting that helps measure what’s working best, and where you should continue to invest for optimal performance. You’ll also enjoy guaranteed media buys that ensure you get the expected visibility and reach.
There are certain Hulu ad types that can’t be purchased programmatically, including sponsored placements, pause ads, and ad-selector ads, among other standout units. For these types, Tinuiti makes reserved buys for our clients from opportunities that are only available through Hulu directly.
Not sure which ad types make the most sense for your business and advertising goals? Our team works with clients to determine which campaign initiatives are best for them, and help ensure their creative meets Hulu’s requirements.
Self-Service Hulu Ads (Beta) – Must RSVP and Be Approved as a Brand
Hulu’s self-serve ad platform allows brands to access ad inventory directly, with a modest $500 campaign minimum. These ads are ideal for smaller businesses that don’t have a sizable streaming ads budget, or are just getting started with OTT and want to test the waters.
The Self-Service Ads beta program offers a glimpse into the future of advertising on Hulu. With features like budget management, targeted audience selection, and ad format flexibility (to some extent), businesses can craft impactful campaigns tailored to their specific needs. However, remember the current limitations and the need for approval before getting started.
Reporting Limitations: Notably, when purchasing through the self-service platform, your reporting will only include impression data; you won’t have insights into where your ads actually ran.
While this offering is still in beta, Hulu has already shared some early success stories. Learn more here about how Hulu self-serve ads work.
How Much Does Hulu Advertising Cost?
Unlike traditional ad buys, Hulu advertising utilizes a cost-per-thousand-impressions (CPM) model. This means you pay each time one thousand viewers see your ad, with estimates ranging from $10 to $30 CPM. Factors like targeting specifics, competition, and ad format (pre-roll vs. mid-roll, length) can influence the final cost.
Hulu advertising costs are structured to allow for advertisers of all sizes and budgets, but the total costs, you’ll realize, will largely depend on a number of factors, including:
- Whether you’re buying directly through Hulu or a DSP (demand-side platform)
- Any restrictions you place on Hulu regarding where your ads display. Specific audience or genre targeting, and/or frequency caps, may incur a premium as well
- Which ad types you choose
- How much creative you will need to generate for your ads (production costs)
- Seasonality—Q4 advertising costs are higher than other quarters
- Whether you’re buying through an up-front agreement (advertising commitment for a full TV season), or the scatter market (ad buys that run month-to-month, or quarter-to-quarter)
How to Advertise on Hulu
Here’s what you need to know to advertise on Hulu, from buying and targeting to measurement and optimization.
Hulu offers several advertising reach options for brands:
- National: Reach viewers across the US
- Local: Reach a localized target audience
- Advanced TV: Automated, data-informed ad buys
Within the Advanced TV category, Hulu has 3 different bidding options:
- Programmatic Guaranteed: Automated, guaranteed buy with advanced targeting.
- Private Marketplace: Non-guaranteed buy with increased targeting control.
- Invite-Only Auction: Find your audience, set your price, and optimize from within your DSP
In Hulu’s invite-only auction, advertisers select their target audience, determine their bid price for that audience, and control and optimize their ad campaigns in real-time based on results and performance. You can learn more about Hulu’s advanced targeting options here.
When it comes to executing Hulu ads, at Tinuiti, we can take on all the heavy lifting for you.
Ad Types Available on Hulu [With Specs]
In today’s streaming world, capturing viewers’ attention is more important than ever. When it comes to Hulu ads, pre-roll placements (those shown before your chosen content) are proven to be highly effective, especially earlier slots within the pre-roll sequence. This is prime real estate for grabbing viewers before they settle into their show.
But don’t be limited! Hulu offers a variety of ad formats to suit your needs, including pre-roll, mid-roll (shown during commercial breaks within the content), and even 7-second bumper ads for quick, impactful messaging. Whether you choose a short and sweet 7-second spot or a more detailed 15 or 30-second video ad, Hulu offers the flexibility to tailor your message to your audience and campaign goals.
When creating your Hulu video ad, it’s important to follow their specifications including:
- Video Duration: 15 to 30 seconds
- Audio Duration: Must match video duration
- Dimensions: 1920×1080 preferred; 1280×720 accepted
- Display Aspect Ratios: 16:9 preferred; Hulu will accept videos shot with 2.39:1, 1.375:1, 3:4, or 4:3 dimensions, but you must make the video fit a 16:9 ratio by inserting matting on the top and bottom of the video.
- Video Format: QuickTime, MOV, or MPEG-4
- File Extensions: .mov or .mp4
- File Size: 10 GB maximum
- Audio Format: PCM, AAC
- Frame Rate: 23.98, 24, 25, 29.97, or 30 fps
- Frame Rate Mode: Constant
- Video Bit Depth: 8 or 16 bits
- Video Bit Rate: 10 Mbps – 40 Mbps
- Audio Bit Depth: 16 or 24 bits (for audio channel 2)
- Audio Bit Rate: 192-256
- Chroma Subsampling: 4:2:0 or 4:2:2
- Codec ID: Apple ProRes 422 HQ preferred; H.264 accepted
- Color Space: YUV
- Scan Type: Progressive Scan
- Audio Channels: 2 channel stereo
- Audio Sampling Rate: 48.0 kHz
Hulu offers what they call “a viewer-first ad experience” made up of an extensive variety of different ad products and solutions, including:
Video Commercial
This is the most ‘standard’ ad type available from Hulu, with your video playing during any “long-form content commercial breaks.” Hulu allows 7-, 15- and 30-second video commercials, and “does not accept stitched Ads.” This simply means that if advertisers want to display a 30-second commercial, they will be required to have an asset of the correct length, and can’t ‘stitch together’ two separate 15-second ads.
Ad Selector
This ad type gives the viewer greater control over their ad experience. Viewers will be given the option to choose between two or three different video ads to watch from the same advertiser. This can increase the chances that viewers will be engaged with your ad as they had some degree of choice in watching it. If no ad selection is made within 15 seconds of being presented with the options, one of the two or three available ads will be selected at random and played automatically.
According to Hulu Brand Lift Norms, 2020, products like these that “give viewers choice and control” have “result[ed] in 70% higher lifts than the average campaign on Hulu.”
Branded Entertainment Selector (BES)
Choice comes into play with Hulu’s BES ads as well, but in this scenario, they are choosing not just their ad experience, but their viewing experience as well. Viewers are given the option to watch their programming of choice with the typical commercial breaks, or to enjoy their programming uninterrupted by first watching a longer ad. We like to think of it as finishing your dinner before eating dessert! This is a popular choice for advertisers who want to tell a story with their ad—or advertise a movie or upcoming event—and need more than 15 or 30 seconds to do so.
Binge Ad
Want to reach viewers dedicating some of their downtime to an hours-long binge session, but don’t want to risk hitting them with the same ad, delivered in the same way, episode after episode? Hulu’s Binge Ad placements are designed with brand safety and a positive watching experience in mind. These “enable marketers to deliver contextually and situationally-relevant messages at the right time and place – during a viewer’s binge session.”
According to the Kantar Brand Lift Study, 2020, ads like these have been shown to “increase[ing] unaided brand awareness by 24% and ad recall by 25%.”
Interactive Living Room
These ads are designed to “foster greater affinity with a brand” through “customizable interactivity” focused on whatever elements of your brand you would like to promote. Whether you want to get the word out about a new product launch, enhanced features of an existing product, a new line of services, a company announcement, or more, these ads make it engaging and easy. Hulu notes that they offer “select functionality via third-party producing and hosting partners,” and that the production lead time is quite a bit longer than for most ad types at “four to six weeks from the receipt of the final assets.”
Max Selector (Beta)
In this ad type, viewers are given a choice over how they would like to learn about the product or service being advertised. Interactive templates are designed to create “a more engaging and immersive choice-based ad experience.”
Branded Slate
Advertisers are given the opportunity to reach audiences before the show has even begun with Branded Slate custom title cards. These brief, static video ads feature your logo with “Presented by” text, with voiceover audio that identifies your brand as the sponsor. Hulu also offers Branded Slate ads specifically tailored to entertainment clients.
Premium Slate
This 7-second ad type is similar to the aforementioned Branded Slate ads, but allows for advertisers to include “their own video, dynamic visuals, and sound” as opposed to a static video with voiceover. If preferred, you can still opt for the voiceover to be handled by Hulu talent, but it is not required as it is with the Branded Slate ads. Hulu also offers Premium Slate ads specifically tailored to entertainment clients.
GatewayGo
These unique ads are designed with conversions in mind, bringing together “Hulu’s traditional living room video ads with action-oriented prompts and personalized offers.” GatewayGo ads harness “second screen enablement technologies such as QR codes and push notifications” by “shifting conversion actions from the TV to mobile devices.” Viewers who wish to learn more can simply scan the QR code using their phone—which is likely within reach, if not in their hand—or choose to receive notifications.
According to a 2020 Hulu Internal Study, “6 in 10 viewers like that they can discover and act on deals with GatewayGO.” For these ad types, Hulu strongly recommends 30-second placements “to increase engagement,” though the minimum required length is just 15-seconds.
Pause Ad
Pause ads are unique in that they reach viewers who have decided they are ready for a break by pressing the pause button, with the ad serving as a screensaver of sorts. These offer an ideal opportunity to reach viewers in the least intrusive way possible, and give you significant opportunity to increase brand awareness—particularly for viewers who pause often, and for longer periods of time.
Poster Marquee Ad
Want to entice viewers to watch a specific series or theatrical release? This ad type makes it possible by leveraging “existing coming soon design components to promote a trailer for an upcoming title.” Hulu recommends that these should ideally be an “extended trailer,” with 15-second and 30-second ad spots not recommended.
Cover Story Brand Placement
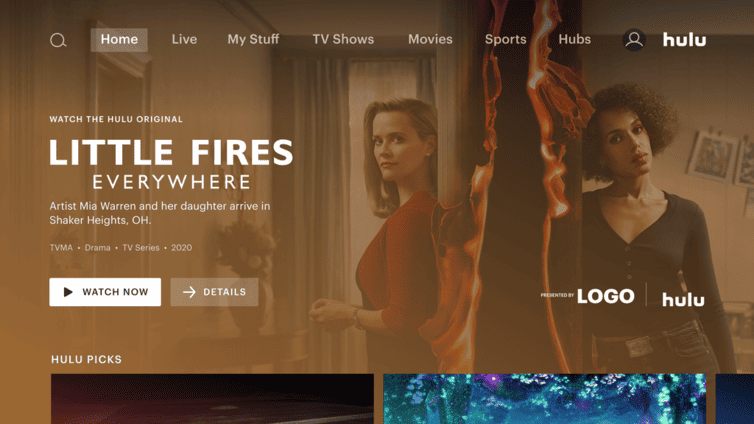
Image Source: https://advertising.hulu.com/ad-products/cover-story-brand-placement/
For this ad type, the only thing Hulu requires is your logo, which will be showcased directly within the Hulu homepage alongside the “Presented By” notation, as shown above. Thanks to their prominent placement, these ads are ideal for increasing exposure, and enhancing brand recognition.
Sponsored Collection Brand Placement
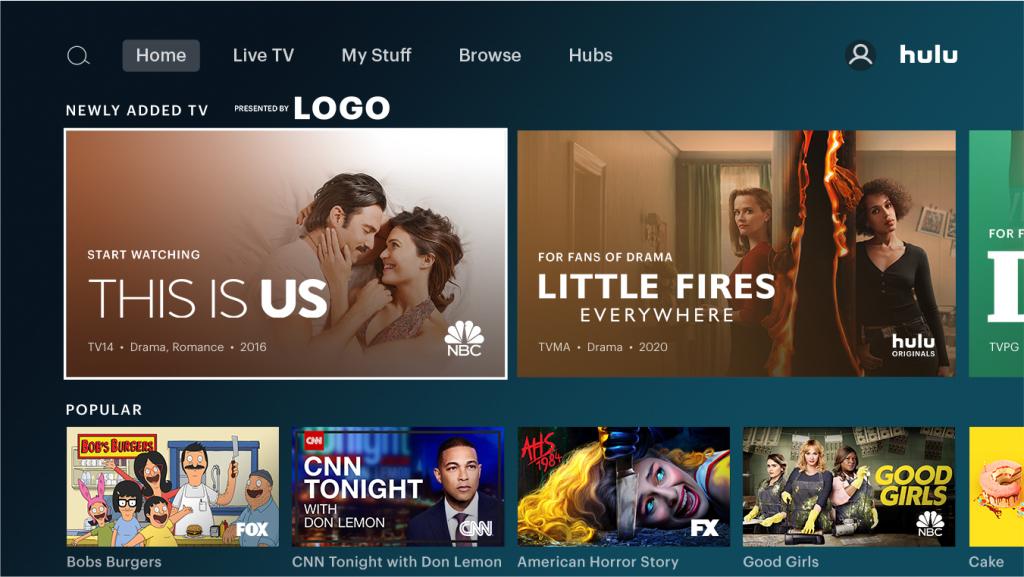
Image Source: https://advertising.hulu.com/ad-products/sponsored-collection-brand-placement/
This placement offers “advertisers extended ownership of a collection sponsorship through logo placement adjacent to content in Hulu’s UI across devices.” As shown in the above example where “Newly Added TV” programs are “Presented by LOGO” (your logo here!), your sponsorship displays in a highly visual location that naturally draws in viewers’ eyes.
Promoted Content Marquee Ad
This unique advertising option “mimics the existing Hulu UI design and only supports long-form full-length episodes or feature films.” Because “Hulu viewers already recognize this design to promote content that is available for them to watch,” they may not even realize what they’re seeing is an ad.
*Note: The ad units mentioned are almost exclusively available via guaranteed IOs (national or local) and not the audience-driven methods.
Best Practices for Hulu Advertising Campaigns
Whether you’re promoting a new product, driving subscriptions, or raising brand awareness, these best practices will help you maximize the impact of your Hulu ads and connect with your target audience effectively. Let’s explore the essential tactics and insights for creating high-performing Hulu ad campaigns.
Follow Creative Best Practices for Video Campaigns
Adhere to Ad Specs – Always adhere to the platform’s ad specifications to ensure your video displays correctly across different devices and platforms. This includes guidelines on resolution, aspect ratio, file format, and maximum file size.
Build a Strong Hook – Grab the viewer’s attention within the first 3-5 seconds. This can be achieved through visually striking imagery, compelling storytelling, or posing a thought-provoking question. The key is to pique curiosity and entice viewers to continue watching.
Consistent Branding is Key – Maintain consistent branding across your video campaigns to reinforce brand recognition and recall. This includes using your logo prominently at the beginning and end of the ad, as well as incorporating consistent color schemes, fonts, and messaging that align with your brand identity.
Stick with Simple Messaging – Focus on communicating a single, specific idea or message in your video ad. Avoid overcrowding the ad with too much information, as this can overwhelm viewers and dilute the effectiveness of your message. Keep it simple, clear, and memorable.
Use Text for Emphasis – Use text overlays strategically to highlight key messaging or calls to action in your video ad. This ensures that important information is conveyed effectively, especially for viewers who may be watching with the sound off.
Provide Variety and Freshness – Rotate your video ads regularly to prevent audience fatigue and maintain engagement. Experiment with different creative strategies, visuals, and messaging to keep your ads fresh and appealing. This also allows for A/B testing to determine which creatives resonate best with your target audience.
Utilize Audience Targeting – Tailor your creative content to resonate with the specific interests, preferences, and demographics of your target audience. This may involve customizing the storyline, imagery, and messaging to appeal to different audience segments and maximize relevance and impact.
By incorporating these best practices into your video campaigns, you can enhance their effectiveness and drive better results in terms of engagement, conversion, and brand awareness.
Use Hulu’s Targeting Capabilities Wisely
Hulu Ad Manager empowers you with a robust suite of targeting options to reach your ideal audience. Here’s how to leverage them effectively:
Audience Targeting:
- Demographics – Reach viewers based on age, gender, income, and parental status. This allows you to tailor your message to resonate with specific segments.
- Lifestyle Interests – Target users based on their interests and hobbies. For example, target fitness enthusiasts with ads for your activewear line. (Explore the full range of interest categories within Hulu Ad Manager).
- Behavioral Targeting – Go beyond demographics by targeting viewers based on their past purchase behavior or browsing habits. This can significantly increase campaign relevance.
Content Targeting:
- Genre Targeting – Place your ads within specific genres (e.g., comedy, sports, documentaries) relevant to your product or service. This ensures your message reaches viewers actively seeking content aligned with your offering.
- Programmatic Targeting – Target specific shows or programs on Hulu where your ideal audience is likely to be watching. This allows for highly focused ad placement.
Location Targeting:
- Geographic Targeting – Reach viewers within specific cities, zip codes, Designated Marketing Areas (DMAs), or regions. This is ideal for promoting local businesses or service-based offerings with a geographical focus.
Pro Tips for Smart Targeting:
- Combine Targeting Methods – Utilize a combination of audience and content targeting for maximum reach and relevance. For example, target viewers interested in fitness (audience) while placing your ads within workout-related shows (content).
- Leverage Lookalike Audiences – Expand your reach by targeting audiences similar to your existing customers.
- Test and Refine – Don’t be afraid to experiment with different targeting combinations and monitor performance metrics to optimize your campaigns for better results.
By strategically using Hulu’s targeting options, you can ensure your ads reach the right people at the right time, maximizing campaign effectiveness and ROI.
Measure and Optimize Campaigns Based on Performance
Data is king when it comes to optimizing your Hulu ad campaigns. Hulu offers advertisers varying measurement and attribution insights for their campaigns, which depend in part on how the ads were purchased. Hulu’s attribution capabilities let advertisers measure brand lift and direct ROI, and business outcomes across QSR, retail, ecommerce, tune-in, automotive, and CPG categories. Third-parties like Tinuiti offer more omnichannel campaign analysis options.
Here’s how to leverage Tinuiti’s expertise to achieve peak performance:
Set SMART Goals and Benchmarks
It’s crucial to begin by defining your objective with a clear SMART goal that aligns with your overarching marketing strategy. This goal should be Specific, Measurable, Achievable, Relevant, and Time-Bound. Once your objective is established, it’s essential to establish benchmarks by leveraging historical data from past campaigns or industry averages. These benchmarks will help set realistic expectations and guide your efforts in tracking key metrics such as impressions, clicks, and conversions throughout the campaign.
Continuous Optimization
At Tinuiti, our omnichannel campaign analysis allows us to compare your Hulu campaign’s performance with other marketing channels like social media and email, giving you a holistic understanding of how customers engage with your brand across different platforms. But it’s not just about data – our team of experts dives deep, uncovering hidden patterns within the data and translating them into actionable insights.
These insights then fuel data-driven recommendations for optimizing your Hulu campaign. We might suggest adjustments to your targeting strategies, ad creatives, or even budget allocation to ensure you achieve the best possible results. We can also analyze viewer fatigue and recommend A/B testing new ad variations, keeping your audience engaged and maximizing the effectiveness of your Hulu advertising.
Putting it into Practice
After a few weeks of your campaign running, revisit your initial benchmarks to evaluate progress. Don’t just rely on surface-level data, leverage omnichannel analysis to understand what elements are resonating and which areas need improvement. This comprehensive analysis allows you to pinpoint the strengths and weaknesses of your targeting, ad creatives, and budget allocation.
By taking a data-driven approach and utilizing Tinuiti’s expertise, you can continuously measure, optimize, and refine your Hulu campaigns, driving maximum impact and achieving your marketing objectives.

Best Examples of Hulu Ads
Let’s dive into some of the most memorable and effective Hulu ad campaigns that have left a lasting impression on audiences.
Filippo Berio Interactive Ads

Image Source: https://advertising.hulu.com/brand-stories/filippo-berio/
Filippo Berio is a brand best known for their selection of olive oils and vinegars, with a legacy tracing back more than 150 years. Their thoughtful use of interactive ad formats helped them in connecting with potential customers, with their Hulu ad campaign resulting in a “2x lift in brand favorability”, and a “3x lift in brand consideration.”
- Filippo Berio’s use of the Interactive Living Room ad type “was especially impactful as an awareness-driver, highlighted by a +44% lift in brand awareness and +64% lift in message association”
- Other ad types were included in the campaign as well, including standard and situational ads
ThirdLove Contextually Relevant Original Sponsorships

Image Source: https://advertising.hulu.com/brand-stories/thirdlove/
ThirdLove is a lingerie and loungewear company that focuses on body positivity and inclusivity in their marketing, and importantly, their range of products and sizes. The brand crafted a Hulu advertising strategy that aimed to enhance “awareness and overall consideration for their products across women of all demographics” with ads that ran “alongside premium and contextually-relevant Original content.”
ThirdLove saw results that outperformed “both industry and Hulu retail norms,” in part by advertising during women-produced content, and content that focuses on themes and issues that are of importance to women. This Hulu campaign included:
- Co-branded ads at the start of every episode of Mrs. America
- Creative that included a CTA and a discount code that could be accessed by “visiting a unique URL tied to the Hulu Original series, Little Fires Everywhere”
Best Strategy for Hulu Advertising [from the experts]
Experimentation is at the heart of all statistically-significant data, and Hulu makes experimentation easy and affordable. With more than a dozen distinct ad types to choose from—and an array of ad lengths to suit all advertising needs and goals—you are provided with all the necessary tools to find the ideal methods to reach new and existing audiences.
With Hulu ads, there is no shortage of innovative options to choose from, and we encourage you to experiment extensively, but also strategically. No matter how sizable your streaming ads budget, no brand can afford to throw everything at the wall and see what sticks. But you can thoughtfully design combinations of differing visual components, and ad lengths, to see which resonate best with viewers.
These learnings can then be applied across similar streaming platforms as well, many of which won’t have the same robust inventory of options to experiment with.
According to a Nielsen CTV Analytics study, 62% of Hulu viewers never saw a brand’s ad campaign on linear TV, making Hulu a critical partner to brands trying to reach new audiences or their full target audience. And with Hulu’s ability to audience-target based on CRM matching or behavioral segments, Hulu is an important partner in delivering addressable TV at scale.
If you’re interested in advertising on OTT/Streaming TV, check out Tinuiti’s TV & Audio advertising services.
Editor’s Note: This post was originally published by Tara Johnson in July 2020 and has been updated for freshness, accuracy, and comprehensiveness.
MARKETING
Updates to data build service for better developer experiences

Optimizely Feature Experimentation users can now benefit from an average of 87% faster data file updates. The ability to generate data files in a faster and more predictable manner enables our customers to make updates to feature flags and experiments more quickly and reliably.
- Datafile build service – Performance, stability
- Webhooks by environment – Lower latency across all environments. Push notification that a new datafile is ready
- Secure environments – Security
Key features
- Smoother workflow
It lets you update feature flags and experiments faster and more consistently as a seamless workflow step. - Better developer experience
Developers can expect faster and more predictable feedback when configuring feature flags during local development. - Faster execution
Product teams benefit from “kill switches” to roll back problematic features and flawed experiments to protect user experience and conversion rates.
Finally…
Speed, performance, and usability are key to delivering a better experience, and as such we are always striving to improve the performance of back-end services. Our improved datafile build service enables you to deliver feature flags and experiment changes to your end-users more quickly and reliably.
Optimizely Feature Experimentation generates a JSON datafile that represents the state of an environment in a customer’s Feature Experimentation project, this datafile is polled for and consumed by our SDKs to enable user-level decisions and tracking.
With our new datafile build service, Feature Experimentation customers will experience better performance and reliability when delivering feature flags and experiment changes to end-users.
-

 MARKETING7 days ago
The key to correcting the C-suite trust deficit
-

 MARKETING6 days ago
A Recap of Everything Marketers & Advertisers Need to Know
-
 MARKETING4 days ago
How To Protect Your People and Brand
-

 PPC4 days ago
How the TikTok Algorithm Works in 2024 (+9 Ways to Go Viral)
-

 SEARCHENGINES5 days ago
Google Started Enforcing The Site Reputation Abuse Policy
-

 SEO3 days ago
How to Use Keywords for SEO: The Complete Beginner’s Guide
-

 SEO7 days ago
128 Top SEO Tools That Are 100% Free
-

 SEO5 days ago
Blog Post Checklist: Check All Prior to Hitting “Publish”


![What is a CRO Test? [+ the 5 Steps to Perform Them Yourself] Free Download: A/B Testing Guide and Kit](https://articles.entireweb.com/wp-content/uploads/2023/02/How-to-Do-It-Right.png)
![What is a CRO Test? [+ the 5 Steps to Perform Them Yourself] The Ultimate A/B Testing Kit](https://articles.entireweb.com/wp-content/uploads/2023/02/1677155937_280_How-to-Do-It-Right.png)


