SEO
How to Automate Dull SEO Tasks

Some SEO processes involve repetitively clicking things on a screen. Not the best use of your time.
With the right tools, however, you can automate various SEO processes—and free up resources for tasks that need more creative, human input.
In this post, I’ll share two examples of how I automate SEO tasks.
Imagine being able to record and email article assignments to writers in seconds using a simple form like this:
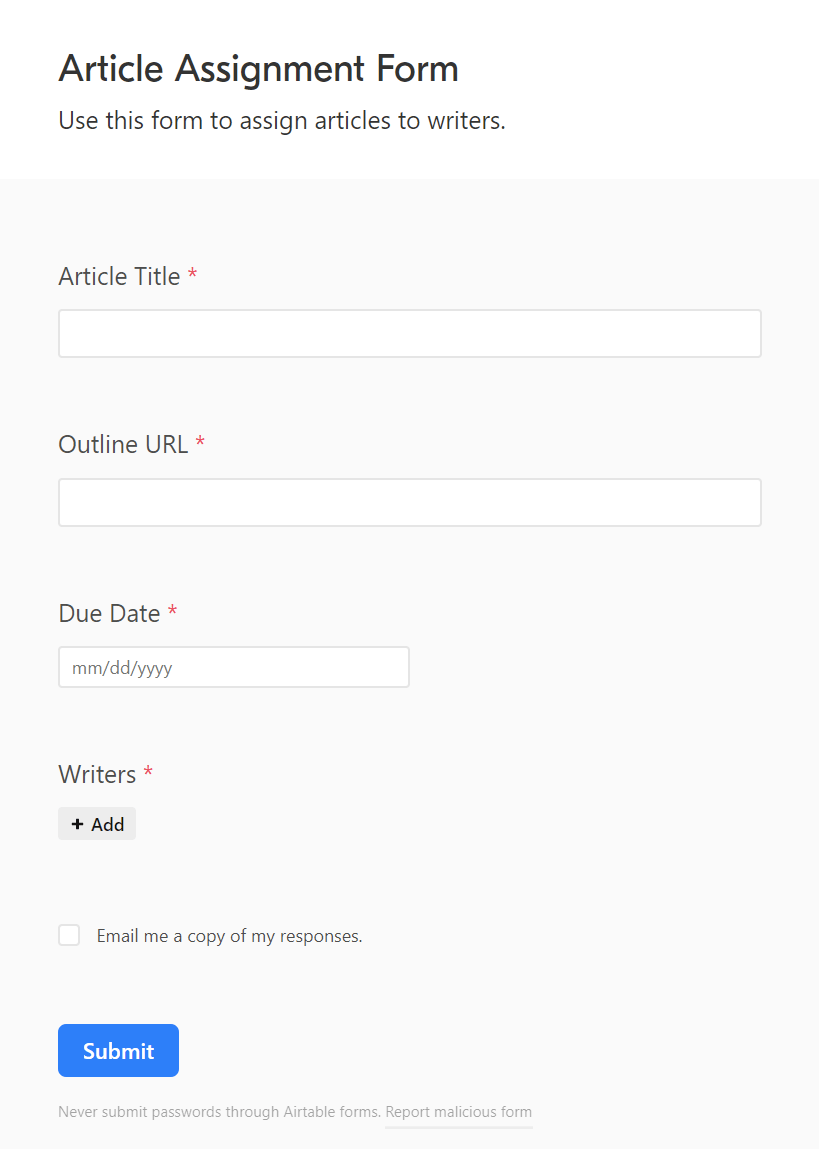
Let’s look at how to set this up.
1. Set up an Airtable database for your writer and article data
Sign up for Airtable and create a new database with a table called “Writers.” The table should have columns for your writers:

In the same Airtable database, create a separate table called “Articles.”
Set up columns in this table for your:
- Article titles.
- Article outline links.
- Article due dates.
- Assigned writer (set this column up as a linked record to your “Writers” table so that Airtable can retrieve data on your writers from it).

You’ll also need to add a lookup field to pull the writer’s email address from the “Writers” table.
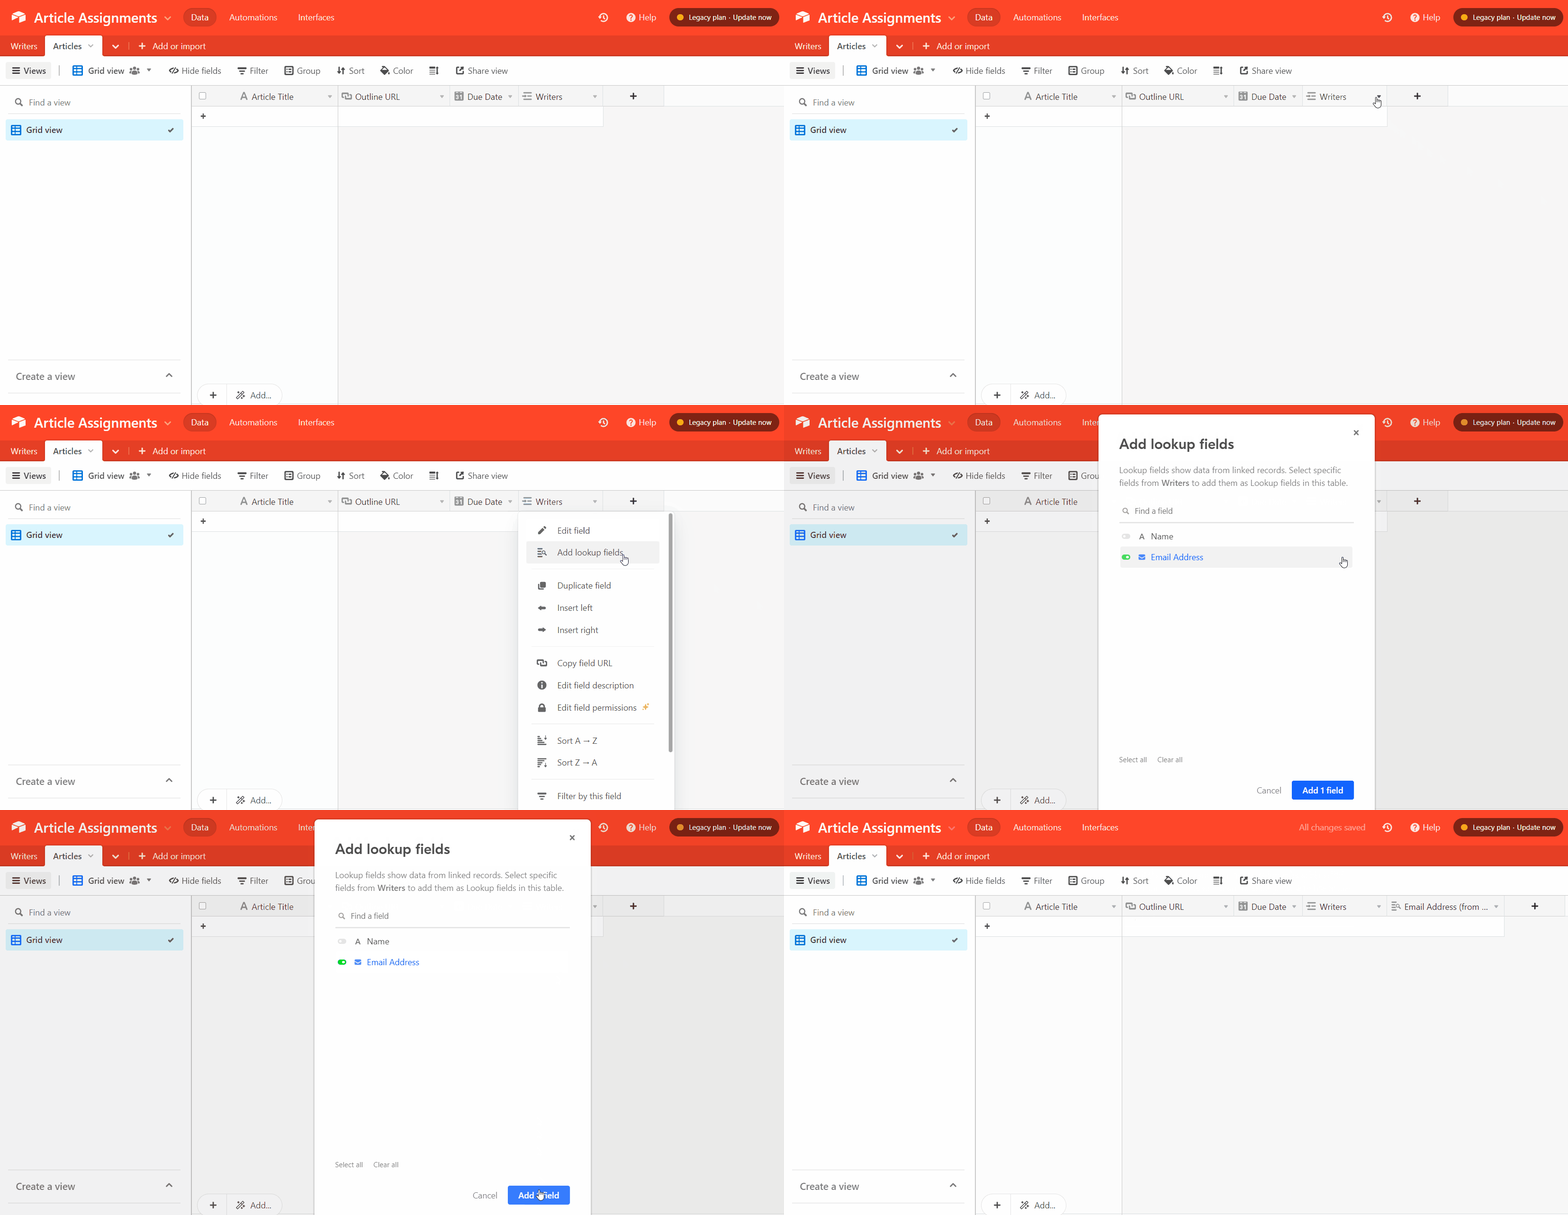
2. Create an Airtable article assignment form
Next, create an article assignment form for the “Articles” table. You’ll use this form to add new article assignments to the “Articles” table.
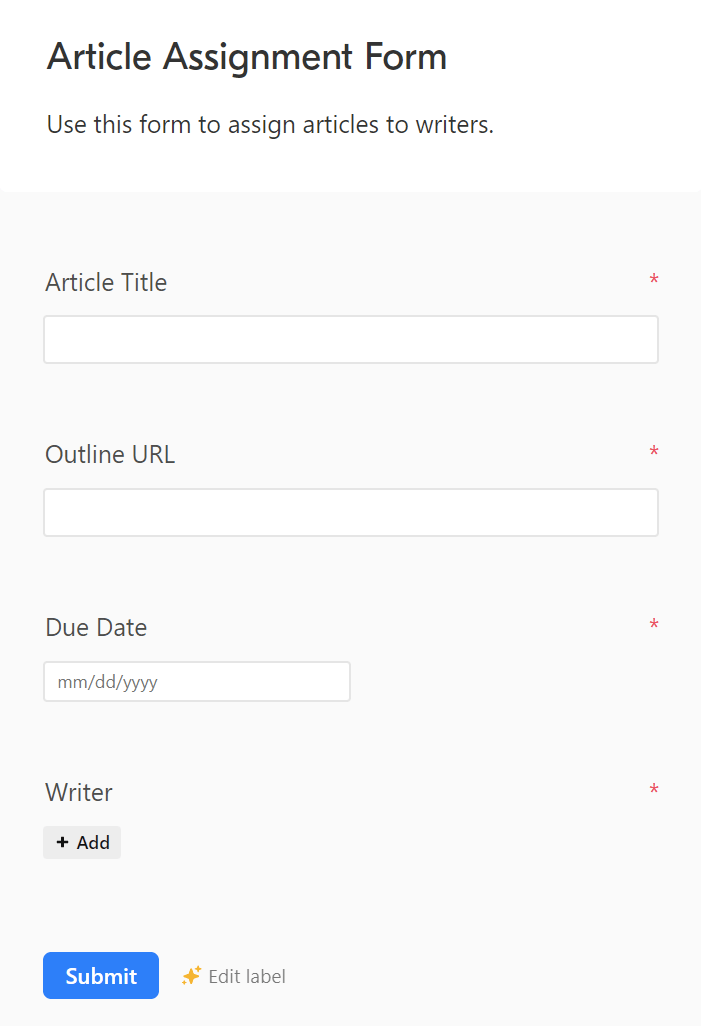
3. Set up a new Zapier automation with a “New Record in Airtable” trigger
When you submit your details on the new article assignment via the Airtable form, Airtable will automatically record the new article assignment in your “Articles” table. So that’s the first step of the article assignment workflow sorted.
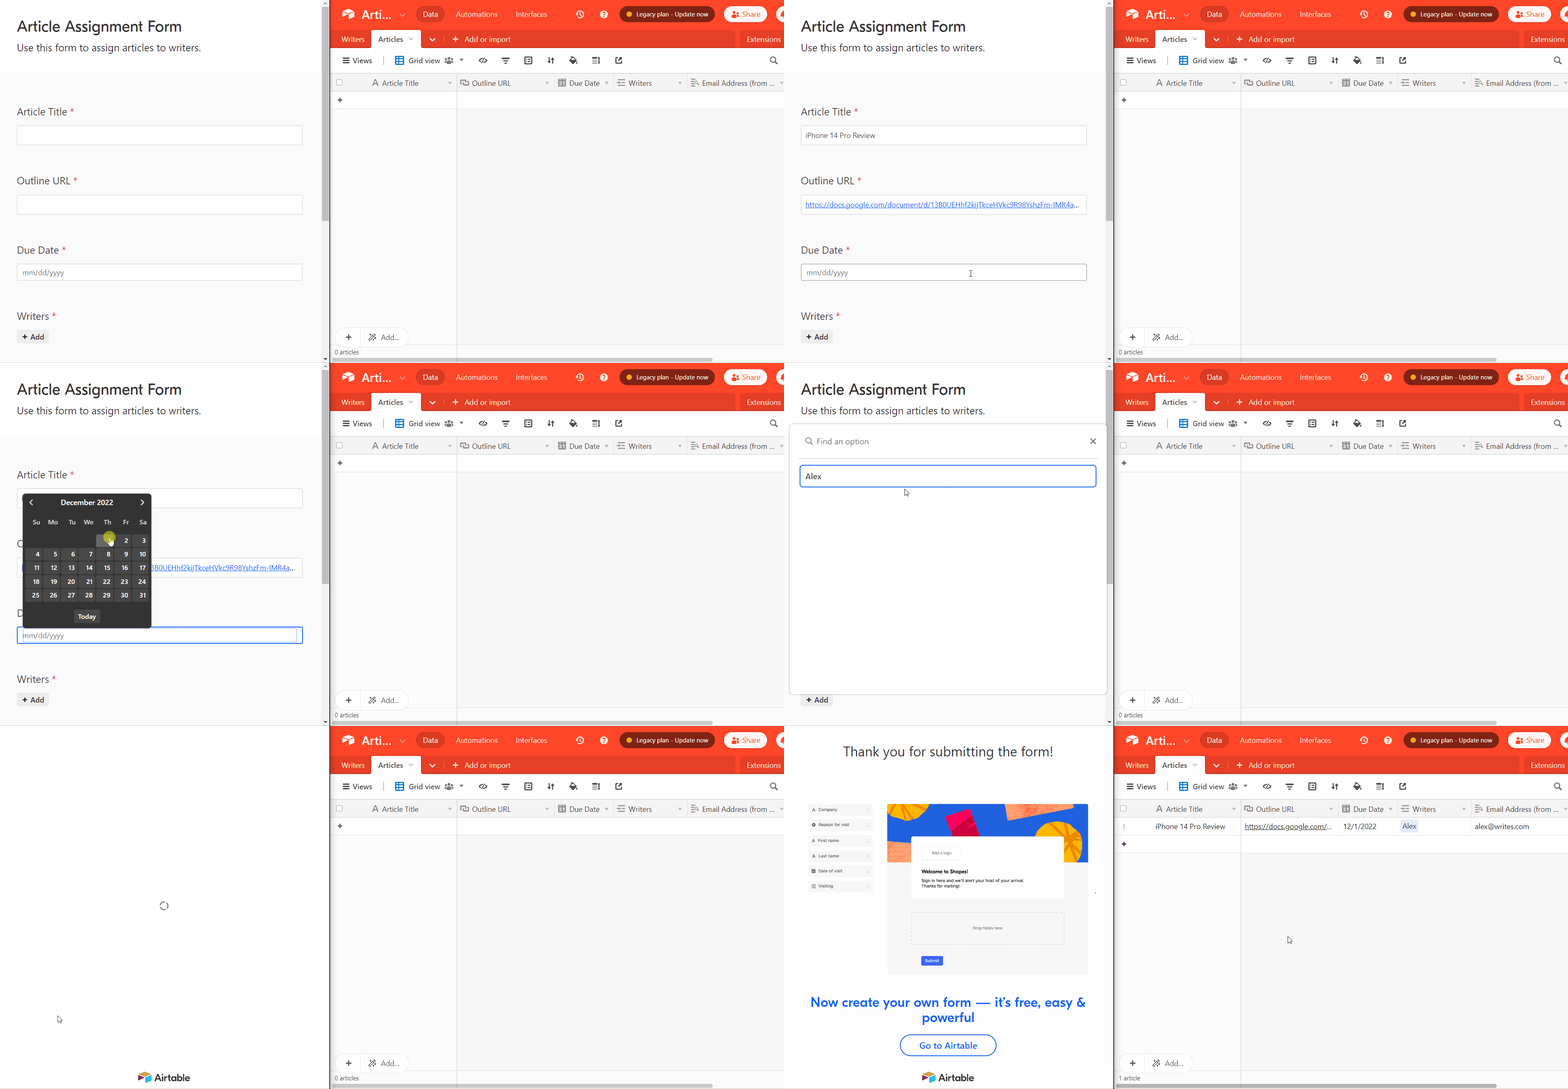
Now, we’ll use the Zapier workflow automation tool to automate the next three steps in the workflow—namely:
- Create a shared Google Drive submission folder for the article.
- Create a Google Doc submission document in the shared Google Drive folder.
- Use Gmail to email the writer the article title, outline link, due date, and link to the shared Google Drive submission folder.
Sidenote.
Instead of Zapier, you can also use any other workflow automation tool, such as Make, as long as the tool supports the automation triggers and actions you’ll need.
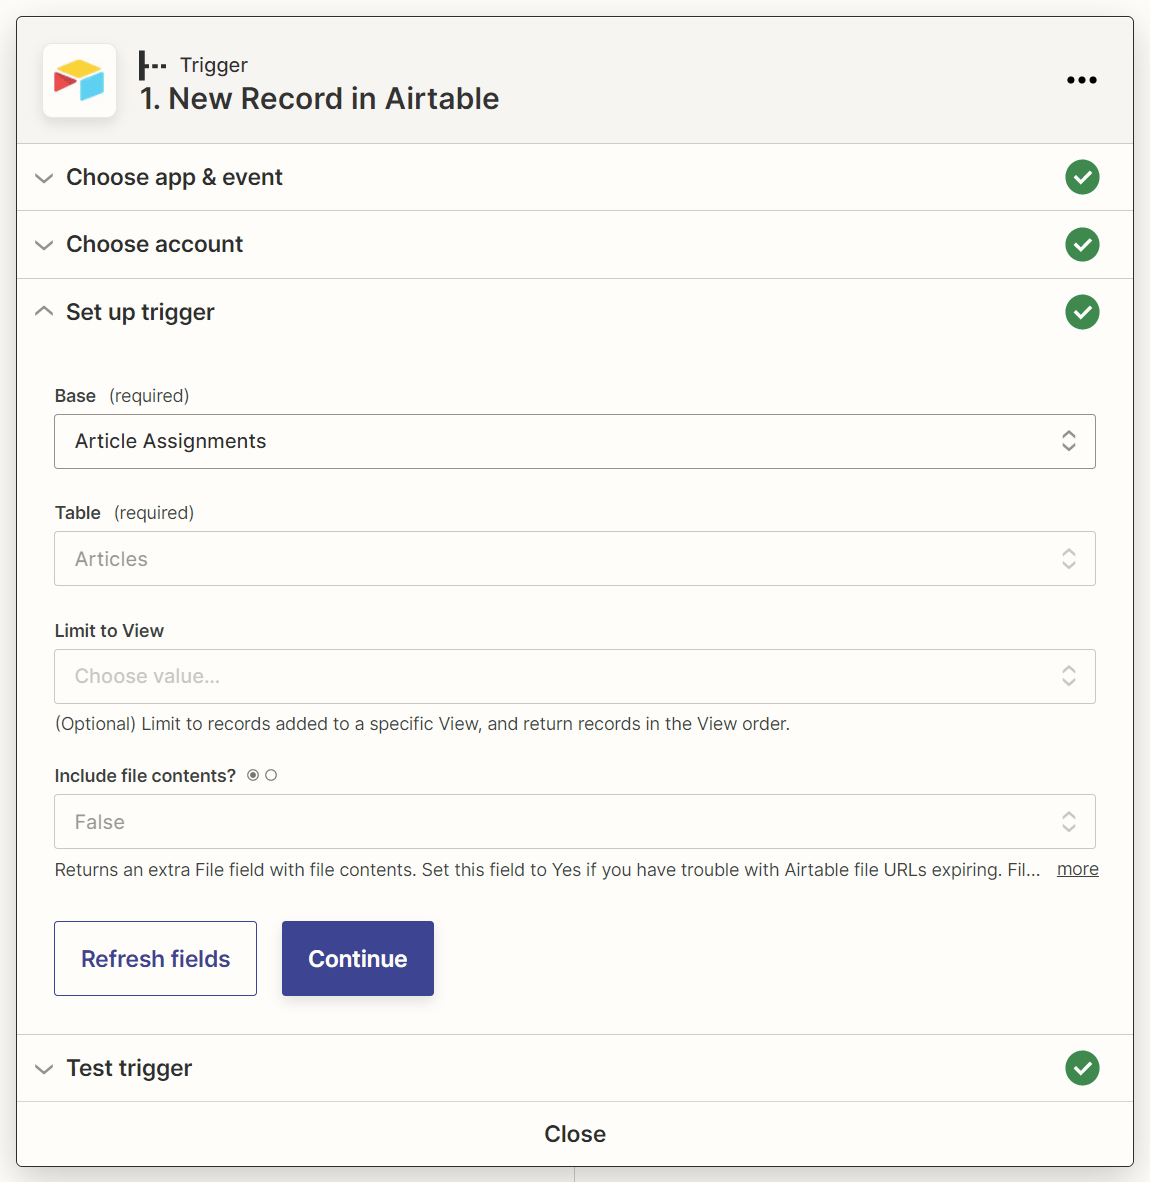
In Zapier, create a new automated workflow (also known as a “Zap”) with:
- Airtable as the trigger app.
- New Record as the trigger event.
With this trigger, your Zap will start running when you add a new record to Airtable (such as by submitting your Airtable article assignment form).
4. Add a “Create Folder in Google Drive” action step to your Zap
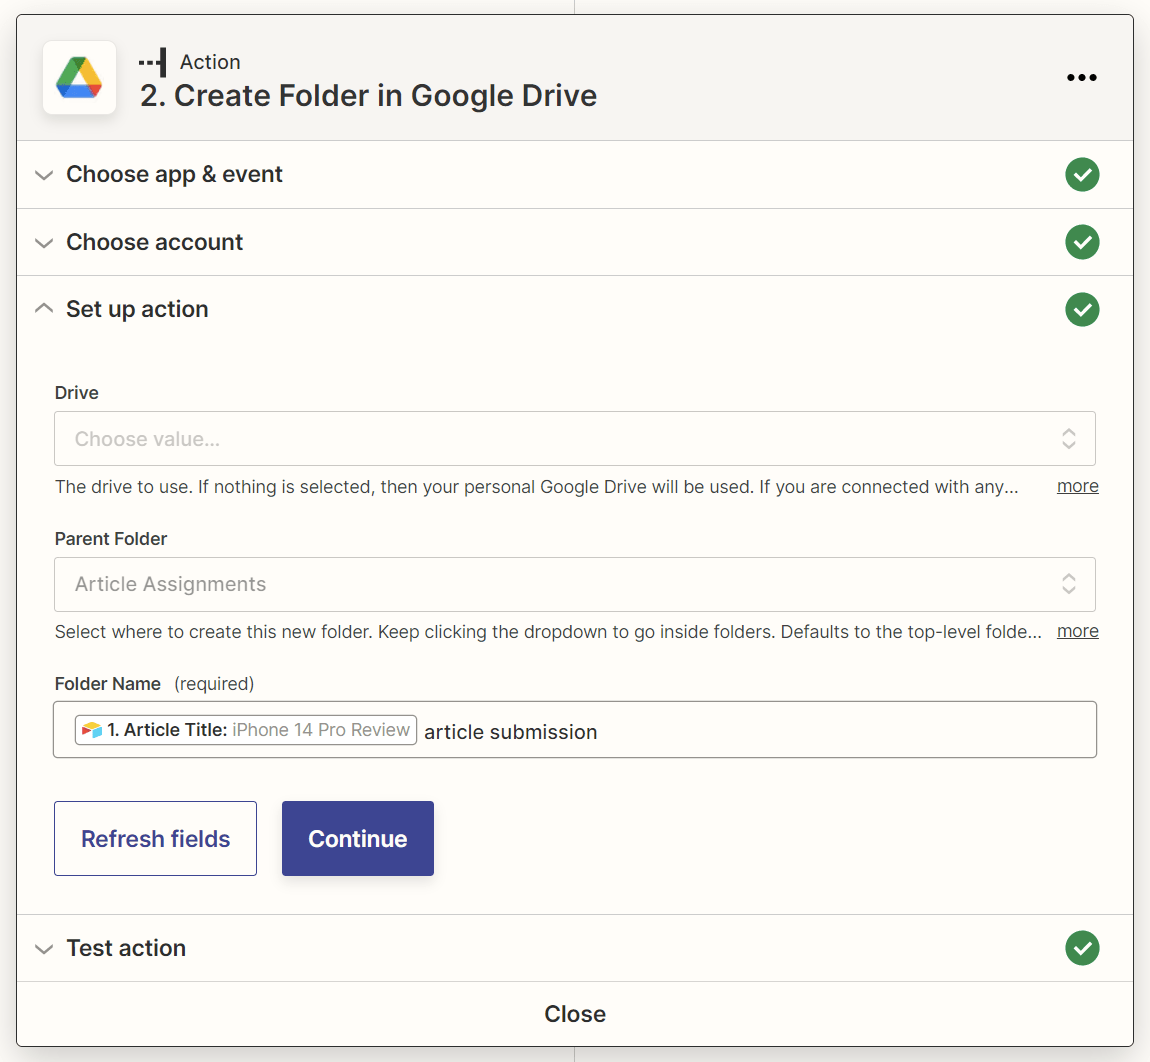
Next, add an action step with:
- Google Drive as the action app.
- Create Folder as the action event.
For the action step’s “Parent Folder” field, select the Google Drive folder in which the new submission folder should be created.
Also, provide a name for the submission folder in the “Folder Name” field. You can map the article title data from Airtable here to name your submission folder after the article’s title.
5. Add an “Add File Sharing Preference in Google Drive” action step to your Zap
The Google Drive folder created by your Zap will have its sharing permissions disabled by default, so let’s add an action step to grant folder access to anyone who has the link to the folder.
This action step should have:
- Google Drive as the action app.
- Add File Sharing Preference as the action event.
Map the file ID of the Google Drive folder created in the previous action step to the “File Id” field of this action step.
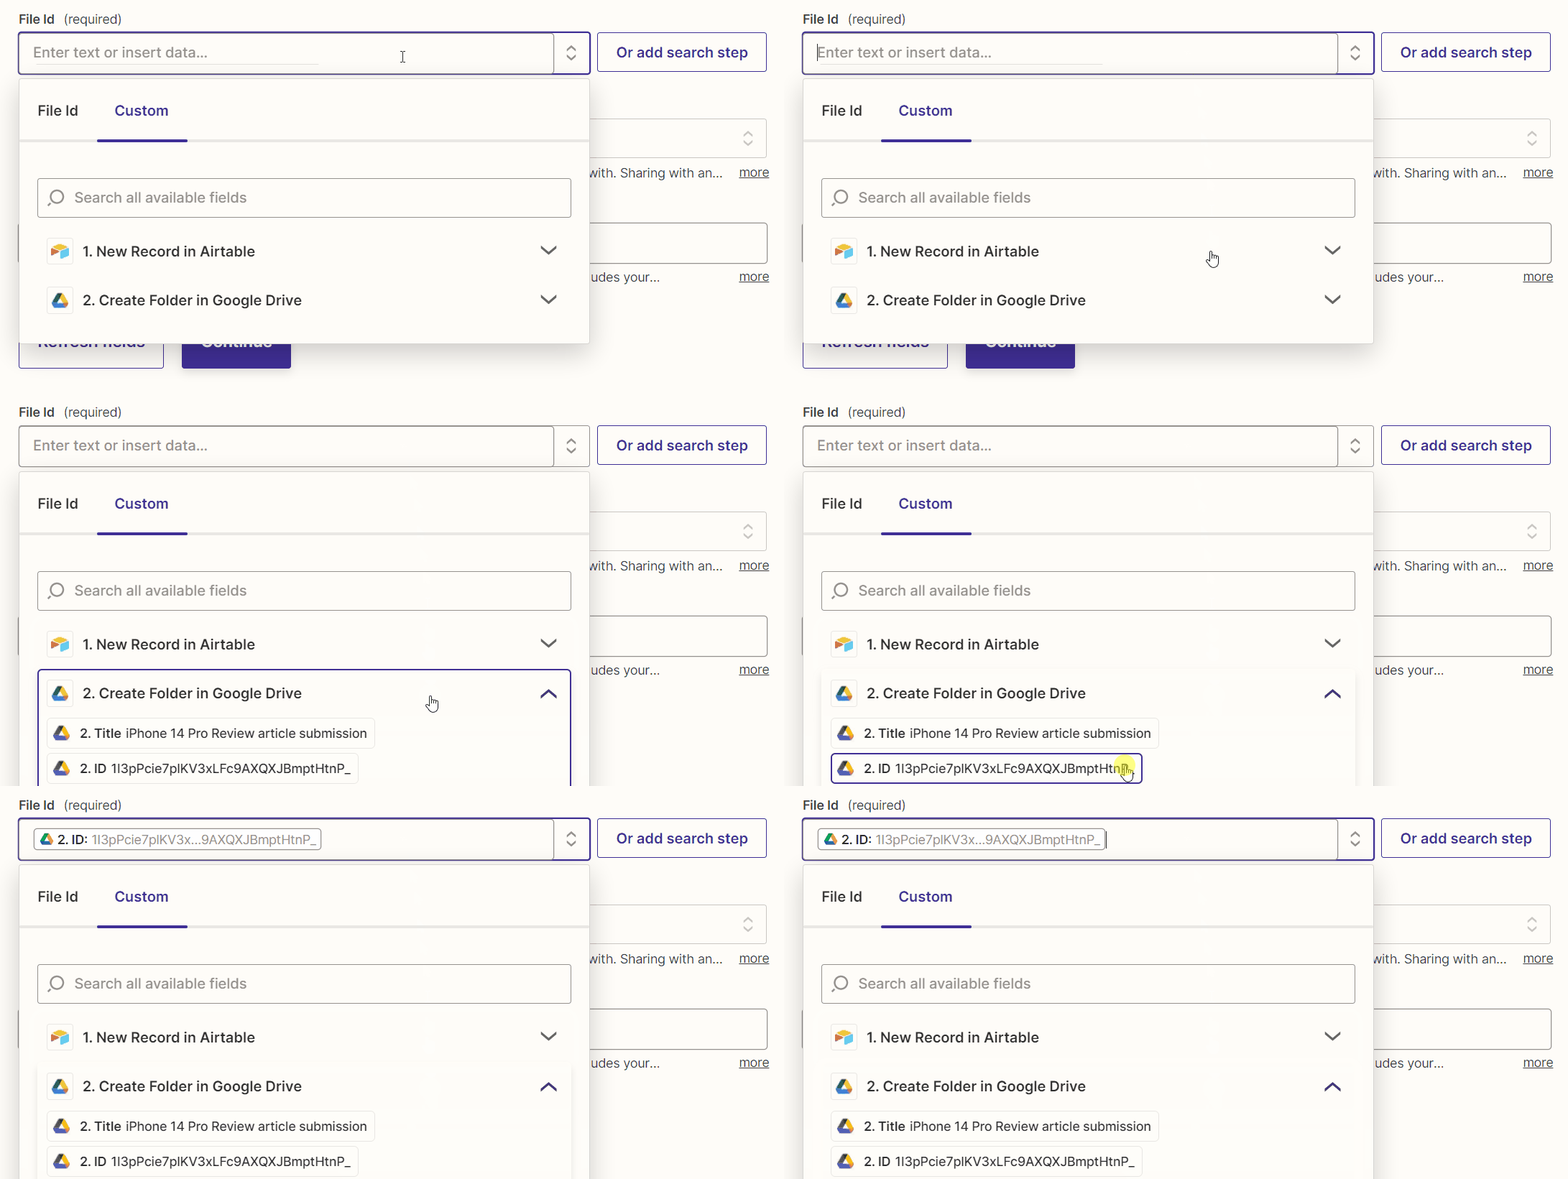
In addition, set the “Sharing Preference” field to “Anyone on the internet who has the link can edit.”

6. Add a “Create Document from Text in Google Docs” action step to your Zap
Now, let’s set up the Google Doc that the writer will use to submit their draft.
We’ll have the Zap create this submission Google Doc in the shared Google Drive submission folder. And since the Google Drive folder will have general access enabled, anyone with the link to the Google Drive folder—and this includes you—will also automatically get access to the Google Doc.
No more frustration over writers forgetting to grant access to their Google Docs!
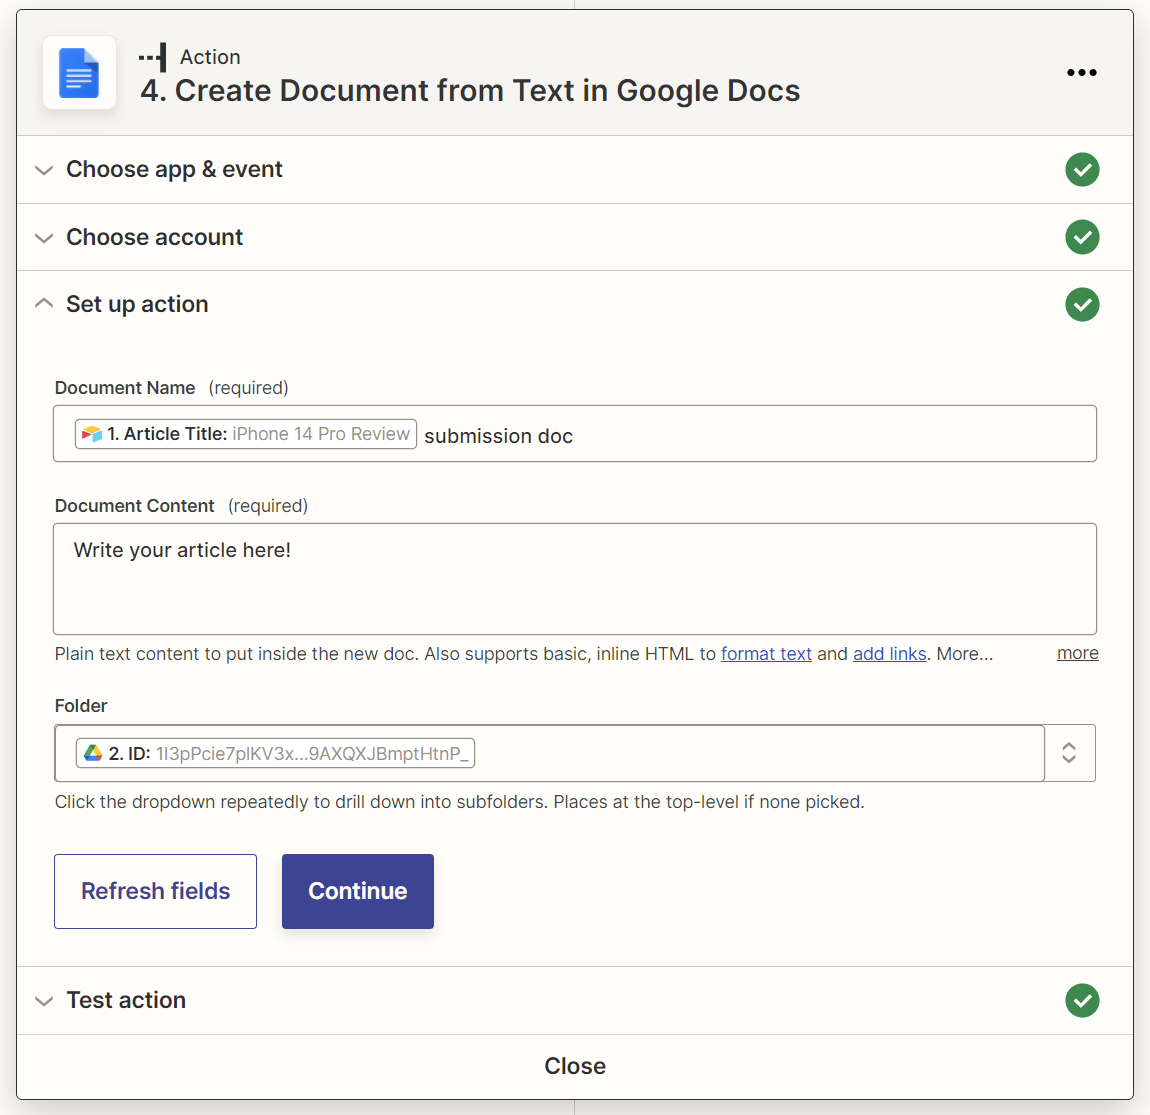
So add a new action step to your Zap with:
- Google Docs as the action app.
- Create Document from Text as the action event.
Map the article title data from Airtable to the action step’s “Document Name” field, and the folder ID of the shared Google Drive folder to the “Folder” field.
You’ll also need to include some default text in the Google Doc, such as “Write your article here!”
7. Add a “Send Email in Gmail” action step to your Zap
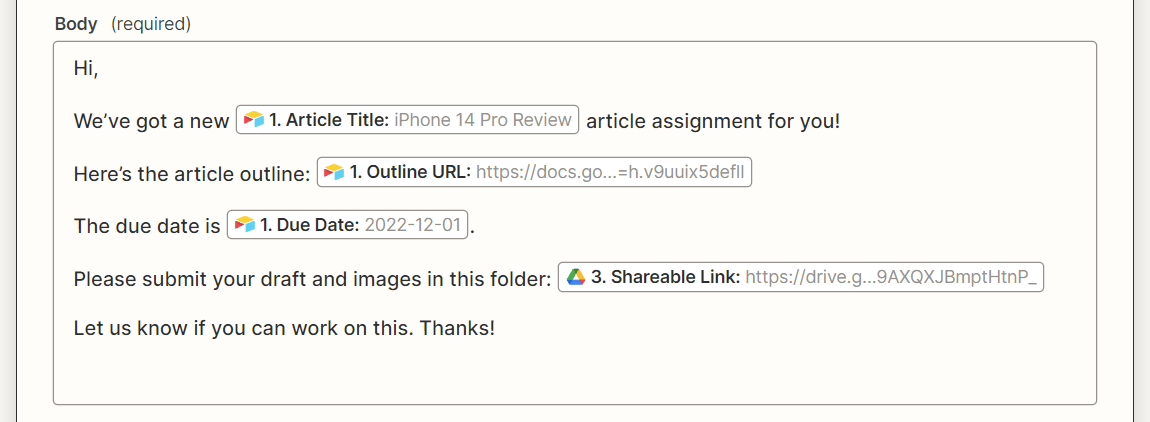
Finally, we’ll get the Zap to use your Gmail account to email the writer the article title, outline link, due date, and link to the shared Google Drive submission folder.
Add a last action step to your Zap with:
- Gmail as the action app.
- Send Email as the action event.
Map the writer’s email address from Airtable to the “To” field for this action step. Also, map the article title, outline link, due date, and Google Drive submission folder link in the email body.
I also recommend adding your own email address to either the “Cc” or “Bcc” field so you get a copy of the automated email (and can confirm it’s been sent).
Once you’re happy with your Zap, hit the Publish button to activate your automation!
Finding email addresses for link building outreach can be a massive pain.
After all, most prospects don’t advertise their email addresses publicly. And even if you’ve managed to dig up their email addresses (or guess them using trial and error), there’s no guarantee they work.
But using Ahrefs’ Content Explorer, you can generate a huge Google Sheets list of link building prospects that looks like this:

Then as you fill out the “Approve?” column for each prospect with data—such as “Yes” or “Approved”—a Zapier automation will automatically do all these for you:
- Find the prospect’s email address using the Hunter email lookup tool
- Add the email address to your Google Sheet list of prospects
- Verify the email address using the NeverBounce email verification tool
- Add the verified email address to the Woodpecker.io email outreach tool so you can start sending customized outreach emails
Here’s how to set this up.
1. Get your list of prospects
Launch Ahrefs’ Content Explorer and search for link prospects.
For example, if you recently published a marketing survey with unique insights and statistics, you may want to look for marketing statistics pages to pitch. To do this, simply run an “In title” search for “marketing statistics.”
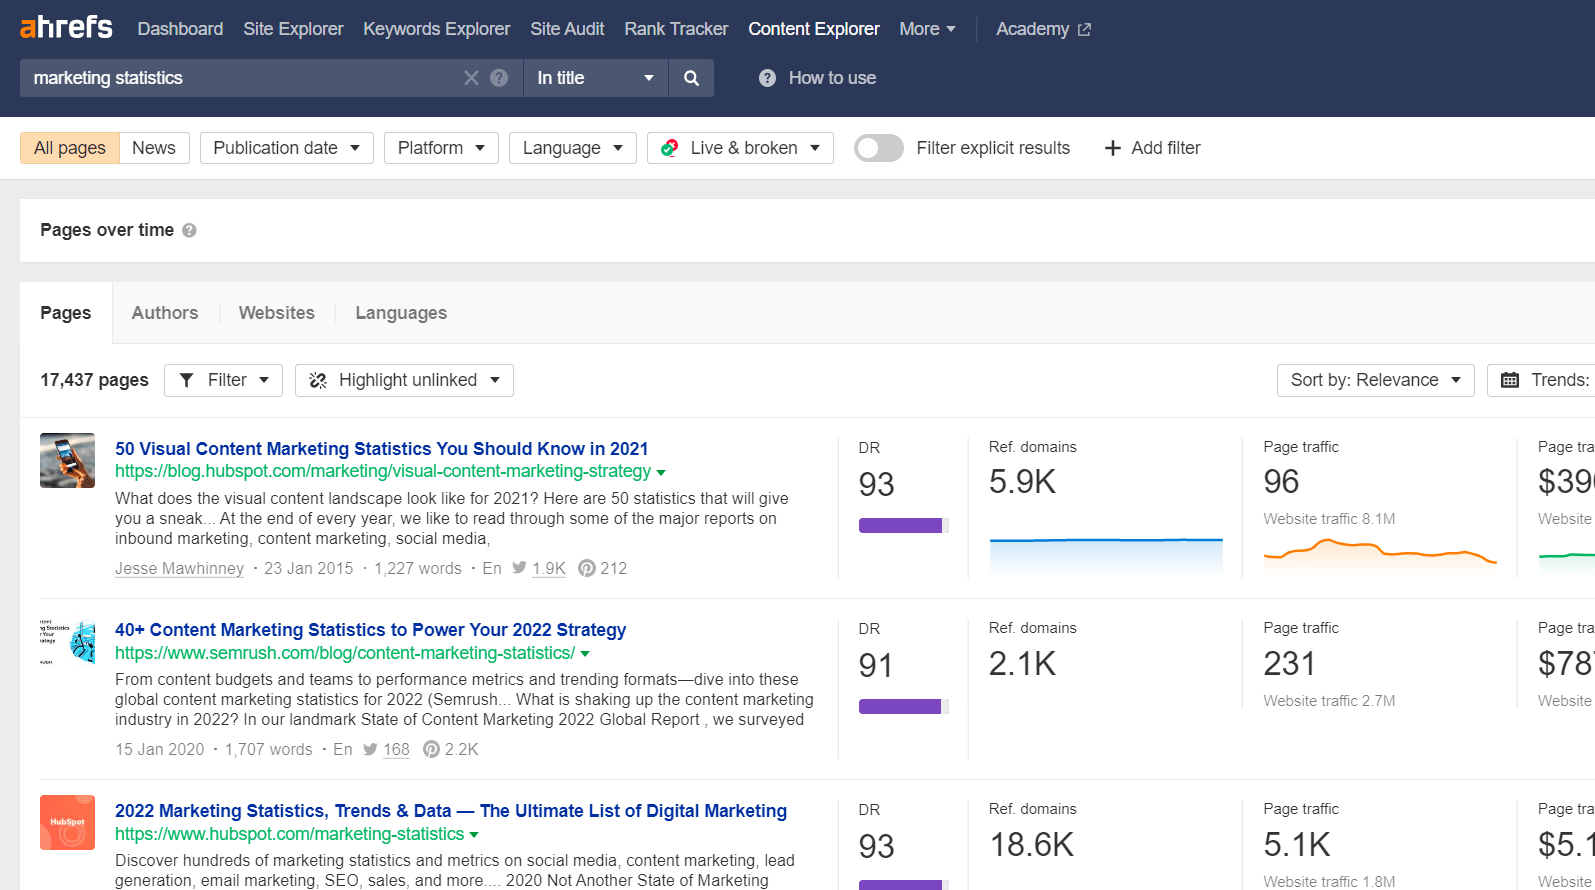
Next, filter your results to show only webpages that are:
- In English (unless you’re targeting webpages in another language).
- Live, as it’d be weird to reach out and say, “Hey, I found you through [this webpage that no longer exists].”
- On websites with a Domain Rating (DR) of 20 to 80 because you want to prioritize pursuing backlinks from authoritative websites but also that your chances of getting backlinks from super high-authority websites are quite low.

Add a last filter to show only one page per domain (since you want to reach out to only one prospect per website).
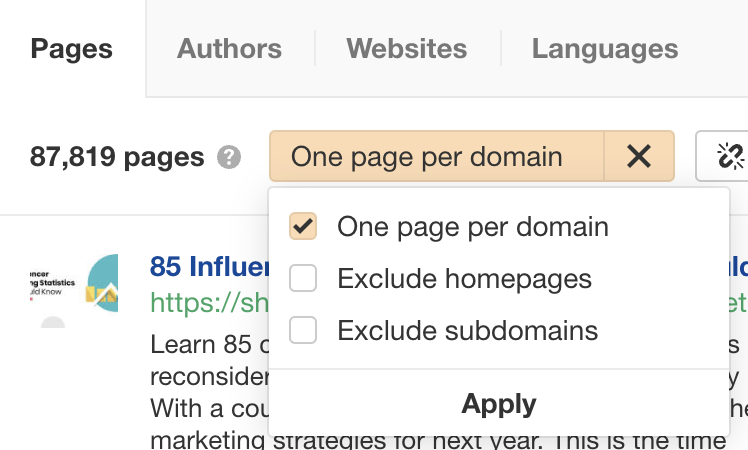
Click the Export button to export your list of prospects in a CSV file.
2. Clean up your list of prospects
As mentioned, we’ll be using Hunter to help us find our prospects’ email addresses.
Hunter uses the first names, last names, and domains of prospects to find email addresses, so we’ll clean up our list of prospects to provide Hunter with the exact data it needs.
Import your CSV list of prospects in Google Sheets and delete all columns in it except for:
- Content Title
- Content URL
- Author
Also, some of the prospects in the CSV don’t have author names, so it’s worth removing these rows from the CSV. To do this, just filter for rows with empty author names and delete them.
Next, use the SPLIT formula to split the author names into their first and last names based on the space between their names.
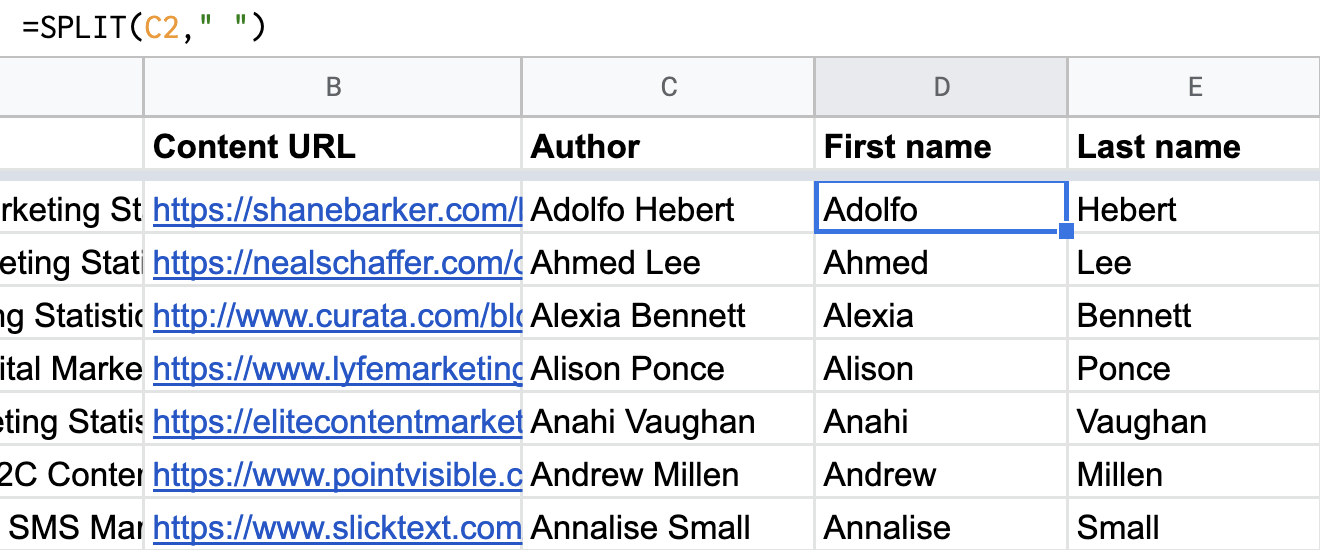
Finally, add two new columns to the sheet:
- Approve?: Adding data to this column will trigger the Zapier automation we’ll be setting up next!
- Email Address: This column will store the prospect’s email address (if found).

3. Set up a new Zapier automation with a “New or Updated Spreadsheet Row in Google Sheets” trigger
In Zapier, create a new Zap with:
- Google Sheets as the trigger app.
- New or Updated Spreadsheet Row as the trigger event.
Map the action step’s “Trigger Column” field to your Google Sheet’s “Approve?” column.
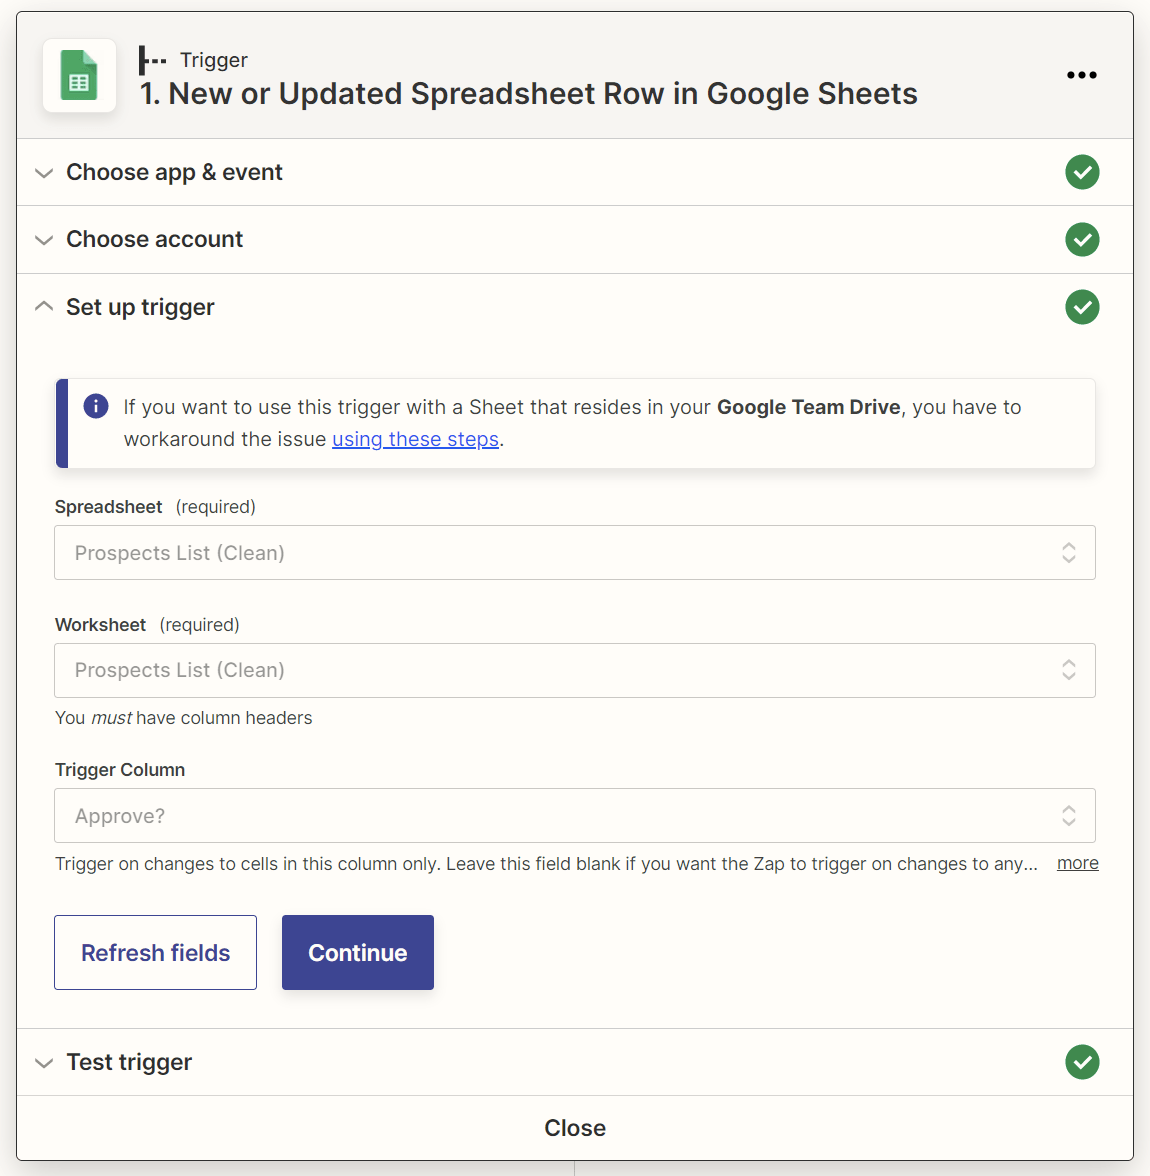
With this setup, you’ll trigger your Zap whenever you add new data—such as “Yes” or “Approved”—to the “Approve?” column for any prospect row.

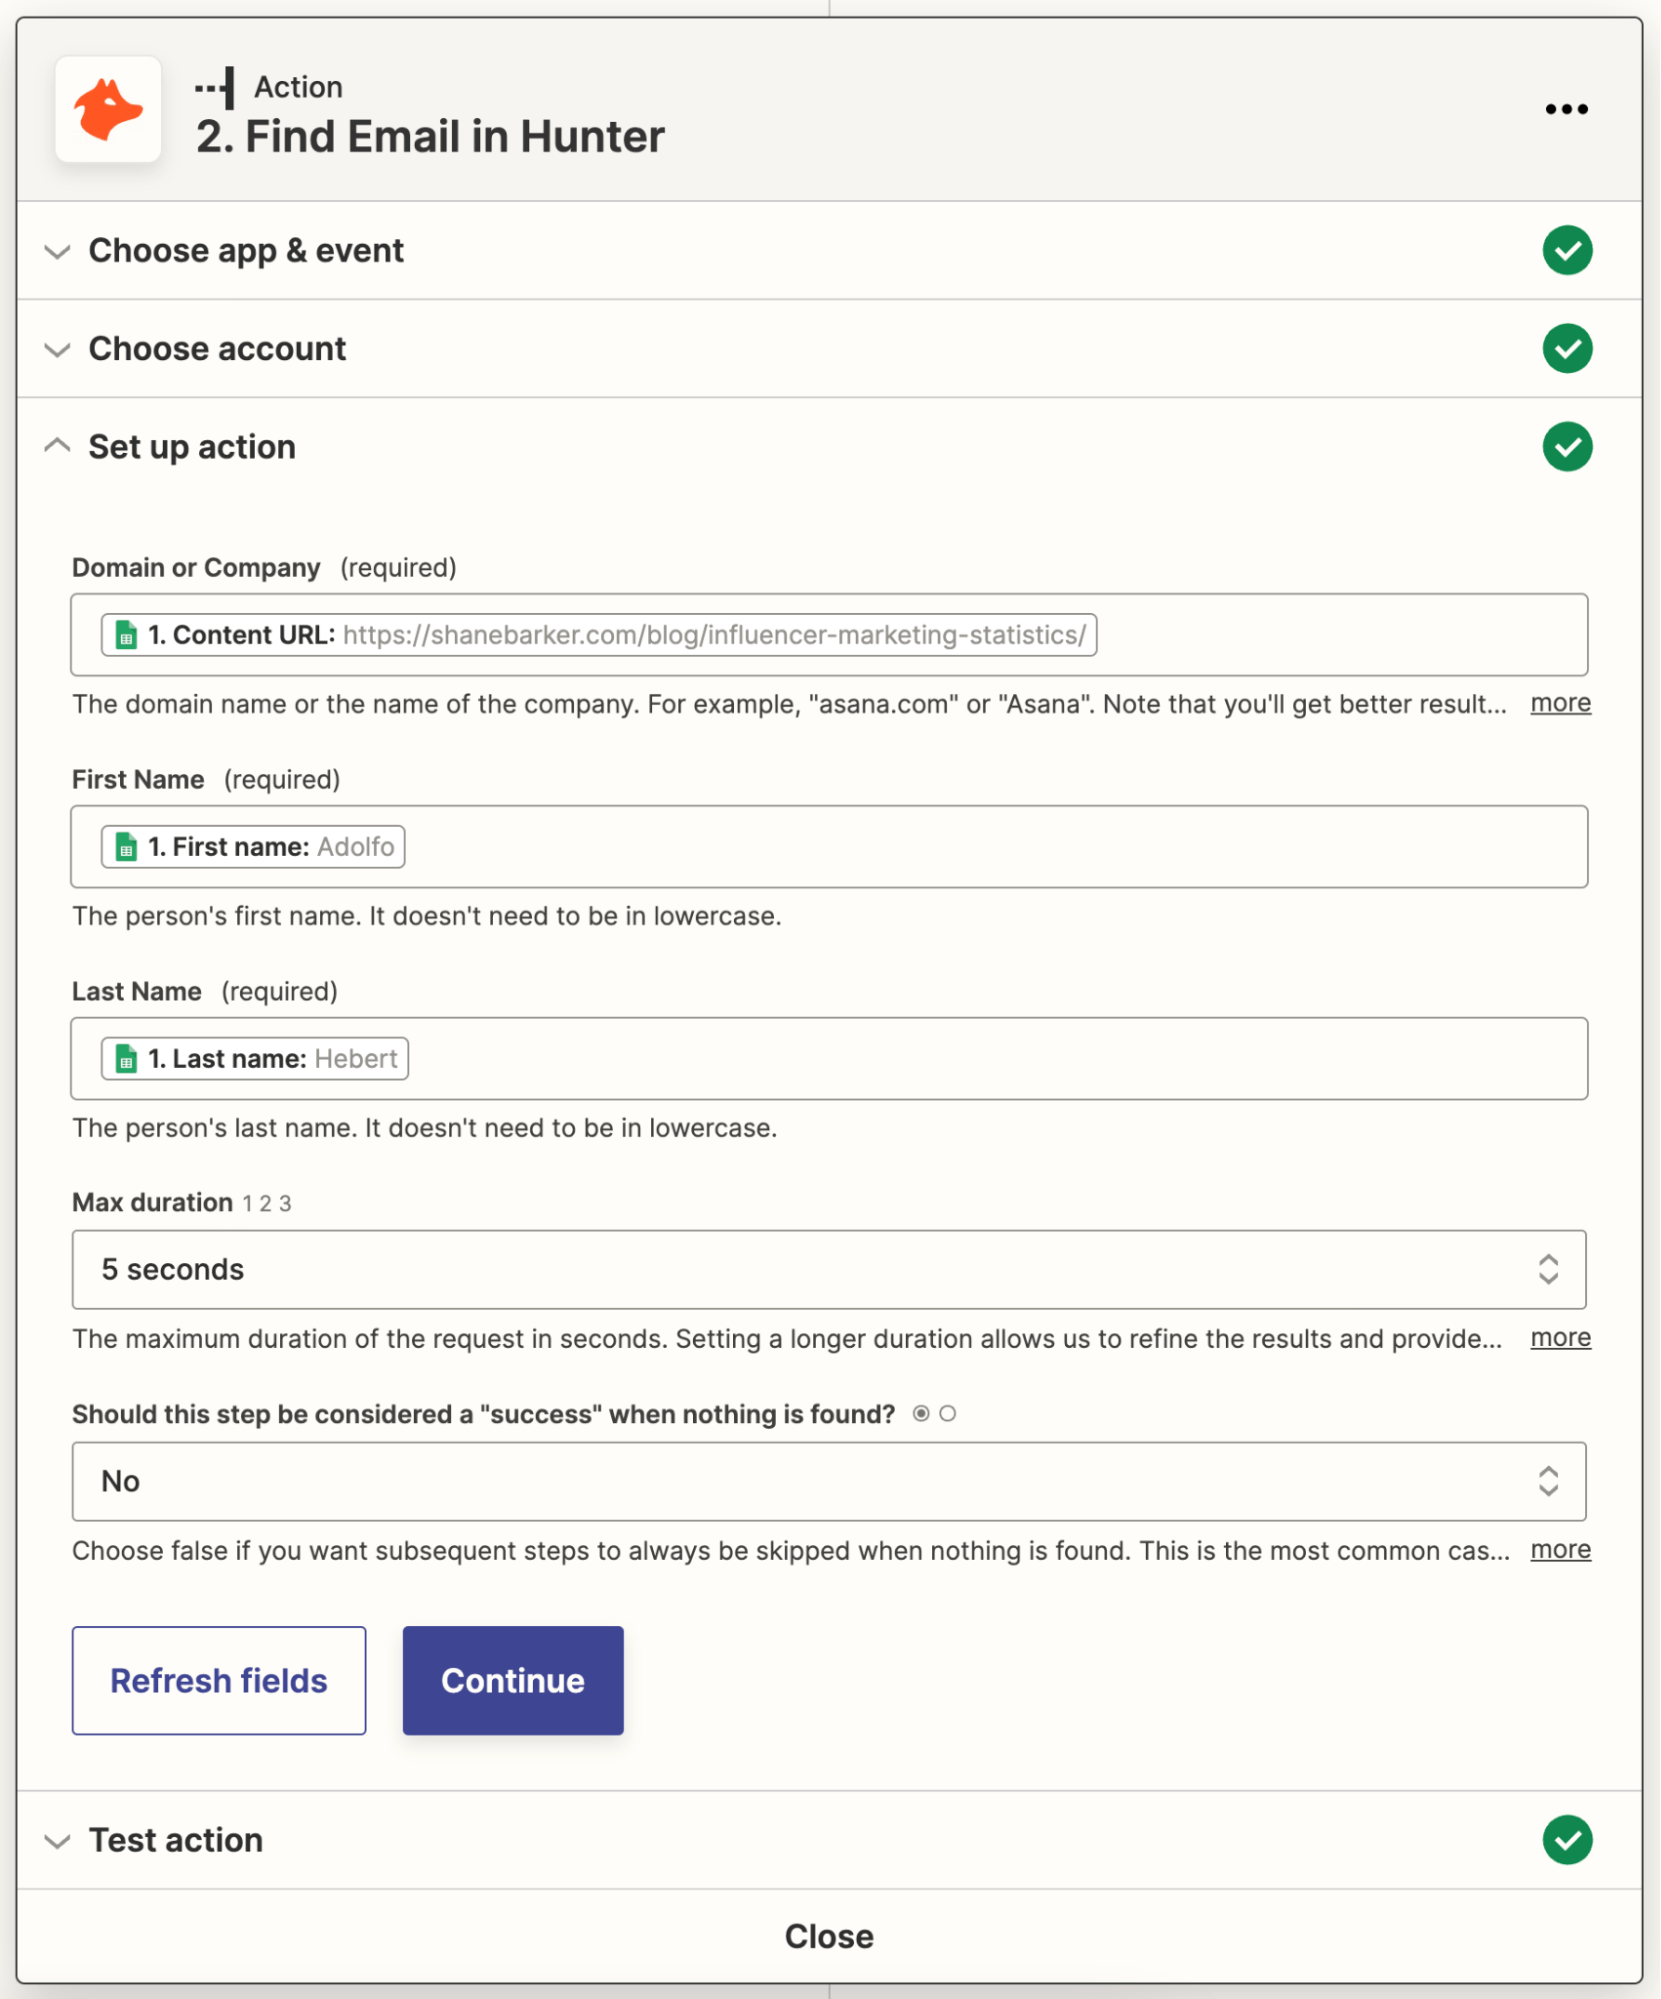
4. Add a “Find Email in Hunter” action step to your Zap
Next, add a new action step with:
- Hunter as the action app.
- Find Email as the action event.
Map the “Content URL,” “First Name,” and “Last Name” columns in your Google Sheet to the “Domain or Company,” “First Name,” and “Last Name” fields for this action step, respectively.
5. Add an “Update Spreadsheet Row in Google Sheets” action step to your Zap
The next action step will update your Google Sheet with a prospect’s email address if Hunter finds it. Use:
- Google Sheets as the action app.
- Update Spreadsheet Row as the action event.
Map the Row Number of the updated row in the trigger step to this action step’s “Row” field.
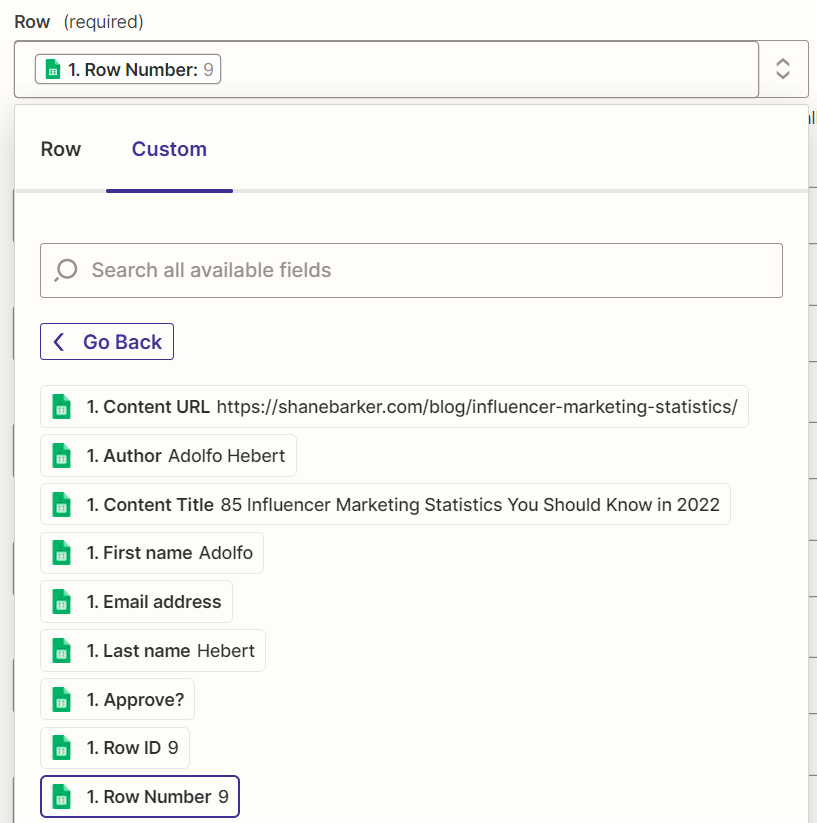
Also, map the email address that Hunter found in the previous action step to the “Email Address” field of this action step.

Sidenote.
This email address does not exist. It is for demo purposes only.
6. Add a Filter action that lets the Zap continue only if Hunter has found an email address
Next, set up a Filter action that lets the Zap proceed only if the email address data found by Hunter contains the “@” symbol.
That’s because all email addresses have the “@” symbol. If Hunter happens to find an email address value that doesn’t include this symbol, we won’t want to waste time verifying it.

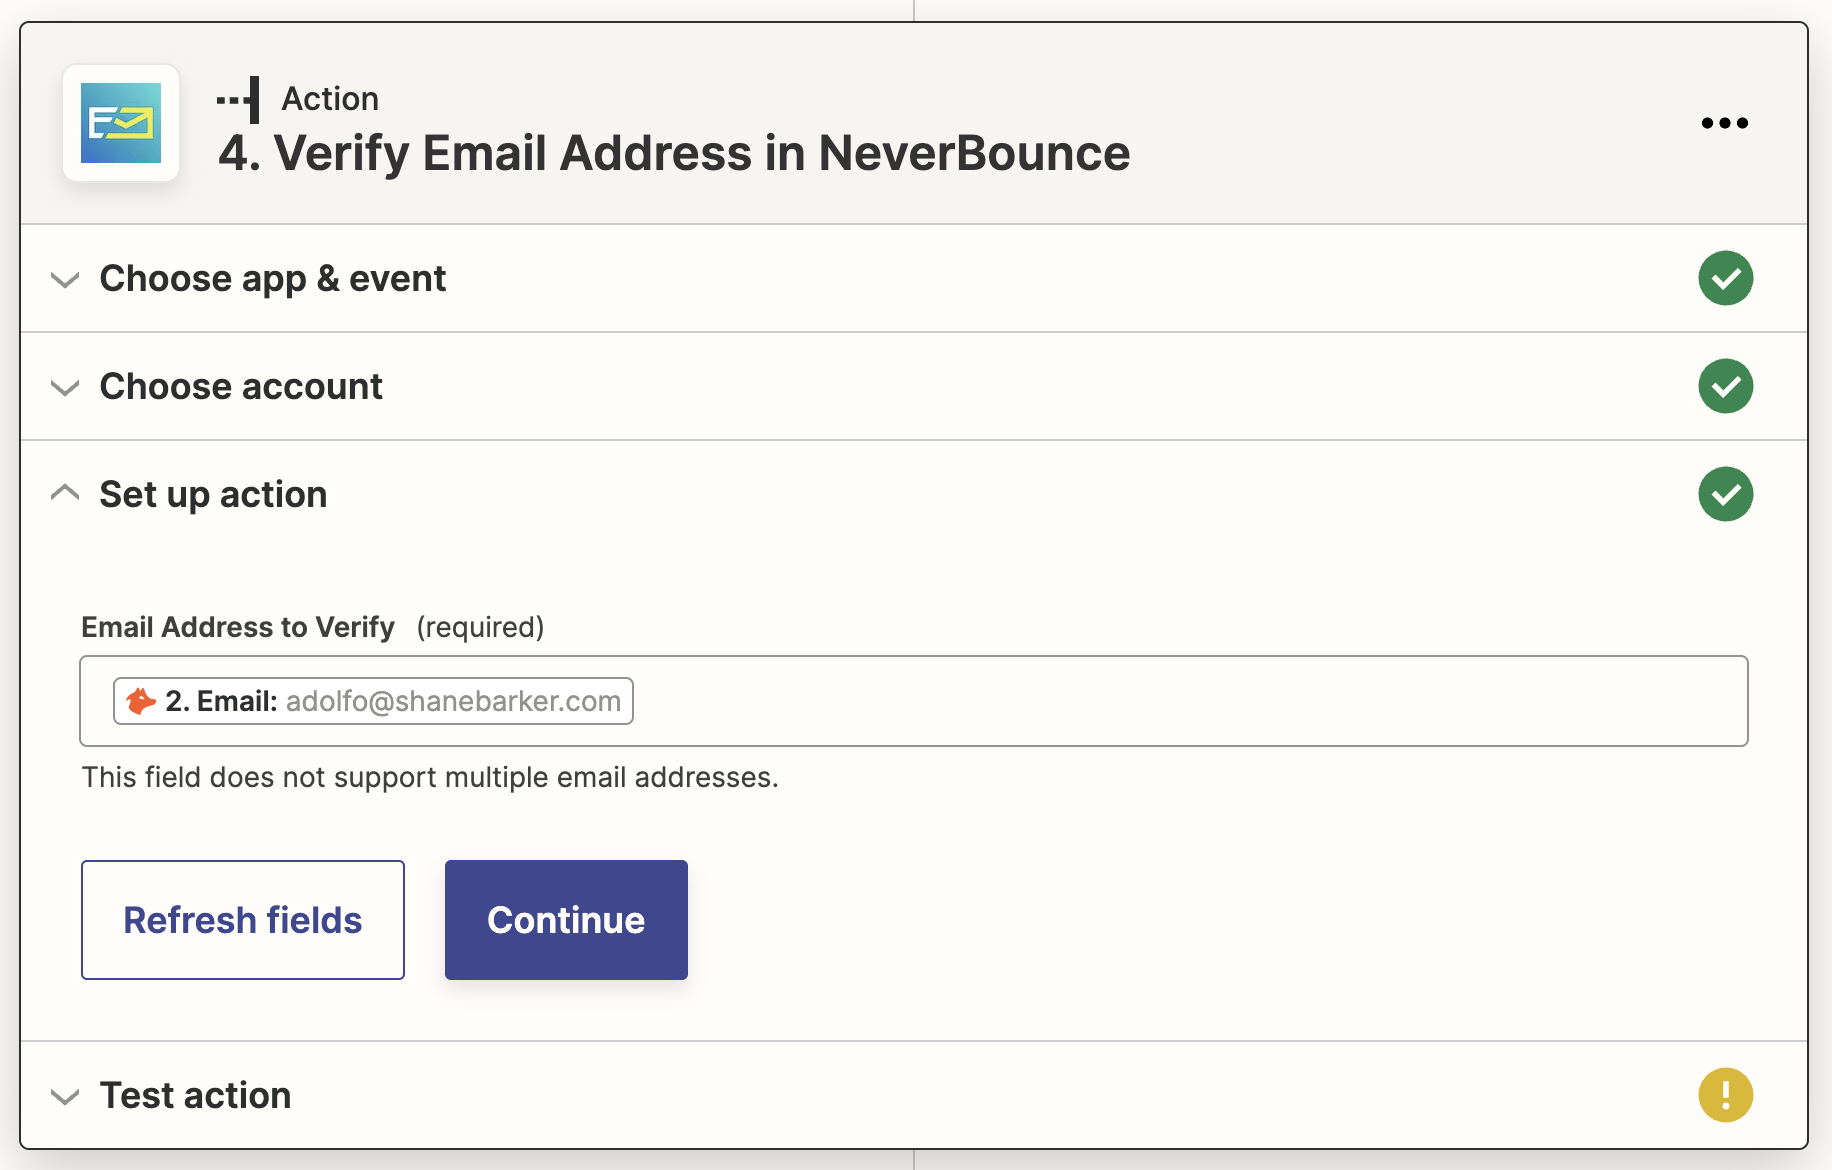
7. Add a “Verify Email Address in NeverBounce” action step to your Zap
Now, we’ll use NeverBounce to verify the validity of the email addresses that Hunter found. Add a new action step with:
- NeverBounce as the action app.
- Verify Email Address as the action event.
Map the email address that Hunter found to this action step’s “Email Address to Verify” field:
8. Add a Filter action that lets the Zap continue only if NeverBounce returns a “Valid” or “Catchall” status for the email address
When NeverBounce verifies an email address, it will return one of four status text codes: Valid, Catchall, Invalid, and Unknown. Email addresses marked with the “Valid” and “Catchall” NeverBounce status codes have the highest likelihood of being valid.
So we’ll add a Filter action that lets the Zap proceed only if an email address’s NeverBounce status text code matches either “Valid” or “Catchall” exactly.
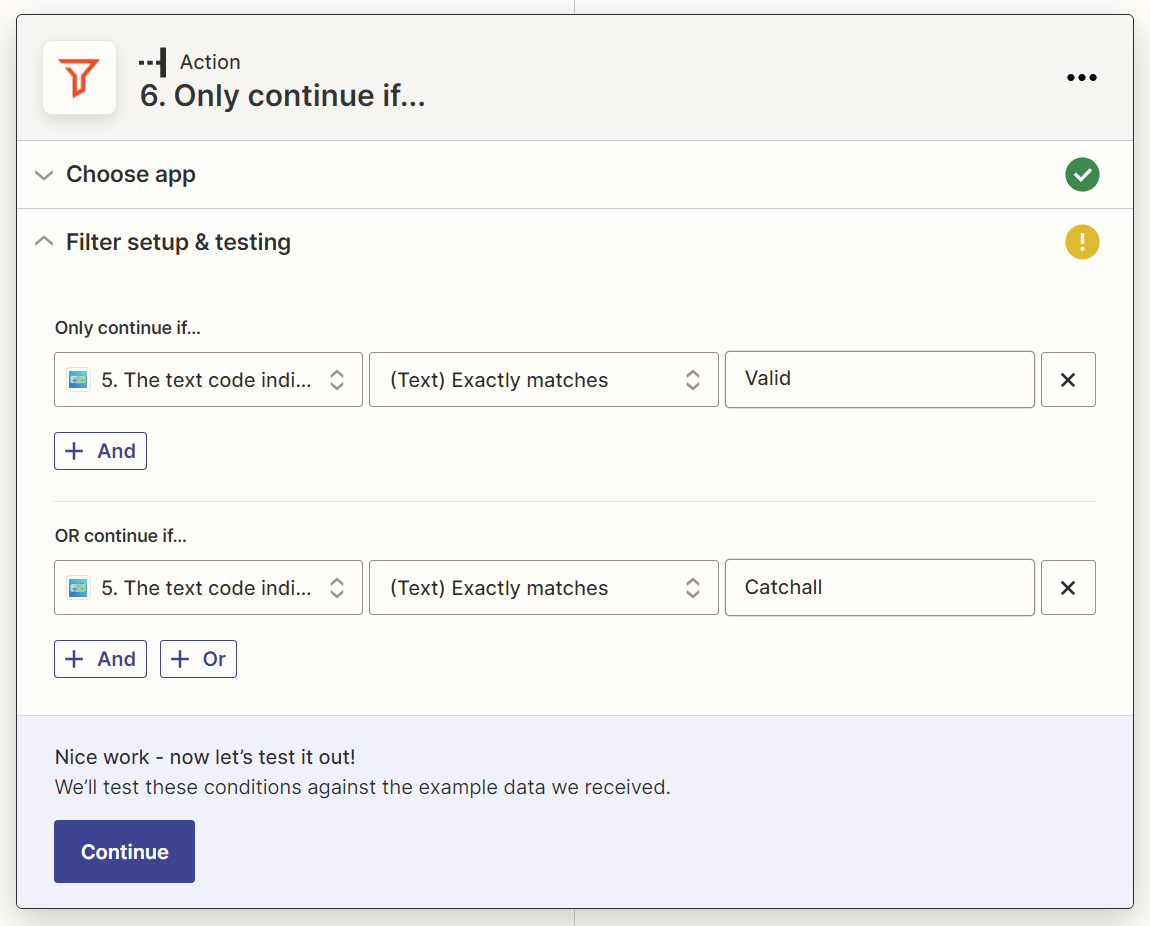
9. Add a “Create/Update Prospect in Woodpecker.co” action step to your Zap
Finally, we’ll set up the Zap to add the verified email address to Woodpecker.co.
Create a last action step with:
- Woodpecker.co as the action app.
- Create/Update Prospect as the action event.
Map the verified email address to the action step’s “Email” field, and your prospect’s first and last name (as obtained from Google Sheets) to the “First Name” and “Last Name” fields, respectively.
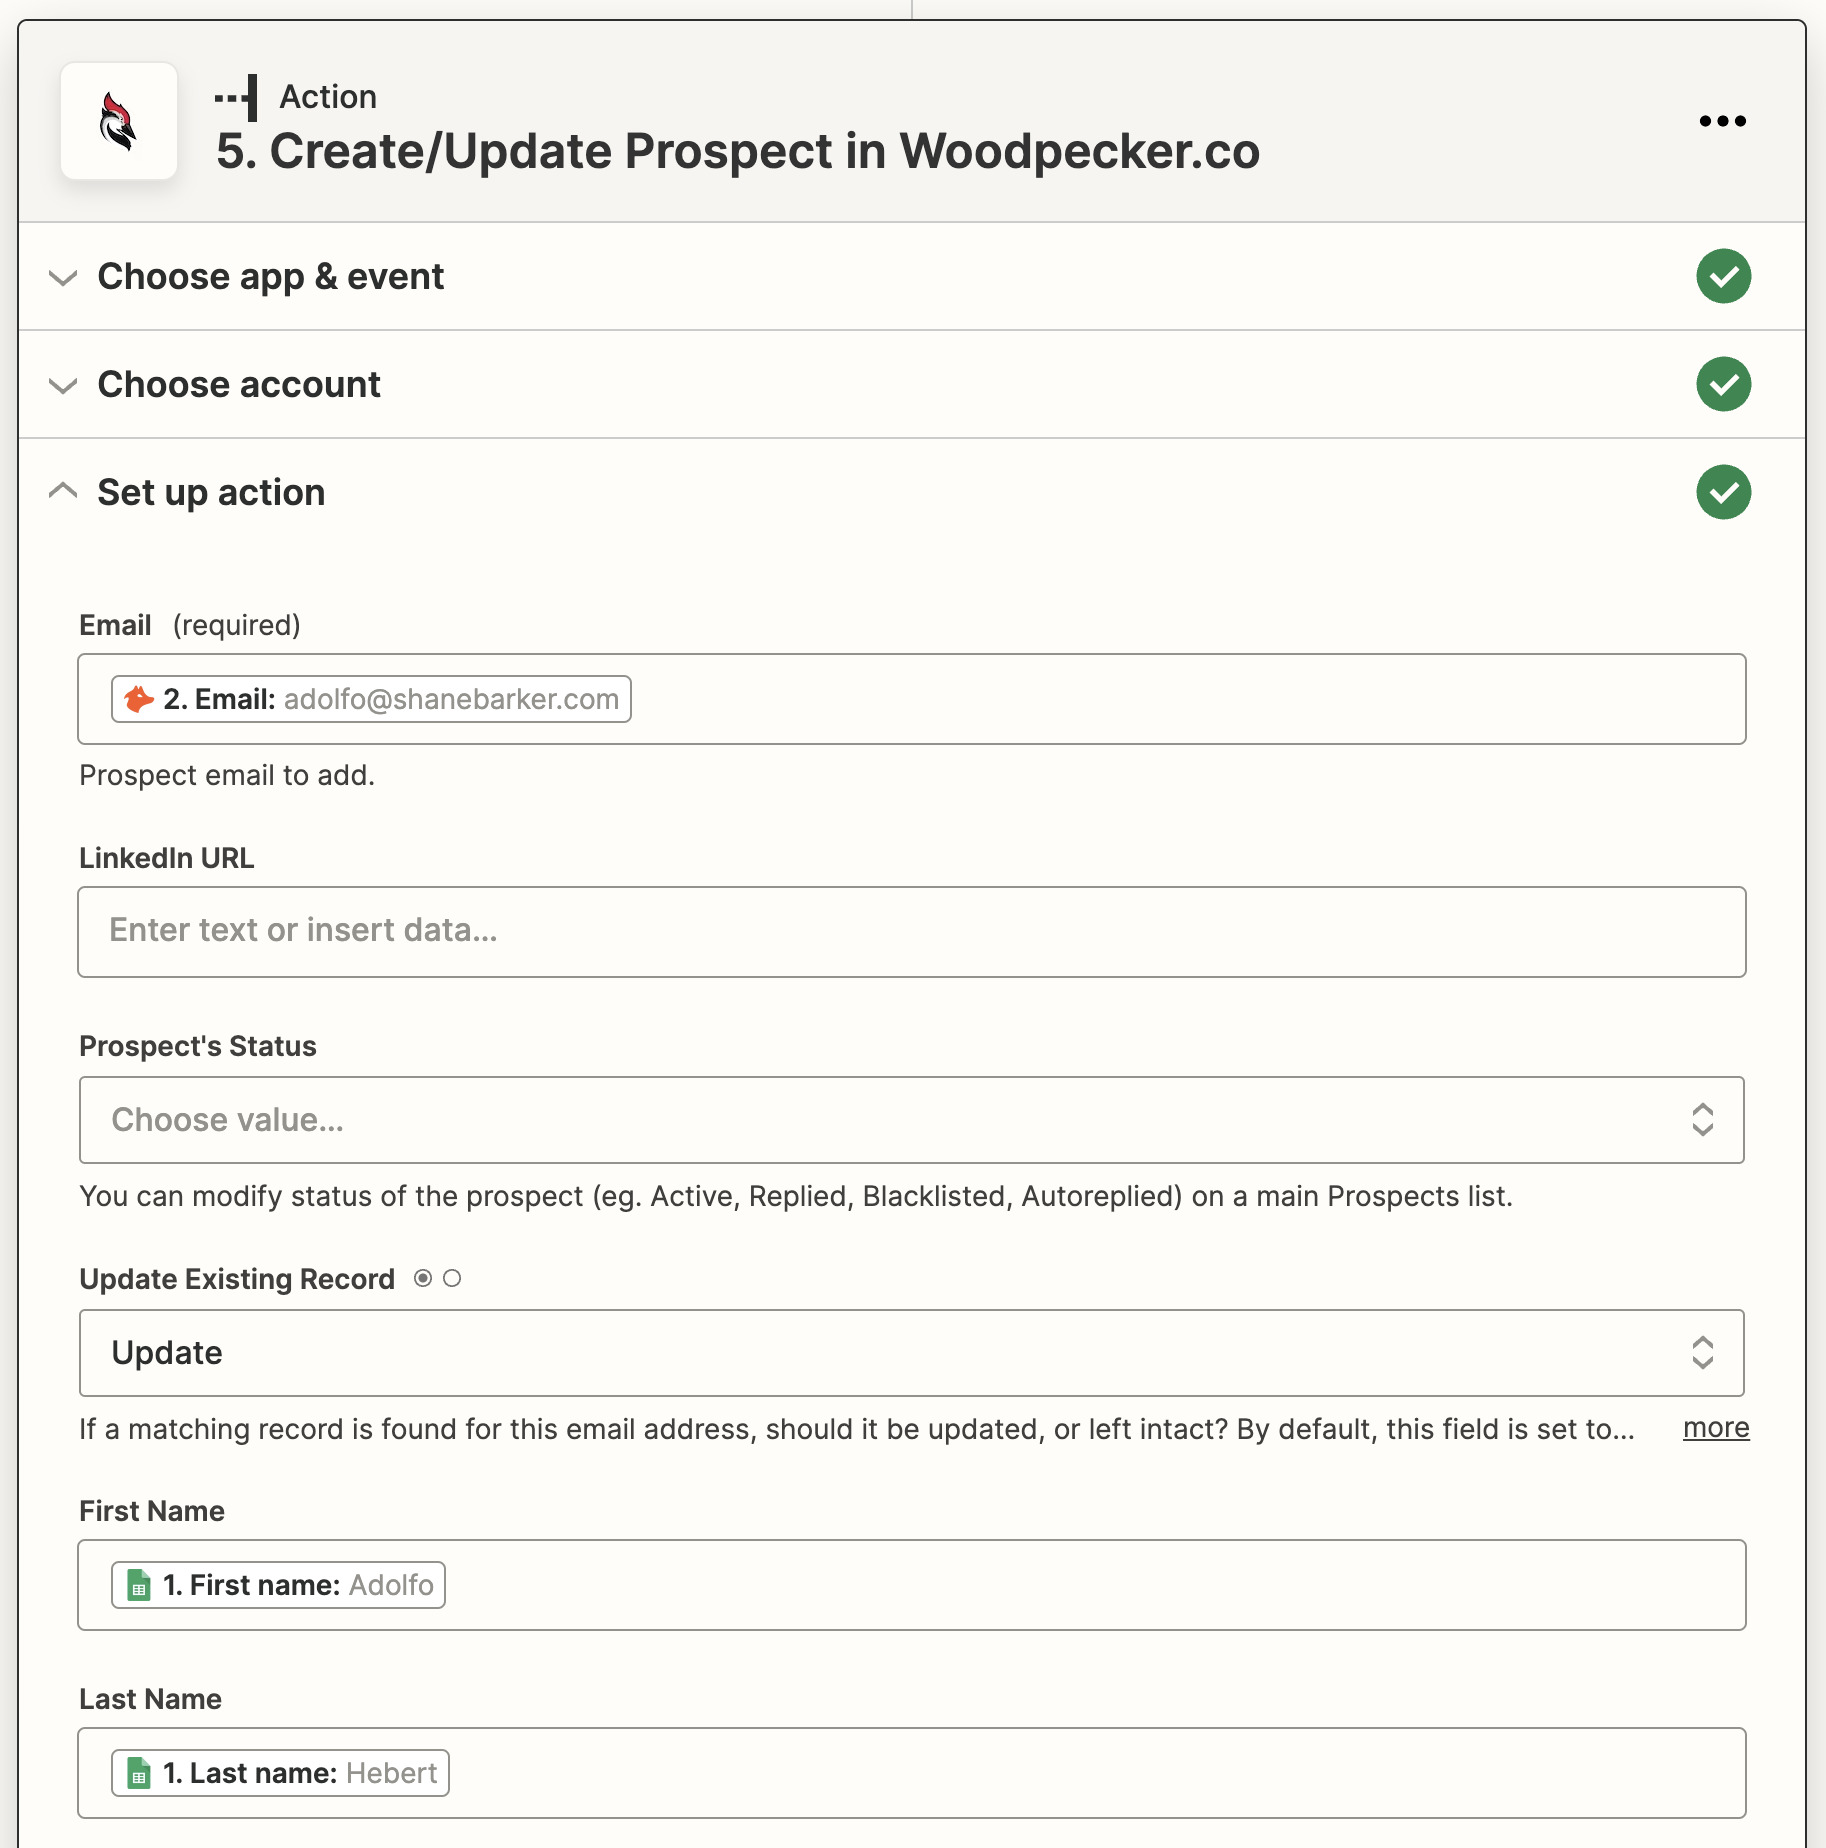
Hit the Publish button to turn your Zap on.
Now, when you fill out the “Approve?” column for prospects in your Google Sheet, your Zap will automatically do the heavy lifting of finding and verifying their email addresses using Hunter and NeverBounce and adding the verified email addresses to Woodpecker.co.
You can then customize your link building outreach emails in Woodpecker.co for each verified email address and, hopefully, snag yourself some backlinks!
Final thoughts
SEO automation takes some initial setup, but it’s amazing to watch your processes run automatically after that. It’s almost like magic.
And apart from the SEO processes we’ve shared here, there are probably plenty others you can automate.
Think of the apps you regularly use for SEO work. If you can connect these apps using Zapier or some other workflow automation tool, automating the workflows they support is likely more than possible.
Got questions? Ping me on Twitter.
SEO
OpenAI Expected to Integrate Real-Time Data In ChatGPT

Sam Altman, CEO of OpenAI, dispelled rumors that a new search engine would be announced on Monday, May 13. Recent deals have raised the expectation that OpenAI will announce the integration of real-time content from English, Spanish, and French publications into ChatGPT, complete with links to the original sources.
OpenAI Search Is Not Happening
Many competing search engines have tried and failed to challenge Google as the leading search engine. A new wave of hybrid generative AI search engines is currently trying to knock Google from the top spot with arguably very little success.
Sam Altman is on record saying that creating a search engine to compete against Google is not a viable approach. He suggested that technological disruption was the way to replace Google by changing the search paradigm altogether. The speculation that Altman is going to announce a me-too search engine on Monday never made sense given his recent history of dismissing the concept as a non-starter.
So perhaps it’s not a surprise that he recently ended the speculation by explicitly saying that he will not be announcing a search engine on Monday.
He tweeted:
“not gpt-5, not a search engine, but we’ve been hard at work on some new stuff we think people will love! feels like magic to me.”
“New Stuff” May Be Iterative Improvement
It’s quite likely that what’s going to be announced is iterative which means it improves ChatGPT but not replaces it. This fits into how Altman recently expressed his approach with ChatGPT.
He remarked:
“And it does kind of suck to ship a product that you’re embarrassed about, but it’s much better than the alternative. And in this case in particular, where I think we really owe it to society to deploy iteratively.
There could totally be things in the future that would change where we think iterative deployment isn’t such a good strategy, but it does feel like the current best approach that we have and I think we’ve gained a lot from from doing this and… hopefully the larger world has gained something too.”
Improving ChatGPT iteratively is Sam Altman’s preference and recent clues point to what those changes may be.
Recent Deals Contain Clues
OpenAI has been making deals with news media and User Generated Content publishers since December 2023. Mainstream media has reported these deals as being about licensing content for training large language models. But they overlooked a a key detail that we reported on last month which is that these deals give OpenAI access to real-time information that they stated will be used to give attribution to that real-time data in the form of links.
That means that ChatGPT users will gain the ability to access real-time news and to use that information creatively within ChatGPT.
Dotdash Meredith Deal
Dotdash Meredith (DDM) is the publisher of big brand publications such as Better Homes & Gardens, FOOD & WINE, InStyle, Investopedia, and People magazine. The deal that was announced goes way beyond using the content as training data. The deal is explicitly about surfacing the Dotdash Meredith content itself in ChatGPT.
The announcement stated:
“As part of the agreement, OpenAI will display content and links attributed to DDM in relevant ChatGPT responses. …This deal is a testament to the great work OpenAI is doing on both fronts to partner with creators and publishers and ensure a healthy Internet for the future.
Over 200 million Americans each month trust our content to help them make decisions, solve problems, find inspiration, and live fuller lives. This partnership delivers the best, most relevant content right to the heart of ChatGPT.”
A statement from OpenAI gives credibility to the speculation that OpenAI intends to directly show licensed third-party content as part of ChatGPT answers.
OpenAI explained:
“We’re thrilled to partner with Dotdash Meredith to bring its trusted brands to ChatGPT and to explore new approaches in advancing the publishing and marketing industries.”
Something that DDM also gets out of this deal is that OpenAI will enhance DDM’s in-house ad targeting in order show more tightly focused contextual advertising.
Le Monde And Prisa Media Deals
In March 2024 OpenAI announced a deal with two global media companies, Le Monde and Prisa Media. Le Monde is a French news publication and Prisa Media is a Spanish language multimedia company. The interesting aspects of these two deals is that it gives OpenAI access to real-time data in French and Spanish.
Prisa Media is a global Spanish language media company based in Madrid, Spain that is comprised of magazines, newspapers, podcasts, radio stations, and television networks. It’s reach extends from Spain to America. American media companies include publications in the United States, Argentina, Bolivia, Chile, Colombia, Costa Rica, Ecuador, Mexico, and Panama. That is a massive amount of real-time information in addition to a massive audience of millions.
OpenAI explicitly announced that the purpose of this deal was to bring this content directly to ChatGPT users.
The announcement explained:
“We are continually making improvements to ChatGPT and are supporting the essential role of the news industry in delivering real-time, authoritative information to users. …Our partnerships will enable ChatGPT users to engage with Le Monde and Prisa Media’s high-quality content on recent events in ChatGPT, and their content will also contribute to the training of our models.”
That deal is not just about training data. It’s about bringing current events data to ChatGPT users.
The announcement elaborated in more detail:
“…our goal is to enable ChatGPT users around the world to connect with the news in new ways that are interactive and insightful.”
As noted in our April 30th article that revealed that OpenAI will show links in ChatGPT, OpenAI intends to show third party content with links to that content.
OpenAI commented on the purpose of the Le Monde and Prisa Media partnership:
“Over the coming months, ChatGPT users will be able to interact with relevant news content from these publishers through select summaries with attribution and enhanced links to the original articles, giving users the ability to access additional information or related articles from their news sites.”
There are additional deals with other groups like The Financial Times which also stress that this deal will result in a new ChatGPT feature that will allow users to interact with real-time news and current events .
OpenAI’s Monday May 13 Announcement
There are many clues that the announcement on Monday will be that ChatGPT users will gain the ability to interact with content about current events. This fits into the terms of recent deals with news media organizations. There may be other features announced as well but this part is something that there are many clues pointing to.
Watch Altman’s interview at Stanford University
Featured Image by Shutterstock/photosince
SEO
Google’s Strategies For Dealing With Content Decay

In the latest episode of the Search Off The Record podcast, Google Search Relations team members John Mueller and Lizzi Sassman did a deep dive into dealing with “content decay” on websites.
Outdated content is a natural issue all sites face over time, and Google has outlined strategies beyond just deleting old pages.
While removing stale content is sometimes necessary, Google recommends taking an intentional, format-specific approach to tackling content decay.
Archiving vs. Transitional Guides
Google advises against immediately removing content that becomes obsolete, like materials referencing discontinued products or services.
Removing content too soon could confuse readers and lead to a poor experience, Sassman explains:
“So, if I’m trying to find out like what happened, I almost need that first thing to know. Like, “What happened to you?” And, otherwise, it feels almost like an error. Like, “Did I click a wrong link or they redirect to the wrong thing?””
Sassman says you can avoid confusion by providing transitional “explainer” pages during deprecation periods.
A temporary transition guide informs readers of the outdated content while steering them toward updated resources.
Sassman continues:
“That could be like an intermediary step where maybe you don’t do that forever, but you do it during the transition period where, for like six months, you have them go funnel them to the explanation, and then after that, all right, call it a day. Like enough people know about it. Enough time has passed. We can just redirect right to the thing and people aren’t as confused anymore.”
When To Update Vs. When To Write New Content
For reference guides and content that provide authoritative overviews, Google suggests updating information to maintain accuracy and relevance.
However, for archival purposes, major updates may warrant creating a new piece instead of editing the original.
Sassman explains:
“I still want to retain the original piece of content as it was, in case we need to look back or refer to it, and to change it or rehabilitate it into a new thing would almost be worth republishing as a new blog post if we had that much additional things to say about it.”
Remove Potentially Harmful Content
Google recommends removing pages in cases where the outdated information is potentially harmful.
Sassman says she arrived at this conclusion when deciding what to do with a guide involving obsolete structured data:
“I think something that we deleted recently was the “How to Structure Data” documentation page, which I thought we should just get rid of it… it almost felt like that’s going to be more confusing to leave it up for a period of time.
And actually it would be negative if people are still adding markup, thinking they’re going to get something. So what we ended up doing was just delete the page and redirect to the changelog entry so that, if people clicked “How To Structure Data” still, if there was a link somewhere, they could still find out what happened to that feature.”
Internal Auditing Processes
To keep your content current, Google advises implementing a system for auditing aging content and flagging it for review.
Sassman says she sets automated alerts for pages that haven’t been checked in set periods:
“Oh, so we have a little robot to come and remind us, “Hey, you should come investigate this documentation page. It’s been x amount of time. Please come and look at it again to make sure that all of your links are still up to date, that it’s still fresh.””
Context Is Key
Google’s tips for dealing with content decay center around understanding the context of outdated materials.
You want to prevent visitors from stumbling across obsolete pages without clarity.
Additional Google-recommended tactics include:
- Prominent banners or notices clarifying a page’s dated nature
- Listing original publish dates
- Providing inline annotations explaining how older references or screenshots may be obsolete
How This Can Help You
Following Google’s recommendations for tackling content decay can benefit you in several ways:
- Improved user experience: By providing clear explanations, transition guides, and redirects, you can ensure that visitors don’t encounter confusing or broken pages.
- Maintained trust and credibility: Removing potentially harmful or inaccurate content and keeping your information up-to-date demonstrates your commitment to providing reliable and trustworthy resources.
- Better SEO: Regularly auditing and updating your pages can benefit your website’s search rankings and visibility.
- Archival purposes: By creating new content instead of editing older pieces, you can maintain a historical record of your website’s evolution.
- Streamlined content management: Implementing internal auditing processes makes it easier to identify and address outdated or problematic pages.
By proactively tackling content decay, you can keep your website a valuable resource, improve SEO, and maintain an organized content library.
Listen to the full episode of Google’s podcast below:
Featured Image: Stokkete/Shutterstock
SEO
25 Snapchat Statistics & Facts For 2024

Snapchat, known for its ephemeral content, innovative augmented reality (AR) features, and fiercely loyal user base, is a vital player in the social media landscape.
While it sometimes flies under the radar – as other platforms like TikTok, YouTube, and Instagram tend to dominate the cultural conversation – Snapchat is an incredibly powerful marketing tool that holds a unique place in the hearts and minds of its users.
In this article, we’ll explore what you need to know about Snapchat, with insights that shed light on what audiences think of the app and where its strengths lie.
From user growth trends to advertising effectiveness, let’s look at the state of Snapchat right now.
What Is Snapchat?
Snapchat is a social media app that allows users to share photos and videos with friends and followers online.
Unlike other social platforms like Facebook, Instagram, and TikTok – where much of the content is stored permanently – Snapchat prioritizes ephemeral content only.
Once viewed, Snapchat content disappears, which adds a layer of spontaneity and privacy to digital interactions.
Snapchat leverages the power of augmented reality to entertain its audience by creating interactive and immersive experiences through features like AR lenses.
Users can also explore a variety of stickers, drawing tools, and emojis to add a personal touch to everything they post.
What started as a small collection of tools in 2011 has now expanded to a massive library of innovative features, such as a personalized 3D Snap Map, gesture recognition, audio recommendations for lenses, generative AI capabilities, and much more.
Creating an account on Snapchat is easy. Simply download the app on Google Play or the App Store. Install it on your device, and you’re ready!
-
Screenshot from Google Play, December 2023
25 Surprising Facts You Didn’t Know About Snapchat
Let’s dive in!
1. Snapchat Has 406 Million Daily Active Users
That number, released by the company in October 2023, represents an increase of 43 million year-over-year – a 12% increase.
Here’s a chart from Statista showing Snapchat’s user growth from 2014 to 2023:
-
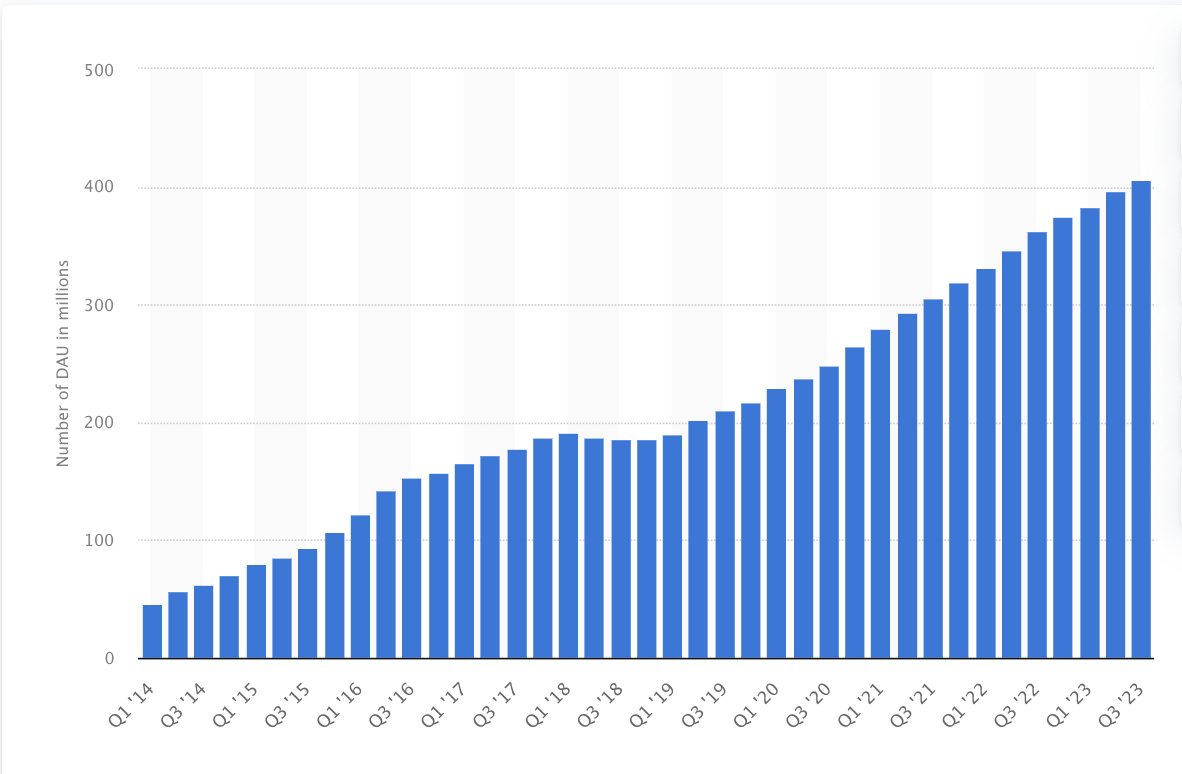 Screenshot from Statista.com, December 2023
And with 750 million monthly active users (MAUs), Snapchat is the fifth-biggest social media network in the world.
2. Users 18-24 Years Old Account For The Biggest Chunk Of Snapchat’s Audience
According to Snapchat’s own advertising data, the platform has 243.5 million users aged 18 to 24 – representing 38.6% of its total ad audience.
The second largest group of users are between the ages of 25 and 34, followed by 13-17-year-olds – proving that Snapchat is reaching young people around the world.
On the flip side, the platform isn’t huge with older users; people aged 50 and over account for only 3.8% of Snapchat’s total ad audience.
As a marketer, you can take a hint on what your campaign should focus on if you use Snapchat. As Snapchat’s own report puts it:
“From its inception, Snapchat has inherently created a frictionless space where Gen Z creatives can experiment with their identities, yet not have to feel like they’re ‘on brand’ in communicating to their close friend groups.”
3. Snapchat Reaches 90% Of The 13 To 24-Year-Old Population
It also reaches 75% of people between the ages of 13 and 34 in over 25 countries, according to Snapchat’s estimates.
In the US, 59% of American teenagers (between the ages of 13 and 17) report using Snapchat. This number amounts to roughly six in 10 US teens.
4. Snapchat Users Open The App Nearly 40 Times A Day
According to the company, this means people interact with their social circles on Snapchat more than any other social network.
In the US, about half of teenagers (51%) report using Snapchat at least once a day – making it slightly more popular than Instagram, but not quite as popular as YouTube or TikTok.
5. Taco Bell Paid $75,000 For 24 Hours Of The Taco Filter/Ad
To boost sales, Taco Bell launched the taco filter on Snapchat. Here’s what it looked like.
Today only: turn yourself into a taco using our @Snapchat lens. Because Cinco de Mayo. pic.twitter.com/P4KwLdFNFZ
— Taco Bell (@tacobell) May 5, 2016
The filter is humorous, relevant, and unique. Users adored it, and it got 224 million views.
That’s great, considering Taco Bell paid $75,000 for the ad – which actually proved to be a great investment for the exposure the brand received.
6. More Than Half (50.6%) Of Snapchat Users Are Female
In contrast, 48.7% of the platform’s global users are male.
While there is not a huge discrepancy between the demographics here, it’s helpful information for any marketers looking to put together Snapchat campaigns.
7. Snapchat Is The No. 1 App People Use To Share What They Bought
Is your brand looking to reach young social media users around the world? Snapchat could be the perfect platform for you.
People are 45% more likely to recommend brands to friends on Snapchat compared to other platforms.
They’re also 2X more likely to post about a gift after receiving it – making Snapchat a powerful tool for influencer marketing and brand partnerships.
8. Snapchat Pioneered Vertical Video Ads
Once a novelty in the social media industry, vertical video ads have become one of the most popular ways to advertise on social media and reach global audiences.
What are vertical video ads? It’s self-explanatory: They’re ads that can be viewed with your phone held vertically. The ad format is optimized for how we use our mobile devices and designed to create a non-disruptive experience for users.
You’ve definitely seen countless video ads by now, but did you know Snapchat pioneered them?
9. You Can Follow Rock Star Business Experts On Snapchat
Who knew Snapchat could be a powerful business tool? Here are the top three experts you should follow right now:
10. More Than 250 Million Snapchatters Engage With AR Every Day, On Average
Snapchat was the first social media app to really prioritize the development of AR features, and it’s paid off.
Over 70% of users engage with AR on the first day that they download the app – and, to date, there have been more than 3 million lenses launched on Snapchat.
11. People Are 34% More Likely To Purchase Products They See Advertised On Snapchat
When compared to watching the same ad on other social media platform, Snapchat proves to be an effective way to reach and convert.
12. Snapchat Is The King Of Ephemeral Content Marketing
Ephemeral content marketing uses video, photos, and media that are only accessible for a limited time.
Here are three reasons it works:
- It creates a sense of urgency.
- It appeals to buyers who don’t want to feel “sold.”
- It’s more personalized than traditional sales funnel marketing.
Guess who’s one of the kings of ephemeral content marketing? That’s right: Snapchat.
Consider that if it weren’t for Snapchat, Instagram Stories would likely not exist right now.
13. More Than 5 Million People Subscribe To Snapchat+
Snapchat+ is the platform’s paid subscription service that gives users access to exclusive and pre-release features on the platform.
Subscribers also receive a range of other perks, including options to customize their app experience and the ability to see how many times their content has been rewatched.
The fact that so many millions of users are willing to pay for special access and features to Snapchat should be a sign to brands and marketers everywhere that the platform has a strong pull with its audience.
Beyond that, the fact that Snapchat+ drew 5 million subscribers within just a year or so of launching is impressive on its own.
14. Snapchat Reaches Nearly Half Of US Smartphone Users
According to Statista, approximately 309 million American adults use smartphones today.
Snapchat’s ability to reach such a considerable portion of US smartphone users is notable.
15. Snapchat Users Spend An Average Of 19 Minutes Per Day On The App
That’s 19 minutes brands can use to connect with people, grow brand awareness, and convey their message.
16. Snapchat’s Original Name Was Picaboo
In fact, Snapchat did run as Picaboo for about a year.
17. Snapchat Was Created After 34 Failures
Snapchat creators Evan Spiegel, Bobby Murphy, and Frank Reginald Brown worked on the Snapchat project while they were studying at Stanford University.
After 34 failures, they finally developed the app as we know it today.
18. Snapchat’s Creators Had A Major Falling-Out Before The App Was Released
Frank Reginald Brown was ousted from the Snapchat project by his friends.
Although no one knows the real story, Brown claims Spiegel and Murphy changed the server passwords and ceased communication with him a month before Snapchat was launched.
19. Snapchat Downloads Doubled After The Launch Of The Toddler & Gender Swap Filters
Users downloaded Snapchat 41.5 million times in a month after the release of these filters!
20. Mark Zuckerberg Tried To Buy Snapchat
Snapchat’s owners refused to sell Snapchat to Zuckerberg (even though the offer went as high as $3 billion!).
21. Snapchat’s Mascot Is Called Ghostface Chillah
The mascot was inspired by Ghostface Killah of the Wu-Tang Clan – and when you consider that the app was once called “Picaboo,” the ghost logo makes more sense.
Apparently, Snapchat co-founder and CEO Evan Spiegel has said that he developed the mascot himself and chose a ghost based on the ephemeral nature of Snapchat content.
22. Facebook And Instagram Borrowed Ephemeral Content From Snapchat
As we mentioned above, we have Snapchat to thank for Facebook and Instagram Stories, which have since become integral to the social media experience.
Snapchat also pioneered the use of AR filters, which were adopted by Instagram and paved the way for the filters that dominate the world of TikTok today.
23. 75% Of Gen Z And Millennials Say Snapchat Is The No. 1 Platform For Sharing Real-Life Experiences
Social media is all about authentic moments and human connection – and social media marketing is no different.
With such a large number of young people preferring Snapchat over other platforms for sharing their life experiences, marketers should follow suit.
Find ways to share behind-the-scenes moments with your team and company, and emphasize the humans behind the brand.
24. Snapchat Users Have Over $4.4 Trillion In Global Spending Power
That’s nothing to sneeze at.
25. In 2022, Snapchat Generated $4.6 Billion In Revenue
It is currently valued at over $20 billion.
Looking Ahead With Snapchat
Snapchat’s ephemeral content, intimacy, and spontaneity are strong points for everyday users, content creators, and businesses alike.
Marketers should keep a keen eye on emerging trends within the platform, such as new AR advancements and evolving user demographics.
Those looking to reach younger audiences or show an authentic, human side of their brand should consider wading into the waters of Snapchat.
By harnessing the power of ephemeral content and engaging features, brands can effectively use Snapchat to grow their brand awareness, engage with audiences on a more personal level, and stay relevant in the fast-paced world of digital marketing.
More resources:
Featured Image: Trismegist san/Shutterstock
-

 MARKETING7 days ago
The key to correcting the C-suite trust deficit
-

 MARKETING6 days ago
A Recap of Everything Marketers & Advertisers Need to Know
-

 PPC4 days ago
How the TikTok Algorithm Works in 2024 (+9 Ways to Go Viral)
-

 MARKETING4 days ago
How To Protect Your People and Brand
-

 SEARCHENGINES5 days ago
Google Started Enforcing The Site Reputation Abuse Policy
-

 SEO7 days ago
128 Top SEO Tools That Are 100% Free
-

 SEO5 days ago
Blog Post Checklist: Check All Prior to Hitting “Publish”
-

 SEO3 days ago
How to Use Keywords for SEO: The Complete Beginner’s Guide


You must be logged in to post a comment Login